Full Text Searchable PDF User Manual
I
N
T
R
O
D
U
C
T
I
O
N
This Instruction Manual is universal for portable air conditioners manufactured
by lifesmart.The appearance of your unit might be slightly different than the
one described in this manual. Operation and usage of your air conditioner
should not vary. In order to ensure your safety,
Please carefully read the sections that correspond with your unit.
Also, keep the manual in a safe place for future reference.
Introduction
1
2
3
5
7
8
10
11
12
Table of Contents:
Introduction
Parts
Control Panel
Remote Control
Water Drainage
Maintenance/Service
Safety
Troubleshooting
Installation
Warning
:
(1)
This appliance is not intended for use by children or invalid persons without
supervision.
(2)
The plug should be accessible after installation of the device.
(3) Do not install unit in laundry room.
(4) Do not use if power cord is damaged.
(5) Please wait three minutes before restarting unit after a power outage.
(6) The unit needs a minimum clearance of three feet from any combustible materials.
This symbol refers to a hazard or unsafe practice which can result
in severe personal injury or death.
This symbol refers to a hazard or unsafe practice which can result
in personal injury or product or property damage.
!
WARNING
CAUTION
!
Warranty
16
INTRODUCTION
This Portable Air Conditioner is a small size appliance that has multiple functions.
Some functions of this unit are that it can adjust the temperature and humidity in
a room, cool, dehumidify, and fan. The unit was designed to be used in home
and office environments with a compact design compared to others.
PORTABLE AIR CONDITIONER
1
Other air conditioning patterns are recommended when the ambient temperature
is either below 18
0
C(65
0
F) or above 35
0
C(95
0
F).
CAUTION
!
Please read this instruction manual carefully to get optimum usage from your unit.
This instruction manual is used for guidance and does not form part of a
contract.We reserve the right to make technical changes without prior notice.
ATTENTION
There might be some water save
d
on the bottom of the base. Please push the Air
Conditioner gently and cautiously to prevent water from splashing out.
2
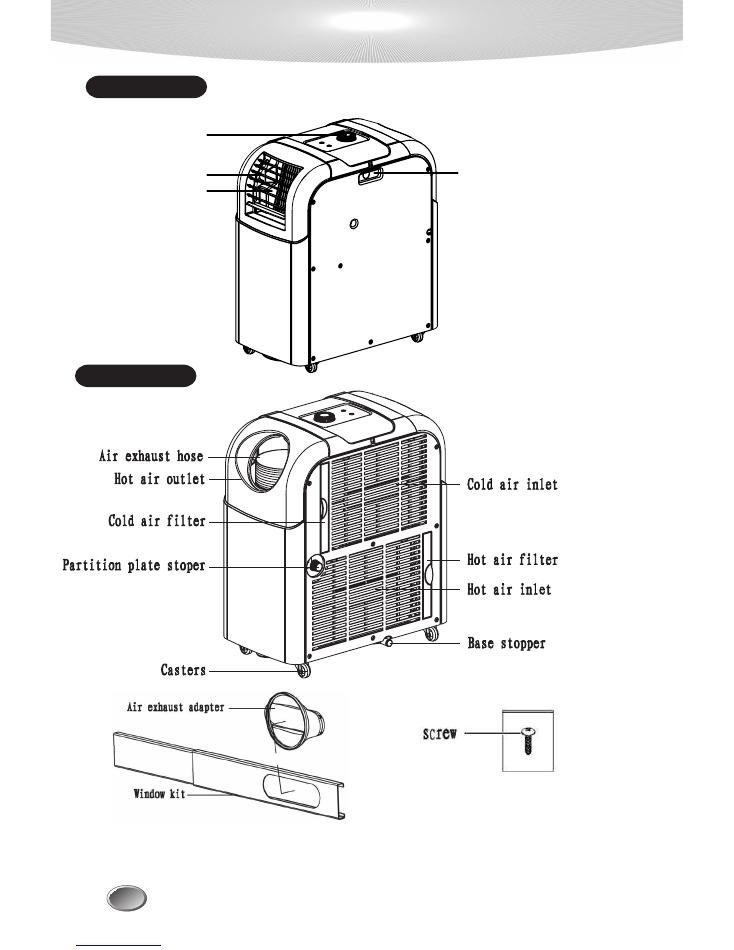
FRONT
BACK
PARTS
Note:
Features and appearance may vary depending on your air conditioner model.
Handle
Control knob
Adjustable air fins
Cold air outlet
CONTROL PANEL
3
CONTROL PANEL 1
*
The AC socket must be firm and reliable.
*
Do not connect portable air conditioner to a power strip/surge protector, or extension cord.
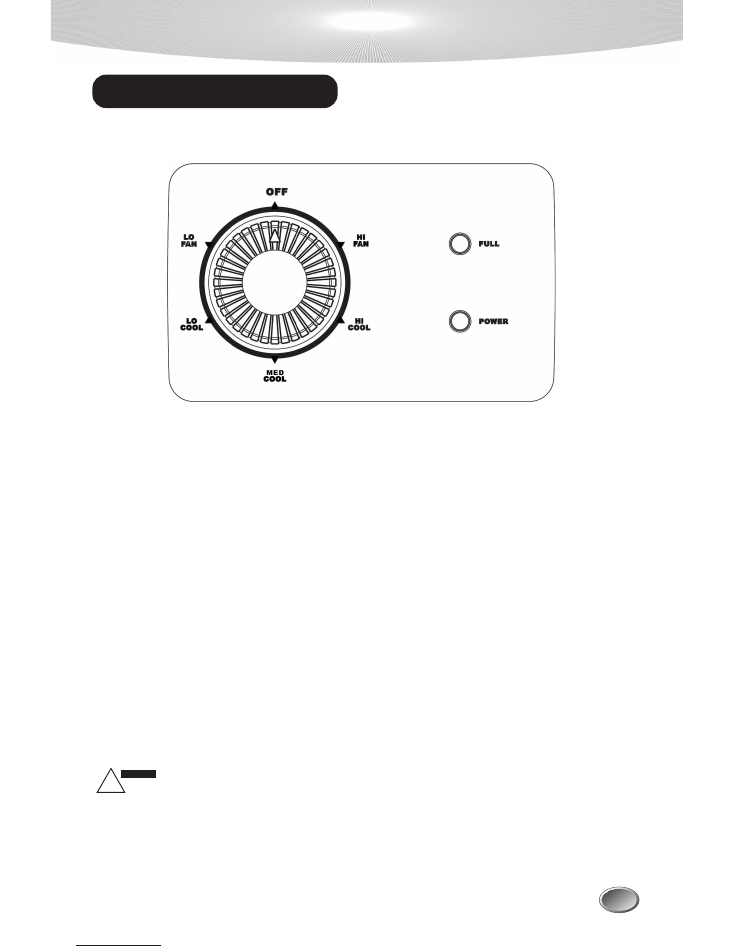
OFF:When the knob is turned to "OFF",the air conditioner will stop operation.
LO FAN: When the knob is turned to "LO FAN",the air conditioner will be in low fan operation
mode to delivery weak airflow.
HI FAN: When the knob is turned to "HI FAN",the air conditioner will be in high fan operation
mode to delivery strong airflow.
LO COOL:When the knob is turned to"LO COOL",the air conditioner will be in low cooling
operation mode to delivery weak airflow.
MED COOL: When the knob is turned to "MED COOL", the air conditioner will be in medium
cooling operation mode to delivery medium airflow.
HI COOL:When the knob is turned to "HI COOL",the air conditioner will be in high cooling
operation mode to delivery strong airflow.
Power: When the compressor is working, the "POWER" lamp
will illuminate.
FULL:When the internal water tank is full, the "FULL"lamp
will illuminate
and the unit will stop
running until the tank is emptied.
POWER SOURCE
!
WARNING
Before you insert the plug,please make sure the knob is turned
to the "OFF" position.
Before you insert the plug,please make sure the knob is turned to "OFF".
CONTROL PANEL
4
CONTROL PANEL 2
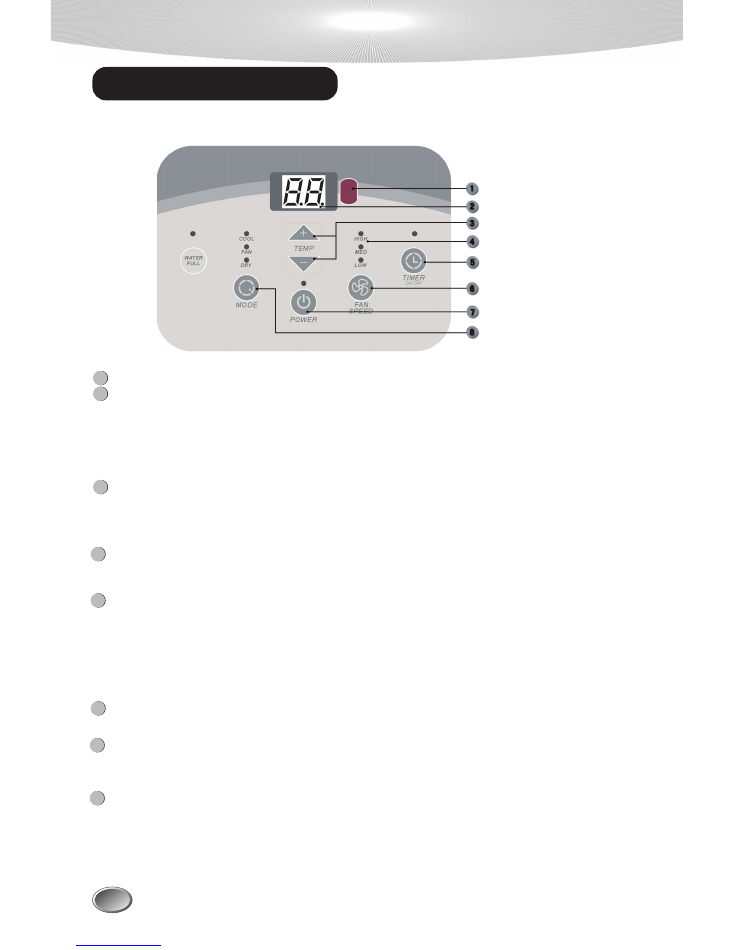
1
REMOTE CONTROLLER SIGNAL RECEIVER
TEMP button
Press this button to adjust setting the temperature within the range of 63F/17C to 88F/31C.
When in the TIMER mode (press and release the TIMER button to enter this status) use
TEMP + or - buttons to set the TIMER time range between 1-12 hours.
2
DIGITAL DISPLAYER
FAN Mode: Indicates room temperature.
COOL or DRY Mode: Indicates setting the temperature.
TIMER Operation: When pressing the TIMER button, this indicates timer time.
If the time has not been adjusted, after 5 seconds the temperature will appear.
ROOM TEMP SENSOR Failure: Display indicates temperature at 77F/25C.
7
POWER button
To turn the air conditioner ON, press the button and the power indicator will light.
To turn the air conditioner OFF,press the button again.
Press this button to set the air speed you desire: High/Low/Med.
UNIT INDICATION button
Allows you to choose between the operation modes: COOL, DRY, FAN, HEAT (heat for the
cooling and heating model).
5
8
MODE button
When selected the corresponding operation mode or fan speed, or the water full, the light will be
on.
6
FAN SPEED button
TIMER button
The TIMER has two modes Switch-ON and Switch-OFF. If the unit is running, pressing the
timer button will enter you into the Switch-OFF mode. If the unit is off, pressing the timer
button will enter you into Switch-ON mode. Pressing this button again will cancel the timer
option. To set the TIMER time use the + or - buttons accordingly. The time can be set
between 1-12 hours.
4
Note:
Features and appearance may vary depending on your air conditioner model.
3
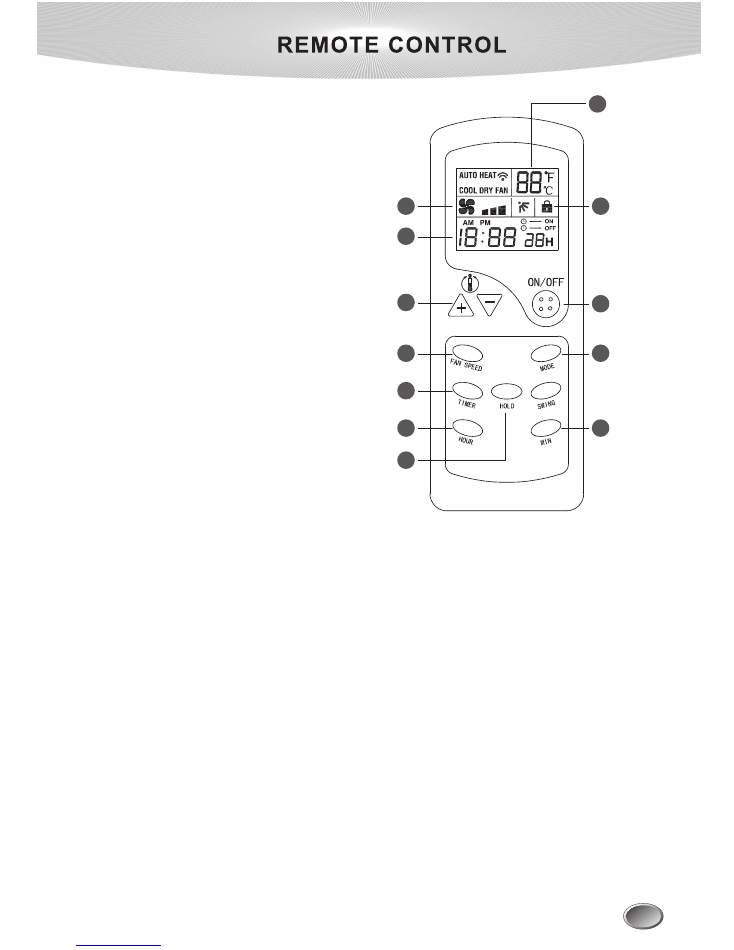
1.
Set temperature indicator
2.
Fan speed indicator
3.
Lock/Hold key indicator
4.
Present time indicator
5.
+/- button
Increase or decrease the room tem-
perature or set the timer duration
a
ft
er pressing the timer button.
6.
On/o
ff
button
Turn the unit on or stop operation
and turn the unit o
ff
.
7.
Hour button
Set the hour on the unit clock by
pressing and holding this button,
then pressing the minute button re-
peatedly to the correct time.
8.
Min button
Set the minutes on the unit clock by
pressing and holding this button,
then pressing the minute button re-
peatedly to the correct time.
9.
Hold button
Press this button to lock or unlock the keypad and prevent undesired changes to
the room temperature and unit settings.
10.
Fan speed
Press this button repeatedly to change the unit fan speed between high, medium,
or low air output.
11.
Timer button
Press this button while the unit is running to program a shutdown time set using
the up and down arrow buttons.
Press this button while the unit is in standby mode to program a startup time set
using the up and down arrow buttons.
12.
Mode button
Press this button repeatedly to alternate between cooling, drying, heating, and fan
operating modes.
13.
Mode indicator
Displays the unit’s current operating mode.
NOTE: Due to the universal nature of the remote control for all of our air conditioner units,
certain remote control functions may not correspond to your particular unit.
1
2
4
5
7
9
10
11
3
8
12
6
5
REMOTE CONTROL
6
*
Point the remote controller at the air conditioner and press the button on the controller. The
instruction signal will be transmitted to the air conditioner.
*
Upon receiving the signal from the remote controller, the air conditioner will make a beep
sound in acknowledgment.
METHOD OF TRANSMISSION
*
Do not place the remote in high temperatures, or directly exposed to sunlight.
*
Do not drop the remote.
*
Do not have any objects obstructing the remote sensor from communicating with the
air conditioner.
*
Do not place heavy objects on the remote.
*
Do not drop in water or other liquids.
*
If the remote is not functioning, replace the batteries.
REPLACEMENT OF BATTERIES
If the signal is transmitted from the remote to the air conditioner,
and there is no acknowledgement, please replace the batteries.
1.
Remove the batteries by sliding the case cover open as the arrow indicates
on the back.
2.
Replace with new batteries and pay attention to the "+" and "-" marks of pole indications.
3.
Close the back cover.
NOTE:The timer is set on the basis of the present time.So set the present time correctly.
PRESENT TIME SETTING PROCEDURE
Press the HOUR button. (Set to AM 10:)
2
Continually press the HOUR button about 2
seconds.
The time indicator is flickering and can set the HOUR time.
1
When cells are inserted,under the timer operation has not been set,do it as following procedure,
EX:set to AM:10:30.
Press the MIN button. (Set to 30)
3
Press the ON/OFF button to confirm the set time
or it would automatically exit the time setting
state after 15 seconds.
4
CAUTION
7
WATER DRAINAGE
Water Drainage:
The air conditioner evaporates condensed water and discharges the moisture through the
hot air outlet.
In some cases it is possible that all water did not evaporate and the internal water tank can
be full. If this is the case, the
WATER FULL light will illuminate
and the unit will stop running.
Follow the steps to drain the water.
*
Power off then unplug
the air conditioner,disconnect the exhaust hose from the back,and move the
unit
to a suitable drain location or outdoors.
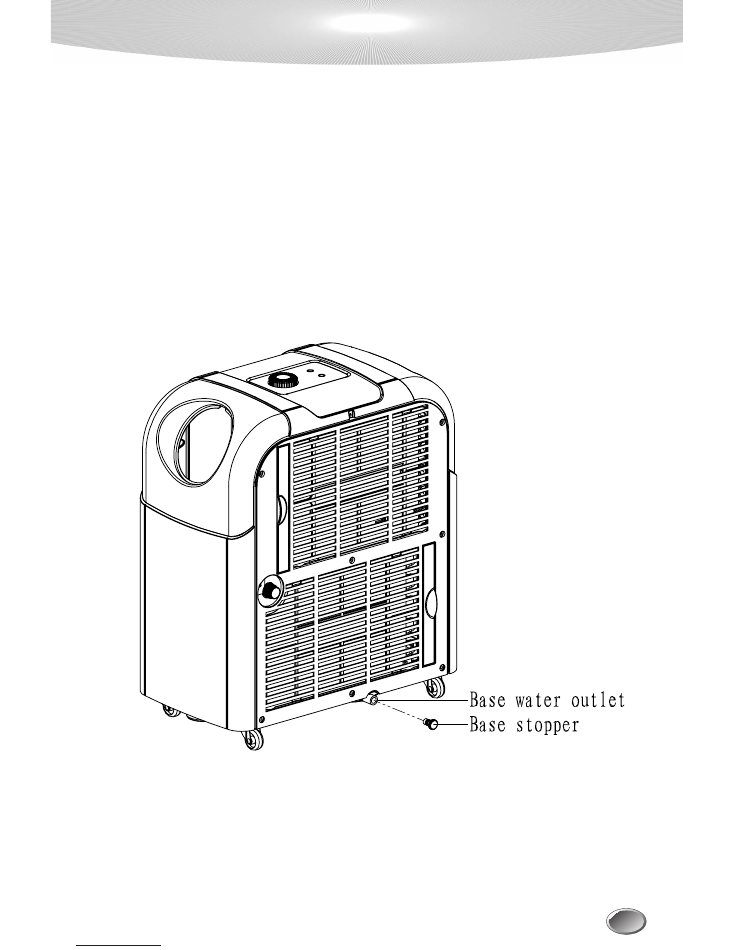
*
Remove the base stopper from the base water outlet to drain water.
*
Once the internal water tank is drained.Reinstall the base stopper and make sure it is on securely.
*
Place the air conditio
n
er in the desired location,reconnect the exhaust hose ,and plug in the
air conditioner.
NOTE:
When the WATER FULL indicator light illuminates, there is approximately 1.5L of water in
the water tank.
MAINTENANCE/SERVICE
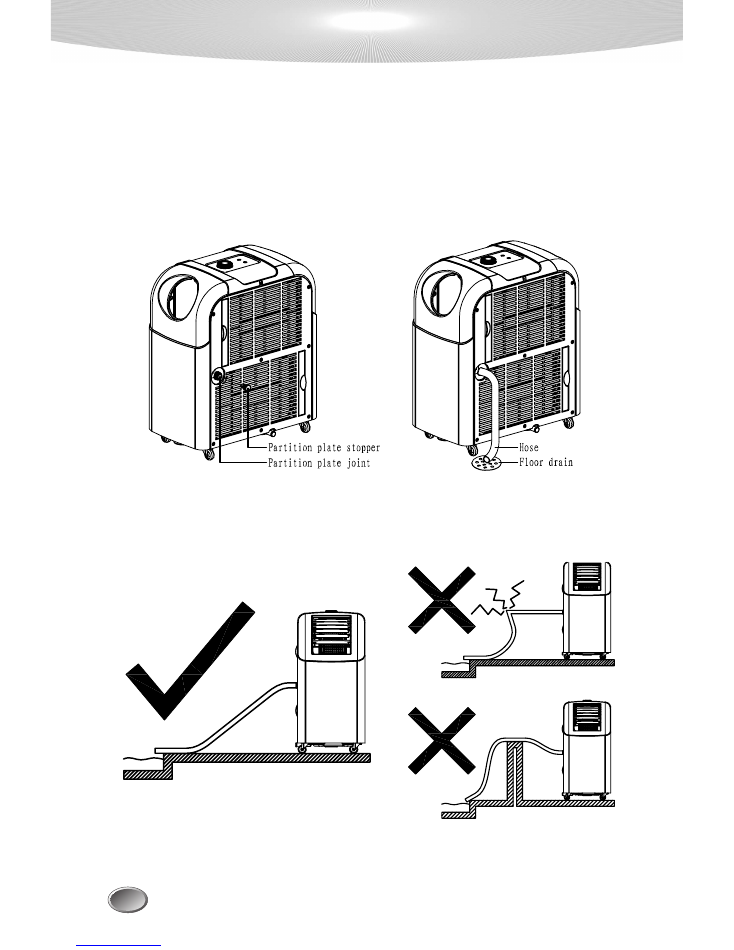
Continuous Drainage
In a high humidity environment, if possible the user can have a continuous drainage.
This can reduce the number of times you have to pour out water. Condensation is
discharged by gravity through a hose (not provided). Of course, this method will
reduce the efficiency of the unit.
a) Pulll out the partition plate stopper.
b) Connecting the hose to partition plate joint and lead it to the floor drain.or a suitable
area for draining the condensate.
When using the continuous drainage function, the hose must be placed horizontally below
the drainage hole.Avoid folding the hose or placing it on an uneven surface.
8
MAINTENANCE/SERVICE
*
Pull the plug out of the socket before cleaning.
*
To prevent accidents caused by electrical shock, make sure there is no
power to the unit before beginning maintenance or repair.
!
WARNING
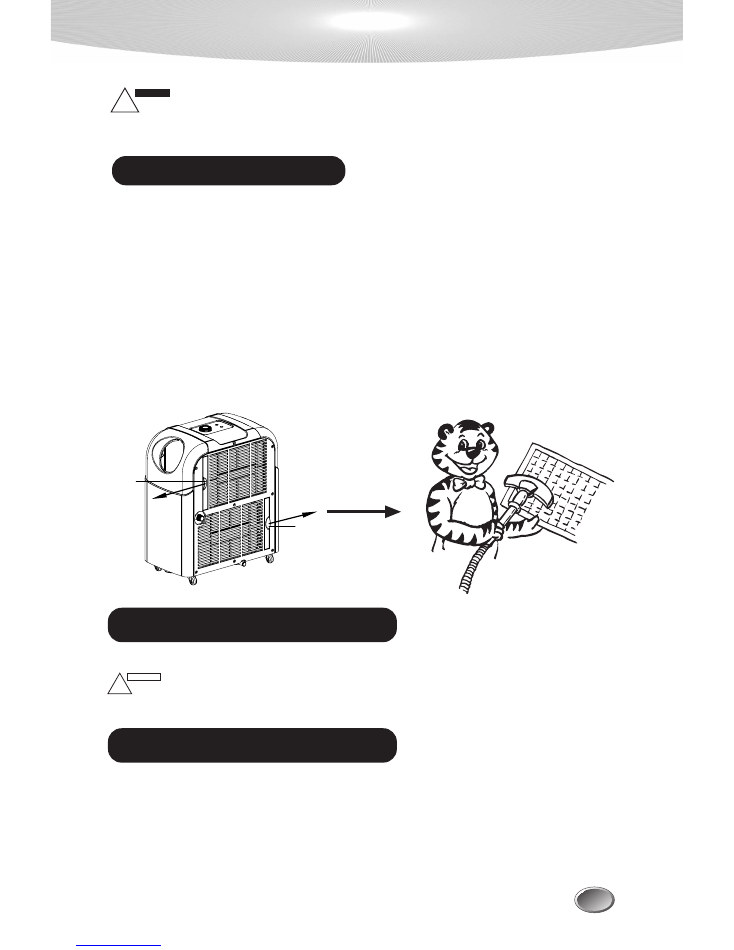
If the air filter is blocked,the air flow volume will reduce.Clean the filter once
every two weeks.
Open and clean the air filter
1. Directly grasp the hook on the bottom to remove the air filters with the direction of the arrow.
2. Wash the air filter gently with warm water and soap.
3. Rinse the filter and let it air dry.
4. Install the air filter back to its original place.
CLEANING OF AIR FILTER
CLEANING OF AIR CONDITIONER
PRIOR TO OPERATION SEASONS
1.Check to see if the air inlets and outlets of the unit are blocked.
2.Check to see if the partition plate stopper and the base stopper are installed accurately.
3.Make sure that air filter is properly in place before operating the machine.If the machine is
operated with air filter removed,dust and foreign objects will result in faulty performance of
the air conditiioner.
Clean the surface of the unit with a damp cloth,then dry using a duster or similar.
CAUTION
!
9
Do not use chemical solvent to clean the surface of
the unit,
This can cause damage, deformation, or scratches to the exterior.
Hook
Hook
MAINTENANCE/SERVICE
AFTER THE OPERATIONAL SEASON
1.
Turn off the air conditioner and disconnect the power source.
2.
Properly maintain the air filter and other parts.
3.Open the partition plate stopper and the base stopper to drain out the water of the
partition plate and the base
.O
perate the unit in fan mode for half an hour to make sure
the partition plate and the base is dry.
4.Please use a plastic sheet to cover the unit to prevent dust or filth from entering the unit.
*
Do not use the unit in narrow rooms.
*
Avoid direct sunlight to the unit.
*
Do not use the unit in water or near water to avoid electrical shock.
*
*
Keep three feet around the unit to avoid overheating, and electromagnetic interference.
Do not use near gas, fires, or flammable liquids.
CAUTION
*
Do not use a damaged or improper AC socket.
*
When unplugging the unit,hold the power plug securely and pull it out carefully.
*
Do not use extension cord.
*
Do not toggle over or incline,If the unit does toggle please
call lifesmart technical
support at 1-866-484-2066.
*
Do not spray with insecticide or other chemicals as the plastic case may
get damaged
or deformed.
!
WARNING
CAUTION
!
10
SAFETY
WARNING
TROUBLESHOOTING
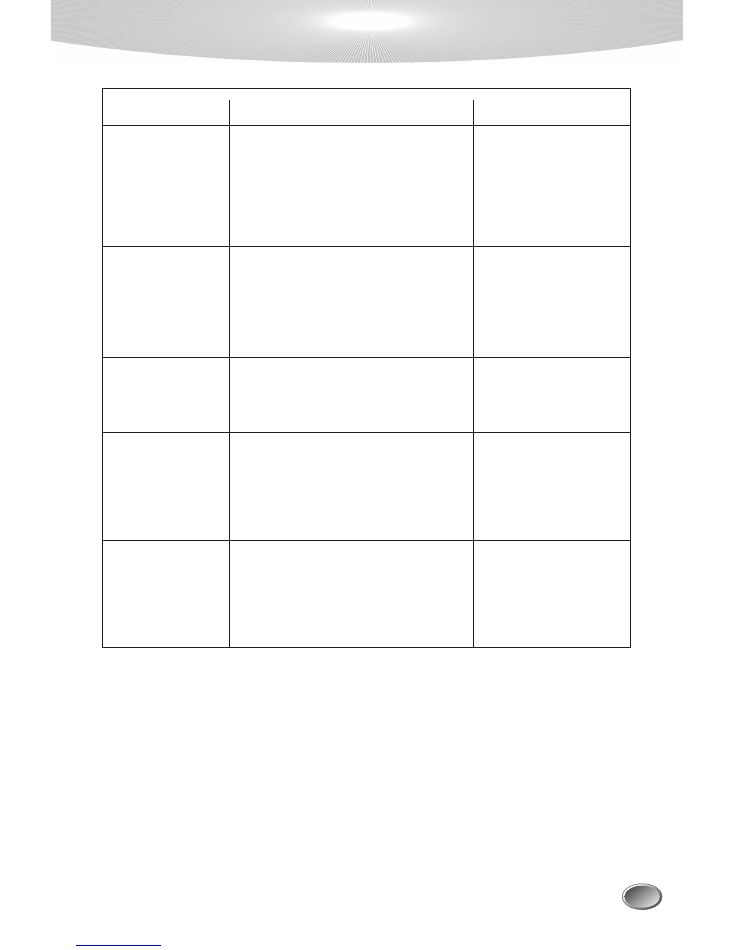
Before calling lifesmart technical support, please check the following.
Trouble
Check
Action
Air conditioner does
not operate at all
Cooling efficiency is
not good
Too noise
and/or
vibration
The machine starts
and stops frequently
*
Is there power?
*
Is it plugged in?
*
Did the fuse or circuit breaker switch
off?
*
The WATER FULL light is illuminated.
*
Is the air inlet or outlet blocked?
*
Is there any other heat source in room?
*
Are the air filters dirty?
*
Is indoor fan speed set at low?
*
It is the inner liquid ( refrigerant)
flowing inside.
*
Is the unit leveled?
*
Is the voltage of the power source
normal?
*
Is the air exhaust fixed rightly or be
bended?
*
Did you add an air exhaust?
*
It is normal
*
Push the plug into the wall
socket
*
Reset the circuit breaker or
move it to the on position
*
Discharge the condensed
water from the base water outlet
*
Clear the path(s)
*
Move the heat source
*
Clean the air filter
*
Set suitable fan speed
*
It is normal
*
Place it in a horizontal
floor
*
Make sure their is a
strong/good power source
*
Make sure the air exhaust
is horizontal.
*
Do not add your own air
exhaust, please remove it.
Condensed water
spills out when
moving the unit
*The base tank is nearly full?
*
DIscharge the condens-
ed water from the base
water outlet
11
at 1-866-484-2066 (USA) or 214-614-2509 (Canada).
For further support or questions please call lifesmart technical support
INSTALLATION
Installation location
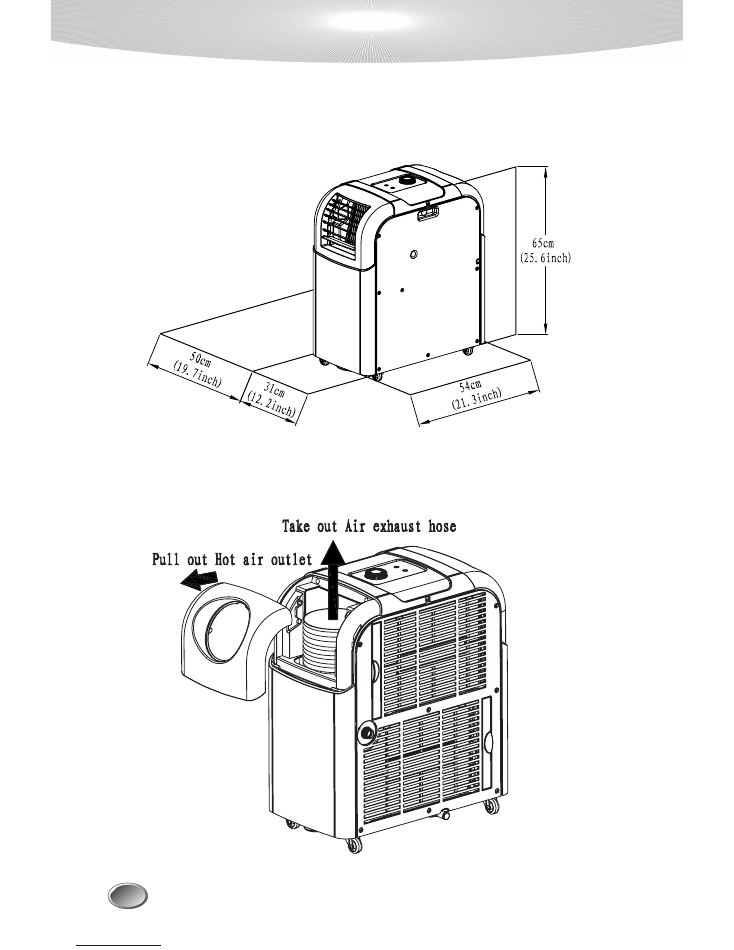
Put the portable air conditioner in a flat location where the air outlets cannot be
obstructed. Make sure the unit has 3 ft around it for airflow.
Installation and Uninstallation of the Air Exhaust Hose
See the figure below,First the user must take out the the hose.
12
INSTALLATION
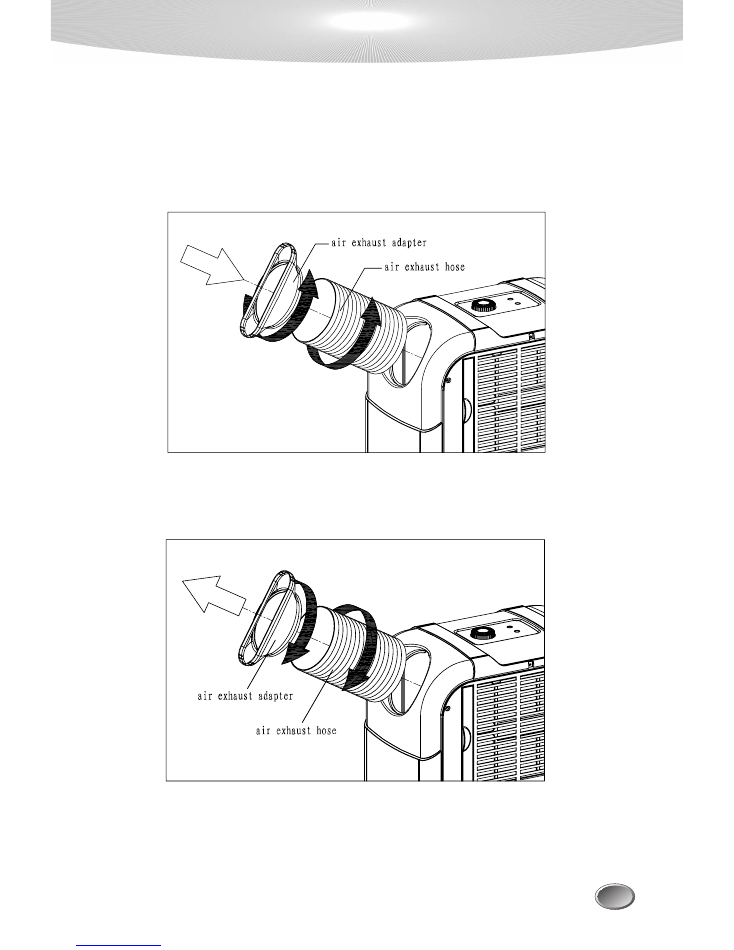
Uninstallation: See the figure below. detach the air exhaust adapter into the air
exhaust hose (Use the arrows for direction). Then detach the air exhaust hose
into the air conditioner.
Installation: See the figure below. Attach the air exhaust adapter into the air
exhaust hose (Use the arrows for direction). Then attach the air exhaust hose
into the air conditioner.
Installation and Uninstallation of the Air Exhaust Hose
13
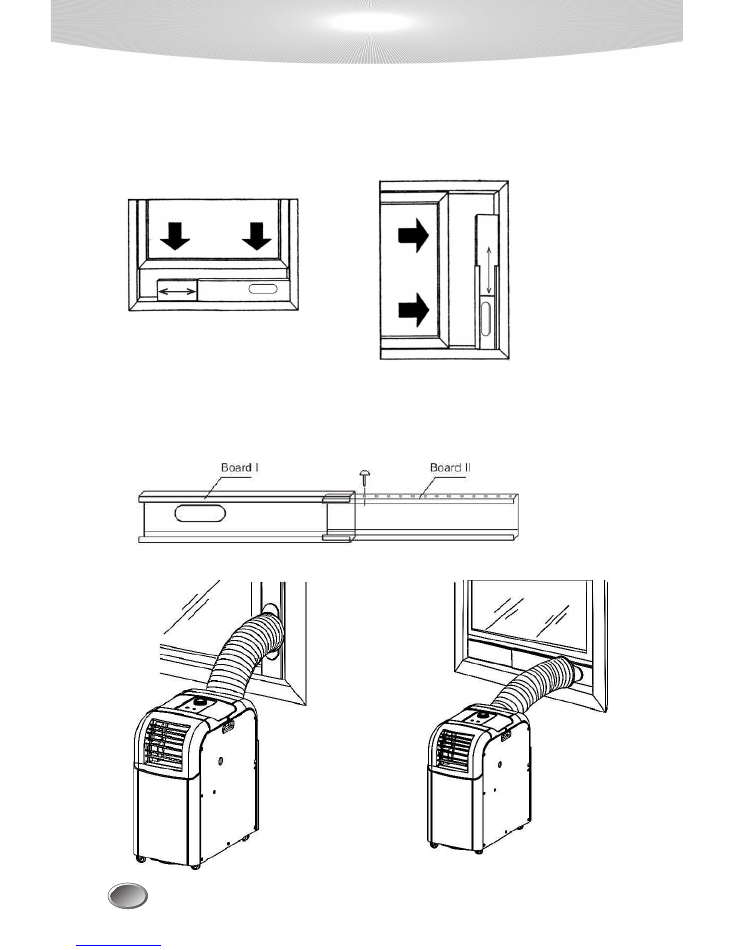
INSTALLATION
Window Kit Installation
Your window kit has been designed to fit most standard "vertical" and "horizontal" window
applications.However,
it may be necessary for you to improvise/modify some aspects
of the installation procedures for certain types of windows.
See the figure below,
14
See the figure below,install the air exhaust adapter to window kit
Window slider kit
Minimum:27-1/2"(70cm)
Maximum:48(122cm)
Vertical window
Window slider kit
Minimum:27-1/2"(70cm)
Maximum:48(122cm)
Horizontal window
Instructions: Use one screw to fix installation board ll in place.
INSTALLATION
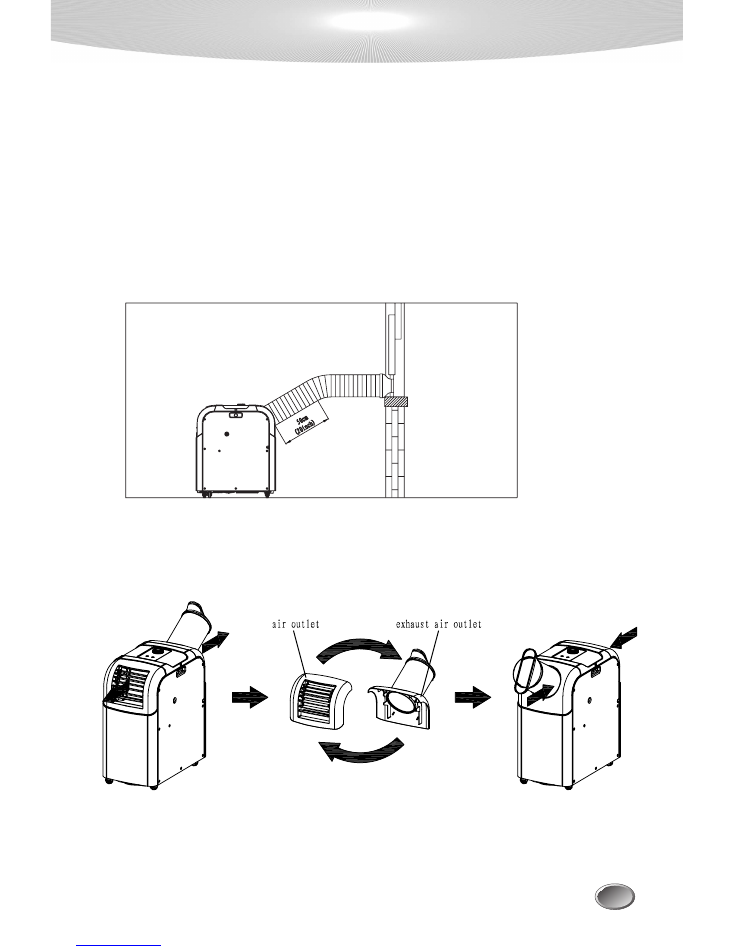
Air Exhaust Hose Mounting Method
The air exhaust hose is 20 cm - 160 cm in length.It is suggested that the hose
be as short as possible to achieve maximum efficiency. If you need to extend
the hose, please use the previous mounting method instructions:
1.Try to avoid bending the hose.
2.Try to avoid bending the hose near the exhaust air outlet (if you need to bend the
hose, the bending point should be at least 50 cm away from the exhaust air intake).
3.Keep the smoothness of the whole air exhaust hose.especially in the bending
points.Avoid any abrupt steep-angled bendings.
15
Interchangable Air Outlet/Exhaust Air Outlet Function
See the figure below.Remove the air outlet and the exhaust air outlet respectively,intercharge
their location,Install to the unit.
Through the above method,cooling air can be blown to the outdoor or other desired place.
No matter what the connection mode,other air conditioning patterns are recommended when
ambient temperature is either below 18
0
C (65
0
F) or above 35
0
C(95
0
F)
16
