Full Text Searchable PDF User Manual

18
611 - 612
GB
The present manual provides a guide for the safe use of your Teuco Minipool, and must be read
carefully before using the product.
This manual constitutes an integral part of the product and must be kept for future reference.
Teuco Guzzini SpA reserves the right to make such changes as are deemed appropriate without
prior notice and without any obligation to update.
USE AND MAINTENANCE MANUAL
CONTENTS
INTRODUCTION
. . . . . . . . . . . . . . . . . . . . . . . . . . . . . . . . . . . . . . . . . . . . . . . . . . . . . . . .18
- USE AND MAINTENANCE MANUAL
- TEUCO QUALITY
- USEFUL HINTS ON PROPER USE OF THE WHIRLPOOL
- SAFETY GUIDELINES
INSTRUCTIONS
- MINIPOOL FUNCTIONS . . . . . . . . . . . . . . . . . . . . . . . . . . . . . . . . . . . . . . . . . . . . . . . . .20
- THE CONTROL PANEL . . . . . . . . . . . . . . . . . . . . . . . . . . . . . . . . . . . . . . . . . . . . . . . . . . .22
- STARTING UP FIRST TIME . . . . . . . . . . . . . . . . . . . . . . . . . . . . . . . . . . . . . . . . . . . . . . . .23
- PUMP 1
- PUMP 2 . . . . . . . . . . . . . . . . . . . . . . . . . . . . . . . . . . . . . . . . . . . . . . . . . . . . . . . . . . . . . . . .24
- AIR JETS
- SETTING THE WATER TEMPERATURE . . . . . . . . . . . . . . . . . . . . . . . . . . . . . . . . . . . . . . . .25
- ECONOMY
- FILTER . . . . . . . . . . . . . . . . . . . . . . . . . . . . . . . . . . . . . . . . . . . . . . . . . . . . . . . . . . . . . .26
- FILTER BOOST
- CLOCK
- LIGHT . . . . . . . . . . . . . . . . . . . . . . . . . . . . . . . . . . . . . . . . . . . . . . . . . . . . . . . . . . . . . . .27
- CONTROL PANEL LOCKOUT
- OFF MODE . . . . . . . . . . . . . . . . . . . . . . . . . . . . . . . . . . . . . . . . . . . . . . . . . . . . . . . . . . .28
- ROTATE DISPLAY
- TEMPERATURE DISPLAY IN DEGREES CELSIUS OR FAHRENHEIT
- MINIPOOL CANVAS . . . . . . . . . . . . . . . . . . . . . . . . . . . . . . . . . . . . . . . . . . . . . . . . . . . .29
MAINTENANCE
. . . . . . . . . . . . . . . . . . . . . . . . . . . . . . . . . . . . . . . . . . . . . . . . . . . . . . . . .30
- CLEANING THE FILTERS
- CLEANING ACRYLIC PARTS OF THE MINIPOOL
- WINTERING PROCEDURE
REPAIRS
. . . . . . . . . . . . . . . . . . . . . . . . . . . . . . . . . . . . . . . . . . . . . . . . . . . . . . . . . . . . . .32
- DIAGNOSTICS MESSAGES
- REMOVING SCUFFS, SCRATCHES AND CIGARETTE BURNS
Dear Customer,
Thank you for choosing a Teuco Minipool.
A generous and versatile range of jets, an incomparable set of functions leaving you free to enjoy
different kinds of relaxation, from toning massages to hydrotherapy, that will revitalize those delicate
areas of the body like the neck, back, legs and feet.
Combating stress and recapturing well-being has never been easier.
19
611 - 612
GB
Teuco takes the greatest care over the materials used in its products, making technological improvements
continuously both to the plastics utilized, and to details of construction. All Teuco Minipools are fashioned from
cast acrylic resin: the frame is zinc-treated steel, and pipelines are of high strength material.
Teuco Minipools bear the
mark, indicating that they are designed and manufactured in accordance with
the essential requirements of European directives 73/23 - 93/68 on electrical safety and 89/336 - 92/91 - 93/68
on electromagnetic compatibility.
The safety of Teuco whirlpool systems is also certified officially by
(Italian Quality Mark Institute) as being
in compliance with the application of current European standards.
TEUCO QUALITY
Given the relaxing and invigorating effects of a whirlpool massage, doubtless the best time to take a
session is after sport or physical exercise, although not on a full stomach and never before food has been
properly digested.
The temperature of the water needs to be around 37 °C to derive maximum benefit from the massage.
In the case of new users, most especially, whirlpool sessions should be restricted to just a few minutes.
Thereafter, the duration can be increased gradually to 15-20 minutes, but always subject to the user’s
general physical fitness.
USEFUL HINTS ON PROPER USE OF THE TEUCO MINIPOOL
SAFETY
To ensure the appliance is correctly installed, follow all the instructions in the accompanying installation manual with due care.
Incorrect installation may result in injury to persons and animals or damage to property. The manufacturer declines any liability
for injury or damage attributable to incorrect installation.
For proper use of the appliance, follow the instructions given in this manual. This appliance must be used only for the purpose
for which it was designed. The manufacturer declines any liability for injury or damage attributable to improper use.
This product is intended for home use. In the event of a Teuco minipool being commissioned for public use, procurement
managers must ensure compliance with all statutory regulations governing safety, water treatment and utility systems
normally in force in the country of installation.
Only adult persons should use the appliance. Children and the disabled may use the Teuco Minipool under constant supervision.
For special cases (the elderly, individuals with high blood pressure or heart disease, pregnant women and people taking cures),
seek medical advice before using the whirlpool.
With the whirlpool system in operation:
- take care that the suction valves or the skimmer are not obstructed by any object or part of the body, and in particular, keep
hair well clear;
- do not handle fragile objects that could break (e.g. drinking glasses);
- do not use electrical appliances (e.g. radios, hair dryers, etc.) near the minipool.
Take care when stepping into or out of the minipool, as water will make all the surfaces slippery.
Do not use the minipool in unsuitable weather conditions (e.g. during a thunderstorm).
Do not block the space between the floor and the side panelling, or in the case of the built-in version, do not block the vents in
the pool surround.
In the event of breakdown or malfunction occurring during the warranty period, contact a Teuco technician or approved service
centre only. The manufacturer declines any liability for damage or injury caused by appliances that have been tampered with or
incorrectly repaired.
Make certain the cap of the Aromatherapy Essences Dispenser is always fitted. Do remove the cap from the Dispenser when the
AIR JETS are in operation (see AIR JETS).
20
611 - 612
GB
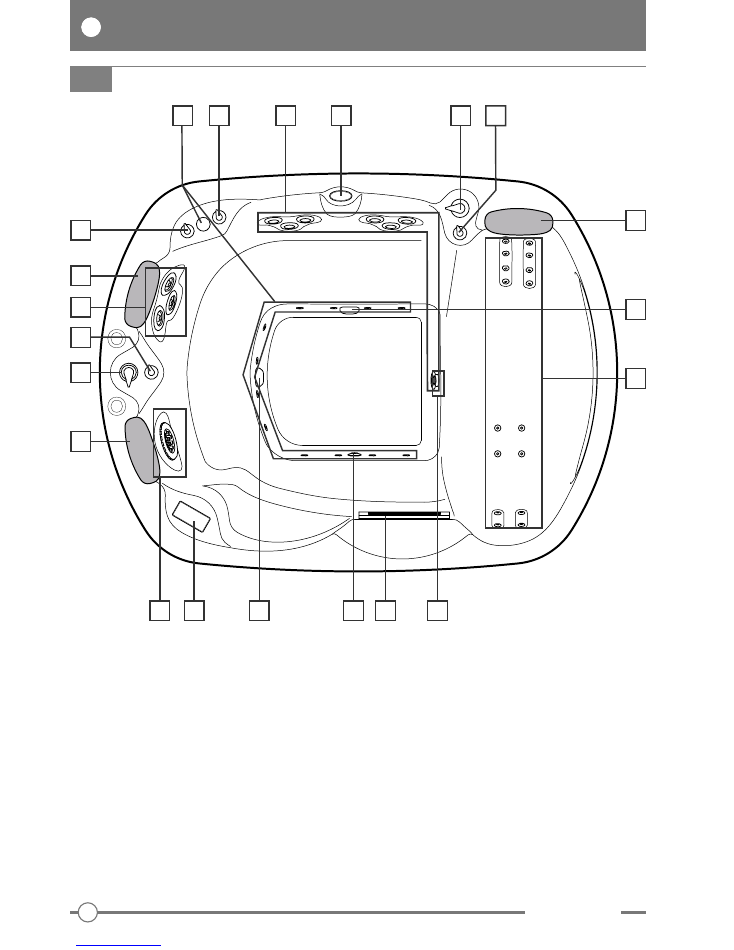
A - Two Seats:
Each with three Multi Roto Jets massaging the torso and one Roto Jet in the central
area of the pool.
B - Recliner:
Includes sixteen Stream Jets within the seat outline.
C - Power Jet:
This is the jet with the deepest and strongest massaging action. Its effect is similar to
a powerful force of nature, like a waterfall or a racing torrent.
D - Tri Roto Jet:
Three jets, all adjustable for direction. The two jets uppermost can be rotated to
create a special vortex effect; the lower jet is directional, like a high flow whirlpool jet. The rate of
flow through all three is adjustable simply by turning the outer ring.
E -Blower:
twelve jets delivering air only, which oxygenate the water and stimulate the skin, giving it
vitality. In combination with whirlpool essences (put into the special dispenser), they excite the
sense of smell, delivering all the benefits of aromatherapy.
INSTRUCTIONS
MINIPOOL FUNCTIONS
G
A
H
E
I
M
M
H
D
G
Q
B
M
C
F
O
N
P
H
H
Q

21
611 - 612
GB
INSTRUCTIONS
Aromatherapy:
according to the principles of aromatherapy, perfumed essences not only give
immediate pleasure to the sense of smell, they also stimulate receptors in the brain that are able
to change our mood for the better, making us calmer, more happy, more focused, depending on
our nature. Besides being harmless to the skin, the essences prepared for the Teuco Minipool do
not cloud the water and will leave no traces of foam.
F - Electronic control panel:
an easy-to-use operating system ensuring that selected functions and
their settings can be monitored continuously.
G - Flow diverter:
used to switch the flow of water from one massage of the minipool to another.
H - Selector knob:
regulates the force of the whirlpool massage by proportioning the amount of air.
I - Quick start:
ON/OFF buttons used to activate Pump 1, Pump 2, Blower and Underwater Light.
M - Anatomically contoured headrest:
soft and ergonomically designed cushions ensuring individual
occupants of the Teuco Minipool can relax with their head comfortably and correctly positioned.
N - Skimmer:
draws impurities off the surface of the water and into a special internal filtering
system.
O - Water treatment:
the water in the pool is filtered and disinfected continuously with ozone by a
special circuit that remains permanently active, even in the standby condition (electrical system
powered up).
Ozone will cease to be generated for a period of 40 minutes whenever any one of the minipool
functions is activated.
P - Underwater light:
the Teuco minipool will be a magnificent sight even after dark, with the
underwater light throwing up reflections that ripple on the surface of the water.
Q - Suction valve ports:
These take water from the tub back into the circuit of the whirlpool system.
22
611 - 612
GB
INSTRUCTIONS
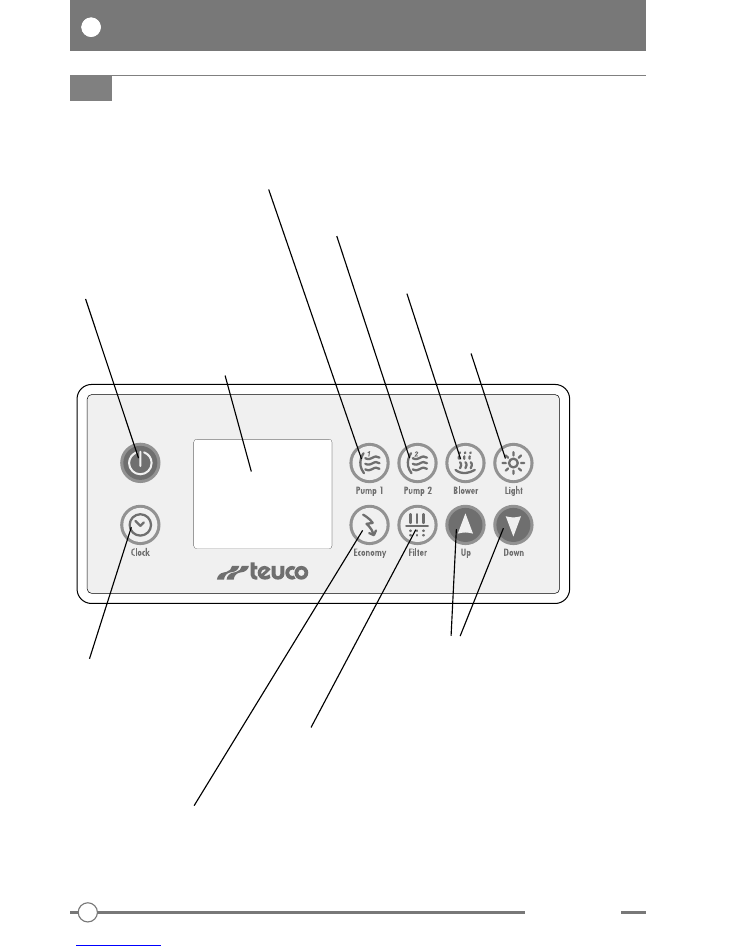
Pump 2 -
Switches the massage jets of
seats C and D on and off
Blower -
Switches the Blower function
on and off
Light -
Switches the underwater light
on and off
THE CONTROL PANEL
O/I -
Used to lock out the various
functions and buttons of the
control panel
Economy -
Deactivates off the water heater for a given period
of time to save energy
Filter -
Used to set the number of filtration cycles
over a 24 hour period
Used to view and set the Clock, Economy,
Filter and Water Temperature functions
Pump 1 -
Switches the massage jets of
seats A and B on and off
Display
Clock -
Used to display and
set the time
23
611 - 612
GB
INSTRUCTIONS
STARTING UP FIRST TIME
08:30
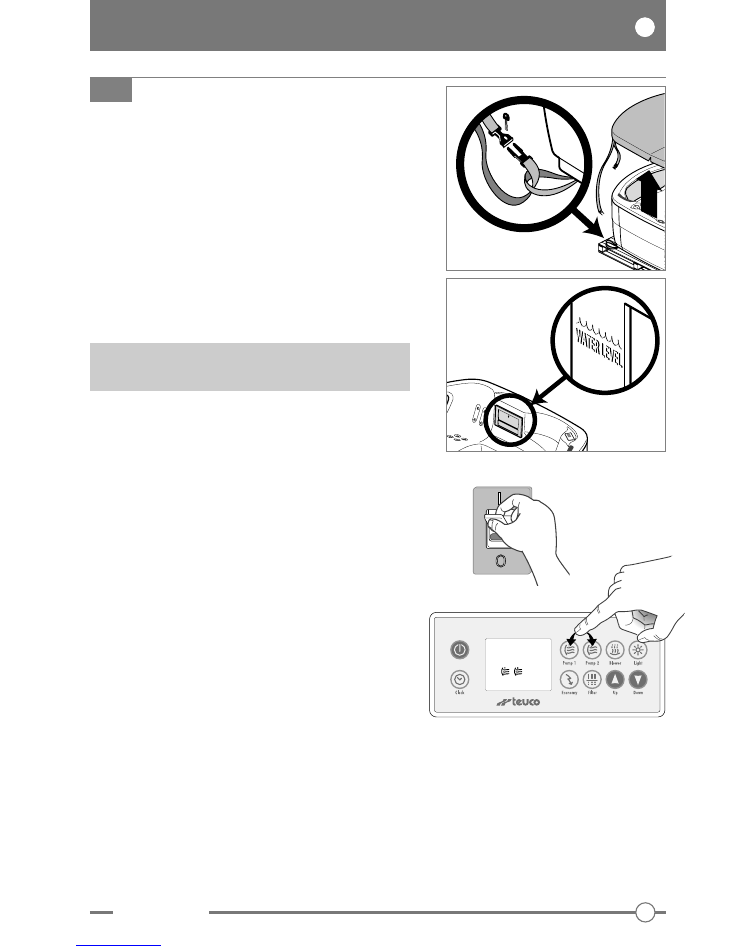
3 - POWER UP THE SYSTEM
CAUTION: power up the electrical equipment only after the
minipool has been filled with water.
Position the isolating switch (fitted during installation) to ON.
Check the smooth operation of the residual current switch,
wired up during preinstallation, by pressing the test button.
The switch should trip.
Reset the switch following the test.
The recirculation pump will start up automatically.
Start up the whirlpool systems by pressing buttons Pump1
and Pump2 at the control panel.
Open all the jets, checking that there are no water leaks
from the plumbing connections, and that everything works
as it should; the pumps can now be switched off.
4 - WATER TREATMENT
Treat the water using the products supplied by Teuco, as
described in the accompanying manual.
Other equivalent proprietary products can also be used.
Check that the pH value of the water is between 7.2 and
7.6 and the quantity of chlorine between 1 and 1.5 ppm.
The pH value and Chlorine level must be tested chemically
at frequent intervals to guarantee the quality of the water is
properly maintained and ensure correct operation of the
system.
1 - REMOVE THE CANVAS FROM THE MINIPOOL
Unhook the retaining straps at the four corners of the pool
to remove the canvas.
2 - FILL THE MINIPOOL
Fill the minipool with water to the level indicated on the
skimmer.
AM
The water put into the pool must be no hotter
than 35 °C.
24
611 - 612
GB
INSTRUCTIONS
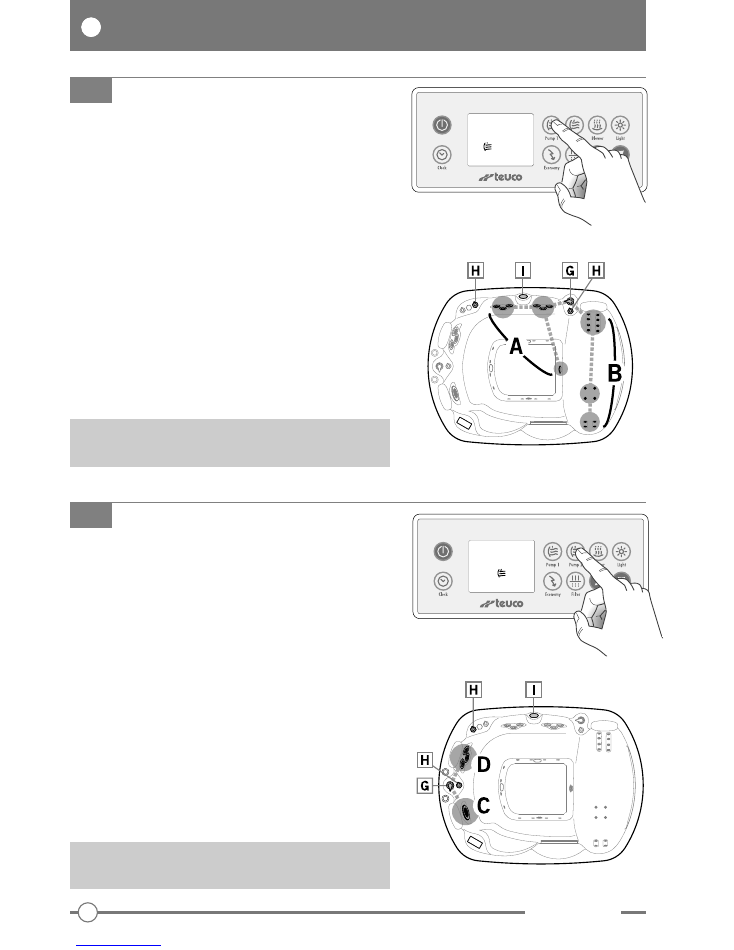
PUMP 1
Press the “Pump 1” button to activate the massage of
seats A - B.
Press “
Pump 1
” a second time to switch the function off.
Use the
DIVERTER (G)
to direct all of the flow to seat A
or seat B, or part of the flow to each.
Use the selector knobs
(H)
to increase or diminish the
power of the jets.
QUICK START: the massages of seats A and B can be
activated by pressing the remote button on the panel
(I).
After 20 minutes continuous operation, the function
will switch off automatically.
PUMP 2
Press “Pump 2” to activate the massage of seats C - D.
Press “
Pump 2
” a second time to switch the function off.
Use the
DIVERTER (G)
to direct all of the flow to seat C
or seat D, or part of the flow to each.
Use the selector knobs
(H)
to increase or diminish the
power of the jets.
QUICK START: the massages of seats C and D can be
activated by pressing the remote button on the panel
(I).
After 20 minutes continuous operation, the function
will switch off automatically.
08:30
AM
37.0
°C
25
611 - 612
GB
INSTRUCTIONS
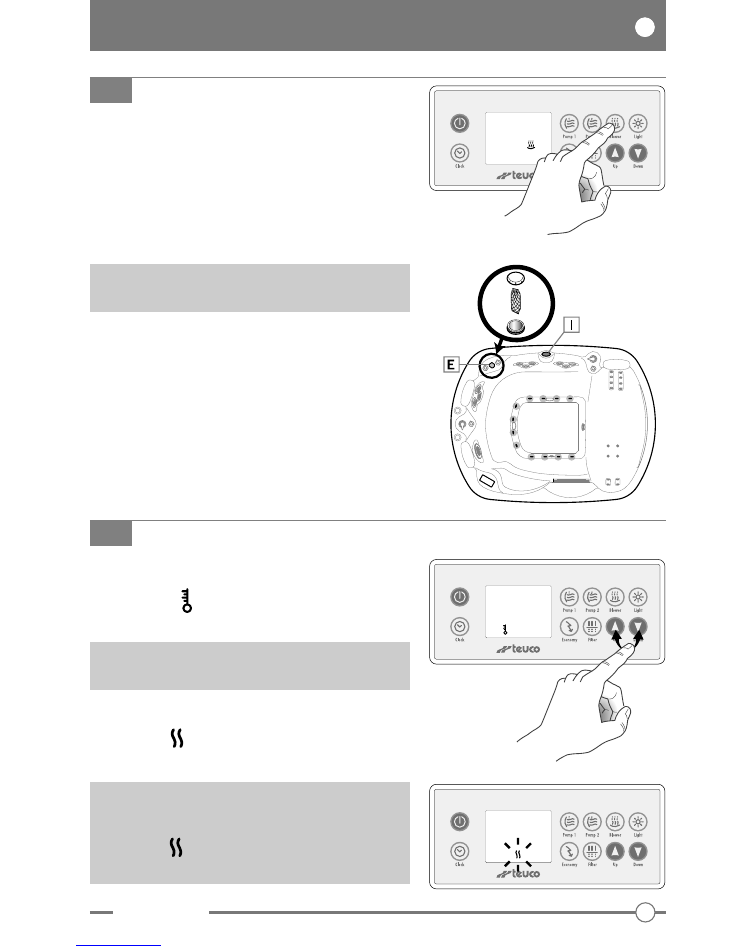
BLOWER
Press “Blower” to activate the Air jets function at HIGH
SPEED.
Press “Blower” a second time to select LOW SPEED.
Press “Blower” a third time to switch the air jets off.
QUICK START: the Blower can be activated by
pressing the remote button on the panel (I).
AROMATHERAPY
Teuco supplies essences for use in the minipool: these are
non-foaming substances that leave the water crystal clear
and will not harm the skin or deface the surfaces of the
tub.
The essence is put into the
DISPENSER (E)
, and always
with the Air Jet function off.
Unscrew the safety cap, put in the essence and close up
again.
Switch on the Air Jet function to mix the essence with the
water.
After 20 minutes continuous operation, the function
will switch off automatically.
37.0
°C
SETTING THE WATER TEMPERATURE
Use buttons “
▲
” and “
▼
” to select the desired
temperature of the water in the minipool.
The symbol “
“ is displayed during the setting
procedure.
If the temperature of the water in the minipool is lower
than the setting, the heater will be activated.
The symbol “
“ is displayed until the water has been
heated to the set temperature.
The temperature can be set between 15 °C and
40 °C
If other functions are activated when the heater is in
operation, the heater may be shut off automatically to
limit the power consumed by the minipool.
When the "
" symbol blinks in the display, this
means that the heater is deactivated temporarily.
37.0
°C
37.0
°C
26
611 - 612
GB
INSTRUCTIONS
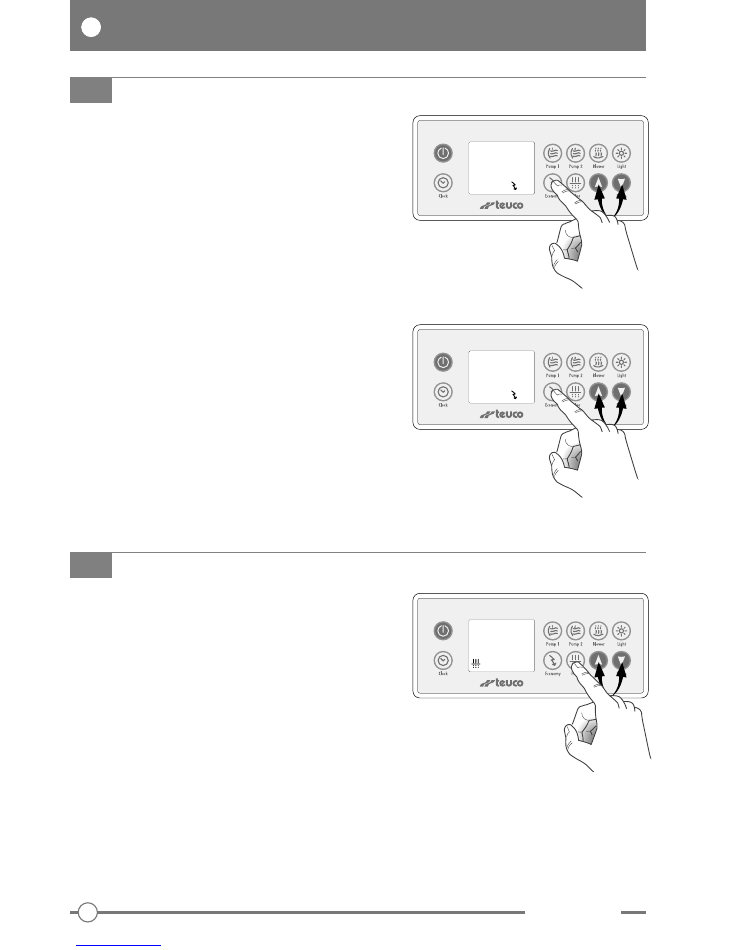
ECONOMY
This function can be used to programme the
deactivation of the heater for a given period of time (e.g.
during the night).
Press the “Economy” button a first time to set the
duration of the Economy period (when the heater
remains off).
The display shows E OO.
Use buttons “
▲
” and “
▼
” to set the duration (from 0
to 24 hours).
Press “Economy” a second time to set the delay before
the Economy function cuts in (number of hours
between the time of programming and the time the
Economy period is due to start).
The display shows Ed OO.
Use buttons “
▲
” and “
▼
” to set the delay (from 0 to 23
hours).
Press the “Economy” a third time to terminate the
programming procedure.
E 00
E800
FILTER
This function is used to programme the number of
filtration cycles for the following 24 hours.
Press the “Filter” button; the display shows P O1.
Use buttons “
▲
” and “
▼
” to set the number of cycles
(1, 2, 3, 4, 6, 8, 12, 24).
- To start the first filtration
immediately
press “Filter” a
second time.
The filtration cycle lasts for 2 minutes with activation
of the Pump 1, Pump 2 and Blower functions.
- To set the system so that filtration does
not start
immediately
, press “Filter”, “
▲
” and “
▼
” and hold
for 5 seconds.
P 0 1
27
611 - 612
GB
INSTRUCTIONS
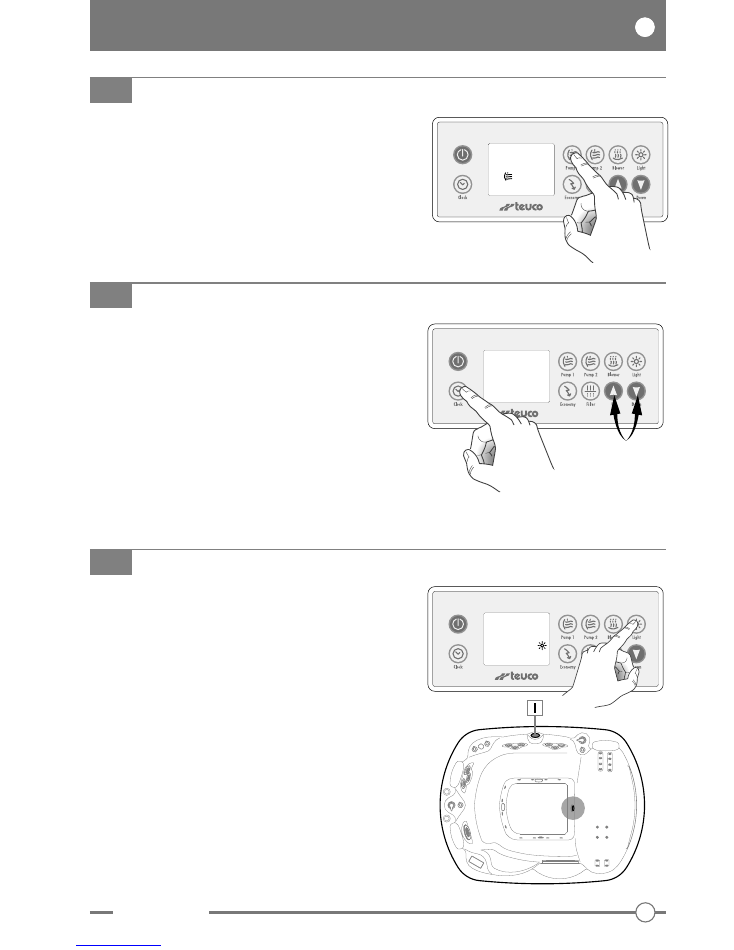
Press the “Clock” button to display the time.
SETTING THE EXACT TIME
To set the exact time, press and hold the “Clock”
button (the hours field will blink).
Use buttons “
▲
” and “
▼
” to set the hours.
Press “Clock” again to set the minutes (the minutes
field will blink).
Use buttons “
▲
” and “
▼
” to set the minutes.
Press the “Clock” button once more to terminate the
setting procedure.
CLOCK
08:30
AM
FILTER BOOST
This function serves advantageously to filter the water
following heavy use of the minipool, or to mix the
treatment chemicals more quickly.
Press the “Pump 1” button and hold for 5 seconds.
The display shows B 00.
Pump 1 and the ozonator are activated for 45 minutes.
B 00
Press the “Light” button to switch on the underwater
light in the minipool.
Press “Light” a second time to switch the underwater
light off.
QUICK START: the underwater light can be switched
on by pressing the remote button on the panel (I).
LIGHT
08:30
AM
28
611 - 612
GB
INSTRUCTIONS
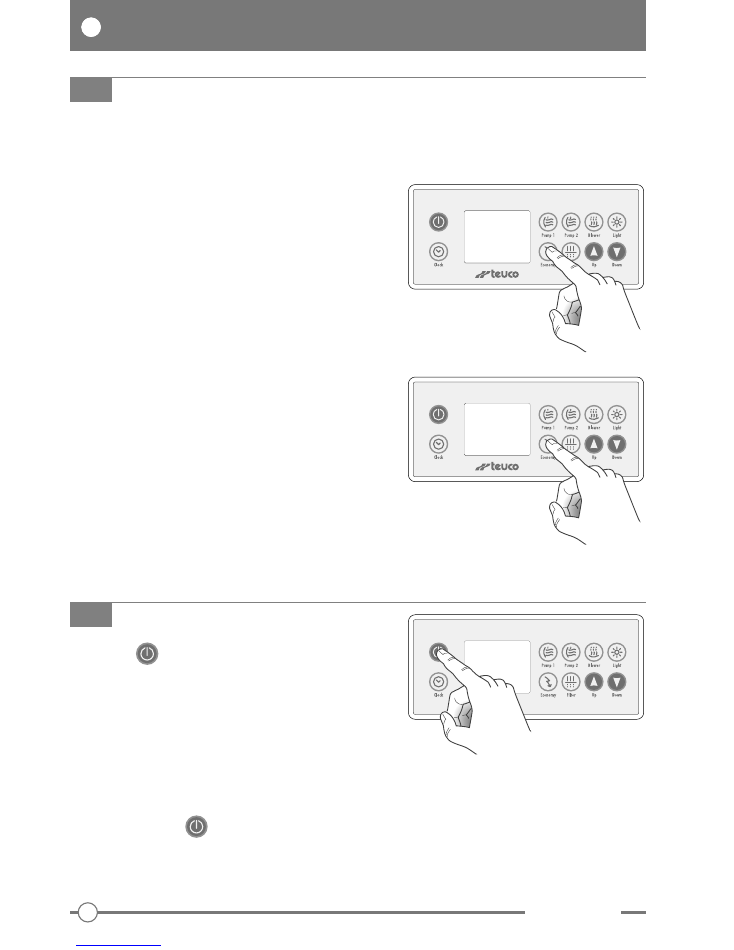
Press the “
” button and hold for 5 seconds to lock
out all functions, recirculation and buttons of the
control panel (for a period of 30 minutes).
This is a safety function for use when cleaning the
filters or removing foreign matter from the bottom of the
pool, or whenever the system needs to be shut off for
technical reasons.
To
reactivate
the control panel before 30 minutes have
elapsed, press the “
” button a second time.
OFF MODE
This function can be used to inhibit the operation of
some or all of the control panel buttons.
PARTIAL LOCKOUT:
Press and hold the “Economy” button for 5 seconds to
inhibit all functions except Pump 1, Pump 2, Blower and
Light.
The display shows “LocP”.
In this situation, the current settings cannot be
changed.
To
re-enable
the control panel, press the “Economy”
button again and hold for 5 seconds.
FULL LOCKOUT:
Press and hold the “Economy” button for 10 seconds to
inhibit all functions.
The display shows “LocF”.
In this situation, all buttons are disabled, whereas the
recirculation and all programming functions remain
active.
To
re-enable
the control panel, press the “Economy”
button again and hold for 5 seconds.
CONTROL PANEL LOCKOUT
Loc P
Loc F
29
611 - 612
GB
INSTRUCTIONS
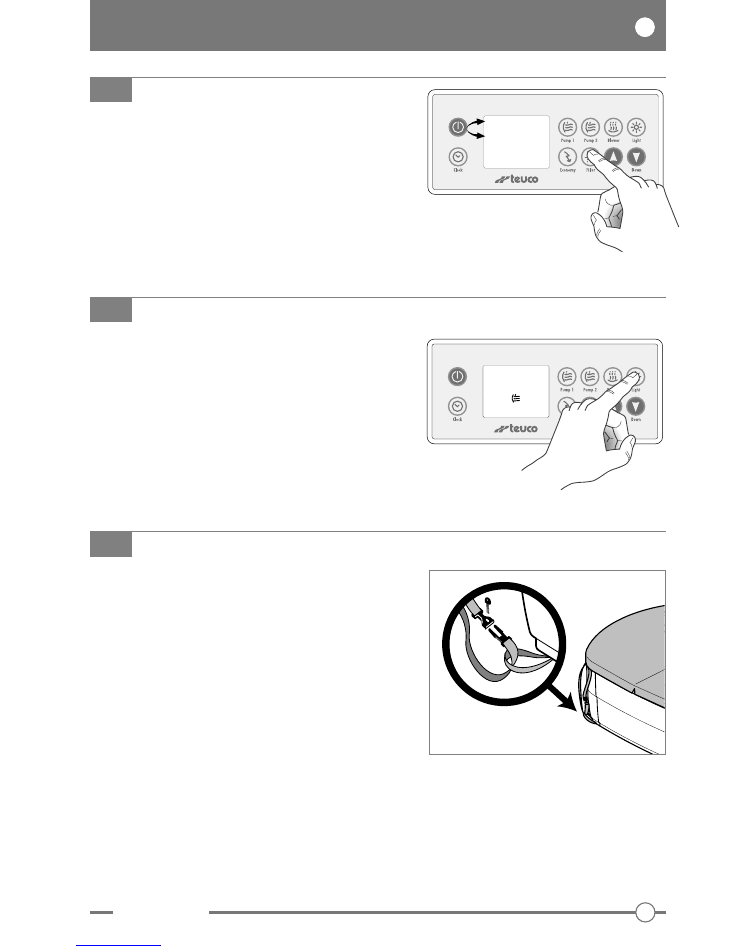
The temperature of the water can be displayed in
degrees Celsius or degrees Fahrenheit.
Press the “Light” button and hold for 5 seconds to
display the temperature in °C or °F.
TEMPERATURE DISPLAY IN DEGREES CELSIUS OR FAHRENHEIT
99.0
°F
Always keep the minipool covered over (when not in
use) so as to avoid heat loss and evaporation, and to
prevent the water being fouled with leaves and dirt.
The canvas must be held down with the straps and, if
necessary, locked for added security.
The canvas is not intended to carry weights.
Do not sit, step or lie on the canvas.
Do not place objects on the canvas.
The canvas can be dangerous if not secured or
properly closed.
Failure to follow the instructions for securing the
canvas can result in danger to the user.
Remove the canvas completely before stepping into
the pool, otherwise there is a risk of being trapped.
MINIPOOL CANVAS
Messages can be displayed upside down so that they
are readable from both inside and outside the minipool.
Press the “Filter” button and hold for 5 seconds to
rotate the display 180°.
ROTATE DISPLAY
37 .0
°C
37 .0
°C
30
611 - 612
GB
MAINTENANCE
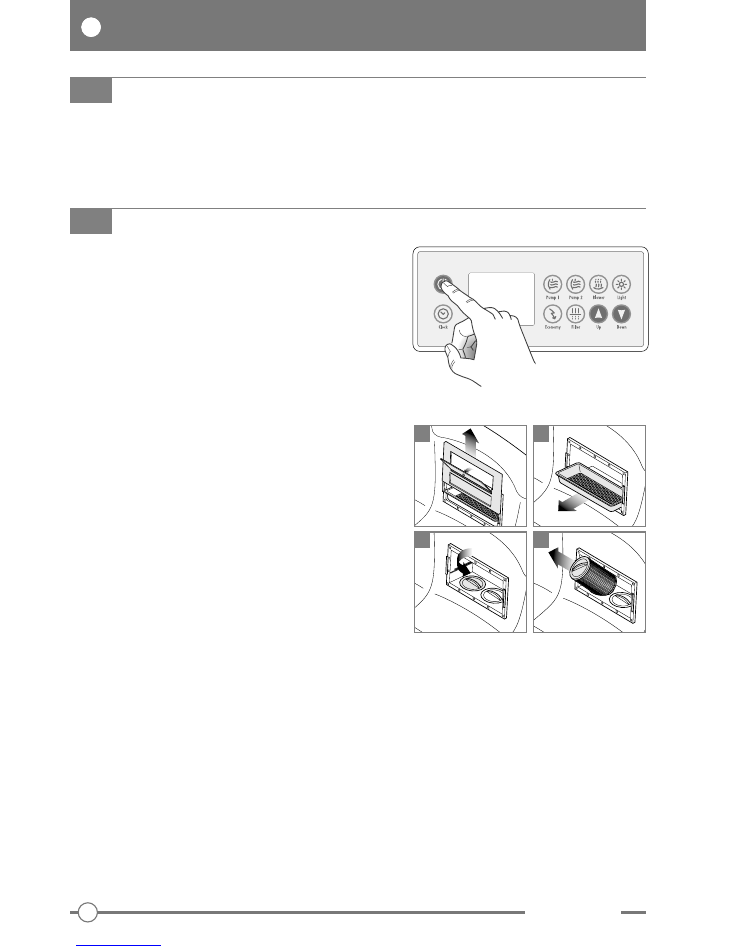
Every two weeks the message CLE will blink in the
display, indicating that the filters need cleaning.
Clean the filters more often if need be.
To clean the filters:
- select “OFF MODE” at the control panel,
- remove the cover and tray of the skimmer,
- unscrew the filters and remove them from their
sockets.
Clean the filters under a strong jet of water (use a high
pressure hose if necessary).
R e p l a c e t h e f i l t e r s a t t h e f i r s t s i g n s o f a n y
deterioration.
Replacement filters are available from Teuco
Authorized Dealers.
Having cleaned or replaced the filters, refit all
components before restarting the minipool.
To restart the minipool, deselect the “OFF MODE”
function at the control panel.
CLEANING THE FILTERS
1
2
3
4
Refer to the CLEANING INSTRUCTIONS manual accompanying the product.
CLEANING THE SURFACES
31
611 - 612
GB
IN TEMPERATE CLIMATES
In areas where the temperature falls below zero only
occasionally, the water can be left in the minipool as
long as it has “antifreeze protection”.
CAUTION: leave the system connected to the electrical
power supply so that the “antifreeze protection” can
come into operation if the water should drop below
5 °C.
This function operates by activating the heater and the
whirlpool pumps in alternation until the water
temperature is raised to 7 °C.
IN COLD CLIMATES
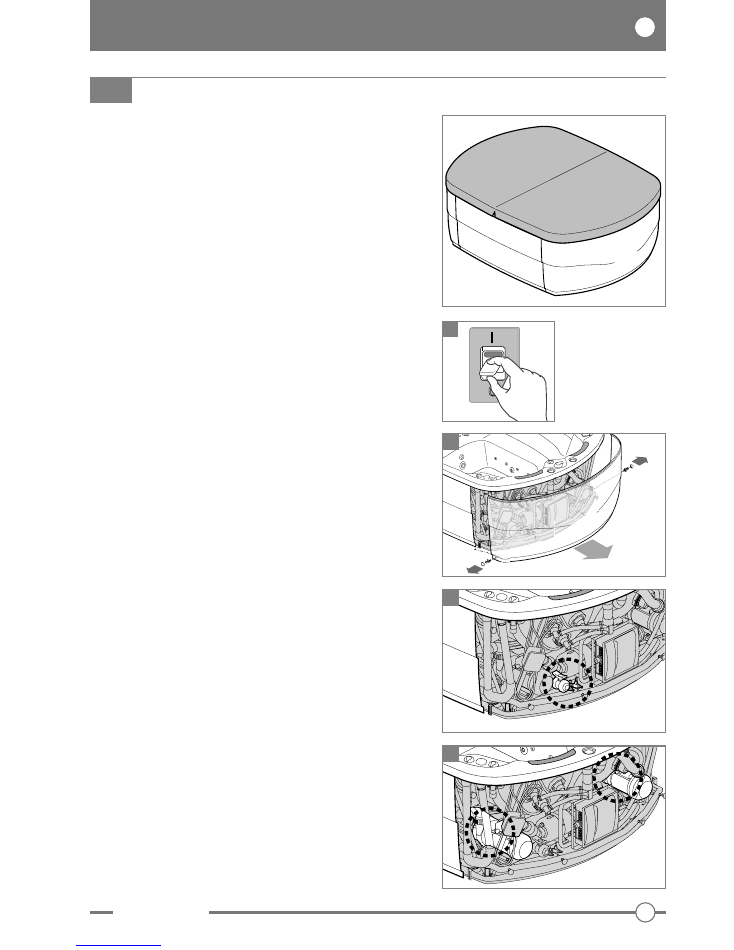
Empty the minipool completely, as follows:
- isolate the minipool from the power supply (1)
- remove the inspection panel (2)
- open the drain valve and the bleed cocks (3)
- unscrew the drain plugs on the pump casings (4)
- using a liquids vacuum cleaner, remove water from
the bottom of the pool and from the AIR JET outlets.
Remove and clean the filters, and store in a dry place.
Cover the minipool with the canvas provided, so that it
will not collect dirt.
Before using the Teuco Minipool again after the winter
break, repeat the steps indicated for STARTING UP
FIRST TIME.
WINTERING PROCEDURE
1
3
4
2
The appliance is equipped with various safety features which monitor the operation of the system.
In the event of malfunction, the system responds automatically by deactivating the function currently
selected and displaying an error message.
32
611 - 612
GB
REPAIRS
DIAGNOSTICS MESSAGES
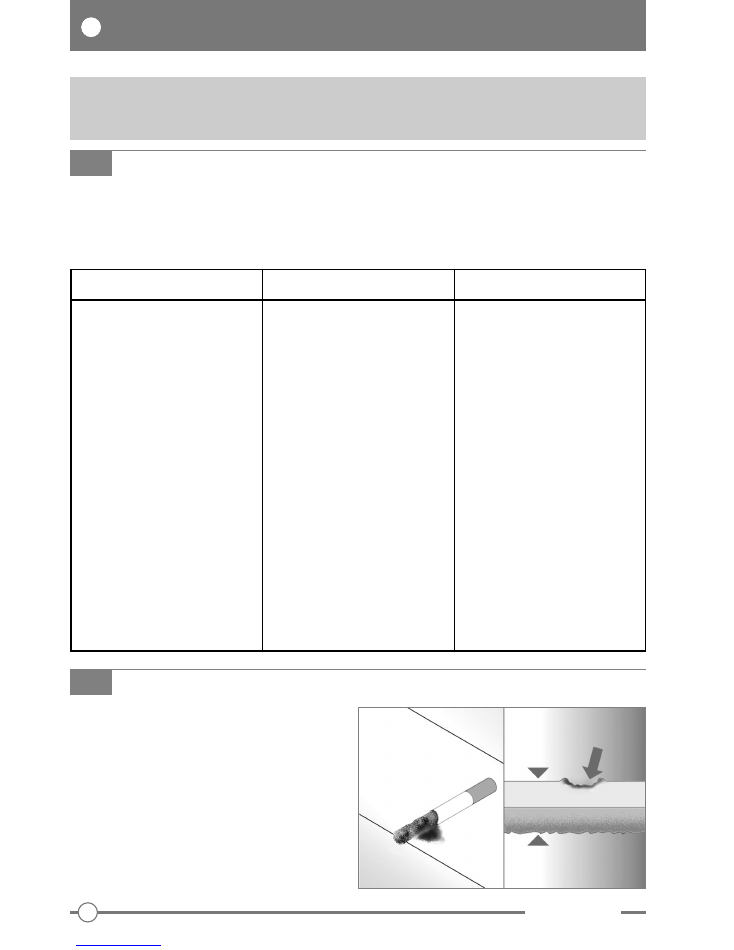
REMOVING SCUFFS, SCRATCHES AND CIGARETTE BURNS
Firstly, make certain that the scratch or burn
has affected only the surface of the acrylic
material.
This type of repair must be entrusted to a
professional with the necessary skills.
ACRYLIC
FIBREGLASS
If any part of the appliance fails to operate as it should (e.g. replacing the lamp in the light
fixture...), call the nearest Teuco Authorized Service Centre (see list attached).
CAUSE
Filters dirty or blocked.
Temperature of water in the minipool
too high.
Sudden loss of electrical power with
water heater in operation.
Pump valves closed or filter blocked.
Problem with temperature probe.
Water level too low.
ACTION
Clean the filters .
Set a lower temperature value and
wait for the water to cool.
If the fault persists, call the nearest
Teuco Authorized Service Centre.
Isolate the minipool from the power
supply and wait for the water to cool
down (about 1 hour). Power the
system up again, and
if the fault
persists, call the nearest Teuco
Authorized Service Centre.
Check that the pump valves are
open; clean the filters.
If the fault persists, call the nearest
Teuco Authorized Service Centre.
Call the nearest Teuco authorized
Service Centre.
Add water, and if the problem
persists, contact a
Teuco Authorized
Service Centre.
TROUBLE OR FAULT
CLE
HL Blinking
- The temperature of the water in the
minipool is higher than 44 °C.
HL permanently alight
- The temperature of the water in the
heater is higher than 48 °C.
FLO
- The system is not sensing any flow
of water in the recirculation circuit.
Prr
H2O

33
611 - 612
GB