Full Text Searchable PDF User Manual

Made in China
Important Information:
Tuscany/Princeton Crib and More
Assembly Instruction
Read all instructions
BEFORE
assembling crib.
KEEP INSTRUTIONS FOR FUTURE USE.
1050#

Page 2
WARNING -
R
ruc
bef r
r b.
KEEP INSTRUCTIONS FOR FUTURE USE. DO NOT
USE
R
L
L WED.
ef re each u a e r a e b y,
pec cr b f r da a ed hardware,
e
,
par
r
harp ed e .
DO NOT
u e cr b a y par are
r br ke . A k y ur dea er r wr e
&T
I e
a /S re e f r rep ace e
par a d
ruc
a
era ure f eeded.
DO NOT
ub
u e
par .”
T reduce he
k f SIDS pe
re
e d he hy f
p aced
he r back
eep,
u e
herw e adv ed by
ur p
a .
W
r
h
.
,
r
b
c
b c ver
r
bed.
c
r
r c r
r
rap
a
r
d.
a
w.
DO NOT
c c rd , r
a c
bec
w
r
d’
r b.
S r
c
r
a
DO NOT
c
r
r
d’
,
h
r
c rd .
DO NOT
p
r
v
r
a
r
y .
I r
,
p
f
re ’
r duc .
Whe
d ab e
pu
a
p
e
er
we p
a d re
bu per
pad , ar
y a d her bjec
a
d erve a
ep f r
b
u .”
NEVER
a r
c v
bec
e
f ca
DO NOT
wa
a r
r b.
r
f
r
f y
b
k
r
r y,
a ever c
p
r per
r
c bef r
y
r b. Mak
r
a
b
ar
h
CRIB WARNINGS
Failure to follow these warnings and assembly instructions
could result in serious injury or death.
!
WARNING-
WARNING-
Infants can suffocate on soft bedding. Never add a pillow or comforter
Never place additional padding under an infant.
!
Infants can suffocate in gaps between crib sides and a mattress that is
too small.
!
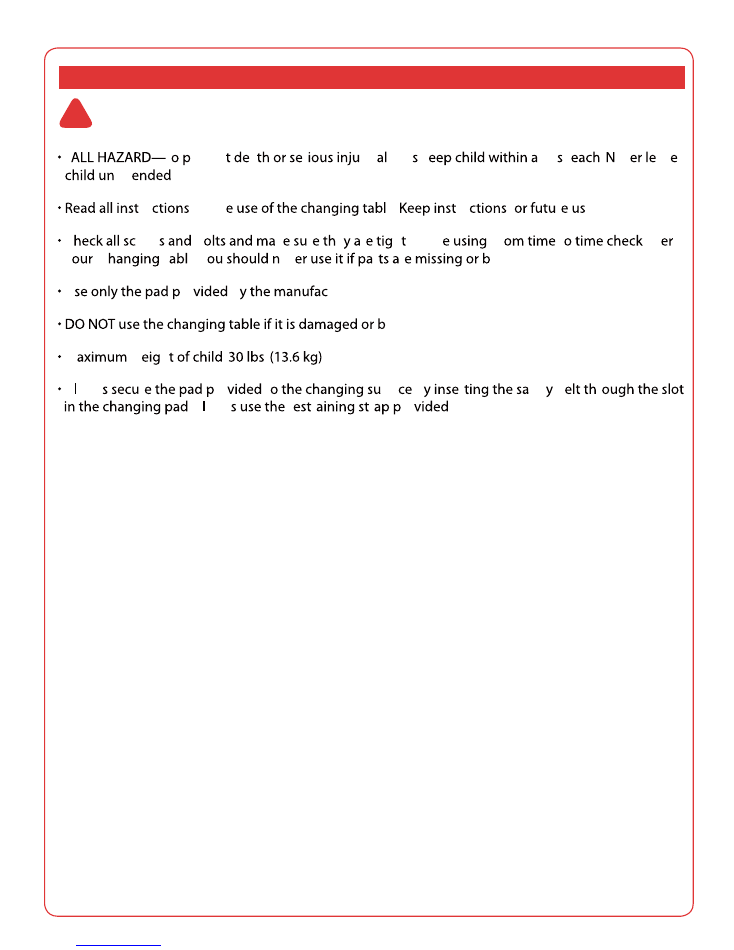
WARNING:
S
ENTRAPMENT/ TRANGULATION HAZARD
FALL HAZARD
CAUTION : ANY MATTRESS USED IN THIS CRIB MUST
BE AT LEAST 27 1/4” (69CM) x 51 5/8” (131 CM) WITH
A THICKNESS NOT EXCEEDING 6” (15CM).
DO NOT
Follow warnings on all products in a crib
1050# Tuscany/Princeton Crib and More assembly instructions ( SC )
SORELLE
3
CLEANING & MAINTENANCE
• ALWAYS STORE THE CRIB & CHANGING TABLE IN A CLEAN AND DRY PLACE.
• TO CLEAN YOUR CRIB & CHANGING TABLE, USE A SOFT DAMP CLOTH WITH A SMALL
AMOUNT OF MILD SOAP, WIPE IMMEDIATELY WITH A DRY CLOTH.
• DO NOT USE ABRASIVES OR DETERGENT ON CRIB & CHANGING TABLE SURFACES.
• REGULARLY CHECK ALL SCREWS AND FITTINGS TO ENSURE THEY ARE TIGHT.
• THE IDEAL BALANCE IS TO MAINTAIN THE TEMPERATURE AROUND 21°C (70°F) AND THE
RELATIVE HUMIDITY AT 40% TO PREVENT WARPING OR SPLITTING.
F
t
reven
a
r
ry, way k
rm’ r
. ev
av
att
.
ru
befor
e.
ru
f
r
e.
C
rew
b
k
r
e
r
h befor
. Fr
t
ov
y
C
T
e.Y
ev
r
r
roken,
U
ro
b
turer.
roken.
M
w
h
:
.
A way
r
ro
t
rfa
b
r
fet b
r
. A way
r
r
r
ro
Failure to follow these warnings and assembly instructions
could result in serious injury or death.
WARNING
SORELLE
-
CHANGING TABLE WARNINGS
!
1050# Tuscany/Princeton Crib and More assembly instructions ( SC )

4
SORELLE
1050# Tuscany/Princeton Crib and More assembly instructions ( SC )
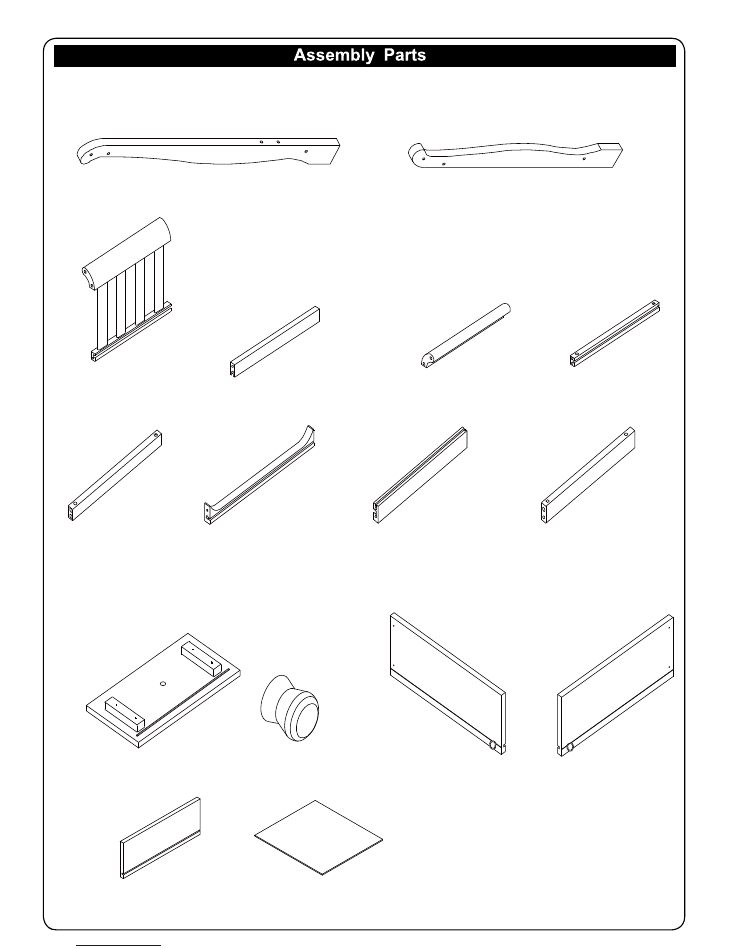
(A): Left Side Rail(x1)
(B) Back Side Rail (x1)
(C) Front Side Rail (x1)
(D) Front&Back Contoured Top (x2)
(E) Rear Changer Leg (x1)
(F) Front Changer Leg (x1)
(G) Metal Mattess Support (x1)
(H): Midlle Panel (x1)
(I) Right End (x1)
(K) Middle Shelf (x1)
(L) Small Shelves (x2)
(J) Top Shelf (x1)
(N) Change Pad (x1)
(M) Bottom Shelf (x1)
PARTS LIST FOR
CHANGER/DRESSER
ASSEMBLY
PARTS LIST FOR
CRIB
ASSEMBLY
5
1050# Tuscany/Princeton Crib and More assembly instructions ( SC )
SORELLE
(O4) Support Bar Solid
Ends (x1) (Side Groove)
(O1) Decorative Support Bar
Bolt Ends (x1)
(O3) Smaill Front
Support Bar (x1)
(O7) Large Support Bar Peg Ends (x1)
(Top & Side Groove)
(O2) Large Support Bar Peg Ends (x1)
(Bottom Groove)
(O5) Support Bar
Bolt Ends (x2)
(O6) Large Support Bar Solid
Ends (x1) (Side Groove)
(O8) Support Bar Solid Ends (x1)
PARTS LIST FOR
DRAWER
ASSEMBLY
(P): Drawer Front (x3)
(Q) Knob (x3)
(T) Drawer Back (x3)
(R) Drawer Right(x3)
(S) Drawer Left(x3)
(U): Drawer Bottom Self (x3)
PARTS LIST FOR
CHANGER/DRESSER
ASSEMBLY
(V) Rear Dresser Leg (x1)
(W) Front Foot Board Leg (x1)
6
1050# Tuscany/Princeton Crib and More assembly instructions ( SC )
SORELLE
Important: In order to properly assemble the crib, carry out the operations in order specified. Failure to assemble the crib in the manner recommended could
make the crib hazardous.
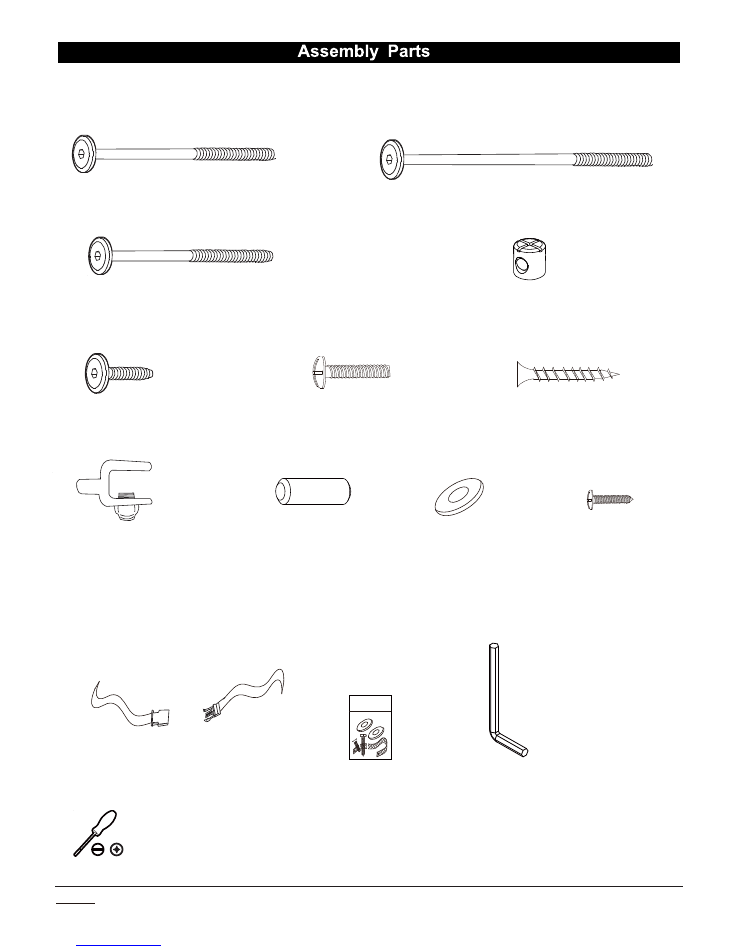
HARDWARE LIST
Tool required
L” Allen Wrench
(HI) Dowel Pin (x13)
(HD) 85.5mm(3 1/2”) Bolts (12mm Head) (x4)
(HE) Barrel Nuts (x26)
(HC) 63mm(2 1/2”) Bolts (12mm Head) (x22)
(HJ) 12mm Washer (x2)
(HH) Shelf Support
Brackets (x8)
(HF): 20mm Screws for knobs (x3)
(HG): 32mm(1 1/4”) Phillips Screws (x24)
(HA) 19mm(3/4”) Bolts (12mm Head) (x4)
(HM) Wall Strap Kit
(HK) 12mm Screws (x2)
(HL) Safety Belt(1sets, HL & H R)
HL
HR
(HB) 50mm(2 ”) Bolts (12mm Head) (x2)
7
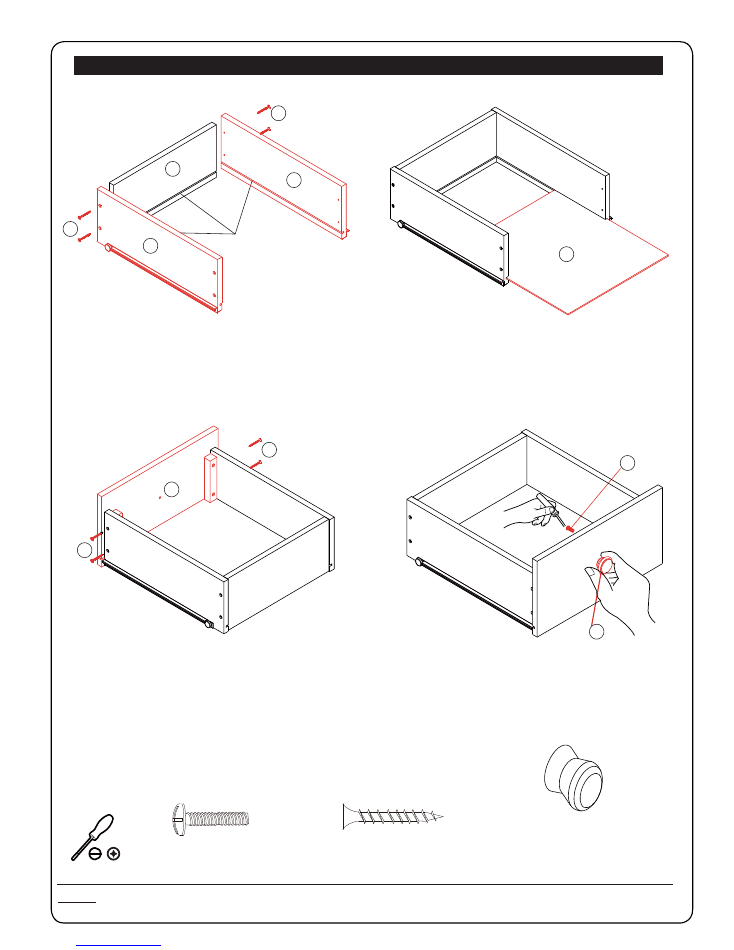
Drawer Assembly
1050# Tuscany/Princeton Crib and More assembly instructions ( SC )
SORELLE
Important: In order to properly assemble the crib, carry out the operations in order specified. Failure to assemble the crib in the manner recommended could
make the crib hazardous.
Tool required
T
Q
P
HF
HG
HG
S
R
Grooves
U
HG
HG
1. Working on a padded, flat surface, attach
drawer sides(R&S) to Drawer Back (T) with
Philips Head Screw (HG), see
Fig 1
Fig. 1
Fig. 2
Fig. 3
Fig. 4
2. Slide Drawer Bottom(U) into drawer
assembly, see
Fig 2
3. Secure both side of drawer front(P)
to Drawer assembly with four(4) Philips
Head Screw (HG), see
Fig 3
4. Using Drawer Knob Screw(HF), install
one(1) Knob(Q) on Drawer, see
Fig 4
(HF): 20mm Screws for knobs (x3) (HG): 32mm(1 1/4”) Phillips Screws (x24)
Check All screws for tightness.
Repeat for all Drawers, set drawers aside for later use
(Q) Knob (x3)
8
1050# Tuscany/Princeton Crib and More assembly instructions ( SC )
SORELLE
CHANGER/DRESSER
ASSEMBLY
Important: In order to properly assemble the crib, carry out the operations in order specified. Failure to assemble the crib in the manner recommended could
make the crib hazardous.
Tool required
Parts Needed: refer to Page 3, “PARTS LIST FOR CHANGER/DRESSER ASSEMBLY”
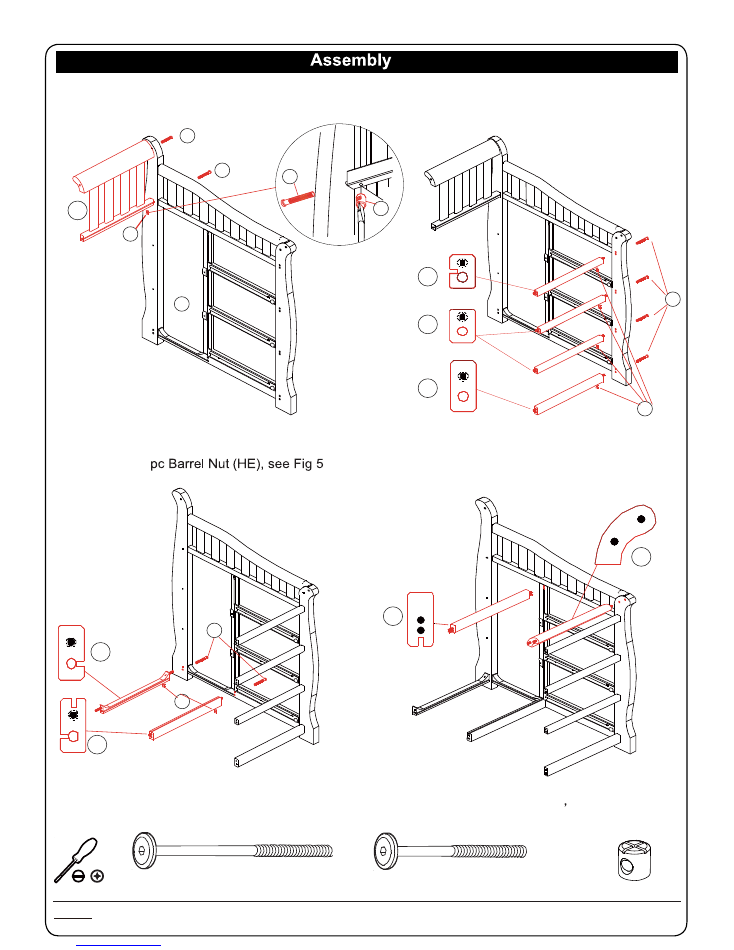
1. Insert Decorative Support Bar (O1) into Right
End (I) and secure with 1pc Bolt(HC)
、
1pc
.
Fig. 5
(HE) Barrel Nuts (x7)
(HC) 63mm(2 1/2”) Bolts (12mm Head) (x7)
HB
O2
I
O3
O6
O8
HC
O1
HE
O4
O5
HC
2. Insert Support Bar O4, O5 and O8 into Right End
(I) and secure with 4pcs Bolt(HC) and 4pcs Barrel
Nuts(HE), See Fig 6
.
Fig. 6
3. Insert Support Bar O6 and O7 into Right End
(I) and secure with 2pcs Bolt(HC) and 2pcs Barrel
Nuts(HE), See Fig 6
.
Fig. 7
4. Put the Right Ends on ground, then Insert Support
Bar O2 and O3 into Right End (I) See Fig 8
.
Fig. 8
O7
HC
HC
HE
HE
1
HE
(HB) 50mm(2 ”) Bolts (12mm Head) (x1)
Bolt(HB)
and
9
1050# Tuscany/Princeton Crib and More assembly instructions ( SC )
SORELLE
CHANGER/DRESSER
ASSEMBLY
Important: In order to properly assemble the crib, carry out the operations in order specified. Failure to assemble the crib in the manner recommended could
make the crib hazardous.
Tool required
Parts Needed: refer to Page 3, “PARTS LIST FOR CHANGER/DRESSER ASSEMBLY”
Fig. 9
Fig. 10
(HE) Barrel Nuts
(x 7)
(HC) 63mm(2 1/2”) Bolts
(12mm Head) (x7)
K
M
J
H
HC
(HH) Shelf Support
Brackets (x8)
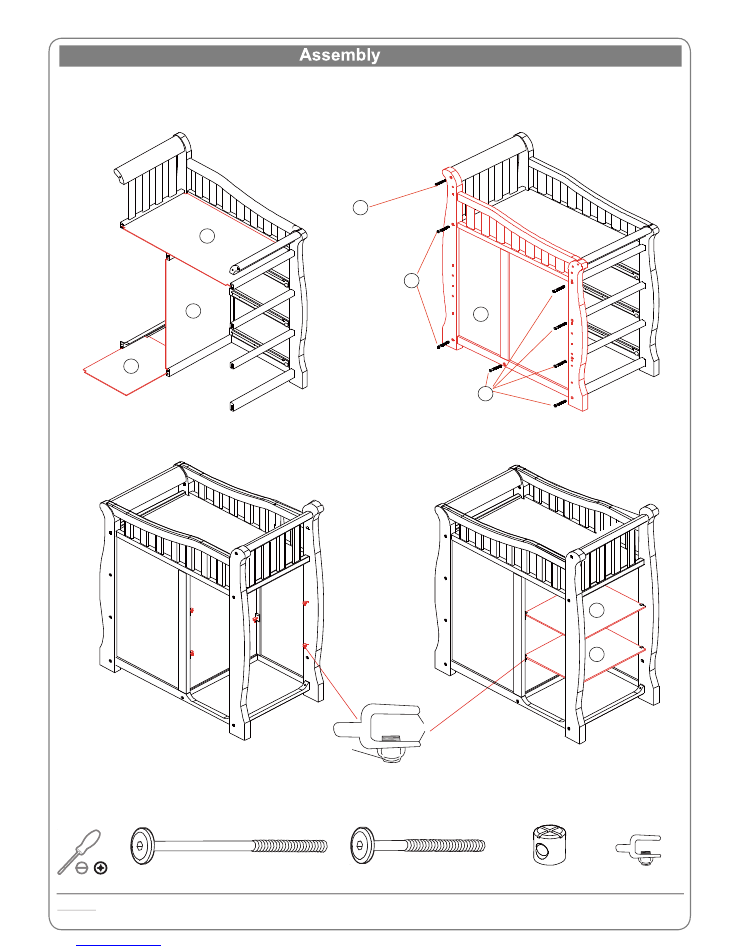
5. Insert Top Shelf(J) , Middle Shelf(K) and
Bottom Shelf(M) into groovess as Fig 9.
6. Attach Middle Panel(H) with each support
bar and secure with 7pcs Bolt(HC),1pc Bolt(HB)
and 7pcs Barrel Nuts(HE), see Fig 10
HC
Bite
Retainer Screws
Fig. 11
Fig. 12
7. Insert Shelf Support Brackests (HH)
into holes in back of dresser, See Fig 11.
8. Slide Shelf(L) into “bite” of bracket. When in place,
tighten retainer screws on brackets. see
Fig
12
NOTE: Retainer screws MUST be tightened to keep shelves from moving.
L
L
HB
(HB) 50mm(2 ”) Bolts
(12mm Head) (x1)

10
1050# Tuscany/Princeton Crib and More assembly instructions ( SC )
SORELLE
CRIB
ASSEMBLY
Important: In order to properly assemble the crib, carry out the operations in order specified. Failure to assemble the crib in the manner recommended could
make the crib hazardous.
Tool required
C
Fig. 13
Fig. 14
&
B
(HI) Dowel Pin (x13)
(HE) Barrel Nuts (x8)
(HD) 85.5mm(3 1/2”) Bolts (12mm Head) (x4)
(HC) 63mm(2 1/2”) Bolts (12mm Head) (x4)
F
A
E
HD
HD
HE
HE
HI
HI
D
H
HC
HE
HE
Fig. 15
Fig. 16
1. Slide 1pc Dowel Pin(HI) to front leg(F), and Using four (4)
Bolts (HD) and Barrel Nuts (HE) assembly Front leg(F) and
Rear Leg(E) to Left Side Rail(A), Make sure all mattress
support holes are facing in, See Fig.13
2. Slide 12pcs Dowel Pin (HI) into each end of Back
Side Rail (B), Front side rail(C) and Front & Back
Contoured Top(D), See Fig.14
3. Put Back Contoured Top(D) to Back Side Rail(B),and then
Attach Back Side Rail(B) to change table with 2pcs Bolts(HC)
and 2pcs Barrel Nuts(HE), See Fig.15
4. Put Front Contoured Top(D) to Front Side Rail(C),and then
Attach Front Side Rail(C) to change table with 2pcs Bolts(HC)
and 2pcs Barrel Nuts(HE), See Fig.16
HI
C
D
D
HC
H
B
HE
11
Crib Assembly
1050# Tuscany/Princeton Crib and More assembly instructions ( SC )
SORELLE
CRIB
ASSEMBLY
Important: In order to properly assemble the crib, carry out the operations in order specified. Failure to assemble the crib in the manner recommended could
make the crib hazardous.
Tool required
Fig. 18
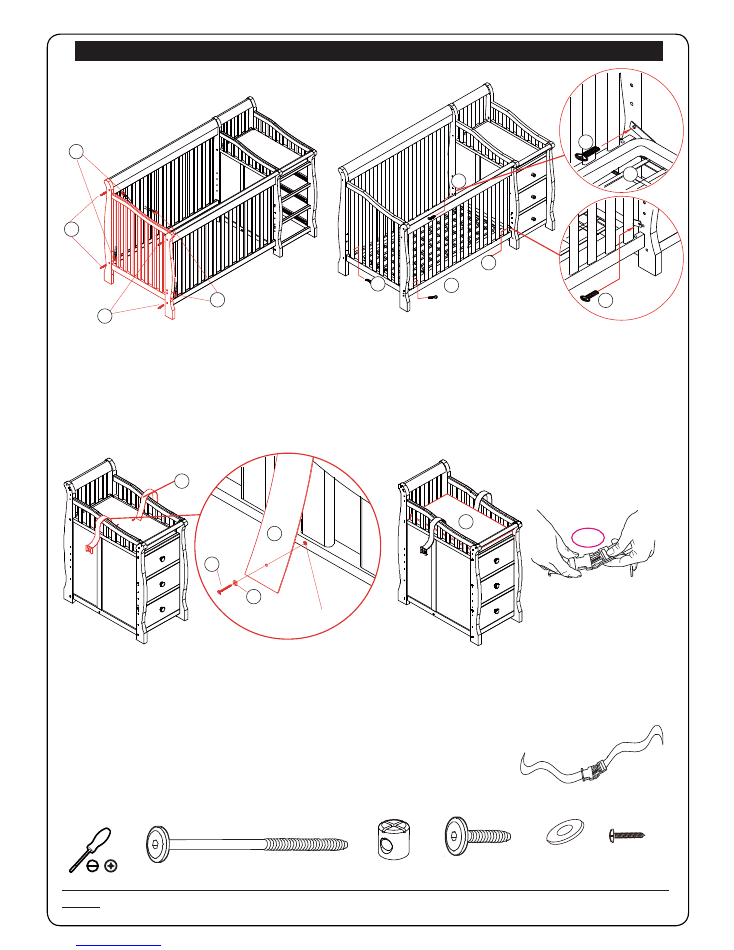
4. Attach completed Mattress support(M) to Crib
using four(4) Bolts(HA) , See Fig 18
CHANGING PAD
ASSEMBLY
1. Screws safety belt (HL) to dresser top(Pilot Hole location) by 12mm Screws(HK) and 12mm Washer(HJ) as per Fig. 19
2. Put the pad(N) to the dresser completely, Make sure pad is facing up and warning are always visible.
Make sure that safety belt is fastened around child and adjusted to safety belt is snug around child’s mid-section.
Make sure buckle is securely latched. See Fig.20.
DISASSEMBLING CRIB FOR STORAGE
To disassemble crib for storage follow assembly steps in reverse.
Store all parts and hardware together in a safe place. Store the instruction
manual in the supplied PE bags attached to the mattress support for future
reference for assembly.
(HA) 19mm(3/4”) Bolts
(12mm Head) (x4)
HA
HA
HA
HA
3. Attach the Right side panel to Back Side Rail(B) and Front
Side Rail(C) with with 4pcs Bolts(HC) and 4pcs Barrel Nuts(HE),
See Fig.17
Fig. 17
HC
(HE) Barrel Nuts (x4)
(HC) 63mm(2 1/2”) Bolts (12mm Head) (x4)
CLICK!
HE
HC
HA
HA
M
ONCE COMPLETED, INSERT THREE(3) DRAWERS INTO CHANGING TABLE AND PUT THE
CHANGING PAD TO THE TOP OF CHANGER
Fig. 20
Fig. 19
(HJ) 12mm
Washer (x2)
(HK) 12mm
Screws (x2)
(HL/HR) Safety Belt(1sets, L & R)
HL
HK
HJ
Pilot Hole
N
HR
HE
12
ASSEMBLY
Important: In order to properly assemble the crib, carry out the operations in order specified. Failure to assemble the crib in the manner recommended could
make the crib hazardous.
Sorelle
PAGE 11
Tool required
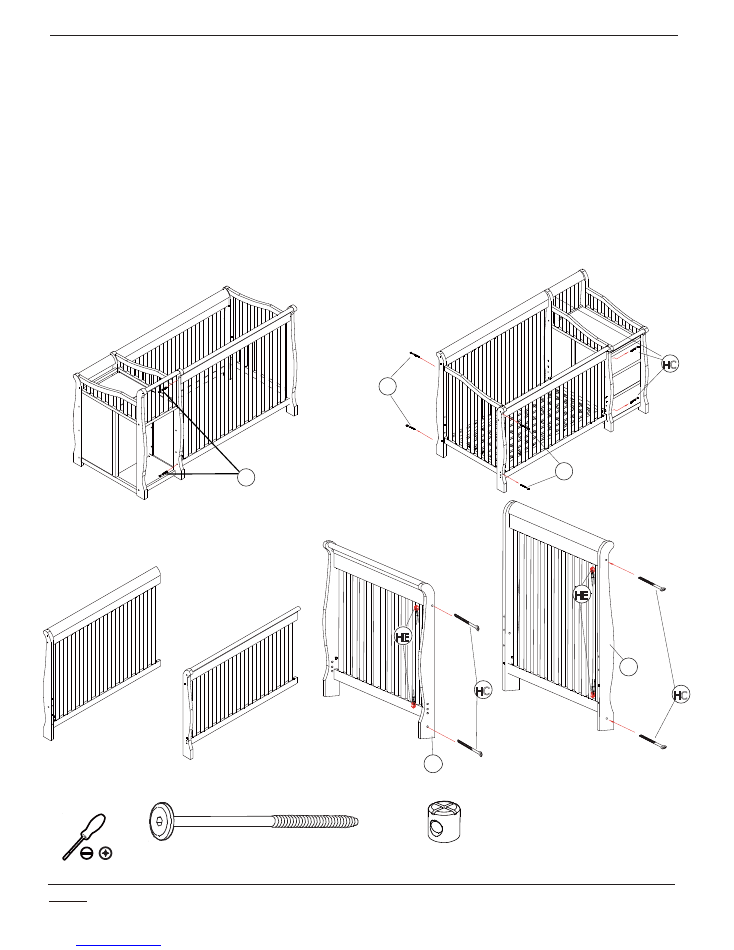
CONVERTING TO A FULL SIZE HEADBOARD
1. Remove the Drawers and Mattress support from Changer and Crib.
2. Remove Changer from the Crib, as Fig. 21 & Fig 22.
3. Remove Left Side Rail from Rear changer leg and Front changer leg, See Fig. 22 & 23.
4. Then add Rear Dresser leg(V) and Front Foot Board leg(W) to Headboard and Footboard using
Bolts(HC) and Barrel Nuts(HE). See Fig. 24.
5. For Adult Bed assembly, only
#215 Adult Bed Rail(Sold separately)
is acceptable for this item. and
please use the instruction sheet from #215 Adult bed rail for Adult bed assembly.
Fig. 21
Fig. 22
V
W
IMPORTANT: You MUST use supplied Wall Strap Kit with stand-alone
Changer/Dresser. See instructions provided with Wall Strap Kit.
RE-CHECK ALL FASTENERS TO BE SURE THEY ARE TIGHT. IT IS GOOD TO ALSO
DOUBLE CHECK THESE NOT USE IN THIS CONVERSION.
Fig. 23
Fig. 24
HD
HD
HC
(HE) Barrel Nuts (x4)
(HC) 63mm(2 1/2”) Bolts (12mm Head) (x4)
HC
HE
HE
HC
HC

3
To use extra Front and Rear legs
to convert to full size
bed with footboard and headboard,
refer to Adult rails 215# instruction.
After removing crib from organizer, remove
Left Ride Rail. To do so, remove four (4) Bolts.
Figure 4.
4
Adult rails 215# ,Toddler rail and extra Front/Rear Legs
can be purchased to covert the crib to
a full size bed and a toddler bed.
Contact the store where you purchased the crib or visit
www.sorellefurniture.com to locate a dealer near you.
1050# Tuscany/Princeton Crib and More assembly instructions ( SC )
SORELLE
V
W


