Full Text Searchable PDF User Manual

Bulletin No.: 036
19
th
February, 2013
SRX-R515P
DCinema Bulletin Archive:
https://filex.sony-europe.com/
Login and navigate to
Dealers/Digital Cinema Bulletins
folder
SRX-R515P v1.00.0 Networking Functionality
Overview
The SRX-R515P with v1.00.0 software is now available but cannot be connected to the Sony
TMS until the next version up. The SRX-R515P however is still capable of being controlled
over the network and accessing DCP and KDMs from a central storage device. This allows
the R515 to be installed at inaccessible locations, such as projection pods, but still able to be
operated over the network. Below is a list of functions that are described in this document:
Network overview of SRX-R515P
Configuring SRX-R515P IP addresses
Configuring Storage Server IP addresses
Accessing the R515 GUI over the network
Setting up a folder share for DCP/KDM ingest over the network
Configuring R515 to access a folder share for DCP/KDM ingest
Configuring R515 to access a FTP server for DCP/KDM ingest
Note. It is not recommended to perform ingesting operations or SPL editing during
play-out when using SRX-R515P v1.00.0 software. This is expected to be improved in
the next firmware version.
Bulletin No.: 036
19
th
February, 2013
SRX-R515P
DCinema Bulletin Archive:
https://filex.sony-europe.com/
Login and navigate to
Dealers/Digital Cinema Bulletins
folder
Network Overview of SRX-R515P
When connecting the SRX-R515P to a network there are two required network connections
to the XCT-S10 server, and one network connection between the XCT-S10 and the XCT-
M10 (IMB).
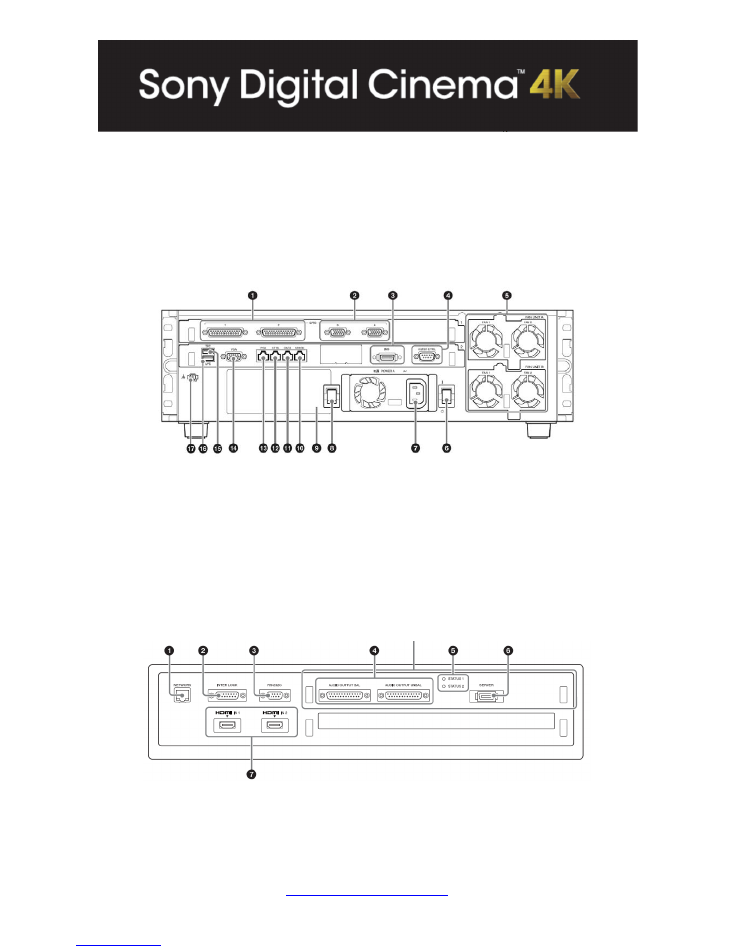
XCT
‐
S10
(Server)
–
Network
Ports
Figure 1 - XCT-S10 rear view
10 – SPARE Port
– Available for future expansion
11
– DATA Port
– Used for the transfer of DCPs via FTP or file share
12
– CTRL Port
– Used for control data such as accessing the GUI or audio processor
control.
13
– PRJ Port
– Used for communication data between the Server and the IMB.
XCT
‐
M10
(IMB)
–
Network
Ports
Figure 2 - XCT-M10 rear view
1 – NETWORK
– Used for communication data between the Server and the IMB.

Bulletin No.: 036
19
th
February, 2013
SRX-R515P
DCinema Bulletin Archive:
https://filex.sony-europe.com/
Login and navigate to
Dealers/Digital Cinema Bulletins
folder
Connecting
R515
to
a
Windows
storage
device
The diagram below shows a typical example of a storage device connected to 2x SRX-
R515P projectors.
SRX
‐
R515
XCT
‐
M10
(IMB)
XCT
‐
S10
(Server)
SRX
‐
R515
XCT
‐
M10
(IMB)
XCT
‐
S10
(Server)
Gb
NETWORK
SWITCH
PRJ
NETWORK
PRJ
NETWORK
CTRL
DATA
CTRL
DATA
Server
Storage
with
XXTB
Projector
1
CTRL
Port
IP
– 192 .168 .101 .11
DATA
Port
IP
– 192.168.201.11
Projector
2
CTRL
Port
IP
– 192.168.101.12
DATA
Port
IP
– 192.168.201.12
NB.
DATA
port
IP
Address
must
be
on
a
different
subnet
to
the
CTRL
port
IP
Address .
The
Switch
can
be
configured
for
separate
VLANs
for
the
control
and
data
traffic .
This
is
up
to
the
installer /customer
preference .
If
the
Storage
device
has
two
NICs
you
may
wish
to
set
one
to
the
CTRL
subnet
and
the
other
to
the
DATA
subnet .
If
only
one
NIC
is
available
set
two
IP
addresses
for
the
one
NIC .
Server
CTRL
IP
– 192.168.101.5
DATA
IP
– 192.168 .201 .5
Figure 3 - Network Storage connection example
The XCT-S10 requires that the CTRL IP address and the DATA IP address are required to
be on separate subnets. This can be used to separate CTRL and DATA traffic through the
use of VLANs on a switch.
Bulletin No.: 036
19
th
February, 2013
SRX-R515P
DCinema Bulletin Archive:
https://filex.sony-europe.com/
Login and navigate to
Dealers/Digital Cinema Bulletins
folder
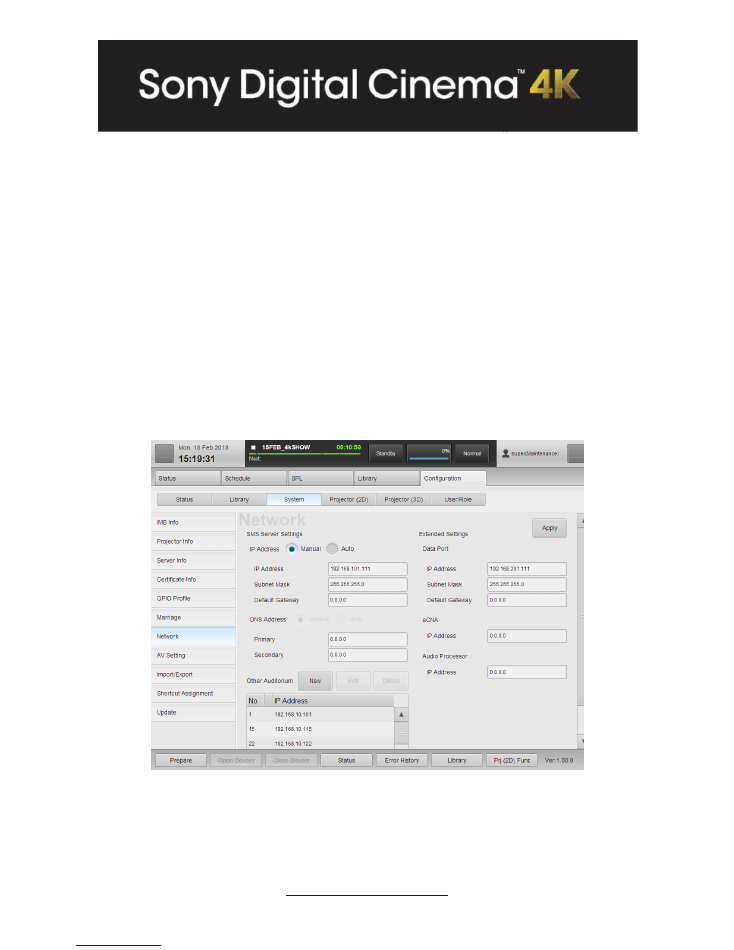
Configuring SRX-R515P IP addresses
To configure the IP address of the SRX-R515P login to the GUI on the touchscreen. Go to
Configuration > System > Network.
Select Manual IP Address. In the screen shot below the following details were used.
SMS
Server
Setting
IP Address – 192.168.101.111
Subnet Mask – 255.255.255.0
Default Gateway – 0.0.0.0
Data
Port
Setting
IP Address – 192.168.201.111
Subnet Mask – 255.255.255.0
Default Gateway – 0.0.0.0
Figure 4 - IP Settings for SRX-R515P

Bulletin No.: 036
19
th
February, 2013
SRX-R515P
DCinema Bulletin Archive:
https://filex.sony-europe.com/
Login and navigate to
Dealers/Digital Cinema Bulletins
folder
Configuring Storage Server IP Addresses
The storage server or PC that you wish to connect to the R515 will require an IP address on
the same subnet as the CTRL Port to access the GUI, and an IP address on the same
subnet as the DATA port for the server to be seen as a DCP/KDM source.
This can be achieved in two ways either give separate IPs to two NICs on the server, or
configure one NIC with two IP addresses. Below is the procedure to configure one NIC with
two IP addresses on Windows Server 2008 R2.
Configuring
two
IP
addresses
on
Windows
Server
2008
Log on to the server/PC you wish to access the R515 from.
Go to Start Menu > Control Panel > Network and Sharing Centre > Network Adapters.
Right Click on the Network adapter and select Properties > Internet Protocol Version 4
properties.
The following screen will appear.
Figure 5 IP4 properties
Select ‘Use the following IP Address’ and enter an IP in the CTRL in Subnet range. Since
the CRTL in IP is 192.168.101.111 this was chosen as 192.168.101.5.
To add a second IP address to the NIC click the ‘Advanced’ button, then click add to the IP
address section. Since the DATA in IP is 192.168.201.111 this was chosen as
192.168.201.5.

Bulletin No.: 036
19
th
February, 2013
SRX-R515P
DCinema Bulletin Archive:
https://filex.sony-europe.com/
Login and navigate to
Dealers/Digital Cinema Bulletins
folder
Figure 6 - Adding 2nd IP address to Server
Accessing SRX-R515P GUI over the network
Once the IP addresses are set on the projector and the server/PC you are ready to access
the R515 GUI on the remote server/PC.
You are required to install the latest Chrome or Firefox v14 and above browser for this
purpose, Internet Explorer does not work.
Enter the following address into the browser:
https://xxx.xxx.xxx.xxx/EvansGUI/run.html
xxx.xxx.xxx.xxx = IP address of CTRL in port of projector
A certificate issue with the website may occur, press “proceed anyway” to continue to the
GUI screen. Please see the SRX-R515P installation manual for more details on how to avoid
this message.
Bulletin No.: 036
19
th
February, 2013
SRX-R515P
DCinema Bulletin Archive:
https://filex.sony-europe.com/
Login and navigate to
Dealers/Digital Cinema Bulletins
folder
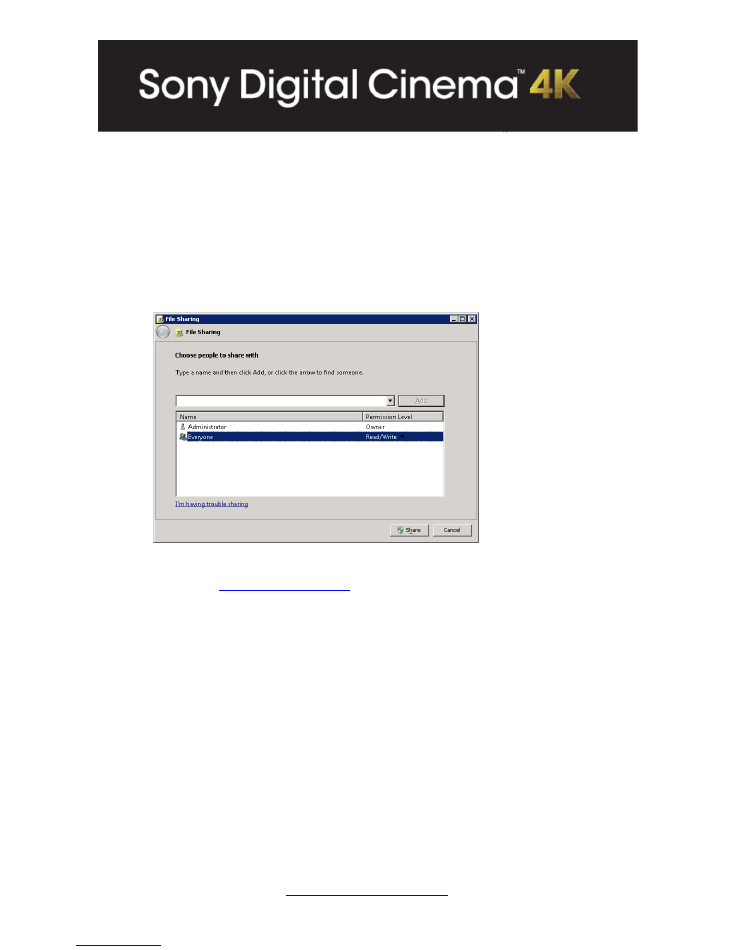
Setting up a folder share for DCP/KDM ingest over the network
On the server/PC you wish to setup a folder for ingesting DCP and KDM content to the R515
follow the steps below.
1- Right click on the desktop and create a new folder.
2- Rename the folder ‘library1’
3- Right Click on the folder and select ‘share with’ then ‘specific people’
4- Enter everyone with read/write permissions.
5- Click share and note the share location. Substitute the Server/PC with the DATA IP
address of the server.
a. E.g.
\\192.168.201.5\library1
6- This will give all users of the server/PC access to this share folder.
7- Copy DCPs into this folder which you wish to share with the SRX-R515P (make sure
you copy them into separate folders).
8- Inside this Library1 folder if you create a folder named ‘KDM’ you can place KDMs in
this folder which can be browsed to for KDM ingest.
Bulletin No.: 036
19
th
February, 2013
SRX-R515P
DCinema Bulletin Archive:
https://filex.sony-europe.com/
Login and navigate to
Dealers/Digital Cinema Bulletins
folder
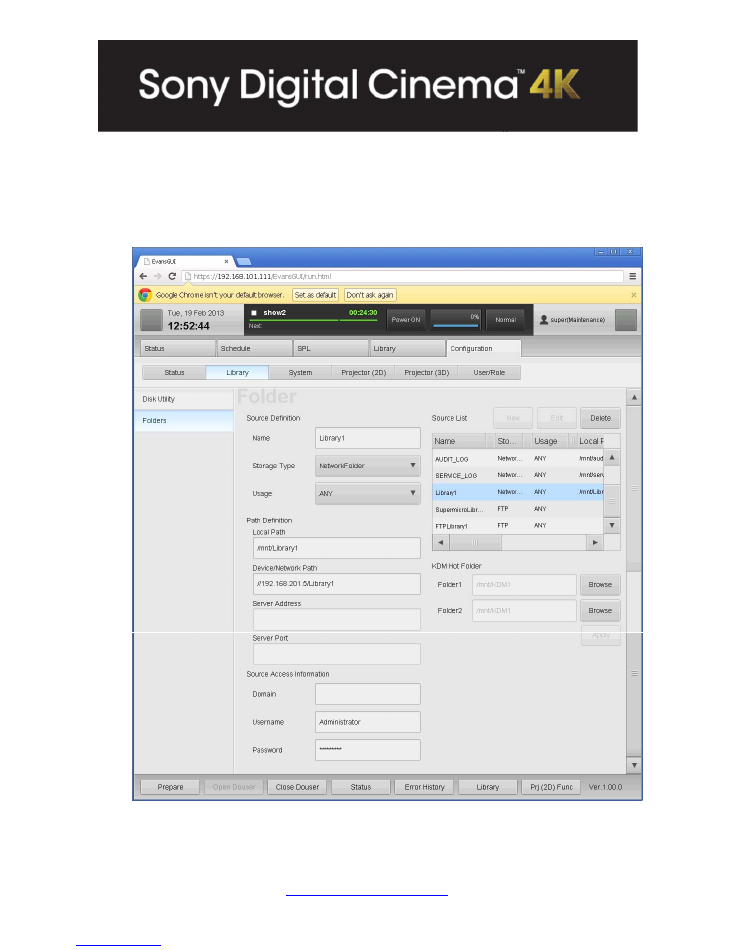
Configuring R515 to access a folder share for DCP/KDM ingest
1- Login to the R515 GUI using the webpage address
2- Go to Configuration tab > Library tab > Folders tab
3- Enter the following information
a. Name
–
Library1
b. Storage Type –
Network Folder
Bulletin No.: 036
19
th
February, 2013
SRX-R515P
DCinema Bulletin Archive:
https://filex.sony-europe.com/
Login and navigate to
Dealers/Digital Cinema Bulletins
folder
c. Usage
–
ANY
d. Local Path - /mnt/Library1
e. Device/Network Path - //192.168.201.5/Library1
i. Not these are forward slashes, and the IP is the DATA IP of
Server/PC
f. Domain
–
enter domain of Server/PC
g. Username
-
enter user of Server/PC
h. Password
-
enter password of Server/PC
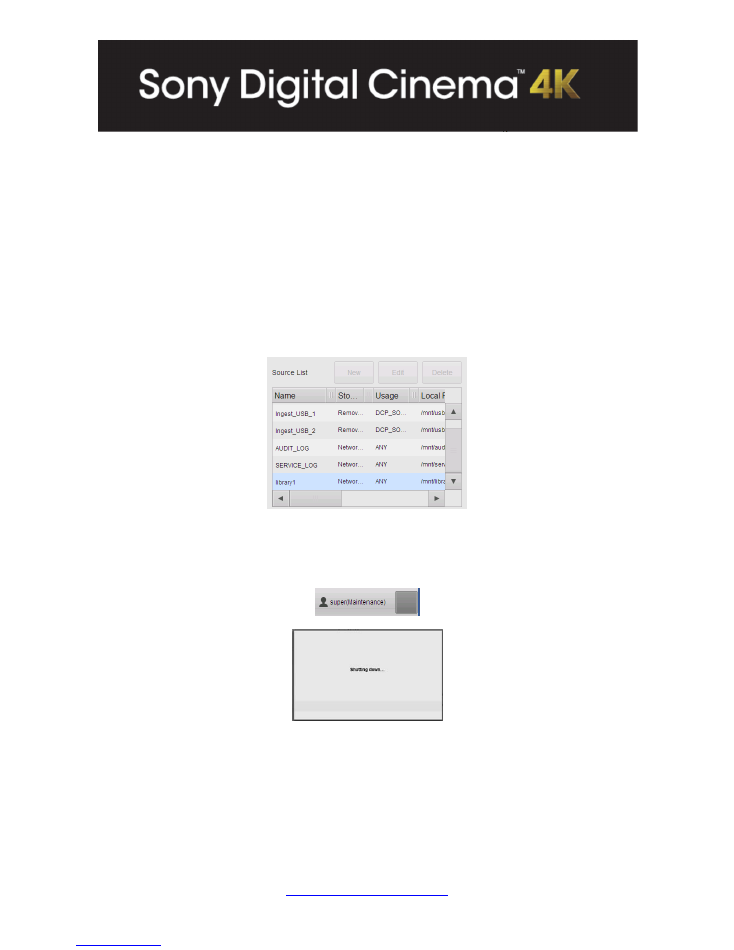
4- Click ‘New’ next to source list at the top left to apply settings
5- The source is now shown in the list
Figure 7 - Source List
6- Shutdown the SRX-R515P via the GUI (grey box at the top right) and turn off
projector head breaker. Power on the projector head breaker and then the XCT-S10.
Figure 8 - Power off button
Be aware that the GUI will disconnect once it begins to shut down and will remain on
this same screen when it is viewed remotely via a browser. It will not show you when
the R515 has completed the shutdown. Typically a shutdown takes a few minutes.
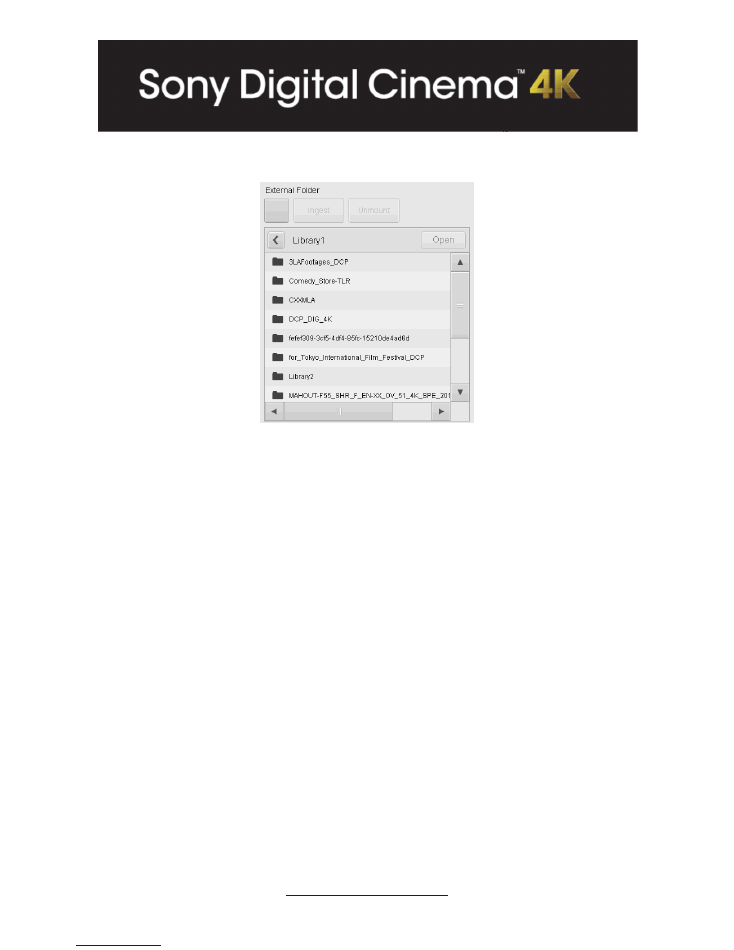
7- Login and go to Library > External Folder list then click ‘Open’. A list of DCPs will be
shown. Select and open required DCP folder, then select DCP file and click Ingest.
Bulletin No.: 036
19
th
February, 2013
SRX-R515P
DCinema Bulletin Archive:
https://filex.sony-europe.com/
Login and navigate to
Dealers/Digital Cinema Bulletins
folder
Figure 9 - External Folder DCP List via Network Share
A typical network share ingest speed is around 40-50MB/s which will result in a typical 2hour
feature to be ingested in around 1 hour.
Bulletin No.: 036
19
th
February, 2013
SRX-R515P
DCinema Bulletin Archive:
https://filex.sony-europe.com/
Login and navigate to
Dealers/Digital Cinema Bulletins
folder
Configuring R515 to access a FTP server for DCP/KDM ingest
The procedure below assumes that a FTP server is setup on the server/PC with a user
account that has the library as the FTP root folder.
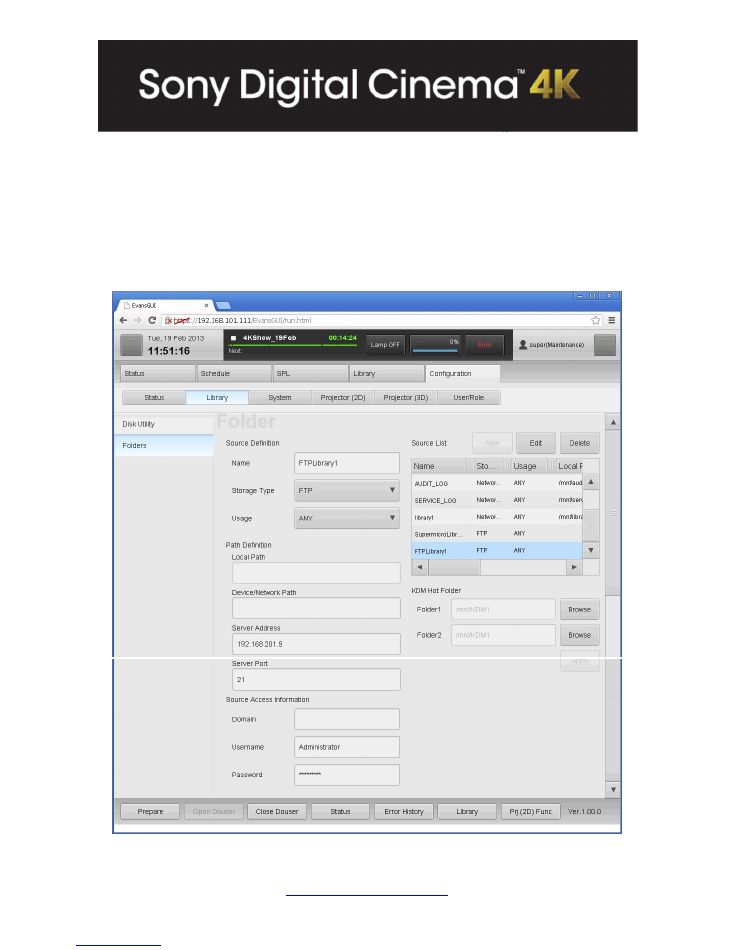
1- Login to the R515 GUI using the webpage address
2- Go to Configuration tab > Library tab > Folders tab
8- Enter the following information
Bulletin No.: 036
19
th
February, 2013
SRX-R515P
DCinema Bulletin Archive:
https://filex.sony-europe.com/
Login and navigate to
Dealers/Digital Cinema Bulletins
folder
a. Name
–
FTPlibrary1
b. Storage Type –
FTP
c. Usage
–
ANY
d. Server Address –
192.168.201.5 (Server/PC Data IP)
e. Server
Port
-
21
f. Domain
–
enter domain of Server/PC
g. Username
-
enter user of Server/PC
h. Password
-
enter password of Server/PC
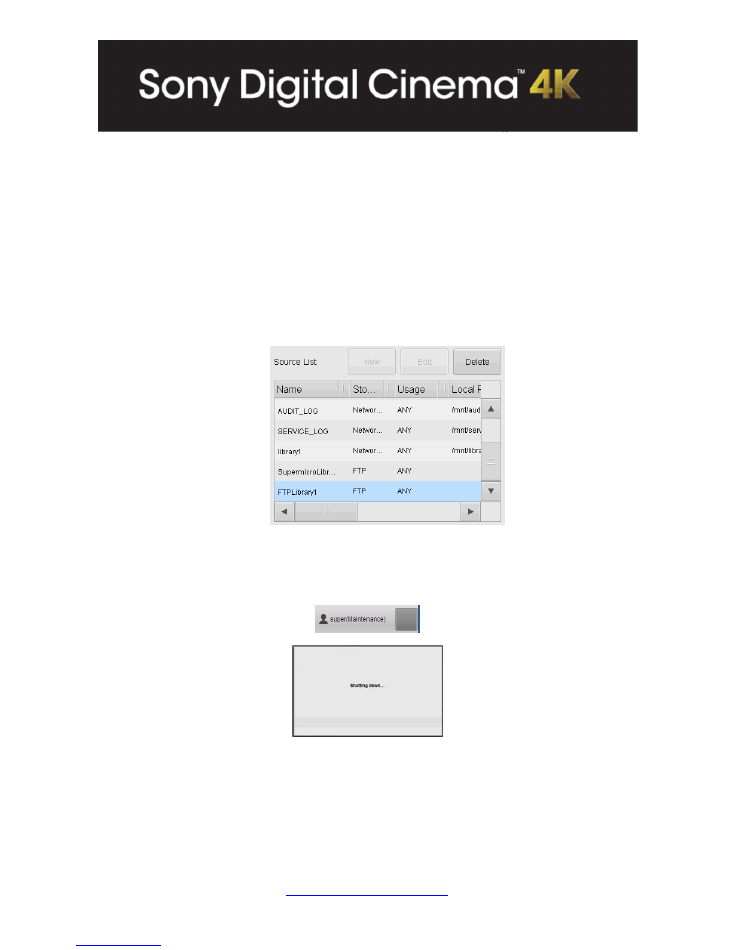
9- Click ‘New’ next to source list at the top left to apply settings
10- The source is now shown in the list
Figure 10 - Source List
11- Shutdown the SRX-R515P via the GUI (grey box at the top right) and turn off
projector head breaker. Power on the projector head breaker and then the XCT-S10.
Figure 11 - Power off button
Be aware that the GUI will disconnect once it begins to shut down and will remain on
this same screen when it is viewed remotely via a browser. It will not show you when
the R515 has completed the shutdown. Typically a shutdown takes a few minutes.
Bulletin No.: 036
19
th
February, 2013
SRX-R515P
DCinema Bulletin Archive:
https://filex.sony-europe.com/
Login and navigate to
Dealers/Digital Cinema Bulletins
folder
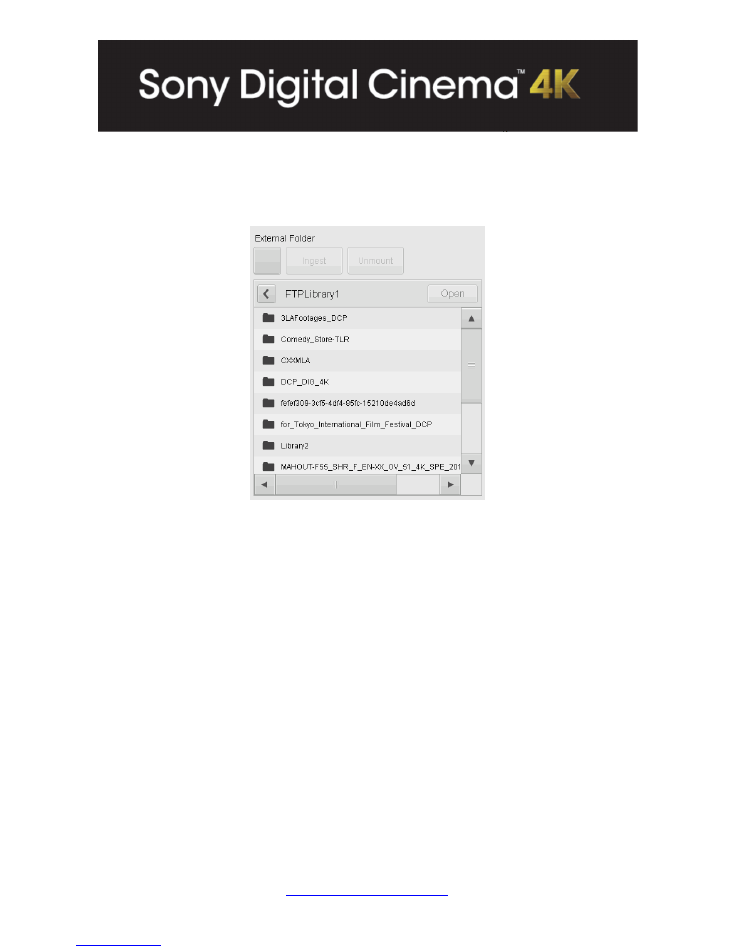
12- Login and go to Library > External Folder list then click ‘Open’. A list of DCPs will be
shown. Select and open required DCP folder, then select DCP file and click Ingest.
Figure 12 - External Folder DCP List via FTP
A typical network share ingest speed is around 100MB/s which will result in a typical 2hour
feature to be ingested in around 30 minutes.