Full Text Searchable PDF User Manual
VE
NTI
LAD
O
R R
ECARGAB
LE
CO
N R
AD
IO Y LÁM
PAR
A D
E L
ED
Manual de U
so
Modelo: KU33006
RE
CHARG
EAB
LE M
IN
I F
AN
W
ITH AM
/F
M R
AD
IO & L
ED L
IG
HT
User Manual
Model: KU33006
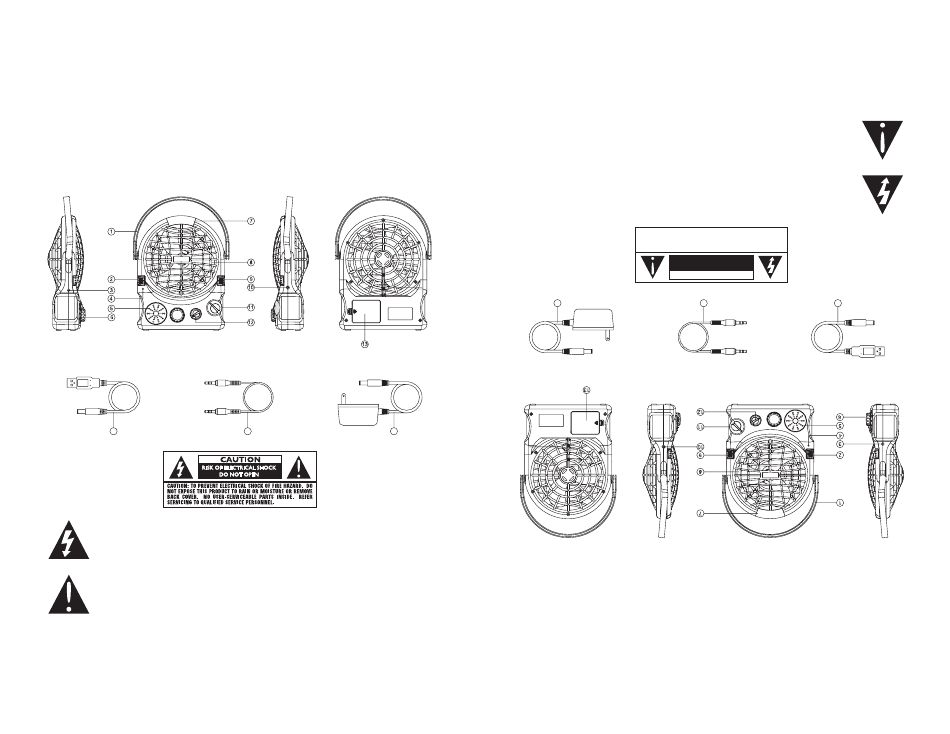
WARNING:
TO REDUCE THE RISK OR FIRE AND ELECTRIC SHOCK. DO NOT EXPOSE
THIS APPLIANCE UNDER RAIN OR MOISTURE.
The lightning flash with arrowhead symbol, within an equilateral triangle, is
intended to alert the user to the presence of uninsulated. "dangerous volt-
age" within the product's enclosure that may be of sufficient magnitude to
constitute a risk of electric shock to persons.
The exclamation point within an equilateral triangle is intended to alert
the user to the presence of important operating and maintenance (ser-
vicing) instructions in the literature accompanying the appliance.
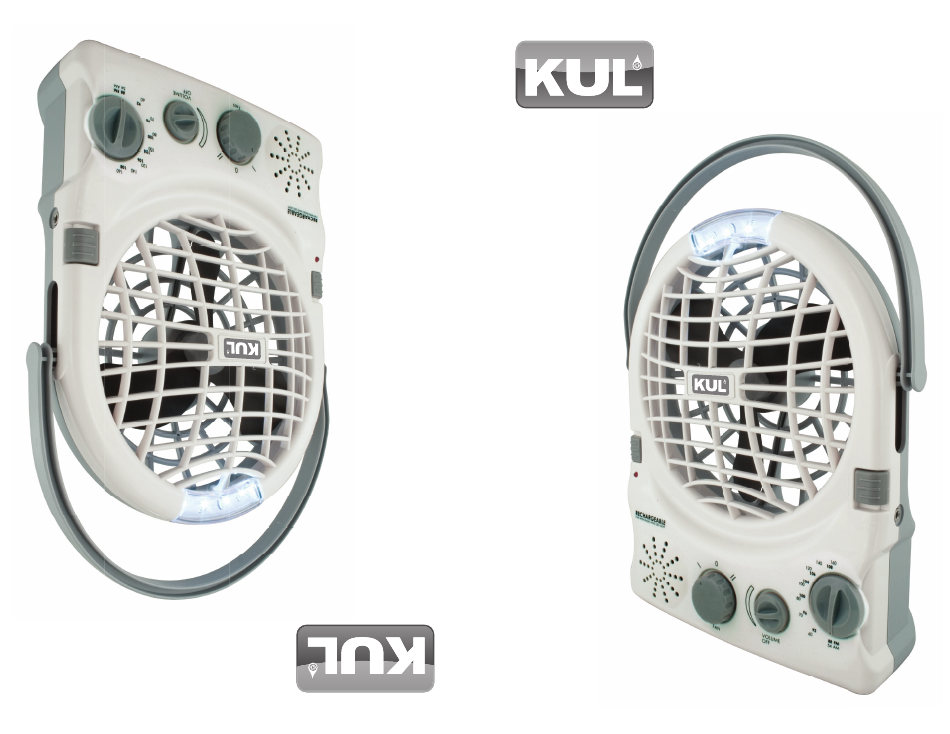
1. HANDLE
2. LIGHT SWITCH
3. DC JACK
4. CHARGE INDICATOR
5. SPEAKER
6. FAN SWITCH
7. LIGHT
8. FAN BLADE
9. AM/FM SWITCH
10. AUDIO JACK
11. TUNING KNOB
12. VOLUME KNOB
13. BATTERY DOOR
14. USB CABLE
15. AUDIO CABLE
16. EXTERNAL ADAPTOR
14
15
16
FEATURES
IB385B01.indd 1
6/24/08 9:56:32 AM
1
ADVERTENCIA:
1. Mango
2. Botón de encendido de la luz
3. Entrada DC
4. Indicador de carga
5. Altavoz
6. Botón de encendido
7. Lámpara
8. Aspas
9. Para cambiar AM/FM
10. Entrada de audio
11. Perilla de sintonización
12. Perilla de Volumen
13. Tapa de batería
14. Cable USB
15. Cable de audio
16. Cable de corriente
14
15
16
CARACTERÍSTICAS
IB385B01.indd 1
6/24/08 9:56:32 AM
PRECA
UCIÓN
RIESGO DE DESCARGA ELÉC
TRICA
NO ABRIR
PRECAUCIÓN:
CON
EL FIN DE E
VITAR UNA DESC
ARGA ELÉCTRIC
A O EL RIESGO DE
QUE SE
OCASIONE UN INCENDIO
, NO EXPONGA ESTE PRODUCTO A L
A LLUVIA O A L
A HUMED
AD
NI RETIRE LAS CUBIER
TAS. NO SE ENC
ONTRAR
Á PIEZAS ÚTILES DENTRO
. TODO SERVICIO
TÉCNICO DEBE LLE
VARSE C
ABO POR PAR
TE DEL PERSONAL CALIFIC
ADO.
La figura de un r
ayo de luz en f
orma de flecha den
tro de un tr
iángulo equiláter
o
tiene como fin aler
tar al usuario de la pr
esencia de voltaje no aislado y pelig
roso
en la parte in
ter
na del produc
to, suficien
temen
te alt
o como par
a repr
esentar un
riesgo de una descar
ga eléctr
ica para una persona.
El signo de e
xclamación den
tro de un tr
iángulo equiláter
o tiene como fin aler
tar
al usuario de la pr
esencia de instrucciones impor
tantes de ser
vicio técnic
o y de
mantenimien
to en los manuales que ac
ompañan el electr
odoméstico.
CON EL FIN DE REDUCIR EL RIESGO DE QUE SE PR
ODUZCA UN INCENDIO O UNA
DESCAR
GA ELÉCTRIC
A, NO EXPONGA ESTE ELECTR
ODOMÉSTICO A LA LL
UVIA O
A LA HUMEDAD
.
1

IB385B01.indd 1
6/24/08 9:56:32 AM
IMPOR
TANT
ES
ADVERTENCIA CON RESPECTO A LA BATERÍA
DE ÁCIDO DE PLOMO RECARGABLE
INSTRUCCIONES DE FUNCIONAMIENTO
1. Por fa
vor lea el manual de instruc
ciones deteni
-
damente an
tes de utilizar el v
entilador r
ecargable
.
2. Asegúr
ese de con
tar con el v
oltaje eléctr
ico
cor
rec
to an
tes de enchufar
.
3. Pr
oceda
a recar
gar el apar
ato cuando
la luz se
tor
ne tenue o el v
entilador funcione len
tamente
.
4. Asegúr
ese de mantener los bot
ones en la
posición “OFF
” (apagado
) cuando no se vay
a a
utilizar el aparat
o.
5. La eficiencia del electr
odoméstico podr
ía
disminuir si se utiliza o se recar
ga cuando la
temper
atur
a se encuentr
e por debajo de los
32 °F (0 °C) o por encima de los 104 °F (40 °C
).
6. Man
tenga el elec
trodoméstic
o lejos del agua
o de la lluvia.
1. El cargador de las ba
ter
ías sólo debe utilizarse
para car
gar la bater
ía de ácido de plomo sellada.
No inten
te r
ecargar otr
o tipo de bater
ías o
bater
ías no recar
gables.
A VENTIL
ADOR A VEL
OCIDAD AL
TA – B
AJA
1. Coloque el bot
ón del ven
tilador (No. 6) en la
posición LOW (bajo
) o HIGH (alto) par
a con
tar
con v
elocidad baja o alta del ven
tilador.
2. Coloque el bot
ón en la posición “OFF
” par
a
detener el funcionamien
to.
B) LUZ LED
Coloque el bot
ón de encendido ON/OFF de la luz
LED (No. 2) en la posición
“ON
” . La luz LED se
encender
á inmediatamen
te. P
resione par
a colocar
en “OFF
” y pr
oceder a apagar
.
C) S
ección de la R
ADIO
• RADIO A
M
Rango de fr
ecuencia 540 Khz – 1600 K
hz
• RADIO F
M
Rango de fr
ecuencia: 88 Mhz – 108 Mhz
1. Coloque el selec
tor de A
M/FM (No
. 9) en la
posición AM o F
M.
2. R
egule la
perilla
de v
olumen (No
. 12)
para
encender la r
adio y obtener el niv
el de sonido
deseado.
3. Selec
cione la emisora de r
adio deseada girando
la perilla de sin
tonización (No
. 11).
D) ENTR
ADA DE A
UDIO
1. Conec
te el c
onector de audio de 3.5mm del
dispositivo de audio a la en
trada de audio (No
. 10)
2. Encienda el dispositivo de audio y c
oloque el
selector de la r
adio (No. 9) en
la posición AM o
FM par
a con
tar con la salida de audio
.
3. R
egule el
con
trol
de v
olumen (No
.12) par
a
con
tar con el niv
el de sonido deseado.
4. Coloque la per
illa de con
trol de v
olumen (No.
12) en la posición “OFF
” par
a apagar.
2. Dur
ante la r
ecarga o el uso de
la bater
ía de ácido de plomo,
el electr
odoméstico debe
encon
trarse en un lugar c
on
una buena ven
tilación.
3. Prest
e atención a la c
olocación de la bater
ía
recar
gable con r
especto a las polar
idades (+) y
(-). No lleve a cabo c
onexiones de cir
cuitos
, no
coloque las ba
ter
ías en el fuego y evite la
recar
ga en rev
erso.
4. Par
a recar
gar la bater
ía, colóquela den
tro del
cargador pr
estando atención a las
polaridades
. Después de utilizar la ba
ter
ía,
proc
eda a recar
gar por lo menos unas 20 horas
para c
ontar c
on una carga c
ompleta.
5. Si existier
a una fuga de parte
de la bater
ía,
retír
ela del electrodoméstic
o con cuidado
.
Proc
eda a reciclar o a desechar la ba
ter
ía de
ácido de plomo adecuadamente
.
6. La bater
ía debe retir
arse del electr
odoméstico
antes de desechar
lo.
7. Al momen
to de desechar la ba
ter
ía, colóquela
dentro del c
ompartimien
to c
on la tapa puesta
en su lugar.
8. El
electr
odoméstico
debe enc
ontrarse
desen-
chufado antes de pr
oceder a r
etirar la ba
ter
ía.
2
IB385B01.indd 1
6/24/08 9:56:32 AM
IMPORTANT NOTES
1. Please read the instruction manual
c a r e f u l l y b e fo r e o p e ra t i n g t h e
rechargeable fan unit.
2. Make sure the electric voltage correct
before plugging in.
3. Please recharge the unit when light
goes dim or the fan goes slow.
4. Make sure the switches must be in
"OFF" position when not in use.
5. The efficiency may decrease if the unit
is used or charged when temperature
is below 32ºF (0ºC) or above 104ºF
(40ºC).
6. Please keep out of reach of water or
rain for proper use.
MODE OF OPERATION
A) FAN WITH HIGH-LOW SPEED
1. Place the Fan Switch (No.6) to "LOW"
or "HIGH" position to achieve low or
high speed of fan.
2. Place it to "OFF" postion to end the
operation.
B) LED LIGHT
Place the LED light ON/OFF switch
(No.2) in "ON" position, the LED will light
up immediately. Push to "OFF" position
to end the operation.
C) RADIO section
• AM RADIO
Frequency range: 540KHz - 1600 KHz
• FM RADIO
Frequency range: 88MHz - 108 MHz
1. Place the AM/FM selector (No.9) in
"AM" or "FM" position.
2. Adjust the volume knob (No.12) to turn
on the radio and to give the desired
level of sound.
3. Select desired radio station by the
tuning knob (No.11).
D) AUDIO OUTPUT
1. Connect the 3.5mm audio plug
of your audio device to audio jack
(No.10).
e
c
a
l
p
,
e
c
i
v
e
d
o
i
d
u
a
r
u
o
y
n
o
h
c
ti
w
S
.
2
the raido selector (No.9) in “AM” or
“FM” position to output the audio.
o
t
)
2
1
.
o
N
(
l
o
r
t
n
o
c
e
m
u
l
o
v
e
h
t
t
s
u
j
d
A
.
3
give the desired level of sound.
4. Adjust the volume control (No.12) in
“OFF” position to end the operation.
WARNING FOR THE RECHARGEABLE
LEAD ACID BATTERY.
1. This Rechargeable Lantern is only
a p p l i c a b l e f o r c h a r g i n g t h e
sealed Lead-Acid battery. Do not
charge with different types or non-
rechargeable batteries.
2 . D u r i n g u s i n g o r
recharging the lead-
a c i d b a t t e r y , t h e
a p p l i a n c e m u s t b e
p l a c e d i n a w e l l
ventilated area.
3. The or ientation of the lead-acid
battery with regard to polarity battery
contact(+)&(-). Do not short circuit or
put into fire, avoid reverse charging.
4. Regarding safe disposal of used lead-
acid batteries, insert the batteries into
battery charger according to the
lead-acid battery polarity. After use,
charge the lead-acid battery at least
20 hours every time to achieve full
charge condition.
5. Leaking lead-acid batter y must
be removed from the appliance
carefully. The lead-acid battery must
be recycled or disposed of properly.
6 . T h e l e a d - a c i d b a t t e r y m u s t b e
removed from the appliance before
it is scrapped.
7.The lead-acid battery is to be disposed
of safely by putting into batter y
compartment with cover.
8.The appliance must be disconnected
from power supply before removing
the battery.
2
IB385B01.indd 1
6/24/08 9:56:32 AM
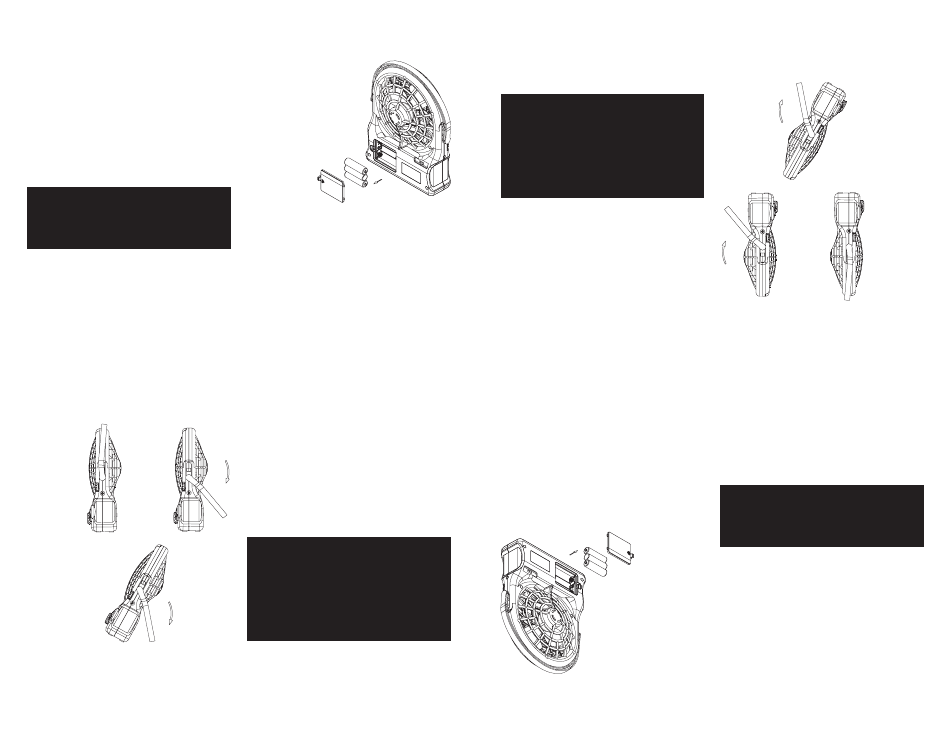
HOW TO OPERATE WITH DRY BATTERIES
(SEE DRAWING 1)
BATTERY SPEC.: AA Alkaline x 3pcs
1. Open the battery door (No.13).
2. Insert the dry batteries according to
correct directions.
3. Close the battery door (No.13).
HOW TO STAND THE UNIT ON TABLE (SEE
DRAWING 2)
1. Pull the handle (No.1) upside.
2. Turn the handle backward to suitable
angle for standing.
IB385B01
HOW TO RECHARGE THE UNIT
NOTE:
Before recharging, please make
sure the switches must be in "OFF"
position.
1. Connect the DC jack (No.3) to wall
socket with external DC adaptor or
USB cable provided..
2. The red charging indicator (No.4) will
light up indicating the unit is under
charging.
WARNING:
PLEASE DO NOT SHOR T CIRCUIT
BATTERY CONTRACT (+) & (-) OR PUT
INTO FIRE.
WARNING:
To avoid electric shock, please do
not open the unit for repairing or
cleaning unless by qualified person.
If the supply cord is damaged, it must
be replaced by the manufacturer,
its service agent or similarly qualified
persons in order to avoid a hazard.
DRAWING 1
TECHNICAL SPECIFICATIONS
Input voltage................................DC/5V
External Adaptor Spec..........DC/5V 500mA
Radio Frequency….............AM : 540KHz - 1600KHz
FM : 88MHz - 108 MHz
Operating Temperature……….......... 0ºC-40ºC
Humidity……………..……..........lower than 90%
Charging Time
External Adaptor.......................10 Hours
USB..............................................22 Hours
LED Spec................Super Bright LED x 4pcs
Battery Spec
Rechargeable Battery.................Lead Acid 4V
Dry Battery.........................AA Alkaline x 3pcs
Duration Time
Rechargeable Battery:
LED Light....................................22 Hours
Fan (Low Speed).........................8 Hours
Fan (High Speed)........................4.5 Hours
Radio.............................................12 Hours
MAINTENANCE:
Use a small cotton swab with cleaning
alcohol to clean the lamp apparatus,
never use strong or volatile chemical to
clean the fan, for damage will be made
to the plastic parts.
DRAWING 2
3
IB385B01.indd 1
6/24/08 9:56:32 AM
CÓMO UTILIZAR CON BATERÍAS SECAS
(VÉASE LA FIGURA 1)
ESPECIFICACIONES DE LAS BATERÍAS:
Alcalina AA x 3 unidades
CÓMO COLOCAR EL EQUIPO SOBRE UNA
MESA (VÉASE LA FIGURA 2)
IB385B01
CÓMO RECARGAR EL ELECTRODOMÉSTICO
NOTA:
ADVERTENCIA
ADVERTENCIA:
FIGURA 1
ESPECIFICACIONES TÉCNICAS
MANTENIMIENTO
FIGURA 2
1. Conec
te la en
trada CD (No
. 3) al tomac
orrien
te
utilizando un adaptador ext
erno DC o el cable USB
que viene incluido.
2. La luz indicadora de r
ecarga (No
. 4) se iluminará
en señal de que el equipo se encuentra car
gándose.
Utilic
e un hisopo de algodón y alcohol par
a limpiar
la lámpara del apar
ato
. Nunca utilice químic
os
fuertes o v
olátiles par
a limpiar el ven
tilador ya que
esto puede dañar las par
tes de plástic
o.
Voltaje de en
trada
DC/5V
Especificaciones del adaptador e
xterno
DC/5V 500mA
Frec
uencia de la radio
AM 540K
hz – 1600Khz
FM 88Mhz – 108Mhz
Temper
atur
a de funcionamiento
0 °C – 40 °C
Humedad
menor de 90%
Tiempo de r
ecarga
Adaptador e
xterno
10 horas
USB
22
horas
Especificaciones LED
LED ultra brillan
te x 4 U
Especificaciones de la ba
tería
Batería r
ecargable
Ácido de plomo 4V
Batería sec
a
Alcalina AA x 3 unidades
Tiempo de dur
ación
Batería r
ecargable
Luz LED
22 horas
Ven
tilador (velocidad baja)
8 horas
Ven
tilador (velocidad alta)
4.5 horas
Radio
12
horas
1. Abr
a el compar
timiento de las ba
ter
ías (No. 13).
2. Coloque las ba
ter
ías secas conf
orme a las
polaridades c
orrec
tas.
3. Proc
eda a colocar la tapa del c
ompartimien
to en
su lugar (No. 13).
1. Coloque el mango (No
. 1) hacia arriba.
2. Gire el
mango hacia atrás hasta alcanzar un
ángulo apropiado par
a apoyar el equipo
.
Ant
es de proc
eder con la r
ecarga, asegú
-
rese de que los bot
ones se encuentren en
la posición “
OFF”.
NO EFECTÚE C
ONEXIONES DE LOS CIR
CUITOS
CON L
OS CONT
ACT
OS DE LA BATERÍA (+)
Y
(-) NI COL
OQUE LAS BATERÍAS EN EL FUEGO
.
Con el fin de evitar una descar
ga eléctrica, no abr
a el
aparat
o para ef
ectuar r
eparaciones o limpieza a
menos que sea por parte de una persona calificada.
Si el cor
dón se dañara, ést
e debe remplazarse por
parte del fabr
icante
, su repr
esentan
te de ser
vicio
técnic
o o cualquier otra persona calificada c
on el fin
de evitar cualquier even
tualidad.
3