Full Text Searchable PDF User Manual

Electronic Scale
0
Contents
Fixing the Weighing
Pan
----------------------------------------------------------------------
1
Protection Device
Disassembly Steps
----------------------------------------------------------------------
1
Precautions
----------------------------------------------------------------------
1
Descriptions of Keys ----------------------------------------------------------------------
2
Functional Operation
of Keys
----------------------------------------------------------------------
2
Panel Illustration
----------------------------------------------------------------------
3
Single Point
Calibration of Weight
----------------------------------------------------------------------
3
Linearity Calibration
of Weight
----------------------------------------------------------------------
4
Parameter Setting
----------------------------------------------------------------------
5
Parameter Functional
Description
----------------------------------------------------------------------
6
Units Conversion
Table
----------------------------------------------------------------------
7
Cross-reference
Table of Full Loads
----------------------------------------------------------------------
7
RS-232 Serial
Interface
----------------------------------------------------------------------
8
Electronic Scale
1
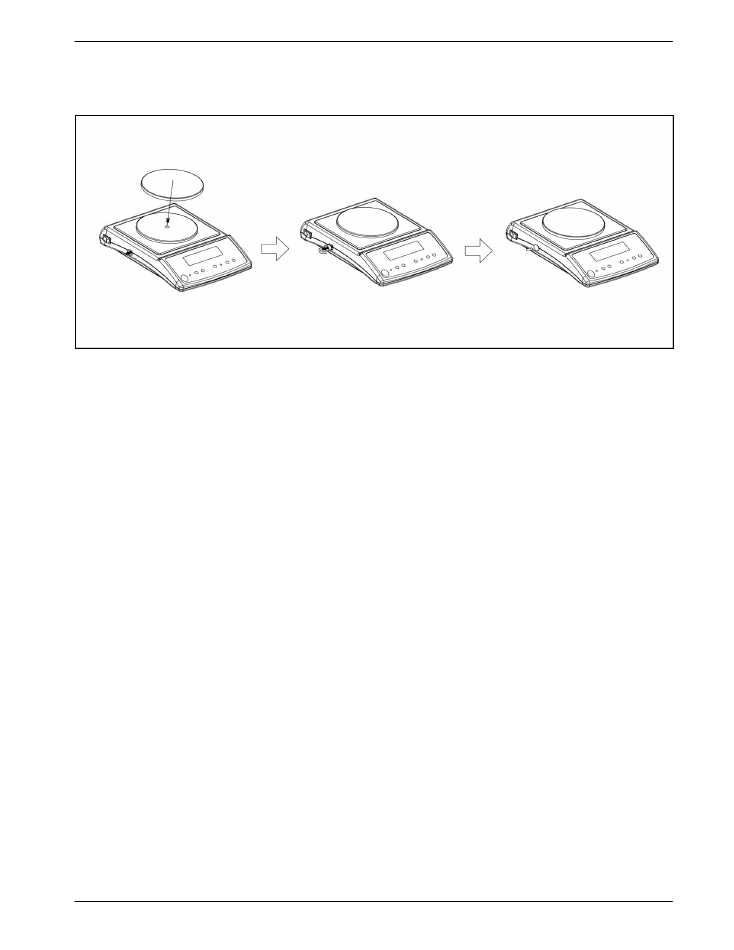
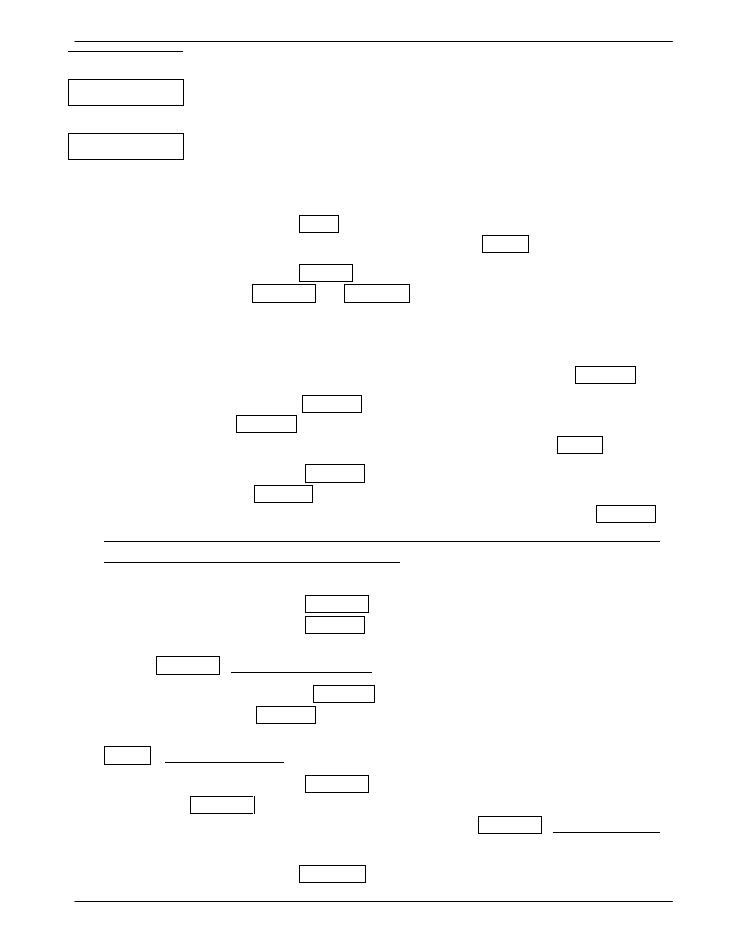
Weighing Pan Fixing Steps
1. When installing the
weighing pan, tighten the
fixing screw in the centre of
the plastic weighing pan.
2. Unscrew and remove the
shipping protection screw on
the side of the scale.
3. After removing the shipping
protection screw on the side of
the scale, fasten the shipping
protection buckle.
Protection Device Disassembly Steps
1. In the upright position, locate the shipping protection screw device on the left side of the
scale.
2. Before using the scale, unscrew counterclockwise and remove the shipping protection
screw.
3. Before transporting the scale, hold the shipping protection screw down inwards and tighten
it clockwise.
Precautions
1. Please pay attention to the environment when performing weight calibration on the
scale. Avoid wind blow and vibration.
2. Use of wrong batteries or wrong wiring may cause danger.
3. 10 minutes warm up till the RED light off before activating the scale.
Electronic Scale
2
Descriptions of Keys
ON/OFF:
The on/off key for switching on/off the equipment.
ZERO:
The zero key for resetting the equipment, functional only when weight is within 4% of the weighing
capacity.
TARE:
The tare key for deducting the weight of container on the weighing pan.
MODE:
The switching key to select weighing, counting and percentage modes in turn.
UNIT:
Weighing units switching key. (13 kinds of units)
SMPL:
In the weighing mode, the key is for switching on/off backlight; in the counting and percentage
modes, the key is for sampling, by pressing which, you may select sample size of 20, 50, 100, 200
or 500 in turn.
Functional Operation of Keys
Weighing:
Press
「
ON/OFF
」
key, the screen will have full display and start counting down. When the screen displays
0.00 X , you can start weighing. If you need backlight, press
「
SMPL
」
key.
Counting:
Press
「
MODE
」
key, the screen will show XXXX pcs, then press
「
SMLP
」
key, and the screen will show
S= 20pcs. You may select sample size of 20, 50, 100, 200 or 500 in turn by pressing
「
SMLP
」
in succession.
After selection, put the sample on the weighing pan and start counting operation when you hear a beep sound.
(Automatic averaging function is provided for simple counting)
Percentage:
Press
「
MODE
」
key, the screen will show XXXX % , then press
「
SMLP
」
key, and the screen will show
S= 20 % . You may select sample size of 20, 50, 100, 200 or 500 in turn by pressing
「
SMLP
」
in succession.
After selection, put the sample on the weighing pan and start using the percentage function when you hear a
beep sound.
Notes:
1. Min. unit weight of sample >=1 readability (e.g.: unit weight of sample of 300g is at least bigger than 0.01g)
2. When weight is unstable, the
STABLE
indicator will go off.
3. After warming up the machine, the
WARMING
indicator will go off.
Electronic Scale
3
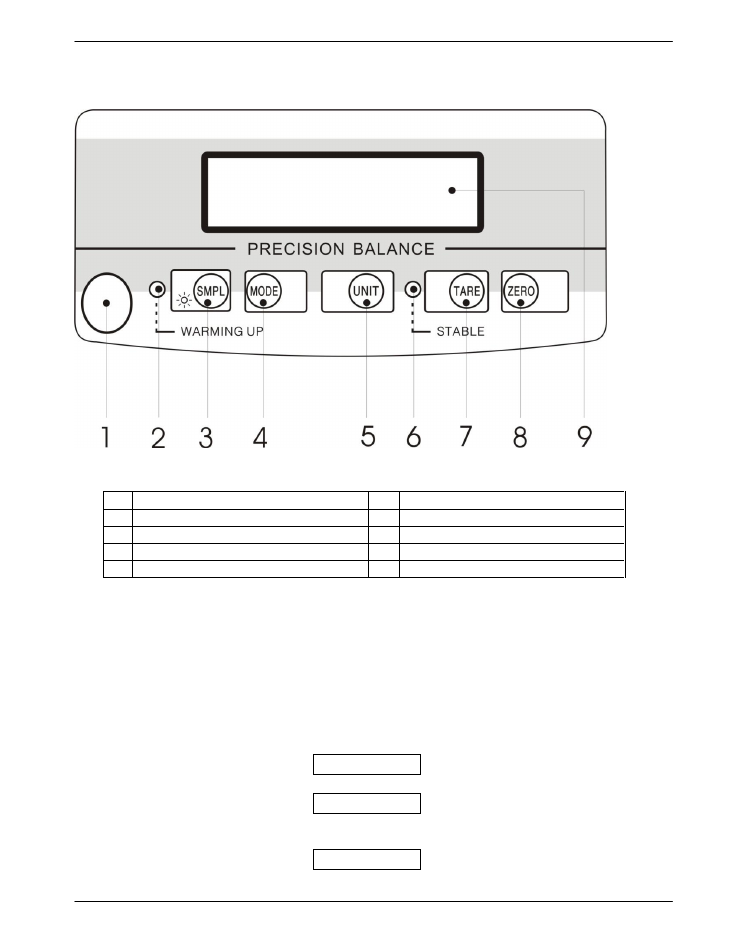
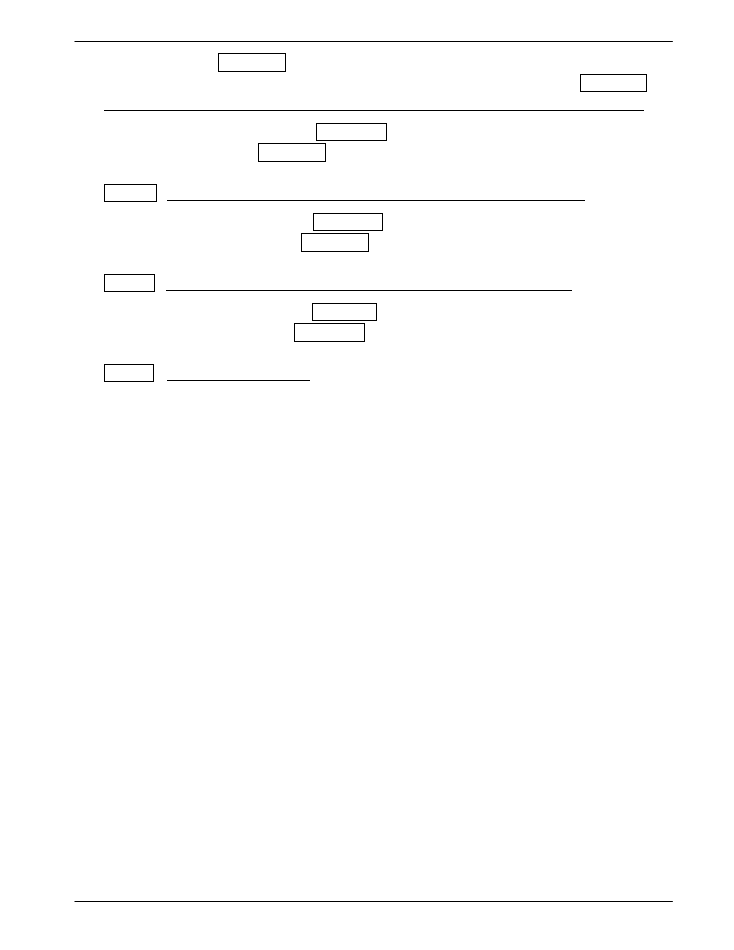
Panel Illustration
1
Level
6
Stable indicator
2
Warming up indicator
7
Tare key
3
Sampling/Backlight key
8
Zero key
4
Function selection key
9
Weight display window
5
Unit conversion key
Single Point Calibration of
Weight
Step 1:
Power off while holding down
「
MODE
」
key, and then press
「
ON/OFF
」
to switch
on the scale. The screen will show the following:
Count
Step 2:
Press the
「
MODE
」
key, the screen will show the following:
CAL
Step 3:
Press the
「
UNIT
」
key to start zero point calibration. Make sure there is nothing on
the weighing pan. The screen will show the following:
ZEro
Please wait for the screen to show:
Electronic Scale
4
CAL-S
The calibration can be done at the point of 1/3 load, 2/3 load or full load. Choose the one
you need and place the corresponding weight onto the pan.
If place 1/3 of load onto the pan, the
screen will show:
on1
If place 2/3 of load onto the pan, the
screen will show:
on2
If place full load onto the pan, the
screen will show:
on3
Step 4:
Place weights of equivalent weight onto the pan, wait for a beep sound and the
screen will show:
PASS
Step 5:
Press
「
MODE
」
and then press
「
SMPL
」
, the screen will show:
busy
Step 6:
After countdown, the single point calibration is completed and the scale returns to
the normal weighing mode.
Linearity Calibration of Weight
Step 1:
Power off while holding down
「
ZERO
」
and
「
TARE
」
keys, and then press
「
ON/OFF
」
to switch on the scale. The screen will show the following:
L-CAL
Step 2:
Clear the weighing pan, then press
「
TARE
」
and the screen will show the following:
(zero point calibration)
on0
Step 3:
Wait for a beep sound and the screen will show the following:
on1
Step 4:
Place 1/3 of load on the weighing pan in ten seconds ,Waiting for a beep sound and
the screen will show the following:
on2
Step 5:
Place 2/3 of load on the weighing pan in ten seconds ,Waiting for a beep sound and
the screen will show the following:
on3
Step 6:
Place full load on the weighing pan in ten seconds, Waiting for a beep sound and the
screen will show the following:
PASS
Step 7:
Clear the weighing pan, then press
「
TARE
」
and the screen will show the following:
busy
Electronic Scale
5
Step 8:
After countdown, the linearity calibration is completed and the scale returns to the
normal weighing mode.
Parameter Setting
Hold down
「
MODE
」
key, then press
「
ON/OFF
」
key to enter the setting mode. The screen
will show
Count
:
「
MODE
」
key:
To select functions;
「
UNIT
」
key:
To enter or exit
function setting selection;
「
SMPL
」
key:
To end setting.
LCD Display
Function
Selection
Selection
Page
「
MODE
」
key
「
UNIT
」
key
「
SMPL
」
key
Count
Internal value
display
Item 1, Page 6
↓
CAL
Single point auto
calibration
Page 3
↓
unit
Weight unit
selection
g
、
ct
、
lb
、
oz
、
dr
、
GN
、
ozt
、
dwt
、
MM
、
tl.j
、
tl.T(g/m
2
)
、
tl.H
、
t(oz/yd
2
)
,
()
for plaiting purpose
ON/OFF
Item 2, Page 6
↓
InitU
Initial weight unit
selection
g
、
ct
、
lb
、
oz
、
dr
、
GN
、
ozt
、
dwt
、
MM
、
tl.j
、
tl.T(g/m
2
)
、
tl.H
、
t(oz/yd
2
)
,
()
for plaiting purpose
Item 3, Page 6
↓
Auto
Auto power-off
selection
Au-no/5/15/30/60
Item 4, Page 6
↓
bAud
Baud rate
selection
2400/4800/9600
Item 5, Page 6
ZEro
Auto zero range
selection
d0/1/2/3/4/5
Item 6, Page 6
↓
Fil
Filter selection
Fil1/2/4/8
Item 7, Page 6
↓
LigH
Backlight
selection
onoFF/oFF/ON
Item 8, Page 6
↓
Printing mode
selection
Pr-St/Co
Item 9, Page 7
Electronic Scale
6
↓
Pr Fu
External device
PC/ SH-24
Item 10, Page 7
↓
diV-Z
Display range
Zero0/1/2/3/4/5
Item 11, Page 7
1. When the LCD display shows Count, press the
「
UNIT
」
key, the current internal value
will be displayed. Press
「
UNIT
」
to return to LCD display
Count.
2. When the LCD display shows unit , press
「
UNIT
」
to enter into unit selection mode,
the screen will show on g or oFF g ,
“on” means to use the current unit
displayed,
“oFF” means not to use the current unit displayed. Press
「
SMPL
」
to switch
between
ON and OFF [to use the unit displayed select
“on”, if you do not require the
unit displayed select
“oFF”]. Press
「
UNIT
」
to select from 13 kinds of weighing units,
after selecting the unit required, press
「
MODE
」
to return to LCD display unit .
3. When the LCD display shows InitU , press
「
UNIT
」
to enter initial unit selection
mode. LCD display InitU
xx
X means the initial unit is selected. Press
「
UNIT
」
to
select the unit required, then Press
「
MODE
」
to return to LCD display
InitU.
4. When the LCD display shows Auto , press
「
UNIT
」
to enter the Auto Power-Off
selection. LCD display XXX X means Auto Power-off selection. Press
「
UNIT
」
to
select the auto power-off time, then press
「
MODE
」
to return to LCD display Auto .
『
Au-no-
means No auto power-off,
5-
means 5 minutes,
15-
means 15 minutes,
30-
means 30 minutes,
60-
means 60 minutes
』
(in case of instability, the auto power-off
function will not work)
5. When the LCD display shows bAud , press
「
UNIT
」
to enter the RS-232 Baud
Rate selection. LCD display XXX X represents the RS-232 baud rate. Press
「
UNIT
」
to select the desired
RS-232 baud rate, then press
「
MODE
」
to return to LCD
display bAud .
『
2400, 4800, 9600
』
6. When the LCD display shows ZEro , press
「
UNIT
」
to enter auto zero range
selection. LCD display d X X represents the auto zero range. Press
「
UNIT
」
to
select the desired auto zero range, then press
「
MODE
」
to return to LCD display
ZEro
。
『
d0, 1, 2, 3, 4, 5
』
(the higher the value is, the wider auto zero range is)
7. When the LCD display shows FiL , press
「
UNIT
」
to enter filter setting mode.
LCD display FiL X X means the filter
level. Press
「
UNIT
」
to select the desired
filter level and press
「
MODE
」
to return to LCD display
FiL .
『
FiL1, 2, 4, 8
』
(the higher the value is, the higher the filter level is)
8. When the LCD display shows LigH , press
「
UNIT
」
to enter backlight setting mode.
Electronic Scale
7
The LCD display XXXX X represents the backlight setting. Press
「
UNIT
」
to select
the desired backlight setting and press
「
MODE
」
to return to LCD display LigH
。
『
onoFF-
means auto-backlight,
oFF-
means backlight off,
ON-
means backlight on
』
9. When the LCD display shows Print , press
「
UNIT
」
to enter printing mode
selection. LCD display Pr-XX X represents the printing mode. Press
「
UNIT
」
to
select the desired printing mode and press
「
MODE
」
to return to LCD display
Print .
『
Pr-Co-
means continuous output,
Pr-St
means
stable output
』
10. When the LCD display shows Pr Fu , press
「
UNIT
」
to enter external device
selection mode. LCD display XXXX X represents external device. Press
「
UNIT
」
to select the desired external device, then press
「
MODE
」
to return to LCD display
Pr Fu .
『
-PC
external PC,
SH-24
external dot matrix mini printer
』
11. When the LCD display shows diV-Z , press
「
UNIT
」
to enter external device
selection mode. LCD display ZEroX X represents display range. Press
「
UNIT
」
to
select the desired external device, then press
「
MODE
」
to return to LCD display
diV-Z
。
『
Zero0, 1, 2, 3, 4, 5
』
(means weight displayed when the weight exceeds the
capacity)
12. Before entering function setting, press
「
SMPL
」
to end function setting and return to
normal weighing mode. Press the
「
MODE
」
key continuously to select function setting
modes.
Units Conversion Table
1 ct
[MET.CARAT]
=0.1999694 g
1 lb
[AVORIRDUPOIS POUND]
=453.59237 g
1 oz
[AVORIRDUPOIS OUNCE]
=28.349523125 g
1 dr
[AVOIRDUPOIS DRAM]
=1.7718451 g
1 GN
[GRAIN](U.K)
=0.06479891 g
1 ozt
[TROY OUNCE]
=31.1034768 g
1 dwt
[PENNY WEIGHT]
=1.55517384 g
1 MM
[MOMME] (JPN)
=3.749996 g
1 tl.j
[HONG KONG JEWELRY TAEL]
=37.4290018 g
1 tl.T
[TAEL](TWN)
=37.49995 g
1 tl.H
[HONG KONG TAEL]
=37.799375 g
1 t
[TOLA] (INDIA)
=11.6638038 g
1 oz/yd
2
=0.33898306 g
1 g/m
2
=0.01 g
Electronic Scale
8
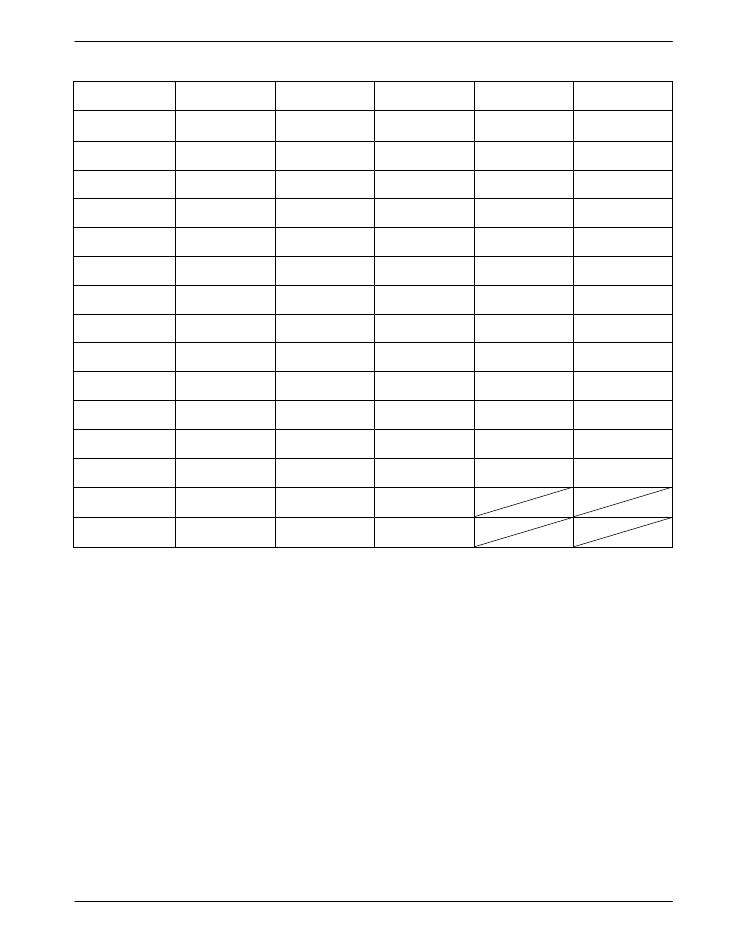
Cross-reference Table of Full Loads
CAP
150
300
600
1500
3000
Gram
150X0.005
300
×
0.01
600
×
0.02
1500
×
0.05
3000
×
0.1
Carat
750.34X0.02
1500.70X0.05
3001.36X0.1
7503.4X0.2
15007.0X0.5
Pound(Avoir)
0.33080X0.00002 0.66160X0.00005
1.323X0.0001
3.3080X0.0002
6.6160X0.0005
Ounce(Avoir)
5.2926X0.0002
10.5855X0.0005
21.171X0.001
52.926X0.002
105.855X0.005
Dram(Avoir)
84.685X0.005
169.37X0.01
338.72X0.02
846.85X0.05
1693.7X0.1
Grain
2315.5X0.1
4631.0X0.2
9262.0X0.5
23155X1
46310X2
Ounce(Troy)
4.8240X0.0002
9.6480X0.0005
19.296X0.001
48.240X0.002
96.480X0.005
Penny weight
96.480X0.005
192.96X0.01
385.92X0.02
964.80X0.05
1929.6X0.1
Momme
40.012X0.002
80.025X0.005
160.05X0.01
400.12X0.02
800.25X0.05
Tael (HK Jewelry) 4.0088X0.0002
8.0175X0.0005
16.035X0.001
40.088X0.002
80.175X0.005
Tael (Taiwan)
4.0012X0.0002
8.0025X0.0005
16.005X0.001
40.012X0.002
80.025X0.005
Tael (Hong Kong) 3.9696X0.0002
7.9390X0.0005
15.878X0.001
39.696X0.002
79.390X0.005
Tola (India)
12.865X0.0005
25.728X0.001
51.456X0.002
128.640X0.005
257.28X0.01
oz/yd
2
442.49X0.01
884.99X0.01
1770.27 X0.01
g/m
2
15000.5 X0.5
30000 X1
60000 X1
Note: Full Load = Capacity + (Readabilityx9)
RS-232
Serial Interface
The 9
PIN
connector at the right back is a RS-232 standard interface. Pin 3 is
for output, Pin 5 is for grounding and the rest have no functions.
BAUD RATE
:
2400 OR 4800 OR 9600 bps
DATA BIT
:
8
PARITY BIT
:
N
﹝
NONE
﹞
STOP BIT
:
1
CODE
:
ASCII
Electronic Scale
9
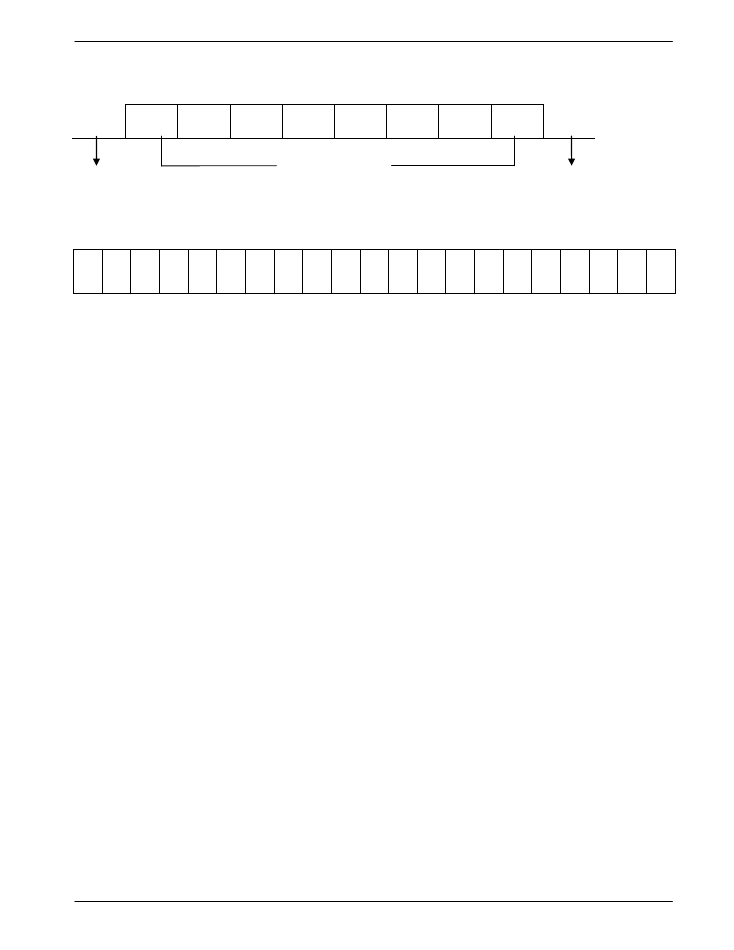
BIT FORMAT
:
LSB MSB
0
1
2
3
4
5
6
7
START BIT DATA BIT STOP BIT
DATA FORMAT
:
S/U T
G W
+/-
LF CR
SP
SP
WEIGHT
SP
UNIT
ST
:
STABLE
UT
:
UNSTABLE
GW
:
GROSS WEIGHT
SP
:
SPACE
Examples: ST GW + 150.00 g
UT NW -
80.00 ct …………..
PC Program: 10 OPEN
〝
COM1:9600,N,8,1,RS,DS,LF
〞
AS #1
(BASICA) 20 INPUT #1,A$
30 PRINT A$
40 GOTO 20
50 END