Full Text Searchable PDF User Manual

Contents
Important Safety Instructions .............................................................................................1
Safety .......................................................................................................................................................................................1
Warning ..................................................................................................................................................................................2
What’s in the Box ...................................................................................................................4
Identifying the Parts .............................................................................................................5
Main Unit ...............................................................................................................................................................................5
Wire Subwoofer.........................................................................................................................................................
.......
...5
Remote Control ...................................................................................................................................................................6
Preparations ..........................................................................................................................6
Prepare the Remote Control ...........................................................................................................................................6
Replace the Remote Control Battery ...........................................................................................................................6
Placement and Mounting ................................................................................................................................................7
Wall Mounting (if using option-B) ................................................................................................................................7
Connections ...........................................................................................................................8
Use the OPTICAL Socket ...................................................................................................................................................8
Use the COAXIAL Socket ..................................................................................................................................................8
Use the AUX Socket ............................................................................................................................................................8
Connect Power .....................................................................................................................................................................9
Pairing the Wireless Subwoofer with the Main Unit ..........................................................9
Automatic pairing ...............................................................................................................................................................9
Manual pairing .....................................................................................................................................................................9
Basic Operation ...................................................................................................................10
Standby/ON ....................................................................................................................................................................... 10
Select Modes ..................................................................................................................................................................... 10
djust the Volume .............................................................................................................................................................. 10
Select a Preset Sound Effect ........................................................................................................................................ 10
AUX/OPTICAL/COAXIAL Operation ...................................................................................10
Bluetooth Operation ...........................................................................................................11
Pair Bluetooth-enabled Devices ................................................................................................................................. 11
Listen to Music from Bluetooth Device ................................................................................................................... 11
USB Operation .....................................................................................................................12
Troubleshooting ..................................................................................................................12
Specifications ......................................................................................................................13
- 1 -
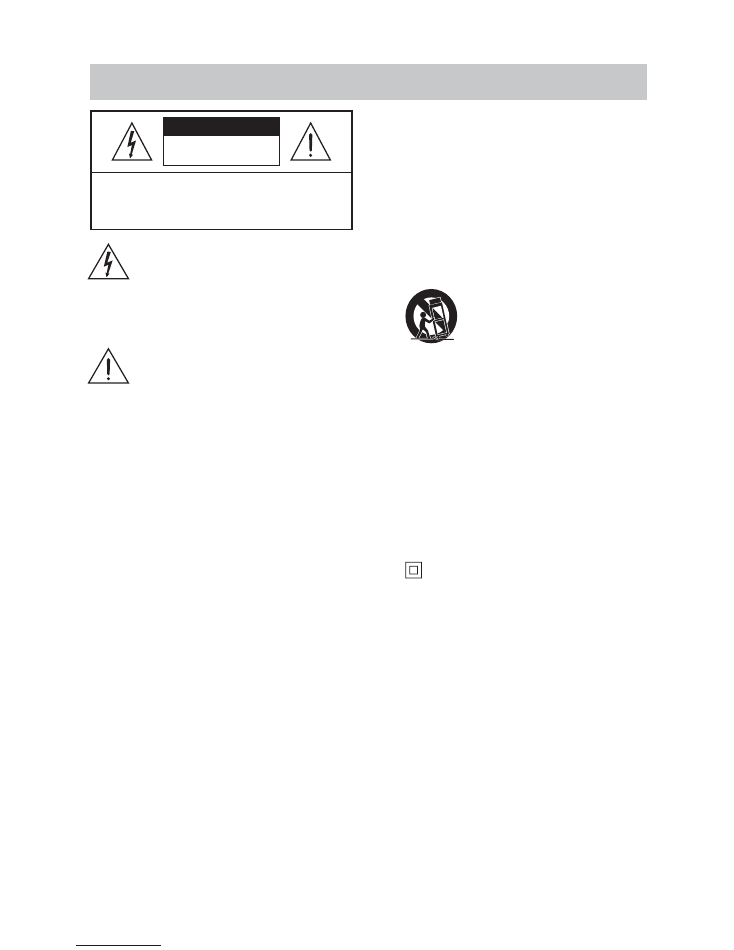
The lightning flash with arrowhead
symbol, within an equilateral triangle,
is intended to alert the user to the
presence of uninsulated “dangerous
voltage” within the product’s enclosure
that may be of sufficient magnitude as
to constitute a risk of electric shock to
persons.
Th e e xc l a m a t i o n p o i n t w i t h i n a n
equilateral triangle is intended to
a l e r t t h e u s e r to t h e p r e s e n c e o f
important operating and maintenance
(servicing) instructions in the literature
accompanying the appliance.
Safety
1
Read these instructions
– All the safety
and operating instructions should be read
before this product is operated.
2
Keep these instructions
– The safety and
operating instructions should be retained
for future reference.
3
Heed all warnings
– All warnings on the
appliance and in the operating instructions
should be adhered to.
4
Follow all instructions
– All operating and
usage instructions should be followed.
5
Do not use this apparatus near water
–
The appliance should not be used near water
or moisture – for example, in a wet basement
or near a swimming pool and the like.
6 Clean only with a dry cloth.
7 Do not block any ventilation openings.
Install in accordance with the manufacturer’s
instructions.
8 Do not install near any heat sources such as
radiators, heaters, stoves, or other apparatus
9. Do not defeat the safety purpose of the
polarized or grounding plug. A polarized
plug has two blades with one wider than
the other. A grounding plug has two blades
and a third grounding prong. The wide
blade or the third prong is provided for
into your outlet, consult an electrician for
replacement of the obsolete outlet.
10 Protect the power cord from being walked
o n o r p i n c h e d p a r t i c u l a r l y a t p l u g s ,
convenience receptacles, and the point
where they exit from the apparatus.
by the manufacturer.
12
Use only with the car t, stand,
!
by the manufacturer, or sold with
the apparatus. When a cart or
rack is used, use caution when
moving the cart/apparatus combination to
avoid injury from tip-over.
13 Unplug the apparatus during lightning
storms or when unused for long periods of
time.
14 Refer all servicing to qualified personnel.
Servicing is required when the apparatus
has been damaged in any way, such as
power supply cord or plug is damaged,
liquid has been spilled or objects have
fallen into the apparatus, the unit has been
exposed to rain or moisture, does not
operate normally, or has been dropped.
15
This equipment is a Class II or double
insulated electrical appliance. It has been
designed in such a way that it does not
require a safety connection to electrical
earth.
16 The apparatus shall not be exposed to
dripping or splashing. No objects filled with
liquids, such as vases, shall be placed on the
apparatus.
17 Minimum distance around the apparatus
for sufficient ventilation is 5cm.
18 The ventilation should not be impeded
by covering the ventilation openings with
items, such as newspapers,table-cloths,
curtains, etc…
19 No naked flame sources, such as lighted
candles, should be placed on the apparatus.
20 Batteries should be recycled or disposed of
as per state and local guidelines.
21 The use of apparatus in moderate climates.
Important Safety Instructions
CAUTION
CAUTION: TO REDUCE THE RISK OF ELECTRIC
SHOCK, DO NOT REMOVE COVER (OR BACK).
NO USER-SERVICEABLE PARTS INSIDE. REFER
SERVICING TO QUALIFIED SERVICE PERSONNEL.
RISK OF ELECTRIC SHOCK
DO NOT OPEN

- 2 -
• Caution:
- U s e o f c o n t r o l s o r a d j u s t m e n t s o r
per formance of procedures other than
those described herein, may result in
hazardous radiation exposure or other
unsafe operation.
- To reduce the risk of fire or electric shock,
do not expose this apparatus to rain or
moisture. The apparatus must not be
exposed to dripping or splashing and
objects filled with liquids, such as vases,
must not be placed on apparatus.
- The mains plug/appliance coupler is used
as the disconnect device, the disconnect
device must remain readily operable.
- Danger of explosion if battery is incorrectly
replaced. Replace only with the same or
equivalent type.
Warning
•
The battery (batteries or battery pack) shall
not be exposed to excessive heat such as
sunshine, fire or the like.
•
Before operating this system, check the
voltage of this system to see if it is identical
to the voltage of your local power supply.
•
Do not place this unit close to strong
magnetic fields.
•
Do not place this unit on the amplifier or
receiver.
•
Do not place this unit close to damp areas
as the moisture will affect the life of the
laser head.
•
If any solid object or liquid falls into the
system, unplug the system and have it
checked by qualified personnel before
operating it any further.
•
Do not attempt to clean the unit with
chemical solvents as this may damage the
finish. Use a clean, dry or slightly damp
cloth.
•
When removing the power plug from the
wall outlet, always pull directly on the plug,
never yank on the cord.
•
Changes or modifications to this unit not
expressly approved by the party responsible
for compliance will void the user’s authority
to operate the equipment.
•
The rating label is pasted on the bottom or
back of the equipment.
• This equipment complies with FCC radiation
exposure limits set forth for an uncontrolled
environment. This equipment should be
installed and operated with minimum distance
20cm between the radiator & your body.
DO NOT INGEST BATTERY,CHEMICAL
BURN HAZARD
The remote control supplied with this
product contains a coin/button cell battery.
If the coin/button cell battery is swallowed,
it can cause severe internal burns in just
2 hours and lead to death. Keep new and
used batteries away from children. If the
b a t te r y co m p a r t m e n t d o e s n o t c l o s e
securely, stop using the product and keep
it away from children. If you think batteries
might have been swallowed or placed
inside any part of the body, seek immediate
medical attention.
Correct Disposal of this product. This marking
indicates that this product should not be
d i s p o s e d w i t h o t h e r h o u s e h o l d w a s t e s
t h r o u g h o u t t h e E U . To p r e ve n t p o s s i b l e
harm to the environment or human health
from uncontrolled waste disposal, recycle it
responsibly to promote the sustainable reuse of
material resources. To return your used device,
please use the return and collection systems
or contact the retailer where the product was
purchased. They can take this product for
environmental safe recycling.
We hereby declares that this product is in
compliance with the essential requirements
and other relevant provisions of Directive
2014/53/EU.
The Bluetooth® word mark and logos are
registered trademarks owned by Bluetooth
SIG, Inc. We are the licensee to use such marks.
Other trademarks and trade names are those of
their respective owners.
M anufac tured under license from Dolby
Laboratories. Dolby and the double-D symbol
are trademarks of Dolby Laboratories.

- 3 -
For U.S. models
FCC Information
Warning:
Changes or modifications to this unit not expressly approved by the party responsible for compliance
could void the user’s authority to operate the equipment.”
NOTE:
•
This equipment has been tested and found to comply with the limits for a Class B digital device,
pursuant to Part 15 of the FCC Rules. These limits are designed to provide reasonable protection
against harmful interference in a residential installation. This equipment generates, uses and can
radiate radio frequency energy and, if not installed and used in accordance with the instructions,
may cause harmful interference to radio communications.
•
However, there is no guarantee that interference will not occur in a particular installation. If this
equipment does cause harmful interference to radio or television reception, which can be
determined by turning the equipment off and on, the user is encouraged to try to correct the
interference by one or more of the following measures:
- Reorient or relocate the receiving antenna.
- Increase the separation between the equipment and receiver.
- Connect the equipment into an outlet on a circuit different from that to which the receiver is
connected.
- Consult the dealer or an experienced radio / TV technician for help.
•
This device complies with Part 15 of the FCC Rules. Operation is subject to the following two
conditions:
(1) this device may not cause harmful interference, and
(2) this device must accept any interference received, including interference that may cause undesired
operation.
• IC Notice:
This device complies with Canada Industry licence-exempt RSS standard(s). Operation is subject to the
following two conditions: (1) this device may not cause interference. and (2) this device must accept any
interference. Including interference that may cause undesired operation of the device.
CAN ICES-3 (B) / NMB-3 (B)
Avis d’Industrie Canada
Le présent appareil est conforme aux CNR d'industrie Canada applicables aux appareils radio exem pts de
licence L'exploitation est autorisée aux deux conditions suivantes:
(1) I'appareil ne doit pas produire de brouillage, et (2) I'utillsateur de I'appareil doit accepterbrouillage
radioélectrique subi meme si le brouillage est susceptible d'encompromettre le fonctionnement. mauvais
fonctionnement de I'appareil.
7
GB
Product Overview
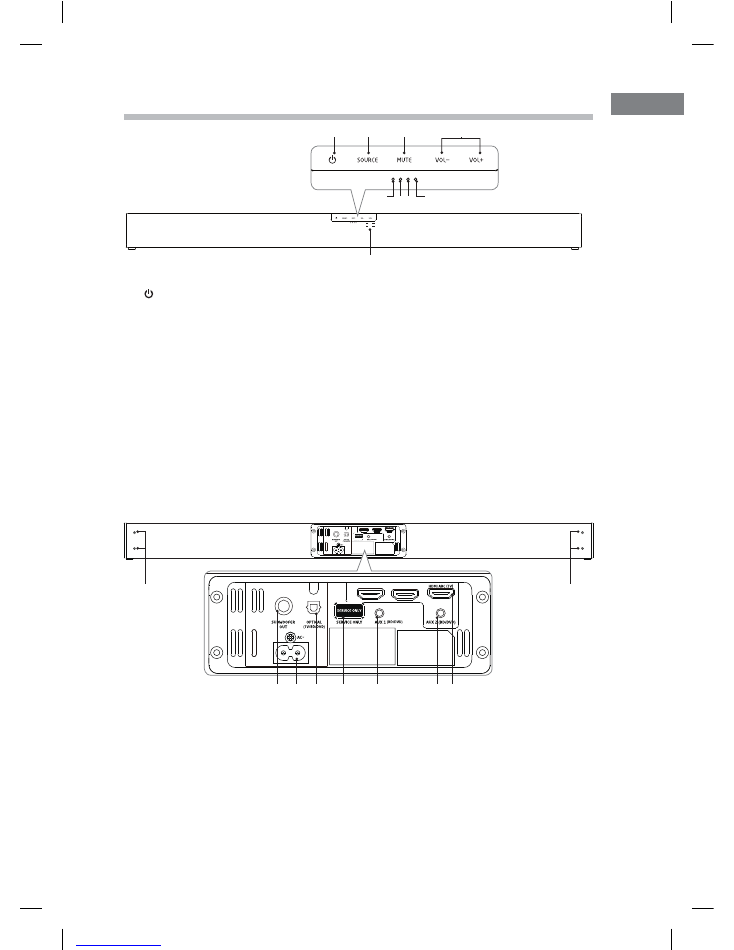
Main Unit
Front View
1.
Button
Switch the unit between
On
and
Standby
mode.
2.
SOURCE
Button
Select the input source.
3.
MUTE
button
Mute or resume the sound.
4.
VOL – / +
Button
Adjust the volume.
5.
Remote Control Sensor
Receive signal from the remote control.
6.
STANDBY Indicator
In STANDBY mode: Light up Red.
7.
AUX 1 / AUX 2
Indicator
In AUX 1 mode: Light up Green.
In AUX 2 mode: Flash in Green.
8.
OPTICAL Indicator
In OPTICAL mode: Light up Orange.
9.
HDMI
'6/$5*0/
Indicator
In HDMI ARC mode: Light up White.
5
1
2
3
4
6
7 8
9
1.
SUBWOOFER OUT
Socket
2.
AC~
Socket
Connect a power cord.
3.
OPTICAL (TV/BD/DVD)
Socket
Connect to an external audio device.
4.
SERVICE ONLY
Socket
The USB socket is for service only. It is
not designed to charge smartphones,
tablets or similar devices.
5.
AUX 1 (BD/DVD)
Socket
Connect to an external audio device.
6.
AUX 2 (BD/DVD)
Socket
Connect to an external audio device.
7.
HDMI
Socket
8.
Wall Bracket Screws
Rear View
1
8
8
2
3
4
7
5
6
TH-D337H_IB_170505_will.indd 7
5/5/2017 4:19 PM
8
GB
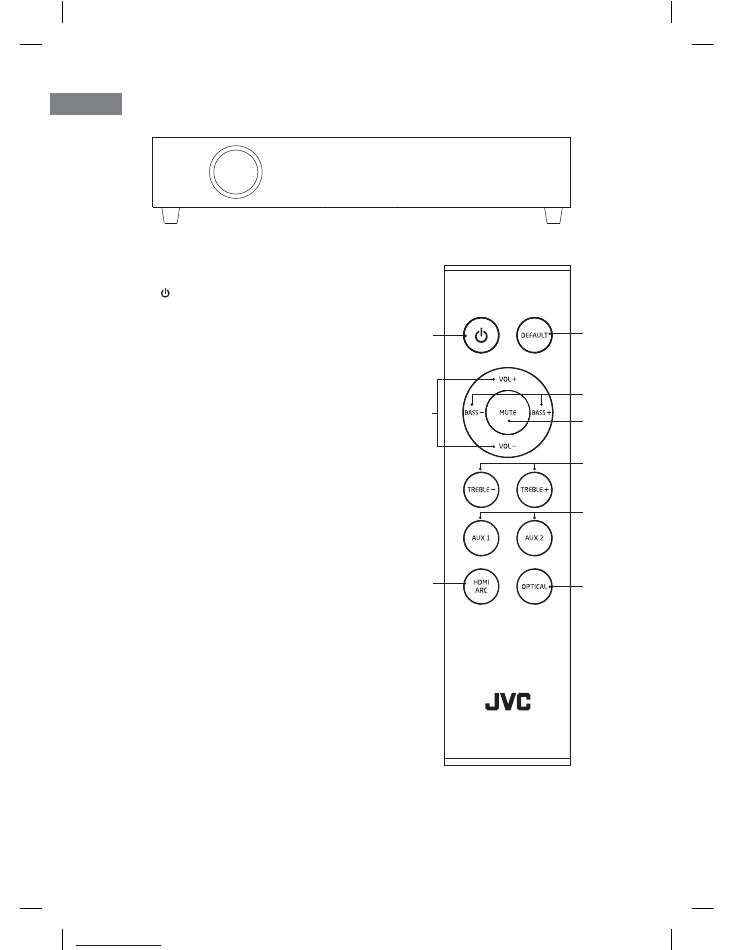
Subwoofer
1.
Button
Switch the unit between
On
and
Standby
mode.
2.
DEFAULT
Button
Press to resume the default sound
effect setting.
3.
VOL + / –
Buttons
Adjust the volume.
4.
BASS – / +
Buttons
Adjust the bass sound level.
5.
MUTE
Button
Mute the unit or resume the sound.
6.
TREBLE – / +
Buttons
Adjust the treble sound level.
7.
AUX 1/ 2
Button
Switch between
AUX 1 / AUX 2
mode.
8.
HDMI ARC
Button
Press to switch to
HDMI ARC
mode.
9.
OPTICAL
Button
Press to switch to
OPTICAL
mode.
Remote Control
1
3
8
4
7
9
5
2
6
TH-D337H_IB_170505_will.indd 8
5/5/2017 4:19 PM
9
GB
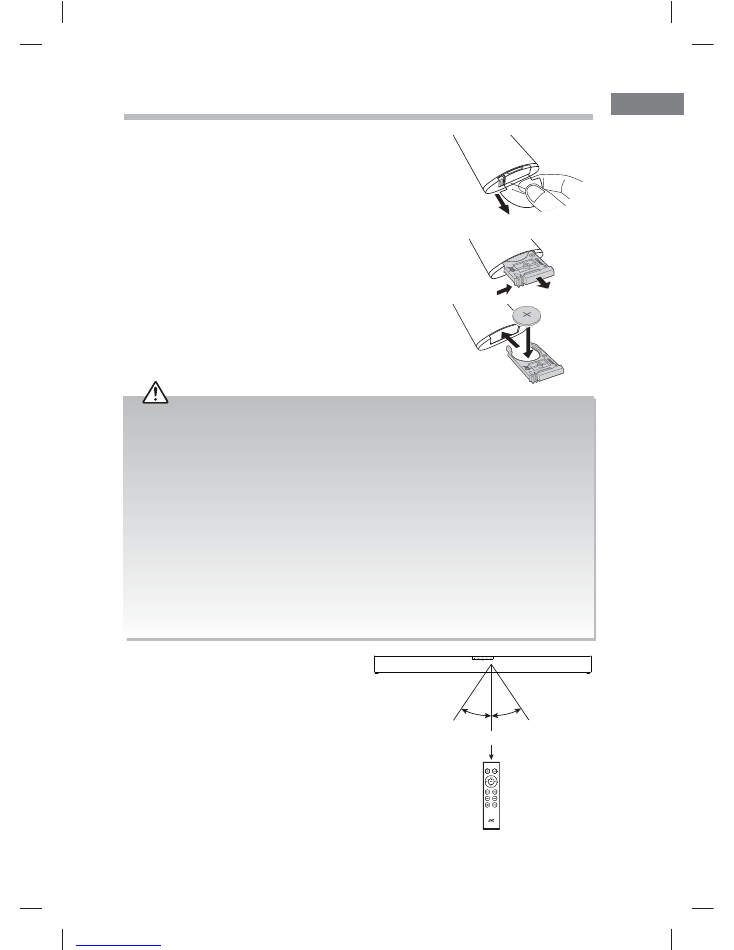
Remote Control Operation
Range
t
The remote control sensor on the front
unit is sensitive to the remote control’s
commands up to a maximum of 6 metres
away and within a maximum of a 60° arc.
t
Please note that the operating distance
may vary depending on the brightness of
the room.
3. Slide the tray back into the remote control.
There will be a click once it is back in place.
Handling the Battery
t
Improper or incorrect use of batteries may cause corrosion or battery leakage, which could cause fire,
personal injury or damage to property.
t
Only use the battery type indicated in this manual.
t
Do not install new batteries with used ones and do not mix different types of batteries.
t
Do not dispose of used batteries as domestic waste. Dispose of them in accordance with local
regulations.
Handling the Remote Control
t
Do not drop the remote control.
t
Do not allow anything to impact the remote control.
t
Do not spill water or any liquid on the remote control.
t
Do not place the remote control on a wet object.
t
Do not place the remote control under direct sunlight or near sources of excessive heat.
t
Remove the battery from the remote control when not in use for a long period of time, as corrosion or
battery leakage may occur and result in physical injury, and / or property damage, and / or fire.
t
When the battery is exhausted, the remote control will not function.
Preparation
First-time Use of Remote Control
The unit has a pre-installed lithium CR2025 battery.
Remove the protective tab to activate the remote control battery.
Battery Replacement for the Remote Control
1. Gently push the tab of the battery tray in and
slide it free from the remote control.
2. Replace with a new CR2025 battery.
30°
30°
Max. 6 m
TH-D337H_IB_170505_will.indd 9
5/5/2017 4:19 PM
10
GB
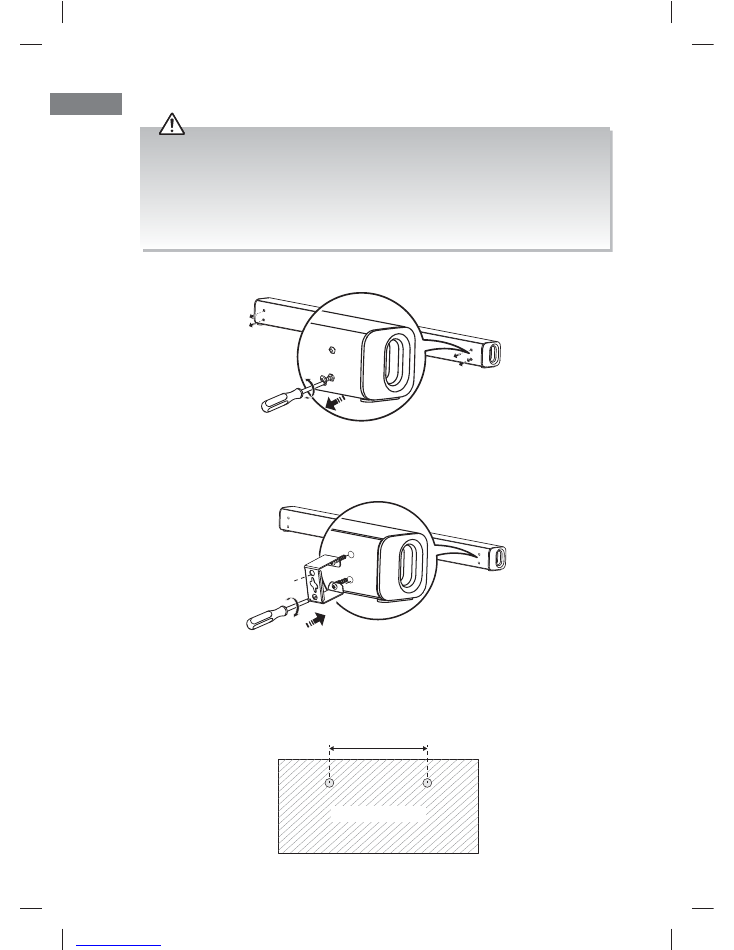
Wall Mounting
t
Installation must be carried out by qualified personnel only. Incorrect assembly can result in severe
personal injury and property damage (if you intend to install this product yourself, you must check
for installations such as electrical wiring and plumbing that may be buried inside the wall). It is the
installer’s responsibility to verify that the wall will safely support the total load of the soundbar.
t
Additional tools (not included) are required for the installation.
t
Do not overtighten screws.
t
Keep this instruction manual for future reference.
t
Use an electronic stud finder to check the wall type before drilling and mounting.
1. Remove the screws from the main unit.
764 mm
Wall (Front view)
3. Drill 2 parallel holes (Ø 3-8 mm each according to wall type) in the wall. The distance
between the holes should be 764 mm.
2. Attach the wall brackets to the main unit with the screws removed from the main unit.
TH-D337H_IB_170505_will.indd 10
5/5/2017 4:19 PM

11
GB
5. Insert 1 screw (included) into each dowel. Be sure to leave a 5 mm gap between the
wall and the screw’s head. Lift the unit over the heads of the screws and slot into place.
4. Firmly fix 1 dowel (included) into each hole in the wall if necessary.
Dowel
Solid wall (i.e., Solid brick,
Solid concrete, Solid wood,
Solid wooden battens)
Drywall, Plaster wall,
Lath wall, etc.
5 mm
25-30 mm
TH-D337H_IB_170505_will.indd 11
5/5/2017 4:19 PM
12
GB
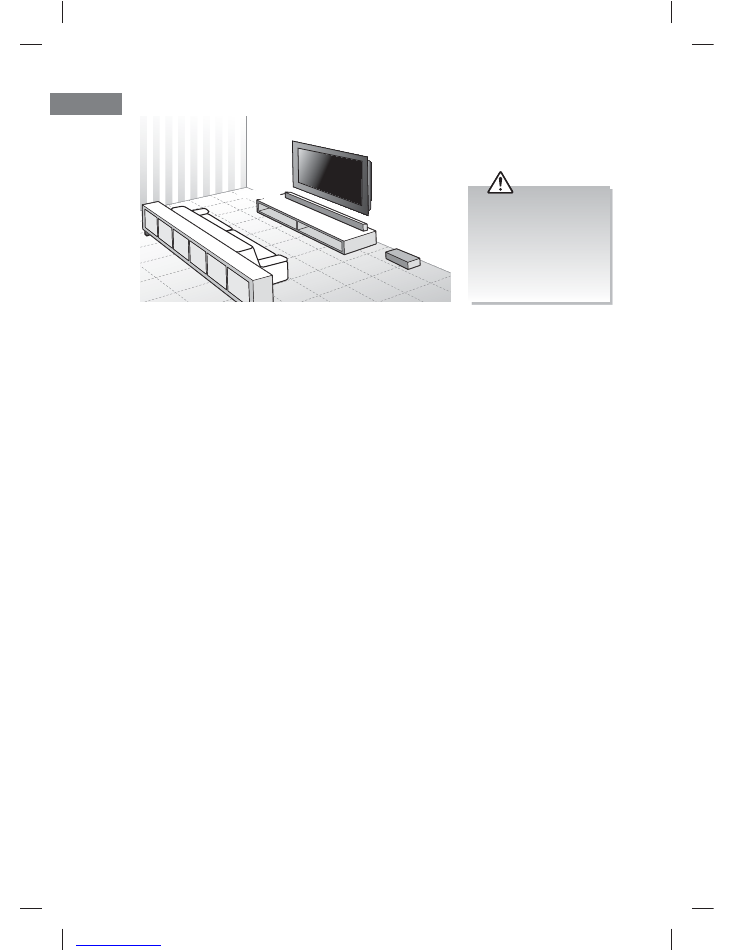
Speakers Placement
SUBWOOFER
SOUNDBAR
Soundbar
Soundbar carries most of the dialogue as well as music and effects.
t
If your TV is placed on a table, you can place the soundbar on the table directly in front
of the TV stand, centred with the TV screen.
t
If your TV is attached to a wall, you can mount the soundbar on the wall directly below
the TV screen.
Subwoofer
A subwoofer is designed to reproduce powerful low bass effects (explosions, the rumble of
spaceships, etc.).
t
The performance of a subwoofer is directly related to its placement in the listening
room. Experiment with placement before choosing a final location for your subwoofer.
Find the location where the bass performance is best.
t
The subwoofer should
be within 5 metres of
the soundbar in an
open area (the closer
the better).
t
Do not put anything
on the top of the
subwoofer.
TH-D337H_IB_170505_will.indd 12
5/5/2017 4:19 PM
13
GB
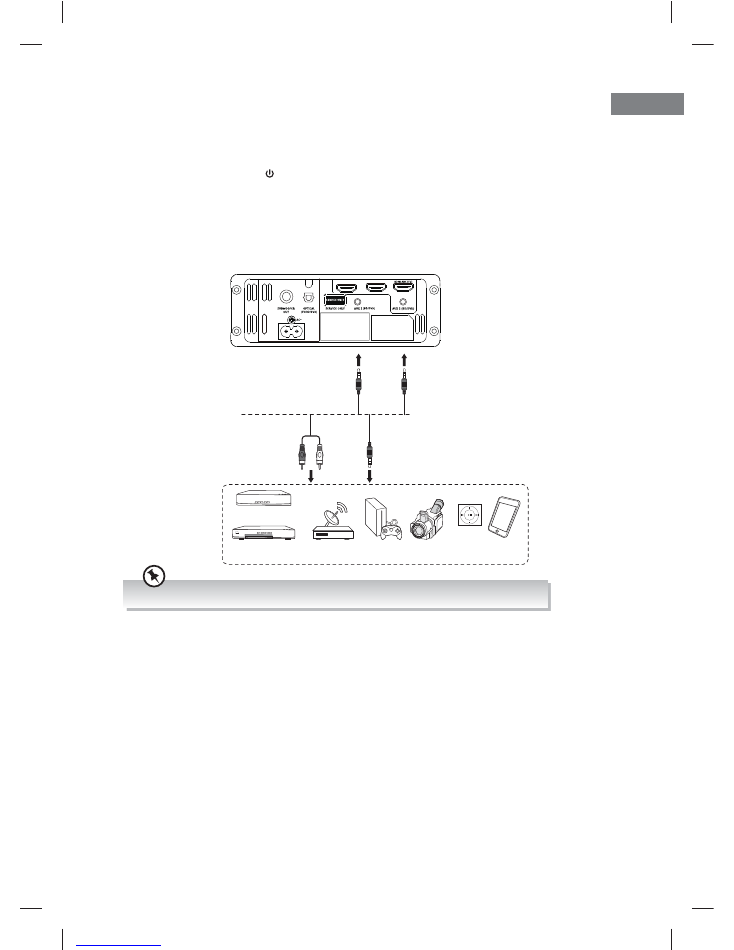
Connections
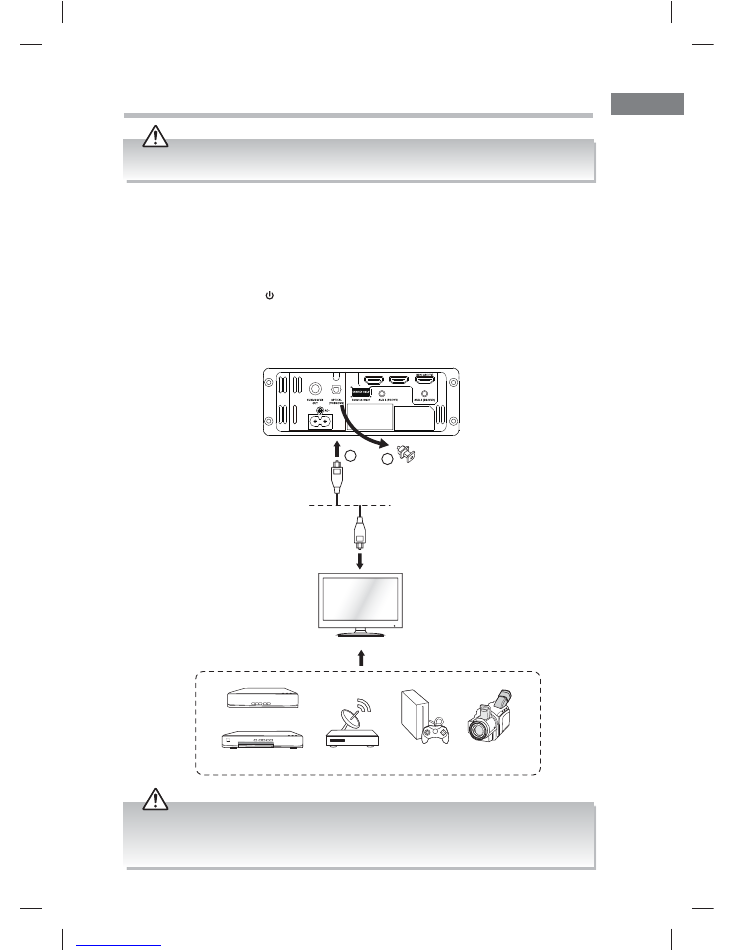
Method 1: Optical Connection
Use an optical cable (not included) to connect the soundbar’s
OPTICAL
socket to the
OPTICAL OUT
socket of the external device. The simplest option is to connect your
soundbar directly to your TV. If you connect the soundbar to another external device (e.g.
Blu-Ray player), you will hear the sound from that device through the soundbar.
1. After connection, press button on the unit or remote control to switch the unit on.
2. Press
SOURCE
on the unit or
OPTICAL
on the remote control to select
OPTICAL
to play
audio from your input device.
This section involves various methods of connecting the product to other external components. Ensure
all audio connections of the unit are connected before connecting to the mains power socket.
The unit may not be able to decode all digital audio formats from the input source. In this case, the unit
will mute. This is NOT a defect. Ensure that the audio setting of the input source (e.g. TV, game console,
DVD player, etc.) is set to
PCM
(Refer to the user manual of the input source device for its audio setting
details) with
Optical
input.
1
2
TV
Rear View of the Soundbar
Blu-ray Player / DVD Player
/ Recorder
Set-top Box
Satellite
Receiver
Game
Console
Video
Camera
Optical cable (not included)
TH-D337H_IB_170505_will.indd 13
5/5/2017 4:19 PM
14
GB
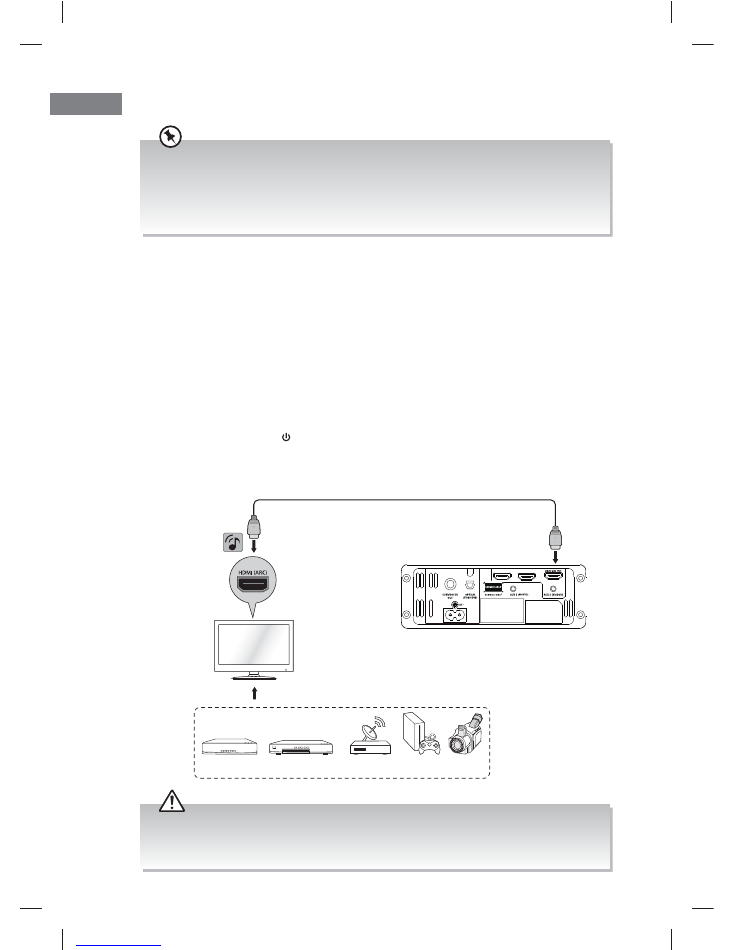
Method 2: HDMI Hub Connection
t
Ensure HDMI cables that can support the ARC function are used.
t
HDMI-CEC will be called different names by different manufacturers – please refer to your owner’s
manual for details on setting up HDMI-CEC and ARC.
t
While using a HDMI cable for ARC function, CEC (Consumer Electronics Control) provides
interoperability between the unit and various devices (e.g. TV). However, this unit is not guaranteed to
fully operate with all HDMI-CEC enabled devices. This is NOT a defect.
Using Your TV as a Hub
The ARC (Audio Return Channel) function allows sound to travel to and from your ARC-
compliant TV to your soundbar through a single HDMI connection. To enjoy the ARC
function, please ensure that your TV is both HDMI-CEC and ARC compliant and set up
accordingly. When correctly set up, the CEC feature allows you to adjust the volume output
(
VOL +
/
–
and
MUTE
) of the soundbar with the TV remote control. When you switch your TV
on/off with your remote control, your soundbar will also be switched on/off. Be patient that
it might take a few seconds for your TV to tell your soundbar to switch on or off.
Use this method to connect all your devices into your TV.
1. Connect an HDMI cable (not included) from your soundbar’s
HDMI ARC (TV)
socket to
the
HDMI (ARC)
socket on your ARC-compliant TV.
2. After connection, press button on the unit or remote control to switch the unit on.
3. Press
SOURCE
on the unit or
HDMI ARC
on the remote control to select
HDMI
ARC
mode to play audio from your input device.
Rear View of the Soundbar
TV
Blu-ray Player / DVD
Player / Recorder
Set-top Box
Satellite
Receiver
Game
Console
Video
Camera
HDMI Cable (not included)
The unit may not be able to decode all digital audio formats from the input source. In this case, the unit
will mute. This is NOT a defect. Ensure that the audio setting of the input source (e.g. TV, game console,
DVD player, etc.) is set to
PCM
(Refer to the user manual of the input source device for its audio setting
details) with
HDMI
input.
TH-D337H_IB_170505_will.indd 14
5/5/2017 4:19 PM
15
GB
Ensure the colours on the cable plugs match with the colours on the input and output sockets.
Method 3: AUX Connection
1. Use a 3.5 mm to RCA stereo audio cable (not included) or a 3.5 mm to 3.5 mm stereo
audio cable (included) to connect the soundbar’s
AUX 1/ AUX 2
socket to the
AUDIO
OUT /HEADPHONES
sockets of the external device.
2. After connection, press button on the unit or remote control to switch the unit on.
3. Press
SOURCE
on the unit or
AUX 1 / AUX 2
on the remote control repeatedly to select
AUX 1 / AUX 2
to play audio from your input device.
Rear View of the Soundbar
Blu-ray Player / DVD
Player / Recorder
Set-top Box
Satellite
Receiver
Game
Console
Video
Camera
MP3 Player or
Mobile Device
OR
3.5 mm to 3.5 mm Stereo
Audio Cable (included)
3.5 mm to RCA Stereo
Audio Cable (not included)
TH-D337H_IB_170505_will.indd 15
5/5/2017 4:19 PM
16
GB
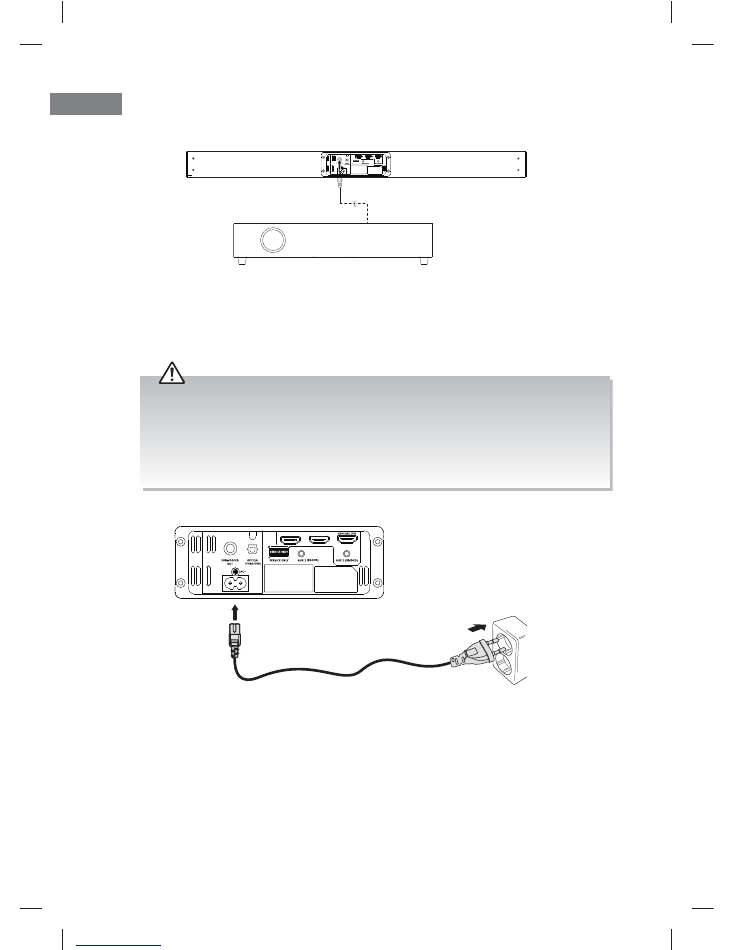
Connecting the Subwoofer to the Soundbar
Connect the subwoofer cable into the
SUBWOOFER OUT
sockect of the soundbar.
t
Connecting the unit to any other power source may damage the unit.
t
Ensure all audio connections of the unit are connected before connecting to the mains power socket.
t
Make sure the mains plug is firmly inserted into the mains socket.
t
To switch the unit off completely, remove the mains plug from the mains socket.
t
Please turn the unit off completely to save energy when not in use.
t
The mains cable are designed for this JVC soundbar only. DO NOT use the mains cable for other
purposes.
Connecting to the Mains Supply
The soundbar is designed to operate with the supplied mains cable.
Soundbar
Unwind the mains cable to its full length. Connect the end of the cable to the
AC~
Socket
at the rear of the unit and then connect the mains plug to the mains socket. Make sure the
mains plug is fully inserted into the mains socket.
To the
mains socket
Rear View of the Soundbar
Front View of the Subwoofer
Rear View of the Soundbar
TH-D337H_IB_170505_will.indd 16
5/5/2017 4:19 PM

17
GB
General Operation
Standby / ON
When you first connect the unit to the mains socket, the unit will be in
Standby
mode.
t
Press on the unit or on the remote control to switch the unit on.
t
Press on the unit or on the remote control again to switch the unit back to
Standby
mode. The Power Indicator will light up red.
Automatic Power Off Function
The unit automatically turns to
Standby
mode after about 15 minutes if the TV or the
external unit is disconnected, switched off or the volume is too close to mute.
t
To switch the unit off completely, remove the mains plug from the mains socket.
t
Please turn the unit off completely to save energy when not in use.
Adjusting the Speaker Level Settings and Effects
Adjusting the Volume
t
Press
VOL
+ / –
to adjust the volume.
t
If you wish to turn the sound off, press
MUTE
on the remote control. Press
MUTE
again,
or press
VOL
+ / –
on the unit or on the remote control to resume normal listening.
Adjusting the Bass Volume Level
Press
BASS + / –
repeatedly to adjust the bass volume level.
Adjusting the Treble Volume Level
Press
TREBLE + / –
repeatedly to adjust the treble volume level.
Selecting Modes
Press
SOURCE
on the unit repeatedly to select between
AUX 1
,
AUX 2
,
OPTICAL
, and
HDMI
ARC
mode.
Alternatively,
t
press
AUX 1/ AUX 2
on the remote control to select
AUX 1
and
AUX 2
mode.
t
press
OPTICAL
on the remote control to select
OPTICAL
mode.
t
press
HDMI ARC
on the remote control to select
HDMI ARC
mode.
TH-D337H_IB_170505_will.indd 17
5/5/2017 4:19 PM

18
GB
AUX / Optical / HDMI Operation
There are
OPTICAL
/
AUX 1 / AUX 2
and
HDMI ARC
sockets located at the rear of the unit.
1. Before connecting to the mains socket, ensure all the connections are completed.
2. While in the
On
mode, press
SOURCE
on the unit repeatedly to select between
AUX 1
,
AUX 2
,
OPTICAL
, and
HDMI
ARC
mode.
Alternatively,
t
press
AUX 1/ AUX 2
on the remote control to select
AUX 1
and
AUX 2
mode.
t
press
OPTICAL
on the remote control to select
OPTICAL
mode.
t
press
HDMI ARC
on the remote control to select
HDMI ARC
mode.
3. Operate your audio device directly for playback features.
While in
OPTICAL
/
HDMI ARC
mode, if there’s no sound output from the unit, ensure that the audio
setting of the input source (e.g. TV, game console, DVD player, etc.) is set to
PCM
(Refer to the user
manual of the input source device for its audio setting details) with
OPTICAL/
HDMI
input.
TH-D337H_IB_170505_will.indd 18
5/5/2017 4:19 PM

19
GB
Maintenance
Ensure the unit is fully unplugged from the mains socket before cleaning.
t
To clean the units, wipe the case with a slightly moist, lint-free cloth.
t
Do not use any cleaning fluids containing alcohol, ammonia or abrasives.
t
Do not spray aerosol at or near the unit.
Hints and Tips
If a problem does occur, it may often be due to something very minor. The following table
contains various tips. If you require additional assistance please click on the link for Support
Centre:
Norway:
www.elkjop.no/service
Sweden:
www.elgiganten.se/service
Denmark:
www.elgiganten.dk/service
Finland:
www.gigantti.fi/huolto
Problem
Solution
No power.
t
Ensure the mains plug is connected.
t
Make sure that you select the
On
mode.
The remote control does
not function.
t
Use the remote control near the unit.
t
Point the remote control at the remote sensor on the unit.
t
Replace the battery in the remote control with a new one.
t
Remove any obstacles between the remote control and
the unit.
Loud hum or noise is
heard.
t
The plugs and sockets are dirty. Wipe them with a cloth
slightly moistened with alcohol.
No sound from
the soundbar and
subwoofer.
Please try either one of the solutions below:
t
Make sure that the unit is not muted. Press
MUTE
or
VOL +/–
button to resume normal listening.
t
Press on the unit or on the remote control to switch the
soundbar to standby mode. Then press the button again
to switch the soundbar on.
t
Unplug the soundbar from the mains socket, then plug it
in again. Switch on the soundbar.
t
Ensure the audio setting of the input source (e.g. TV, game
console, DVD player, etc.) is set to
PCM
mode while using
digital (e.g.
HDMI
,
OPTICAL
) connection.
t
The unit may not be able to decode all digital audio
formats from the input source. In this case, the unit will
mute. This is NOT a defect.
The unit does not
respond when pressing
any buttons.
t
The unit may freeze up during use. Switch the unit off and
then on again at the mains socket to reset the unit.
TH-D337H_IB_170505_will.indd 19
5/5/2017 4:19 PM

- 13 -
• Design and specifications are subject to change without notice.
Specifications
Sound Bar
Power Supply ............................................................................................................................................... AC120V~ 60Hz
Power Consumption ...................................................................................................................................................... 30 W
Output Power ............................................................................................................................................................ 30 W x 2
USB Socket ...............................................................................................................................................................
5V == 0.5A
Audio input sensitivity ............................................................................................................................................... 700mV
Frequency Response .................................................................................................................................. 120Hz - 20KHz
Unit Dimension (W x H x D)..............................................................................................................952 x 63 x 65.7 mm
Speaker Impedance ...................................................................................................................................................."#$%
Bluetooth
Version .................................................................................................................................................................................. V 4.2
Maximum power transmitted ..............................................................................................................................<20 dbm
Frequency bands............................................................................................................................2402 MHz ~ 2480 MHz
Remote Control
Distance ...................................................................................................................................................................................6m
Angle .......................................................................................................................................................................................30°
Battery Type ..................................................................................................................................................................CR2025