Full Text Searchable PDF User Manual

Section 1
Safety
1.1 Instructions for the Safe Operation and Use of the Pulse Oximeter
WARNING: EXPLOSION HAZARD
Do not use the Pulse Oximeter
in a flammable atmosphere where concentrations of flammable
products exist.
WARNING:
Do not throw batteries in fire as this may cause them to
explode.
WARNING:
Do not attempt to recharge normal dry-cell batteries as
they may leak, cause a fire or explode.
WARNING:
Do not use the Pulse Oximeter in an MRI or CT
environment.
1.2 Warnings
Do not attempt to service the Pulse Oximeter yourself. Only qualified
service personnel should attempt any necessary internal servicing.
Prolonged use or depending on the patient's condition may require
changing the sensor site periodically. Change sensor site and check skin
integrity, circulatory status and correct alignment at least every 2 hours.
SpO2 measurements may be adversely affected in the presence of high
ambient light. Shield the sensor area if necessary.
The following will cause interference to the testing accuracy of the
Pulse Oximeter:
High-frequency electrosurgical equipment.
Placement of the sensor on an extremity with a blood pressure cuff,
arterial catheter, or intravascular line.
Patients with hypotension, severe vasoconstriction, severe anaemia or
hypothermia.
The patient is in cardiac arrest or is in shock.
Fingernail polish or false fingernails may cause inaccurate SpO2
readings.

CAUTION:
Keep the operating environment free of dust, vibrations,
corrosive, or flammable materials, and extremes of temperature and
humidity.
CAUTION:
Do not operate the unit if it is damp or wet. Avoid using
the equipment immediately after moving it from a cold environment to
a warm, humid location.
CAUTION:
Never use sharp or pointed objects to operate the front-
panel switches.
CAUTION:
The batteries must be taken out from the battery compart-
ment if the device will not be used for more than 12 months.
CAUTION:
The device should only be used if the battery cover is
closed.
CAUTION:
The batteries must be properly disposed of according to
local regulation after their use.
CAUTION:
The device should be kept away from children & pets to
avoid swallowing.
WARNING:
If this equipment is modified, appropriate inspection and
testing must be conducted to ensure continued safe use of equipment.
WARNING:
Do not modify this equipment without authorisation of the
manufacturer.
2
#
Batch code, Date of manufacturer and Serial No. are printed on the label on the
battery cover
Section 2
Introduction
2 .1 General
This chapter provides a general description of the Pulse Oximeter
including a brief device description and product features.
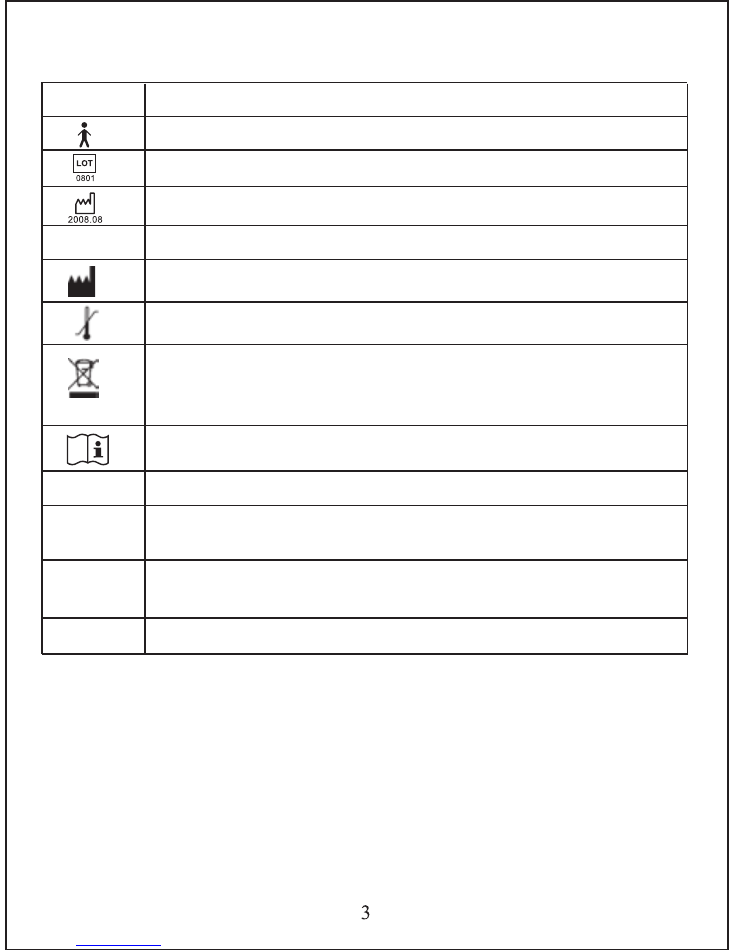
1.3 Definitions and Symbols
SN
When the end-user wishes to discard this product, it must
be sent to separate collection facilities for recovery and
recycling
Temperature limitation
Serial No.
#
Information of manufacture, including name and address
Caution
Anti-dust & Anti-water class
Note
The important information you should know
The information you should know to protect patients and
medical staff from possible injury
The information you should know to protect the equipment
from possible damage
Date of manufacture
#
Type BF Equipment
Symbol
Description
Batch code
#
Follow instruction for use
Warning
IPX4

2.2 Brief Device Description
The Pulse Oximeter is intended for non-invasive spot-check
measurements of functional oxygen saturation of arterial haemoglobin
(SpO2). The advanced DSP algorithm
^
can minimize the influence of
motion and improve measurement accuracy of low perfusion
^
.
CAUTION:
The device cannot be used in children less than 1 year
old as the result may not be accurate.
Measures oxygen saturation (SpO2) and pulse rate (PR).
Lightweight & portable.
Easy to use.
Manually adjust the direction of interface (6 display modes).
Dual colour OLED display, simultaneous display for testing value
and plethysmograph^ .
Low perfusion: 0.2%.
Anti-shaking technology.
Visual & sound alarm function.
Real-time spot-checks.
Low battery voltage indicator.
Automatic switch off.
Standard 2x AAA 1.5V Alkaline batteries will provide more than 20
hours continuous output.
2.3 Product Features
The Pulse Oximeter can be used to measure human oxygen saturation
and pulse rate through the finger. The product is suitable for use by
individuals and healthcare professionals in multiple situations, including;
home, clinical & sporting environments. For example:
Pre/post-exercise.
Pre/post-operative conditions.
Monitoring respiratory conditions.
Section 3
Installation, Setup and Operation
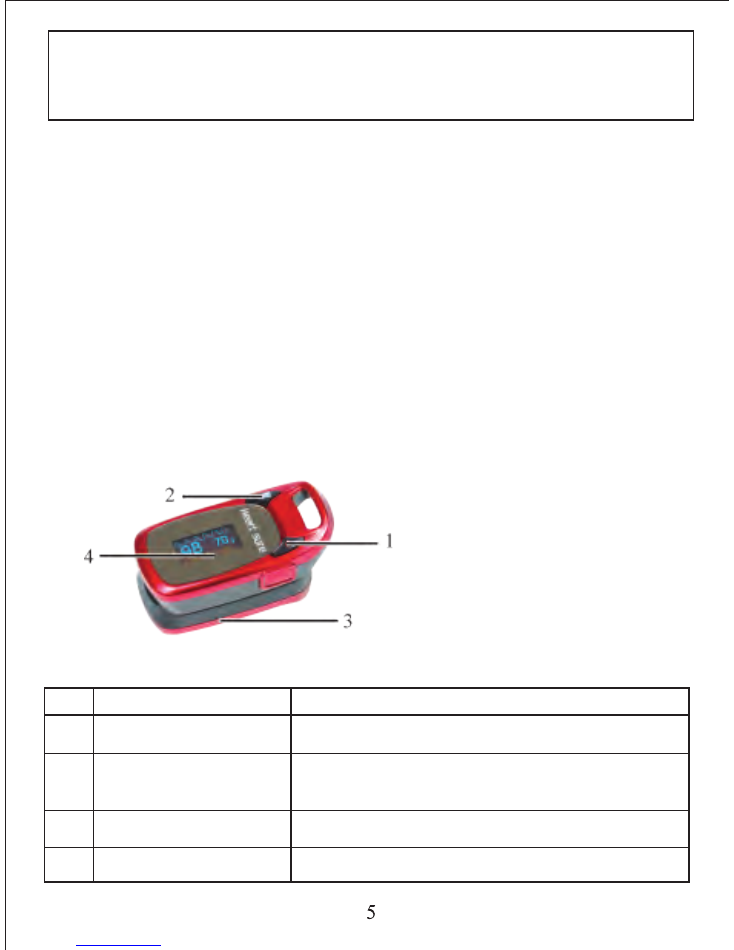
Figure 3.1.1
Parts of front & back panel
Table 3.1.1 Part Name and Description
3.1. Description of the Front Panel (as figure 3.1.1)
Item
1
2
Name
3
Description
4
Power Button
Turn on/off the machine
Direction Button
(M)
Battery Compartment
OLED Panel
Direction change & parameter setting within
the menu
Compartment for batteries
Displays the SPO2/PR data & Plethysmograph
CAUTION:
The fingertip Pulse Oximeter is intended only as an
adjunct in patient assessment. It must be used in conjunction with
other methods of assessing clinical signs and symptoms.
2.3.1 ^ Defintions
^
DSP algorithm:
Digital signal processor algorithm.
^
Low perfusion:
In physiology, perfusion is the process of a body
delivering blood to a capillary bed in its biological tissue. Under the
condition of low perfusion, the measurement of non-invasive saturation
of pulse-blood oxygen can be low.
^
Plethysmograph:
Instrument for measuring changes in volume
within an organ or whole body (usually resulting from fluctuations in
the amount of blood or air it contains).
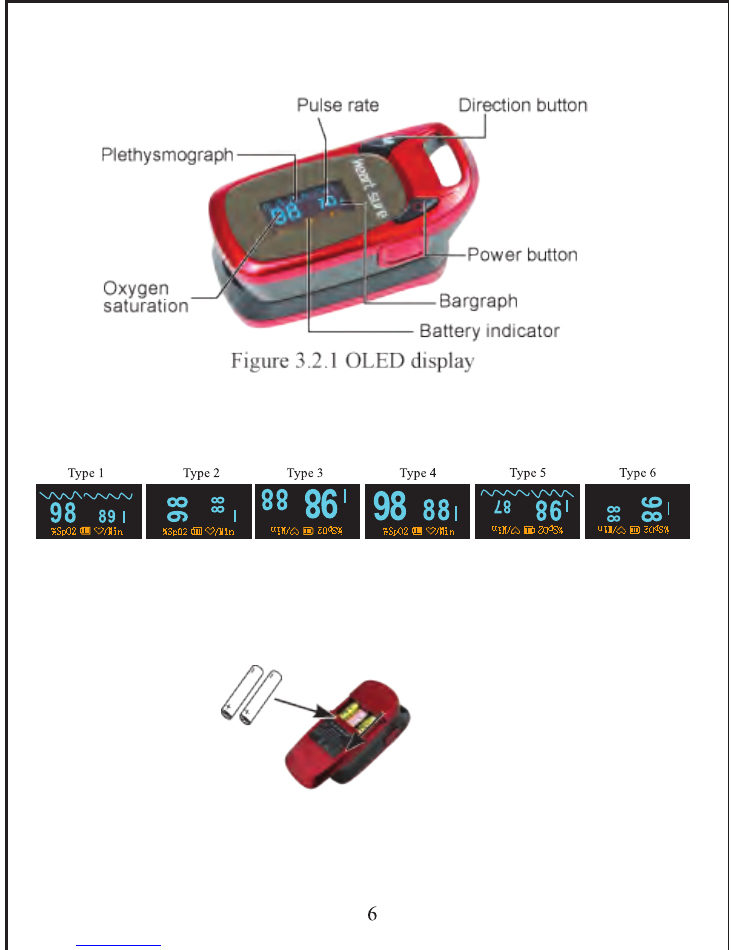
3.2.1 Display Modes
The OLED display can rotate four directions with six different display
modes when pressing the direction button (M) as shown below:
3.3 Operation
3.3.1 Install battery
Remove cover & install 2 x AAA batteries into the battery cassette in
correct polarities and place cover back on.
3.3.2 Turn the Pulse Oximeter On
Press the power button for 2 seconds to turn the Pulse Oximeter on. Open
the clamp, then place one finger into rubber hole of the Pulse Oximeter
3.2 Display
After being switched on, the OLED display is as follows:
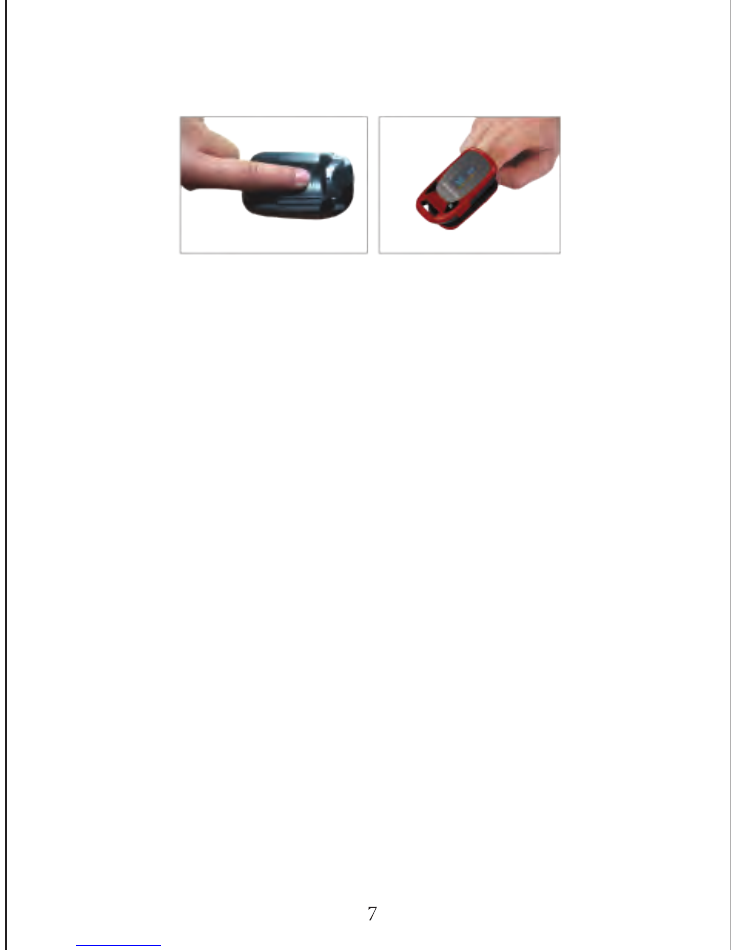
(it is best to put the finger as far in as possible) with nail surface upward,
then release the clamp to shut.
3.3.3. Read data on the display screen
The data may take a few seconds to appear while a reading is obtained.
Only your Healthcare Professional can interpret your individual readings.
3.3.4. Parameter Settings
In the parameter settings menu you can set high/ low alarm values for both
SpO2 and PR, as well as turning sound on/off. To access the parameter
settings hold down the (M) button for one second.
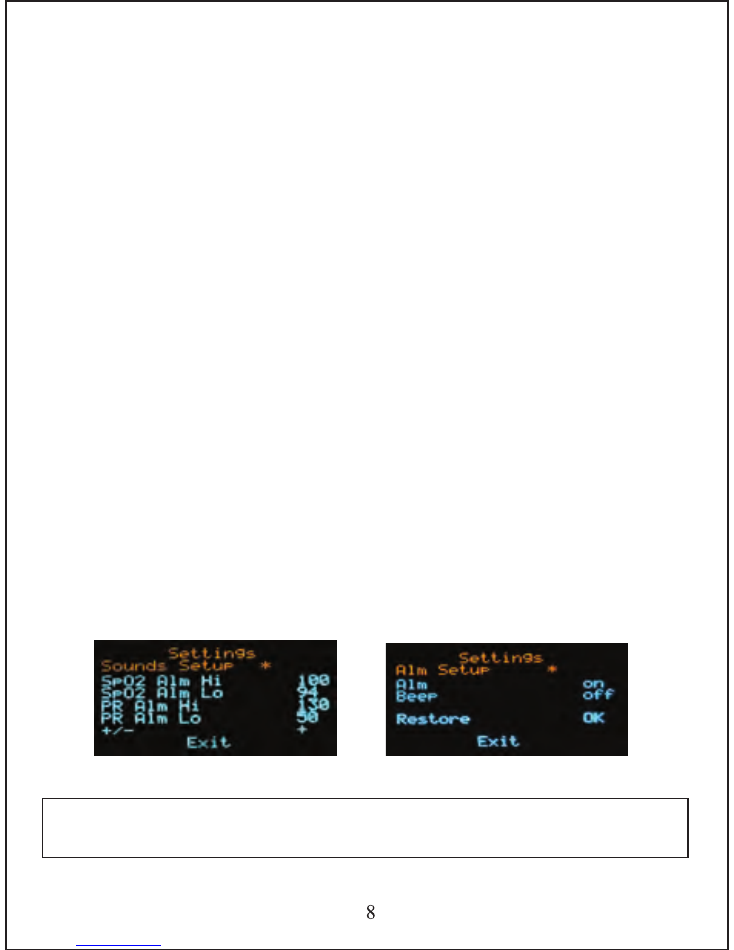
There are two types of submenus; Alarm Setup and Sounds Setup. To
switch between the setups, ensure the * is next to the word Sounds Setup
or Alm Setup, then press (M) for one second to switch between menus,
as per figures 3.3.1 and 3.3.2.
3.3.4.1. Sounds Setup
Hold down the (M) button for one second to bring up the sound menu as
per figure 3.3.1. Press (M) quickly to move down the menu.
To increase parameter values
Press (M) quickly to move down the menu until your * signal appears next
to the + / - sign. Then hold down (M) for one second until the + sign
appears. This will now increase the value of any parameter in this menu.
Quickly press (M) to move to the parameter value you wish to change.
Once you have reached the parameter value you want to change, hold
down (M) for one second and you will see the value increase. Once you've
reached your desired level, release the (M) button.
To decrease parameter values
Press (M) quickly to move down the menu until your * signal appears next
to the + / - sign. Then hold down (M) for one second until the - sign
appears. This will now decrease the value of any parameter in this menu.
Quickly press (M) to move to the parameter value you wish to change.
Once you have reached the parameter value you want to change, hold
down (M) for one second and you will see the value decrease. Once
you've reached your desired level, release the (M) button.
3.3.4.2. Alarm Setup
Hold down the (M) button for one second to bring up alarm menu as per
figure 3.3.2. Press (M) quickly to move down the menu.
To turn Alarm or Beep ON
Press (M) quickly to move down the menu until your * signal appears next
to the word ALM or Beep. Then hold down (M) for one second until the
word
on
appears.
To turn Alarm or Beep OFF
Press (M) quickly to move down the menu until your * signal appears next
to the word ALM or Beep. Then hold down (M) for one second until the
word
off
appears.
3.3.4.3. To Exit Parameter Settings Menu
Press (M) quickly to move down the menu until your * signal appears next
to the word Exit. Then hold down (M) for one second to exit menu.
Note:
1.The alarm sound has a 1 second delay after an incorrect result
is detected.
Figure 3.3.1
Figure 3.3.2
Note:
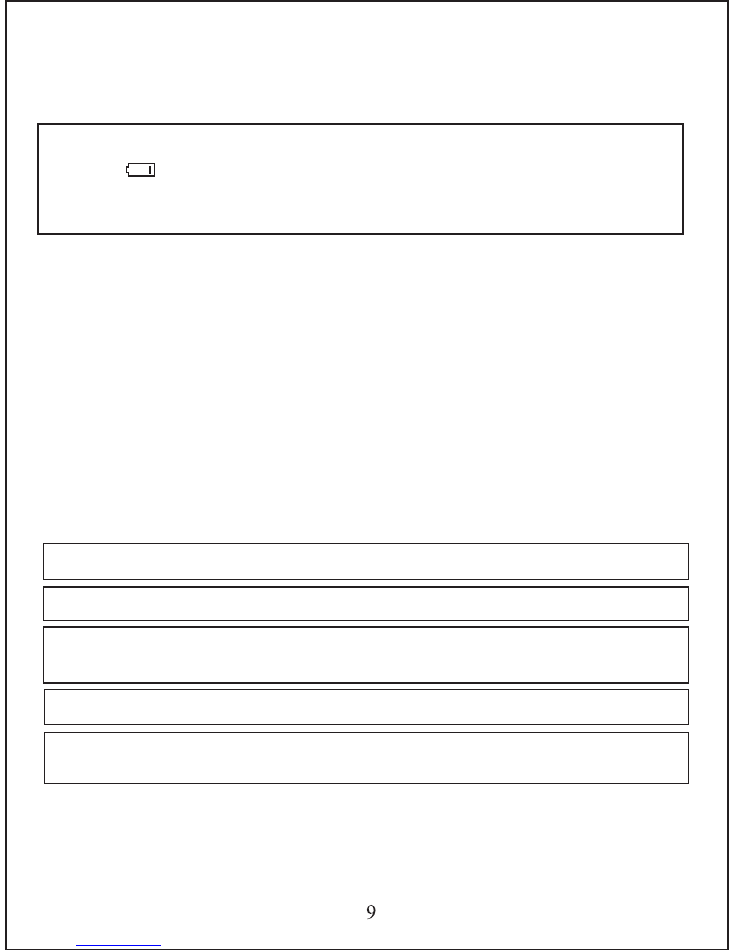
1. When the battery power is at lowest level, the battery indicator
symbol " " appears, indicating replacement of battery is required.
2. The plethysmograph can been regarded as correct if the wave is
fluctuating constantly.
Section 4
Cleaning and Disinfection
4.1 Cleaning & Disinfection
Switch off the power and take out the batteries before cleaning. Keep
the surface of the device clean and free of dust and dirt. Clean the
surface (OLED display screen included) of the unit with a soft dry
cloth. Disinfect the machine if being used in a clinical setting or by
multiple users. To disinfect, use a small amount of 70-75% density
medical alcohol on a soft dry cloth to avoid alcohol permeating into
the device.
CAUTION:
Do not leave any cleaning solution on the surface of the
device.
CAUTION:
Do not allow any liquid into the product, and do not
immerse any parts of the device into any liquids.
CAUTION:
Never use an abrasive such as steel wool or metal polish.
3.4.4 Turn the Pulse Oximeter Off
Press & hold the power button for 2 seconds. Alternatively the device
will automatically shut off after approximately 10-15 seconds.
CAUTION:
Do not use strong solvent. e.g acetone.
CAUTION:
Avoid pouring liquid on the device while cleaning.

Section 5
Troubleshooting and Maintenance
5.1 Maintenance
Replace the batteries when the battery indicator symbol is low.
Clean/disinfect surface of thе Pulse Oximeter before use.
Remove the batteries inside the battery cassette if the Pulse Oximeter
will not be operated for more than 12 months.
Store the product in a place where ambient temperature is -10 to 50
℃
and humidity is 15% to 80%.
Regularly inspect the device to make sure that no obvious damage
exists that will effect the safety and performance of device.
1. Finger is not
placed correctly.
2. Finger is trembling
or patient is moving.
Oxygen saturation or
pulse rate is unstable
1. Retry by placing the finger
in the correct position as
per instructions.
2. Ensure patient is not
moving during
measurement.
Problems
Possible Reason
Resolutions
2. Patient's perfusion
is too low to be
measured.
1. Finger is not placed
correctly.
Oxygen saturation or
pulse rate is reading
abnormally.
1. Retry by placing the finger
in the correct position as
per instructions.
2. Retry the measurement, if
still reading abnormally,
please consult healthcare
professional.
5.2 Troubleshooting
Table 5.2.1 Troubleshooting

Section 6
Specifications
Pulse Oximeter Specifications:
Physical Characteristics
Machine
Dimensions : 37mm (W)× 74mm
(
D
)
× 38mm (H)
Weight : approx: 50g
(
including 2×AAA battery
)
Problems
Possible Reason
Resolutions
1. Finger is not placed
correctly.
1. Retry by placing the finger
in the correct position as
per instructions.
Oxygen saturation or
pulse rate is abnormal
and caused alarm to
sound.
2. Patient's SpO
2
& PR
is abnormal.
2. Please consult healthcare
professional.
Pulse Oximeter
does not turn on.
1. There maybe
inadequate power
left in the batteries.
3. The Pulse Oximeter
may be damaged.
2. Batteries may have
been installed
incorrectly.
3. Please contact local
customer service center.
2. Please re-install the
batteries.
1. Please replace batteries.
1. The product is
automatically
powered off when
no signal is detected
longer than approx.
10-15 seconds.
2. Please replace the batteries.
1. This is normal.
The device
automatically
turns off.
2. There maybe
inadequate power
left in the batteries.

Retail package
Dimensions
:
90mm (W) × 120mm (D) × 67mm (H)
Gross Weight: 175g
Classifications:
:
Anti-electric Shock Type: Internally powered equipment
Anti-electric Shock Degree: Type BF equipment
EMC: Type B class IMode of operation: Continuous Operation
Enclosure Degree of ingress protection: IPX4
^
^
IPX4
means shell of this product can withstand the water from any
direction dropping to the surface.
Operating Temperature
5°C to 40°C
Relative Humidity
15% to 80% non-condensing
Air Pressure
86kPa-106kPa
0-2000 m
Power
2x AAA 1.5V alkaline battery
Less than 30mA(Normal)
Internal
Power Consumption
Operating Altitude
Operation Environmental Condition:
Storage Temperature
-10°C to 50°C
Relative Humidity
10% to 80% non-condensing
Air Pressure
60kPa-106kPa
0-2000 m
Operating Altitude
Transportation and Storage Environmental Condition:

Alarm default value
Parameter
Oxygen Saturation
Pulse Rate
Value
Upper limit: 100 / Lower limit: 90
Upper limit: 130 / Lower limit: 50
Electronics Parameters
Parameter
Oxygen Saturation Display
Pulse Rate Display
Resolution
Oxygen Saturation
Pulse Rate
Measure Accuracy
Oxygen Saturation
Pulse Rate
35-100%
30-250 BPM
1%
1 BPM
±2 BPM
Probe LED Specification
RED
Infra RED
Radiant Power
Wave Length
660±2 nm
905±2 nm
1.8 mW
2.0 mW
±2% (70%-100%)
unspecified(≤70%)
Value

Should repair be needed within the warranty
period, enclose the tear off section of this
warranty card and your proof of purchase receipt.
Please ensure all
relevant details are completed
before sending your unit in for service. Please
ensure your contact details are current and
include a brief description of the problem you are
experiencing together with your proof of
purchase.
Include the unit with all product
components in
your package. This is
extremely important, as it
will assist our repair technicians in making the
correct diagnosis of any problems.
user
in regards to
,
Customer Service

J.A.Davey Pty Ltd- Heart Sure Repairs
