Full Text Searchable PDF User Manual
connection diagram:
Fingerprint Access Control System
User Manual
Due to continuous update of our products
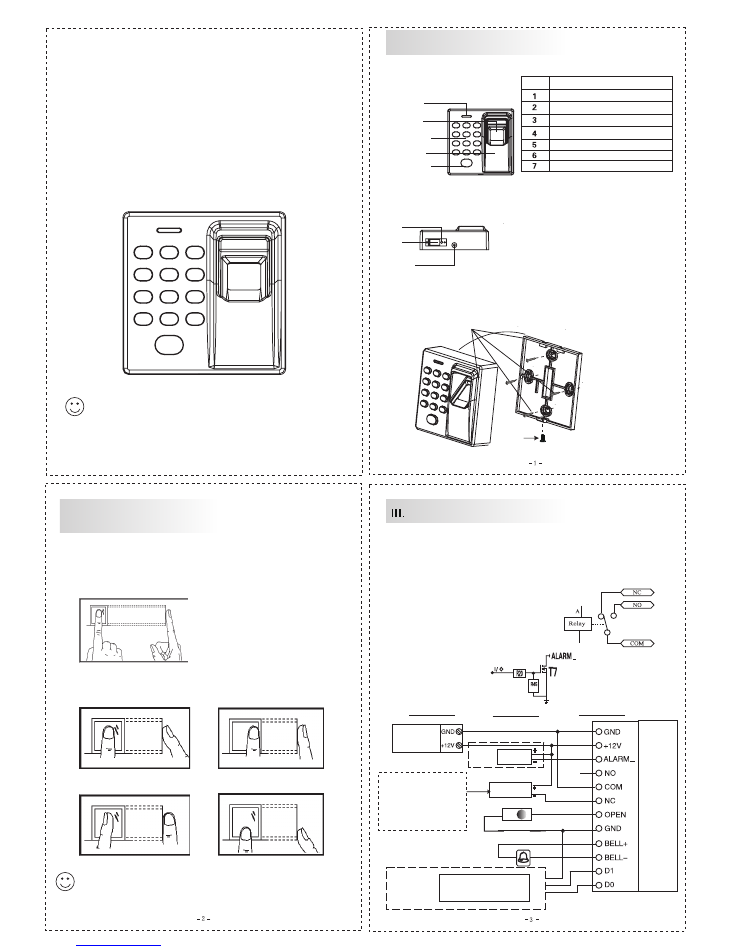
I.Product Overview and Installation Instruction
Applicable Models
Status light
Fingerprint-reading are
Keypad
Card-reading are
Doorbell
Rese
USB
Fixing hole
Operating Environment:
Room temperature: -20°C-+50°C
Relative humidity: 95%
Operating Voltage & Current:
Input DC: +12V
Standby current:≤60mA
Operating current:≤120m
Mounting screws
Set screw
II.Inputting Fingerprint
Suggested finger: index finger, middle finger or
ring finger instead of thumb or little finger
1)Correct method
Use the finger to evenly press
the center of fingerprint are
2)Wrong methods
Incomplete touch
Off cente
Turn sideway
Low position
Please input fingerprint correctly for verification,
and improper operation might
result in poor performance of this device
Ports & Wiring Diagram
Black
Wiring Diagram
Alarm Port
Relay Output Connection Diagra
High level output in case of alar
Red
Power
Alarm
Lock
Red
Black
Door open button
Gray
Blue
Orange
Purple
Yellow
Black
Pink
Light green
White
Green
Optional
Access controller
Optional
Note: negative pole
of normally-closed
to NC port;
normally-open
end to NO port
S.N.
Functions
Numeric keys
Tamper alarm
Reading head for data output
86mm box-type panel for installation
Built-in card reader
Dark-background fingerprint reader
User verification with fingerprint or card
Connect this device and breaker via NO, COM and NC
output to separate from internal circuit of this device.
Once relay gets closed, electric lock is released.
Contact output current:3A;
please refer to right diagram.
Connection Diagram
Access Control System
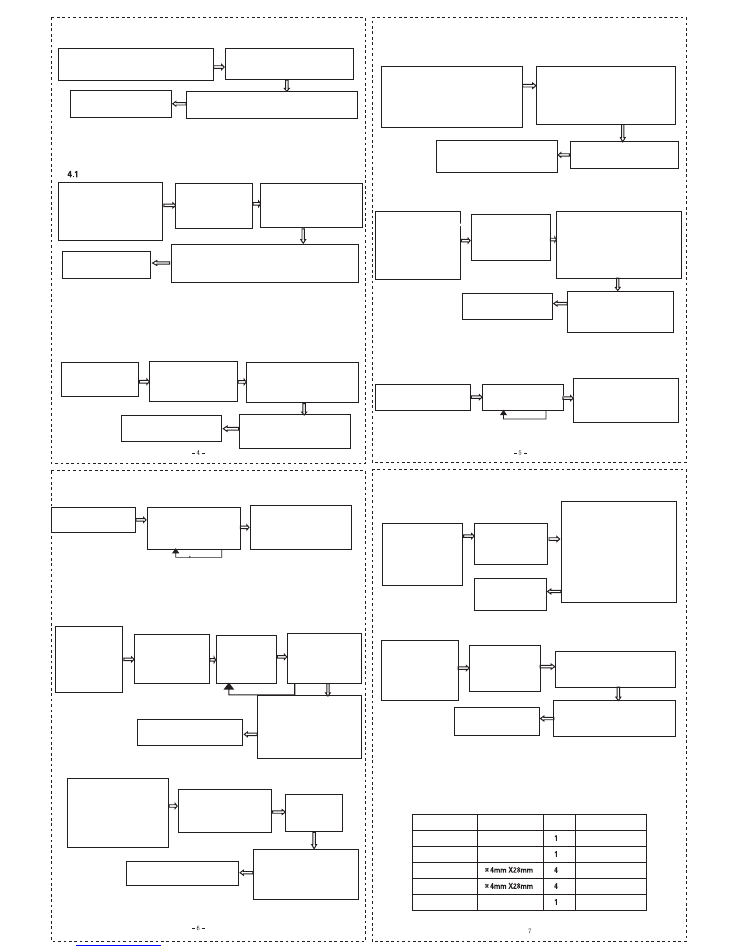
IV.Administrator Operation
4.Exit
3.Verification request succeeds
(while the blue light turns on)
2.Enter administrator password
(initial password: 123456)
1.Press [*]and there is a
beep while the red light turns on
Remarks: once verification request succeeds,
it is allowed to register administrator
and the initial password will be out of use.
Registering Administrator
5.Exit (by pressing [#])
4.Once registration request
succeeds there is a long beep
2.Press (*1)
and the orange
1.Enter administrator password
verification request succeeds
the blue light turns on
3.Register administrator via
fingerprint twice or read card once)
Remarks:
1.It is allowed to register at most 5 administrators via fingerprint or card
2.In case administrator quantity reaches the maximum value, they will be
cleared according to serial number.
4.2 Missing Administrator Password
1.Power off this device
2.Power on tamper
switch to give an
3.Enter initial password
blue light turns on
4.Register administrator again
5.Exit (by pressing “#”)
V:Registering User
5.1 Register Users Automatically
4.Exit (by pressing “#”)
3.Once registration
request succeeds
2.Register administrator via
fingerprint twice or read card once)
1.Enter administrator password
the blue light turns on
5.2 Register Users by Adding Employee ID
5.Exit (by pressing “#”)
4.Once registration request
beep and the blue light blinks once
3.Register user via fingerprint
(input fingerprint twiceread card
once or enter password twice)
2.Enter employee
ID #(1~4 digits)
1.Enter administrator
Once verification request
blue light turns on.
VI:User Operation
6.1 User Verification via Fingerprint or Card
1.Standby mode. 2.Input fingerprint
VII:Deleting Users
7.1 Delete a User
1.Enter administrator
Once verification request
blue light turns on
2.Press [*2]
or enter administrator
3.Enter employee
ID# input fingerprint
6.Exit (by pressing “#”)
4.In case of incorrect
ID# fingerprint or card
there is two beeps and
5.In case the user
is in use delete it.
is a long beep
7.2 Delete All Users
1.Enter administrator
request succeeds the
2.Press [*2] or
enter administrator
3.Enter
4.Delete all users
There is a long beep
and the blue light
5.Exit (by pressing “#”)
8.2 Setting Unlocking Time
1.Enter administrator
request succeeds the
blue light turns on
2.Press [*3]
and the orange
3.Set unlocking time
(0~99 seconds
and press # to for confirmation)
4.Setup succeeds
There is a long beep
and the blue light blinks once
5.Exit
IX:Unpacking
Remarks
Rocket screwdriver
Specifications
Description
Device
Packaging box
Plastic plugs
Self-tapping screws
Screwdriver
Quantity
For mounting and fixing
For mounting and fixing
1.Enter administrator
verification(Once succeeds
the blue light turns on
2.Press [*9]
and the orange
3.Set system
4.Exit (by
VIII:Access Control System Management
8.1 System Settings
6.2 User Verification via Password
1.Standby mode
2.Enter employee ID
press # to for confirmation
and enter password
verification request succeeds,
for verification.Once
fingerprint or card(input
password for verification
succeeds, the
card or password
succeedsthere is a long
or read card.
passwordfor
light turns on
light turns on
password for
verification Once verification
(by pressing [#])
light turns on
for verification.Once
fingerprint or card(input
and theblue light blinks once
and dismantle it
alarm for 30 seconds
(*123456)and the
password
password for verification.
succeeds the
or read card
the red light turns on
light blinks once
blue light turns on
password
(0000#)
blinks once
Note: 5 seconds have been set as factory default.
(by pressing “#”)
3.Verification request succeed
(There is a long beep sound
and the blue light blinks once.)
Verification request fails.
(it beeps twice and the red light turns on.
Verification request fails.
(it beeps twice and the red light turns on.)
3.Verification request succeed
(There is a long beep sound
and the blue light blinks once.)
it beeps twice and the
red light turns on
There and the blue
password for verification
Once verification
verification request
Press [*90#] for menu
initialization press [*91#]
for system initialization
press [*92#] to delete
administrator and then
press [#] for confirmation.
pressing “#”)