Full Text Searchable PDF User Manual
1
❏
❏
❏
❏
❏
Index
Soldering point.
Male connector.
Female connector.
M/F faston connector.
Test point.
Supply voltage.
Logic supply ground.
Analog supply ground.
Chassis ground.
Earth ground.
Flag joined with one or more flags
GENERALMUSIC S.p.A. Sales Division: 47842 S.Giovanni in Marignano (RN) ITALY - Via delle Rose, 12
Phone +39(0)541/959511 - Fax +39(0)541/957404 - GENERALMUSIC on the NET: http://www.generalmusic.com
pRP6, pRP7 and pRP8 Test Procedures.
pRP6 Opening Instructions.
pRP7 and pRP8 Opening Instructions.
2
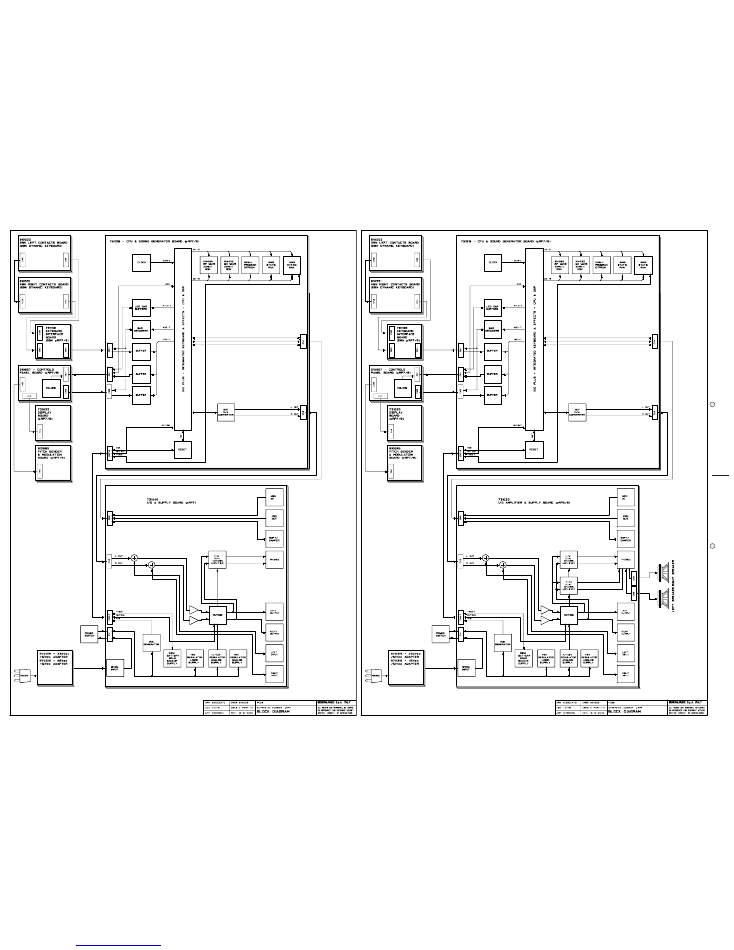
pRP7 and pRP8 Block Diagrams.
3
Timing Table, pRP6 Block Diagram.
5
6
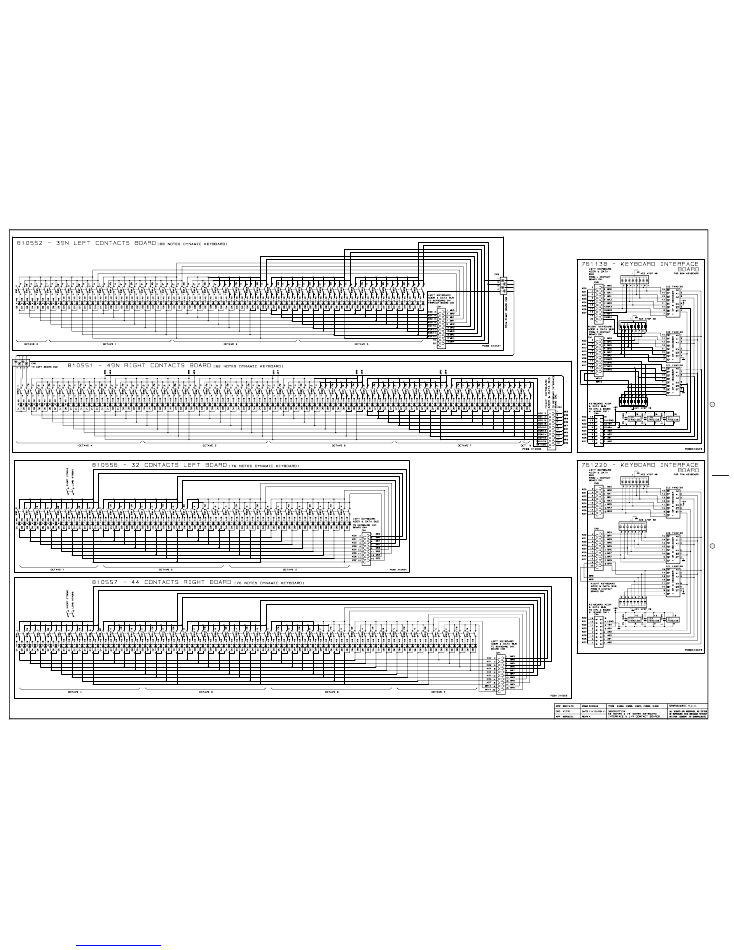
L/R Contact, Keyboard Interface Board.
7
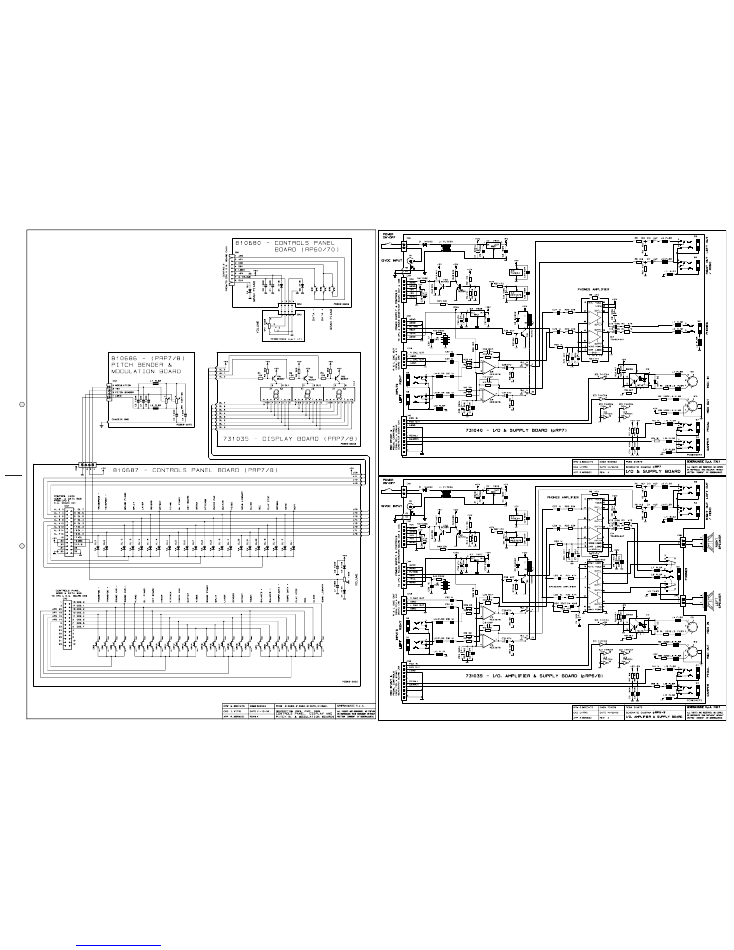
Controls Panel and Display Boards, I/O Amplifier & Supply Boards.
8
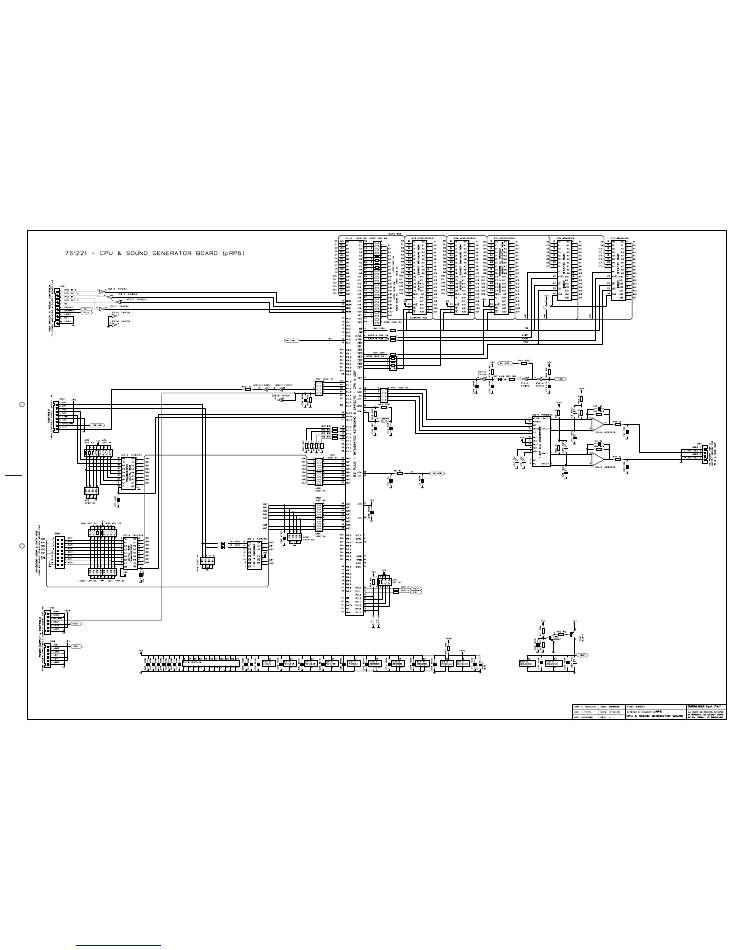
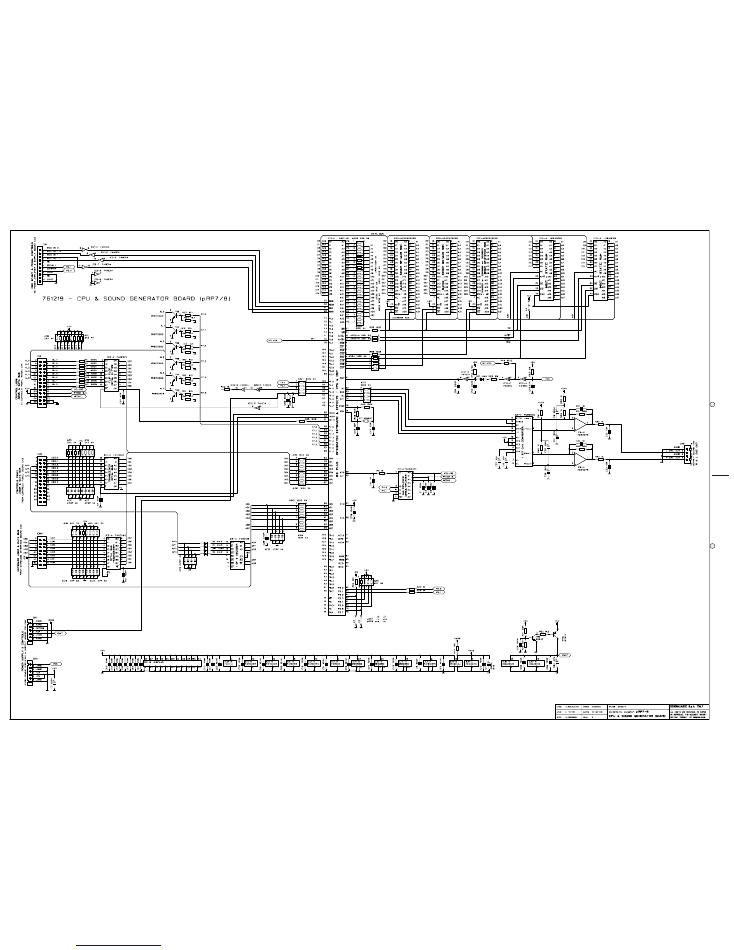
pRP7 and pRP8 Cpu & Sound Generator Board.
9
10
11
Spare Part List.
pRP6 Cpu & Sound Generator Board.
4
SERVICE MANUAL
CODE: 270245
Warnings
with the same signal name inscribed.
Address
ATTENTION
Observe
precautions when handling electrostatic sensitive devices.
Notice
Service must be carried out by qualified personnel only. Any tampering carried out by unqualified personnel during the guarantee period
will forfeit the right to guarantee.
For a correct operation of the instrument, after having switched off, be careful to wait at least 3 seconds before switching on again.
To improve the device's specifications, the schematic diagrams may be subject to change without prior notice.
All components marked by this symbol have special safety characteristics, when replacing any of these components use only
manufacturer's specified parts.
The (µ) micro symbol of capacitance value is substituted by U.
The (
Ω
) omega symbol of resistance value is substituted by E.
The electrolytic capacitors are 25Vdc rated voltage unless otherwise specified.
All resistors are 1/8W unless otherwise specified.
All switches shown in the "OFF" position. All DC voltages measured to ground with a voltmeter 20KOhm/V.
✔
✔
✔
✔
✔
✔
✔
✔
✔
✔
✔
✔
✒
☎
1st edition december 2000
❏
❏
❏
❏
❏
2
APP.
CKD
DRW
REV:
DISK:
DWG#
PRT:
PCB#
GENERALMUSIC S.p.A. ITALY
ALL RIGHTS ARE RESERVED, NO COPIES
WRITTEN CONSENT BY GENERALMUSIC.
OR REPRODUCE THIS DOCUMENT WITHOUT
BOCCATO
VITRI
MORBIDI
500932
1/1
21/12/00
PRP6
OPENING INSTRUCTIONS
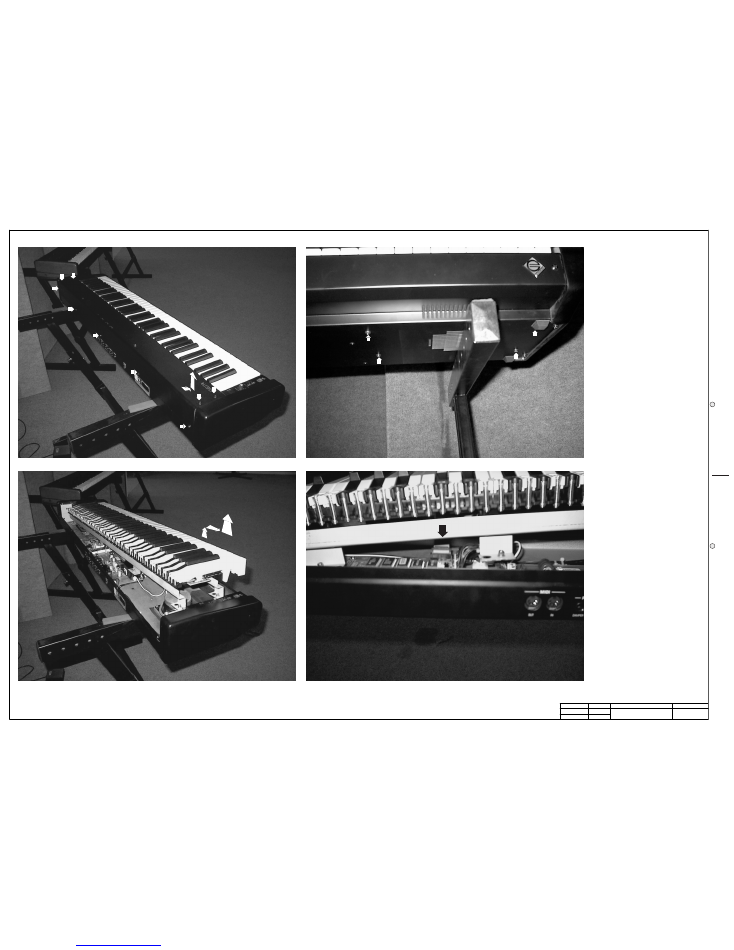
pRP6 Opening Instructions
Fig.1
Unscrew the 9 fixing screws (A) and move the front panel towards you and lift it up .
Fig.2
To remove the keyboard unscrew the 10 fixing screws (B) underneath it.
Fig.3
To remove the keyboard lift it up some centimeters from the left end only, shift it to the left how it is suf-
ficient to free the right side and extract it entirely. Note: The attraction of the speaker magnetic core can cause
some difficulty.
Fig.4
BE CAREFUL:
disconnect the keyboard cable (C) without forcing it when you remove the keyboard, to
connect the keyboard out of the chassis is needed a longest cable (GM ordering code 840532).
A
A
A
A
A
A
A
A
A
B
B
B
B
C
3
❏
❏
❏
❏
❏
APP.
CKD
DRW
REV:
DISK:
DWG#
PRT:
PCB#
GENERALMUSIC S.p.A. ITALY
ALL RIGHTS ARE RESERVED, NO COPIES
WRITTEN CONSENT BY GENERALMUSIC.
OR REPRODUCE THIS DOCUMENT WITHOUT
BOCCATO
VITRI
MORBIDI
500933
1/1
22/12/00
PRP7/8
OPENING INSTRUCTIONS
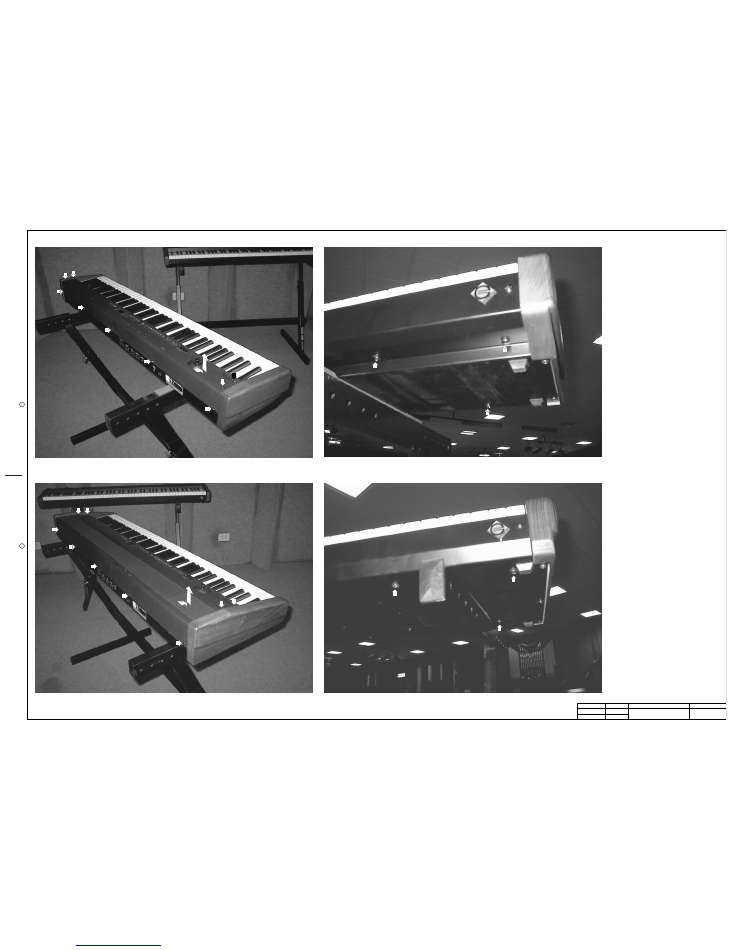
pRP7 Opening Instructions
Fig.1
Unscrew the 9 fixing screws (A) and move the front panel towards you and lift it up .
Fig.2
To remove the keyboard unscrew the 11 fixing screws (B) underneath it.
A
A
A
A
A
A
A
A
A
B
B
B
pRP8 Opening Instructions
Fig.1
Unscrew the 9 fixing screws (A) and move the front panel towards you and lift it up .
Fig.2
To remove the keyboard unscrew the 11 fixing screws (B) underneath it.
A
A
A
A
A
A
A
A
A
B
B
B

❏
❏
❏
❏
❏
4
pRP6 TEST PROCEDURE
This procedure are not intended to repair a fault but only to check the proper instrument operations after a repairing
execution. The procedures that follow must be executed in the order specified.
Instrument and Tools
1)
Dual trace oscilloscope (Note: the Oscilloscope must be earth insulated).
2)
Sinusoidal signal generator.
3)
Digital Multimeter.
4)
N.1 Midi cable.
5)
N.1 Stereo jack plug.
6)
N.2 Mono jack plug.
Setup
l
Insert the mono jacks into the LEFT and RIGHT OUTPUTS.
l
Check jumper positions: for pRP6 none must be shorted.
Supplies Check
l
Check with the Multimeter the following voltages on "Cpu & Sound Generator Board":
l
Switch off
CN7 pin1-4 = +3.6Vdc (+VBAT for memory backup)
l
Switch on
CN7 pin1-4 = +4.8Vdc (+VBAT for battery recharging)
CN7 pin1-5 = +5Vdc (+5VB for analog DAC supply)
CN8 pin2-4 = +5Vdc (+5V for digital supply)
Memory and System Reset
l
To Re-set the instrument press the two SOUND/DATA buttons while holding pressed the GRAND PIANO button.
The Led turns off and after some seconds lights on again. This operation clear all data in memory.
Speakers Check
l
Press and hold C6 note key and then GRAND PIANO and SOUND/DATA UP buttons: playing a note (OBOE preset)
it must be heard from right speaker.
l
Press and hold D6 note key and then GRAND PIANO and SOUND/DATA UP buttons: playing a note (OBOE preset)
it must be heard from left speaker.
Right & Left Output Levels Check
Check the levels as follow:
l
Set the VOLUME at max.
l
Connect the probes of the oscilloscope between the pins of the speakers, set them at 1ms/div. 5V/div.
l
Press and hold E6 note key then GRAND PIANO and SOUND/DATA UP button: Play the C5 note (OBOE preset) with
the maximum dynamic, the note must be heard from each speaker without distortions or oscillations, the level
displayed on the oscilloscope screen must be 17.5±1Vpp.
l
Connect the two probe tips of the oscilloscope to the tip and ring contacts of the stereo jack plug plugged into
PHONES and a ground clip to the sleeve of the same jack plug, set it at 1ms/div. 1V/div.
l
Play the C5 note with the maximum dynamic, the level displayed on the oscilloscope screen must be 4.2±0.1Vpp.
l
Connect the first trace of the oscilloscope to the tip and sleeve contacts of the mono jack plugged into RIGHT
OUTPUT, set it at 1ms/div. 0.5V/div.
l
Connect the other trace of the oscilloscope to the tip and sleeve contacts of the stereo jack plugged into LEFT
OUTPUT, set it at 1ms/div. 0.5V/div.
l
Play the C5 note with the maximum dynamic, the level displayed on the oscilloscope screen must be 1.6±0.2Vpp.
Right & Left Inputs Levels Check
Check the levels as follow:
l
Set the sinusoidal generator at 1KHz 400mVpp.
l
Connect the generator to the RIGHT INPUT.
l
Set the oscilloscope at 2ms/div. 0.2V/div.
l
A sinusoidal signal of 1±0.1Vpp must be showed on the scope screen.
l
Also check the LEFT INPUT.
Pedals Check
l
Plug the switch pedals into the DAMPER JACK socket, press down the pedal and then press a note key: the
instrument plays the note, release the note key and the sound holds on, release the pedal and the sound shuts
off.
l
Plug the switch pedals into the PEDAL JACK socket, press a note key while pressing the pedal the sound is more
soft.
Midi In/Out Check
l
Set the Local Off pressing and holding F7 note key and then SOUND/DATA DOWN button.
l
Playing some notes you do not hear sound, connect the midi cable between MIDI IN and OUT sockets, play again
and now the instrument sound.
l
Restore the Local On pressing and holding F7 note key and then SOUND/DATA UP button.
Reliability Check
Before reassembling the instrument and before return it to the user, it is a goal verify its reliability:
Leaving it switched on and operating with greatest caution, carefully shake the boards and connections using an
insulated tool to find faulty contacts, bad solderings and so on, at the same time verify the instrument working.
Start the Demo pressing SOUND/DATA DOWN and SOUND/DATA UP simultaneously, leave it switched on for a long
time verifing its functionality occasionnally.
pRP7 TEST PROCEDURE
This procedure are not intended to repair a fault but only to check the proper instrument operations after a repairing
execution. The procedures that follow must be executed in the order specified.
Instrument and Tools
1)
Dual trace oscilloscope (Note: the Oscilloscope must be earth insulated).
2)
Sinusoidal signal generator.
3)
Digital Multimeter.
4)
N.1 Midi cable.
5)
N.1 Stereo jack plug.
6)
N.2 Mono jack plug.
Setup
l
Insert the mono jacks into the LEFT and RIGHT OUTPUTS.
l
Check jumper positions: for pRP7 J3 is shorted and J2 is open.
Supplies Check
l
Check with the Multimeter the following voltages on "Cpu & Sound Generator Board":
l
Switch off
CN7 pin1-4 = +3.6Vdc (+VBAT for memory backup)
l
Switch on
CN7 pin1-4 = +4.8Vdc (+VBAT for battery recharging)
CN7 pin1-5 = +5Vdc (+5VB for analog DAC supply)
CN8 pin2-4 = +5Vdc (+5V for digital supply)
Memory and System Reset
l
To Re-set the instrument press the two SOUND/VARIATIONS buttons while holding pressed the GRAND PIANO
button.
All Leds turn off and after some seconds light on again. This operation clear all data in memory.
Speakers Check
l
Press and hold A6 note key and then GRAND PIANO and TEMPO/DATA UP buttons: playing a note (OBOE preset)
it must be heard from right speaker.
l
Press and hold G6 note key and then GRAND PIANO and TEMPO/DATA UP buttons: playing a note (OBOE preset)
it must be heard from left speaker.
Right & Left Output Levels Check
Check the levels as follow:
l
Set the VOLUME at max.
l
Connect the two probe tips of the oscilloscope to the tip and ring contacts of the stereo jack plug plugged into
PHONES and a ground clip to the sleeve of the same jack plug, set it at 1ms/div. 1V/div.
l
Press and hold B6 note key then GRAND PIANO and TEMPO/DATA UP button: Play the C5 note (OBOE preset) with
the maximum dynamic, the level displayed on the oscilloscope screen must be 4.2±0.1Vpp.
l
Connect the first trace of the oscilloscope to the tip and sleeve contacts of the mono jack plugged into RIGHT
OUTPUT, set it at 1ms/div. 0.5V/div.
l
Connect the other trace of the oscilloscope to the tip and sleeve contacts of the stereo jack plugged into LEFT
OUTPUT, set it at 1ms/div. 0.5V/div.
l
Play the C5 note with the maximum dynamic, the level displayed on the oscilloscope screen must be 1.6±0.2Vpp.
Right & Left Inputs Levels Check
Check the levels as follow:
l
Set the sinusoidal generator at 1KHz 400mVpp.
l
Connect the generator to the RIGHT INPUT.
l
Set the oscilloscope at 2ms/div. 0.2V/div.
l
A sinusoidal signal of 1±0.1Vpp must be showed on the scope screen.
l
Also check the LEFT INPUT.
Pedals Check
l
Plug the switch pedals into the DAMPER JACK socket, press down the pedal and then press a note key: the
instrument plays the note, release the note key and the sound holds on, release the pedal and the sound shuts
off.
l
Plug the switch pedals into the PEDAL JACK socket, press a note key while pressing the pedal the sound is more
soft.
Midi In/Out Check
l
Set the Local Off pressing and holding B7 note key and then TEMPO/DATA DOWN button.
l
Playing some notes you do not hear sound, connect the midi cable between MIDI IN and OUT sockets, play again
and now the instrument sound.
l
Restore the Local On pressing and holding B7 note key and then TEMPO/DATA UP button.
Reliability Check
Before reassembling the instrument and before return it to the user, it is a goal verify its reliability:
Leaving it switched on and operating with greatest caution, carefully shake the boards and connections using an
insulated tool to find faulty contacts, bad solderings and so on, at the same time verify the instrument working.
Start the Demo pressing the two SOUND/VARIATIONS buttons simultaneously, finally leave it switched on for a long
time verifing its functionality occasionnally.
pRP8 TEST PROCEDURE
This procedure are not intended to repair a fault but only to check the proper instrument operations after a repairing
execution. The procedures that follow must be executed in the order specified.
Instrument and Tools
1)
Dual trace oscilloscope (Note: the Oscilloscope must be earth insulated).
2)
Sinusoidal signal generator.
3)
Digital Multimeter.
4)
N.1 Midi cable.
5)
N.1 Stereo jack plug.
6)
N.2 Mono jack plug.
Setup
l
Insert the mono jacks into the LEFT and RIGHT OUTPUTS.
l
Check jumper positions: for pRP8 J2 is shorted and J3 is open.
Supplies Check
l
Check with the Multimeter the following voltages on "Cpu & Sound Generator Board":
l
Switch off
CN7 pin1-4 = +3.6Vdc (+VBAT for memory backup)
l
Switch on
CN7 pin1-4 = +4.8Vdc (+VBAT for battery recharging)
CN7 pin1-5 = +5Vdc (+5VB for analog DAC supply)
CN8 pin2-4 = +5Vdc (+5V for digital supply)
Memory and System Reset
l
To Re-set the instrument press the two SOUND/VARIATIONS buttons while holding pressed the GRAND PIANO
button.
All Leds turn off and after some seconds light on again. This operation clear all data in memory.
Speakers Check
l
Press and hold A6 note key and then GRAND PIANO and TEMPO/DATA UP buttons: playing a note (OBOE preset)
it must be heard from right speaker.
l
Press and hold G6 note key and then GRAND PIANO and TEMPO/DATA UP buttons: playing a note (OBOE preset)
it must be heard from left speaker.
Right & Left Output Levels Check
Check the levels as follow:
l
Set the VOLUME at max.
l
Connect the probes of the oscilloscope between the pins of the speakers, set them at 1ms/div. 5V/div.
l
Press and hold B6 note key then GRAND PIANO and TEMPO/DATA UP button: Play the C5 note (OBOE preset) with
the maximum dynamic, the note must be heard from each speaker without distortions or oscillations, the level
displayed on the oscilloscope screen must be 17.5±1Vpp.
l
Connect the two probe tips of the oscilloscope to the tip and ring contacts of the stereo jack plug plugged into
PHONES and a ground clip to the sleeve of the same jack plug, set it at 1ms/div. 1V/div.
l
Play the C5 note with the maximum dynamic, the level displayed on the oscilloscope screen must be 4.2±0.1Vpp.
l
Connect the first trace of the oscilloscope to the tip and sleeve contacts of the mono jack plugged into RIGHT
OUTPUT, set it at 1ms/div. 0.5V/div.
l
Connect the other trace of the oscilloscope to the tip and sleeve contacts of the stereo jack plugged into LEFT
OUTPUT, set it at 1ms/div. 0.5V/div.
l
Play the C5 note with the maximum dynamic, the level displayed on the oscilloscope screen must be 1.6±0.2Vpp.
Right & Left Inputs Levels Check
Check the levels as follow:
l
Set the sinusoidal generator at 1KHz 400mVpp.
l
Connect the generator to the RIGHT INPUT.
l
Set the oscilloscope at 2ms/div. 0.2V/div.
l
A sinusoidal signal of 1±0.1Vpp must be showed on the scope screen.
l
Also check the LEFT INPUT.
Pedals Check
l
Plug the switch pedals into the DAMPER JACK socket, press down the pedal and then press a note key: the
instrument plays the note, release the note key and the sound holds on, release the pedal and the sound shuts
off.
l
Plug the switch pedals into the PEDAL JACK socket, press a note key while pressing the pedal the sound is more
soft.
Midi In/Out Check
l
Set the Local Off pressing and holding B7 note key and then TEMPO/DATA DOWN button.
l
Playing some notes you do not hear sound, connect the midi cable between MIDI IN and OUT sockets, play again
and now the instrument sound.
l
Restore the Local On pressing and holding B7 note key and then TEMPO/DATA UP button.
Reliability Check
Before reassembling the instrument and before return it to the user, it is a goal verify its reliability:
Leaving it switched on and operating with greatest caution, carefully shake the boards and connections using an
insulated tool to find faulty contacts, bad solderings and so on, at the same time verify the instrument working.
Start the Demo pressing the two SOUND/VARIATIONS buttons simultaneously, finally leave it switched on for a long
time verifing its functionality occasionnally.
5
❏
❏
❏
❏
❏
❏
❏
❏
❏
❏
6
7
❏
❏
❏
❏
❏
❏
❏
❏
❏
❏
8
9
❏
❏
❏
❏
❏
❏
❏
❏
❏
❏
10
11
❏
❏
❏
❏
❏
Spare Part List
Legend
EU
= Specify European Version (230Vac)
US
= Specify United States Version (115Vac)
Baldwin
= Baldwin version
Gem
= Gem version
PRP6
= PRP6 model only
PRP7
= PRP7 model only
PRP8
= PRP8 model only
Code
Description
Accessories
970315
230Vac/12VDc Adapter 2.2A (EU)
970316
115Vac/12VDc Adapter 2.2A (US)
340965
Music Stand
271313
Owner's Manual (All Languages) (PRP6)
271314
Owner's Manual (All Languages) (PRP7)
271323
Owner's Manual (All Languages) (PRP8)
Optional Accessories
130301
2mt Midi Cable
970110
X-Stand
970941
Carring Bag (PRP6)
970942
Carring Bag (PRP7)
970134
Piano Sustain Pedal
970116
Suatain Pedal
Cabinet Assembly
660713
Top Chassis (PRP6)
660710
Bottom Chassis (PRP6)
660709
Bottom Chassis (PRP7)
660708
Bottom Chassis (PRP8)
653502
Left Side (PRP6)
262310
Left Side (PRP7)
262304
Left Side (PRP8)
653501
Right Side (PRP6)
262309
Right Side (PRP7)
262303
Right Side (PRP8)
340916
Button for Power Switch (PRP6)
340435
Adhesive Foot
340186
Adhesive Cable Fixing
340090
Music Stand Bush
220121
8ohm 4" Full Range Speaker (PRP6)(PRP8)
210277
Speaker Cloth (PRP6)
210276
Speaker Gasket (PRP6)
262307
Speaker Box (PRP8)
210020
1.5x12mm Adhesive Red Felt (specify mt)
210016
1x10mm Adhesive Black Felt (specify mt)
180793
31x120mm "Gem" Adhesive Plate
180675
40.5x12 "Gem" Adhesive Plate
180674
20x24mm "GM" Logo Adhesive Plate
171835
Angular Support for Keyboard
171833
Angular Fixing for Left Side (PRP6)(PRP7)
171832
Angular Fixing for Right Side (PRP6)(PRP7)
171831
Angular Fixing for Left Side (PRP8)
171830
Angular Fixing for Right Side (PRP8)
171766
Mains Switch Support (PRP6)
120971
M4x8tc Screw to fix the Controls Panel
120600
M4 Self-Locking Nut
120581
M3 Nut
120489
14x6.4x2 Black Nylon Washer
120341
WL4x20tt Black Screw
120319
B3.5x19tc Black Screw
120272
WL3x10tc Black Screw
120118
M4x10tc Black Screw
120028
M3x6tc Black Screw
120003
M3x8tc Black Screw
120970
M5x17 Brassed Screw
120525
5mm Grower Washer
120120
M5x10tc Black Screw
120374
WL4x15tt Black Screw
110285
4A 250Vac Bipolar Power Switch (PRP7)(PRP8)
PRP6 Keyboard Assembly
720631
TP8 Keyboard Assembly with Interface Board (PRP6)
840808
*
16 Wires 30cm Length Flat Cable
840761
*
20 Wires 12.5cm Length Flat Cable
761220
*
Keyboard Inferface Board (Pcb#310573)
141018
**
20 Contacts Vert Female Connector
141016
**
16 Contacts Vert Female Connector
140854
**
16 Contacts Vert Male Connector Din41651
100606
**
74HC138 1 Of 8 Decoder
010660
**
470p 10% 50V X8 Cap Array
010595
**
100n 50V -20+80% Ceramic Cap. Multilayer
720630
*
76N TP8 Keyboard Assembly
810557
**
44N Right Contacts Board (Pcb#310566)
340211
***
12 Dual Contact Rubber Strip
141018
***
20 Contacts Vert Female Connector
080103
***
1N4148 100mA 75V Signal Diode
810556
**
32N Left Contacts Board (Pcb#310565)
340211
***
12 Dual Contact Rubber Strip
141016
***
16 Contacts Vert Female Connector
080103
***
1N4148 100mA 75V Signal Diode
500078
**
76N Mechanical Keyboard Assembly (TP8)
160212
***
Key Return Spring (TP8)
151261
***
First E Key (TP8 20g)
151260
***
Last G Key (TP8 20g)
151180
***
Sharp Key (TP8 11g)
151179
***
B Key (TP8 20g)
151178
***
A Key (TP8 20g)
151177
***
G Key (TP8 20g)
151176
***
F Key (TP8 20g)
151175
***
E Key (TP8 20g)
151174
***
D Key (TP8 20g)
151173
***
C Key (TP8 20g)
340092
*
5mm Board Spacer
120288
*
WL3x20tc Black Screw
PRP7/8 Keyboard Assembly
720636
TP23 Keyboard Assembly with Interface Board (PRP7)(PRP8)
841071
*
20 Wires 30cm Length Flat Cable
840761
*
20 Wires 12.5cm Length Flat Cable
761138
*
Keyboard Interface Board (Pcb#310573)
141018
**
20 Contacts Vert Female Connector
140854
**
16 Contacts Vert Male Connector Din41651
100606
**
74HC138 1 Of 8 Decoder
720632
*
88N TP23 Keyboard Assembly
810552
**
39N Left Contacts Board (Pcb#310531)
340764
***
3 Dual Contacts Rubber Strip
340211
***
12 Dual Contact Rubber Strip
141018
***
20 Contacts Vert Female Connector
141010
***
4 Contacts Vert Female Connector
080103
***
1N4148 100mA 75V Signal Diode
810551
**
49N Right Contacts Board (Pcb#310530)
340212
***
13 Dual Contact Rubber Strip
340211
***
12 Dual Contact Rubber Strip
141018
***
20 Contacts Vert Female Connector
141010
***
4 Contacts Vert Female Connector
080103
***
1N4148 100mA 75V Signal Diode
160220
**
Key Return Spring (TP23)
151256
**
Last C Key (TP23)
151255
**
First A Key (TP23)
151254
**
Sharp Key (TP23)
151253
**
B Key (TP23)
151252
**
A Key (TP23)
151251
**
G Key (TP23)
151250
**
F Key (TP23)
151249
**
E Key (TP23)
151248
**
D Key (TP23)
151247
**
C Key (TP23)
340092
*
5mm Board Spacer
120288
*
WL3x20tc Black Screw
PRP6 Controls Panel Assembly
820607
Controls Panel Assembly (PRP6)
810680
*
Controls Panel Board (Pcb#310662)
340456
**
Led Spacer
140899
**
20 Contacts Strip
140529
**
Microswitch 12V 50mA 0.25mm
120808
**
12mm Spacer
080752
**
Led 3mm Wide Diffused Red
080103
**
1N4148 100mA 75V Signal Diode
074593
**
10KB 9mm Vert. Rotary Potentiometer
653452
*
Left Cheek Block (1)
653450
*
<Grand-Piano> Button
653419
*
<< >> Rubber Pad
347360
*
Knob
120294
*
WL3x6.5tc Screw
PRP7/8 Controls Panel Assembly
820622
Controls Panel Assembly (PRP7)
820623
Controls Panel Assembly (PRP8)
810687
*
Controls Panel Board (Pcb#310676)
841267
**
26 Wires 35cm Length Flat Cable
841195
**
26 Wires 25cm Length Flat Cable
731035
**
Display Board (Pcb#310668)
090194
***
BC560 TO92 LN Pnp Transistor
080717
***
HDN1105 7 Segments Display
340091
**
4mm Led Spacer
140529
**
Microswitch 12V 50mA 0.25mm
120581
**
M3 Nut
120028
**
M3x6tc Black Screw
080752
**
Led 3mm Wide Diffused Red
080103
**
1N4148 100mA 75V Signal Diode
070551
**
10K Linear 30mm Slider Potentiometer
010595
**
100n 50V -20+80% Ceramic Cap. Multilayer
810686
*
Pitch & Modulation Board (Pcb#310675)
230569
**
FL5R200PNT EMI Coil For Signal
120272
**
WL3x10tc Black Screw
070700
**
10K+10K Linear Joystik Potentiometer
010595
**
100n 50V -20+80% Ceramic Cap. Multilayer
710651
*
Speakers Grid (PRP8)
660712
*
Top Chassis & Controls Panel (PRP7)
660711
*
Top Chassis & Controls Panel (PRP8)
653476
*
<Play/Rec> Rubber Pad
653475
*
<< >> Rubber Pad
653474
*
<+ -> Rubber Pad
653473
*
<Grand Piano> Rubber Pad
653460
*
<Click/Song Library> Rubber Pad
653459
*
<Split...Touch> Rubber Pad
653458
*
<- + Piano...Vibes> Rubber Pad
340820
*
Slider Knob
340523
*
6.5mm Spacer
340512
*
Slider Potentiometer Guide
340277
*
Joystick Support
340276
*
Joystick Knob
340120
*
Plexiglass Display Screen
340092
*
5mm Board Spacer
340090
*
Music Stand Bush
210275
*
Speaker Foam (PRP8)
210020
*
1.5x12mm Adhesive Red Felt (specify mt)
120682
*
M3 Threaded Insert-Bush For Knob
120581
*
M3 Nut
120276
*
B2.9x6.5mm Screw
120543
*
4.2x9x1.5 Washer (PRP8)
120312
*
WL4x10tt Black Screw (PRP8)
PRP7 I/O & Supply Board
731040
I/O & Supply Board (Pcb#310673) (PRP7)
340138
*
Dc-Socket Reinforcement
230569
*
FL5R200PNT EMI Coil For Signal
230559
*
20uH 50V 3A Dc Line Filter
230527
*
BL02RN2-R62 EMI Coil For Signal
170716
*
TO220 38mm height Heatsink
140217
*
Jack Slim Horizontal S-F Socket
140212
*
5 Poles Din Horizontal Female Socket
140211
*
Dc Horizontal Male Socket
140207
*
Jack Horizontal F Socket (with dual switch)
120582
*
M3 Nut
120521
*
3mm Grower Washer
120272
*
WL3x10tc Black Screw
120003
*
M3x8tc Black Screw
110305
*
Relay 12V / 2 Switch 1A 250Vac
110282
*
3.6V 60mAh Nicd Battery
106007
*
TDA8542AT SOIC 2X1.5W BTL Audio Amplifier
100919
*
MC33078 Dual LN Operational Amplifier
100602
*
74HC04 Hex Inverter
100059
*
7805 +5V 1A Voltage Regulator
100035
*
6N138 Optocoupler
090183
*
BC550 TO92 LN Npn Transistor
080156
*
1N4002 1A 100V Rectifier Diode
080103
*
1N4148 100mA 75V Signal Diode
052056
*
47K 1/8w 5% Resistor
052054
*
33K 1/8w 5% Resistor
052052
*
22K 1/8w 5% Resistor
052050
*
15K 1/8w 5% Resistor
052049
*
12K 1/8w 5% Resistor
052048
*
10K 1/8w 5% Resistor
052046
*
6K8 1/8w 5% Resistor
052045
*
5K6 1/8w 5% Resistor
052044
*
4K7 1/8w 5% Resistor
052038
*
1K5 1/8w 5% Resistor
052037
*
1K2 1/8w 5% Resistor
052036
*
1K 1/8w 5% Resistor
052028
*
220E 1/8w 5% Resistor
052024
*
100E 1/8w 5% Resistor
050211
*
47E 1/4W 5% Resistor
030805
*
2200u 25V 20% Vert Electrolytic Capacitor
030715
*
1000u 6v3 20% Vert Electrolytic Capacitor
030565
*
220u 25V 20% Vert Electrolytic Capacitor
030485
*
100u 25V 20% Vert Electrolytic Capacitor
030403
*
47u 25V 20% Vert Electrolytic Capacitor
030170
*
4u7 50V 20% Vert Electrolytic Capacitor
021030
*
330n 63V 10% MKT Polyester Capacitor
010599
*
1u 50V -20+80% Ceramic Cap. Multilayer
010595
*
100n 50V -20+80% Ceramic Cap. Multilayer
010547
*
10n 50V 10% CL2 Ceramic Capacitor
010345
*
100p 50V 10% CL2 Ceramic Capacitor
PRP6/PRP8 I/O, Amplifier & Supply Board
731039
I/O, Amplifier & Supply Board (Pcb#310673) (PRP6)(PRP8)
340138
*
Dc-Socket Reinforcement
230569
*
FL5R200PNT EMI Coil For Signal
230559
*
20uH 50V 3A Dc Line Filter
230527
*
BL02RN2-R62 EMI Coil For Signal
170742
*
Heatsink
170716
*
TO220 38mm height Heatsink
140217
*
Jack Slim Horizontal S-F Socket
140212
*
5 Poles Din Horizontal Female Socket
140211
*
Dc Horizontal Male Socket
140207
*
Jack Horizontal F Socket (with dual switch)
120582
*
M3 Nut
120521
*
3mm Grower Washer
120301
*
B3.5x13tc Black Screw
120272
*
WL3x10tc Black Screw
120257
*
B2.9x9.5tc Black Screw
120003
*
M3x8tc Black Screw
110305
*
Relay 12V / 2 Switch 1A 250Vac
110282
*
3.6V 60mAh Nicd Battery
106007
*
TDA8542AT SOIC 2X1.5W BTL Audio Amplifier
100966
*
TDA7266 7+7W Dual Bridge Amplifier
100919
*
MC33078 Dual LN Operational Amplifier
100602
*
74HC04 Hex Inverter
100059
*
7805 +5V 1A Voltage Regulator
100035
*
6N138 Optocoupler
090183
*
BC550 TO92 LN Npn Transistor
080156
*
1N4002 1A 100V Rectifier Diode
080103
*
1N4148 100mA 75V Signal Diode
052056
*
47K 1/8w 5% Resistor
052054
*
33K 1/8w 5% Resistor
052052
*
22K 1/8w 5% Resistor
052050
*
15K 1/8w 5% Resistor
052049
*
12K 1/8w 5% Resistor
052048
*
10K 1/8w 5% Resistor
052046
*
6K8 1/8w 5% Resistor
052045
*
5K6 1/8w 5% Resistor
052044
*
4K7 1/8w 5% Resistor
052038
*
1K5 1/8w 5% Resistor
052037
*
1K2 1/8w 5% Resistor
052036
*
1K 1/8w 5% Resistor
052030
*
330E 1/8w 5% Resistor
052028
*
220E 1/8w 5% Resistor
052024
*
100E 1/8w 5% Resistor
050211
*
47E 1/4W 5% Resistor
030805
*
2200u 25V 20% Vert Electrolytic Capacitor
030715
*
1000u 6v3 20% Vert Electrolytic Capacitor
030650
*
470u 25V 20% Vert Electrolytic Capacitor
030565
*
220u 25V 20% Vert Electrolytic Capacitor
030485
*
100u 25V 20% Vert Electrolytic Capacitor
030403
*
47u 25V 20% Vert Electrolytic Capacitor
030170
*
4u7 50V 20% Vert Electrolytic Capacitor
030082
*
2u2 50V 20% Vert Electrolytic Capacitor
021030
*
330n 63V 10% MKT Polyester Capacitor
010599
*
1u 50V -20+80% Ceramic Cap. Multilayer
010595
*
100n 50V -20+80% Ceramic Cap. Multilayer
010547
*
10n 50V 10% CL2 Ceramic Capacitor
010345
*
100p 50V 10% CL2 Ceramic Capacitor
Cpu & Sound Generator Board
761221
Cpu & Sound Generator Board (Pcb#310677) (PRP6)
761219
Cpu & Sound Generator Board (Pcb#310677) (PRP7)(PRP8)
140882
*
26 Contacts Vert Male Connector Din41651
140877
*
Jumper For Contacts Strip (p=2.54mm)
140874
*
Single In Line Vert Male Strip (specify contacts)
140854
*
16 Contacts Vert Male Connector Din41651
106001
*
MC33078P SOIC Dual Low Noise Op. Amp.
105011
*
IKE plus - Cpu & Dsp
104055
*
MX23C1610MC-12 32Mbit Rom "Program PRP6"
104056
*
MX23C1610MC-12 32Mbit Rom "Program PRP7/8"
104050
*
MX23C3210MC-12 32Mbit Rom "RealPiano Sounds"
104032
*
MX23C3210MC-12 32Mbit Rom "GM-GMX Sounds"
104000
*
HM628128LFP5 SOP 1Mbit Static Ram Ta=55nS
103017
*
74HC4051DW SOIC 8ch Analog Multiplexer
103013
*
74HC138D SOIC 1 Of 8 Decoder
103010
*
74HC04D SOIC Hex Inverter
103008
*
PCM69AU SOIC 2ch 1bit Dac
103003
*
74HC374DW SOIC Octal D-Type Flip-Flop
103002
*
74HC245DW SOIC Octal Bus Transceiver
103000
*
74HC14D Soic Hex Inverter Schmitt Trigger
091002
*
PMBT2369 TO236 Smd Npn Transistor
091001
*
BC857 TO236 Smd Pnp Transistor
091000
*
BC847 TO236 Smd Npn Transistor
081000
*
PMLL4148 Smd 100mA 75V Signal Diode
055104
*
2K2 X4 1/16w 5% Smd Resistor Array
055102
*
33E X4 1/16w 5% Smd Resistor Array
055101
*
4K7 X4 1/16w 5% Smd Resistor Array
055100
*
100E X4 1/16w 5% Smd Resistor Array
054068
*
470K 1/10w5% Smd Resistor 0805
054052
*
22K 1/10w5% Smd Resistor 0805
054050
*
15K 1/10w5% Smd Resistor 0805
054048
*
10K 1/10w5% Smd Resistor 0805
054046
*
6K8 1/10w5% Smd Resistor 0805
054044
*
4K7 1/10w5% Smd Resistor 0805
054042
*
3K3 1/10w5% Smd Resistor 0805
054038
*
1K5 1/10w5% Smd Resistor 0805
054037
*
1K2 1/10w5% Smd Resistor 0805
054036
*
1K 1/10w5% Smd Resistor 0805
054034
*
680E 1/10w5% Smd Resistor 0805
054024
*
100E 1/10w5% Smd Resistor 0805
050131
*
10E 1/4W 5% Resistor
030715
*
1000u 6v3 20% Vert Electrolytic Capacitor
030565
*
220u 25V 20% Vert Electrolytic Capacitor
030485
*
100u 25V 20% Vert Electrolytic Capacitor
030403
*
47u 25V 20% Vert Electrolytic Capacitor
030245
*
10u 50V 20% Vert Electrolytic Capacitor
011502
*
470pF x4 10% 100V NP0 Smd Capacitor Array
011501
*
220pF x4 10% 100V NP0 Smd Capacitor Array
011500
*
47pF x4 10% 100V NP0 Smd Capacitor Array
011064
*
220n 50V 10% Smd CL2 X7R 1206
011060
*
100n 50V 10% Smd CL2 Y5V 0805
011056
*
47n 50V 10% Smd CL2 X7R 0805
011048
*
10n 50V 10% Smd CL2 X7R 0805
011036
*
1n 50V 10% Smd CL2 X7R 0805
011032
*
470p 50V 10% Smd CL2 X7R 0805
011028
*
220p 50V 10% Smd CL2 X7R 0805
011024
*
100p 50V 10% Smd CL2 X7R 0805
011020
*
47p 50V 10% Smd CL2 X7R 0805
011018
*
33p 50V 10% Smd CL2 X7R 0805
011012
*
10p 50V 10% Smd CL2 X7R 0805
010714
*
30MHz Quartz Resonator
Wiring Connections
841262
2x25cm Speaker Cable
841260
2x45cm Speaker Cable
841259
8 Wires 95cm Length Crimp Terminal Cable
841257
10 Wires 30cm Length Crimp Terminal Cable
841256
6 Wires 10cm Length Crimp Terminal Cable
841255
4 Wires 10cm Length Crimp Terminal Cable
841254
4 Wires 15cm Length Crimp Terminal Cable
841253
6 Wires 15cm Length Crimp Terminal Cable
840686
16 Wires 10cm Length Flat Cable
840552
16 Wires 15cm Length Flat Cable
841258
Power Switch Cables Assembly (PRP7)
770909
Power Switch Cables Assembly (PRP6)
Note:
Each spare part is single quantity unless otherwise specified.
Asterisk prefix explanation:
Omitted
= First level spare part.
One asterisk
= Second level, part of previous listed first level part.
Two asterisk
= Third level, part of previous listed second level part.
Three asterisk = ............
Any request for not above mentioned part must encompass specific
description including:
1) Model name,
2) Section name,
3) Module code,
4) Reference name,
5) Quantity number.
