Full Text Searchable PDF User Manual
Thanks for purchasing the Buzz. Designed in California, assembled in China.

Buzz
emax-usa.com
Disclaimer
Please read the disclaimer carefully before using this product. By using this product,
you hereby agree to this disclaimer and signify that you have read them carefully and
completely. This product is not suitable for people under the age of 18. Adult
supervision is highly recommended for kids under the age of 18.
The Buzz features open-source flight controller and Electronic Speed Controllers to
meet the FPV enthusiasts' need to upgrade their quad.
Please read the instruction manual and warnings carefully. Before every flight, make
sure the battery is fully charged and power connections are secure. DO NOT fly
around crowds, children, animals or objects. EMAX ACCEPTS NO LIABILITY FOR
DAMAGE(S) OR INJURIES INCURRED DIRECTLY OR INDIRECTLY FROM THE
USE OF THIS PRODUCT.
Precautions
Please follow the instructions to assemble and to operate this product in a proper
way.
Pilots do not use this product if you have physical or mental illness, dizziness,
fatigued, or use while under the influence of alcohol or drugs.
Please fly in a safe area away from people
Do not modify or use other parts and accessories not approved for the use of EMAX.
Do not use this product in harsh environments (such as winds, rain, lightning, snow,
etc.).
Do not use this product in a strong electromagnetic environment.
Support
Please visit
emax-usa.com
or
emaxmodel.com
for any updates or support needs.

Buzz
emax-usa.com
Table of Contents
Buzz
1
emax-usa.com
Product specification
Product list
1. Buzz × 1
2. Avan Flow 5x4.3x3 (3x CW, 3x CCW)
3. Avan Scimitar 5x2.6x3 (3x CW, 3x CCW)
4. Extra Parts Package × 1
5. Instruction manual × 1
6. Pagoda Right Hand Antenna × 1
7. HD Camera Strap x 1
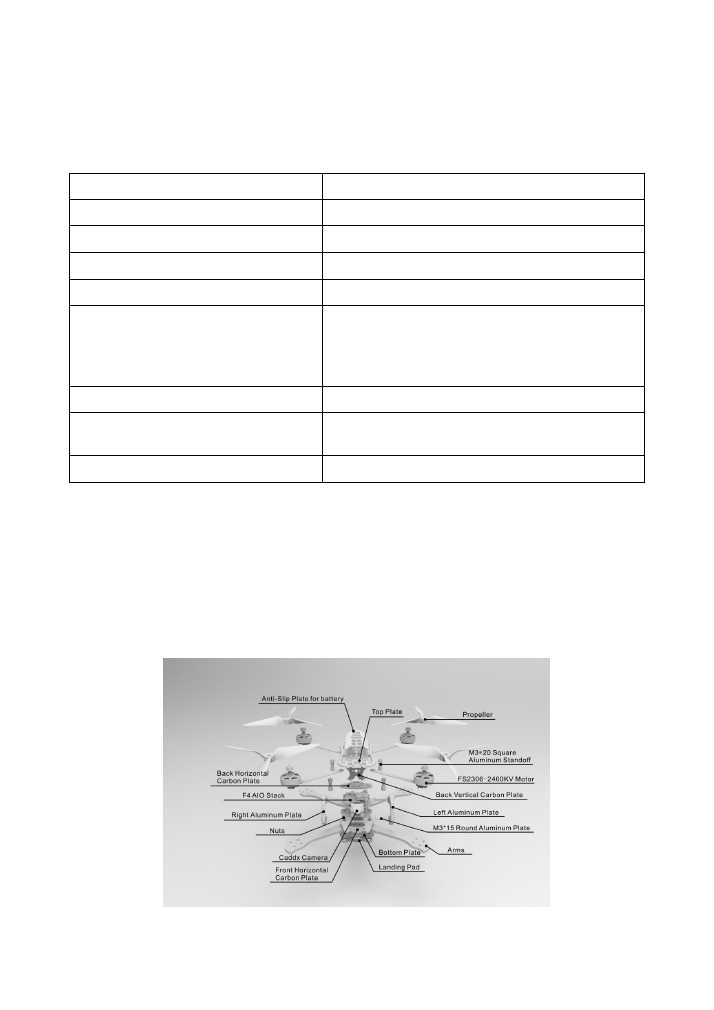
Buzz Structure
Buzz
Parameter
Diagonal wheelbase (without paddles)
245mm
Aircraft weight (without battery)
358g
Motor
FS 2306 2400kv
Propeller
Avan Flow 5x4.3x3 & Avan Scimitar 5x2.6x3
Main Flight Controller
F4
(
OmnibusF4 firmware
)
4 in one 3s-6s 45A 32 bit ESC
FrSky XM+ receiver 16 CH Diversity
Camera
Caddx Micro S1 CCD
Transmitter
0-25-200mW Adjustable frequency 37CH With
Smart Audio
Battery
Recommended 1300-1800 mAh 4S (Not Included)
Buzz
2
emax-usa.com
Buzz Assembly
The Buzz comes nearly completely assembled out of the box, only required to install
the propellers and FPV antenna.
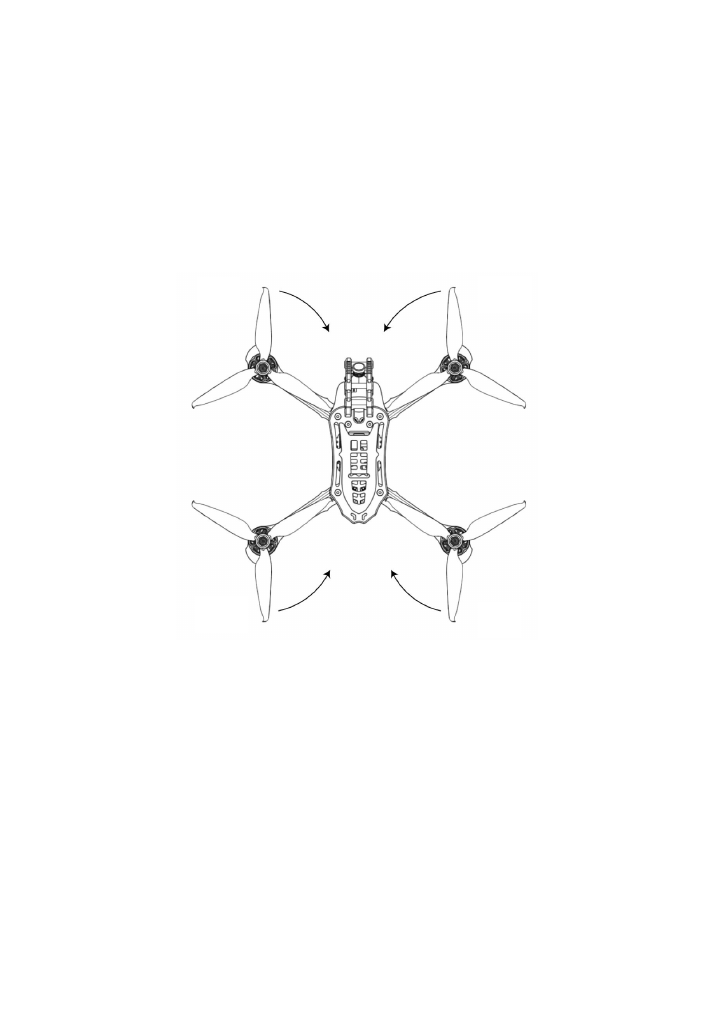
Propeller Direction and Mounting
There are 2 spinning directions for the propellers, Clockwise (CW) and Counter-
Clockwise (CCW). When Buying a set of propellers, 2 CW and 2 CCW will be given.
The blunt leading edge indicates the direction the propeller is supposed to rotate as
compared to the sharp trailing edge. When mounting propellers please make sure
the correct orientation shown in the diagram below.
Caution:
Failure to mount the propellers in the correct orientation will cause Buzz to
not fly correctly and with no control. Please double check for the correct orientation.
1. Push the propeller down the 5mm shaft.
2. Tighten the M5 lock nut and secure it.
3. Periodically check nut tightness to ensure it will stay tight during flight.
Propeller Type
There are two different propeller types given with buzz: Avan Flow 5x4.3x3 and Avan
Scimitar 5x2.6x3. These two props will give two different flight styles. The Avan Flow
5x4.3x3 flies very fast and operates well at higher speeds with the compromise of
lower flight time. Avan Scimitar 5x2.6x3 flies slower but with an increase of flight
time.
Antenna Mount
Mount the provided pagoda antenna to the back of the Buzz where the SMA port
mounts. Periodically check tightness to insure good video quality during each flight.
CW
CW
CCW
CCW
Buzz
3
emax-usa.com
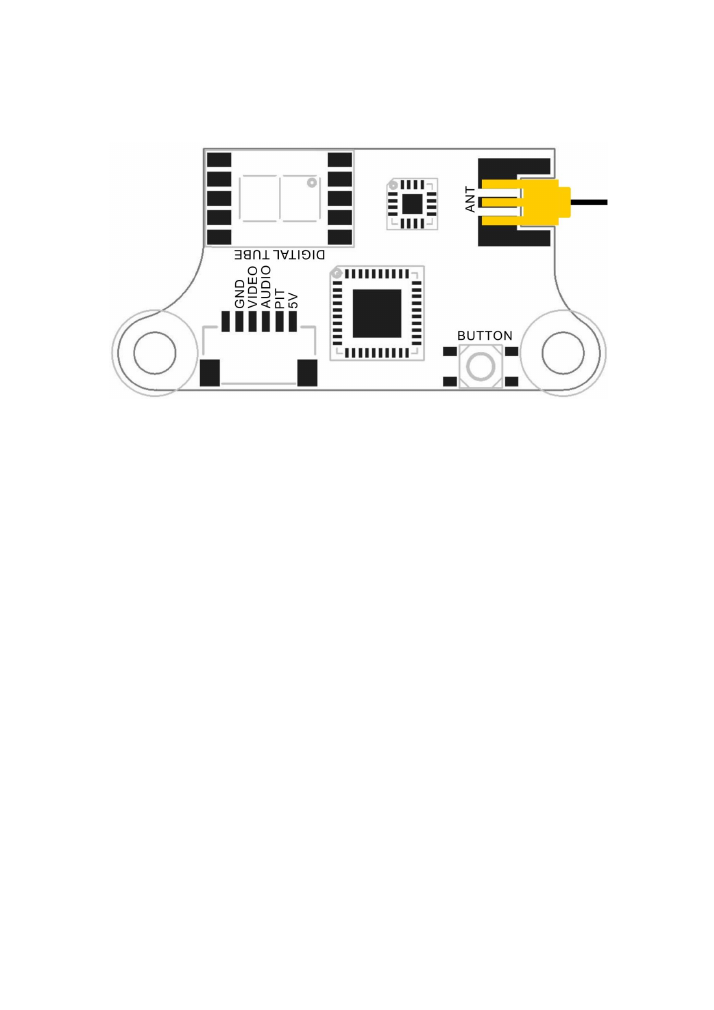
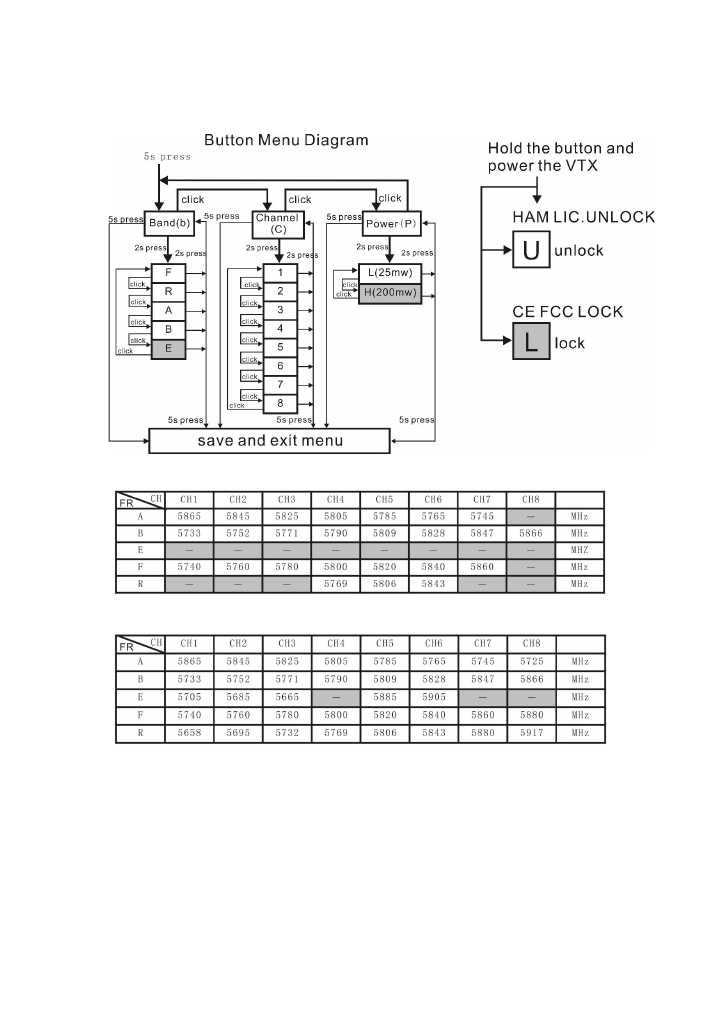
Buzz VTX Operation
Vtx Schematic and Button Diagram
VTX Channel Settings with the Button
1. Menu Entry / Exit
(1)Press the button and hold for 5s to enter the menu
(2)Press the button and hold for 5s again to save parameters and exit the menu.
2. Band, Channel, and Power parameter change
After entering menu, short click button to switch frequency group band(b)/frequency
channel (C)/power (P).
3.Enter/Exit Parameters
(1) After choosing menu, press the button and hold for 2s to enter parameter option.
(2)Press and hold for 2s to exit the parameter selection and to move back a menu
option
4. Select Parameter
After entering desired menu, press the button to cycle through the parameters.
5. Save Selections
Press and hold for 5s.
Notice:
When SmartAudio function is on, if the video receiver can't display image
such as showing only white noise, that is because flight controller set the VTX
frequency to an illegal one. While battery is connected you can press vtx button to
adjust the frequency to the legal one to display an image and after wards you can set
the frequency to legal one in OSD menu.
Buzz
4
emax-usa.com
Button Menu Diagram
CE and FCC unlicensed user chart
Unlocked FCC HAM licensed user chart
* From the factory this video transmitter is designed to operate within CE and FCC
unlicensed users specifications. To use the unlocked features of this VTX the user is
required to have a HAM radio license or prior consent from the FCC. By purchasing
this equipment, the user is agreeing that they understand these responsibilities and
will operate the equipment legally. Emax cannot be held responsible for your actions
if you purchase and/or use this product in violation of your government's regulations.

Buzz
5
emax-usa.com
Changing VTX setting via Betaflight OSD
Buzz is equipped with SmartAudio and is already configured with stock settings. The
SmartAudio line is operated on UART 6 TX.
1. Power on Buzz, Goggles, and Controller.
2. Follow the tips on screen to enter the main settings menu: THROTTLE MID+ YAW
LEFT+ PITCH UP to enter OSD parameter adjustment menu. as shown in Figure 2.
3. In the menu interface, switching PITCH up/down to choose menu option. Move the
cursor to “FEATURES” and stir Roll stick right to enter next menu. Using PITCH stick
to move cursor to “VTX SA”, as shown in Figure 3.Then pull ROLL stick right to enter
VTX configuration menu, as shown in Figure 4.
Figure 1 Figure 2
Figure 3 Figure 4
4. In the menu of VTX SA, we can configure the BAND, CHAN and POWER. Pulling
the PITCH stick to move cursor up and down to choose VTX options that need
setting. While pulling ROLL stick left and right to change the corresponding
parameters.
Once the parameters is set, moving the cursor to “SET”, then turn ROLL
stick right to enter “SET” and choose “YES” and turn ROLL stick right to save setting
parameters, as shown in Figure 5.
Figure 5
Buzz
6
emax-usa.com
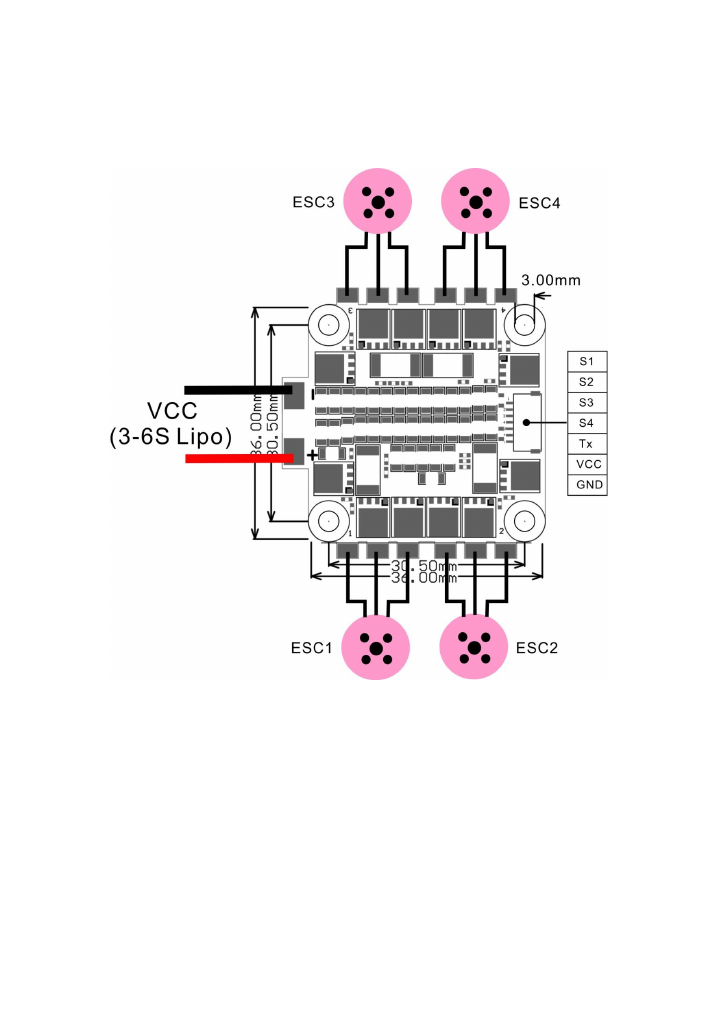
Buzz ESC
ESC Schematic and pinout Diagram.
The Buzz is using 4-in-one 45A 32-bit ESC. Buzz supports 3-6S Lipo.
Recommended 1300-1800 mAh 4S.
Signal Wires:
S1-S4 is the signal input of ESC1-ESC4. Tx is ESC telemetry output
connected to UART 3 RX on the Buzz Flight Controller.
Buzz
7
emax-usa.com
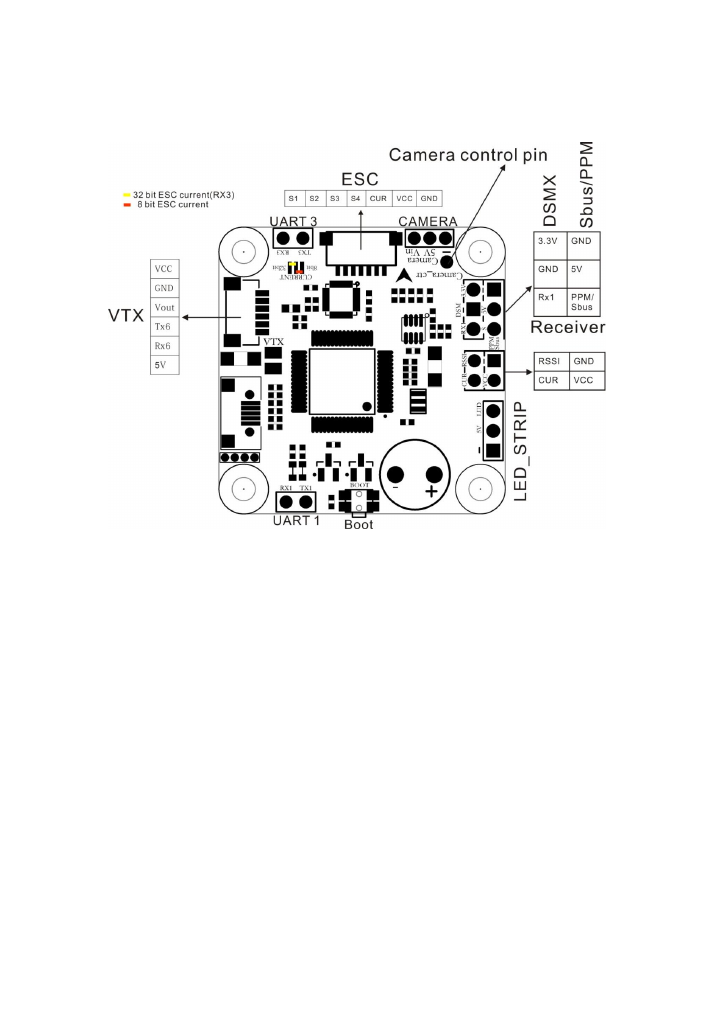
Buzz Flight Controller
FC Schematic and pinout Diagram
Stock Flight Controller Settings
Buzz is configured to take a channel map of the TAER1234 convention. That is the
channel map is in the respective order: throttle, aileron, elevator, rudder, AUX
Channels. The arm switch on Buzz is set on AUX 1 and armed with the highest
value. AUX 3 is set to beeper with beeping on in a high state. AUX 4 is set to the
VTX power switch: High value is VTX on and Low value is VTX off.
Caution:
Make sure your control is set with a channel map described above,
otherwise Buzz may not operate properly or even transmit video.
Camera control is already set up with stock settings and is connected to pin A08. To
enter the control menu of the camera, move throttle to middle throttle position and
yaw all the way right. You can move through the menu by pitching up and down. To
enter a menu or selection, yaw right. In this menu you can change exposure,
brightness, contrast, and many other camera settings.
PID profiles: PID profile 1 is tuned and optimized for Buzz for ultimate control of flight
indoors and outdoors. Please do not change these values. Change the rates to get
the flight control characteristic desired.
Caution:
Changing PID settings can cause poor flight behavior and worst case
burning a motor or ESC. Departure from stock PIDs will void all warranty with the
Buzz.
Buzz
8
emax-usa.com
Current Sensor Jumper
There is jumper pads on the FC shown in the diagram above to choose the current
sensing style desired. Solder jumped in the yellow mark configuration connects 32bit
telemetry to UAR
T 3 RX. This configuration has all the features 32 bit ESC’s offer.
Soldering the jumper highlighted in the red connects an analog current sense signal
to the correct ADC for the omnibus and overall current draw can be known that way.
Adjusting Software Settings (Betaflight Configurator)
Betaflight Configurator can be used to changed programmed settings on Buzz and to
flash new firmware if desired. Betaflight Configurator can be downloaded at
https://github.com/betaflight/
. The hardware target for Buzz Flight Controller is
OmnibusF4 and the correct firmware can be found on emax-usa.com.
DISCLAIMER
: We do not suggest changing any PID settings on Buzz or upgrading
the firmware to new or old versions. Buzz comes stock with an optimal tune for
superior flight performance. Changing this can affect flight time, overall speed,
control of the aircraft, or excessive heat within the motors.
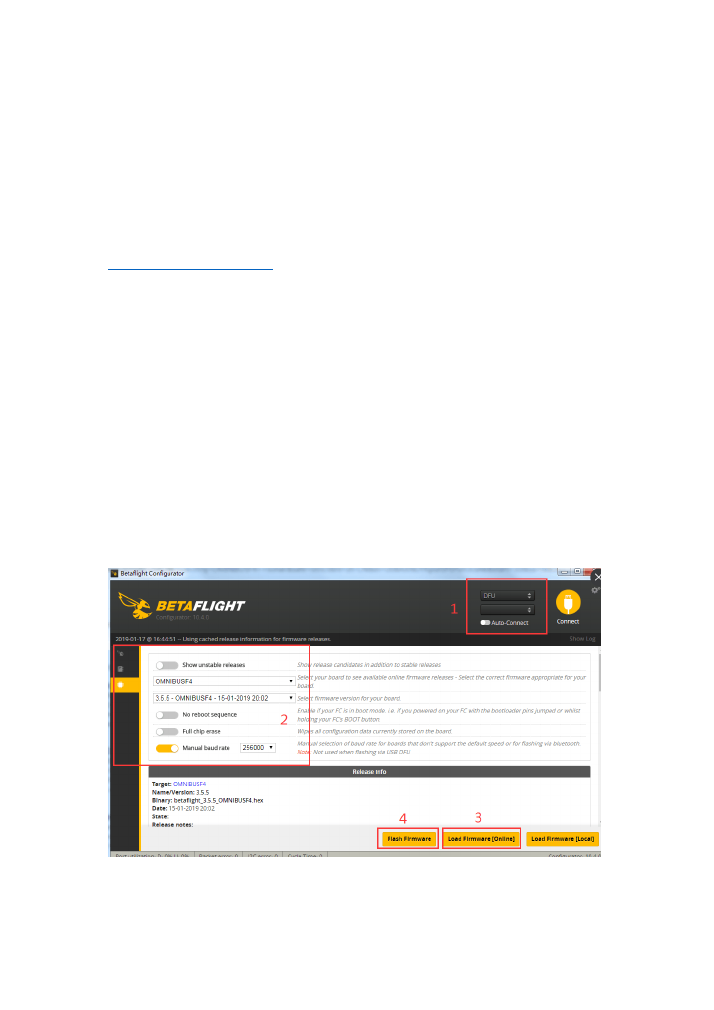
Reprogramming Buzz Flight Controller
1. Put the Flight Controller in DFU mode by pressing the Boot button while
plugging in the micro USB cable to a computer.
2. Select OmnibusF4 as the target and then select the desired firmware (4.0.0
stock). Betaflight 4.0.0 firmware can also be downloaded from emax-usa.com
if it is not available in the drop down menu. Select Manual Baud Rate with
256000 in the drop down menu
3. Select Load Firmware(Online) to download the firmware or if the hex
file was downloaded from emax-usa.com select Load Firmware (Local)
and select the path to the correct hex file.
4. Select Flash Firmware to program the flight controller
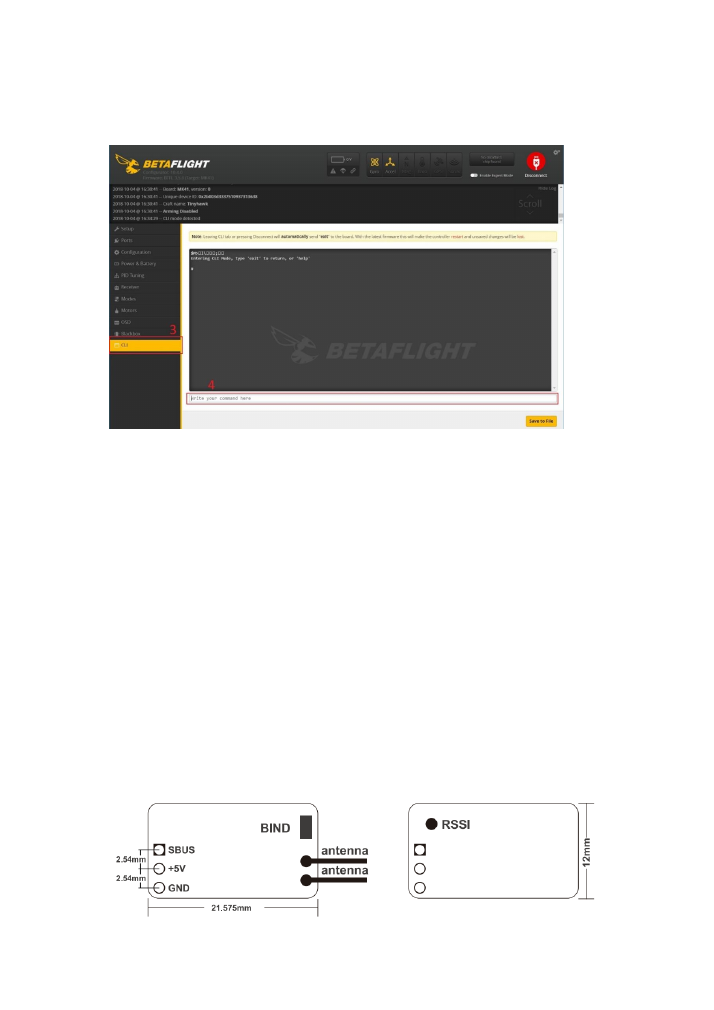
Set the Correct Settings
1. Download the latest CLI Dump File from
2. Connect Buzz to Betaflight configurator and select the CLI tab
Buzz
9
emax-usa.com
3. Open the CLI Dump File in a text editor and copy all the text.
4. Paste the settings into the command bar and press enter
5. Buzz will reconnect to Betaflight when completed
VTX Power Cut Off Switch
The Buzz flight controller is configured with a switch for power for the vtx controllable
from an RC channel. This allows turning off the VTX from a switch on a controller.
This is useful when testing Buzz and you do not want to spam your video or in a
team race situation.
Operation:
Configure a 4 channel switch (AUX 4) on your radio to be a high
– low switch. With
this switch in a high state, the vtx power is on. With the switch in a low state the vtx
will be off. The flight controller is already configured in betaflight with stock settings. If
this is not working properly please return Buzz to stock betaflight settings.
Caution:
When the VTX is in the off state, there is just enough power to keep the
channel indicator on the VTX on so you can visually see the channel it is set to. This
is enough power to transmit video signal about 5 ft away. If you are testing the switch
in a close situation you may see some video in your goggles when in the off state.
Buzz Receiver
The Buzz is using an FrSky XM+ 16 CH diversity receiver.

Buzz
10
emax-usa.com
Binding Procedure
Binding is the process of uniquely associating a receiver to a transmitter module. A
transmitter module can be bound to multiple receivers (not to be used
simultaneously). A receiver can only be bound to one transmitter module.
Follow the steps below to finish the binding procedure.
1. Power on Buzz while holding the BIND button on the module (please refer to the
module instruction manual for switch positions). Release the button when a green
light starts flashing.
2. Turn on the transmitter (radio controller) and put it into bind mode for a D16
module.
3. A red light will start flashing on the receiver indicating binding process was
successful
4. Turn the radio out of bind mode and power off Buzz to save bind settings.
Thank you for purchasing our product! Enjoy Flying Buzz.
Please visit
emax-usa.com
or
emaxmodel.com
for any updates or support needs.
Warning
:
Please pay attention to your surroundings. Not
Recommended for persons under 18 years of age.