Full Text Searchable PDF User Manual
User manual
B950I, B1000i, B2000i, B3000i

Page 20
•
Always read the user manual thoroughly before using the generator.
•
Never use the generator in a closed room/area. Exhaust may cause suffocation.
•
The exhaust pipe becomes very hot during operation. Do not touch the exhaust pipe after use.
•
Only use approved cables.
•
Fuel is very flammable, be careful when filling with gasoline. Do not fill when you are close to open
fire, lighted cigarettes, sparks or similar. Always clean up spilled gasoline.
•
Standby power generators for buildings must only be connected by an authorised electrician, who
must comply with the regulations in question. Incorrect connection can make the power/electricity
run back to the generator. This can cause an electric shock if a person gets in contact with the
generator. After the power has been restored the generator may explode, burn or cause a burn in
the electric system.
•
Always inspect all connections before you start the machine. This can prevent an accident.
•
Always place the generator 1 meter away from buildings or other equipment during operation.
•
Only use the generator on a horizontal surface.
•
Draw attention to how the generator is to be stopped and understand all its functions. Never leave
the use of the generator to persons who has not received any instruction about the operation.
•
Keep children away from the generator during operation.
•
Using the generator with wet hands may lead to electric shock.
•
Never use the generator in rain or snow. Always make sure that the generator does not become
wet.
NOTE
If you are going to use the generator in thin statums of air, higher than 1500 meter above water
surface you shall contact your dealer for guidance.

Page 21
1. Contents
1. Contents
...........................................................................................................................................21
2. Identification of components
...............................................................................................................22
3. Automatic current control (SMART)
.....................................................................................................22
4. Before start - Oil
................................................................................................................................23
4.1. Before start - gasoline
.................................................................................................................24
4.2. Before start - air filter
...................................................................................................................24
5. Start
.................................................................................................................................................25
6. Operation of the generator
.................................................................................................................27
6.1. Alternating current
......................................................................................................................27
6.2. Indicators
...................................................................................................................................28
6.3. Direct current
..............................................................................................................................28
6.4 Oil warning
..................................................................................................................................30
6.5 Stop
...........................................................................................................................................30
7. Maintenance
....................................................................................................................................31
7.1 Changing oil
................................................................................................................................31
7.2 Air filter
.......................................................................................................................................32
7.3 Spark plug
..................................................................................................................................33
8. Transport and storage
........................................................................................................................33
9. Specifications
....................................................................................................................................35
10. Trouble shooting
..............................................................................................................................36
Spare parts
Part list and explosive drawings for the specific product, please contact your
dealer.
If you help find part numbers yourself, it will ease the service.
For purchase of spare parts, please contact your dealer.
Page 22
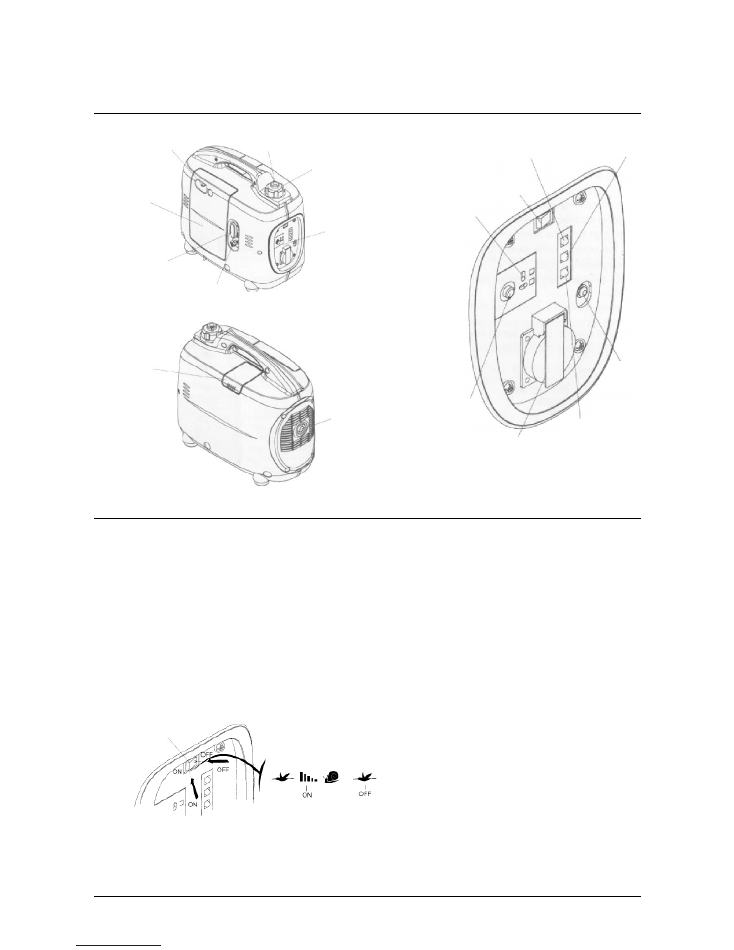
2. Identification of components
3. Automatic current control (SMART)
The engine speed is automatically adjusted, when the current is disconnected. The same way the speed goes
up when you connect the current. This ensures the fuel consumption being held at a minimum.
Warning -
The automatic regulation does not work effectively if an even electric current is needed.
Warning -
When the generator is to produce a heavy, even current you shall place the switch in
the OFF position in order to reduce changes in the current.
Warning -
When you work with DC (Direct Current), always place the switch in the
OFF
position.
Choker
Cover
Starter
Engine switch
Control panel
Fuel cap
Fuel cap cent
lever
Cover for
fuse
Muffler
DC
receptable
Smart contact
Smart-Throttle switch
Over load indicator
Ground
terminal
Oil indicator
AC
DC circuit
protector
Switch
Page 23
4. Before start - Oil
NOTE
-
Always inspect the generator on a horizontal surface with a turned-off engine.
-
The in-built alarm system will automatically stop the engine before the oil level drops under the
approved level. In order to avoid unpredicted disconnection you shall check the oil level regularly.
-
Using the generator with too little oil can cause severe damages to the wear parts of the engine.
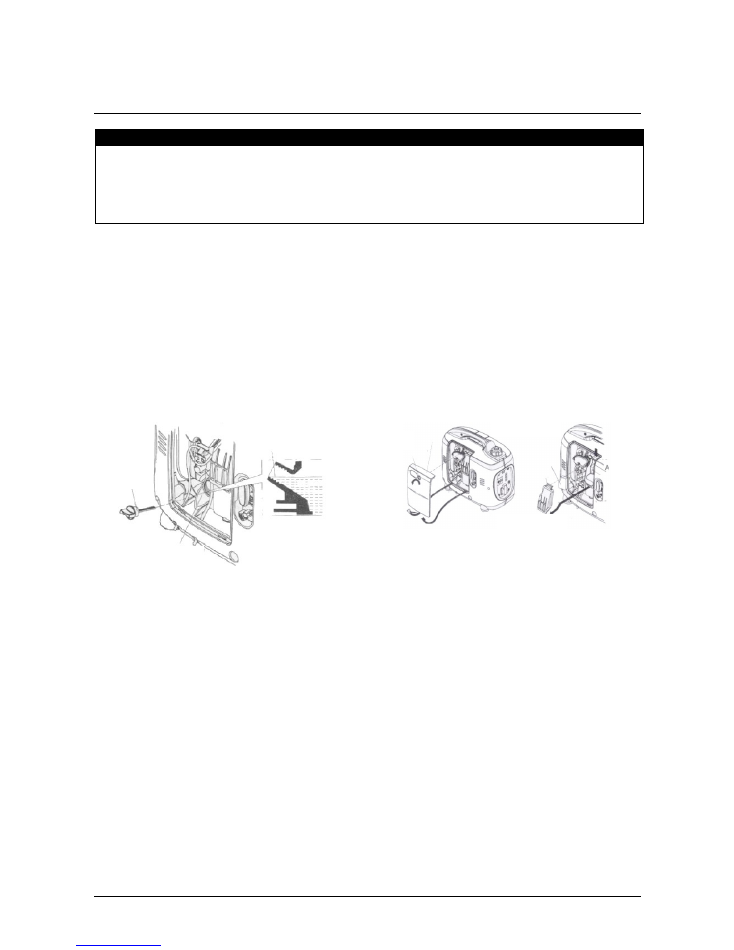
Use full-synthetic premium 4-stroke oil, which meets the demands in question.(API)
Loosen the screws that tighten the plate on the backside of the generator and remove the plate. Check the oil
level by removing the oil stick, clean it with a dry clean cloth. Insert the oil stick without screwing it in. See the
oil level on the stick. Fill with oil if necessary.
Oil capacity: 0,25/0,40 L.
Oliepind
Fill oil until here
Screw
Left maintenance
cover
Air cleaner
cover
Oil stick
Oil filler hole
Page 24
4.1. Before start - gasoline
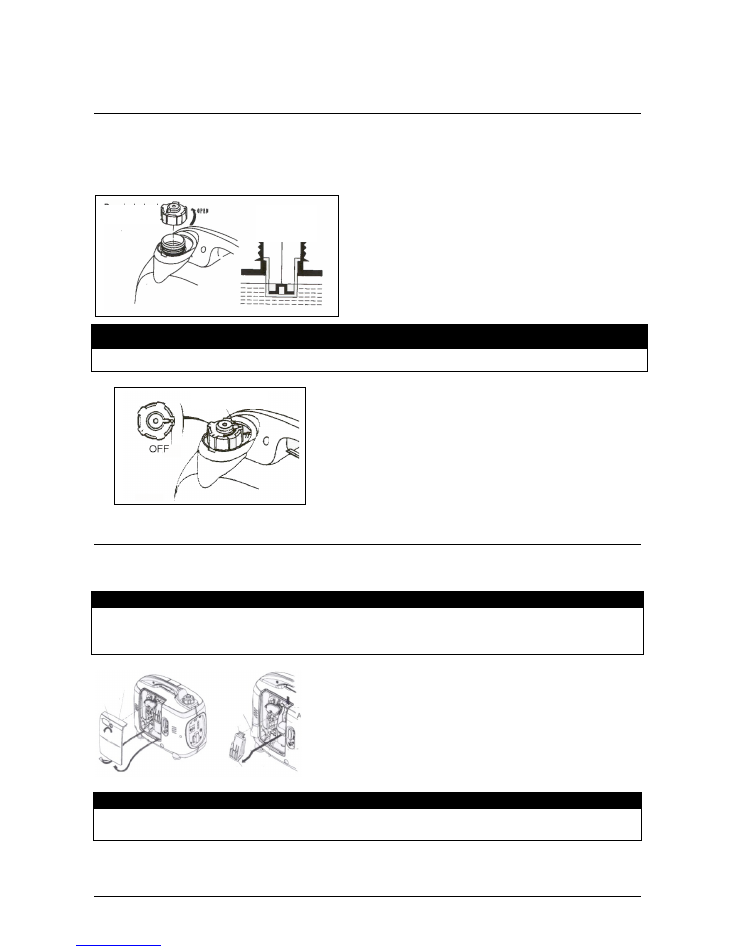
Use regular unleaded 95 octane gasoline.
Avoid getting dust, dirt or water in the tank.
After filling, fasten the tank cover securely.
Only fill fuel to the indicated marking (see figure below).
4.2. Before start - air filter
Check that the air filter is clean and in good shape.
PROCEDURE
Loosen the screws that fasten the plate on the backside of the generator and remove the plate. On the top of
the air filter a tap is placed, press this down and the air filter is loosened.
Check the filter and clean it, replace if necessary.
WARNING
Never use the generator without an air filter. This will result in dirt being drawn into the carburettor of the
engine.
NOTE
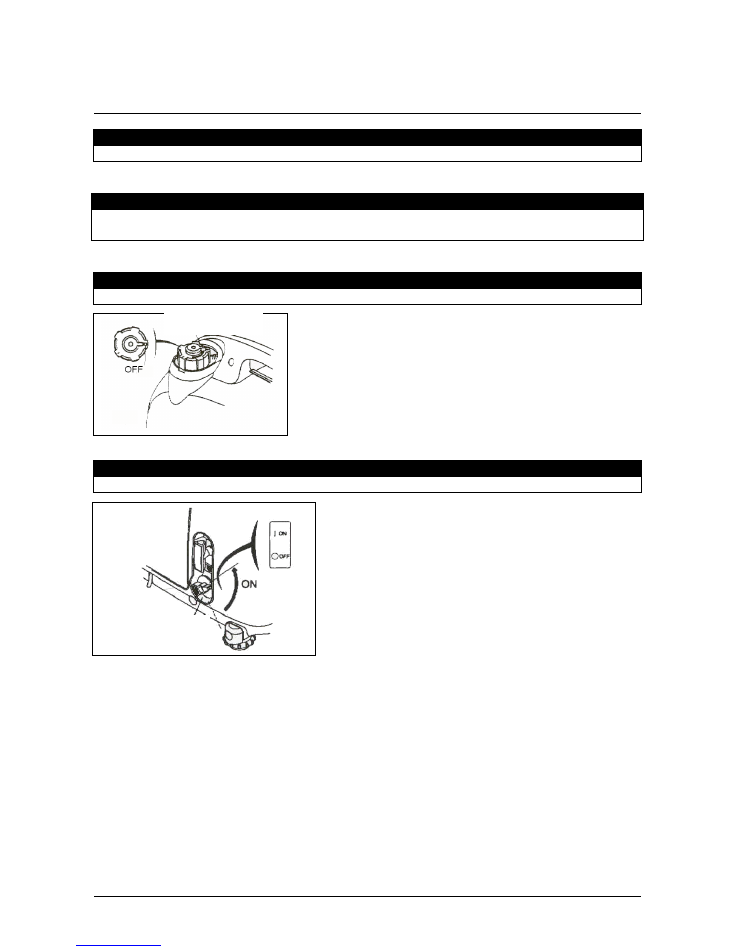
- By transport you always turn the upper part of the gasoline cover to the ”OFF” position.
Fill untill
here
Fuel cap
Fuel cap
Page 25
5. Start
WARNING
Disconnect all machines connected to the generator before starting.
WARNING
Before use the generator must be grounded. Connect the ground take off on the generator with a frame
connection e.g. an earth auger.
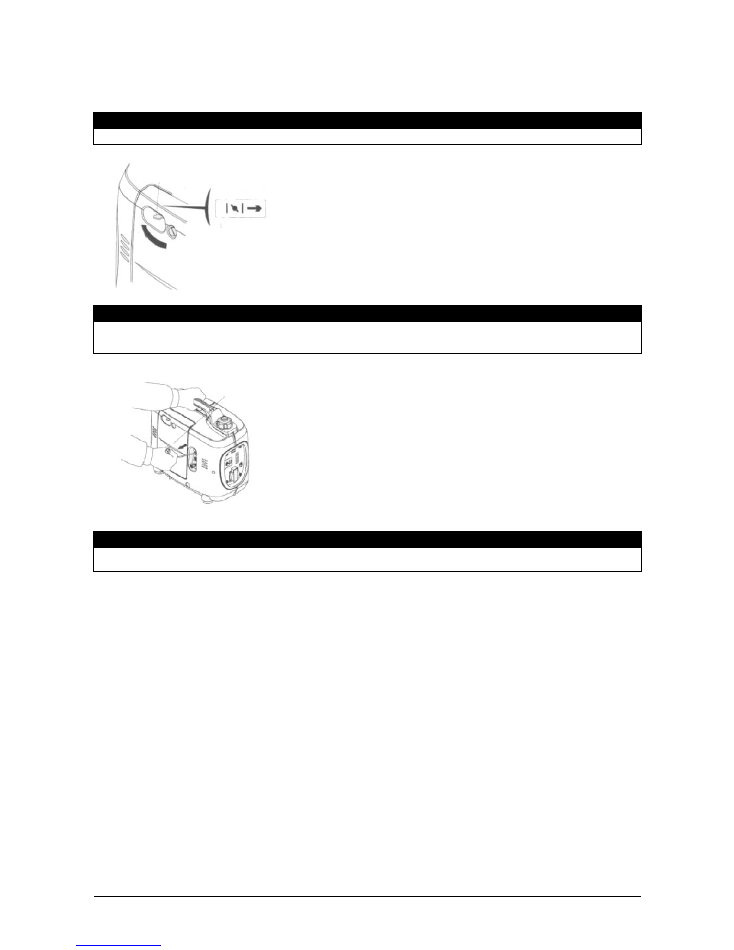
1
Turn the upper part of the fuel cover clockwise to the ”ON” position.
2
Turn the ignition switch to the ”ON” position.
Gasoline cover
Ignition switch
Page 26
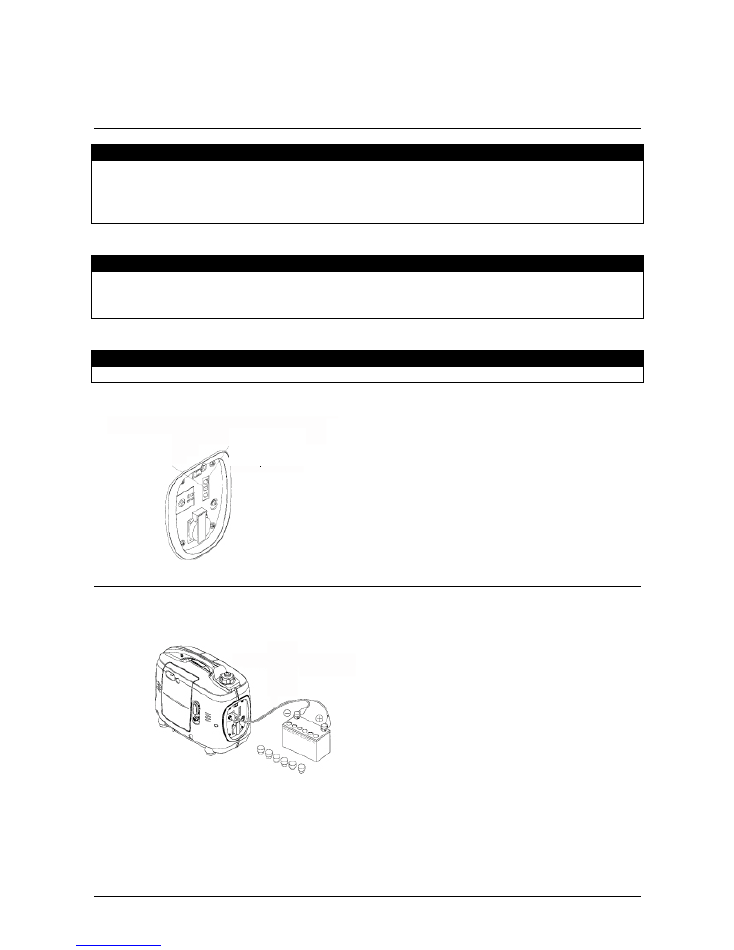
3
Place the choke of the machine in open position. To the right.
4
Pull slowly in the starting cord of the engine until you feel resistance. Then you pull one heavy long draw.
Never let the starting cord run back by itself, always follow it with your hand.
5
Close the choke by placing it in the right position while the engine is warming up.
Starting cord
Choke

Page 27
6. Operation of the generator
WARNING
In order to prevent electric shock, the generator must be grounded. This is done by connecting the frame
take off of the generator with a frame connections e.g. an earth auger.
NOTE
-
Do not exceed the voltage limit stated for a regular plug.
-
Do not connect the generator to a closed system in e.g. a house. This may cause damages on both
the circuit and the generator.
-
Do not make any amendments to the generator.
-
Do not connect more generators in a parallel connection.
-
Do not extend the exhaustion on the generator.
-
By using an extension cord you shall use a heavy and flexible cable.
-
Maximum length of extension cords:
-
1.5 mm
2
= 60 meters
-
2.5 mm
2
= 100 meters
-
During operation you must not place the generator close to any other electrical cables.
-
The DC exit can be used together with the AC exit, but draw attention to the current intensity being
able to vary if the load is too high.
6.1. Alternating current
PROCEDURE
1.
Start the generator and note that the green light in the panel goes green.
2.
Make sure that the apparatus you want to use has been turned off.
3.
Insert the plug into the generator.
4.
Turn the apparatus on*.
NOTE
-
Continued overload of the generator (indicated by a red light) can damage the generator and shorten
the life of the engine.
-
Always inspect that the receiver apparatus works and is in good shape before use.
-
If the apparatus starts performing irregularly or if the engine suddenly stops during operation you shall
stop the generator and disrupt the current by removing the plug from the generator.
Page 28
6.2. Indicators
1
-
The running indicator will be lit during regular running (green light).
-
If the generator is overloaded the green light will turn itself off and the red indicator for overload will be
lit. At the same time the current for the apparatus will be disconnected. In this case you must stop the
generator and inspect it for the source of the overload.
2
When starting the generator it may occur that both the green as well as the red indicator is lit. The red
indicator should turn itself off in a few seconds. If not you must stop the generator and inspect it for the
source of the overload. You can also contact your dealer.
3
When starting if the green indicator is not lit, but the red indicator is, you must stop the generator and retry.
6.3. Direct current
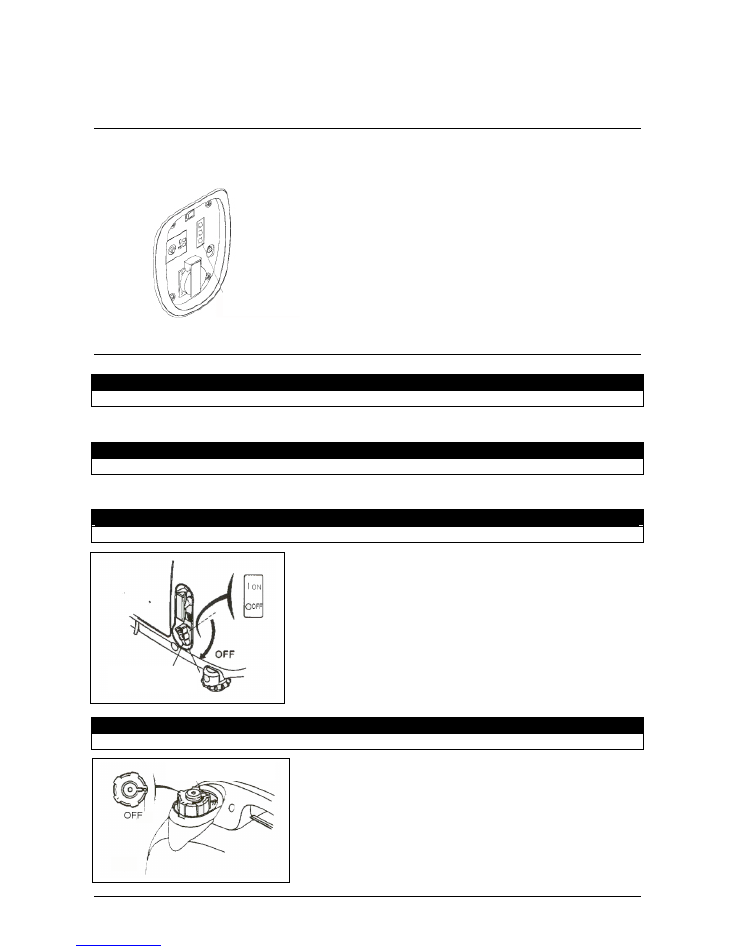
6.3.1
Connect the charging cables on the DC take-off on the generator to the correct poles as shown
on the drawing.
6.3.2
Start the generator.
The take off for alternating current can be used with the direct current take-off.
Oilalarm
NOTE: Avoid 12 volt charging
directly to batteries as this may
cause overheating of the
battery. Texas recommend only
to use a 230 volt battery
charger. Charging of batteries
should only be done in
ventilated places due to risk of
sparkling gasses.
Current out
green light
Overload
red light

Page 29
WARNING
-
In order to prevent the possibility of a spark close to the battery, you must first connect the charging
cable to the generator and thereafter to the battery.
When dismounting, start by dismounting the battery.
-
When charging batteries which are still mounted in cars, it is important that the frame cable has been
removed from the pole of the battery. After charging the frame cable is mounted on the correct pole.
-
This procedure prevents the risk of a short circuit between generator and the chassis of the car.
NOTE
-
Do not try to start a car while the generator is connected to the battery of the car. The generator may
be damaged.
-
Always check that the generator has been correctly connected to the battery.
WARNING
Always respect the indicated instructions for use of battery
NOTE
12 V take-off on the generator must only be used for charging 12 V automobile batteries.
By use of direct current take off the automatic current control must be turned off.
Page 30
6.4 Oil warning
There is an inbuilt oil alarm on the generator. This means that if the generator is lacking oil during operation
the generator will stop automatically. At the same time the oil lamp in the panel will be lit.
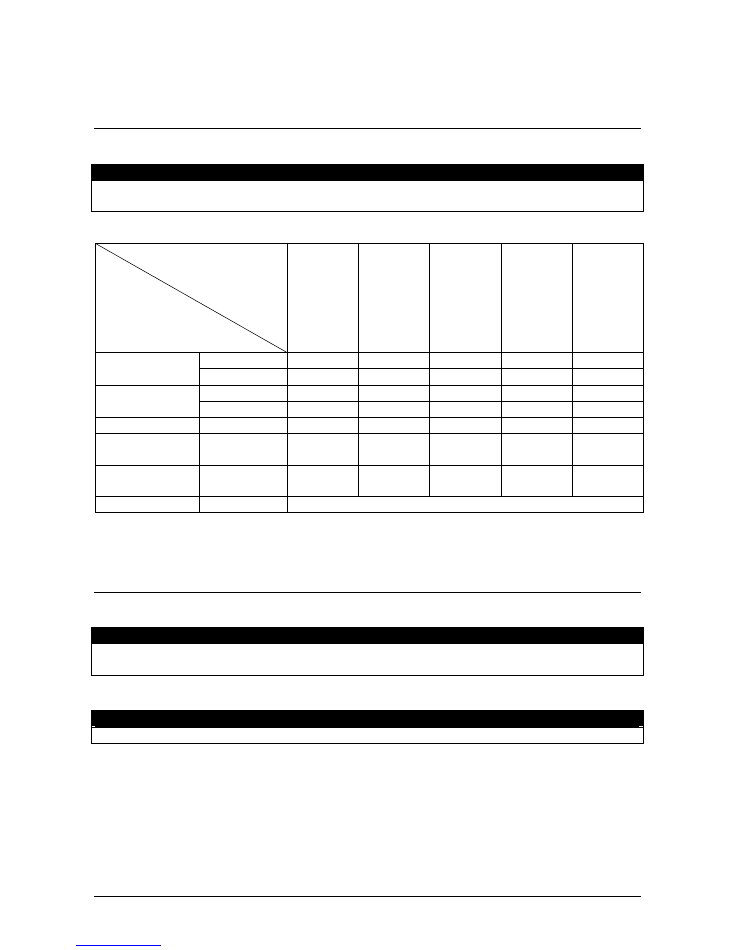
6.5 Stop
NOTE
In case of emergency the generator can be turned off on the ON/OFF switch on the side of the generator.
1
Turn the apparatus off and remove the plug from the generator.
2
Turn the generator off on the ON/OFF switch on the side of the generator.
3
Turn the upper part of the gasoline cover anti-clockwise to the ”OFF” position.
Oil alarm
Engine Switch
Fuel cap
Page 31
7. Maintenance
Part
Every use
1. month
or
10 hours
every 3.
month.
or
50 hours
every 6.
month.
or
100 hours
every year
or
300 hours
Check
X
Oil
Replace
X
X
Check
X
Air filter
Clean
X1
Sparking plug
Clean – adjust
X
Sparking plug –
spark screen
Clean
X
Gasoline- tank /
filter
Clean
X
Gasoline hose
Check
Every 2nd year (replace if necessary)
Check should be carried out more often if the generator is being used in dusty areas.
7.1 Changing oil
NOTE
-
The purpose of the maintenance is to keep the generator in its best possible shape.
-
Repairs should always be carried out by an authorized Texas Power Line dealer.
WARNING
The ignition switch and upper part of the gasoline cover of the generator must always be in the OFF position
when changing oil.
NOTE
-
Replace oil while the oil is still warm this gives a complete and quick oil change.
Page 32
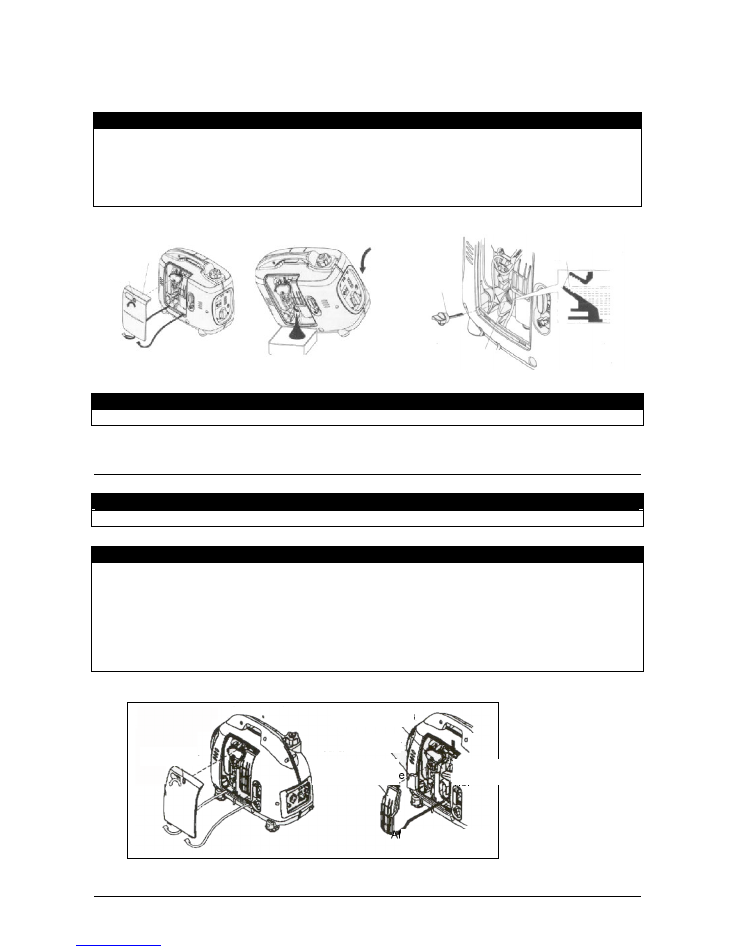
PROCEDURE
-
Unfasten the screws that fasten the plate on the back side of the generator and remove the plate.
-
Remove the oil stick.
-
Pour the used oil into a can.
-
Fill with the recommended oil and check the oil level.
-
Put the plate back in its place and fasten the screws safely.
NOTE
Always get rid of the used oil in the best way so that you save the environment as much as possible.
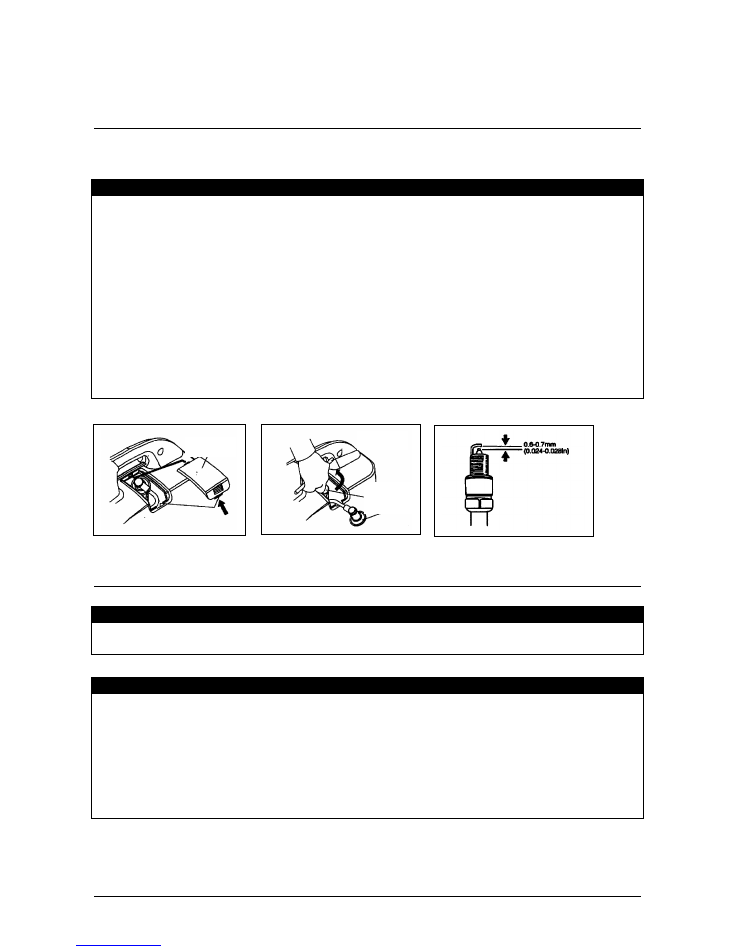
7.2 Air filter
WARNING
Never use gasoline or other flammable fluids to clean the air filter.
PROCEDURE
-
Unfasten the screws that fasten the plate on the back side of the generator and remove the plate.
-
On the top of the air filter a tap is placed, press this down and the air filter is loosened.
-
Wash the air filter thoroughly in mild soapy water. Rinse with warm water. Let the air filter dry
thoroughly .
-
Soften the filter in pure engine oil and squeeze the filter for redundant oil.
-
Put the filter back in its place in the holder and in the machine.
-
Put the plate back in its place and fasten with screws.
Cover screw
Left cover
Max. level
Oil stick
Drain tap
Air filter box
Air cleaner
Air cleaner body
Screw
Insert here
Page 33
7.3 Spark plug
Recommended spark plugs: NGK CR5HSB / DENSO U16FSR-UB
8. Transport and storage
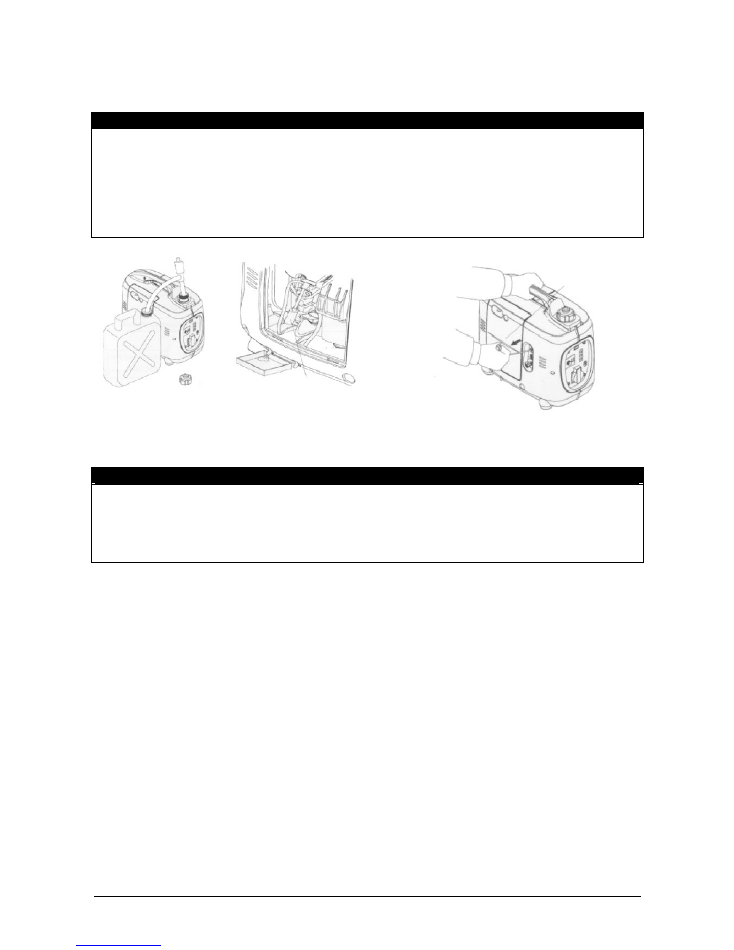
PROCEDURE
-
Remove the cover at the top of the generator.
-
Remove the sparking plug cover.
-
Remove dirt around the sparking plug.
-
Use a sparking plug wrench to unfasten the sparking plug.
-
Check the sparking plug, replace if the isolation has cracked.
-
Clean the sparking plug with a steel brush if you want to reuse it.
-
Measure the electrode distance, be careful not to damage the sparking plug.
-
The distance should be 0,6 mm – 0,7 mm.
-
Insert the sparking plug carefully and fasten it with a sparking plug wrench.
-
Normally you have to fasten a new sparking plug by
½
turn by the means of the sparking plug wrench.
-
You only have to fasten a used sparking plug by
1/8
–
¼
turn.
-
Mount the sparking plug cover .
-
Put the cover back on the generator.
NOTE
By transport the generator must be placed in normal standing position and the upper part of the gasoline cover
is turned anti-clockwise to the ”OFF” position.
WARNING
-
Never overfill the fuel tank.
-
Never use the generator while it is onboard a vehicle, only operate the generator in an open and
ventilated area.
-
By transport you must avoid direct sun light. If the generator is exposed for direct sun light for many
hours, gasoline steams may evaporate and self-ignite.
-
By transport on uneven roads for longer periods of time you should drain all gasoline.
-
Always draw attention to the storage area being free for dust and damps.
-
Drain all fuel from the generator before storage.
Cover
Handle
Wrench
Cap
Page 34
PROCEDURE - GASOLINE
-
Drain all gasoline from the tank into a container.
-
Turn the ignition switch of the generator to the ON position.
-
Loosen the delivery screw of the carburettor and drain all the fuel of the carburettor into a tank.
-
Remove the sparking plug cover and pull the starting cable 3-4 times. Thereby the fuel is drained in
the gasoline pump.
-
Turn the ignition switch of the generator to the OFF position
-
Fasten all screws securely
PROCEDURE - OIL
-
Change the oil on the generator.
-
Remove the sparking plug and pour app. one spoonful of pure engine oil into the cylinder.
-
Pull the starting cable 3 - 4 times, so that the oil is allocated. Put the sparking plug back in its place.
-
Pull the starting cable of the generator slowly until you feel resistance.
-
Now the generator is ready to be stored.
Starting cord
Page 35
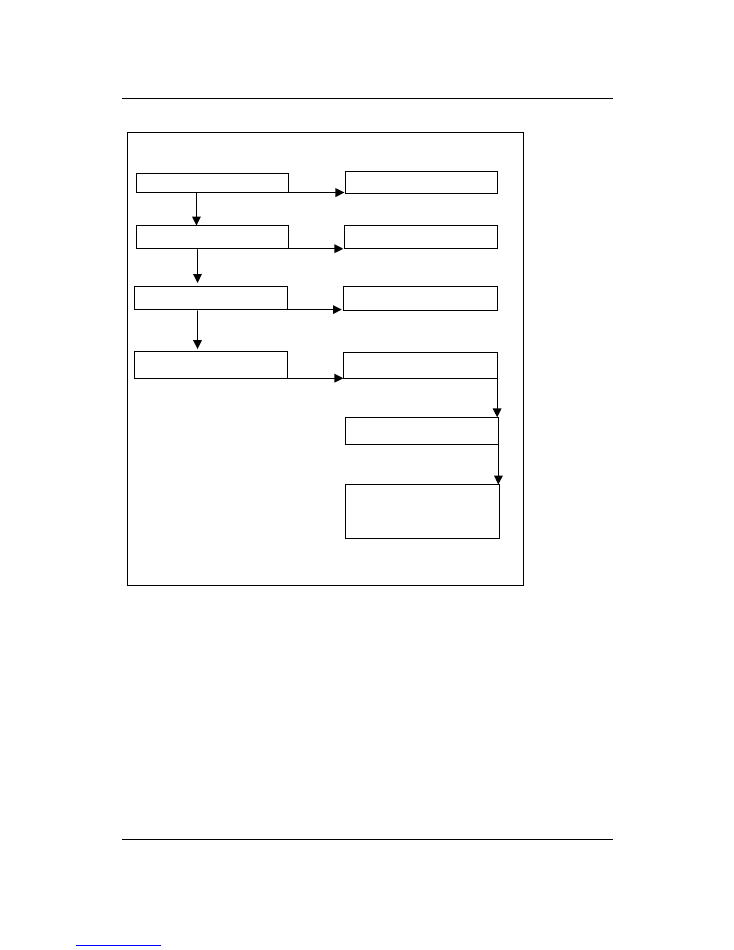
9. Specifications
Dimension and weight
B1000i
B2000i
L x B x H
450 x 240 x 380 mm
549x291x405 mm
Dry weight
14 kg
22 kg
Engine
Model
KG55
KG105
Engine
4-stroke, OHV
Stroke volume (drilling x stroke
length)
55 cc (43,5 x 36,0mm)
64 cc (56,0 x 40,0 mm)
Compression
8,5 : 1
Engine speed
rev/min (with automatic regulation switched off)
Cooling
Air
Ignition
Transistors
Oil capacity SAE 30
0,25 Liter
0,40 Liter
Fuel tank capacity
2,1 Liter
4,1 Liter
Noise level at 7 metres distance
64 dB(a)
59 dB(a)
Generator
Model
B1000i
B2000i
Volt(V)
230
Frequency(Hz)
50
Ampere(A)
3,9
7,0
Effect (KVA)
0,9
1,6
AC ud
Max effect (KVA)
1
2,0
DC out
Only for charge of car batteries.
Max load effect: 8A
Page 36
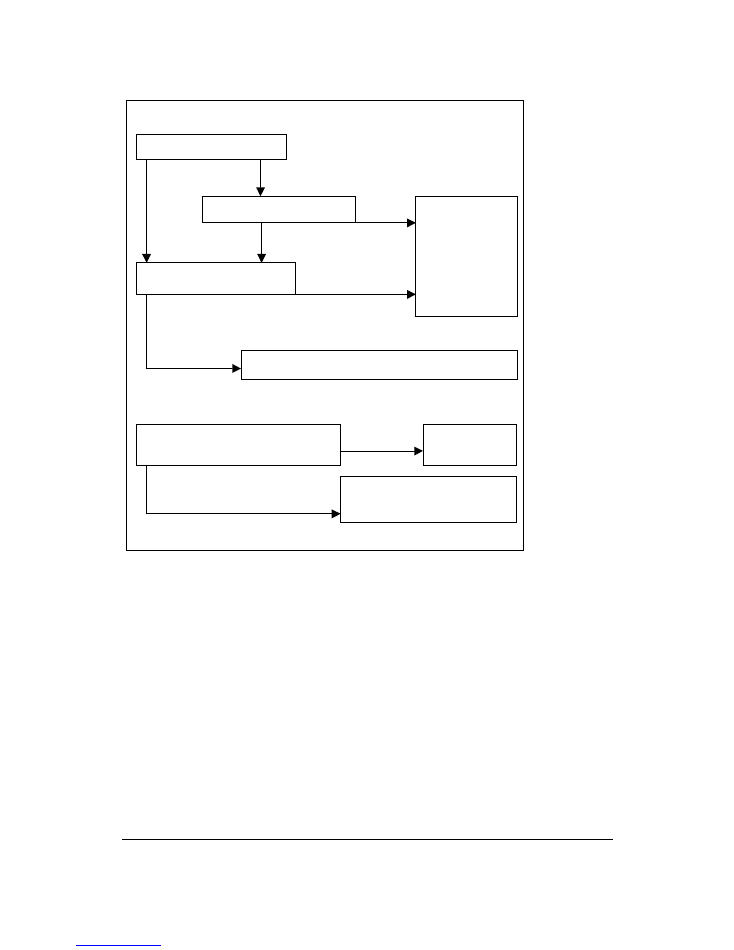
10. Trouble shooting
Engine does not start:
No
Yes
No
Yes
No
Yes
No
No
No
Enough fuel in tank
?
Is the generator turned on
?
Fill fuel into tank
Enough oil
?
Turn on the generator.
Fill with oil
Spark from spark plug
?
Replace spark plug
Still no spark ?
Contact your dealer
Page 37
Connected tool/apparatus does not work.
Yes No
Yes
No
No
Yes
No power from DC outlet
No
sl
Yes
”output” lamp lights
”alarm” indicator lights
Check that tool/appatus works
Contact your
dealer
Replace tool/apparatus.
Is automatic safety on
?
Turn it on
Contact your dealer