Full Text Searchable PDF User Manual

Rev 1.0
Doro Secure 480 User Guide
This document describes the how to use the Doro Secure 480 wearable personal safety device.

Doro Secure 480 user guide 0.1
Page 2 of 16
Doro AB -
www.doro.com
GENERAL NOTE
THIS DOCUMENT CONTAINS INFORMATION ON DORO AB PRODUCTS. THE SPECIFICATIONS IN THIS
DOCUMENT ARE SUBJECT TO CHANGE WITHOUT PRIOR NOTICE. THE RECIPIENT SHALL NOT TRANSFER,
COPY, MODIFY, TRANSLATE, REVERSE ENGINEER, CREATE DERIVATIVE WORKS; DISASSEMBLE OR
DECOMPILE THE PRODUCT OR OTHERWISE USE THE PRODUCT EXCEPT AS SPECIFICALLY AUTHORIZED. THE
PRODUCT AND THIS DOCUMENT ARE PROVIDED ON AN "AS IS" BASIS ONLY AND MAY CONTAIN
DEFICIENCIES OR INADEQUACIES. TO THE MAXIMUM EXTENT PERMITTED BY APPLICABLE LAW, DORO AB
DISCLAIMS ALL WARRANTIES AND LIABILITIES. THE RECIPIENT UNDERTAKES FOR AN UNLIMITED PERIOD
OF TIME TO OBSERVE NON-DISCLOSURE REQUIREMENTS REGARDING ANY INFORMATION AND DATA
PROVIDED TO HIM IN THE CONTEXT OF THE DELIVERY OF THE PRODUCT. THIS GENERAL NOTE SHALL BE
GOVERNED AND CONSTRUED ACCORDING TO SWEDISH LAW.
Copyright
Transmittal, reproduction, dissemination and/or editing of this document as well as utilization of its
contents and communication thereof to others without express authorization are prohibited. Offenders
will be held liable for payment of damages. All rights created by patent grant or registration of a utility
model or design patent are reserved.

Doro Secure 480 user guide 0.1
Page 3 of 16
Doro AB -
www.doro.com
Contents
1
DORO SECURE 480 at a glance ..................................................................................... 5
1.1
DORO SECURE 480 overview ........................................................................................................... 5
1.2
Accessories ....................................................................................................................................... 6
1.3
Buttons ............................................................................................................................................. 6
1.3.1
Help request call .................................................................................................................. 7
1.3.2
Function buttons in the watch bezel .................................................................................... 7
1.4
Speaker and microphone ................................................................................................................. 7
1.5
Analog watch ................................................................................................................................... 7
1.6
Wearing the DORO SECURE 480 ...................................................................................................... 8
1.7
DORO SECURE 480 display status icons ........................................................................................... 8
2
Getting Started ........................................................................................................... 9
2.1
Charging ........................................................................................................................................... 9
2.2
Setting up ....................................................................................................................................... 10
2.2.1
DORO SECURE 480 ready for setup.................................................................................... 10
2.3
Web service .................................................................................................................................... 10
2.4
Making Help Request calls ............................................................................................................. 11
2.4.1
Help requests call in normal mobile network conditions ................................................... 11
2.4.2
Help requests call when DORO SECURE 480 is not connected to a mobile network ......... 11
2.5
Answering and reject a call ............................................................................................................ 12
2.6
Home beacon placement ............................................................................................................... 12
3
Safety, Handling and Support .................................................................................... 13
3.1
Guidelines for Safe Use .................................................................................................................. 13
3.1.1
Recommendations for safe use of the DORO SECURE 480 ................................................ 13
3.1.2
Home beacon power supply .............................................................................................. 13
3.1.3
DORO SECURE 480 Battery ................................................................................................ 13
3.2
Charging of the DORO SECURE 480 ............................................................................................... 14
3.3
Repair ............................................................................................................................................. 14
3.4
Strap replacement ......................................................................................................................... 14
3.5
Export regulations ..............................................................................
Error! Bookmark not defined.
3.6
End user license agreement ........................................................................................................... 14
3.7
GPS/GLONASS, home beacon and mobile network location ......................................................... 15
3.8
Help request calls ........................................................................................................................... 15
3.9
Medical devices .............................................................................................................................. 15
3.10
Specific Absorption Rate (SAR) and Radio Frequency (RF) exposure ............................................ 15
3.11
DORO SECURE 480 support information ....................................................................................... 16
3.12
Battery replacement ...................................................................................................................... 16

Doro Secure 480 user guide 0.1
Page 4 of 16
Doro AB -
www.doro.com
DOCUMENT HISTORY
Rev. #
Notes
Date
1.0
Initial release
2016-03-17
Complementary reading
Ref. #
Document Name
1
Doro Secure 480 web interface user guide
DORO SECURE 480 device HW and SW requirements
This document describes features of the following DORO SECURE 480 device HW and SW version.
HW version
SW version
DORO SECURE 480 HW revision D or
later
DORO SECURE 480 SW version 1.5.9
or later
Instructional icons
Warning
: situations that could cause injury to yourself, others or may damage a
device
Note
: notes, usage tips, or additional information
Doro Secure 480 user guide 0.1
Page 5 of 16
Doro AB -
www.doro.com
1
DORO SECURE 480 at a glance
1.1
DORO SECURE 480 overview
This user guide describes the use of the DORO SECURE 480 wearable personal safety wristwatch. Please
refer to the Web service user guide [Ref #1] for instructions on how to configure and manage the DORO
SECURE 480 wristwatch. The DORO SECURE 480 wristwatch is primarily designed for assisting persons who
may require help in order to manage their day to day life. It is also well suited for lone workers.
The most commonly function of the DORO SECURE 480 wristwatch is to show the time. The safety
requirements are catered for by mobile phone capabilities for making help request calls, normal calls and
receiving calls as well as the mobile data communications with the Web service. DORO SECURE 480
wristwatch has an inbuilt GPS/GLONASS receiver enabling accurate location information of the DORO
SECURE 480 wearer to be sent to the Web service when the wearer is outdoors. In the event that
GPS/GLONASS location cannot be acquired mobile network cell location or home beacon location can be
reported to the Web service.
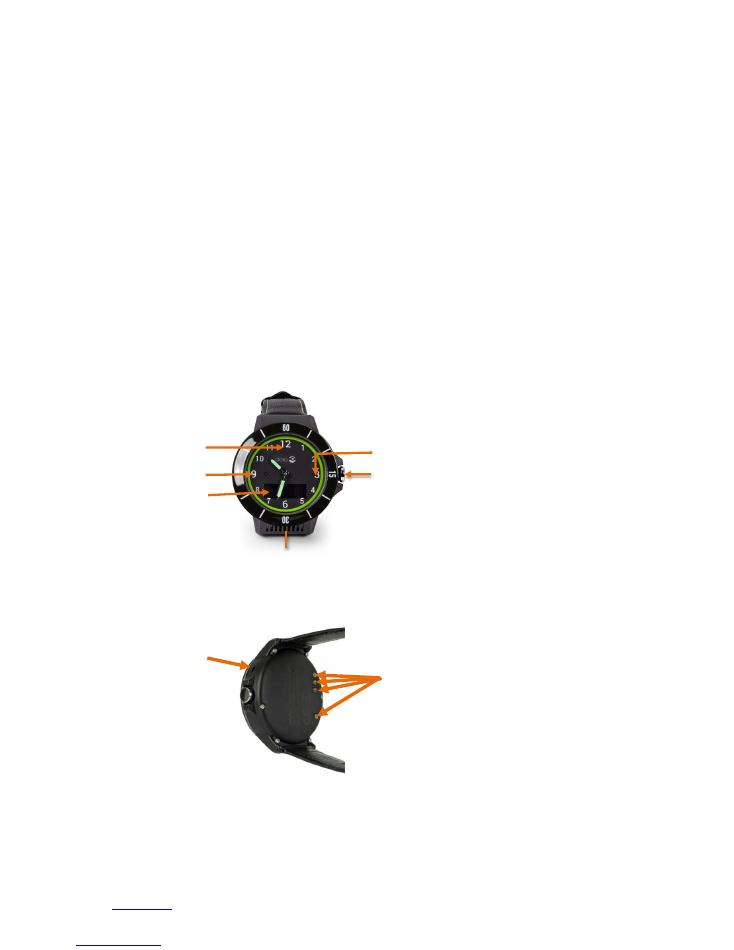
Key features of the DORO SECURE 480 wristwatch are:
Charging contacts
Microphone
Yellow LED
Red LED
Display
Green LED
Crown button /
Help request button
Speaker
Doro Secure 480 user guide 0.1
Page 6 of 16
Doro AB -
www.doro.com
The DORO SECURE 480 also has a Bluetooth Low Energy link that can be used to detect the proximity of a
home beacon and more importantly the loss of contact with the home beacon.
DORO SECURE 480 also has a vibrator to assist persons with hard of hearing or poor eye sight with the use
of the DORO SECURE 480. The DORO SECURE 480 speaker is also used as part of the user interface.
1.2
Accessories
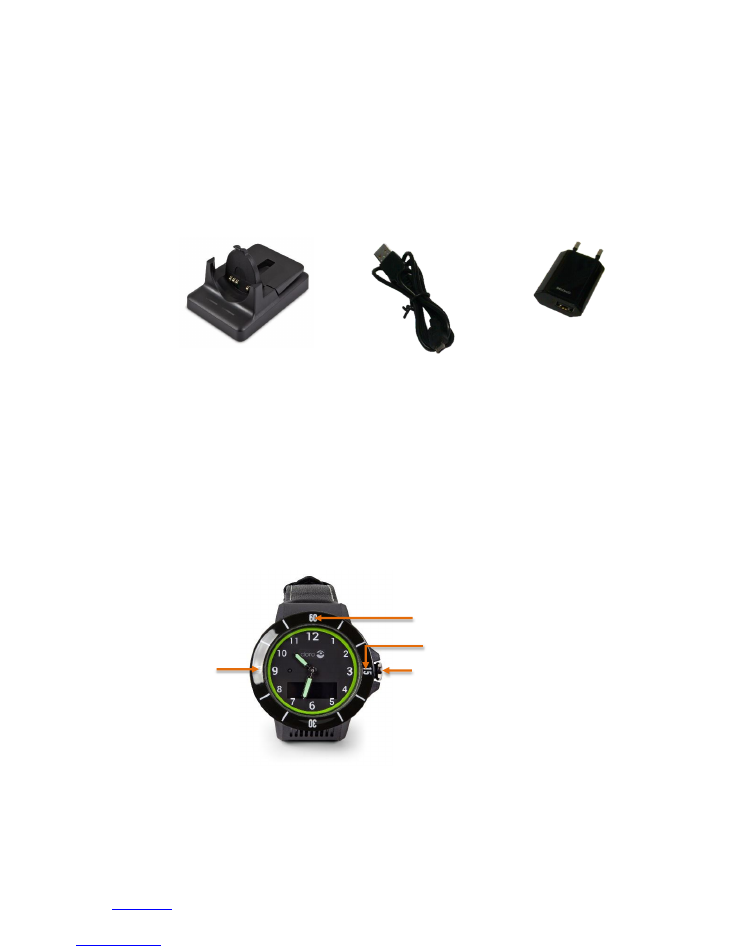
The following accessories are provided with DORO SECURE 480 (these may vary depending on model and
region).
Home beacon
USB cable
USB charger
1.3
Buttons
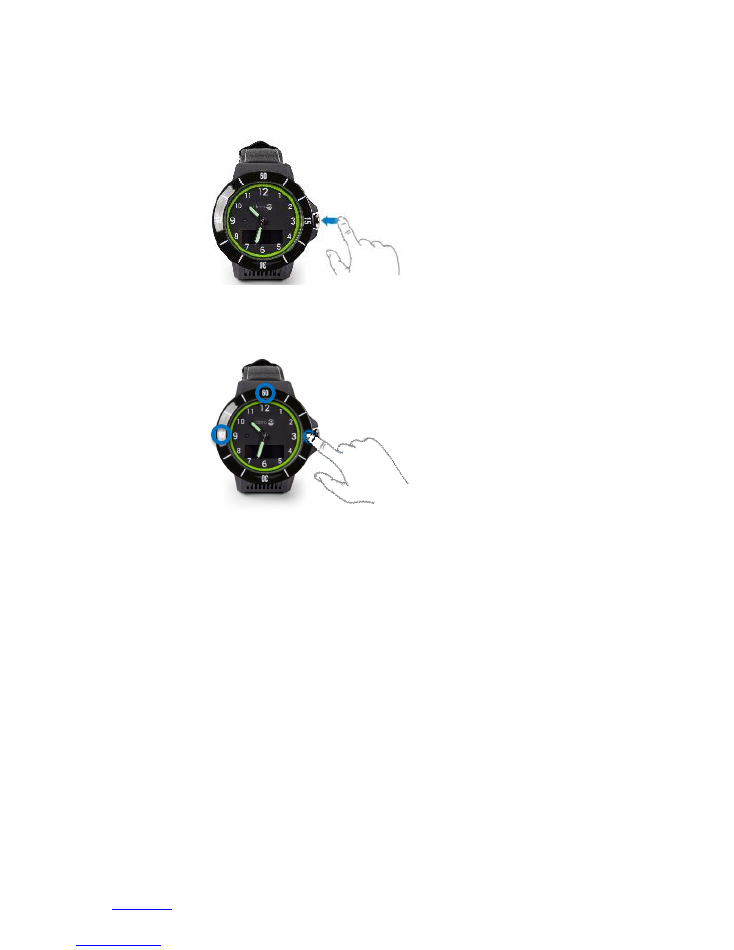
The DORO SECURE 480 wristwatch has Three buttons and a crown. The three buttons on the watch bezel
are hidden inside the watch mechanics and there are no mechanical buttons visible. Press firmly the watch
bezel at number 15, 45 or 60. When the button is activated the watch gives a haptic feedback and the
selected action is activated. The crown button is the only visible mechanical button.
The help request call is initiate by the crown button. The UP button is located at number 60 in the bezel.
The CALL / YES button is located at number 45 in the bezel. The CANCEL / NO button is located at number
15 in the bezel. The buttons and crown are enabled or disabled depending on the profile selected.
Up
Call / Yes
Crown button /
Help request call
Cancel / No
Doro Secure 480 user guide 0.1
Page 7 of 16
Doro AB -
www.doro.com
1.3.1
Help request call
Press the Crown button and hold down to initiate a help request call. The DORO SECURE 480 vibrate
shortly and the display will show SOS with background animation. This function is active in Safety alarm
profile.
1.3.2
Function buttons in the watch bezel
Buttons are located at number 15 (CALL/YES), at number 45 (CANCEL/NO) and at number 60(UP).
Please note that button functions are enabled or disabled depending on selected DORO SECURE 480
profile. In safety alarm profile the 15, 45 and 60 buttons show the battery level in the display. In Geofence
and home beacon profiles none of the buttons are operational.
1.4
Speaker and microphone
DORO SECURE 480 has a powerful speaker directed towards the wearer. The microphone is located in the
side of the watch body at 2 o’clock. During a phone call please keep the DORO SECURE 480 approximately
25 cm away from your mouth if possible. This is an optimum position for best sound quality for the DORO
SECURE 480 speaker and microphone. The speaker volume can be easily adjusted using the Web service.
1.5
Analog watch
The DORO SECURE 480 has an analog watch function. The time shown by the DORO SECURE 480 is
synchronized with the Web service. The time zone selection can be easily done with the Web service. The
watch hands will move away from the display area if there is something to be shown in the display. When
the display is turned off the watch hands resume their correct locations. Please note that there is a watch
hand position sensor near the 9 o’clock LED in the watch face. Occasionally the DORO SECURE 480 checks
the position of the watch hands by moving the hands over the sensor. The watch hand calibration may fail
if a bright light impairs the sensor during calibration. The watch will recalibrate the hands later
automatically. It is also possible to initiate the calibration process with the Web service if the time shown
by the watch is incorrect.

Doro Secure 480 user guide 0.1
Page 8 of 16
Doro AB -
www.doro.com
1.6
Wearing the DORO SECURE 480
The DORO SECURE 480 has been built so that it can be used in everyday life without too many limitations.
The wristwatch itself is splash water proof but like any wristwatch it may fog up if exposed to extreme
temperature changes or submerged in water. It is not recommended that the DORO SECURE 480 is worn
in sauna or other environments where similar extreme temperatures changes can occur. It is
recommended that the DORO SECURE 480 is kept clean and dry. The mineral glass of the wristwatch may
break if a direct impact hits the glass.
1.7
DORO SECURE 480 display status icons
The DORO SECURE 480 has a two row OLED display. The display is operational when a call is being made
and when the crown has been pressed in Safety alarm profile. It is also operational for a short period of
time when the DORO SECURE 480 is placed into the charging dock. The display icons are explained the in
the table below.
Status icon
Icon name
What it means
Battery
Shows DORO SECURE 480 battery level or charging
status.
Home beacon
Device has a connection to a home beacon.
GPS
When the icon is steady the DORO SECURE 480 has
successfully acquired a GPS location. When this icon is
blinking, it means that DORO SECURE 480 is in the
process of acquiring a GPS location.
Tracking
The icon is shown when tracking is activated.
Call
You have an active voice call ongoing.
Data transfer
When the icon is shown the device is uploading or
downloading data.
Mobile network
You are in range of the mobile network. DORO SECURE
480 can make and receive phone calls and it has
connection to Web service. Number of the coverage
bars indicates the strength of mobile network signal;
more bars indicate better signal strength.
Mobile network
If the DORO SECURE 480 is not connected to a GSM
network you will see a network icon with a cross.
Doro Secure 480 user guide 0.1
Page 9 of 16
Doro AB -
www.doro.com
2
Getting Started
Warning
: To avoid injury read section 2.6 Safety, handling and support before using
DORO SECURE 480.
2.1
Charging
The DORO SECURE 480 has an internal battery that provides power to the device. It must be charged
regularly in order for the DORO SECURE 480 to work properly.
Connect the charger with the provided USB cable to the home beacon.
Connect the charger to a power outlet. The blue LED on the right will be lit for couple of seconds
when home beacon is first powered to indicate that the home beacon is working normally. The
blue LED will turn off automatically in order not to disturb the wearer during sleep if the home
beacon is placed on a night stand.
Place the home beacon onto a steady flat surface such as a table. Please keep the home beacon
dry and where possible away from direct sunlight and excess heat sources.
Do not touch the charging contacts in the charging dock as excess force may deform them.
Prior to using the DORO SECURE 480 device for the first time it must be charged. The initial charging time
is approximately one and half hours if the battery is completely empty.
Please place the DORO SECURE 480 into the home beacon charging dock as shown in the picture
above. The DORO SECURE 480 will beep when it has been properly seated in the dock. The left
home beacon LED will be lit.
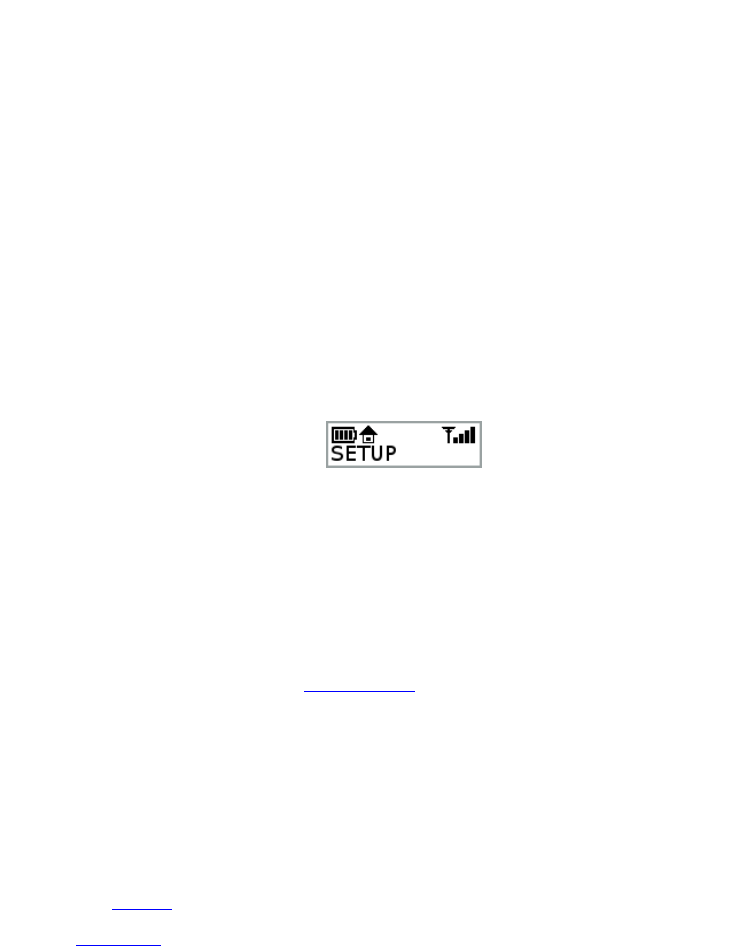
When the DORO SECURE 480 is placed into the charging dock for the first time the DORO SECURE
480 display will show
SETUP
. During charging the DORO SECURE 480 YELLOW LED at 12 o’clock is
lit and the battery icon will show an animated charging sequence. The left LED of the home beacon
is RED when charging is taking place.
When the battery is fully charged in the battery icon all four battery level bars are lit and the DORO
SECURE 480 GREEN LED at 3 o’clock is lit. The left LED of the home beacon will turn GREEN when
the DORO SECURE 480 battery is fully charged. Please note that the left LED of the home beacon
may remain RED for a period of time after DORO SECURE 480 display shows
BATT FULL
.
When the DORO SECURE 480 has been setup in the Web service the
SETUP
display will change
either to
CHARGING
or to
BATT FULL
. Please note that the DORO SECURE 480 will calibrate the
watch hands when leaving from the SETUP state. Please refer to section 2.2 for instructions on how
the set the DORO SECURE 480 up in the Web service by using the user name and password provided
in the label inside the DORO SECURE 480 delivery box lid
.
Doro Secure 480 user guide 0.1
Page 10 of 16
Doro AB -
www.doro.com
When the DORO SECURE 480 is placed in the charging dock all bezel button functions are disabled
and device screen turns OFF after 10 seconds. By pressing the crown button the DORO SECURE 480
display is turned ON for 10 seconds to show the DORO SECURE 480 status, network and battery
level.
2.2
Setting up
In order to use the DORO SECURE 480 it must configured using the Web service. A new DORO SECURE 480
has been put into a
SETUP
mode at the factory and powered off for shipment. The DORO SECURE 480 will
remain in
SETUP
mode until it has been configured using the Web service.
2.2.1
DORO SECURE 480 ready for setup
During the initial charging period the DORO SECURE 480 display will show
SETUP
. This indicates that
DORO SECURE 480 is in a setup mode. Please note that if you remove the DORO SECURE 480 from the
charging dock in
SETUP
mode the DORO SECURE 480 will turn itself off automatically. Please keep the
DORO SECURE 480 in the charging dock for the duration of the configuration. Please wait until the DORO
SECURE 480 mobile network icon shows at least one bar and the battery is fully charged. The fully charged
state is indicated by GREEN LED on DORO SECURE 480 dial near 3 o’clock and by steady battery icon with
all four bars visible. Please note that it is normal for the DORO SECURE 480 to move the watch hands
during the setup period.
NOTE: Connection to a mobile network is required in order to complete the DORO SECURE 480 setup. If
mobile network is not available for DORO SECURE 480 in a couple of minutes please move the DORO
SECURE 480 to another location where mobile network is available.
2.3
Web service
Doro Secure 480 web service is a service that allows individual caregivers and professional care entity
personnel to manage the call routing and caregiver reachability services, to manage the settings of DORO
SECURE 480 devices, and to see the location of an assistee in a map view.
The Doro Secure 480 web service is hosted by Doro in a telecom grade redundant server environment.
Caregivers and professional care providers can use the Doro Secure 480 web service with a web browser.
Doro Secure 480 is found here:
https://secure480.com
Please see User manual for Doro Secure 480 web service Ref #1 for more detail information how to use
the Web service.
Doro Secure 480 user guide 0.1
Page 11 of 16
Doro AB -
www.doro.com
2.4
Making Help Request calls
One of the most useful features of the DORO SECURE 480 is the ability to make help request calls by a
single push of a button. A help request call can be made by pressing the pressing the crown button. Please
note that Safety alarm profile is only profile supporting crown button alarms
2.4.1
Help requests call in normal mobile network conditions
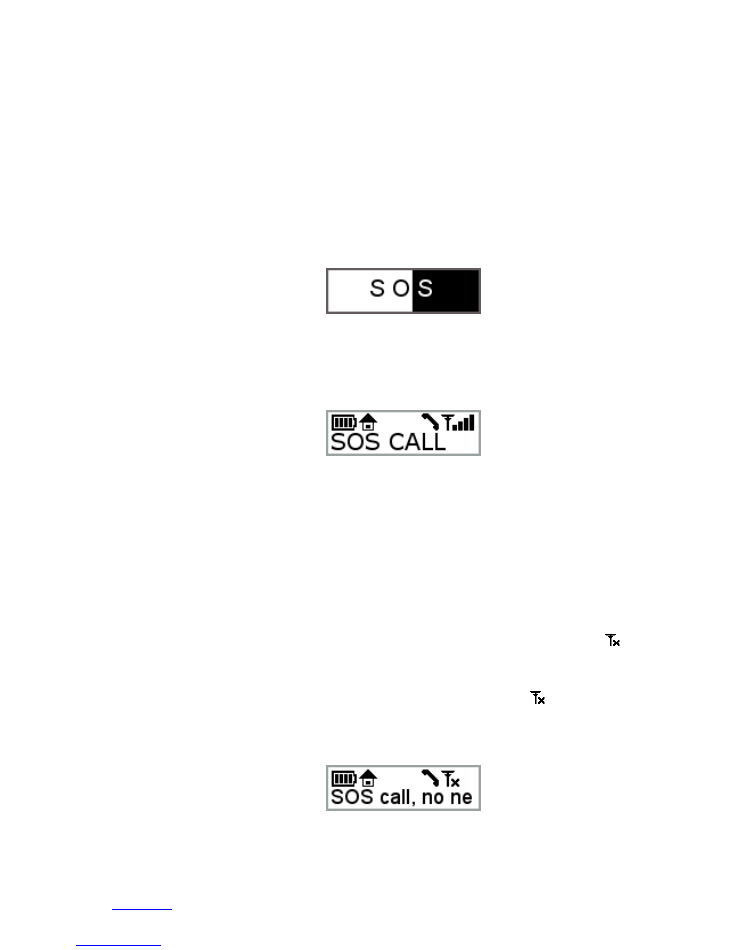
Press the crown button. The DORO SECURE 480 will vibrate briefly when the button has been actuated.
The display will show SOS with an animation turning the background white from left to right. When the
button has been pressed for the required time the animation reaches the right side of the display and the
help request call is initiated. If the button is released prior to the end of the animation the help request
call is not placed. This purpose of the short delay is to avoid accidental help request calls.
When the help request call is initiated the DORO SECURE 480 will vibrate for a second to tell the wearer
that the call is being made. At the same time the display will show that the SOS call initiation is in
progress.
Shortly afterwards the DORO SECURE 480 speaker will play a beeping sound sequence until the dial tone is
available from the mobile network. Depending on the mobile network connection time and number of
caregivers that are being reached the call connection time may vary. Typical call connection time is a few
seconds if the first number in the call sequence is reachable.
2.4.2
Help requests call when DORO SECURE 480 is not connected to a mobile
network
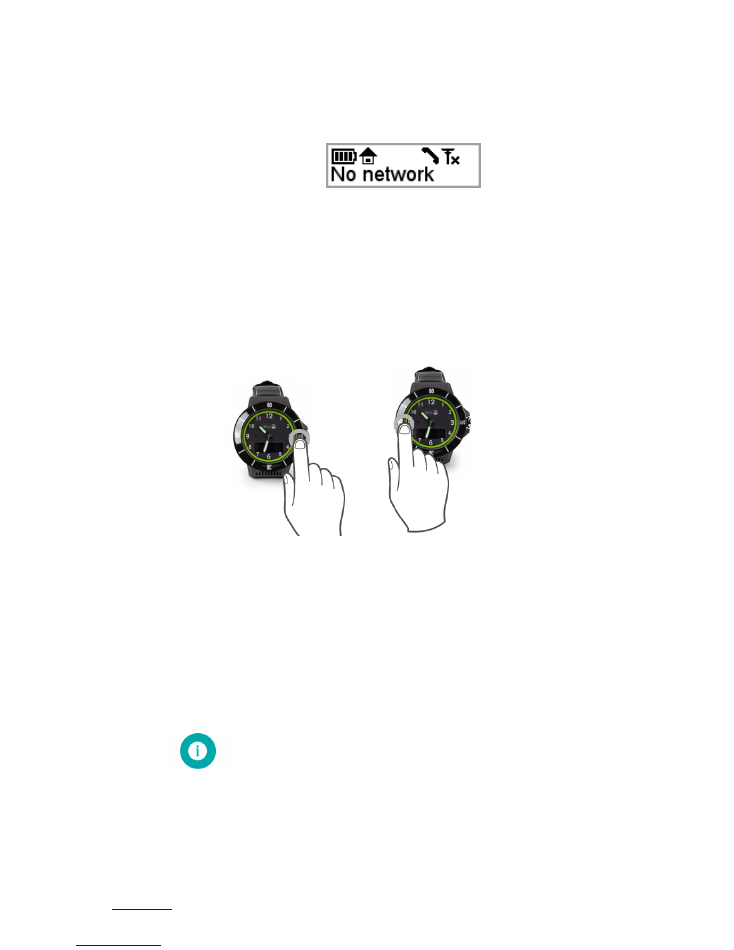
In the event that the DORO SECURE 480 is outside of mobile network coverage help request calls cannot
be successfully connected. The mobile network icon in the DORO SECURE 480 display will show
as
shown in the picture below.
If the
ALWAYS ON-LINE
toggle in the Web service has been turned
OFF
the DORO SECURE 480 turns off
its mobile network module in order to save power. This is also indicated by the
icon. When a call is
initiated the DORO SECURE 480 will attempt to connect to the GSM network. If the network connection
can’t be achieved in 10 minutes an error message will be displayed.
Doro Secure 480 user guide 0.1
Page 12 of 16
Doro AB -
www.doro.com
If the call cannot be immediately connected it is advisable that the DORO SECURE 480 user moves to a
location where mobile network coverage is available if at all possible. If the connection cannot be
established during the 10 minutes period the help request call attempt will be given up and
NO
NETWORK
will be shown in the DORO SECURE 480 display.
2.5
Answering and reject a call
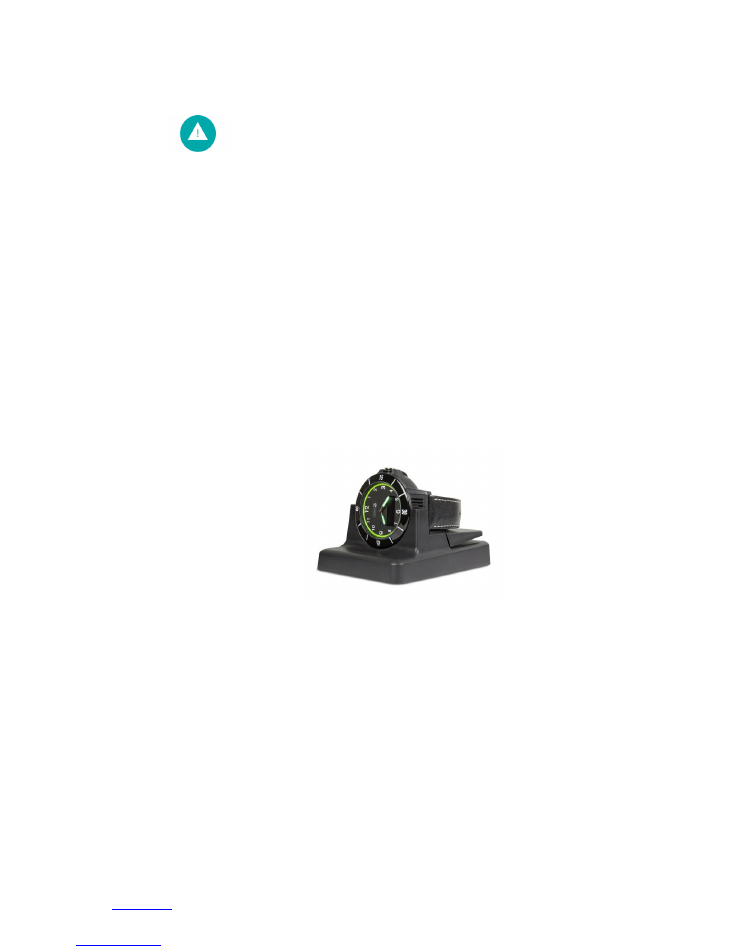
DORO SECURE 480 can also receive calls. The DORO SECURE 480 will automatically accept the calls when
geofence and home beacon profile is selected. In the Safety alarm profile the wearer has the option to
either accept or reject an incoming call. The call is accepted by pressing the YES button at number 15 as
shown in the picture below left. The call can be rejected by pressing NO as shown in the picture below
right.
2.6
Home beacon placement
Placement of home beacon and full coverage in assistee’s home is important when using home beacon
alarm profile. Lack of home beacon coverage when using home beacon alarm profile will generate false
alarms. When DORO SECURE 480 is in range of a home beacon, GSM and GPS is turned off, thus battery
consumption is significantly decreased. The range of the home beacon in open space is up to 10 meters.
Walls and other solid obstructions may significantly shorten the range of the home beacon. Additional
home beacons may be needed to get full coverage of assistee’s home. You can pair up to 10 home
beacons with one DORO SECURE 480 device. One Home beacon can be paired by many DORO SECURE 480
devices.
Note
: Make sure you have full home beacon coverage in assistee’s home. This will
reduce number of false home beacon alarms and increase battery usage time.
Accept a call
Reject a call

Doro Secure 480 user guide 0.1
Page 13 of 16
Doro AB -
www.doro.com
3
Safety, Handling and Support
3.1
Guidelines for Safe Use
Please follow these guidelines. Failure to do so might be a potential health risk or product malfunction. If
you doubt that the DORO SECURE 480 is not functioning properly have it checked by a certified service
partner prior to using or charging it.
3.1.1
Recommendations for safe use of the DORO SECURE 480
Warning
: The DORO SECURE 480 may explode if exposed to fire.
Handle the DORO SECURE 480 with care and keep it clean and dust-free.
Do not use the DORO SECURE 480 in environments where relevant IP rating limitations, if applicable, are
exceeded (including excess depths) or expose it to excess humidity.
Do not use the DORO SECURE 480 or the home beacon in explosive atmosphere.
For optimum performance, the DORO SECURE 480 should not be operated in temperatures below -20°C or
above +60°C. Do not expose the battery to temperatures above +60°C.
Do not attempt to disassemble the DORO SECURE 480 or the home beacon. Only an authorized service
partner is allowed to perform service operations.
Do not expose the DORO SECURE 480 or the home beacon to flames.
Do not throw or drop the DORO SECURE 480.
Avoid volume levels that may be harmful to your hearing.
Do not expose the DORO SECURE 480 or the home beacon to prolonged periods to excess heat.
Please use only mild detergents and soft tissue to clear the DORO SECURE 480.
Do not expose the home beacon to moisture.
Keep the home beacon charging dock free of any foreign objects.
Please keep the microphone and speaker grills clear of debris and other obstacles.
Warning
: Broken glass may create sharp edges that can harmful.
3.1.2
Home beacon power supply
Connect the power supply to power sources as marked on the product. Do not use in damp areas or
exposed to elements. Do not subject the cable to stress. Do not use a damaged cable.
3.1.3
DORO SECURE 480 Battery
Charge the DORO SECURE 480 battery in temperatures between +0°C and +45°C. Do not try to open the
DORO SECURE 480 nor to change the battery. Battery life depends on temperatures, signal strength,
profile chosen and voice calls. Only approved service partners should replace the battery.

Doro Secure 480 user guide 0.1
Page 14 of 16
Doro AB -
www.doro.com
3.2
Charging of the DORO SECURE 480
Please charge the DORO SECURE 480 only in the home beacon charging dock. When charging the DORO
SECURE 480 keep it dry, away from direct sunlight and exposure to dust. Please note that the DORO
SECURE 480 can be charged in temperatures between +0°C and +45°C.
3.3
Repair
The DORO SECURE 480 is a delicate piece of electronics and micromechanics. It may only be repaired by
an authorized service partner.
3.4
Strap replacement
The DORO SECURE 480 strap is a normal watch strap with a 22 mm interface. The strap may be replaced
by a qualified store selling straps and providing replacement services.
Please check with Doro AB for strap options for wearers suffering from dementia or for persons with poor
dexterity.
3.5
Export regulations
The end user shall comply with all national, state, and local laws and regulations governing the use of
Binary in the course of the license. In the United States, these may include, but are not limited to,
Department of Commerce including U.S. Export Administration regulations, Securities Exchange
Commission, Environmental Protection Agency, and Department of Transportation regulations applicable
to Hazardous Materials.
GOVERNMENT GPS LIMITATIONS: end user shall, in the use of the S1 shall conform to, all applicable
federal, state and local orders, laws, regulations and ordinances, including specifically United States
federal government regulations relating to GPS technology.
U.S. GOVERNMENT RESTRICTED RIGHTS: Software is provided with Restricted Rights. Use, duplication, or
disclosure by the Government is subject to restrictions as set forth in License Terms available from Doro at
request, pursuant to DFARS 227 7202-3 or subparagraphs (c)(i) and (2) of the Commercial Computer
Software- Restricted Rights at 48 CFR 52.227 19, as applicable, or as set forth in the particular department
or agency regulations or rules that provide Doro with protection equivalent to or greater than the above-
cited clause. The Manufacturer is Navigil Ltd, Klovinpellontie 1-3, 02180 Espoo, Finland.
The device or software may be subject to import and export regulations of the European Union, the
United States and other countries. The end user will comply with these applicable laws and regulations
and will obtain and maintain any export and import license required for the delivery of goods to the end
user. Without limiting the foregoing, and as an example, the S1 may not be knowingly export or re-export
the S1 to destinations identified pursuant to Articles in Chapter II of European Council Regulation (EC)
428/2009 and specifically, and without limitation, you will also comply with U.S. government Export
Administration Regulations (“EAR”, 15 C.F.R. §§ 730-774, http://www.bis.doc.gov/) administered by
Department of Commerce, Bureau of Industry and Security and economic sanctions regulations (30 C.F.R.
§§ 500 et. seq., http://www.treas.gov/offices/enforcement/ ofac/) administered by the U.S. Department
of Treasury, Office of Foreign Assets Control.
3.6
End user license agreement
Software delivered with DORO SECURE 480 and home beacon is owned by Doro AB and/or its affiliated
companies and its suppliers and licensors.

Doro Secure 480 user guide 0.1
Page 15 of 16
Doro AB -
www.doro.com
Doro AB grants the end user a non-exclusive limited license to use the software solely in conjunction with
the DORO SECURE 480. Ownership of the software is not sold, transferred or otherwise conveyed. The
license grant is subject to the timely and full payment of all fees payable by end user from time to time.
End user may not (i) modify, (ii) reverse engineer, or (iii) for the purpose of reverse engineering,
disassemble, decompile or trace the execution of software or any portion of it.
This license grant is valid throughout the useful life of the DORO SECURE 480. It can be terminated by
transferring your rights to the device to a third party in writing.
Failure to comply with any of these terms and conditions will terminate the license forthwith.
This license is governed by the laws of Sweden. When applicable, the foregoing applies to statutory
consumer rights.
Doro AB and its third party suppliers and licensors retain all rights, title and interest in and to the
software. To the extent that the software contains material or code of a third party, such third parties
shall be beneficiaries of these terms.
3.7
GPS/GLONASS, home beacon and mobile network location
The DORO SECURE 480 features GPS/GLONASS, home beacon and mobile network location based
functions. Location determining functionality is provided “As is” and “With all faults”. DORO AB makes no
representation or gives any warranty to the accuracy of location information.
Location-based information provided by the DORO SECURE 480 and Web service may not be always
available or be error free. It also is dependent on mobile network service availability. Please note that
GPS/GLONASS performance may be reduced or prevented in certain environments such as indoors and
densely forested areas where GPS/GLONASS signals can’t be received reliably.
The home beacon range may vary significantly depending on obstructing structures between the home
beacon and the DORO SECURE 480.
The mobile networks are in constant flux of change. It may not be possible to derive a mobile network
based location in all areas.
3.8
Help request calls
Connection of help request calls cannot be guaranteed under all conditions. Calls may not be possible in
all areas, on all networks subject to network capacity limitations, network coverage limitations and
building or other similar obstructions.
3.9
Medical devices
The DORO SECURE 480 and the home beacon are equipped with radio transmitters that may affect
implanted and other medical equipment. In order to reduce risk of interference keep the DORO SECURE
480 and the home beacon a minimum distance of 15 cm away from the medical device. Do not use the
DORO SECURE 480 at your ear if possible. For use in proximity to medical devices, please consult a
physician and the medical device manufacturer.
3.10
Specific Absorption Rate (SAR) and Radio Frequency (RF)
exposure
The DORO SECURE 480 is equipped with a Bluetooth Low Energy link and GSM mobile phone features.

Doro Secure 480 user guide 0.1
Page 16 of 16
Doro AB -
www.doro.com
The Bluetooth Low Energy link and the GSM mobile phone emit low levels of radio frequency energy.
International safety guidelines have been developed for such emissions. These guidelines establish
permitted levels of radio wave exposure. The guidelines include a safety margin designed to assure the
safety of all persons and to account for any variations in measurements.
Specific Absorption Rate (SAR) is used to measure radio frequency energy absorbed by the body when
using the DORO SECURE 480. The SAR value is determined at the highest certified power level in a
laboratory. The DORO SECURE 480 is uses the minimum power necessary to access the chosen network,
thus actual SAR level can be well below this value.
3.11
DORO SECURE 480 support information
Please visit www.doro.com for more information.
3.12
Battery replacement
The DORO SECURE 480 internal battery can only be changed at an authorized service partner. Please
check with your nearest service partner location.