Full Text Searchable PDF User Manual
BEFORE ASSEMBLING THIS COT READ AND UNDERSTAND THE INSTRUCTIONS.
• Do not use mattress other than the one supplied by the manufacturer.
Incorrect mattress can cause death.
• Use only accessories as recommended by the manufacturers.
• Ensure the top rails and base are fully locked.
• Stop using this cot if any part of the cot is broken, torn or missing.
KEEP THESE INSTRUCTIONS IN A SAFE PLACE FOR FUTURE REFERENCE.
www.britax.com.au
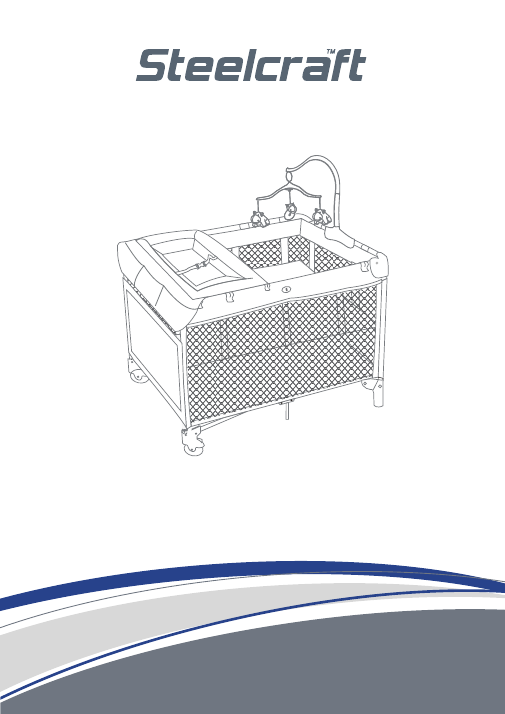
SeriesY-835
4 IN 1 PORTABLE COT

ALWAYS FOLLOW THE MANUFACTURERS INSTRUCTIONS.
READ ALL INSTRUCTIONS CAREFULLY BEFORE ASSEMBLY AND USE
OF THIS COT.
THE CORRECT USE AND MAINTENANCE OF THIS PRODUCT IS
ESSENTIAL.
WARNINGS
• FOLLOW THE MANUFACTURERS INSTRUCTIONS.
• MAKE SURE CHILDREN ARE KEPT AWAY WHILE YOU ARE ASSEMBLING/
DISASSEMBLING THE COT.
• ALWAYS APPLY THE BRAKES WHEN USING THE COT.
• DO NOT LEAVE YOUR CHILD UNATTENDED.
• USE ONLY THE MATTRESS SUPPLIED BY THE MANUFACTURER,
INCORRECT MATTRESSES CAN CAUSE DEATH.
• DO NOT ADD ANY EXTRA MATTRESSES AS IT MAY CAUSE SUFFOCATION
& DEATH.
• TO PREVENT FALLS THE BASSINET MUST NOT BE USED ONCE A CHILD
CAN SIT UP.
• NEVER PLACE A CHILD IN THE COT WHEN THE BASSINET IS IN PLACE.
• NEVER PLACE A CHILD IN THE COT WHEN THE CHANGE TABLE IS IN
PLACE.
• ALWAYS USE THE HARNESS WHEN USING THE CHANGE TABLE.
• REMOVE THE TOY MOBILE FROM THE COT WHEN THE CHILD BEGINS TO
PUSH UP ON HANDS AND KNEES.
• Check that the assembly of the cot is correct and safe.
• Check that all folding parts and locking devices are fully engaged
before placing child in the cot.
• Do not place more than one child in the cot at the same time.
• Check that the assembly of the cot is correct and safe.
• Check that all folding parts and locking devices are fully engaged
before placing child in the cot.
• Do not place more than one child in the cot at the same time.
WARNINGS:
TO AVOID INJURY OR DEATH:
02

WARNINGS
WARNINGS
• Do not use your cot if any part is torn, broken or missing.
• Do not place toys or other objects in the cot which could provide a
step or foothold to help the child climb out.
• Cots with padded rails should not be used if the covering fabric has
been bitten through.
• Do not use or leave the cot near open fires, naked flames, electric bar
fires, gas fires, stoves, heaters or barbecues.
• Do not place the cot where your child could reach medication, money,
string, elastic, small toys or other small objects.
• Do not place the cot near trailing or hanging cords, leads or flexes such
as curtain cords, electrical cords or leads, etc.
• The thickness of the mattress has been specified to ensure that the
distance from the top of the mattress to the top of the lowest side or
end will always be at least 500mm. This will reduce the risk of the child
falling out of the cot.
• Using the wrong size mattress may create hazardous gaps that could
result in suffocation or could reduce the side height of the cot, which
may result in your child falling out of the cot.
• Do not use parts or accessories other than those tested and approved
by Nursery Elegance.
• Do not use this cot with a child who can climb out, weighs more than
15kg, or is taller than 90cms.
• Always check parts regularly for tightness of screws, nuts and other
fasteners - tighten if required.
THIS PRODUCT IS NOT INTENDED FOR COMMERCIAL USE.
03
TESTED AND APPROVED ACCESSORIES
Using the wrong size mattress may create hazardous gaps that could
result in suffocation or could reduce the side height of the cot which may
result in your child falling out from the cot.
To ensure the cots correct assembly and use, ensure you follow these
instructions in the order they are written.
IMPORTANT
WARNING: MATTRESS SIZE
WARNINGS
04
Mattress by Steelcraft - Series Y-835M
Bassinet by Steelcraft - Series Y-835M
Change Table by Steelcraft - Series Y-835M
Toy Mobile by Steelcraft - Series Y-835M
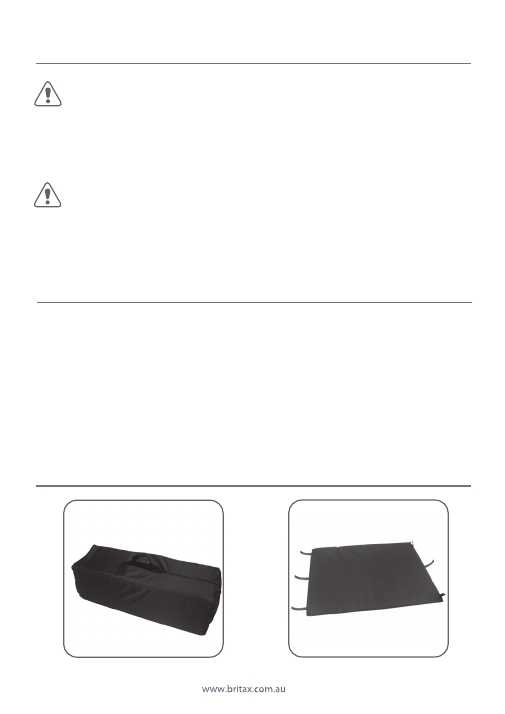
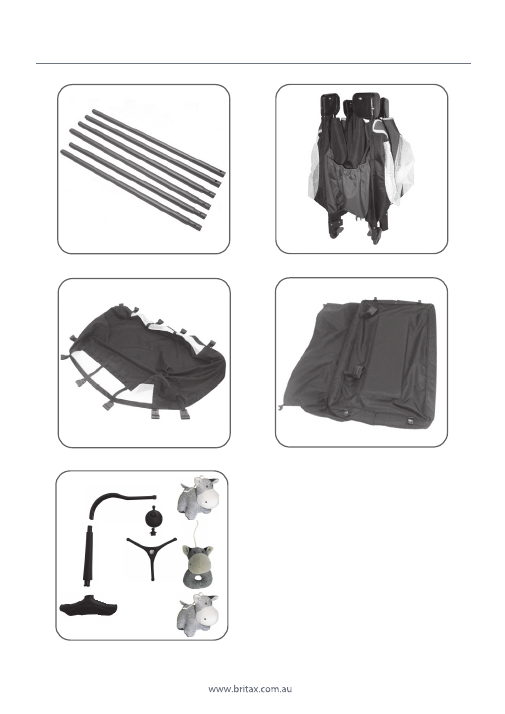
PARTS LIST
A
1 x Carry Bag
B
1 x Mattress
C
6 Mattress Support Rods
D
1 x Cot
PARTS LIST
E
1 x Bassinet
F
1 x Change Table
G
1 x Toy Mobile Stand
& 3 Soft Toys (
4 in 1 model only
)
05
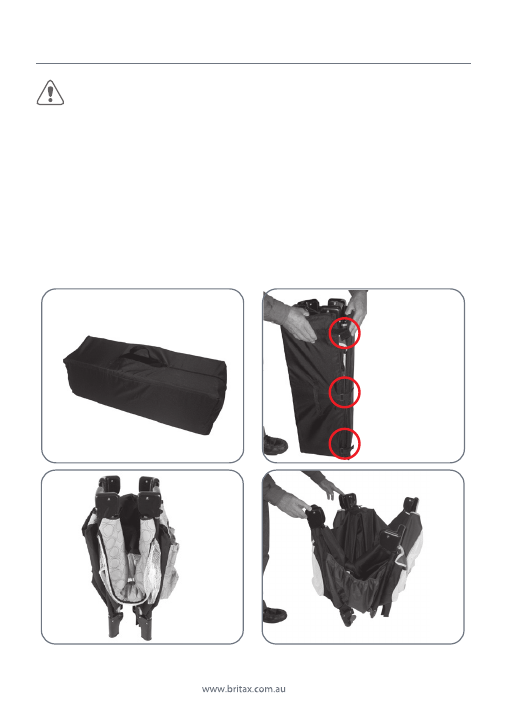
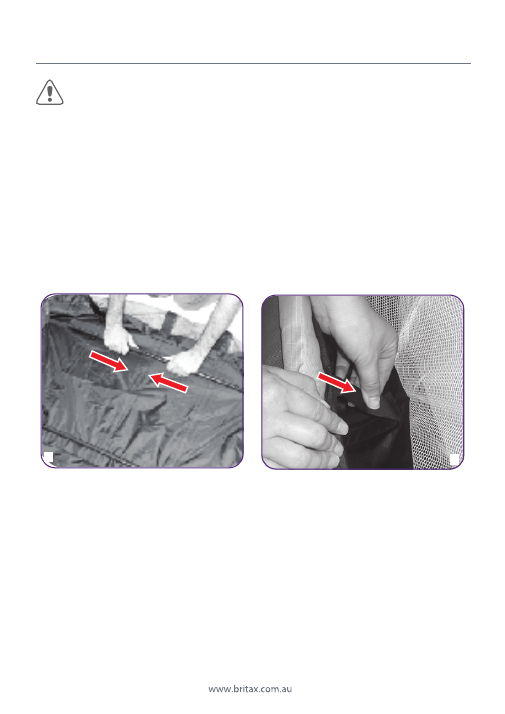
1. TO OPEN THE COT
A
Unzip the carry bag and remove the cot.
B
Stand the cot on its feet and undo the hook & loop straps that hold
the mattress around the frame.
C
Remove the mattress and set it aside.
D
Separate the legs of the cot.
IMPORTANT:
THESE STEPS WILL ENSURE THAT
THE COT IS CORRECTLY OPENED AND READY TO USE.
A
B
C
D
06
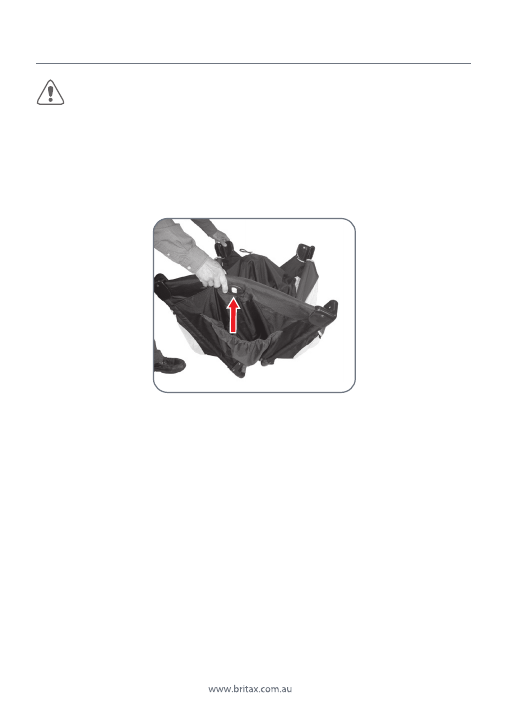
1. TO OPEN THE COT
E
Starting with the short rails, pull the centre up with both hands quickly
until they are locked in place.
F
Now do the same with the longer rails.
CAUTION:
TAKE CARE, AS FINGER PINCHING CAN
OCCUR IN THE CORNER WHEN LOCKING THE RAILS IN PLACE.
PLEASE NOTE:
All top rails should be locked in place. If they are not,
release them and try again. The centre of the cot base must be in a
raised position to allow the rails to lock easily. Check for the secure
engagement of the rails by pushing down on them.
G
Holding one end of the cot clear of the ground, gently press down in
the middle of the base until the base lays down flat. The base should
now be locked into position.
F
07
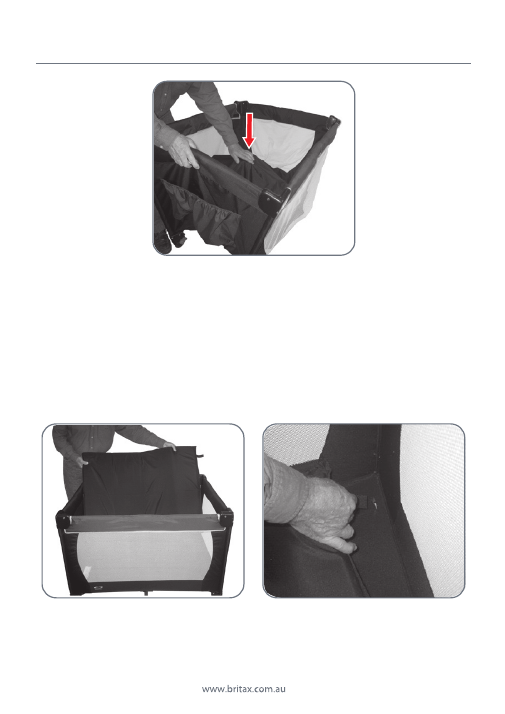
I
Secure the mattress to the cot by passing the loop straps through the
slots in the cot base and pressing it onto the hook attachment strips,
sewn to the underside of the cot base.
PLEASE NOTE:
Always secure the mattress before using the cot.
H
Place the mattress into the cot with its padded side facing up.
1. TO OPEN THE COT
G
H
I
08
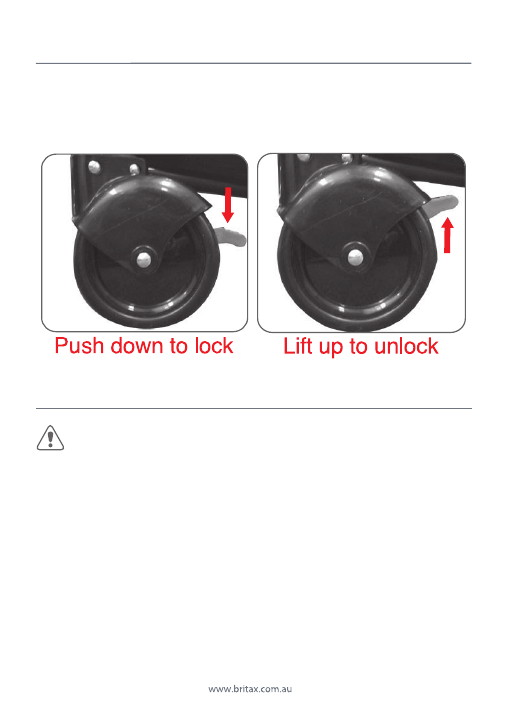
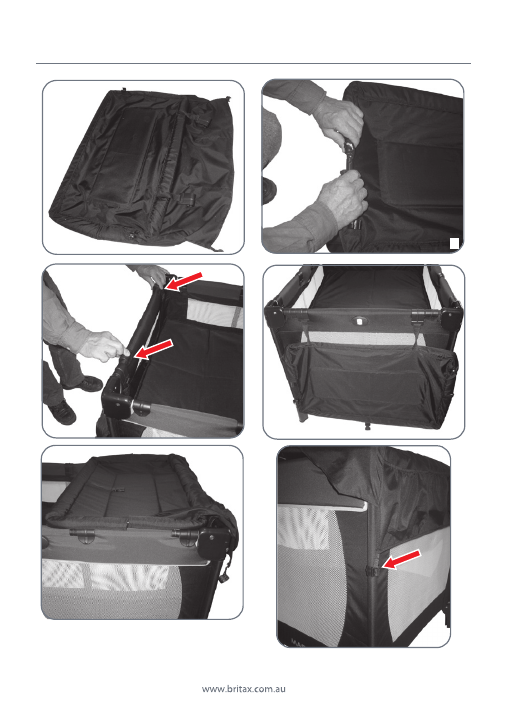
A
Push the brake lever down to lock, or lift the brake lever up to unlock.
PLEASE NOTE:
Always apply the brakes wherever and whenever you are
using the cot.
2. TO USE THE WHEELS
09
A
Release the loop straps under the base that secure the mattress and
remove the mattress from the cot.
B
Pull the strap up in the middle of the base all the way up.
C
Release each top rail by lifting the rail slightly and squeezing on the
buttons, located under the centre joint.
D
Ensure that each rail is fully released and then pull all the way up on
the cot base strap, while gathering the legs and the frame together
until its fully folded.
IMPORTANT:
THESE STEPS MUST BE FOLLOWED
IN THIS ORDER TO EASILY FOLD THE COT.
3. TO FOLD THE COT
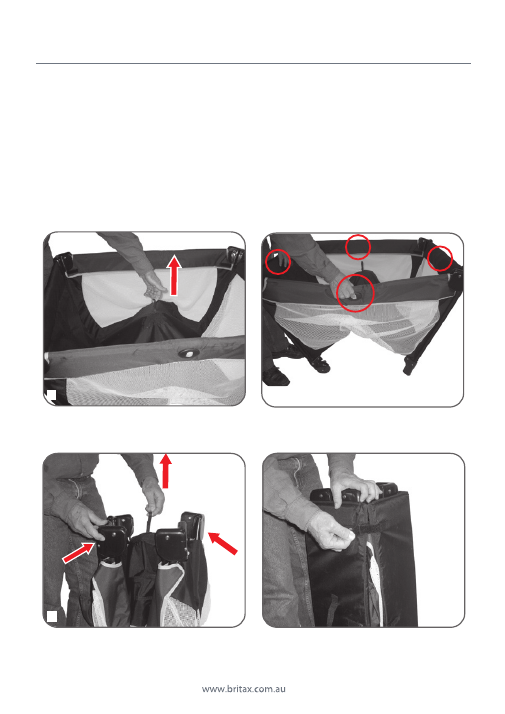
IF THE TOP RAILS DO NOT FOLD - DO NOT FORCE THEM - LIFT THE BASE
HIGHER AND RE-SQUEEZE THE BUTTONS TO FULLY RELEASE THEM.
3. TO FOLD THE COT
B
DISASSEMBLE AND STORE THE BASSINET AND CHANGE TABLE IN THE CARRY
BAG.
E
Take the mattress and wrap it around the folded cot with the padded
side facing inwards.
F
Thread the straps through the plastic loops, pull them tight and secure
using the hook and loop attachments.
G
Take the carry bag and cover the folded cot. Finish covering the cot
ensuring the mattress handle is through the opening then close the
zipper.
10
C
E/F
D
11
A
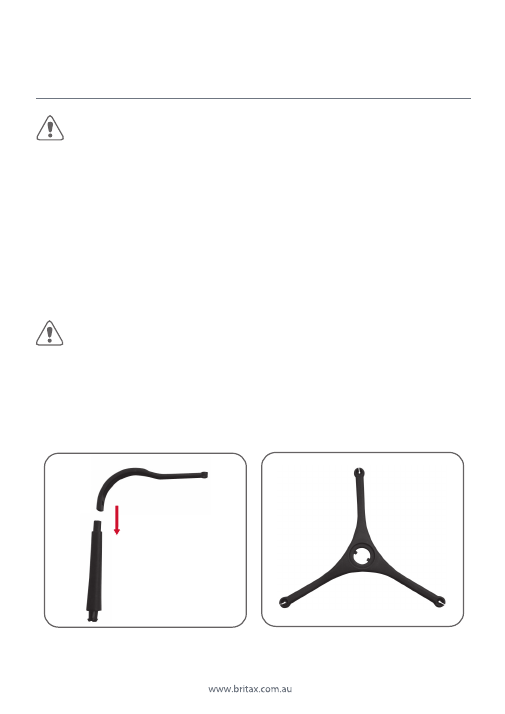
Insert the 3, two piece support rods into bassinet inner sleeves
separately and engage them in the middle with the locking pin.
B
Insert the mattress and secure it to the bassinet by passing the loop
straps through the slot in the bassinet base, then press the loop straps
onto the hook attachment, sewn to the underside of the bassinet.
WARNINGS:
TO PREVENT FALLS, THIS BASSINET
SHOULD NOT BE USED ONCE A CHILD CAN SIT UP.
NEVER PLACE A CHILD IN THE COT WHEN THE BASSINET IS IN
PLACE.
C
Lower the bassinet into the cot and snap the 12 plastic clips onto the
top rails of the cot. Make sure the plastic clips are positioned against
the edge of the corner mouldings.
4. TO USE THE BASSINET
A
B
12
PLEASE NOTE:
Always secure the mattress before using the bassinet.
IMPORTANT:
ALWAYS REMOVE THE BASSINET
BEFORE FOLDING THE PORTABLE COT.
4. TO USE THE BASSINET

13
WARNINGS:
NEVER LEAVE YOUR CHILD
UNATTENDED.
TO PREVENT FALLS THE CHANGE TABLE SHOULD NOT BE USED
ONCE A CHILD CAN SIT UP.
NEVER PLACE A CHILD IN THE COT WHEN THE CHANGE TABLE
IS IN PLACE.
ALWAYS USE THE HARNESS WHEN USING THE CHANGE TABLE.
A
Lay the change table face down with the four plastic hooks facing up.
B
Connect the tubes together on either side of the change table. Insert
one tube end into the other until the pin engages. Pull on the tubes to
make sure they are locked together.
C
Pick the change table up by the plastic hooks and connect to the
outside of the portable cot short end rail as shown. +
D
Rotate the change table over the portable cot and engage each of the
four clamps onto the side rails. Move the bassinet clamps slightly if
they interfere with the attachment of the change table.
E
Pull the pocket flap over the end of the portable cot. Attach the plastic
clamps to the leg tubes to keep the pocket in place.
F
When the change table is not in use, always fold over the end rail until
required again.
G
To remove the change table, release the plastic hooks from the top
rails.
5. TO USE THE CHANGE TABLE
14
A
B
PLEASE NOTE: Make sure the four
clamps are engaged on to the
side rails.
5. TO USE THE CHANGE TABLE
C
C
D
F
15
WARNING:
POSSIBLE ENTANGLEMENT INJURY:
THIS MOBILE IS DESIGNED TO BE USED FROM BIRTH TO 5
MONTHS. A MOBILE IS INTENDED FOR VISUAL
STIMULATION AND IS NOT INTENDED TO BE TOUCHED BY
THE CHILD. KEEP OUT OF THE BABY’S REACH. DO NOT
PLACE YOUR CHILD DIRECTLY UNDER THE MOBILE. REMOVE
MOBILE FROM THE COT WHEN BABY BEGINS TO PUSH UP
ON HANDS AND KNEES.
DO NOT ADD ADDITIONAL STRINGS OR STRAPS TO ATTACH
TO A CRIB OR PLAYPEN.
6. TO ASSEMBLE AND USE THE TOY
MOBILE
(4 in 1 Portable cot model only)
WARNING:
ALWAYS ATTACH THE MOBILE SECURELY
TO THE COT ACCORDING TO THESE INSTRUCTIONS. CHECK
ATTACHMENT FREQUENTLY.
A
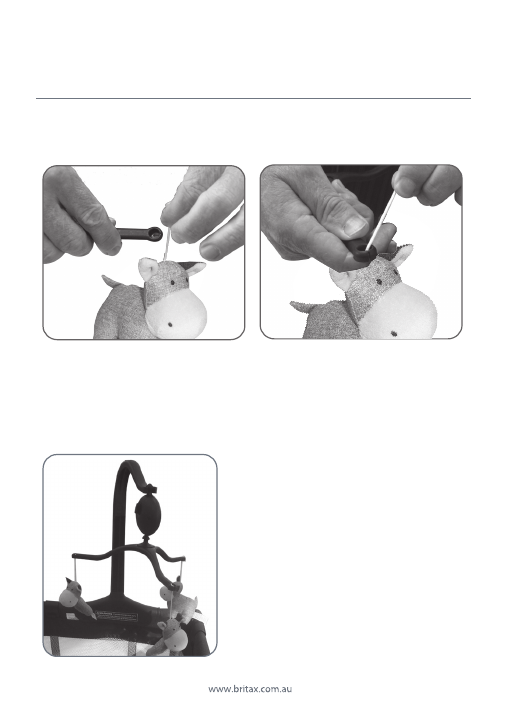
Insert the mobile upper curved arm into the mobile lower arm
until locked together.
A
B

16
6. TO ASSEMBLE AND USE THE TOY
MOBILE
B
Insert the connector on the round music box into the hole on the
mobile hanger and push until they lock together.
C
Snap the moulding on the top of the music box into the end of the
upper curved arm. Push the assembled mobile into the hole in the
base moulding. Make sure it fully snaps in by pulling up the arm to
check if they are securely attached.
17
E
The mobile can be fitted to the cot with or without the bassinet.
To attach the mobile push the base of the mobile over any of the cot
top rail centre joints. If using the change table, ensure the toy mobile is
fitted at the opposite end.
6. TO ASSEMBLE AND USE THE TOY
MOBILE
D
Connect each of the three toys to the mobile tri-shaped hanger by
threading the string into the slot at the end of each hanger arm.
D
D

18
F
To operate the music box turn the winder on the back of the box
clockwise.
6. TO ASSEMBLE AND USE THE TOY
MOBILE

19
CARE & MAINTENANCE
• To prolong the life of your cot keep it clean and do not leave it in the
direct sunlight for extended periods of time.
• Removable fabric covers and trims may be cleaned using warm water
with a household soap or mild detergent. Allow it to dry fully,
preferably away from the direct sunlight.
• Non removable fabric covers and trims may be spot cleaned using a
damp sponge with soap or a mild detergent. Allow it to dry completely
before folding or storing it away.
•
DO NOT DRY CLEAN OR USE BLEACH.
• Do not machine wash, tumble or spin dry, unless care labeling on the
product permits these methods.
• In some climates the covers and trims may be affected by mould and
mildew. To help prevent this occurring, do not fold or store the product
if damp or wet. Always store the product in a well ventilated area.
• Regularly inspect and maintain you product to ensure the freedom of
movements of the locking devices and security of components.
To maintain the safety of your nursery product, seek prompt repairs for
bent, torn, worn or broken parts.
WARNING:
IF THE SIDES DO NOT LATCH FIRMLY OR
THERE ARE HOLES IN THE MESH SIDES, DISCONTINUE USE
IMMEDIATELY AND SEEK REPAIR.
THIS PRODUCT IS NOT INTENDED FOR COMMERCIAL USE.

2018 Copyright Britax Childcare Pty. Ltd. Australia
CUSTOMER SERVICE
1300 303 330 - Australia 0508 688 822 - New Zealand
Due to our continuing program of development, Britax reserves the right to alter
the specifications, color or design without any further notice.
The Steelcraft trademark is the property of Britax Childcare Pty.Ltd - Australia.
The Britax trademark is the property of Britax Childcare Holdings Limited - UK.
Visit the Britax website at: www.britax.com.au or email us at au-custserv@britax.com
Due to the variations in the style and design of our products the illustrations used
in this instruction booklet are generic.
This product is designed to comply with Australian and New Zealand standard
AS/NZS 2195:2010+Amendment No.1:2013+Amendment No.2:2015.
www.britax.com.au
Art No. 4002156/B
BRITAX CHILDCARE PTY. LTD.
A.B.N. 55 006 773 600
Level 4, 650 Lorimer Street, Port Melbourne, Victoria 3207, Australia
Phone: (03) 9288 7288 Fax: (03) 9311 5798