Full Text Searchable PDF User Manual
QP1 Thermal Printer
User Guide
152-0005-01
2
INTRODUCTION
What’s in the box?
•
QP1 Printer with Paper Roll
•
Customer Support information card
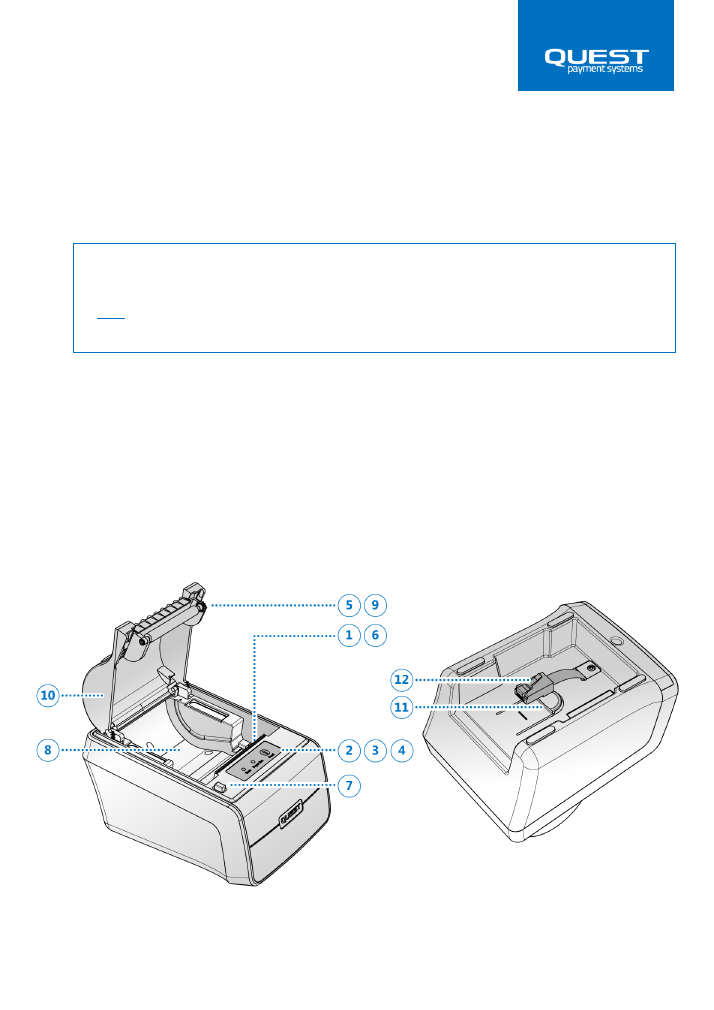
Features
1.
Thermal Print head
2.
Paper feed button
3.
‘Paper out’ indicator light
4.
‘Error’ indicator light
5.
Automatic Paper cutter
6.
Tear bar, for manual paper cutting
7.
Lid release button
8.
Paper roll bucket
9.
Paper Feed roller
10.
Lid
11.
‘Cable Interface Box’ release button
12.
COM cable
IMPORTANT INFORMATION
The power supply and all other cables are included with the QT720 Payment terminal,
NOT the QP1 printer. If you find something is missing from your QT720 Payment Terminal
and QP1 printer, contact the Quest support team (see ‘Support’ section in this guide).
3
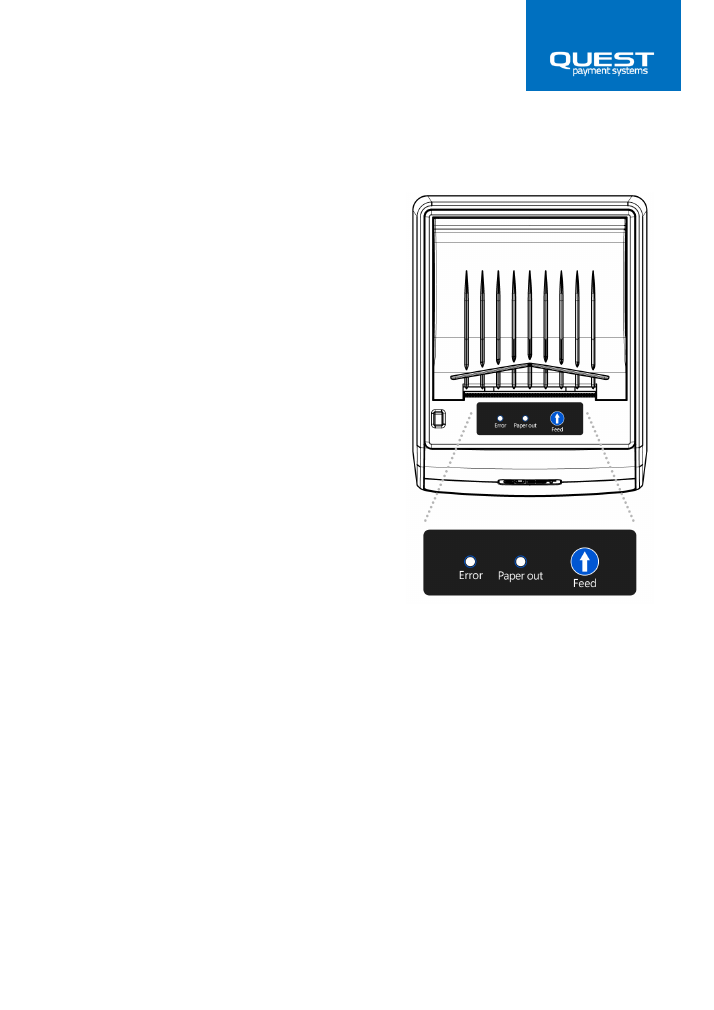
Printer controls
‘Feed’ Button
Press the ‘Feed’ button once to advance
paper one line. Hold down the FEED button to
print a ‘Self-Test’ page. See ‘Self-test’ section
for more information.
‘Error’ Light
If the ‘Error’ light illuminates red, it indicates
an error which is preventing normal
operation. The paper may be jammed or the
lid is not closed properly. See the
'Troubleshooting' section in this guide for
more information on errors.
‘Paper out’ Light
This light indicates the end of a paper roll.
Install a new paper roll, and the printer will
continue printing. If the roll runs out whilst
printing a receipt, install a new roll and QT720
will re-print that same receipt.
4
INITIAL SETUP
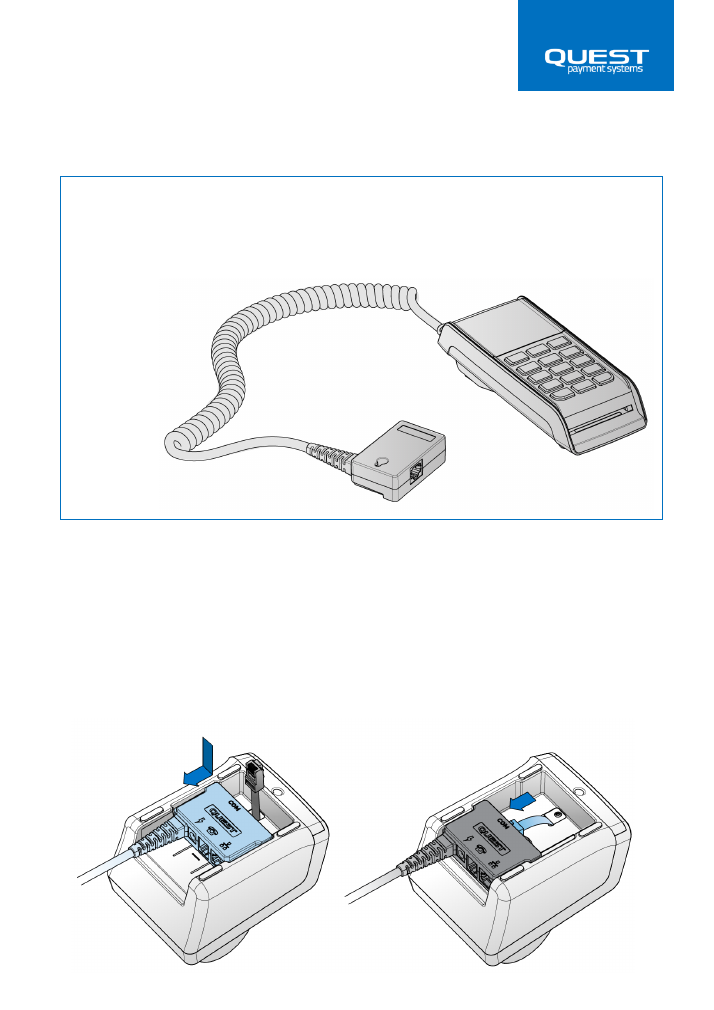
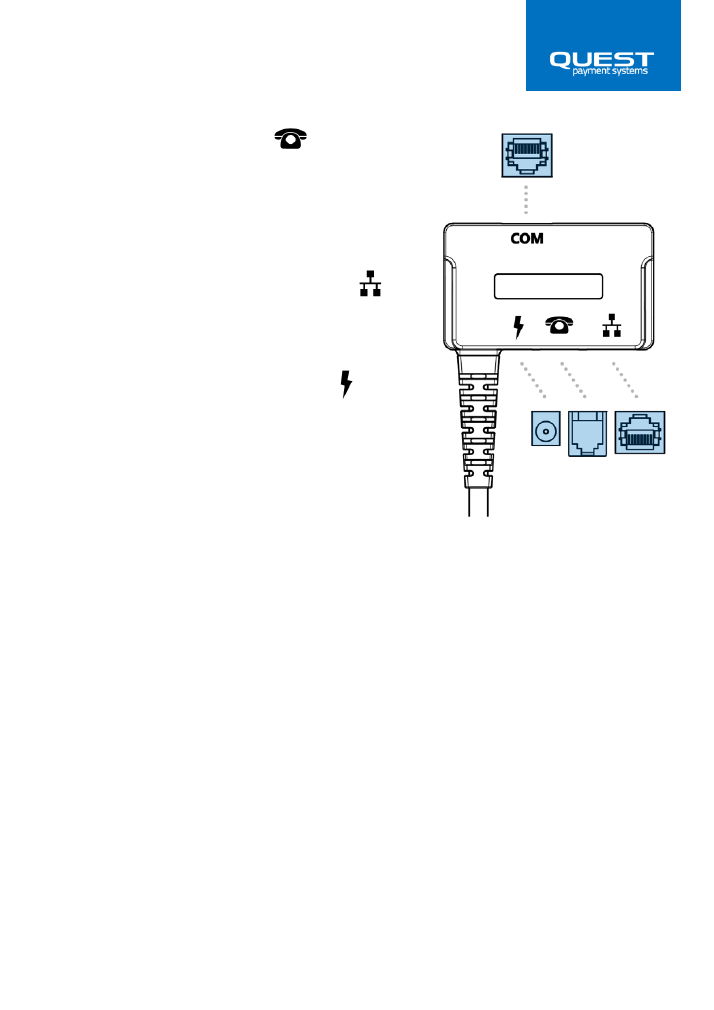
Connecting QP1 Printer to QT720 Payment Terminal
Connecting the COM cable
Note: Before connecting the main cable to QP1, ensure no power is connected.
1.
Place the QP1 upside down on a soft, clean surface. Orientate the 'Interface box'
of the Main cable as shown and lower it into the recess on the underside of the
printer.
2.
Slide the ‘Interface box’ toward the back of the printer until it clicks into position.
3.
Connect the small black cable exiting the printer to the COM port on the
'Interface box'.
IMPORTANT INFORMATION
The QT720 Standalone terminal is provided to you with a pre-fitted ‘Main cable’.
Other cables included with QT720:
•
10m Phone line cable
•
5m LAN Cable
•
Power supply
5
Connecting the Dialup line
If your site requires you to use ‘Dialup’ as a backup
communication method, plug your landline
telephone cable into the ‘Phone’ port on the
‘Interface box’.
Connecting the Network (LAN) cable
Connect your LAN (Local Area Network) cable into
the LAN port on the ‘Interface box’.
Connecting the Power Supply (DC)
Warning: Only use the power supply provided with
your QT720 Payment Terminal. Using any other
power supply may cause damage, fire or electrical
shock and void your warranty.
1.
Connect the DC Jack of the Power supply
provided with your QT720 into the DC
socket on the ‘Interface Box’ fitted to the
QP1 printer.
2.
Plug the DC Power supply into an
electrical outlet. Ensure all other
communication cables are fitted before
switching on the power at the electrical
outlet.
3.
When power is supplied, the QP1 Printer
lights will momentarily flash and the
QT720 Payment Terminal will begin to
boot up.
4.
Your QT720 Standalone Payment Terminal
is now setup.
6
USING THE PRINTER
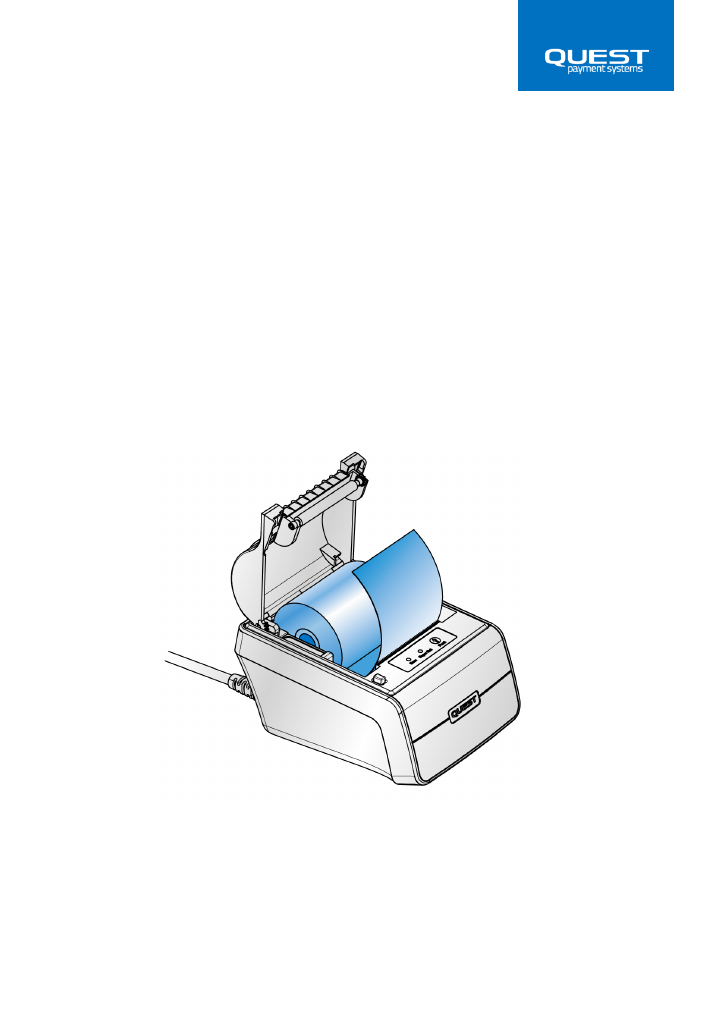
Inserting a Paper Roll
Note: Be sure to use paper rolls that meet the specifications listed within this guide. Do
not use paper rolls that have the paper glued to the core as the printer cannot detect the
paper end correctly.
1.
Ensure the printer is not receiving data; otherwise, data may be lost.
2.
Open the paper roll lid by pressing the lid release button. If the button will not
open the lid, see the
Troubleshooting
section in this guide.
3.
Remove and discard any partial paper roll or empty core.
4.
Insert the paper roll as shown. When the paper roll is in place, ensure the paper
feeds from the bottom of the roll.
5.
Before closing the lid, pull out a small amount of paper, then close the lid by
pressing on both sides of the lid (simultaneously) or press on the middle area of the
lid (near the paper exit). The lid is closed once you hear a “
Click”.
6.
Tear off any excess paper. QP1 is now ready to print.
7
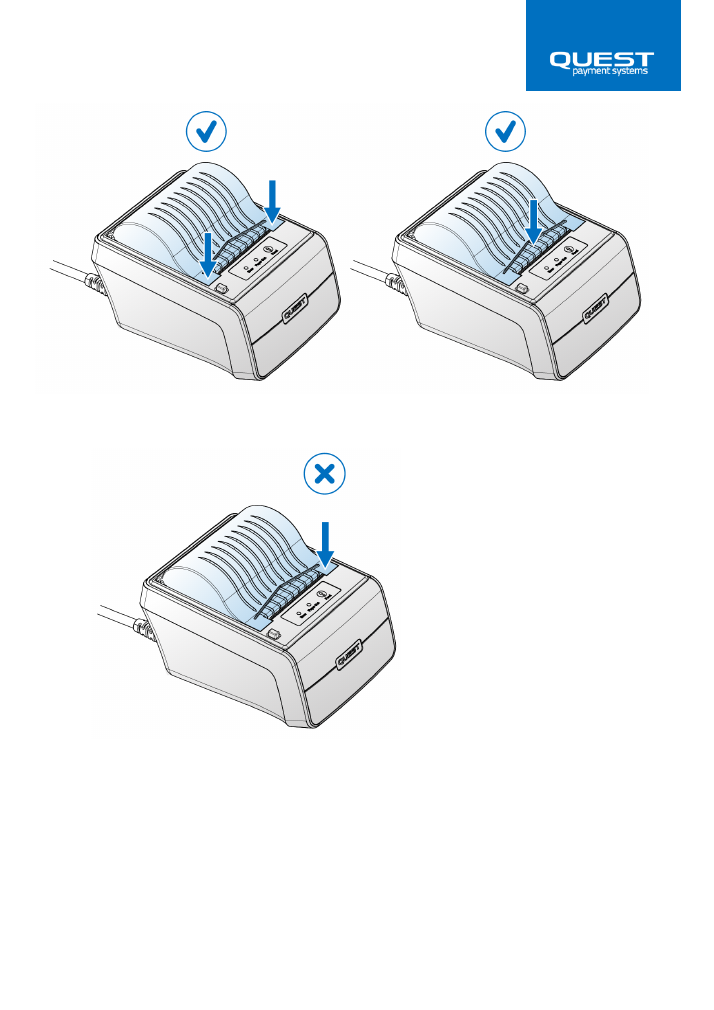
DO
– Press evenly on the Lid to close
DO
– Press on the middle area to
close
DO NOT
– Press on one side only
Receipt cutting
For your convenience, the QP1 Printer has an auto cutter that will cut the receipt
automatically after printing. A small portion of the paper is left uncut, gently pull the
receipt and the paper will break away.
If the auto cutter fails, a secondary tear bar is included as a backup. Simply pull the
receipt toward you to tear off.
8
MAINTENANCE
Disconnecting QP1 from the QT720 Payment Terminal
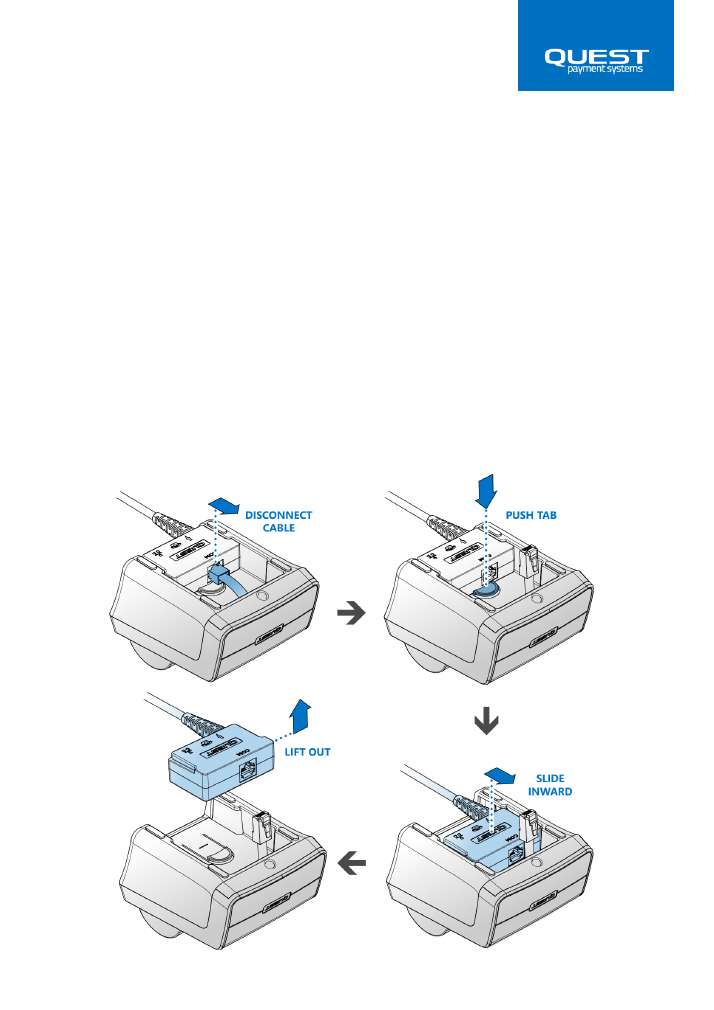
In order to swap the QP1 Printer or QT720 Payment Terminal, you will need to disconnect
the Main cable from the QP1 Printer.
Note: The Main cable must remain connected to QT720 at all times. If returning QT720 for
service, leave the Main cable attached to the QT720.
1.
Disconnect the power at the electrical outlet.
2.
Disconnect the ‘Power’ cable from the back of QP1, then the ‘Phone’ and ‘LAN’
cables. Turn over the QP1 printer and disconnect the ‘COM’ cable by pressing the
plastic tab on the plug and withdrawing the connector from the ‘Interface box’.
3.
Push the large button on the underside of QP1 and slide the 'Interface box'
towards the front of the printer.
4.
Lift the ‘Interface box’ out.

9
Enclosure cleaning
Note: All cleaning should be done when the power supply is off.
Do not spray water or any liquid directly onto QP1. Any liquid that goes into the product
may cause a failure, fire, or electric shock. Turn off QP1, then gently wipe the outside
surfaces with a micro-fiber cloth dampened with a small amount of water. Do not use
flammable liquids (benzene, thinners, etc.) or a cleaning agent.
Print head cleaning
Cleaning should be done when any one of the following conditions occurs:
•
Reduced printing quality
•
Unusual noise whilst feeding paper
Do not touch the surface of the printer head with bare hands. Do not use hard tools on
the printer head, rubber platen, and heating element, as this may cause damage.
Do not use organic solvents to clean the printer head, such as gasoline, acetone, etc.
Cleaning steps:
•
Turn off the power supply
•
Cleaning should be done after the printer head has completely cooled.
•
Wipe the heating element of the print head lightly with cotton swabs with
ethyl-alcohol applied.
•
Ensure all cleaning solution has completely dried before printing.
Paper Feed Roller cleaning
Cleaning should be done when any one the following conditions occurs:
•
Paper has stopped feeding
•
Paper feeding is unusually noisy
Cleaning steps:
•
Turn off the power supply
•
Wipe the Feed roller clean with a lint free cloth with ethyl-alcohol applied
•
Ensure all cleaning solution has completely dried before printing.

10
Self-Test
The ‘Self-Test’ lets you know if your printer is operating properly. This test is independent
of the QT720 Payment Terminal, and independent of all software.
Running the Test:
1.
Make sure a suitable paper roll is installed and printer lid is closed properly.
2.
Hold down the FEED button until the self-test begins. The ‘Self-Test’ will print a
test pattern. The printed pattern should have good contrast and be consistent in
appearance. If the test print is poor, see the
Troubleshooting
section in this
guide.
3.
The printer is ready to receive data as soon as it completes the ‘Self-Test’.
Storage
Do not store the printer in damp places or areas with large temperature variations.
Condensation on the printer may cause damage to the thermal head or unit failure.
Do not store the printer in dusty places.
When storing the printer for longer than six months, the printer lid must be kept open
such that the Paper Feed roller is not in contact with the Thermal Print head. If the Paper
Feed roller and Print head have continued direct contact for prolonged periods the Feed
roller can become deformed and may affect normal operation.

11
TROUBLESHOOTING
Troubleshooting
If the printer seems to have a problem, first refer to the troubleshooting table below. If
none of these troubleshooting tips apply, please contact your Help desk or contact the
help desk at Quest Payment Systems.
Issue
Solution and explanations
The lights on the control panel
do not come on during initial
setup.
Make sure the DC power supply cable is correctly plugged into
the printer and is plugged into a working power outlet. Make
sure power is supplied to the power outlet.
The ERROR light is on (not
blinking) and nothing printed.
If the PAPER OUT light is off, make sure the printer lid is
properly closed. Re-open the lid and close again by pressing the
printer lid until the lid audibly clicks into place.
If the PAPER OUT light is on, the paper roll is not installed or is
at or near the end. Install a new paper roll. See Chapter 1 for
instructions.
The ERROR light is blinking and
the printer does not print.
First, check for a paper jam.
If there is no paper jam and the printer has been printing for
quite a while, the print head may be overheated. If the print
head is overheated, the printer will resume printing when the
head has cooled (usually within two or three minutes).
If there is no paper jam and the print head is not overheated,
turn off the printer and turn it back on after about 10 seconds.
If the ERROR light is still flashing, contact your nominated
Support desk.
The ERROR light is off, but
nothing has printed.
Try to run the 'Self test' to check that the printer works
properly. Press and hold the Feed button until the ‘Self test’
prints. If the self-test does not work, contact your nominated
Help desk.
If the ‘Self-test’ works properly, check the following:
1.
Check all cable connections into the 'Interface cable
box'.
2.
If the printer still does not print, contact your
nominated help desk.

12
Printing is poor
Ensure good quality thermal paper is used.
Paper dust on the heating element of the thermal print head
can lower the print quality. Try cleaning the print head as
described below:
Cleaning the print head. Caution
After printing, the print head can be very hot. Be careful not to
touch it. Also let it cool before you clean it. Damage can occur
to the print head if touched with your fingers or any hard
object.
1.
Press the Lid release button to open the printer lid.
2.
Clean the thermal element of the print head with a
cotton swab moistened with an alcohol solvent
(ethanol, methanol, or IPA).
The Printer lid won’t open. The
button doesn’t work as normal.
If the Lid release button won’t depress fully and release the lid,
check that the printer lid is completely shut. Press firmly in the
center of the lid near the tear bar, then try pressing the release
button again. Repeat this action repeatedly until the button
opens the lid as normal. Once open, remove any paper roll,
inspect the button mechanism and ensure it is operating
smoothly. Ensure there is no debris in this mechanism. A strong
blow of air is often enough to clear unwanted debris.
If the above still does not open the lid, try grasping the lid on
the sides and gently assisting it to open whilst depressing the
button. If you still have trouble, please call your nominated
Help desk.
Paper is not feeding as normal
Open the Lid of the printer and first inspect the paper. Ensure
there are no joins/ abnormalities in the paper roll.
Ensure the Rubber roller can turn freely. Use your finger on the
gear to turn the roller.
Inspect the rubber surface of the roller for dust and foreign
particles. If dirty, refer to the ‘Maintenance’ section in this
guide.
13
GENERAL CHARACTERISTICS
MODEL
QP1
Printing
Printing method
Thermal dot printing
Number of dots
384 dots/line
Resolution
8 dots/mm
Paper entry width(mm)
58mm
Printing width(mm)
48mm
Paper roll diameter (mm)
Φ
50mm Max
Paper thickness (
μ
m)
60-80
Paper loading
Easy loading
Recommended paper
Only use the recommended or other equivalent quality
thermal paper. Poor quality thermal paper may reduce the
life time of print head.
Maximum paper roll dimension : 57mm Wide x
50mm Diameter (note: <50mm diameter rolls
work also)
PD150K OJI paper
F230 AA Mitsubishi paper
DJ03Aclas paper
Detection
Paper end sensor
By photo interrupter
Head temp sensor
By thermistor
Operating voltage
12V
Peak current
For head
2.38A at 13.2V(45) dots
For motor
1.47A Max
Graphics
Variable width and offset, Double width and
height
Barcodes
Variable width and offset, Double width and
height, 11 barcodes: normal and rotated 90°
Barcodes type
UPC-A, UPC-E, EAN8, EAN13, CODE39, I25,
CODABAR, CODE128,CODE11, MSI
Interface
RS232
Life
Abrasion resistance
100KM
Pulse activation
100 million
Operating environment
Operating temperature
0~50 deg, Celsius
Operating humidity
10~90% RH (No condensation)
Storage temperature
-20~60 deg. Celsius
Storage humidity
5~95%RH
(No condensation)
Physical characteristics
Dimensions (W x H x D)
103 x 90 x 134mm
Weight (without Paper roll)
325g
Design and specifications are subject to change without prior notice.

14
SUPPORT
If you cannot resolve an equipment issue and require further assistance, please contact
the Quest Support team. The standard hours for email and phone support are 9.00am to
5:00pm (AEST) Monday to Friday, excluding National and Victorian public holidays.
Email:
Phone:
(+61) 3 8807 4444
Website:
www.questpaymentsystems.com

15
WARRANTY
Hardware Warranty
Quest Payment Systems Pty Ltd (Quest) hardware products are warranted against defects caused by
faulty workmanship and materials for twelve (12) months from the date of supply for new products, and
ninety (90) days from the date of repair for refurbished or repaired products.
This warranty does not apply to defects caused by the hardware products not being used in accordance
with instructions, accidental damage, damage caused by external forces, liquids damage, misuse,
security tamper activation, fair wear and tear, or repair or attempted repair by unauthorised persons. All
warranties not referred to in this document are excluded.
Subject to Quest’s rights under the Australian Consumer Law (which Quest fully reserves), our goods
come with guarantees that cannot be excluded under the Australian Consumer Law. You are entitled to
a replacement or refund for a major failure and compensation for any other reasonably foreseeable loss
or damage. You are also entitled to have the goods repaired or replaced if the goods fail to be of
acceptable quality and the failure does not amount to a major failure.
You agree that our hardware products will be of acceptable quality if they remain functional in
accordance with their specifications and accompanying documentation for twelve (12) months from the
date of supply for new products, and ninety (90) days from the date of repair for refurbished or repaired
products.
The liability of Quest for the breach of the consumer guarantees in the Australian Consumer Law and all
other liability in relation to our hardware products is limited to, at the option of Quest, the repair or
replacement of the hardware product, the supply of an equivalent hardware product or the payment of
the costs of replacing or repairing the hardware product.
If you wish to make a claim under the warranty against defects set out above or the consumer
guarantees in the Australian Consumer Law, you must return the relevant hardware product to Quest
within twelve (12) months from the date of supply for new products, and ninety (90) days from the date
of repair for refurbished or repaired products. Freight and insurance charges to and from Quest are your
responsibility.