Full Text Searchable PDF User Manual
Instruction Sheet
Part 331276B
02
E
2010 Nordson Corporation
P/N 331276B
02
Series EPC-30 Current-to-Pressure (I/P)
Transducer
WARNING!
Allow only personnel with appropriate training and experience
to operate or service the equipment. The use of untrained or inexperienced
personnel to operate or service the equipment can result in injury, including
death, to themselves and others, and damage to the equipment.
Introduction
This instruction sheet contains the procedure for installing the
current-to-pressure (I/P) transducer (kit P/N 772033).
If the Eclipse
t
EPC-30 pattern control is equipped with an optional
input/output (I/O) board, the I/P transducer can be installed to provide
run-up control for the system. Refer to the Eclipse EPC-30 pattern control
manual for setting the run-up control.
Specifications
The following table lists specifications for the I/P transducer.
Item
Specification
Note
Air supply input pressure
8.6
−
10.3 bar (125
−
150 psi)
A
Air supply output pressure
0.2
−
8.3 bar (1
−
120 psi)
A
Input impedance
260 ohms (nominal)
Input signal
4
−
20 mA VDC
B
NOTE A: The transducer was calibrated using a 6.6
−
6.9 bar (95
−
100 psi) air supply.
B: With a 6.6
−
6.9 bar (95
−
100 psi) air supply, the output should be 0
−
0.3 bar (0
−
5 psi) with a 4 mA signal or
6.0
−
6.4 bar (87
−
93 psi) with a 20 mA signal.
Series EPC-30 Current-to-Pressure (I/P) Transducer
2
Part 331276B
02
E
2010 Nordson Corporation
I/P Transducer Installation
Use this procedure to install the I/P transducer.
CAUTION!
Mount the transducer with the UP arrow pointing directly up.
Mounting the transducer in any other position will change the
current-to-pressure ratio.
1. Use one of the following methods to mount the transducer-and-bracket
assembly within 30 feet of the hot melt unit’s pump. For the best
performance, mount the transducer as close to the pump as possible.
Make sure the UP arrow is pointing directly up.
S
If you are mounting the transducer on a wall or similar location, use
the mounting bracket.
S
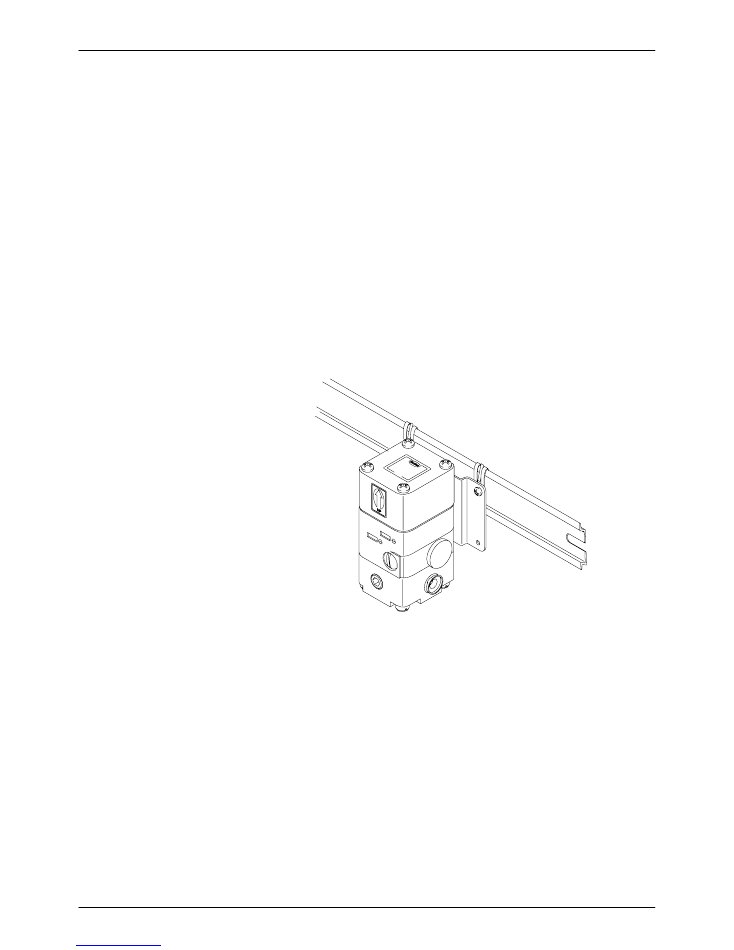
See Figure 1. If you are mounting the transducer on a DIN rail, install
the two mounting clips in the top two bracket holes and attach the
clips to the DIN rail.
5742120A
Figure 1 Mounting the transducer on a DIN rail
1. DIN rail
2. Mounting clips
3. Bracket
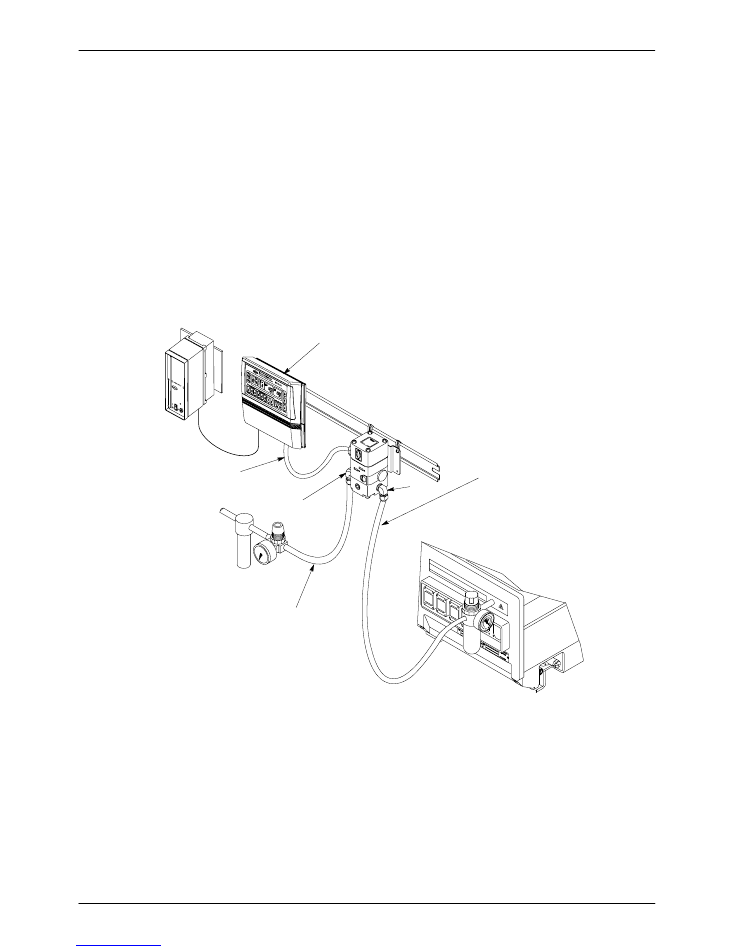
2. See Figure 2. Install the two
1
/
4
NPT elbows from the kit in the
transducer’s air inlet and outlet ports.
Series EPC-30 Current-to-Pressure (I/P) Transducer
3
Part 331276B
02
E
2010 Nordson Corporation
3. Use
5
/
16
-in. diameter (minimum) air line tubing to connect a clean, dry
air supply to the transducer air inlet port.
4. Connect
5
/
16
-in. diameter (minimum) air line tubing between the
transducer’s air outlet port and the hot melt unit.
5. Set the hot melt unit’s air pressure regulator at the maximum setting
(turn the regulator fully clockwise).
6. Route the transducer cable to the Eclipse EPC-30 pattern control. Refer
to the Eclipse EPC-30 pattern control manual for instructions on:
A. Connecting the transducer cable to the pattern control unit
The transducer cable wire color code information
:
S
natural lead wire is common or negative
S
black lead wire is positive
B. Setting up and using the run-up control
5742119A
1
3
2
5
6
4
Figure 2 Transducer connections
1. Eclipse EPC-30 pattern control
2. Transducer cable
3. Elbow (air inlet port)
4. Elbow (air outlet port)
5. Air line tubing (air supply to
transducer)
6. Air line tubing (transducer to unit)

Series EPC-30 Current-to-Pressure (I/P) Transducer
4
Part 331276B
02
E
2010 Nordson Corporation
Troubleshooting
The following troubleshooting guide allows for a quick check in the field to
help reduce down time. For additional troubleshooting information, refer to
the manuals provided with the other equipment used in the hot melt system.
If you cannot solve a problem with the information given here, contact your
local Nordson representative for help.
Pneumatic Section
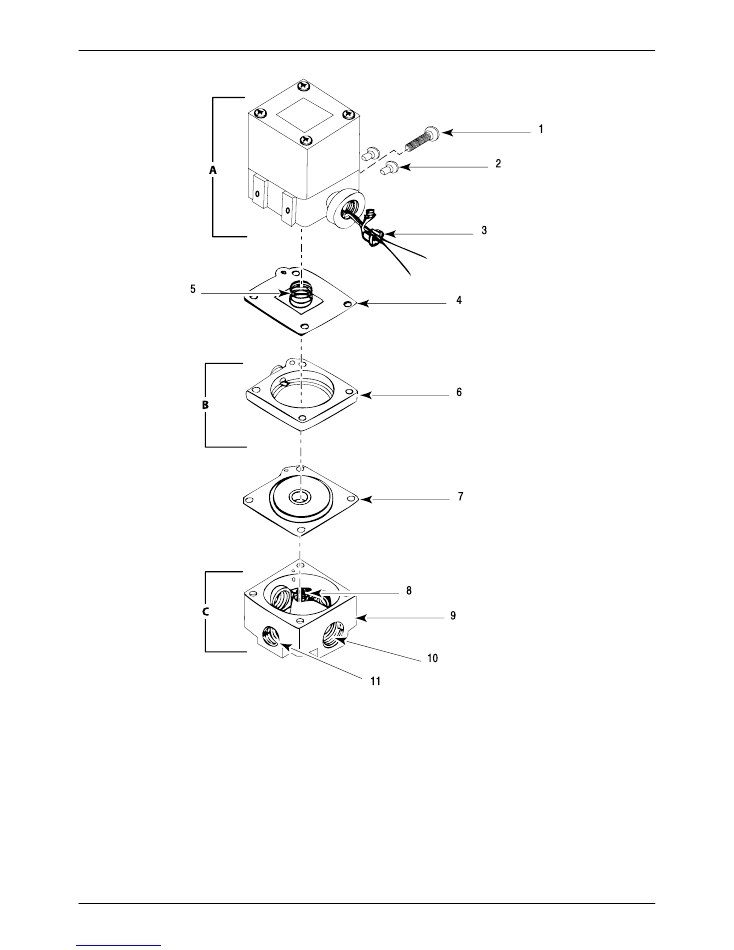
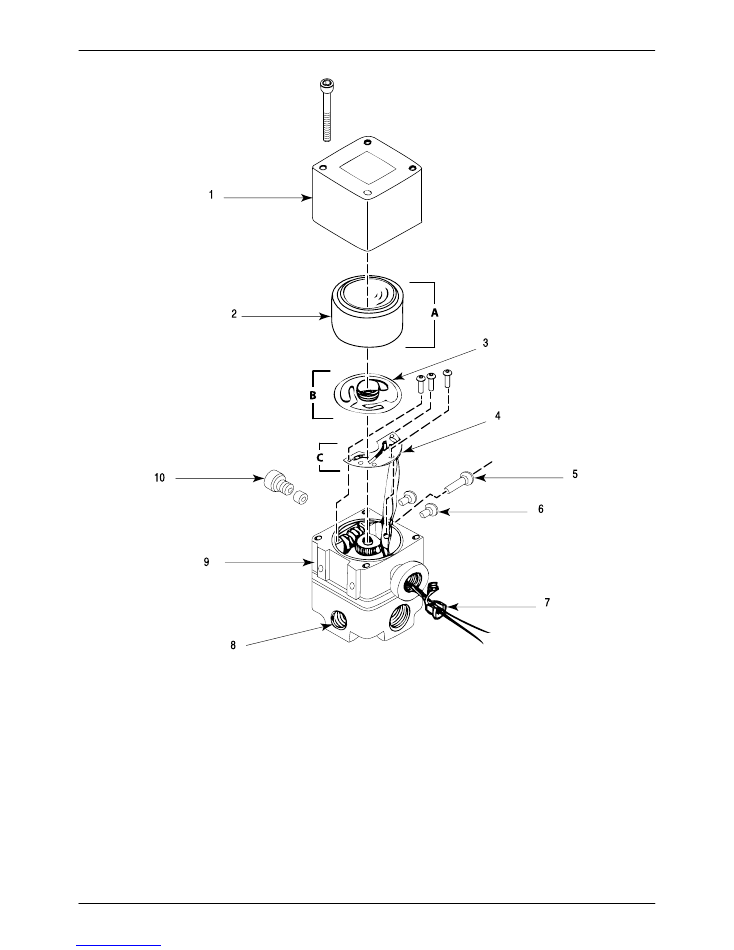
The pneumatic section of the transducer consists of three basic parts. See
Figure 3.
A. Pilot section
B. Diaphragm set
C. Inlet
Series EPC-30 Current-to-Pressure (I/P) Transducer
5
Part 331276B
02
E
2010 Nordson Corporation
Figure 3
Pneumatic components of the transducer
1. Orifice assembly
2. Zero and span protector assembly
3. Strain relief
4. Protector diaphragm assembly
5. Spring
6. Spacer
7. Control diaphragm assembly
8. Half ball
9. Body assembly
10. In port
11. Gauge port
Series EPC-30 Current-to-Pressure (I/P) Transducer
6
Part 331276B
02
E
2010 Nordson Corporation
Troubleshooting the Pneumatic Section
NOTE:
If the diaphragm fails, the transducer will leak internally.
Problem
Possible Cause
Corrective Action
Supply air on and the signal is set
to 4 mA
S
Make sure that the air supply is
clean and oil free
Diaphragm failure
No output regardless of the input
signal
clean and oil free
S
Unplug the bleed orifice screw
S
Unblock the bleed orifice screw
Diaphragm failure
Sluggish response to an input
signal
S
Unblock the bleed orifice screw
Bleed orifice screw may be
plugged or partially blocked
Electronic Section
The electronic section of the transducer consists of three basic parts. See
Figure 4.
A. Magnet
B. Coil/flexure assembly
C. Circuit board
Series EPC-30 Current-to-Pressure (I/P) Transducer
7
Part 331276B
02
E
2010 Nordson Corporation
Figure 4
Electrical components of the transducer
1. Bonnet
2. Magnet
3. Coil/spring assembly
4. Circuit board assembly
5. Orifice assembly
6. Zero and span protector
assembly
7. Strain relief
8. Gauge port
9. Housing assembly
10. Rain sheild assembly

Series EPC-30 Current-to-Pressure (I/P) Transducer
8
Part 331276B
02
E
2010 Nordson Corporation
Troubleshooting the Electronic Section
Use a multi-meter with both continuity and resistance to troubleshoot the
transducer’s electronic section. Follow the sequence below:
1. Connect the test leads to the black and white leads on the transducer
and check for continuity.
2. Check the initial resistance, then turn the
SPAN
potentiometer either
clockwise (CW) or counter clockwise (CCW). The resistance will change
and should be in the range of 150
−
250 ohms.
NOTE:
If you have continuity and the resistance changes when you turn
the
SPAN
potentiometer, the electronic section of the transducer is in good
working order.
Basic Calibration
ZERO Adjustment
The
ZERO
adjustment potentiometer is located on the front of the
transducer. For mechanical adjustment of the nozzle, adjust the
ZERO
potentiometer settings.
For forward acting transducers:
S
turning the settings CW decreases the output pressure on the
ZERO
and
SPAN
adjustments.
S
turning the settings CCW increases the output pressure on the
ZERO
and
SPAN
adjustments.
NOTE:
If the
ZERO
potentiometer is turned CCW, the nozzle moves closer
to the coil/flexure assembly via a worm and pinion gear assembly. If the
nozzle contacts the coil/flexure damage may occur. If the pitch on the zero
assembly is okay it does not need any adjustment.

Series EPC-30 Current-to-Pressure (I/P) Transducer
9
Part 331276B
02
E
2010 Nordson Corporation
SPAN Adjustment
The
SPAN
adjustment potentiometer is located on the front of the
transducer. It is used to set the maximum pressure output. The minimum
and maximum pressure outputs must be checked each time an adjustment
is made. Follow these steps to calibrate the transducer:
1. Set the input signal to 4 mA.
2. Adjust the
ZERO
potentiometer until a proper setting is attained.
3. Set the input signal to 20 mA.
4. Adjust the
SPAN
potentiometer until a proper setting is attained.
5. Repeat steps 1
−
4 until the transducer is calibrated.
Field Troubleshooting
1. Verify that the supply air pressure is higher than the maximum output
pressure and the supply air is free to flow to the transducer.
2. Cycle the transducer from 4
−
20 mA several times and observe the
pressure output.
3. Apply 4 mA to the transducer and disconnect one or both of the leads.
After reconnecting the leads, make sure that there is a slight metallic
sound. This sound is caused when the coil jumps in the magnet, and it
indicates that the transducer has continuity.
4. Examine the
SPAN
potentiometer. If it does not show signs of damage,
then the electronic portion of the transducer is in good working
condition.
5. Apply 4 mA to the transducer and turn the
ZERO
potentiometer either
CW or CCW until the output pressure is 2 psi. The total deflection of the
coil from 4
−
20 mA is about .002”.
NOTE:
If the
ZERO
potentiometer is turned CW (causing the nozzle to
move away from the flexure) to a point where the nozzle bottoms out
(approximately 1.00” away from the coil/flexure), it will take 30
−
50 turns
in the CCW direction before the pressure starts to climb.
Series EPC-30 Current-to-Pressure (I/P) Transducer
10
Part 331276B
02
E
2010 Nordson Corporation
Parts
To order parts, contact the Nordson Customer Service Center or your local
Nordson representative. Use the following parts lists to describe and locate
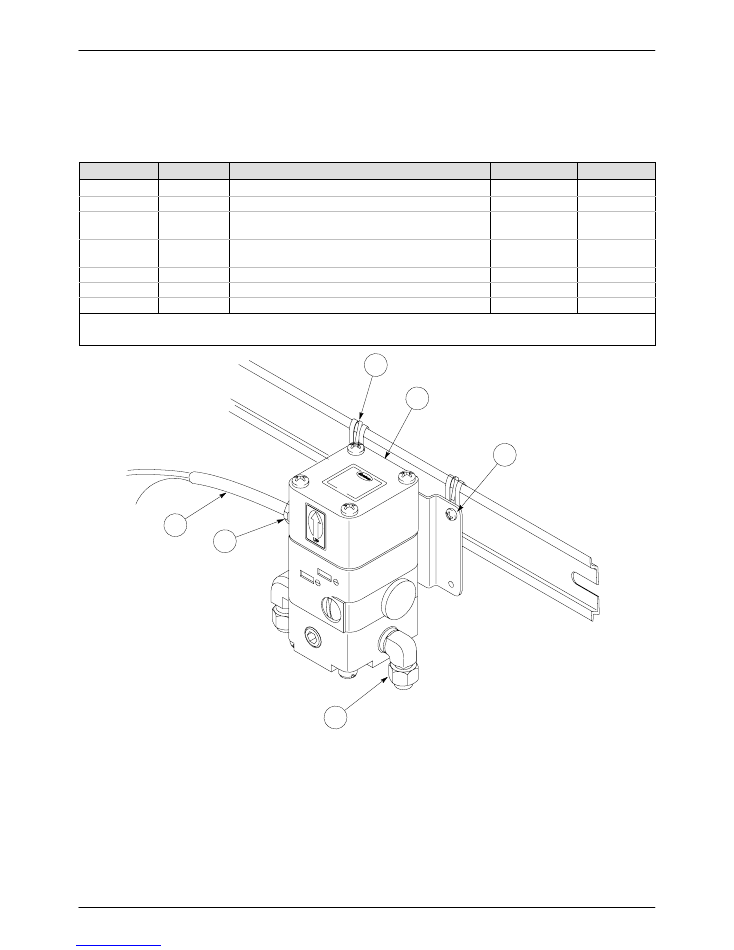
parts correctly. See Figure 5.
Item
Part
Description
Quantity
Note
—
772033
Service kit, transducer, current-to-pressure
—
1
326947
S
Mounting clip, 35 mm DIN rail
2
2
101695
S
Transducer, current-to-pressure, 4
−
20 mA,
3
−
90 psi
1
A
3
332747
S
Screw, hex-head, slotted, w/lock washer,
M4 x 8 mm
2
4
334875
S
Elbow, male,
5
/
16
in. tube x
1
/
4
NPT
2
5
900739
S
Bushing, strain relief,
1
/
2
NPT
1
B
6
155197
S
Cable, 2-conductor, shielded, 30 ft
1
B
NOTE A: This transducer includes a preassembled mounting bracket.
B: The cable and strain relief bushing are preassembled on the transducer.
5742121A
6
5
1
2
3
4
Figure 5 Transducer service kit parts
Issued 08/10
Original copyright date 1999. Nordson and the Nordson logo are registered trademarks of Nordson Corporation.