Full Text Searchable PDF User Manual
www.kruess.com
inno
vation s
inc
e
17
96
M5000
Betriebsanleitung
Schmelzpunktmessgerät
M5000
User Manual
Melting Point Meter
de|en

3
English
1. Description M5000
19
2. Safety Precautions
20
3. Unpacking and Assembly
20
4. Melting point analysis
21
5. Structure process / operator programme
22
6. Starting the melting point analysis
23
7. Reaching the melting point
25
8. Subsequent retrieval of the last melting point
26
9. Setting of date, time and language
27
10. Technical data 28
11. Maintenance
29
12 Recovery and Recycling
29
Warranty conditions
30
Inhalt / Index
Inhaltsverzeichnis / Index
Deutsch
1. Beschreibung M5000
5
2. Sicherheitsmaßnahmen
6
3. Auspacken und Inbetriebnahme
6
4. Bestimmung eines Schmelzpunktes
7
5. Struktur-Ablauf / Bedienerprogramm
8
6. Starten der Schmelzpunktprüfung
9
7. Erreichen des Schmelzpunktes
11
8. Nachträgliche Abfrage des letzten Schmelzpunktes
12
9. Einstellung von Datum, Uhrzeit und Bedienersprache
13
10. Technische Daten
14
11. Wartung
15
12 Rückgewinnung und Recycling
15
Garantiebestimmungen
16
5
DEUTSCH
1. Beschreibung
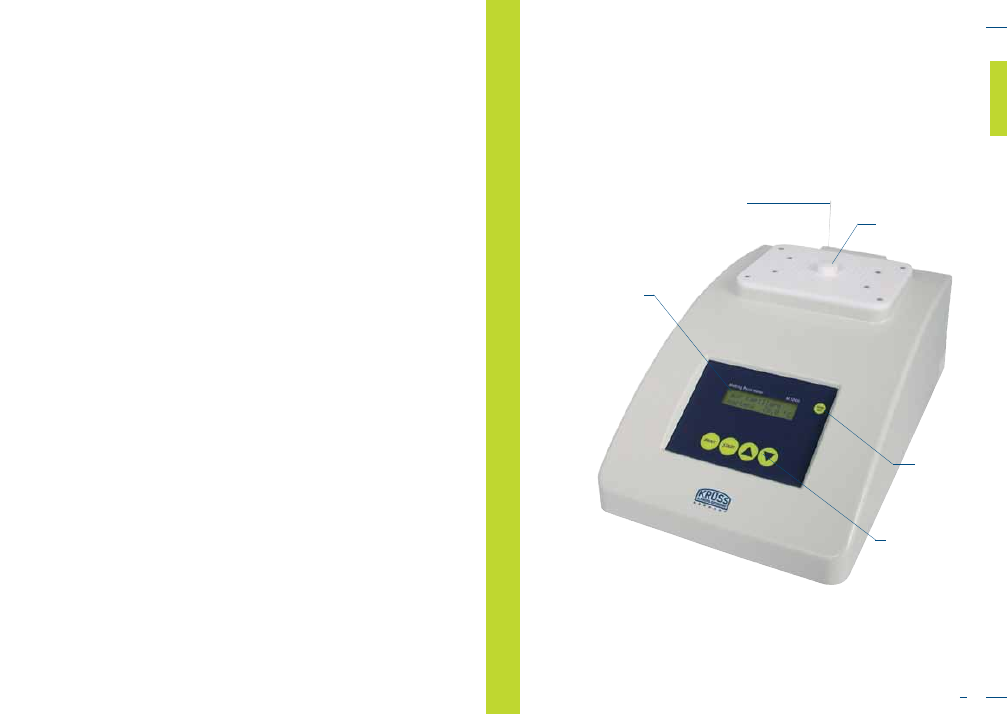
1. Beschreibung M5000
Display
Kapillare
für Probe
Funktionstasten
Time-/Set-Taste
Kapillarenaufnahme

7
6
4. Bestimmung eines Schmelzpunktes
Mit dem Gerät können Sie Schmelzpunkte von pulvrigen Substanzen bis zu einer
Höchsttemperatur von 400 °C bestimmen.
►
Netzschalter an der Geräterückseite einschalten.
Im Display wird die aktuelle Ofentemperatur angezeigt und ein Signalton ertönt.
►
Wählen Sie mit der Pfeiltaste die gewünschte Starttemperatur (ca. 3 °C unter dem zu
erwartenden Schmelzpunkt). Drücken Sie die Starttaste.
Beim Erreichen der vorgewählten Temperatur ertönt ein Signalton.
►
Nach Erreichen der vorgewählten Starttemperatur stecken Sie eine gefüllte Kapillare
(ca. 4 mm Füllung) vorsichtig mit der Öffnung nach oben in die Bohrung des
Führungskopfes bis die Kapillare fühlbar anstößt.
Das Gerät heizt sich nun automatisch mit 1°C/min bis zum Erreichen des Schmelzpunk-
tes auf. Nach Erreichen des Schmelzpunktes kühlt das Gerät wieder auf die vorgewählte
Temperatur ab und ein Signalton ertönt. Der Schmelzpunkt wird angezeigt und kann nun
über die Druckertaste ausgedruckt werden.
►
Während des Abkühlens bis zur Starttemperatur blinkt im Display „auto/warten“.
Erlischt die Anzeige „warten“ kann die gleiche Messung erneut durchgeführt werden.
►
Wird innerhalb von 5 min keine erneute Messung durchgeführt, kühlt das Gerät
automatisch (Lüfter) bis 30 °C ab.
►
Das Gerät sollte erst bei 30 °C abgeschaltet werden, da mit dem Abschalten die
Lüfterkühlung ebenfalls abgeschaltet wird.
►
Möchten Sie eine Messung durchführen während die Kühlung in Betrieb ist, können
Sie direkt mit den Pfeiltasten die Temperatur anwählen.
Die Kühlung schaltet dann ab.
►
Liegt die gewünschte Starttemperatur unter der aktuellen Temperatur, muss abge-
wartet werden, bis die Kühlung die Temperatur unterschritten hat.
►
Schutzhaube erst nach dem Abkühlen überziehen.
4. Bestimmung eines Schmelzpunktes
2. Sicherheitsmaßnahmen / 3. Auspacken und Inbetriebnahme
• Lüftungsschlitze nicht abdecken.
• Keine Gegenstände in die Lüftungsschlitze stecken.
• Es darf keine Feuchtigkeit in das Gerät gelangen.
• Bei der Schmelzpunktbestimmung erwärmt sich der Messkopf, besonders im Bereich
der Lüftungsschlitze sehr stark. Berühren Sie den Messkopf in diesem Bereich nicht.
• Für die Schmelzpunktbestimmung nur die passenden Kapillaren mit 1.4 mm Außen-
durchmesser verwenden.
• Beim Umgang mit Chemikalien die entsprechenden Sicherheitsbestimmungen
beachten.
• Bei allen Wartungsarbeiten am Gerät (z.B. Auswechseln der Sicherung, Reinigen mit
trockenem oder wenig feuchten Tuch, etc.) immer durch Ziehen des Netzsteckers
das Gerät vom Stromnetz trennen.
• Arbeiten und Serviceleistungen am Gerät dürfen nur von autorisierten Fachkräften
bzw. vom Hersteller durchgeführt werden.
• Packen Sie das Gerät vorsichtig aus.
• Sollte ein Transportschaden entstanden sein, melden sie diesen unverzüglich.
Suchen Sie einen geeigneten Standort für das Gerät. Vermeiden Sie starke Sonnenein-
strahlung sowie die unmittelbare Nähe von Heizquellen.
Netzstecker an 230 V 50 Hz Wechselstrom anschließen. Vor der ersten Messung sollte
das Gerät ca. 15 min eingeschaltet werden um die optimale Betriebstemperatur zu
erreichen.
2. Sicherheitsmaßnahmen
3. Auspacken und Inbetriebnahme

9
8
6. Starten der Schmelpunktprüfung
Temperaturanwahl
> Ofentemperatur
Ist die Starttemperatur höher als die aktuelle
Ofentemperatur, wird beim Einführen einer Kapillare für
ca. 3 s eine Fehlermeldung angezeigt.
Danach springt das Gerät zur Startanzeige zurück und
bricht den Vorgang ab. Der Lüfter wird entsprechend
der Logik eingeschaltet.
Die zuletzt eingestellte Temperaturanwahl wird nur beim
Ausschalten des Gerätes gelöscht.
6. Starten der Schmelzpunktprüfung
6.1 Prinzipielles
Der Start der Schmelzpunktmessung erfolgt nur durch
das Einsetzen einer gefüllten Kapillare in den Ofen,
wenn zuvor eine Starttemperatur eingestellt und bis zu
dieser aufgeheizt wurde.
Bei einer nicht gefüllten Kapillaraufnahme erscheint auf
dem Display:
auf Kapillare warten
Nach dem Einführen erfolgt automatisch die Messung.
Wird die Kapillare eingeführt, erscheint automatisch
wieder das Einstellmenü.
Wenn die Kapillare beim Start des Menüs für die Start-
temperatur bereits im Ofen steckt, erfolgt eine Meldung
auf dem Display, die zum Entfernen der Kapillare auf-
fordert.
Bitte Kapillare entfernen.
5.1 Startanzeige
Aktuelle Temperatur
25.8 °C
Die Anzeige erscheint immer beim Einschalten des
Gerätes.
Ist die Temperatur höher als 35 °C, wird automatisch
der Lüfter eingeschaltet.
Ist die Temperatur niedriger als 30 °C, wird der Lüfter
ausgeschaltet.
Wird eine der Pfeiltasten betätigt, so gelangt man zu
Punkt 5.2
Einstellung des Temperatursollwertes
.
5. Struktur-Ablauf / Bedienerprogramm
5. Struktur-Ablauf / Bedienerprogramm
5.2 Einstellung des
Temperatursollwertes
Temperaturanwahl
120.0 °C
Die Einstellung erfolgt in Schritten von 1°C.
Das Menü kann nur durch Aus- und Einschalten des
Gerätes oder durch time-set verlassen werden.
Nach 5 min (ohne Tastenbetätigung) erfolgt
time-out und das Gerät wird automatisch neu gestartet
(siehe 5.1
Startanzeige
).
Der Lüfter wird beim Start der Temperaturanwahl immer
abgeschaltet.
Wenn eine Starttemperatur eingestellt wurde, die höher
als die aktuelle Ofentemperatur ist, so wird mit dem
Einstecken der Kapillare der ganz normale Vorgang der
Schmelzpunktbestimmung gestartet.

11
10
7. Erreichen des Schmelzpunktes
Wird der Schmelzpunkt innerhalb von 30 min
nicht
erreicht, so wird der langsame Heizvorgang mit einem
time-out abgebrochen und als Schmelzpunkt wird ein
interner Fehlerwert gespeichert.
Mit den Pfeiltasten kann der Vorgang jederzeit abge-
brochen werden. Das Gerät springt dann zum
Menüpunkt 5.2
Einstellung des Temperatursollwertes
zurück. Es wird kein Lüfter eingeschaltet!
Die Drucktaste hat keine Funktion.
Schmelzpunkt
121.9 °C auto
7. Erreichen des Schmelzpunktes
Wird der Schmelzpunkt erreicht, so ertönt ein dreifacher
Signalton.
Im Display wird der ermittelte Schmelzpunkt angezeigt.
Das Gerät stellt den Schmelzofen automatisch auf die
eingestellte Starttemperatur zurück. In dieser Zeit blinkt
in der rechten unteren Ecke des Displays der Begriff
„auto“.
Wurde die Starttemperatur wieder erreicht, ertönt der
Signalton und der Begriff „auto“ bleibt in der rechten
unteren Ecke des Displays stehen.
Wird während des Zeitraumes, in dem der Begriff
„auto“ blinkt, eine neue Kapillare eingesetzt, so erfolgt
keine Fehlermeldung. Sobald die Starttemperatur er-
reicht wurde, wird sofort der nächste Schmelzpunkt-
bestimmungsvorgang gestartet.
Wird innerhalb von 5 min eine neue Schmelzprobe
eingesetzt, so wird der Messvorgang wiederholt.
6. Starten der Schmelzpunktprüfung
Wenn die Kapillare entfernt wird, kann die Schmelztem-
peratur eingestellt werden.
Die zuletzt eingestellte Starttemperatur bleibt ge-
speichert bis das Gerät ausgeschaltet wird.
Der zuletzt ermittelte Schmelzpunkt bleibt gespeichert
bis das Gerät ausgeschaltet wird oder eine neue
Schmelzpunktermittlung gestartet wird.
6.2 Schnellheizen
Nach Einstellen der Starttemperatur wird das Schnell-
heizen durch Betätigen der Starttaste automatisch
gestartet. Die aktuelle Ofentemperatur wird angezeigt.
Nach Erreichen der eingestellten Starttemperatur (das
Gerät verringert die Heizgeschwindigkeit ca. 3 °C vor-
her), ertönt ein Signal.
Das Schnellheizen lässt sich mit einer der Pfeiltasten ab-
brechen. Mit den Pfeiltasten wird die
Einstellung des Temperatursollwertes
(siehe Kap 5.2)
gestartet.
Der Lüfter wird nicht eingeschaltet!
Die Drucktaste hat keine Funktion.
Schnellheizen
Temp. 78.8 °C
6.3 Langsames Heizen
Das langsame Heizen erfolgt mit ca. 1°C/min
Wenn die eingestellte Starttemperatur erreicht wurde,
wird der Vorgang durch Einführen einer gefüllten
Kapillare automatisch gestartet. Der Schmelzvorgang
wird mit Beginn des Schmelzens bis zum Erreichen des
Schmelzpunktes in °C und in % angezeigt.
Die aktuelle Solltemperatur des Schmelzofens wird
angezeigt.
1°C/min 2 %
Temp.121.3 °C

13
12
9. Einstellung von Datum, Uhrzeit und Bedienersprache
Der Begriff „auto“ wird nicht angezeigt, da hier keine
Schmelzpunktermittlung gestartet werden kann.
Das Einstecken einer Kapillare hat keine Wirkung.
Wenn als Schmelzpunkt ein interner Fehlerwert ermittelt
wird, dann:
- wurde die Schmelzpunktbestimmung mit den Pfeiltas-
ten vorzeitig abgebrochen (Klartextanzeige des Fehlers
für 5 s)
Abbruch, kein
Schmelzpunkt
- war der Schmelzpunkt wegen time-out (10 min) nicht
ermittelbar, d.h. der Schmelzpunkt könnte 10 °C höher
liegen als die eingegebene Starttemperatur (Klartextan-
zeige des Fehlers für 5 s).
time-out,
kein Schmelzpunkt
Nachdem in der Startanzeige die time/set-Taste rechts
neben dem Display betätigt wurde, erscheint das Ein-
stellmenü.
9. Einstellung von Datum, Uhrzeit und Bedienersprache
deutsch 12:38
Mo 31.01.2009
Im Display wird ein blinkender Cursor eingeblendet. Mit
jeder Betätigung der Taste
time/set
springt der Cursor
zum nächsten Eingabewert. Mit den Pfeiltasten lässt sich
der Wert verändern bzw. einstellen.
Wird innerhalb von 5 min eine der beiden Pfeiltasten
betätigt, öffnet sich die
Einstellung des Temperatursoll-
wertes
(siehe Kap 5.2).
Es wird kein Lüfter eingeschaltet!
Wird innerhalb von ca. 5 min die Drucktaste betätigt,
so wird auf dem optional angeschlossenen Drucker
gedruckt. Der Vorgang ist beliebig wiederholbar.
Nach 5 min (ohne Tastenbetätigung) erfolgt der auto-
matische time-out. Das Gerät springt auf die
Start-
anzeige
(siehe Kap. 5.1). Der letzte Schmelzpunkt bleibt
gespeichert und kann zu einem späteren Zeitpunkt mit
der Druck-Taste abgerufen werden.
8. Nachträgliche Abfrage des letzten Schmelzpunktes
aktuelle Temperatur
25.8 °C
8. Nachträgliche Abfrage des letzten Schmelzpunktes
Wurde der Zeitpunkt des Schmelzpunkt-Ablesens ver-
passt und steht das Gerät wieder auf der Startanzeige,
so lässt sich der letzte Schmelzpunkt mit der Drucktaste
erneut anzeigen.
Schmelzpunkt
121.9 °C
Die Anzeige erfolgt für ca. 5 s. Danach springt das
Gerät wieder auf die Startanzeige zurück. Wird die
Drucktaste innerhalb der 5 s erneut betätigt,
so erfolgt ein Ausdruck auf dem angeschlossenen
Drucker (soweit vorhanden).
Der Vorgang lässt sich beliebig oft wiederholen.

15
14
10. Technische Daten
Bei der Einstellung wird der Reihenfolge nach eingestellt:
Min
Std
Wochentag
Jahr
Monat
Tag
Sprache
zurück mit:
Wenn der Monat eingestellt wird, springt die Anzeige des
Tages immer auf 1.
Stunde und Minute werden getrennt eingestellt.
Wenn alle Einstellungen erfolgt sind, wird das Menü mit
der Betätigung der Drucktaste verlassen und alle Ein-
gaben werden gespeichert. Die Eingaben bleiben auch
beim Abschalten des Gerätes erhalten.
Das Gerät besitzt eine Batterie. Deshalb werden
Datum und Uhrzeit auch im ausgeschalteten
Zustand etwa 1 Jahr lang ohne Einschalten aktualisiert.
Die Kalibrierungsparameter sowie die Spracheinstellung
wird in einem EEPROM gespeichert und ist deshalb
länger gesichert.
Spannung
230 V
Nennleistung
40 VA
Schutzklasse IP20
Messbereich
25–400 °C
Genauigkeit
25–200 °C, ± 0,3 °C
200–400 °C, ± 0,5 %
Aufheizrate beim Messen 1°C/min
Es wird empfohlen das Gerät alle zwei Jahre neu
kalibrieren zu lassen.
10. Technische Daten
11 Wartung / 12. Rückgewinnung und Recycling
Ihr Schmelzpunktmessgerät sollte, wie alle Präzisionsgeräte, sorgfältig behandelt
werden. Schützen Sie es vor Staub, Niederschlag, Vibration und vor direkter
Sonneneinstrahlung.
Benutzen Sie bitte keine ätzenden Reinigungsmittel!
11. Wartung
wichtiger Hinweis!
Im Falle eines Fehlers muss das Gerät von der
Firma A. KRÜSS oder einer authorisierten Werkstatt
repariert werden.
wichtiger Hinweis!
Aggressive Stoffe können den Lack oder das Kunst-
stoffgehäuse beschädigen!
12. Rückgewinnung und Recycling
Das Gerät kann eine wichtige Quelle für Rohmaterialen sein. Bitte nicht als Müll
entsorgen, sondern separat für das Recycling und die Rückgewinnung der enthaltenen
Materialien sammeln. Die Materialien können bei unsachgemäßer Entsorgung schädlich
für die Umwelt und die menschliche Gesundheit sein.
Der Hersteller des Geräts, A.KRÜSS Optronic GmbH, sammelt, nutzt und recycelt die
enthaltenen Rohmaterialien. Diese Rückgewinnung erfordert jedoch Ihre Unterstützung.
Wenn Sie sich entschließen, dieses Schmelzpunktmessgerät zu entsorgen, versuchen Sie
nicht, dieses zu öffnen oder Teile davon anders zu verwenden, als in dieser Anleitung
beschrieben, sondern bringen Sie das Gerät zum Händler, von dem Sie es gekauft
haben. Der Händler sollte das Gerät kostenfrei zurücknehmen.
Die Rückgewinnung der Rohmaterialien erfolgt unter Beachtung der Europäischen
Vorgabe 2002/96/EC und allen weiteren zutreffenden Vorgaben.

17
16
Garantiebestimmungen
A.KRÜSS Optronic übernimmt die Garantie für Material und Herstellung der Geräte für
einen Zeitraum von 24 Monaten, gerechnet ab Datum des Versands.
Während dieser Garantiezeit wird A.KRÜSS Optronic Mängel durch Reparatur oder
Austausch beheben, wenn diese unter den Garantieanspruch fallen.
Für Garantiereparaturen oder Service muss das Gerät an A.KRÜSS Optronic zurück-
gesandt werden. Der Versand vom Kunden geht bei Garantiereparaturen zu Lasten der
A.KRÜSS Optronic, ansonsten zu Lasten des Kunden.
A.KRÜSS Optronic garantiert, dass die Hardware, welche von A.KRÜSS Optronic für
dieses Gerät bestimmt ist, fehlerfrei arbeitet, wenn sie nach unseren Herstellerangaben
eingesetzt wird.
A.KRÜSS Optronic garantiert jedoch nicht den fehlerfreien und ununterbrochenen
Betrieb des Geräts oder Fehlerfreiheit dieser Bedienungsanleitung.
Auch für Folgeschäden wird nicht gehaftet.
Garantie-Beschränkung:
Die vorstehende Garantie erstreckt sich nicht auf Fehler und Defekte, welche durch
unsachgemäße Behandlung, durch Modifizierung, Missbrauch oder durch Betrieb
außerhalb der angegebenen Umgebung oder durch unautorisierte Wartung entstanden
sind.
Weitergehende Ansprüche werden nicht zugesagt und anerkannt. A.KRÜSS Optronic
garantiert ausdrücklich nicht die Verwendungsfähigkeit oder den wirtschaftlichen Einsatz
für bestimmte Anwendungsfälle.
A.KRÜSS Optronic behält sich jederzeit Änderungen dieser Bedienungsanleitung und
der technischen Daten des beschriebenen Geräts vor.
KRÜSS-Geräte sind nur versandfähig, wenn sie sachgemäß in die vollständige Original-
verpackung eingepackt werden. Fordern Sie notfalls eine Ersatzverpackung bei Ihrem
Lieferanten an.
Garantiebestimmungen
A.KRÜSS Optronic GmbH
Alsterdorfer Straße 276–278
22297 Hamburg | Germany
Tel
+49-(0)40-51 43 17-0
Fax +49-(0)40-51 43 17-60
E-Mail info@kruess.com
Web www.kruess.com
English
1. Description M5000
19
2. Safety Precautions
20
3. Unpacking and Assembly
20
4. Melting point analysis
21
5. Structure process / operator programme
22
6. Starting the melting point analysis
23
7. Reaching the melting point
25
8. Subsequent retrieval of the last melting point
26
9. Setting of date, time and language
27
10. Technical data 28
11. Maintenance
29
12 Recovery and Recycling
29
Warranty conditions
30
Index
Index
19
1. Description
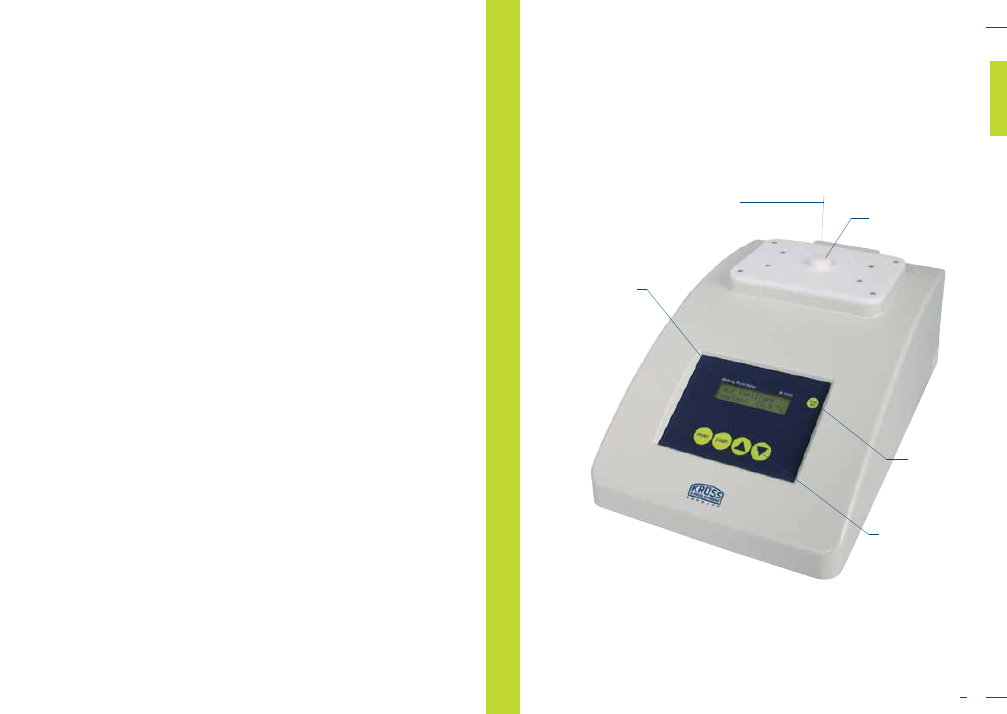
1. Description M5000
display
capillary tube
for sample
control keys
time-/set-key
capillary tube adaptor
ENGLISH

21
20
2. Safety precautions / 3. Unpacking and assembly
• Do not cover ventilation slots.
• Do not insert any objects into ventilation slots.
• No humidity may intrude into the device.
• During analysing the melting point, the measuring head heats up extremely around
the ventilation slots. Do not touch the measuring head in this area.
• Only use suitable capillary tubes with an external diameter of 1.4 mm for the
determination of the melting point.
• When working with chemicals, follow safety precautions.
• When maintaining the device, e.g. changing the fuse, cleaning with a dry or any
slightly wet towel, always make sure that the device is disconnected from electricity.
• Only authorized personnel or the manufacturer may carry out servicing and
maintenance.
• Carefully unpack the device.
• Immediately report any transport damage occurred.
Find a suitable place for the device, i.e. avoid direct sunlight and vicinity of heating
devices. Connect power plug to 230 V / 50 Hz alternating current.
Before initial measuring the device should be switched on for about 15 min to reach
ideal working temperature.
2. Safety precautions
3. Unpacking and assembly
4. Melting point analysis
With the device you will be able to determine the melting point of powdery substances
up to 400 °C.
►
Switch on the mains switch on the back of the device.
You will see the current oven temperature on the display and you will hear a signal
tone.
►
By pressing the arrow key, select the desired starting temperature (approx. 3 °C
below expected melting point).
►
When having reached the selected starting temperature, carefully insert a filled capil-
lary tube (filled with approx. 4 mm) with the opening facing upwards into the drill
hole of the guiding head until you feel the capillary tube touching the end.
After having reached the melting point, the device falls back to the selected tem-
perature and you will also hear a signal tone. The melting point is displayed and can
be printed via the printing key.
►
During cooling down to the starting temperature “auto/waiting” will flash up on the
display. After the “waiting” display has disappeared, the same measuring can be
repeated.
►
If there is no new measuring within 5 min, the device automatically cools
down (fan) to 30 °C.
►
Do not switch off the device before reaching 30 °C, because then the fan cooling
will also be switched off.
►
If you wish to carry out a measuring while the cooling is operating, you can directly
select the temperature using the arrow keys. The cooling will switch off automatically.
►
If the desired starting temperature is below the current temperature, you have to wait
until the cooling has reduced the temperature.
►
Do not attach protective cover before the device has cooled down.
4. Melting point analysis

23
22
5.1 Starting display
actual temperature
25.8 °C
The display always appears when switching on the
device.
If the temperature is above 35 °C, the fan will start
automatically.
If the temperature is below 30 °C, the fan will switch off.
If one of the arrow-keys is pressed, you continue with
5.2
Selection of the target temperature
.
5. Structure process / operator programme
5. Structure process / operator programme
5.2 Selection of the
target temperature
select temperature
120.0 °C
Adjustment takes place in steps of 1 °C.
The menu can only be left by turning the device off and
on or by time-out.
After 5 min (without pressing any key) time-out
appears and the device will be restarted
(see 5.1 Starting display).
When choosing a temperature, the fan will always be
switched off.
If a starting temperature higher than the current oven
temperature is selected, inserting the capillary tube will
start the normal process of melting point analysis.
If the starting temperature is lower than the current oven
temperature, an error message will be displayed for 3 s
when the capillary tube is inserted.
6. Starting the melting point analysis
Selected temperature
> oven temperature
After that, the device will return to the starting display
and the procedure will be cancelled. The fan will be
started according to the logic.
The latest selection of temperature can only be erased
when turning off the device.
6. Starting the melting point analysis
6.1 In principle
The starting of a melting point analysis will only be
effected by inserting a filled capillary tube in the oven, if
a starting temperature has previously been selected and
reached.
In the case of an unfilled capillary tube, an error warn-
ing will be displayed. It will be automatically deleted
after the empty capillary tube has been removed.
empty capillary tube
After inserting, measurement will automatically start.
When the capillary tube is inserted, the starting menu is
automatically shown.
If there is already a capillary tube in the oven before the
starting temperature has been selected, a message on
the display will ask you to remove the capillary tube.
Please remove
capillary tube
Only then (automatically after removing the capillary
tube) the selecting menu will be shown.
The last selected starting-temperature remains in
memory until the device is turned off.

25
24
6. Starting the melting point analysis
The last melting point determined will be saved until the
device is turned off or a new melting point analysis is
started.
6.2 Express heating-up
After selecting the starting temperature, express heating
up will automatically be started after pressing the start
key. The current oven temperature will be displayed.
After reaching the selected starting temperature (the
device decreases heating-up speed approx. 3 °C before)
a signal tone will be heard for about 5 seconds.
Express heating up can be cancelled by pressing one of
the arrow keys. The selection of the target temperature
(see chapter 5.2) is started with the arrow keys. The fan
will not be activated! The printing key has no function.
express heating
Temp. 78.8 °C
6.3 Slow heating-up
Slow heating-up means approx. 1 °C per minute.
The process is automatically started by inserting a filled
capillary tube when the selected starting temperature
has been reached. The melting process is displayed
in °C and % from the beginning of melting until the
melting-point is reached. The current target temperature
of the melting-oven is displayed.
In case the melting point is not reached within 30 min,
the slow heating-up process will be interrupted by time-
out and and an internal error value will be saved as
melting point.
By pressing the arrow keys, the process can be inter-
rupted at any time. The device will then jump to menu
item 5.2
selection of target temperature
. No fan will be
activated! The printing key has no function.
1°C/min 2 %
Temp.121.3 °C
7. Reaching the melting point
melting point
121.9 °C auto
7. Reaching the melting point
A signal tone will sound three times when the melting
point has been reached.
The determined melting point will be shown on the
display. The device will automatically set the melting
oven back to the selected starting temperature. During
this time the term “auto” will flash up in the lower right
corner of the display.
When the starting temperature has been reached once
more, the signal tone will sound and the term “auto”
will remain in the lower right corner of the display.
If a new capillary tube is inserted during the time the
term “auto” is flashing up, no error message will be
displayed. As soon as the starting temperature has been
reached, the next melting point analysis process will
immediately be started.
If a new melting sample is inserted within 5 min, the
measuring process will be repeated.
If one of the two arrow keys is pressed within 5 min, the
selection of the target temperature will be activated (see
chapter 5.2) No fan will be turned on!
If the printing key is pressed within 5 min, you can print
on the optionally attached printer. This process can be
repeated as often as you want.
If no keys are pressed for about 5 min, a time-out
will occur and the device will automatically jump to
the starting display. The last melting point remains in
memory and can be displayed at a later time by press-
ing the printing key.

27
26
8. Subsequent retrieval of the last melting point
actual temperature
25.8 °C
8. Subsequent retrieval of the last melting point
If you missed the time for reading the melting point and
the device has returned to the starting display, the last
melting point can be displayed once more by pressing
the printing key.
melting point
121.9 °C
The display will appear for about 5 sec. After that the
device will return to the starting display. If the printing
key is activated once more within the 5 s, the print-out
will be created with the attached printer (if available).
This can be repeated as often as you want.
The term “auto” will not be shown on the display, since
no melting point analysis can be started in this case
inserting a capillary tube does not have any effect.
If an internal error value is determined as melting point,
the melting point analysis was prematurely aborted by
pressing the arrow keys (clear text display of the error
for 5 s).
The melting point could not be determined due to a
time-out (10 min.), i.e. the melting point could be
10 °C higher than the selected starting temperature
(clear text display of the error for 5 s).
abort,
no melting point
9. Setting of date, time and language / 10. Technical data
After pressing the time-set-key on the right hand side of
the display, the set-up menu appears.
The settings will be made in the following order:
min
h
weekday
year
month
day
language
return with:
9. Setting of date, time and language
english12:38
Mo 31.01.2009
A flashing cursor will appear on the display. With each
activation of the time- / set-key the cursor will jump to
the next item. The value can be changed resp. set with
the arrow keys. When setting the date you should start
with year, then month and at least day and week-day.
When the month is set, the day always shows 1.
Hour and minute are set separately.
When all settings are completed, the menu is left and
all settings are saved by pressing the printing key. The
settings will also remain after turning off the device.
The device includes a battery. This is why the date and
time are also updated in the off mode for about 1 year
without turning on the device.
Calibration parameters as well as language are stored
in EEPROM and therefore remain for a longer period.

29
28
10. Technical data
Power supply
230 V
Power consumption
40 VA
Safety classified
IP 20
Measuring range
25–400 °C
Accuracy
25–200 °C, ± 0.3 °C
200 °C–400 °C, ± 0.5 %
Heating-up rate during measuring 1 °C/min.
It is recommended to have the device calibrated every
two years.
10. Technical data
11 Maintenance / 12. Recovery and Recycling
12. Recovery and Recycling
The device can be an important source of raw materials. Please do not dispose of as
waste, but collect separateley for the recycling and recovery of the contained materials.
If disposed improperly, the materials may be damaging to the environment and human
health.
The manufacturer of the device, A.KRÜSS Optronic GmbH, collects, uses and recycles
the contained raw materials. However this recovery requires your support.
If you decide to dispose of this melting point meter, please do not try to open it up or
to use parts of it in any other way than described in this manual, but return the device
to the dealer you purchased it from.
The dealer should take the device back free of cost.
The recovery of the raw materials is effected with respect to the European guideline
2002/96/EC and any other applicable guideline.
11. Maintenance
Like all precision devices, your Melting point meter should be treated with care.
Protect it against dust, condensation, vibration and direct solar radiation.
Please do not apply acrid detergents to the instrument!
Important information!
In case of defect, the device must be repaired by
the company A.KRÜSS or an authorised workshop.
Important information!
Corrosive chemicals can harm the varnish or plastic
housing!

30
Warranty conditions
A.KRÜSS Optronic guarantees the materials and workmanship of KRÜSS instruments for
a period of 24 months from the date of shipping. A.KRÜSS Optronic will repair or
replace defective devices within this period, given that they fall under terms of the
guarantee. The device must be sent back to A.KRÜSS Optronic for warranty repairs or
service. Shipping from the customer is at the expense of A.KRÜSS Optronic for warranty
repairs. In all other cases, expenses must be paid by the customer.
A.KRÜSS Optronic guarantees that the hardware specified by A.KRÜSS Optronic for use
with this device will function without error if used according to the instructions provided
in our manual.
A.KRÜSS Optronic does not guarantee error-free and uninterrupted operation of the
device or the accuracy of this instructions manual. A.KRÜSS Optronic is not liable for
consequential damage.
Warranty limitations:
This warranty does not cover errors and damage arising due to improper handling,
through modification, misuse, operation above and beyond the specified environmental
conditions or through unauthorised maintenance.
Further claims will not be accepted or recognised. A.KRÜSS Optronic expressly provides
no guarantee for the workability or economic use in specific application cases.
A.KRÜSS Optronic reserves the right to make changes to this instruction manual and the
technical data of the device in question at any point in time.
All devices may only be transported when properly packed in the complete original
packaging. Request replacement packaging from your supplier if necessary.
Warranty conditions
A.KRÜSS Optronic GmbH
Alsterdorfer Straße 276–278
22297 Hamburg | Germany
Tel
+49-(0)40-51 43 17-0
Fax +49-(0)40-51 43 17-60
E-Mail info@kruess.com
Web www.kruess.com

A.KRÜSS Optronic GmbH
Alsterdorfer Straße 276–278
22297 Hamburg | Germany
Tel
+49-(0)40-51 43 17-0
Fax +49-(0)40-51 43 17-60
E-Mail info@kruess.com
Web www.kruess.com
Version 1.1 | Stand:
Januar 2013
| Änderungen und Irrtümer vorbehalten
Version 1.1 | State:
January 2013
| Subject to technical modification without notice / errors and omissions excepted