Full Text Searchable PDF User Manual
Model: X6S
OWNER’S MANUAL
Thank you for purchasing inxni Robotic Vacuum Cleaner. To obtain the best result of the product, please
read this manual carefully as well as the quick start guide to get familiar with the product.
Welcome to the world of smart robotic floor cleaner.
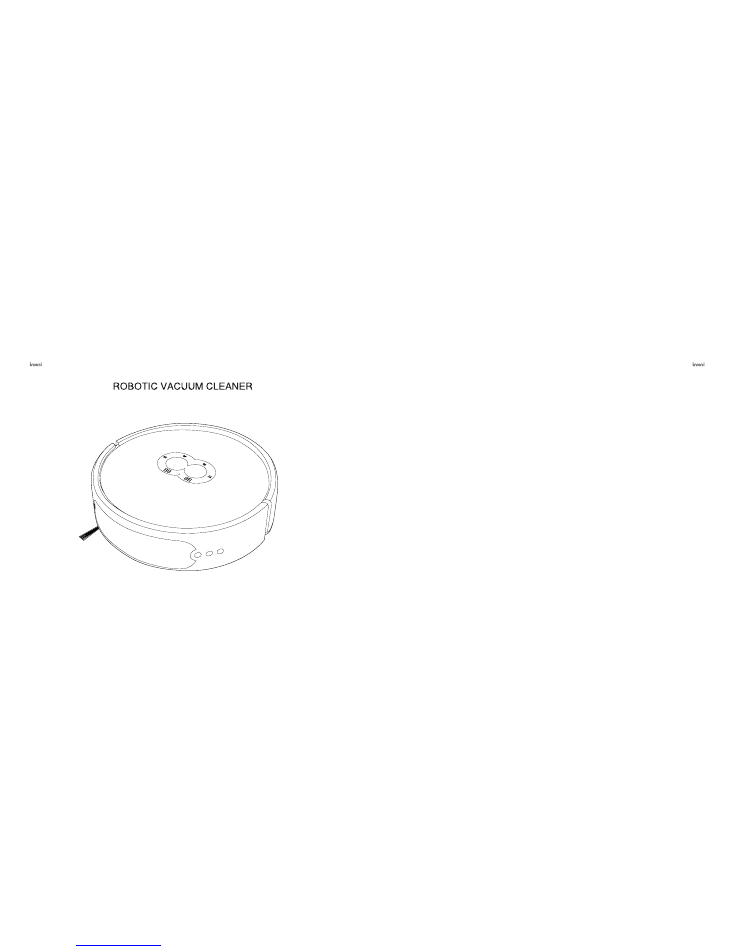
inxni Robotic Vacuum Cleaner is a robot based on laser autonomous navigation
with advanced smart technology. Equipped with a laser scanning range finder,
inxni Robotic Vacuum Cleaner can create a map intelligently and optimize the
cleaning path accordingly. It can automatically return to the initial position after
completing the cleaning work because it has the memory function of map
coordinates. The APPS provide the interactive control, visualize the area, avoid
obstacle and automatic recharge and scheduled cleaning.
Thank you for purchasing
iBoto
inxni Robotic Vacuum Cleaner. We believed that
you will enjoy the product.

Thank you for choosing the inxni robo
ti
c vacuum cleaner
Please read the manual carefully before using.
SAVE THIS MANUAL FOR FUTURE REFERENCE.
Owner’s Manual

Product Maintenance
5.1 Storage
5.2 Cleaner General Maintenance
5.3 Cleaning the Dirt and Dust inside the Dust-box
5.4 Cleaning Dust in the Filter
5.5 Brush Cleaning
5.6 Cleaning the Side-brush
5.7 Cleaning the Wheel
5.8 Cleaning the Sensor
15-19
5.
Product Trouble Shooting
6.1 Error Message
6.2 Common Issue or Problem
20-21
6.
APPS Installation
23-25
8.
Product Specification
22
7.
Product Safety
1.1
User Instructions
1.2
About Safety of the Product
1.3
About Children’ Safety
1.4
About Battery
1.5
About where the cleaner
should NOT be used
1.6
Violation of Warranty
03-07
1.
Product Anatomy
2.1 Part Name and Package Contents
2.2 Main Control Panel Description
4.1 Product Cleaning Mode
4.2 Charging Mode
08-11
2.
Product Installation
11
3.
Product Operating Mode
12-15
4.
1. Product Safety
1.1 User Instructions
Read all of the following safety precautions carefully prior to the use of this product:
Operate this product in accordance with the steps indicated in this OWNER’S Manual.
Keep the OWNER’S Manual properly stored for future reference.
If you need to have any third party use this Cleaner, please hand the OWNER’S Manual over together with quick start
guide to the new owner.
Serious personal injury or damage to the Cleaner itself may occur if owner does not follow the Cleaner usage guideline
mentioned in this Manuel.
1.2 About Safety of the Cleaner
This Cleaner must use with the original adapter, battery and charging stand provided with the Cleaner. If not, the Cleaner
may cause damage, Electric shock or Fire hazard as a result.
If you find the main body and parts of this Cleaner damage, please stop using it immediately and contact our customer
service as soon as possible.
Only inxni designated or authorized servicemen or service center is allowed to dismantle, repair or replace the Cleaner.
Don’t touch the power plug or the Cleaner when hands are wet as this may cause electrical shock.
To avoid personal injury due to the accidental drop such as from stair case of the Cleaner, please don’t uses the Cleaner
in the area close to staircase step, unsecured balcony, etc ensure that fence out the area if needed.
Don’t pull or move this Cleaner with the power cable and don’t bend or place heavy object on top of the power cable.
Keep the Cleaner away from fire, inflammable matter, explosive and corrosive chemical.
Don’t place your clothes, any parts of your body such as hair, finger, nail, etc close to the rotating brushes or wheel when
the Cleaner is in operation as it may cause personal injury.
Cleaner should only use indoor.
Keep the Cleaner away from water, oil or other liquid as it may cause damage to the electronic inside the Cleaner.
No loose wires should scattered on the floor as it may cause damage to the Cleaner when the Cleaner rolls over those wire.
Contents
Pr
od
uct Safety
2
3

1.3 About Children’s Safety
Please remove fragile items such as glass cup, bottle, etc from table top.
The charging stand should set up against the wall so that the Cleaner can be properly docked upon initial and final cycle.
Turn off the ON/OFF power switch in Cleaner to avoid battery damage if the Cleaner is not use for a long period of time.
If the Cleaner is not used for a longer period of time, fully charge the battery and store the Cleaner in the cool and dry
place at the same time keep the bottom of the Cleaner dry and clean.
If the Cleaner is used for the first time or use after idle for a long period of time, charge the Cleaner for about 6 hours
before starting the cleaning cycling.
After the Cleaner is fully charged for the first 3 to 4 times, the Cleaner can be charged properly at the base should the
Cleaner ran out of power.
Unplug the power adaptor from the wall electrical outlet should the Cleaner stay idle for a long period of time.
Do not move or relocate the charging stand or cleaner when the cleaner is in operation as the cleaner may not be able to
dock automatically.
Cleaner consists of Laser Emission and don’t look into the front part of the Cleaner directly as looking into it may case eye
injury .
Do not allow children to operate the cleaner nor stay close to the cleaner when it is in operation.
Under all circumstances, children should not play with the package plastic bags or any packing related material as it
may cause suffocation.
Screw driver or related tools shipped is not a toy and should not be used by children.
1.4 About Battery
The cleaner can only work with the battery provided by original manufacturer and only genuine inxni
battery should be
used at all the time.
Only inxni
Power adaptor provided should be used to charge the cleaner.
Turn the power switch to OFF before removing the battery from the cleaner. In some case, only designated person authori-
zed by inxni can remove the battery from the cleaner.
Remove the battery when the cleaner is disposed at the end of it Cleaner life cycle.
Battery can only dispose into area under the local municipality recommendation and guidance.
Should battery require replacement, contact inxni
customer service hotline for further advice and support.
Use of the incorrect or non-inxni
genuine battery is prohibited and may cause accidents.
In case of battery leakage, don’t touch the battery with bare head as the chemical leaked my cause damage to skin or cl-
othes. When such incident occurs, send the battery to the local municipality designated recycling area or send it to the
inxni designated repair center.
Don’t dispose battery in normal garbage bin.
Properly handle the used battery of the cleaner (including the remote control) because it may contain environmentally haz-
ardous substances.
Please follow the local environment rules and dispose the battery into the local municipality designated recycle bin or area.
P
roduct S
afety
P
rod
uct Safety
4
5

The cleaner Not Applicable
1.5 About where the cleaner should NOT be used
*Cleaner should not be used in extremely hot or cold environment.
* Cleaner can only be used indoor.
*To avoid personal injury due to the accidental drop such as from stair case of the Cleaner, please don’t uses the Clea-
ner in the area close to staircase step, unsecured balcony, etc ensure that fence out those areas if needed.
*Don’t use the cleaner in the places which is wet, consists of flammable, explosive or corrosive chemical.
*Don’t allow the cleaner to collect or pick up burning cigarette butt or matches or any matter that is in flame.
*Don’t direct the cleaner to collect or pick up toner used inside the laser printer or photo copier as toner consists of sub-
stances that may cause fire hazard.
*Don’t direct the cleaner to collect sharp matter such as broken glass, iron nail, screws as such matter may cause dam-
age to the cleaner.
Important: Do not disassemble the Cleaner. Disassembling the Cleaner will
void the warranty. Only inxni
or a party expressly authorized by inxni
should perform service on this Cleaner.
1.6 Violation of Warranty (1 year Limited)
The cleaner can’t be repaired or warranted when the owner conducted or encountered the following:
A. When owner fail to store cleaner in places not according to the OWNER’S Manual;
B. The cleaner and components warranty period expired;
C. Damage occurred when owner disassemble the cleaner without sending it out to an authorized service center for
e
r pairing;
D. Not able to provide a valid proof of purchase at the time when service or repairing is required.
E. When the model number in the warranty card does not match with the Cleaner number shown in the cleaner.
F. When damage occur due to force majeure including natural disaster;
G. When the Cleaner fail or damage due to unexpected factors or man-made reasons (including mis-operate, fluid
fo
und in the inlet, improper insertion or pulling, hauling, bump, improper voltage input and others).
Prod
uct Safety
Prod
uct Safety
6
7

2. Product Anatomy
Cautious:
Screw driver shipped is not a toy and should NOT be used by children.
The battery, side brush and filter were preinstalled to the cleaner prior to
shipment.
2.1 Part Name and Package Contents
The Cleaner
*1pc
Air Filter
*1pc
Side Brush
*2pc
Dust Brush
*1pc
Screwdriver
*1pc
Charging Station
*1pc
Battery
*1pc
Adapter
*1pc
*
2.2 Main Control Panel Description
Main Control Panel
B
Laser Sensor
umper
Ground Detection Sensors
Charging Pole Shoe
Side Brush
Front Wheel
Battery Compartment
Wheel
Floor Brush
Main Brush
Dust Box
Main Control Panel Detail
Clock (Hour)
Schedule Program
Spot Cleaning
Clock (Minute)
ON/OFF (Auto Cleaning)
Current Time Setting
Home Key (back to charging station)
Battery Indicator
Prod
uct Anatomy
Prod
uct Anatomy
8
9
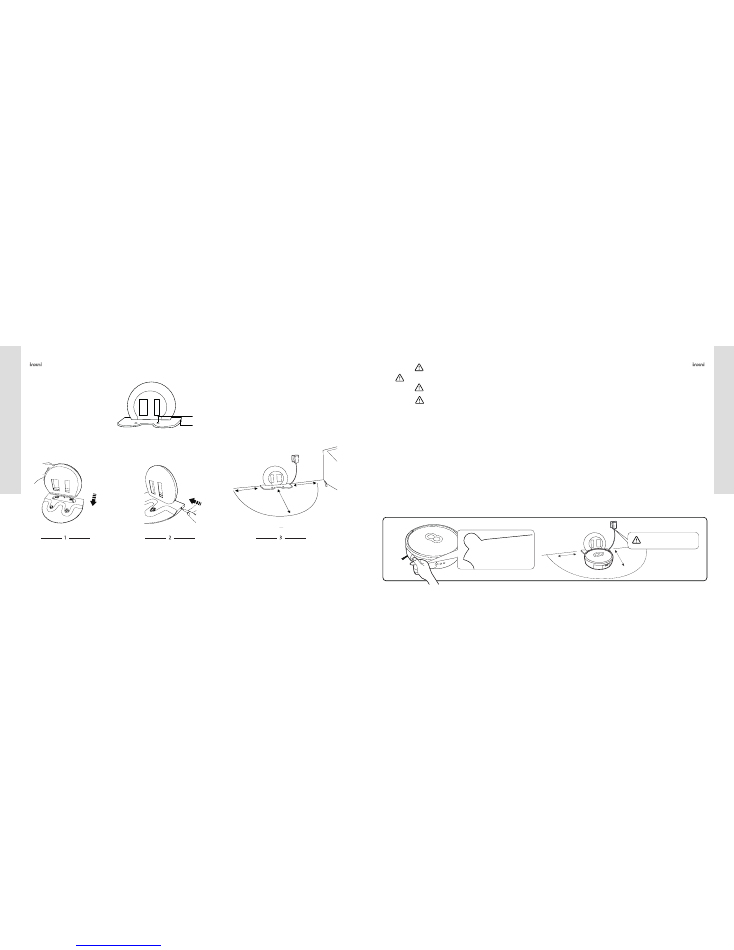
1. Insert the upper half of the part vertically into the base as shown.
2. Connect the base with the DC power cord from the adaptor as shown
3. Place the charging base against the wall and connect the power adapter to a wall outlet in which a 3.4 feet (1 meter) long
in front by 1.7 feet (0.5 meter) to the left and 1.7 feet (0.5 meter) to the right obstacle free area as shown is required.
Power Adaptor Input Jack
Charging Pad
Setting up the Charging Base
Charging Base
Prod
uct Anatomy
Prod
uct Installation
Cau
ti
ous :
Don’t place the charging base on carpet.
Don’t move or relocate the charging base while the cleaner is in the cleaning process, else the cleaner will not be able
to find the charging base automatically for charging.
1. Turn off the Power Switch when the vacuum cleaner should the cleaner is not used for extended period of time to prevent the
battery from any unexpected damage.
2. Should the vacuum cleaner is not used for a long period of time, fully charge the battery, then take out the battery and store it
in a cool and dry place separately. Keep the bottom of the cleaner dry and clean as well while the battery is in storage.
3. When the cleaner is used again after being put in storage for a long period of time, charge the battery for about 6 hours. Try to
fully use up the battery power and continue this cycle for about 3 to 4 time to enable the battery operates at its optimal point.
4. Use only the inxni genuine battery for the cleaner. If not, the non inxni battery may cause damage to the cleaner or unwanted
accidents.
5. When connecting the inxni genuine power adapter to the charging base, ensure that the wire between the adapter and the
charging base is properly stow to prevent the wire end up winding into moving part of the cleaner. Thus, damage to the cleaner is
anticipated
6. Don’t move or relocate the charging base while the cleaner is in the cleaning process, else the cleaner will not be able to find the
charging base automatically for charging.
7. High Voltage at the wall plug! Please operate the cleaner and plug in the power adaptor with dry hands.
To further enhance the life span of the battery.
3. Product Installation
Remove the protective film in the front before the first use of this cleaner.
10
11
1.7 ft
1.7 ft
3.4 ft 1 M
0.5 M
0.5 M
1.7 ft
1.7 ft
3.4 ft 1 M
0.5 M
0.5 M
The work of each time starts
from charging station
R
EM
OV
E P
RIO
R TO
USAG
E OF PRODUCT
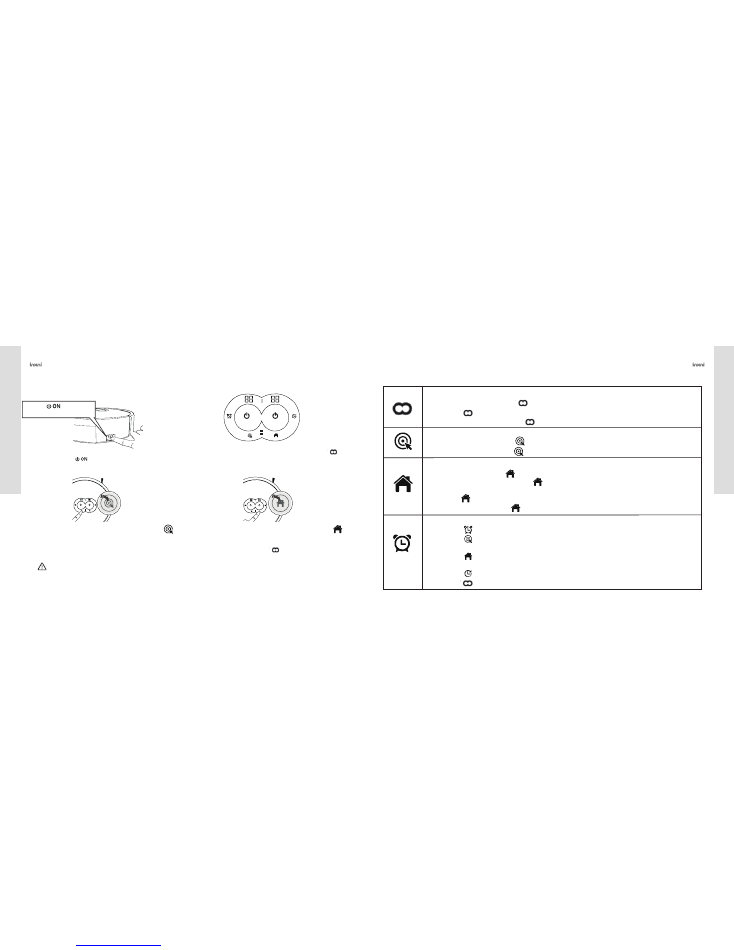
4.1.1 Description:
1. Ensure that the cleaner battery is charged fully. Turn on
the power switch and wait for about 20 seconds. The
battery indicator should light up while charging. At this time
the cleaner is in the standby mode and ready to use.
Cautions:
Should the cleaner is low on battery, cleaning cycle will be stopped and the cleaner will automatically search for the
charging base for charging.
4. Product Operating Mode
4.1 Product Cleaning Mode
2. When the cleaner is in standby mode, touch the “ ”
ON button to start the auto cleaning cycle. Touch the OFF
button to stop the cleaning cycle.
3. When the cleaner is on standby mode, touch the“ ”
SPOT button and the spot cleaning will start for cleaning
within 3.4 feet (1 meter) in diameter area. Touch the OFF
button to stop the cleaning cycle.
4. When the cleaner is on standby mode, touch the “ ”
HOME button and the cleaner will return to the charging base
and recharge. Should the cleaner need to resume to the cleaning
cycle again, touch the OFF“ ”button again to stop the
cleaner from go back to the base and resume to cleaning mode
4.1.2 Operational Guideline for Touch button seen on top of the Cleaner
Product Operating Mode
Product Operating Mode
12
13
Turn on and wait
for about 20 seconds.
ON / OFF
In the standby mode, touch the " " ON button, the cleaner will start to clean.
Touch the " " OFF button, the cleaning cycle will stop.
In the clock setup mode, touch this " " button, the setting will be deleted.
SPOT Cleaning
In the standby mode, touch the " " button and the cleaner will start spot cleaning mode.
In the clock setup mode, touch " "button to adjust the hour setting.
HOME
In standby mode, touch the " " HOME button as return button
In Operation mode, upon touching the " " HOME button, the cleaner will search the charging base,
thus, return to the base for charging.
Touch the " "HOME button immediately after, the cleaner will stop searching the base.
In Scheduling mode, touch the" "HOME button to adjust the minute setting
SCHEDULE Setup
Touch the " " button the cleaner will enter the Scheduling mode;
Touch the " " button to adjust the hour setting. Each touches count as one hour and will increase to
24 hours and will loop back to 00 hours as the hour continue to increase.
Touch the " " button to adjust the minute setting. Each touches count as one minute and will increase
to 60 minute and will loop back to 00 minutes as the minute continue to increase.
Touch the " " button to save the Schedule setting.
Touch the " " button to exit or complete the time current setting.
5. Product Maintenance
4.2.1 Normal Charging
4.2 Charging Mode
1. Connect the power adapter provided and plug into the
power jack in the charging base of cleaner first.
2. Plug the power adaptor provided into the wall electrical
outlet.
3. Switch on the cleaner and wait for 20 seconds until it
enters the standby mode.
4. Place the cleaner in front of the charging stand and aim
it at the central position of the charging stand.
5. Manually push the cleaner to the charging stand slowly
until the charging pole shoe is well connected with the
terminal of charging stand.
6. Charging will start after the cleaner clicks.
5.1 Storage
OFF
5.2 Cleaner General Maintenance
1. APPS charging:
Connect the cleaner with the Apple iPhone / iPad or and then touch the “HOME” button (Icon) as seen in the APPS.
The cleaner will automatically search the location of charging base and return back to the base for charging once located.
2. Auto Charging:
The cleaner will stop cleaning when the battery power is low and it will search the location of charging base and return back
to the base for charging once located.
1. Shut off the power or unplug the wall power plug with dry hand before cleaning the main body and charging base
2. Gently clean the surface of the main body with damped cloth along with non aggressive cleaning agent
3. Don
’
t rinse the cleaner with running water or submerge the cleaner into water
4. Don
’
t clean the cleaner surface with oil or any oil base cleaning agent.
Tips:
Clean and Maintain the cleaner frequently
4.2.2 Automatic Charging:
Ch
arging Mode
Product Maintenance
1. Shut off the power when
cleaner is not used for a long
period of time.
2. Should the vacuum cleaner is
not used for a long period of time,
fully charge the battery, then take
out the battery and store it in a cool
and dry place separately. Keep the
bottom of the cleaner dry and clean
as well while the battery is in storage
Cautious! High Voltage at the wall
power outlet! Hand must be dry when
plugging into the wall outlet.
14
15
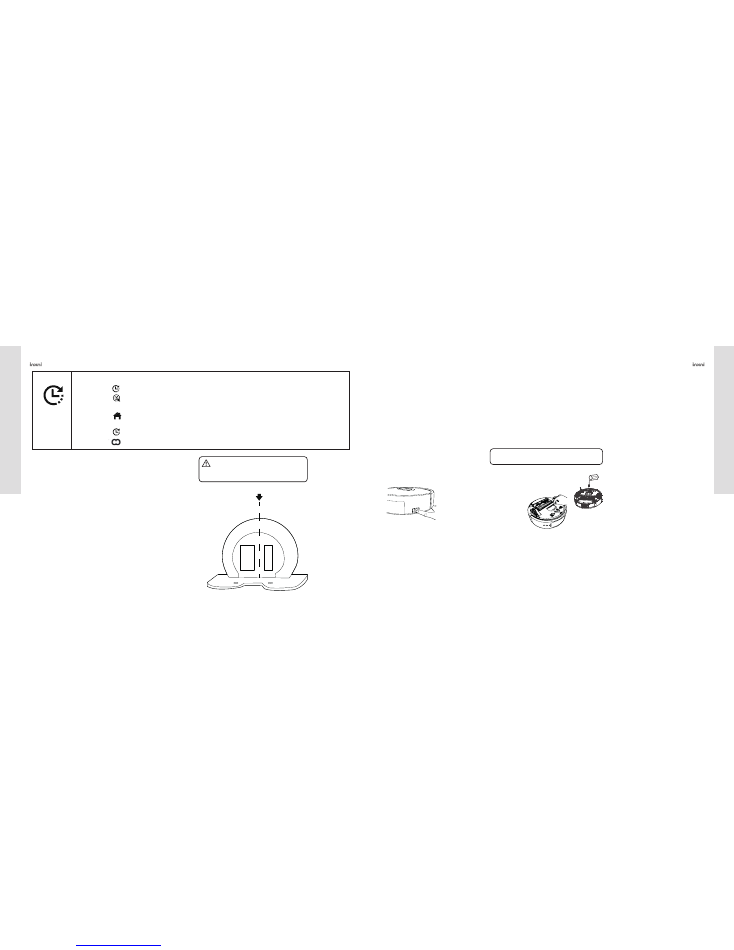
CLOCK Setup
Touch the " " button, the cleaner will enter into current time setting mode.
Touch the " " button to adjust the hour setting. Each touches count as one hour and will increase to
24 hours and will loop back to 00 hours as the hour continue to increase.
Touch the " " button to adjust the minute setting. Each touches count as one minute and will increase
to 60 minute and will loop back to 00 minutes as the minute continue to increase.
Touch the " " button to save the time setting.
Touch the " " button to exit or complete the time current setting.
Charging base center line
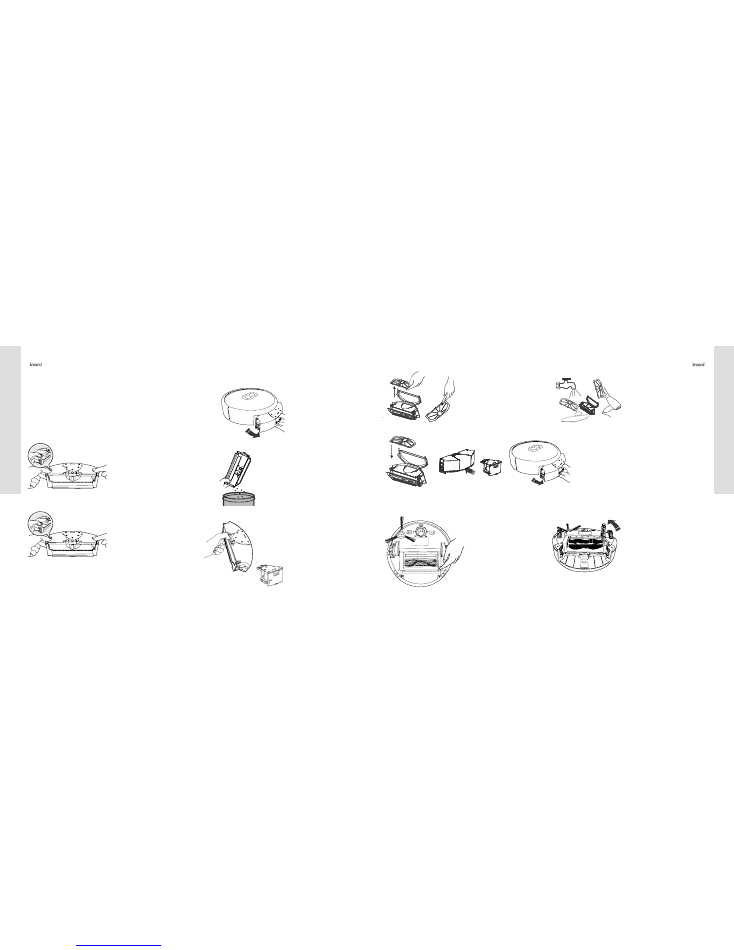
5.3.1 Removing the Dust Box
5.3.2 Emptying the Dust and Dirt from the Dust-box
5.3 Cleaning the Dirt and Dust inside the Dust-box
1. Gently lift up the buckles on both
side of the dust box as shown above
2. Open the upper and lower baffle
and remove the dust and dirt
3. You may wipe the inside of the
dust box with the brush provided
or a dry cloth.
5.4 Cleaning Dust in the Filter
1. Follow and complete step listed
in 5.3.2
2. Remove the electric motor as
shown by pressing down the
button as indicated.
(Warning: The electric motor
assembly can
’
t be washed
directly or submerge in water.)
As shown in the above picture, press the button on
the dust box and slowly draw out the dust box from
the cleaner as the first step.
5.5.1 Removing and Installing the Center Brush
Prod
uct Maintenance
Prod
uct Maintenanc
e
5.5 Brush Cleaning
3. Take out the filter as indicated
and gently bush off the dust seen
on the filter into the garbage using
the brush provided in the
accessory box.
4. After completing the cleaning, install the filter
and electric motor assembly into the dust box
5. Then install the dust box back into the cleaner
as shown above
4. should too much dust seen
inside the box and on the filter,
gently rinse the filter with clean
water (Warning: the dust box
and filter can be placed back
into the cleaner only when they
are fully dry.)
1. As shown in the above diagram,
push the locking buckle and lift up
the side bar as indicated.
2. Hold and lift up the side bar and
gently remove the main brush first.
Then, remove the floor brush after.
16
17
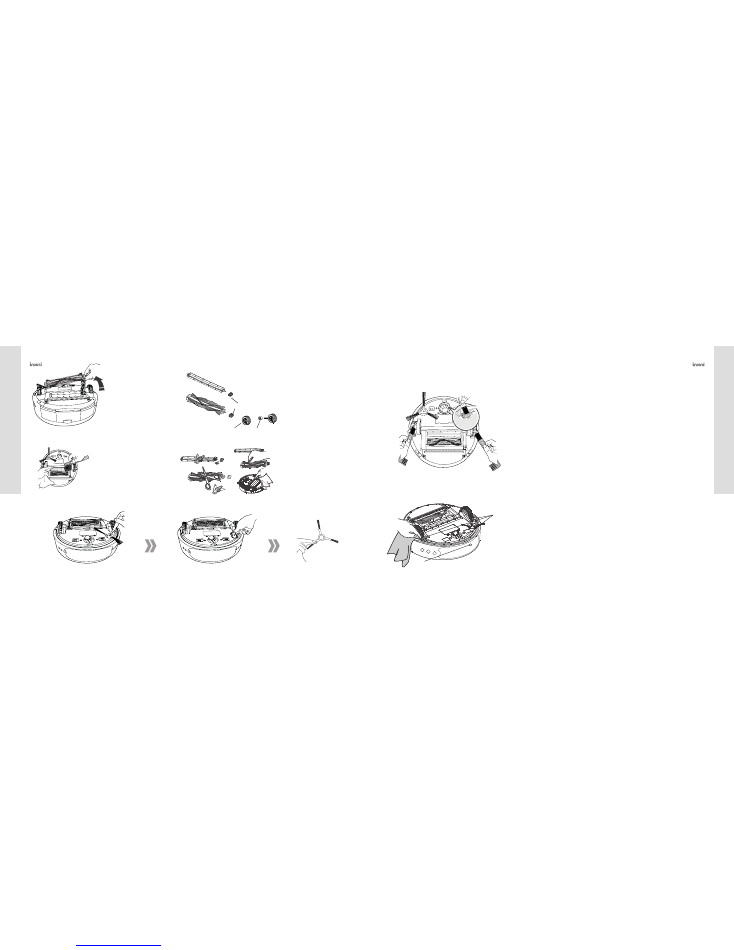
5.5.2 Cleaning of Main Brush and Floor brush
5.6 Cleaning the Side-brush
3. The main brush and floor
brush can be removed
Completely as indicated.
4. Remove the rubber sleeves
separately from the main brush
and the floor brush.
(Warning: there is a metal
bearing inside the rubber sleeve.
Don’t let it drop out from the
sleeve. If it did, simply insert it
back into the rubber sleeve.)
1. As shown in the figure on the
right clean the main brush and
floor brush with the brush
provided frequently.
2. Hair and other entanglements
may be found on the main brush
or floor blush, remove those hair
or entanglements before re-
install the bushes back into the
cleaner.
1. First, remove the screw from the side
brush with the screw driver provided
2. Secondly, take out the side brush
out and remove the hair or
entanglements if any is observed.
3. Lastly, install the side brush back onto
the cleaner tightened the screw with the
screw driver provided.
5.7 Cleaning the Wheel
5.8 Cleaning the Sensor
Clean the front wheel and left & right wheels with the dust brush frequently.
(Note: The wheel spindle may be entangled by hair and cloth strips. If it does
happen, remove them immediately.)
There are a total of 3 infra-red sensors installed in the bottom of the cleaner
and a laser emitter in front of the cleaner. These sensors are used to prevent
the clean from fall off from the staircase or used to navigate. However, dust
may build up in those areas. Use a piece of clean cleaning cloth and wipe off
the dust in the area as indicated in the diagram.
Prod
uct Maintenance
Prod
uct Maintenanc
e
Rubber Sleeve
Bearing
Rubber Sleeve
Laser Sensor
Ground Detection Sensor
18
19

6. Product Trouble Shooting
6.1 Error Message
Warning: 1. Error code will appear on the display seen on top of the cleaner should the cleaning cycling is interrupted
unexpected.
Product Trouble Shooting
Troublesh
ooting
Tips: If the corresponding failure indicated above can’t be solved by the remedies or solution suggested, contact
customer service personnel immediately.
Error Code
E001
E002
E003
E004
E005
E006
E007
Related Error Message Possible Causes
Remedies
Note
Ground detection failure. 1. The sensor is blocked.
2. The cleaner is stuck.
1. Clean the ground detection sensor with a
clean cloth.
2. Relocate the cleaner from area stuck manually.
Clean the sensor frequently.
Main or Floor brush
failure.
1. Either one of the brush
is jammed.
2. The brush may be
tangled up with hair or
fabric from carpet.
Remove the brush according to the steps as
seen in section 5 and remove the unwanted
matters.
Clean and maintain the
brushes frequently.
Battery low warning.
1. The cleaner can
’
t
work normally.
2. It can
’
t charge
automatically.
Conduct the manual charging by placing the
cleaner on charging base
The cleaner can
’
t automatically
return to the case because the
battery power reserve is too
low.
Right wheel failure.
1. The wheel is jammed.
2. The wheel may be
tangled up with hair or
fabric from carpet.
Check the right wheel and remove the
entanglements on the right wheel.
Clean and maintain the wheels
frequently.
Dust box faults:
Motor faults due to poor
contact
1. The dust box is not
mounted properly.
2. The dust box is not
contacting with the
cleaner well.
1. Remove the dust box and install it back into
the cleaner.
2. Check the installation of the dust box.
Ensure that the dust box is
properly installed after
emptying the dirt and dust
The cleaner is off from
ground.
1. The cleaner is lifted up.
2. The front wheel is
elevated excessively.
Slow put the cleaner back onto the ground.
Clean the dust box first before
lifting the cleaner off from the
ground.
Side brush is jammed.
The side brush may be
tangled up with hair or
fabric from carpet.
Check the side brush and remove foreign
matters.
Replace the excessively worn
side brush with a new one if
needed.
6.2 Common Issue or Problem
1
2
3
4
5
6
Issue
Problem
Solutions
The vacuum cleaner always goes
backward during operation
1. Prevent the cleaner from working in the glare environment.
2. Prevent the cleaner from being used on the dark-black carpet.
3. Check if the ground detection sensor are covered with dirt including dust.
If so, please clean it with a piece of dry cloth.
The cleaner won
’
t start up.
1. Check the ON/OFF switch of cleaner and should be ON and the indicator for
charging should be lilted up.
2. Check if the cleaner is powered ON and start to charge it first.
The cleaner can
’
t charge
automatically.
1. Check if the charging stand is powered up and well connected to the wall outlet.
2. Check if there are obstacles between the cleaner and the charging base.
3. Charge the battery manually if the power is low.
The cleaner can
’
t communicate
with APPS.
1. Check if the latest version of the APPS is installed or not.
2. Check the cleaner and iPad or mobile it they are connected properly or not
wirelessly.
The cleaner will stop after working
for a short period of time.
1. Check if the cleaner started up with “SPOT Cleaning” mode.
2. “SPOT Cleaning” mode works 3-5 minutes per cycle.
The cleaner can’t be charged.
1. Check if the adapter is an original provided and verify if the cleaner is connected
with the power supply or not.
2. If the cleaner is found broken or damaged, stop using the cleaner immediately
and contact customer service for follow up.
20
21

7. Product Specifications
8. APPS Installation
Note: inxni Reserve the right to change any wording; update the technology, design of product without advance notice.
Functional Parameters of Main Body
Functional Parameters of Parts
Operating Voltage
14.8 V DC
Power Adapter
Rated Power
24 W
Output Voltage
18V DC
Battery
Lithium Battery
Output Current
Battery Capacity
2600mAh
Charging Time
About 3-5 hours
Charging Base
Operating Time
60 minutes(Area 1290 FT²/ 120
㎡)
Input Voltage
Noise
65dB
N.W.
3.5kg
Dimensions
340*340*90mm
1000 mA
18V DC
Prod
uct Specifications
APPS
Installation
Tips: APPS may lose connection when the device is far from the mobile phone or ipad due to the network WiFi signal quality
of home. If the signal is weak, check or improve the WiFi signal before reconnecting it
8.1 How to download APPS?
Scan the two-dimensional code seen on the Sales packaging or locate the APPS from the related APPS store for
downloading.
8.2 How to install APPS?
Search and download “inxni”.
Install APPS and register a new account and connect the machine as prompted.
8.3 How to use APPS?
Initiate the APPS icon and turn on the power switch of the cleaner
Initial Step:
Click “START SETUP WIZARD” and enter the screen as show in the following figures.
Start the next step by clicking “Refresh”.
22
23
Message
Battery
No cleaner is found nearby,pls
confirm your cleaner is opened.
Refresh

Next Steps
Click “Refresh” and the Cleaner AP address will appear.
Click “CONNECT” after selecting the Cleaner AP address
first and then enter the password of the Cleaner in the area
shown in figures below (note that each Cleaner has its own
unique label).
Click “NEXT” TO ENTER THE NEXT STEP / PAGE.
Select “OK” as shown in the figure below and start
the next step after entering the password for connection.
APPS Installation
APPS Installation
Click “RETURN” on the mobile phone or pad as shown
in the following figures
Enter the next APPS operating phase by clicking “OPEN MAP”
as shown in the following figures
The operation interface of APPS is shown as the following
figures.
24
25
Message
Battery