Full Text Searchable PDF User Manual
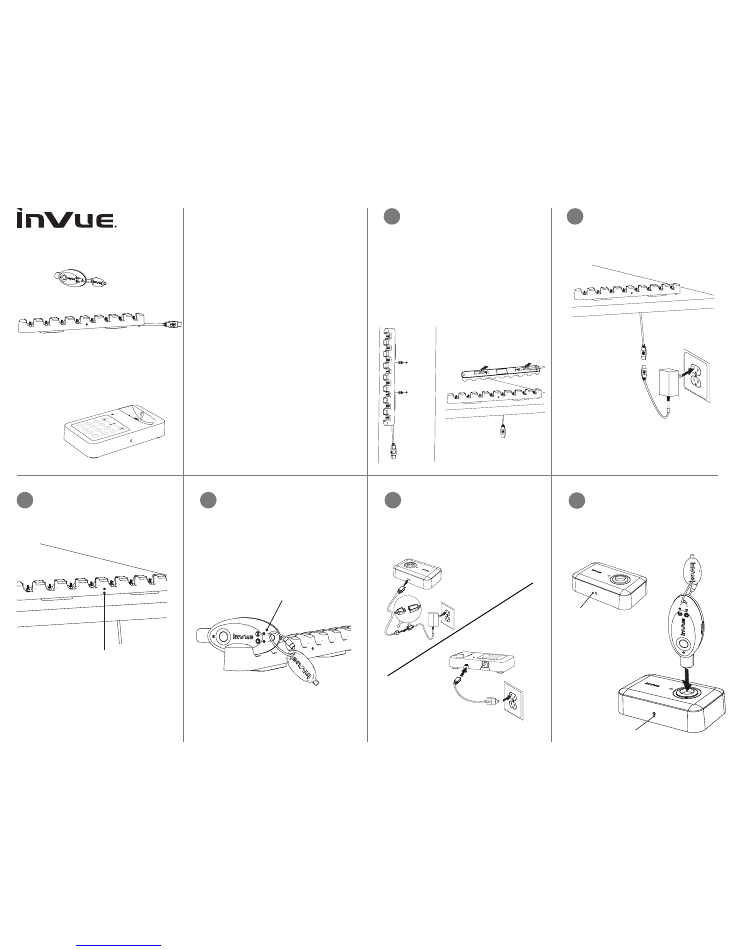
Charger Mounting Options
Screw Mount:
Drill two screws
provided into fixture 5” (128 mm)
apart (horizontally or vertically). Hang
charger on screws using holes on
back of charger.
Adhesive Mount:
Remove liner from
adhesives on bottom of charger.
Press and hold charger to fixture for
10 seconds.
Connect cable components of power
supply. Plug 5.3 USB-A power supply
into charger and outlet.
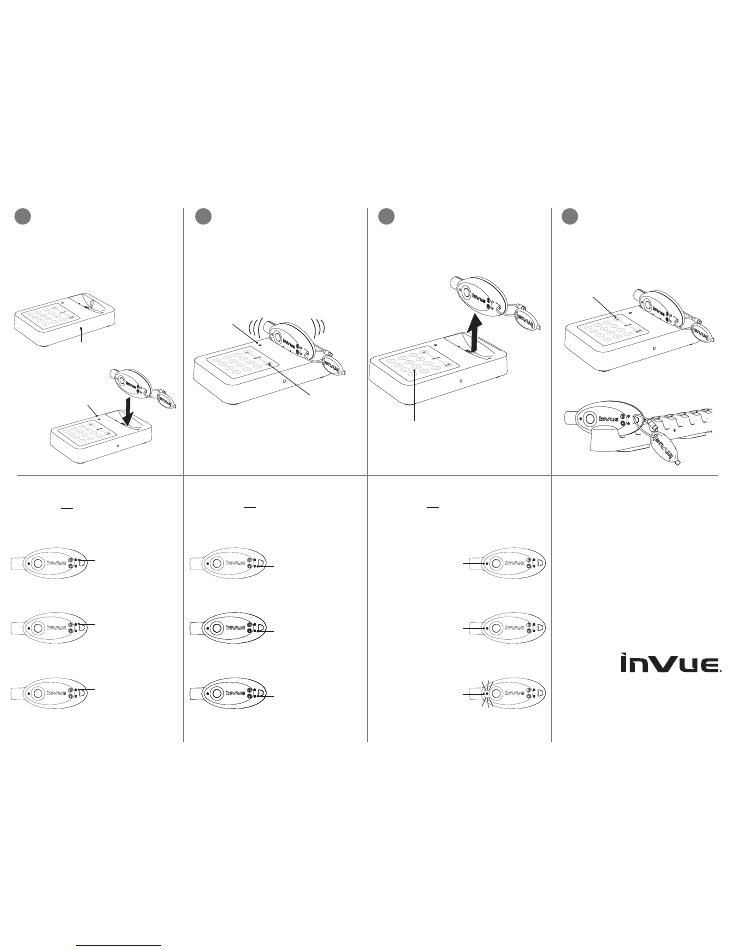
Fully charge key.
Note:
Charger may
take several seconds to recognize
inserted key. Once key has been
recognized, battery indicator will light
up. A completely depleted battery may
take up to 3 hours to reach full charge.
Confirm green LED is on. If
green LED is not on, confirm
power is getting to charger.
Plug power supply into outlet and IR2
Programming Station (PK4401) or Key
Authorization Station (AK4408).
Note:
For auditing and zoning capabilities,
refer to InVue Access Manager
installation.
IR3 Key
AK4400
IR3 Charger
AK4408
1
2
3
4
System Components
1. IR3 Key (AK4400)
2. IR3 Charger (AK4408)
3. IR2 Programming Station (PK4401)
or Key Authorization Station (AK4401)
4. Power Supply for Programming Station /
Key Authorization Station (KAS)
5. Power Supply for Charger
System Overview
IR3 Keys need to be reauthorized after each
charge. The IR3 Key is compatible with
either the IR2 Programming Station or the
Key Authorization Station. For auditing and
zoning capabilities, use the Key Authorization
Station with InVue Access Manager. Refer
to installation of InVue Access Manager for
programming instructions.
Battery Warnings
› Key contains a lithium-ion battery
› Battery is not replaceable
› Entire device should be recycled at an
approved center for rechargeable batteries
› Do not immerse in water
› Do not place in fire or heater
› Do not disassemble, puncture or pierce
5
Green LED
BATTERY INDICATOR
Flashing RED = Charging
Solid GREEN = Charged
For use with IR2 Programming Station,
confirm green light is on and constant.
If green light is not on, confirm power
is getting to programming station.
momentarily.
6
Key Authorization Station
AK4401
Once key has been fully charged,
place key on IR2 Programming
Station. Press button on IR3 Key
and wait for “beep”.
Note
: If double
“buzz”, then a programming error
has occured. Try again.
BLUE = Valid Activation
RED = Programming Error (try again)
GREEN LIGHT
ORANGE
= 1 hour or less
of activation time remaining
(return to Key Authorization
Station soon)
Remove key. Key is now activated for
12 hours of use.
Note:
An unlimited
number of keys can be authorized by
a single Key Authorization Station.
If key was checked out at beginning
of shift, check back in at end of shift
to de-authorize.
Return key to charger at the end of
each shift.
For use with Key Authorization
Station, once purple LED is no longer
flashing, press “OUT” button.
Note:
If key makes a double “buzz,” then
a programming error has occurred.
Remove key and try again.
8
9
© 2016 InVue Security Products Inc. All rights reserved.
InVue is a registered trademark of InVue Security Products.
SD0328 Rev1 05/12/16
www.invue.com
NA / LATAM
// 704.752.6513 • 888.55.INVUE
EMEA
// +31.23.8900150
APAC
// +852.3127.6811
7b
“BEEP”
Blue LED will
confirm valid
activation
Press
button to
check out
Refer to installation of
InVue Access Manager for
programming instructions
Press button
to check in
BATTERY INDICATOR LIGHTS
(When key is
out
of KAS)
ACTIVATION LIGHTS
(When key is
out
of KAS & button is pressed)
POWER LIGHTS
(When key is
out
of KAS & button is pressed)
BLUE
= Activated and
can provide power
RED
= Not activated or
battery too low for wire-
less devices. Check other
LED’s for activation time
or battery charge level.
Flashing PURPLE
=
Unlocked cabinet
reminder or error “buzz”
GREEN
= More than 1
hour of activation time
remaining (continue use)
RED
= Deactivated
(return to Key
Authorization Station
immediately)
If LED is
GREEN
when
button is pressed, the
battery is good (continue
use).
If LED is
flashing
ORANGE
, the battery
is low (return to Key
Authorization Station soon).
If LED is
RED
when button
is pressed, the battery is
too low for use (return to
Key Authorization Station
immediately).
For use with Key Authorization
Station, confirm green light is on
and constant. If green light is not
on, confirm power is getting to Key
Authorization Station. Once key has
been fully charged, place key on Key
Authorization Station. LED will flash
purple momentarily.
7a
Green LED
Flashes purple
when key is
first inserted