Full Text Searchable PDF User Manual
S5 SUPPLEMENTARY MANUAL

1
INTRODUCTION
Welcome to the
Cervélo
family, and congratulations on your purchase of the fastest road bicycle ever produced.
With 20 years of aerodynamic research driving it, the S5 remains the most advanced aero-road bicycle ever developed by
Cervélo
. Engineered to exceed the
performance needs of the most demanding elite riders, and designed to integrate seamlessly with the latest trends in equipment, we are proud to offer unprecedented
combinations of versatility and high performance.
This document has been prepared to guide you through the set-up of the unique features of the S5, but is intended only as a supplement to the assembly instructions
offered by your component manufacturer.
TABLE OF CONTENTS
Introduction ......................................................................................................1
Features diagram .............................................................................................2
Getting started .................................................................................................3
Fork ...............................................................................................................3
Derailleur cables ............................................................................................3
Rear brake ........................................................................................................9
Replaceable Rear Derailleur mount ................................................................10
Installing Internal Battery ................................................................................10
2
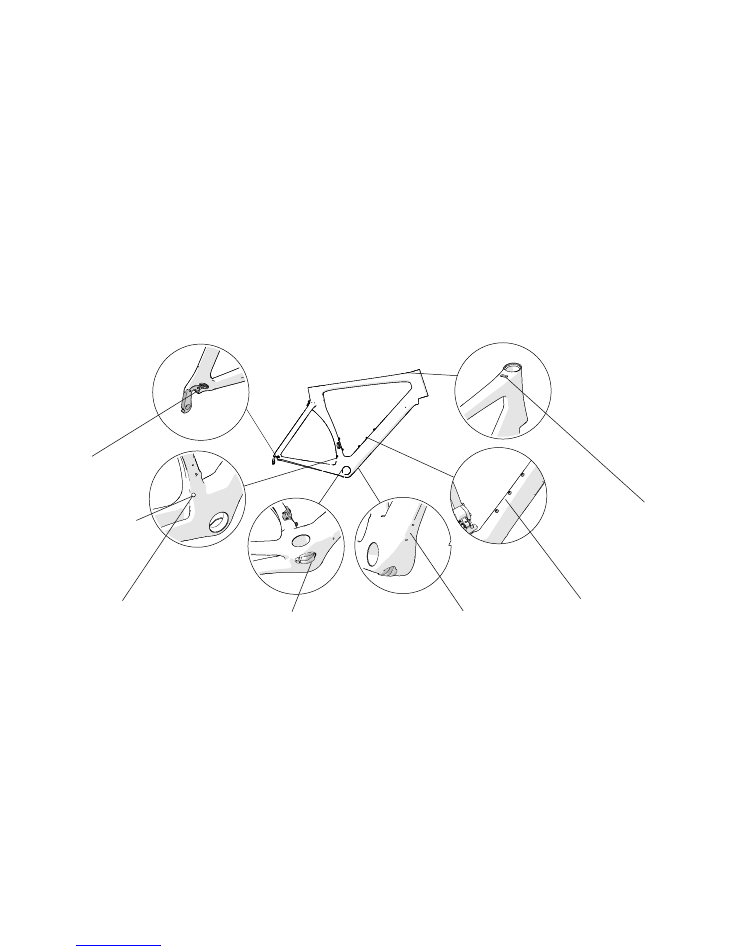
FEATURES DIAGRAM
A guide to your
Cervélo
S5
Rear dropout cable exit
Mechanical front derailleur
cable exit hole
Electric front derailleur
wire exit hole
Single bend cable guide
External battery
mount hole
Multi-position Downtube
bottle mounts.
Top tube internal cable ports

3
GETTING STARTED
Fork
Before fitting and installing your fork, please consult the included
Cervélo
Fork Installation manual, and familiarize yourself with the correct assembly procedure.
Along with the guide, you will find the
Cervélo
bond-in compression plug and sleeve, two-part epoxy, and cleaning materials. When cutting to length,
Cervélo
requires that the Steerer tube is held using the appropriate saw guide for threadless steerer, and cut using a carbon specific blade only. To ensure rider safety, the
inside of the fork should be properly cleaned before the bond-in compression plug is installed, and the epoxy is allowed to cure.
Derailleur cables
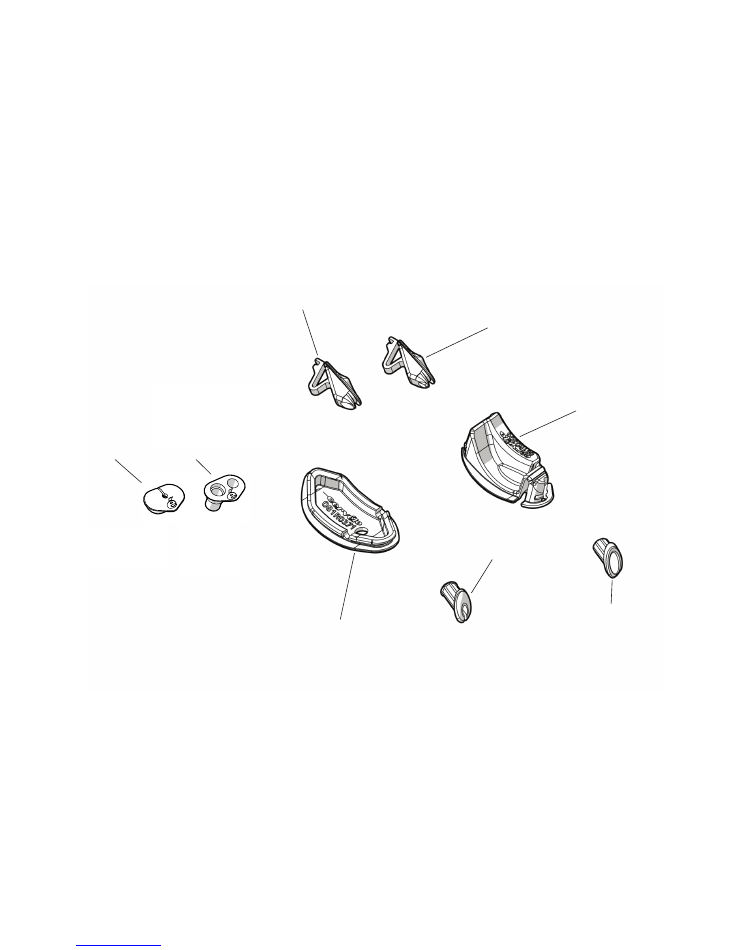
Designed to accommodate electronic, mechanical and hydraulic controls, the S5 frame has been engineered to provide seamless integration of all shifting systems,
regardless of method or brand. In order to do so, you will require the parts shown on the following page:
4
Rubber electric wire
guide for rear dropout
(GR-DROPOUT-GUIDE)
Top tube Rubber blanking
plug for battery wire hole
(GR-TTFILL-S5D)
Top tube cable stop
(ICS4-S5D)
Mechanical shifting and
brake click-in cable stops
(CBS-TTC—TT-MECH)
Hydraulic hose click-in guide
(CBS-TTC-TT-HYDR)
Reduced friction cable guide
(BBG-R-2013)
Press-In cable stop for
rear dropout
(CBS-DRPOUT)
Rubber blanking plug
for BB access port
(GR-BB-GUIDE)
5
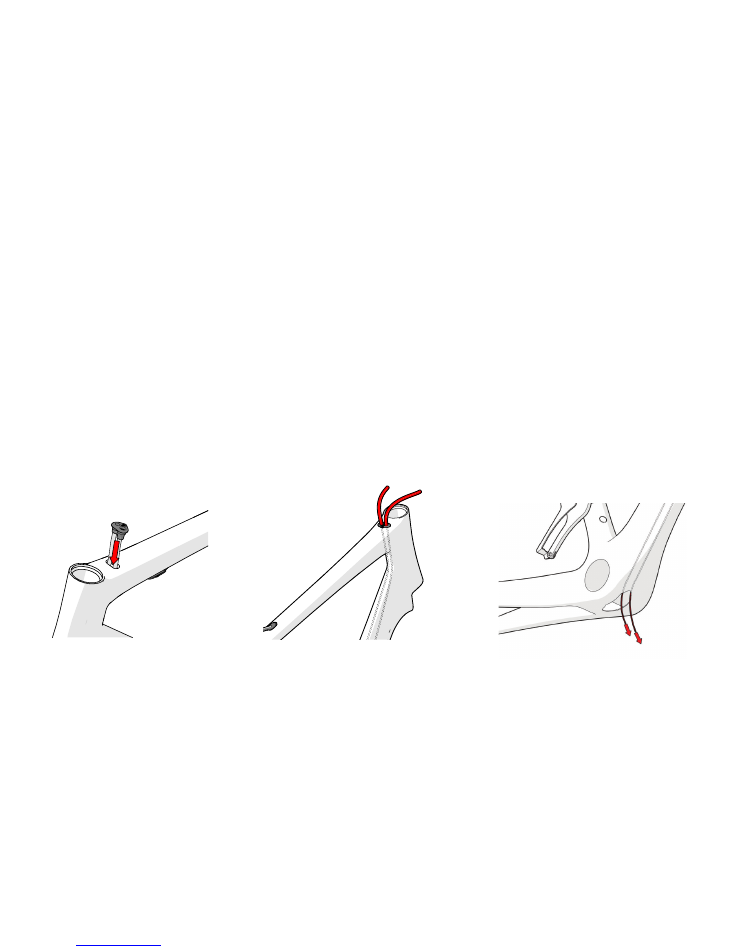
5a
5b
Mechanical
Front and rear derailleur cables should be assembled with the rear housing inserted into the drive-side port of the top tube cable stop, and the front housing in the
non-drive side cable port (with rocket-adjuster installed). The housing should be long enough that it passed in a smooth arc from the lower back of the bar, over the
stem cap, and enters the top tube cable stop perpendicular to the top tube. The housing stops in the cable stop, with the cables continuing into the frame though
the plastic straws provided.
Connect the cables to derailleurs and adjust as per manufacturer's instructions
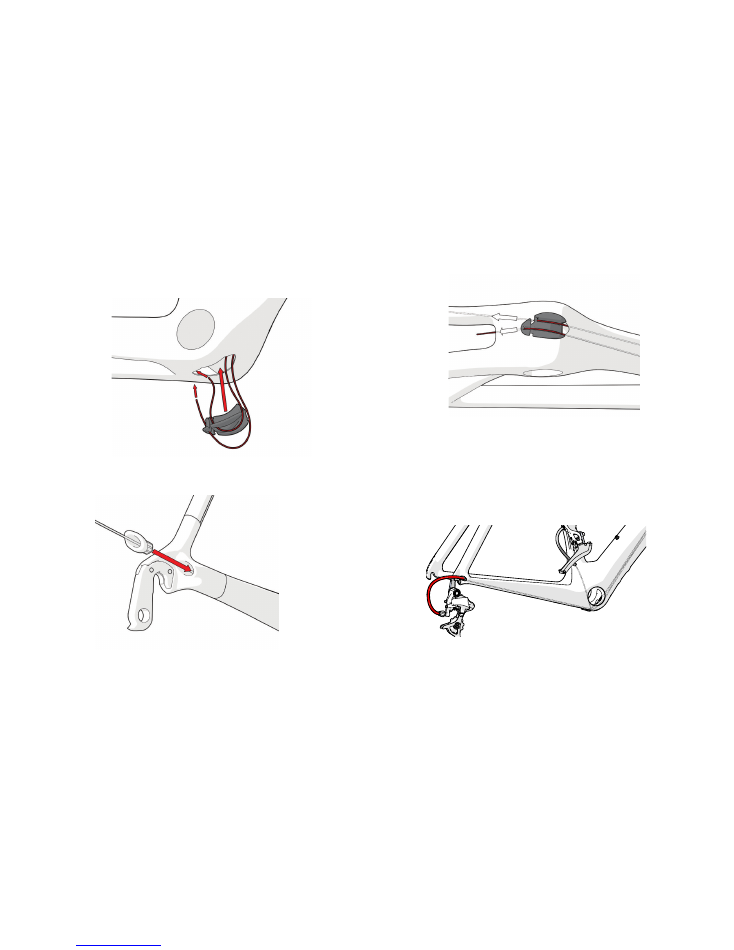
Clip in top tube cable stop
Route housings to cable stop in smooth arc
Route cables into the frame, and out of
bottom bracket. Ensure cables are not twisted
together.
6
6d
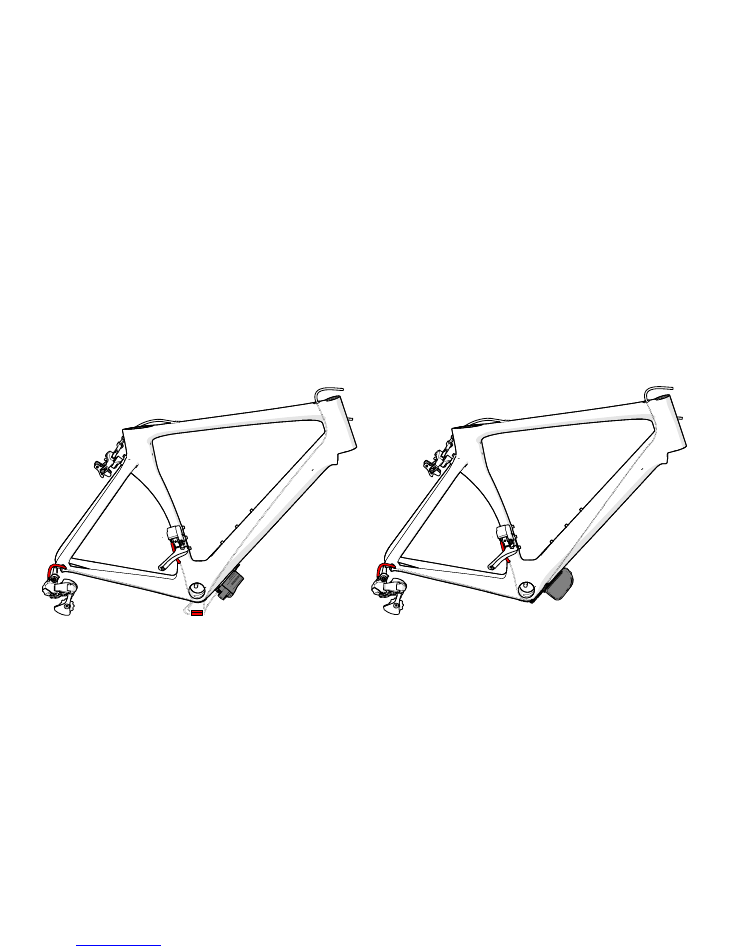
Route cables through BB guide. Front cable crosses the valley.
Feed cables in direction of seat tube and chain stay.
Install chain stay housing stop.
Housing stop is about 8cm farther back, so
use about 8cm shorter housing than normal.
Route cables out of front derailleur and rear
dropout exit holes. Snap BB guide into frame.
7
Electrical
These instructions and pictures are for assembling the Shimano and Campagnolo electronic shifting systems on the
Cervélo
S5, and are intended as a supplement to
the manufacturer’s installation instructions only. Please refer to www.shimano.com, www.campagnolo.com and www.cervelo.com for additional information.
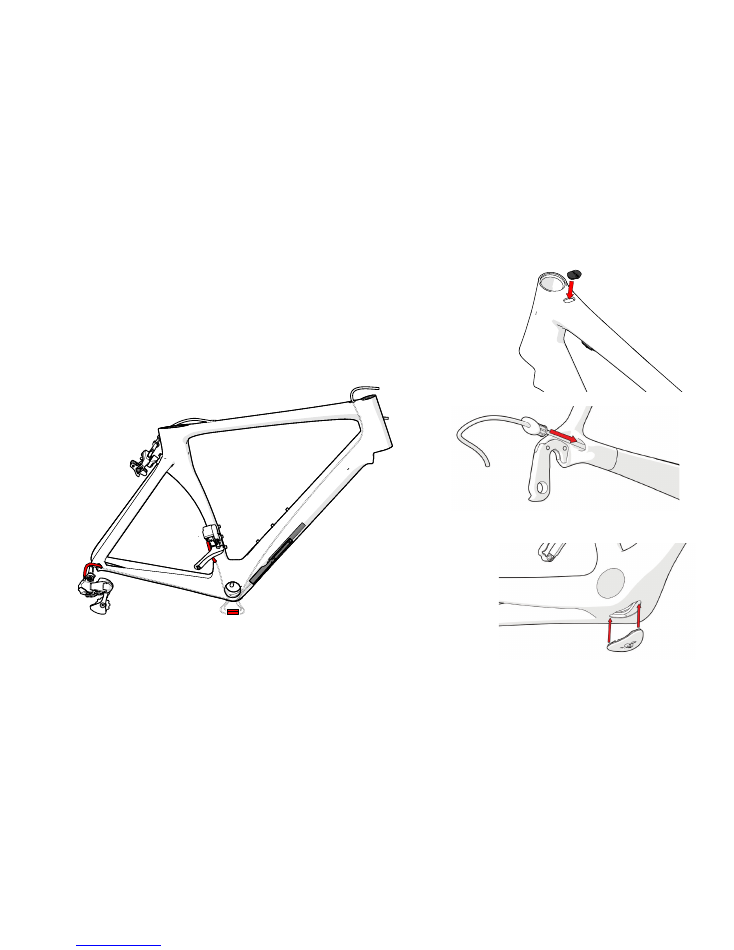
It is recommended to install the electronic system as a first step when building up a bare frame.
Shimano external battery
Campagnolo
7a
7b
8
Insert rubber parts as shown.
Shimano internal battery
Close bottom bracket with the
Cervélo
cover.
8a
8b
9
REAR BRAKE
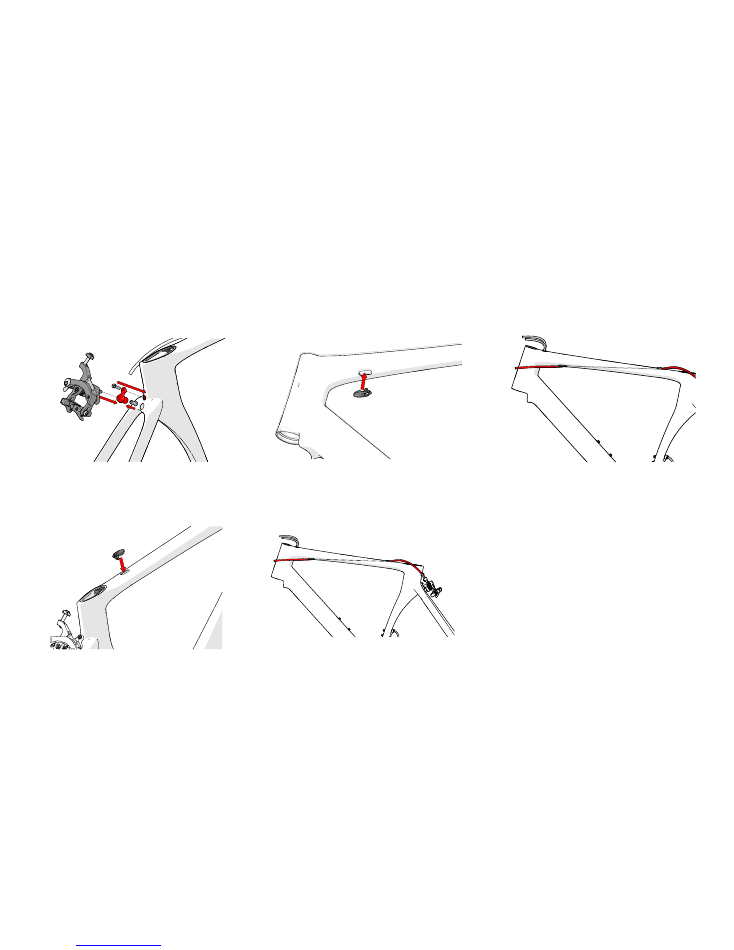
The installation of the rear brake requires the attachment of the S5 brake plate to the caliper, before it can be fitted to the frame.
Install front click-in cable housing stop.
Install caliper to S5 brake plate (size specific) using
10mm fixing nut as per manufacturer’s specifications.
Attach S5 brake plate to frame using lightly greased
M5 fixing screw. Tighten to maximum 4.5Nm.
Install rear housing and adjust brake as usual.
For hydraulic brakes, substitute the appropriate
click-in hose guides. Hydraulic hose guides have a
5mm through hole.
Route brake cable in and out of the top tube.
Install rear click-in housing stop.
9a
9b
9d
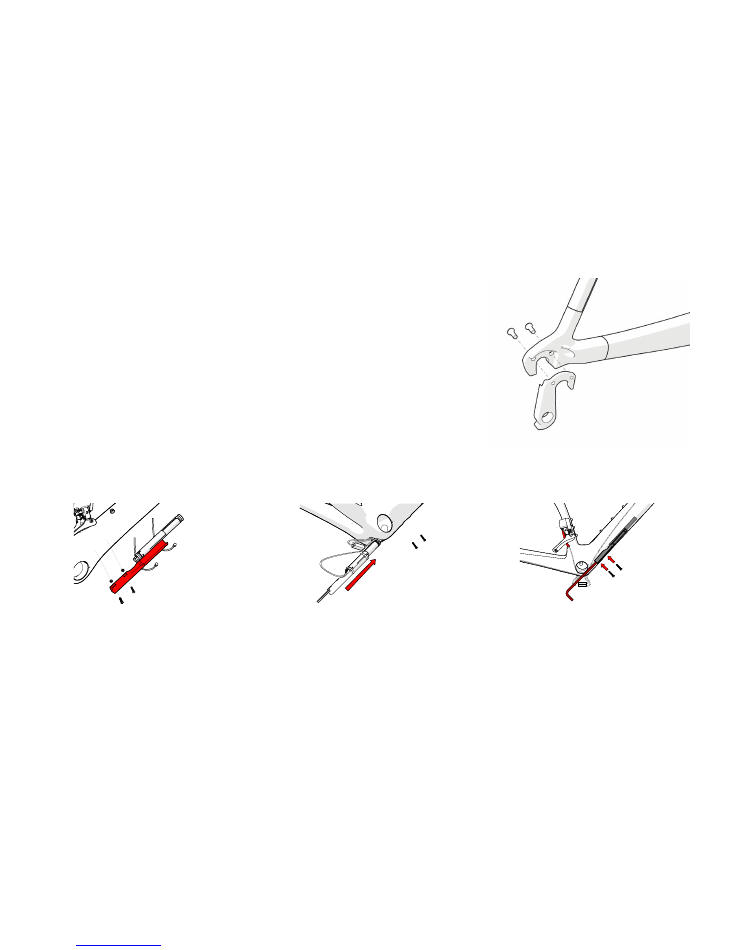
10
Attach battery to mount using 2 zip ties, and install
the two M3 fixing nuts into the holder through the
upper holes.
Apply Loctite 242 to the M3 fixing screws, and pass
them through the mounting holes so that they catch
the fixing nuts in the battery holder. Tighten only
slightly. Remove 5mm hex key. Using 2mm hex key,
tighten fixing screws to maximum of 2.5Nm.
Insert a long 5mm hex key into the lower end of the
battery holder to work as insertion tool. Passing
the battery and holder through the opening in the
bottom bracket shell, locate the battery holder so
that it is inside the down tube, and the fixing nuts are
positioned over the mounting holes.
REPLACEABLE REAR DERAILLEUR MOUNT
Your S5 utilizes a replaceable rear derailleur mount (DRH-R-2012) for simplified service
and extended frame life. In the unfortunate event that replacement is required,
Cervélo
recommends authentic Cerv
é
lo replacement parts be used.
Inspect the frame for damage and ensure the frame is clear of any debris. Apply Loctite 242
to the fixing screws, and tighten the screws equally to a maximum of 2.5Nm. Install the wheel
in the frame, and use a Derailleur Alignment Gauge to align the hanger parallel to the wheel.
INSTALLING INTERNAL BATTERY
The battery for your Shimano Di2 system mounts inside the downtube using a holder (DI-BM-INT-S5D) designed to fit this frame.
Because this is a sealed location, it is important to test the system and install the battery unit, prior to the bottom bracket
Cervélo and Squoval are trademarks used under license by Cervélo Cycles Inc.

www.cervelo.com