Full Text Searchable PDF User Manual
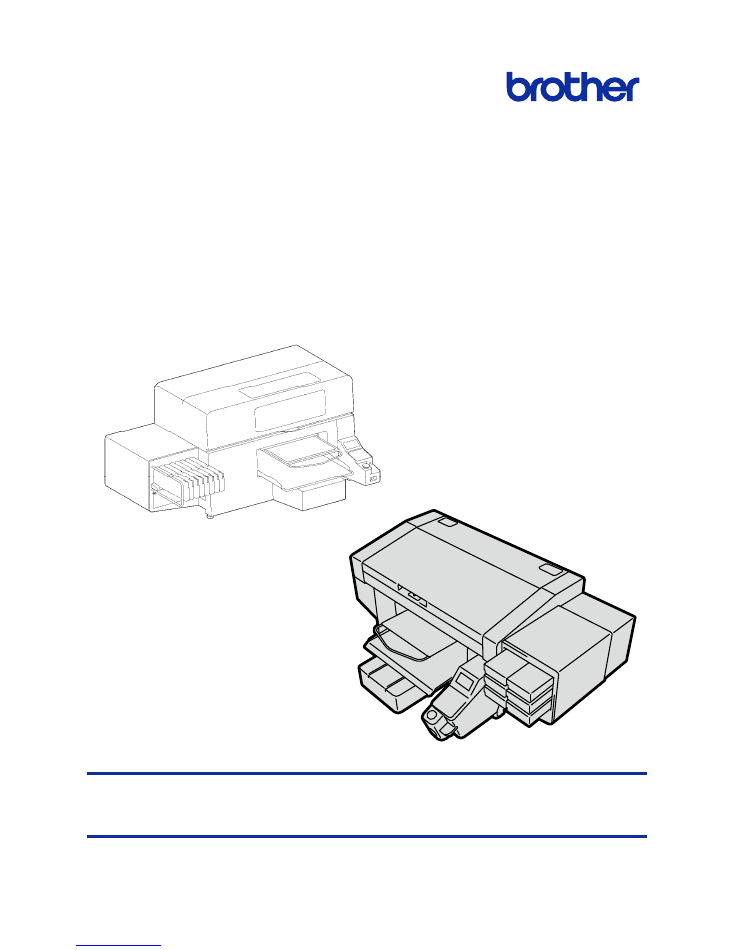
GT-3 Series/GTX-4
GARMENT PRINTER
GTX Graphics Lab
Instruction Manual
(Windows / Macintosh)
Please be sure to read this manual before using this product.
Keep this manual in a safe place for future use.

2
Table of contents
1. Before Using Your Printer for the First Time
3
1-1. Be sure to read the following notes before using the printer ..................................................................................................... 3
1-2. What is GTX Graphics Lab? ...................................................................................................................................................... 4
1-3. Specifications .............................................................................................................................................................................. 4
2. Preparation
5
2-1. Setting up application software .................................................................................................................................................. 5
2-2. Activating GTX Graphics Lab ..................................................................................................................................................... 6
3. Screen display and functions
7
3-1. Using GT Transparency to set RGB=255 to "Transparent color" ............................................................................................. 7
3-2. Structure of GTX Graphics Lab screen ...................................................................................................................................... 8
3-3. Use GTX Graphics Lab to edit text .......................................................................................................................................... 10
3-4. Editing images in GTX Graphics Lab ....................................................................................................................................... 14
3-5. Creating print data (AR3/ARX4 file) from GTX Graphics Lab ................................................................................................. 16

3
Before Using Your Printer for the First Time
1
1-1. Be sure to read the following notes before using the printer
Keep in mind the following points before using the application.
About display screen images indicated on this document
Unless otherwise stated, the display screen images indicated on this document are those images that are
commonly seen in Windows 7 operating environment. Please note, however, that they may vary depending on
OS and use environment.
About trademarks
The names of operating systems described in the main context of this manual are abbreviated. Product names used in
this manual are, in general, trademarks or registered trademarks of their respective developer or manufacture. However,
in this manual, the ® marks or TM marks are not used.
Brother logo is registered trademark of Brother Industries, Ltd.
Apple, Macintosh, Mac OS, iOS, OS X, Safari, iPad, iPhone, iPod and iPod touch are registered trademarks of Apple Inc.
in the United States of America and other countries.
The official name of Windows
®
7 is Microsoft
®
Windows
®
7 operating system. (represented as Windows 7 in this
manual) Also, the official name of Windows
®
8.1 is Microsoft
®
Windows
®
8.1 operating system. (represented as
Windows 8.1 in this manual) Also, the official name of Windows
®
10 is Microsoft
®
Windows
®
10 operating system.
(represented as Windows 10 in this manual)
Microsoft
®
, Windows
®
7, Windows
®
8.1 and Windows
®
10 are trademarks and registered trademarks of Microsoft
Corporation in the United States of America and other countries.
Other product and company names mentioned herein may be the trademarks or registered trademarks of their
respective owners.
Information in this document and the specifications of this product are subject to change without notice.
4
Before Using Your Printer for the First Time
1-2. What is GTX Graphics Lab?
GTX Graphics Lab is the software application for creating and saving layout data and print data of the GT-3/GTX-4
printer. Its intuitive operation enables you to lay out images and text and create data. It is also able to create a layout
data that contains the transparent information (
α
channel).
Layout data can be created and saved through the use of GTX Graphics Lab, and data files will be stored in ".gtpl"
format.
In addition, GT-3 or GTX-4 printer driver must be installed beforehand for creating and saving print data.
<TIPS>
The GTX Graphics Lab enables to output both print data for GT-3 (AR3 file) and print data for GT-4 (ARX4 file). When outputting
data for GT-3, job comment can be entered by configuring it on the printer driver. Job comment cannot be specified when
outputting data for GTX-4.
When
both
PDIP
and
GTX Graphics Lab
are available,
GTX Graphics Lab
only should be used. Operating both PDIP and GTX
Graphics Lab at the same time may cause a functional error.
1-3. Specifications
About operating environment
Compatible OS
Windows 7 (64 bit), Windows 8.1 (64 bit), Windows 10 (64 bit) and Mac OS X
10.12 Sierra
Min. operating environment
CPU with 2 GHz or above
RAM with 4 GB or above
Display resolution
XGA (1024 x 768) or higher
About computer-readable image file format
In cases where an image data does
not contain some transparent
information
PNG, JPEG, BMP and GIF
In cases where an image data
contains some transparent
information
PNG only
5
Preparation
2
2-1. Setting up application software
To begin with, install the GTX Graphics Lab's application software "GTX Graphics Lab" onto your PC.
At this stage, do not connect the printer to your PC yet.
<TIPS>
You must log into your PC with administrator privileges.
For any PC onto which the GT-3/GTX-4 printer driver has already been installed, its uninstallation will begin when you perform
the procedures mentioned below.
Then, please reinstall the printer driver by performing the procedures mentioned below.
(1)
Activate the PC.
(2)
Complete all of the current sessions.
(3)
Double-click on the "setup.exe" to execute installer.
<TIPS>
In case of operation on Macintosh, double-click "BrotherGT-3_ver***.pkg" or "BrotherGTX-4_ver***.pkg" to execute the
installer.
(4)
Then, the installation procedures will begin. Follow the on-screen instructions to complete the installation.
(5)
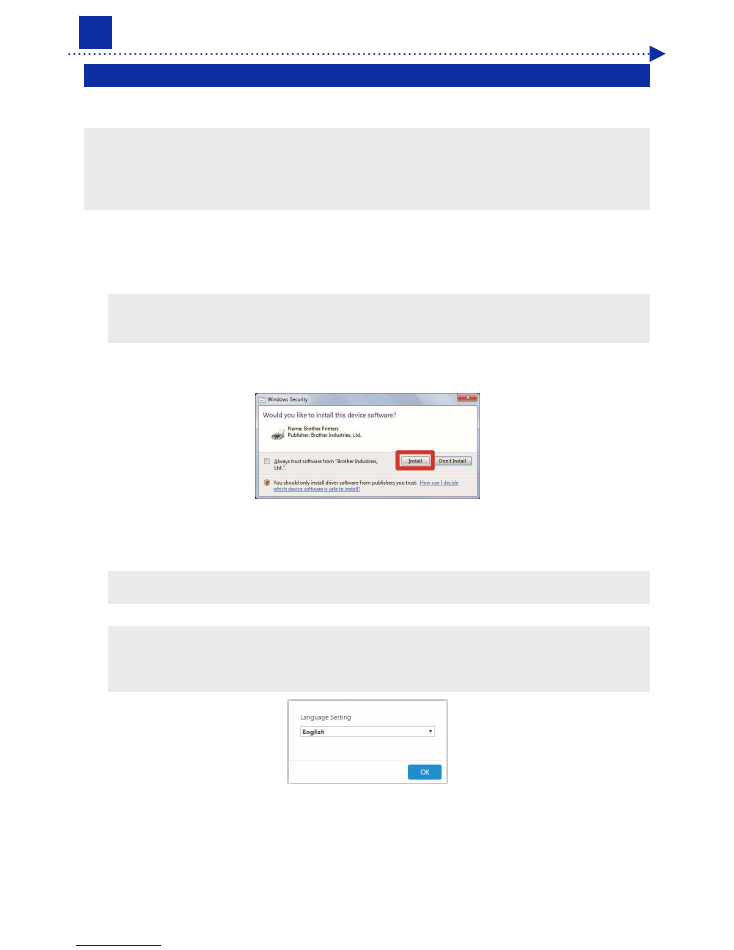
When the dialog box shown below appears, click the [Install].
(6)
After the installation is completed, reactivate the PC.
(7)
From [All Programs] in the Start menu, select the "Brother GT-3 Tools" or "Brother GTX-4 Tools" > "GTX Graphics
Lab".
<TIPS>
For Macintosh, select [Finder] > [Applications] > "GTX Graphics Lab.app".
(8)
Select your language.
<TIPS>
The language selection window appears only at the initial startup. If you exit the application without selecting your desired
language, the language selection window will appear again at the next startup stage.
The display language at the initial startup is English.

6
Preparation
2-2. Activating GTX Graphics Lab
When activating the GTX Graphics Lab, from [All Programs] in the Start menu, select the "GTX Graphics Lab" of
"Brother GT-3 Tools" or "Brother GTX-4 Tools".
<TIPS>
For Macintosh, select [Finder] > [Applications] > "GTX Graphics Lab.app".
To load a layout file, activate the GTX Graphics Lab first, then select the file to be loaded by clicking on [New/Open] >
[Open…].
Although it is possible to activate the GTX Graphics Lab when double-clicking a GTPL file, such file cannot be read out
even if it is correlated to OS.
7
Screen display and functions
3
3-1. Using GT Transparency to set RGB=255 to "Transparent color"
"GT Transparency" is a tool used to treat RGB=255 as "Transparent color" when creating print data in GTX Graphics
Lab.
In case of GTX Graphics Lab, RGB=255 is normally treated as "White", which executes printing in white with white ink.
When treating RGB=255 as "Transparent color", using "GT Transparency" enables you to convert RGB=255 of image
file to transparent and save as PNG file.
This application covers PNG, JPEG, BMP and GIF files.
(1)
From [All Programs] in the Start menu, select the "Brother GT-3 Tools" or "Brother GTX-4 Tools" > " GT
Transparency".
(2)
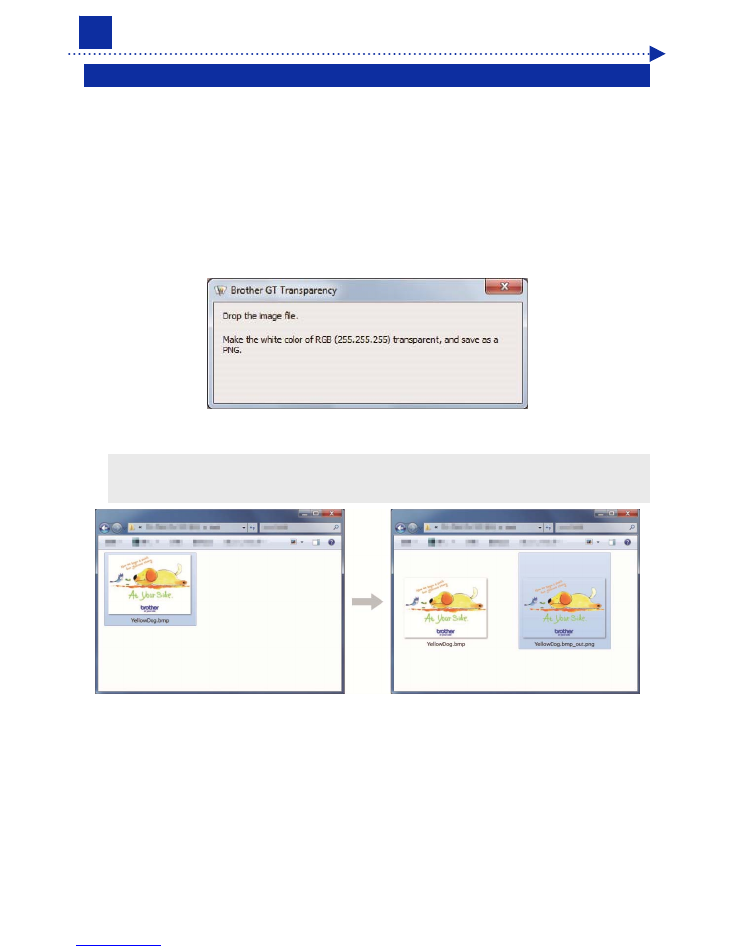
Drop your selected image file in the displayed dialog.
(3)
The PNG file of RGB=255 converted to transparent color is saved in the same layer as the folder where the image
file was stored.
<TIPS>
This application covers PNG, JPEG, BMP and GIF files.
Nothing happens even if files other than above-mentioned are dropped here.
8
Screen display and functions
3-2. Structure of GTX Graphics Lab screen
3
1
4
5
6 7 8
9
10
2
No.
Name
Function
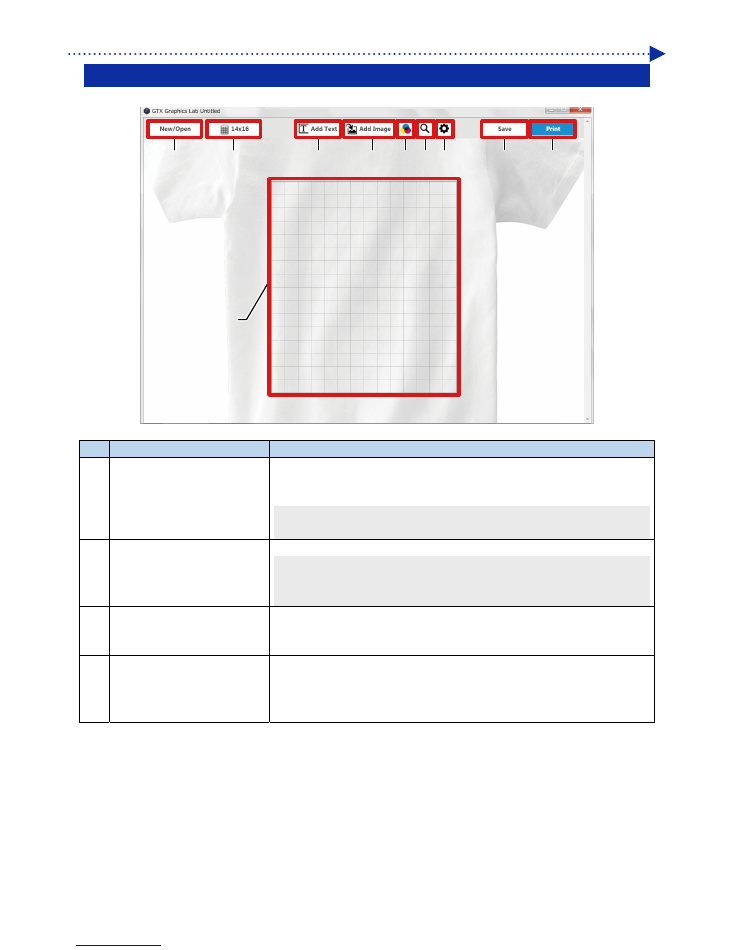
1 [New/Open]
New: With this function, a new layout can be created.
Open: Clicking this causes a layout file which has already been saved to the
system to be opened.
<TIPS>
Even when you have opened a GTPL file as read-only, overwriting is possible.
2
Change Platen Size button
Pressing this button enables you to change the current platen size.
<TIPS>
When outputting data for GT-3, 16X18 platen and 16X21 platen cannot be
selected.
3 Platen
Frame
This will change correspondingly to the Change Platen Size button.
At the time of printing, only such range that is clipped out by means of Platen
Frame will be printed out.
4 [Add
Text]
With this function, enter your desired text within 20 characters, and fix the text
object in it's desired placement.
For details of the editing of a text object, refer to "3-3. Use GTX Graphics Lab to
edit text >>P.10".
9
Screen display and functions
No.
Name
Function
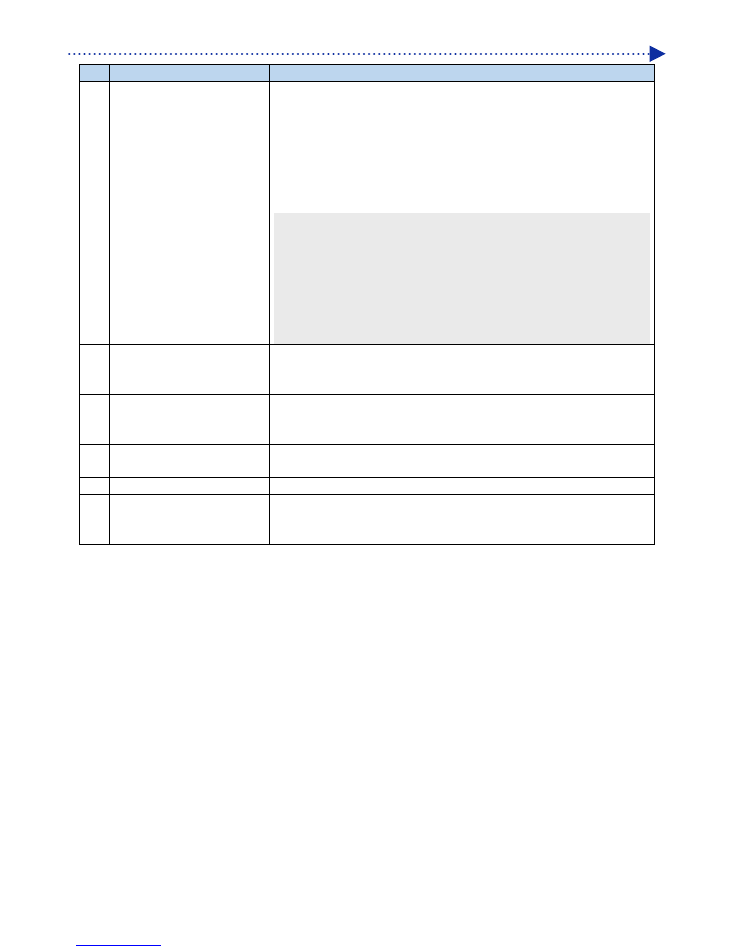
5 [Add
Image]
With this function, select an image file, and place an image object in place by
means of the Open button.
The image formats that GTX Graphics Lab can read out are as follows:
For image data that does not contain any transparent information:
PNG, JPEG, BMP and GIF
For image data that contains transparent information: PNG only
For details of the editing of an image object, refer to "3-4. Editing images in
GTX Graphics Lab >>P.14".
<TIPS>
When you read BMP and GIF files, the maximum size is Width: 4800 px x Height:
5400 px. Images larger than this size cannot be read, and an error message will be
displayed.
RGB=255 is treated as "White". When treating RGB=255 as "Transparent color",
using "GT Transparency" enables you to convert RGB=255 of image file to
transparent. For details, please refer to "3-1. Using GT Transparency to set
RGB=255 to "Transparent color" >>P.7".
6
Change T-shirt Background
Color button
Pressing this button enables you to change the background color of the T-shirt.
By pressing the + button, you can add any optional colors and specify up to
eight colors. When adding the 9th color, the leftmost color is deleted.
7 Print
Preview
The layout is shown under the conditions that the platen grid does not exist and
the entire T-shirt view remains visible. The preview screen will be closed if you
click on a place on the screen.
8 Details
button
After pressing this button, you can confirm a unit of measure, Grid Display, Grid
distance, any change in language setting and version information.
9
[Save]
Select [Save] or [Save As...], and save a layout data in the form of GTPL file.
10 [Print]
With this function, you can make your settings when creating print data.
For details, refer to "3-5. Creating print data (AR3/ARX4 file) from GTX
Graphics Lab >>P.16".
10
Screen display and functions
3-3. Use GTX Graphics Lab to edit text
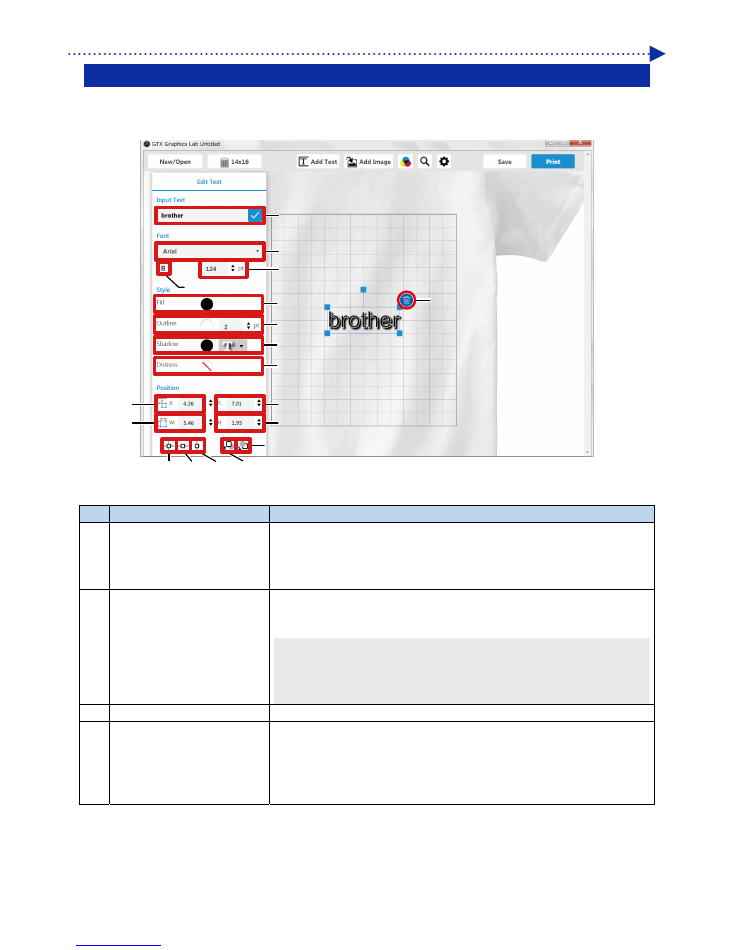
When you select an already placed text object, the text properties appear.
Changing any item inside the properties enables you to edit the text object.
9
11
4
1
3
13 14
18
2
5
6
7
8
10
12
17
15 16
No.
Name
Function
1 Input
Text
With this function, you can change content of the text.
With this function, enter your desired text within 20 characters, and reflect the
entry in the applicable text object by pressing the Enter key or the Accept
button.
2 Font
Using this function, you can change a font type.
Those fonts that have been installed on the PC will appear in the drop-down
listbox.
<TIPS>
Only fonts that are confirmed to be normally usable are displayed. Therefore, some
fonts may not appear in the drop-down listbox even when they are installed on the
PC.
3
Boldface
This function makes the specified font boldface.
4 Font
Size
Using this function, you can change a font size.
When you drag one of the four corners of a text object to zoom it in/out, or
when you change the font width or the font height, the corresponding value
changes accordingly.
The maximum value is 1,300 pt, and the minimum value is 10pt.
11
Screen display and functions
No.
Name
Function
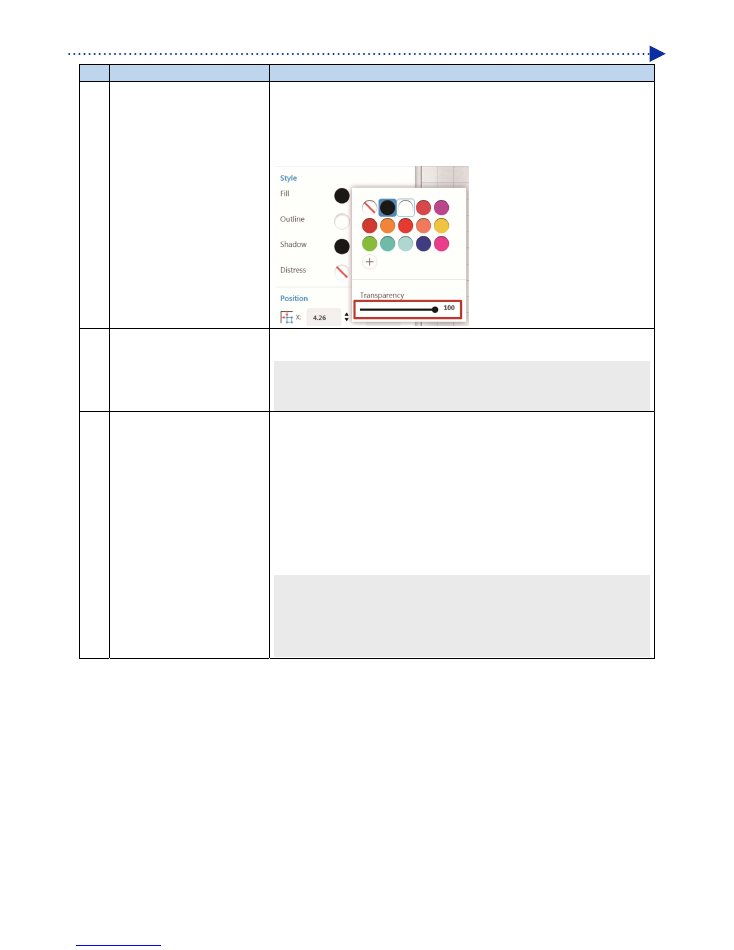
5 Fill
This function enables you to change the fill color for text and the solid filled
transparency.
The transparency can be changed by moving the [Transparency] bar. The
transparency will increase or decrease, as the value increases or decreases.
By pressing the "+" button, you can add any optional colors.
6 Line
With this function, color, transparency and thickness of the outline of text can be
changed.
<TIPS>
If the outline thickness value is too large, the outline may not be arranged along the
font shape, resulting in the collapsing of the shape.
7 Shadow
This function gives a drop-shadow to text. Using this function, you can specify a
shadow color, transparency, position, distance and blurring.
Color: Using this function enables you to change a shadow color.
Transparency: This function changes a shadow transparency.
Position: With this function, you can change a position to which the shadow is
applied. By default, it is set to the lower-right corner.
Distance: With this function, you can change a distance over which the shadow
is applied. As the value increases or decreases, the distance increases or the
object comes nearer to the center.
Blur: As the value increases, the level of blurring increases.
<TIPS>
When text with a shadow is moved, part of the shadow may seem to disappear
from the screen. However, such shadows appear when the text is printed out.
When shadow is applied to a text placed over an object with RGB=255, the area
around the blurring section of the shadow may become white.
12
Screen display and functions
No.
Name
Function
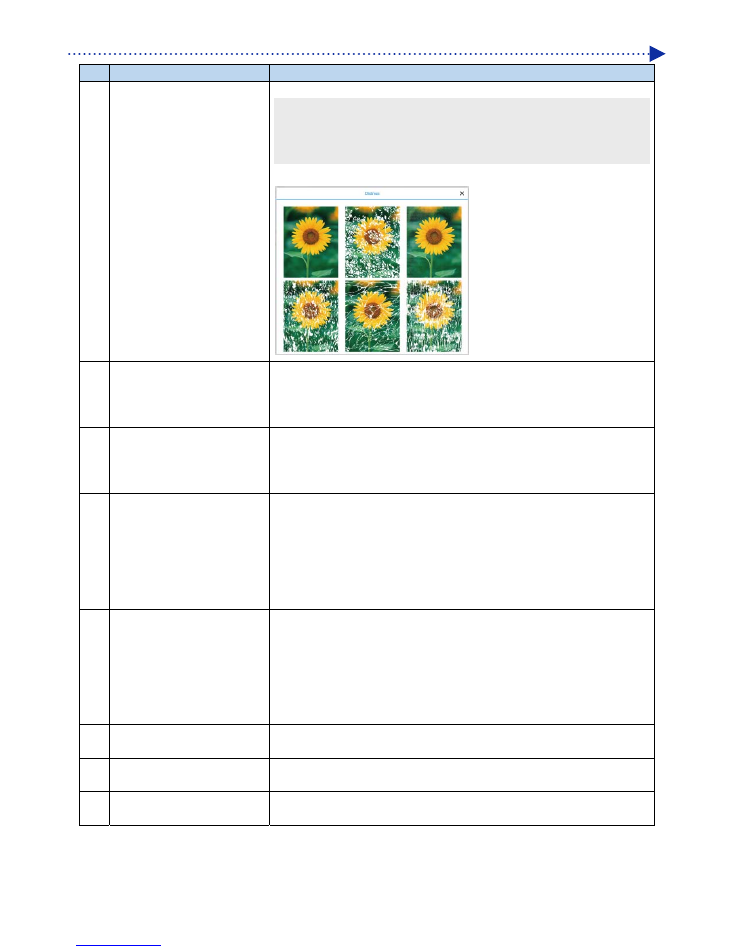
8 Distress
Effect
This function applies Distress Effect to an object.
<TIPS>
The Distress Effect refers to the function that applies some texture pattern to an
object and provides a special effect to the white portion in a sample in such a
manner that such portion will not be printed out.
Select a sample and reflect the special effect on it.
9 Horizontal
Position
With the leftmost part of Platen Frame set to 0, this function enables you to
display and change the horizontal position of an object.
When you drag the object to move it elsewhere, the corresponding value
changes accordingly.
10 Vertical
Position
With the uppermost part of Platen Frame set to 0, this function enables you to
display and change the vertical position of an object.
When you drag the object to move it elsewhere, the corresponding value
changes accordingly.
11 Font
Width
By specifying the width, you can change the font size.
When you drag one of the four corners of a text object to zoom it in/out, or
when you change the font size or the font height, the corresponding value
changes accordingly.
The maximum value is 1,300 pt or an equivalent value, and the minimum value
is 10pt or an equivalent value.
A unit for the values is the one specified by the Details button.
12 Font
Height
By specifying the height, you can change the font size.
When you drag one of the four corners of a text object to zoom it in/out, or
when you change the font size or the font width, the corresponding value
changes accordingly.
The maximum value is 1,300 pt or an equivalent value, and the minimum value
is 10pt or an equivalent value.
A unit for the values is the one specified by the Details button.
13 Centering
This function positions an object at the center of the platen grid in both vertical
and horizontal directions.
14 Vertical
Centering
This function positions an object at the center of the platen grid in a vertical
direction.
15 Horizontal
Centering
This function positions an object at the center of the platen grid in a horizontal
direction.
13
Screen display and functions
No.
Name
Function
16 Bring to the Front
It brings an object to the front.
Among those objects that overlap with the selected object, this function moves
one object to the foremost position in front of the object which is currently
positioned at the front side. However, no change will take place if no object
overlaps with each other.
17 Send to the Back
Send an object to the bottom/back of the overall image.
Among objects that overlap with the selected object, this function moves one
object to the bottommost position behind the object which is currently
positioned at the rearmost of the overall image. However, no change will take
place if no object overlaps with each other.
18 Delete
Click on the recycle bin icon to delete any object.
14
Screen display and functions
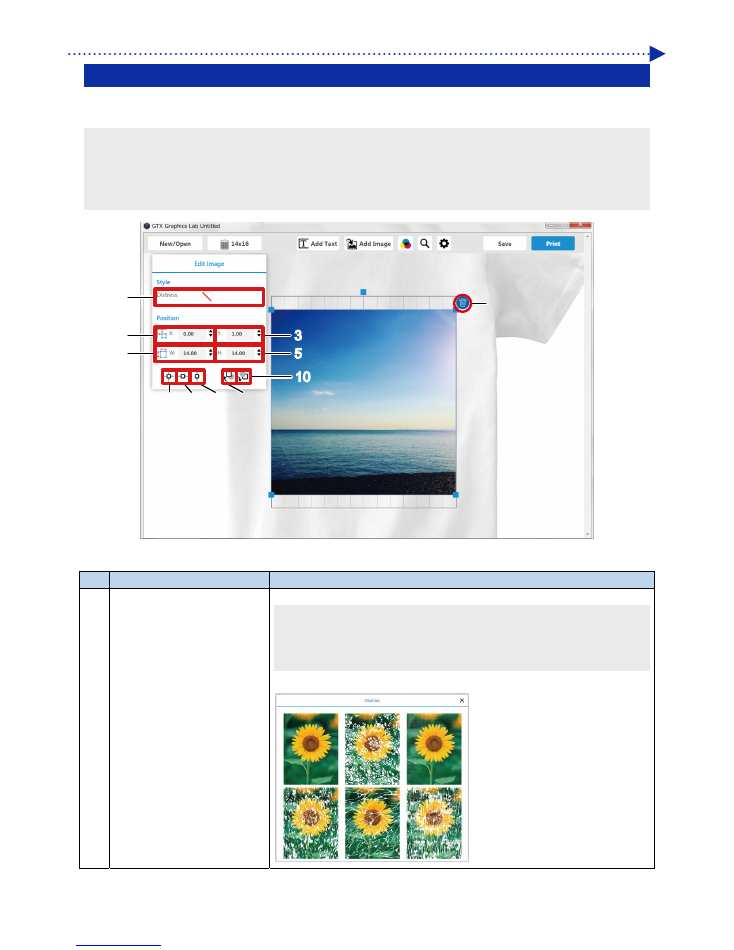
3-4. Editing images in GTX Graphics Lab
When you select an already placed image, the image properties appear.
Changing any item inside the properties enables you to edit an image object.
<TIPS>
When you read an image data, the color profile is deleted. However, it will not be deleted from the source data.
RGB=255 is treated as "White". When treating RGB=255 as "Transparent color", using "GT Transparency" enables you to
convert RGB=255 of image file to transparent. For details, please refer to "3-1. Using GT Transparency to set RGB=255 to
"Transparent color" >>P.7".
1
2
4
6 7
11
8
9
10
3
5
No.
Name
Function
1 Distress
Effect
This function applies Distress Effect to an object.
<TIPS>
The Distress Effect refers to the function that applies some texture pattern to an
object and provides a special effect to the white portion in a sample in such a
manner that such portion will not be printed out.
Select a sample and reflect the special effect on it.
15
Screen display and functions
No.
Name
Function
2 Horizontal
Position
With the leftmost part of Platen Frame set to 0, this function enables you to
display and change the horizontal position of an object.
When you drag the object to move it elsewhere, the corresponding value
changes accordingly.
3 Vertical
Position
With the uppermost part of Platen Frame set to 0, this function enables you to
display and change the vertical position of an object.
When you drag the object to move it elsewhere, the corresponding value
changes accordingly.
4 Image
Width
By specifying the width, you can change the image size.
When you change the image height, the corresponding value changes
accordingly.
The maximum value is 32 inch, and the minimum value is 0.5 inch.
A unit for the values is the one specified by the Details button.
5 Image
Height
By specifying the height, you can change the image size.
When you change the image width, the corresponding value changes
accordingly.
The maximum value is 42 inch, and the minimum value is 0.5 inch.
A unit for the values is the one specified by the Details button.
6 Centering
This function positions an object at the center of the platen grid in both vertical
and horizontal directions.
7 Vertical
Centering
This function positions an object at the center of the platen grid in a vertical
direction.
8 Horizontal
Centering
This function positions an object at the center of the platen grid in a horizontal
direction.
9
Bring to the Front
It brings an object to the front.
Among those objects that overlap with the selected object, this function moves
one object to the foremost position in front of the object which is currently
positioned at the front side. However, no change will take place if no object
overlaps with each other.
10 Send to the Back
Send an object to the bottom/back of the overall image.
Among objects that overlap with the selected object, this function moves one
object to the bottommost position behind the object which is currently
positioned at the rearmost of the overall image. However, no change will take
place if no object overlaps with each other.
11 Delete
Click on the recycle bin icon to delete any object.
16
Screen display and functions
3-5. Creating print data (AR3/ARX4 file) from GTX Graphics Lab
Save the image data and print settings as a set of print data in AR3/ARX4 file format.
The following will be made available if the print data is converted into an AR3/ARX4 file:
Image data and print settings can be put together and stored.
Without connection to PC, the printing can be performed directly from a USB flash memory.
<TIPS>
Image editing is unavailable for any AR3/ARX4 file. As such, save your image data for an editing purpose in advance.
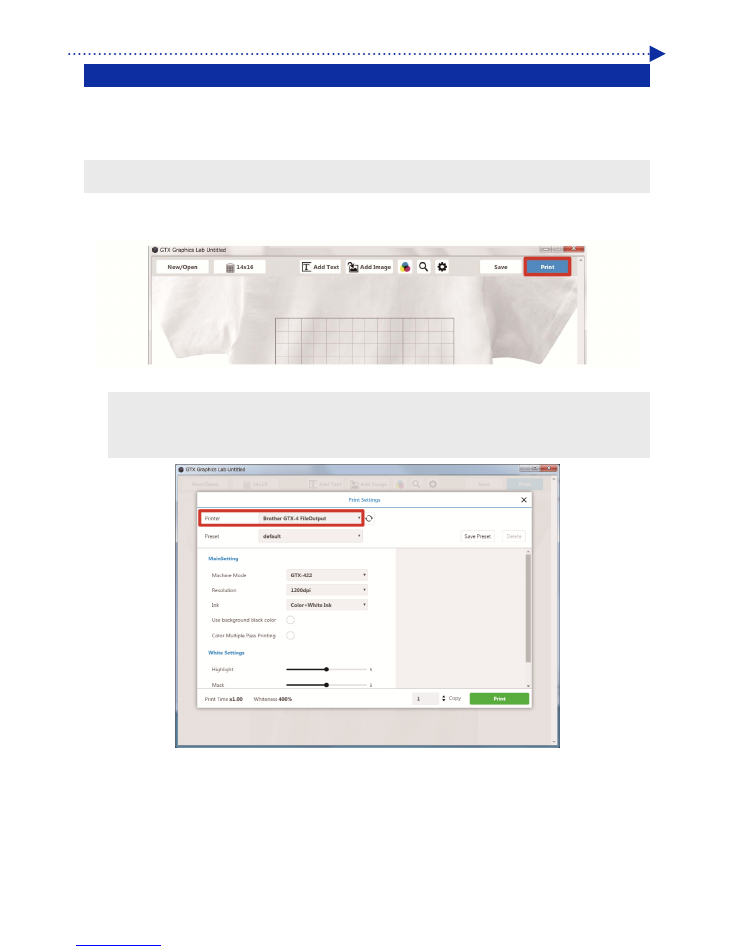
(1)
Open an image data file in GTX Graphics Lab.
(2)
Click [Print].
(3)
From [Printer], select "Brother GT-3 FileOutput" or "Brother GTX-4 FileOutput" for file output.
<TIPS>
If the specified [Printer] is set to "Brother GT-3" or "Brother GTX-4", the print data will be sent to the printer.
If the specified [Printer] is set to "Brother GT-3 FileOutput" or "Brother GTX-4 FileOutput", the print data will be saved as an
ARX3 file or ARX4 file.
17
Screen display and functions
(4)
Make your settings for the printer driver.
<TIPS>
For details of setting printer drivers, please refer to the instruction manual.
Older versions of the printer driver may display an error [A driver of corresponding version is not found. (-1401)]. If so,
please update the driver to the newest version.
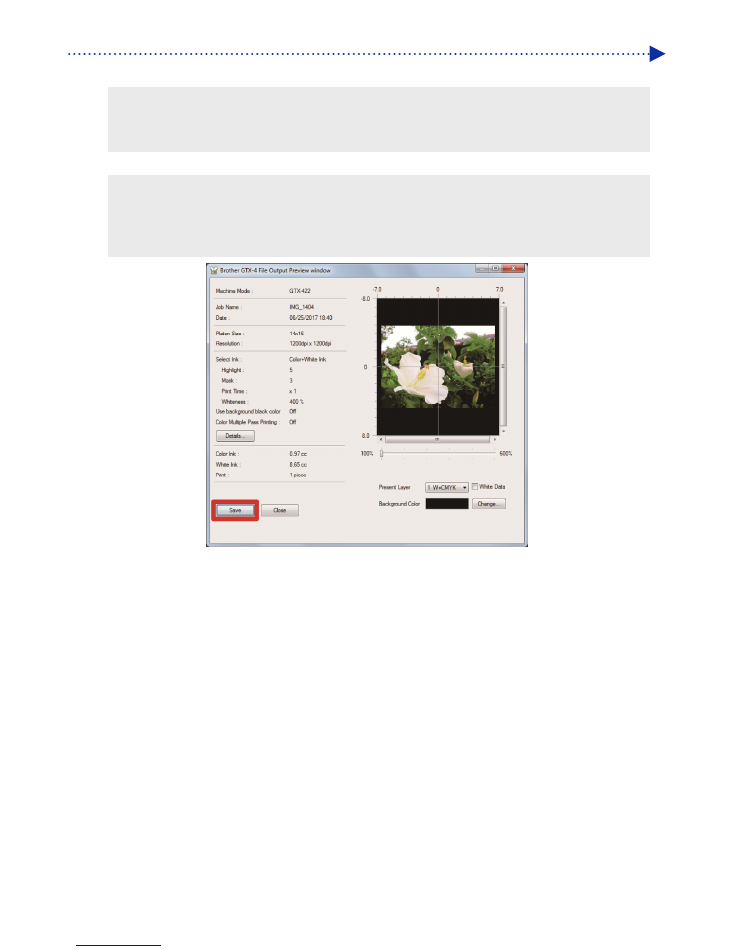
(5)
When you click [Print], the dialog box shown below will be displayed on the screen. After that, click [Save].
<TIPS>
When you use a Macintosh to output a file by means of "Brother GT-3 FileOutput" or "Brother GTX-4 FileOutput", activate
the "GT-3 FileViewer" or "GTX-4 FileViewer" first, then click [Print]. If you try to output and send a file without activating it, an
error will occur and the file cannot be saved to the system.
There may be cases where this saving process takes several minutes.
(6)
Specify the [Save In] and [File name] first, then click [Save] to save the AR3/ARX4 file to your PC.
*Please note that the contents of this manual may differ slightly from the actual product purchased as a result of product
improvements.
http://www.brother.com/
1-5, Kitajizoyama, Noda-cho, Kariya 448-0803, Japan.
© 2017 Brother Industries, Ltd. All Rights Reserved.
This is the original instructions.
GTX-422
I7081164F E
2017.08.F(1)