Full Text Searchable PDF User Manual

GY-NE250RF
REFRIGERATOR
INSTRUCTION MANUAL

Dear customer,
Before placing your new refrigerator/freezer into operation,please read these operating instructions
carefully. They contain important information for safe use, for installation and for maintenance of
the appliance. Please keep these operating instructions for future reference. Pass them on to po-
ssible new owners of the appliance.
Notes: which are important for your safety or for the proper functioning of the appliance, are str-
essed with a warning triangle or with signal words (Warning!, Caution!, Important! ).Please ob-
serve the following carefully.Supplementary information regarding operation and practical applic-
ations of the appliance appear after this symbol.
Tips and notes concerning economical and environmentally sound use of the appliance are marked
with the cloverleaf.
The operating instructions contain instructions for the correction of possible malfunctions by the
user in the section “Trouble shooting”. If these instructions should not be sufficient, contact your
local Service Force Center.
1

Changing
the
light
bulb
............................................
9

Important safety instructions
These warnings are provided in the interests of your safety. Ensure that you understand them all
before installing or using this appliance.Your safety is of paramount importance. If you are unsure
about the meanings of these warnings, contact the Customer Care Department for assistance.
Intended to use
The refrigerator is intended for use in the home.It is suitable for the storage of food at low tempe-
rature. If the appliance is used for purposes other than those intended or used incorrectly,no liab-
ility can be accepted by the manufacturer for any damage that may be caused.
Alterations or changes to the refrigerator are not permitted for reasons of safety.
If you use the refrigerator in a commercial application or for purposes other than the cooling of
foods, the manufacturer accepts no liability for any damages that may occur.
Prior to initial start-up
Check the appliance for transport damage.Under no circumstances should a damaged appliance
be plugged in. In the event of damage, please contact your supplier.
Refrigerant
The refrigerant isobutene (R600a) is contained within the refrigerant circuit of the appliance, a na-
tural gas with a high level of environmental compatibility, which is nevertheless flammable. During
transportation and installation of the appliance, ensure that none of the components of the refrig-
erant circuit becomes damaged.
The refrigerant (R600a) is flammable.
WARNING
—Keep ventilation openings, in the appliance enclosure or in the built-in structure,
clear of obstruction.
WARNING
—Do not use mechanical devices or other means to accelerate the defrosting pro-
cess, other than those recommended by the manufacturer.
WARNING
—Do not damage the refrigerant circuit.
WARNING
—Do not use electrical appliances inside the food storage compartments of the
recommended by the manufacturer.
WARNING
—This appliance is not intended for use by persons (including children) with reduced
physical,sensory or mental capabilities,or lack of experience and knowledge,unless they have
Caution
:
risk
of
fire
If the refrigerant circuit should become damaged:
Avoid open flames and sources of ignition.
Thoroughly ventilate the room in which the appliance is situated.
The instructions shall include the warnings:
3

been given supervision or instruction concerning use of the appliance by a person responsible
for their safety.
WARNING
—Young children should be supervised to ensure that they do not play with the app-
liance.
WARNING
—If the supply cord is damaged, it must be replaced by the manufacturer, its servi-
ce agent or similarly qualified persons in order to avoid a hazard.
WARNING
—When disposing of the appliance do so only at an authorized waste disposal
centre. Do not expose to flame.
WARNING
—Please keep the appliance away from substance, which can cause ignition.
WARNING
—Before obtaining access to terminals, all supply circuits must be disconnected.
Safety for children
Packaging (e.g. wraps, polystyrene) can be dangerous for children. There is a risk of suffocation!
Keep packaging material away from children! Make old appliances unusable prior to disposal.Pull
out the mains plug, cut off the mains cable, break or remove spring or bolt catches, if fitted. By
doing this you ensure that children cannot lock themselves in the appliance when playing (there is
risk of suffocation!) or get themselves into other dangerous situations. Often children cannot rec-
ognize the hazards present in household appliances. It is therefore important that you ensure ad-
equate supervision and never let children play with the appliance!
Daily operation
Containers with flammable gases or liquids can leak at low temperatures.There is a risk of an ex-
plosion! Do not store any containers with flammable materials such as spray cans,fire extinguisher
refill cartridges etc in the refrigerator and/or freezer.
Do not operate any electrical appliances in the refrigerator and/or freezer (e.g. electric ice cream
makers, mixers etc.).
Before cleaning the appliance,always switch off the appliance and unplug it,or pull the house fuse
or switch off the circuit breaker.
When unplugging always pull the plug from the mains socket, do not pull on the cable.
In case of malfunction
If a malfunction occurs on the appliance,please look first in the “Trouble shooting”section of these
instructions.If the information given there does not help, please do not perform any further repairs
yourself.
Under no circumstance should you attempt to repair the appliance yourself.Repairs carried out by
inexperienced persons may cause injury or serious malfunctioning.Contact your local Service
Force Center.
4

Remove transport packaging
The appliance and the interior fittings are protected for transportation. Pull off the adhesive tape
on the left and right side of the door. You can remove any remnants of adhesive using white spirit.
Remove all adhesive tape and packing pieces from the interior of the appliance.
Installation
Installation Location
Before installing, carefully read the instruction in order to avoid a certain number of problems.
Positioning
Position the appliance away from sources of heat such as stoves, radiators, direct sunlight etc.
Maximum performance and safety are guaranteed by maintaining the correct indoor temperat-
ure for the class of unit concerned, as specified on the rating plate. This application perform
well from N to ST. The Appliance may not work properly if it is left for a longer period at a tem-
perature above or below the indicated range.
IMPORTANT!
-There is a need of good ventilation around the fridge for easy dissipation of heat,
high efficiency of refrigeration and low power consumption. For this purpose, sufficient clear
space should be available around the fridge. It is advisable for there to be 75mm separating
the back of the fridge to the wall, at least 100mm of space at its two sides, height of over 100mm
from its top and a clear space upfront to allow the doors to open 160.
Climate class
Ambient temperature
SN
N
ST
T
Appliances must not be exposed to rain. Sufficient air must be allowed to circulate in the lower
rear section of appliances, as poor air circulation can affect performance. Built-in appliances
should be positioned away from heat sources such as heaters and direct sunlight.
+10°C to +32°C
+16°C to +32°C
+16°C to +38°C
+16°C to +43°C
5
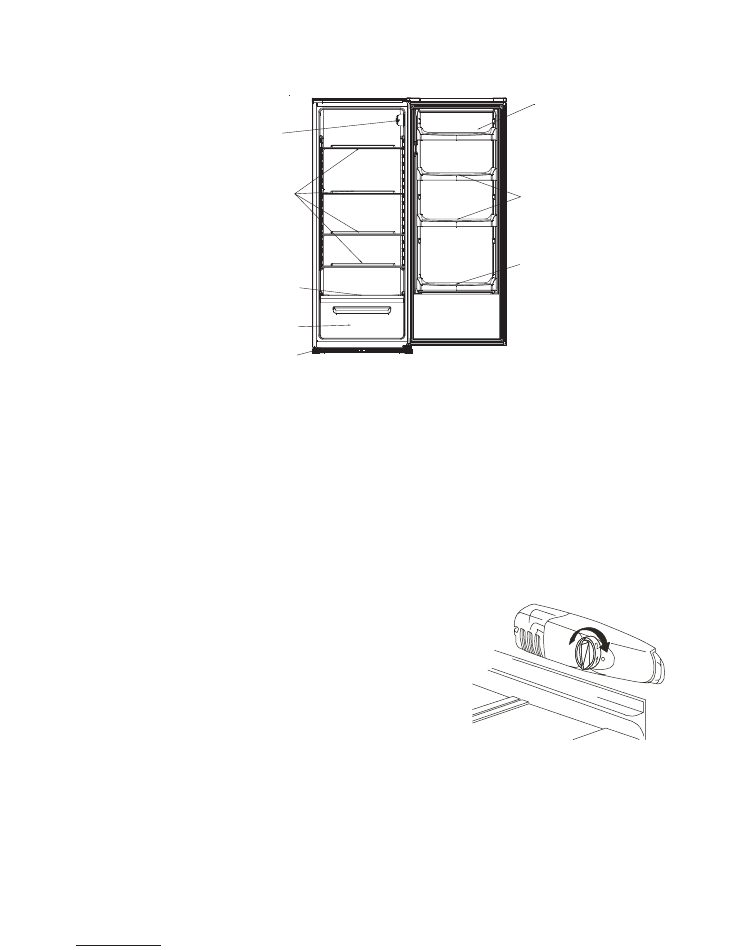
Description of the appliance
View of the appliance
1.Butter/cheese compartments
with flap and egg storage insert
2. Door storage compartment
3. Bottle shelf
4. Temperature regulator
5. Storage shelves
6. Vegetable drawer cover
7. Vegetable drawer
8. Leveling leg
1
2
3
4
5
6
7
8
Starting up and temperature regulation
Insert the plug of the connection lead into the plug socket with
protective earth contact. When the refrigerator compartment
door is opened, the internal lighting is switched on.
The temperature selector knob is located on the RH side of the
refrigerator compartment.
Setting “0” means:Off.
Turning clockwise in direction Refrigerating unit on, the latter
then operating automatically.
Setting “1” means:Highest temperature, warmest setting.
Setting “7” (end-stop) means:Lowest temperature,coldest
setting.
At a low ambient temperature of around 16 °C,setting 1 should
be selected. At ambient
temperatures of around 25 °C,select setting 2. If you require a
lower temperature, select setting 3 or 4.
Note:
Due to unceasing modification of our products your refrigerator may be slightly different from
this Instruction Manual, but its functions and using methods remain the same.
6

1
2
2
3
4
4
5
5
5
6
Important!
Normally we advise you select setting of 2 or 3 or 4, if you want the temperature warmer or colder
please turn the knob to lower or higher setting accordingly.
When you turn the knob to lower which can lead to the more energy efficiency. Otherwise, it would
result the energy-consuming.
Important!
High ambient temperatures (e.g. on hot summer days) and a cold setting on the temperature re-
gulator (position 6 to 7) can cause the compressor to run continuously or even non-stop.
Reason:when the ambient temperature is high,the compressor must run continuously to maintain
the low temperature in the appliance.T
Interior accessories
Various glass or plastic storage shelves and wire trays are included with your appliance -different
models have different combinations. You should always slide one of the full size glass storage sh-
elves into the lowest set of guides, above the fruit and vegetable containers, and keep it in this positio
The height of the storage shelves can be adjusted:
To do this,pull the storage shelf forward until it can be swiveled upwards or downwards and rem-
oved. Please do the same in reverse to insert the shelf at a different height.
IMPORTANT!
– in order to make the most of the volume of the fresh
food storage compartment and frozen-food storage compartment,
the user can removed one or more shelves, drawers, out of the
appliance, according to your daily use.
Correct storage
1.Butter and cheese
2.Preserves
3.Drinks
4.Ready meals, pastries, and preserves
5.Meat, salami, cold cuts, dairy produce
6.Cheese storage, fruit, and vegetables
Tips:
Food in the fridge should always be covered or
packaged,to prevent drying and tainting of other food.
The following are suited for packaging:
Polyethylene airtight bags and wraps,
7

Defrosting
Why defrosting
Water contained in food or getting air inside the fridge b
y
opening doors may form a layer
o
f
frost inside.It will weaken the refrigeration when the frost is thick.
If
it is more than 10mm thick,
you should defrost.
Defrosting in fresh food storage compartment
It is automatically controlled by switching the temperature regulator on or off so that there is no
need of operation of defrosting. Water from defrosting will be drained into a drip tray through a
drain pipe at the back of the fridge automatically.
Warning!
Switching off the appliance.
To switch off the appliance, turn the temperature regulator to position ”0”.
Important!
The fridge should be defrosted at least every one month.During the using process, if the door was
opened frequently or using the appliance in the extreme humidity, we advise the user to defrost
every two weeks.
Cleaning and Care
For hygienic reasons the appliance interior,including interior accessories,should be cleaned regularly.
Warning!
The appliance m
ust
not be connected to the mains during cleaning. Danger of electrical shock!
Before cleaning switch the appliance off and remove the plug from the mains, or switch off or turn
out the circuit breaker or fuse.
Never clean the appliance with a steam cleaner. Moisture could accumulate in electrical compon-
ents,danger of electrical shock! Hot vapors can lead to the damage of plastic parts.The appliance
must be dry before it is placed back into service.
Important!
Ethereal oils and organic solvents can attack plastic parts,e.g.lemon juice or the juice from orange
peel, butyric acid, cleanser that contain acetic acid.
Do not allow such substances to come into contact with appliance parts.
Do not use any abrasive cleansers.
Remove the food from the refrigerator. Store it in a cool place, well covered. Switch the appliance
Plastic containers with lids;
Special plastic covers with elastic,
Aluminium foil.
8

cleaner. Check the water drain hole on the rear wall of the fridge. Clear a blocked drain hole with
the aid of the green peg in the pack of accessories included with the appliance. After everything
is dry place appliance back into service.
Energy Saving tips
1. Do not place warm foods into the appliance. Allow warm foods to cool first. Do not install the
appliance near cookers, radiators or other sources of warmth. High ambient temperatures cause
longer, more frequent operation of the compressor.
2. In order to make the cooling system work efficiently, please make sure the side plates and back
plate of the product are with some distance from the wall. It is strongly recommended that its back
is 75mm away from the wall, its sides at least have a space of 100mm separately and the
height from over its top is not less than 100mm.
3. When the product works, please do not open the door too often or leave the door open any
longer than necessary.
4. Do not set temperature any colder than necessary.
5. The direct cooling refrigerator (with a freezer) needs to be defrosted when necessary. This will
improve the cold transfer and reduce energy consumption.
6. The sketch map shows the right combination of the drawers, crisper and shelves which can
lead to the more energy efficiency. If users adjust the combination, it would result in the energy-
consuming.
7. Store food logically. Do not exceed the storage period specified.
Changing the light bulb
Warning!
If the light bulb is damaged
,
it must be replaced by a qualified persons in order to avoid a hazard.
Contact your local Service
Force Center for help.
Before changing the light bulb, switch off the appliance and unplug it, or pull the fuse or the circuit
breaker.
off and remove the plug from the mains, or switch off or turn out the circuit breaker or fuse. Clean
the appliance and the interior accessories with a cloth and lukewarm water.Commercially available
dish washing detergents may also be used. After cleaning wipe with fresh water and rub dry.
Accumulation of dust at the condenser increases energy consumption. For this reason carefully
clean the condenser at the back of the appliance once a year with a soft brush or a vacuum
9

Trouble shooting
Noises during Operation
The following noises are characteristic of refrigeration appliances:
Whenever the compressor switches on or off, a click can be heard.
As soon as the compressor is in operation, you can hear it humming.
When refrigerant flows into thin tubes, you can hear bubbling or splashing noises.
Even after the compressor has been switched off, this noise of splashing can be heard for a
short time.
Correcting Malfunctions
Spare parts:
The following spare parts can be ordered from your local Service Center. You can fit
these yourself without any special skill or training, e.g.:
Butter/cheese compartment,
Egg holders,
Door racks,
Fruit and vegetable drawers,
Storage racks.
Light bulb data: 220-240 V, max. 15 W
1. To switch off the appliance, set the temperature regulator to position “0”.
2. Unplug the mains plug.
3. To change the light bulb, undo the screw.
4. Press the light bulb cover as shown and slide it backwards.
5. Change the defective light bulb.
6. Refit the light bulb cover and the screw.
7. Put the refrigerator back into operation.
10

The compressor does not restart after
a temperature change
There is water on the floor or the racks
This is normal, as the compressor only
restarts after a certain time.
The drain hole is blocked. Unclog it with
a knitting needle.
PROBLEM
The freezer does not operate
The freezer is too cold/ not cold enough
The fridge light does not come on
The fridge vibrates or makes noise
SOLUTION
Check that it is properly plugged in, that
the fuse has not blown or that the circuit-
breaker has not tripped.
Check the thermostat and set it to a more
appropriate temperature.
Check the bulb and change it if necessary.
Also check that the plug is correctly inse-
rted, that the fuse has not blown or that
the circuit-breaker has not tripped.
Check that it is perfectly level. Adjust the
feet.
A malfunction may be caused by only a minor fault that you can rectify yourself using the following
instructions.Do not perform any other work on the appliance if the following information does not
provide assistance in your specific case.
Important!
Repairs to refrigerators/freezers may only be performed by competent service engineers.Improper
repairs can give rise to significant hazards for the user. If your appliance needs repairing, please
contact your specialist dealer or your local Service Force Center.
Regulations, Standards, Guidelines
This appliance is in accordance with the following EU guidelines:
-73/23/EEC low voltage guidelines.
-89/336/EEC EMC Directive
-2009/125/EC framework for the settting of ecodesign requirements for energy-using
-EC.643/2009. requirements for household refrigerating appliances.
11

Reversing the door
The side at which the door opens can be changed from the right side (as supplied) to the left side,
if the installation site requires.
Before you start lay the refrigerator on it's back in order to gain access to the base,you should rest
it on soft foam packaging or similar material to avoid damaging the cooling pipes at the rear of the
refrigerator.
1.Stand the refrigerator, use a flat bladed screw driver to remove the 4 screw covers at the rear
of the refrigerator lid.
2. Unscrew and lift the lid from the rear and remove it, then lift the upper door and place it on a
padded surface to prevent it getting scratched.
3. Use a flat bladed screw driver to remove the front ornament of top cover plate.
4.Replace the front ornament of top cover plate in the other side
12

5.Remove the upper hinge core,transfer it to left side and tighten securely,then put it in a safe place
6.Remove both adjustable feet and remove the bottom hinge bracket by unscrewing the bolts.
7. Unscrew and remove the bottom hinge pin, turn the bracket over and replace it. Refit the bra-
cket fitting the bottom hinge pin. Replace both adjustable feet. Transfer the lower door to the pr-
operty position. Secure the door's level, make the bottom hinge pin into the lower hole of the door,
then tight the bolts.
8.Replace the lid by fitting the upper hinge core into the upper door's hole, securing it with the 4
screws. Replace the screw covers.
Warning!
When changing the side at which the door opens, the appliance must not be connected to the
mains. Remove plug from the mains beforehand.
13

When you reverse the door ,please do this first :
Move the accessory B from the upper cover of
upper door and fit the accessory A that is a small
detachable part from a small bag.
14