Full Text Searchable PDF User Manual
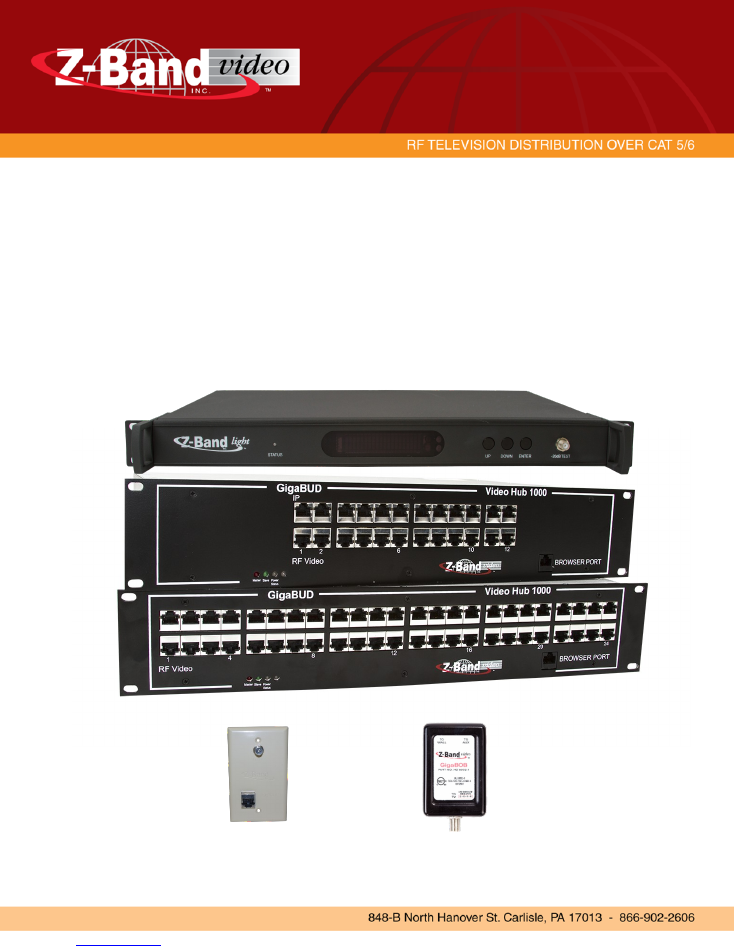
Gen 4 “GigaBUD 1000”
Video Distribution System
Installation Guide
October 2014
Version 5.2
www.z-band.com/866-902-2606
2
“GigaBUD 1000” Installation Guide
IMPORTANT SAFETY INSTRUCTIONS:
The “GigaBUD 1000”, along with all of the components, are designed for indoor use ONLY. Direct exposure
to moisture must be avoided. Connect the modular power cable to the rear of the “GigaBUD 1000” BEFORE
plugging the other end into the wall.
Must be grounded to earth ground. Do not defeat the safety purpose of a ground-type or polarized plug. If
the provided plug does not fit into your outlet, consult an electrician for replacement of the obsolete outlet.
Do not use extension cords to lengthen the power cord provided. Power cord must be accessible for the
removal of power from the unit.
SHOCK HAZARD
The video hub and remotely powered balun System meet UL/CSA Listed
compliance criteria as well as being FCC Part 15, Subpart B Compliant.
WARNING:
Failure to follow this guide can lead to malfunction of the system and invalidation of the warranty
OPERATING AND ENVIRONMENTAL WARNINGS
LASER RADIATION
A laser transmitter emits invisible radiation that can cause permanent eye damage. This product is used with
a combination of fiber optic components a cables.
AVOID DIRECT EXPOSURE TO LASER BEAM.
Operate all
components with proper fiber cabling. Disconnect power when making any cabling changes to avoid
accidental exposure.
Do not mount this unit with front panel facing upwards.
Each “GigaBUD 1000” is 2U and must be mounted in a 19” rack.
Airflow around the rack must be sufficient to maintain proper cooling of the “GigaBUD 1000”

www.z-band.com/866-902-2606
3
“GigaBUD 1000” Installation Guide
General System Overview
The
Z-Band Video Distribution System
is designed to distribute the full spectrum
(54 to 860 MHz) of high quality, Analog and/or Digital Radio Frequency (RF) Video
from a CATV direct feed or a Headend (Sources) to Televisions and/or Set-top-
boxes (Receivers) in a building, campus or metropolitan area.
The Z-Band System utilizes Single-mode Fiber and/or Coaxial Cable for distribu-
tion in the Backbone and TIA 568 Certified Category 5e or better Twisted Pair
Cable for distribution in the Horizontal.
Quality Video begins with the Quality of the Video Signal and Noise Levels from
the Sources . The Z-Band System employs Intelligent Automatic Gain Control
(AGC) technology in the Backbone with the Z-Band Light Fiber Transmitter and/or
the GigaBUD Video Hub 1000 (GigaBUD 1000). In the Horizontal, the AGC is
maintained by the Z-Band Intelligent GigaBOB at each Receiver.
The AGC, in a coax based Backbone, is designed to maintain Video Signal
Integrity on a RG6 cable length of 400’ or less or a RG11 cable length of 600’ or
less; therefore, the RG6 or RG11 coax Backbone cannot exceed these limits.
If the Source Signal and Noise Levels are correct, the Z-Band AGC technology
will maintain Signal Integrity to each Receiver.
The Z-Band GigaBUD 1000 uses pins 7 & 8 of the twisted pair cable for the RF
Video and pins 4 & 5 for a return path in interactive system applications. Pins 1,
2, 3, & 6 are available for 10/100 Ethernet or other Auxiliary signals, such as
RS232 control, over the same cable (Shared Sheath) to the same destination
GigaBOB where they a broken out to separate the RF Video and Ethernet/Aux sig-
nals
The Z-Band System does not Switch, Route, Repeat, or in anyway interact with
the IP signal; we simply allow it to be sent over the same cable, to the same
destination..
www.z-band.com/866-902-2606
4
“GigaBUD 1000” Installation Guide
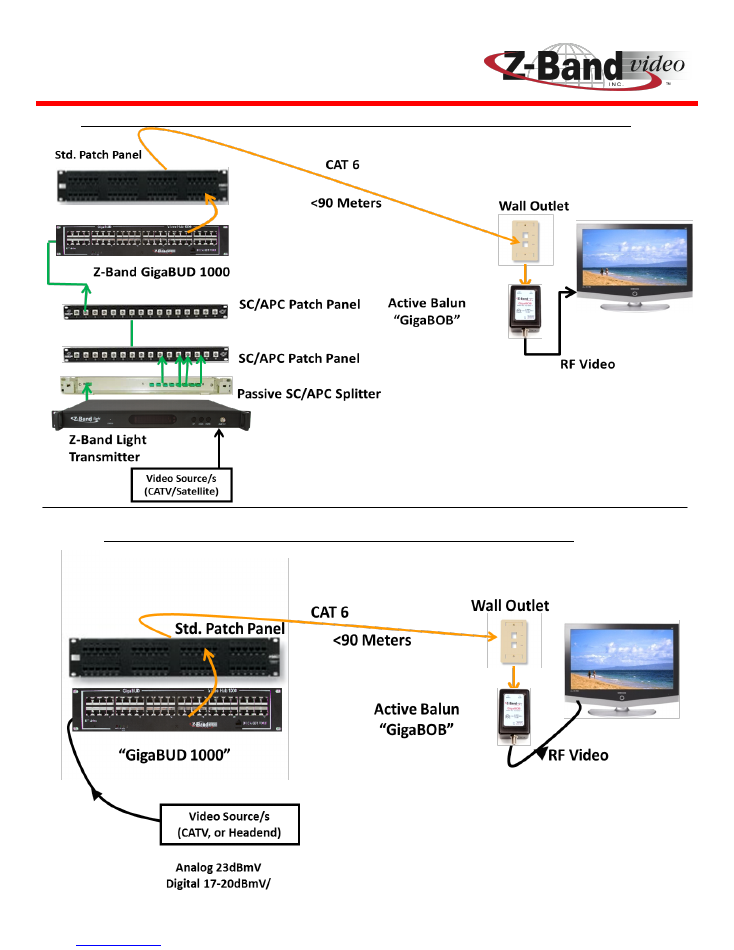
Depicts a Basic Layout of a System with a Singlemode Fiber Backbone
Depicts a Basic Layout os a System with a Co-
Figure 1
Figure 2
Depicts a Basic Layout of a System with a Coaxial Backbone
Notice that the Horizontal is the same in the
Figure 1 and Figure 2 options.
www.z-band.com/866-902-2606
5
“GigaBUD 1000” Installation Guide
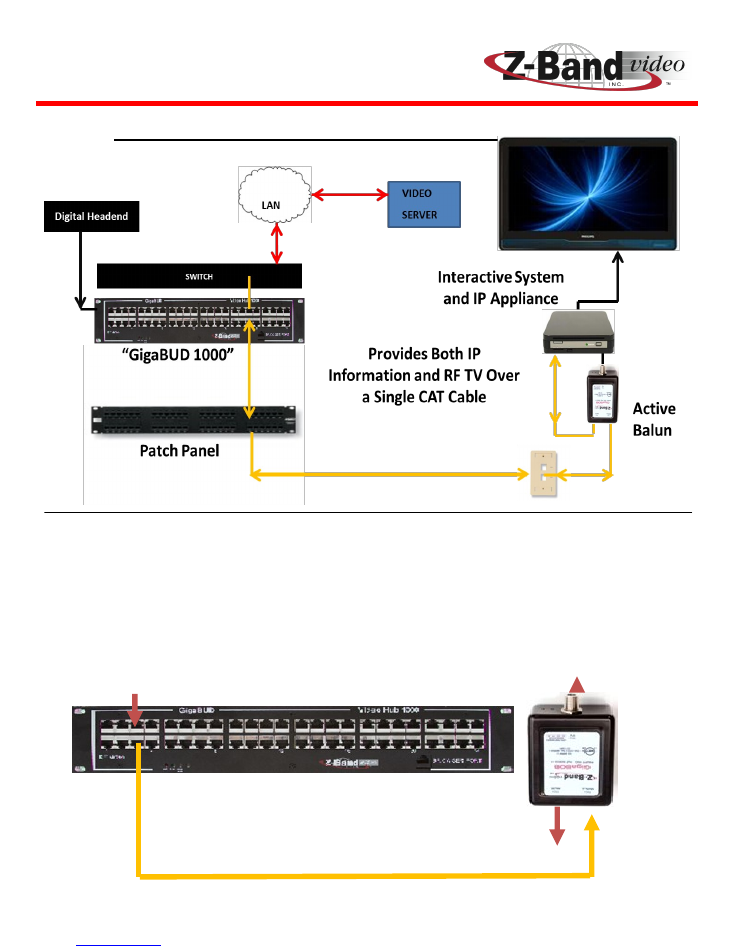
Layout of Basic System with Shared Sheath for Video and IP
Figure 4
Allows the RF Video (on Pins 7 & 8) and the IP (on Pins 1, 2, 3, 6) to be com-
bined at the GigaBUD 1000 and Separated at the GigaBOB. A port from the
Ethernet Switch is plugged into the top row (Aux) of the GigaBUD and is com-
bine with the RF Video that is on the bottom row. At the GigaBOB the RF Video
is now available at the “F” connector output and the IP is available at the Aux
output.
IP & RF In
IP In
IP OUT
IP & RF
RF OUT
The Z-Band System does not Switch,
Route, Repeat or in anyway interact with
the IP signal.
Figure 3
www.z-band.com/866-902-2606
6
“GigaBUD 1000” Installation Guide
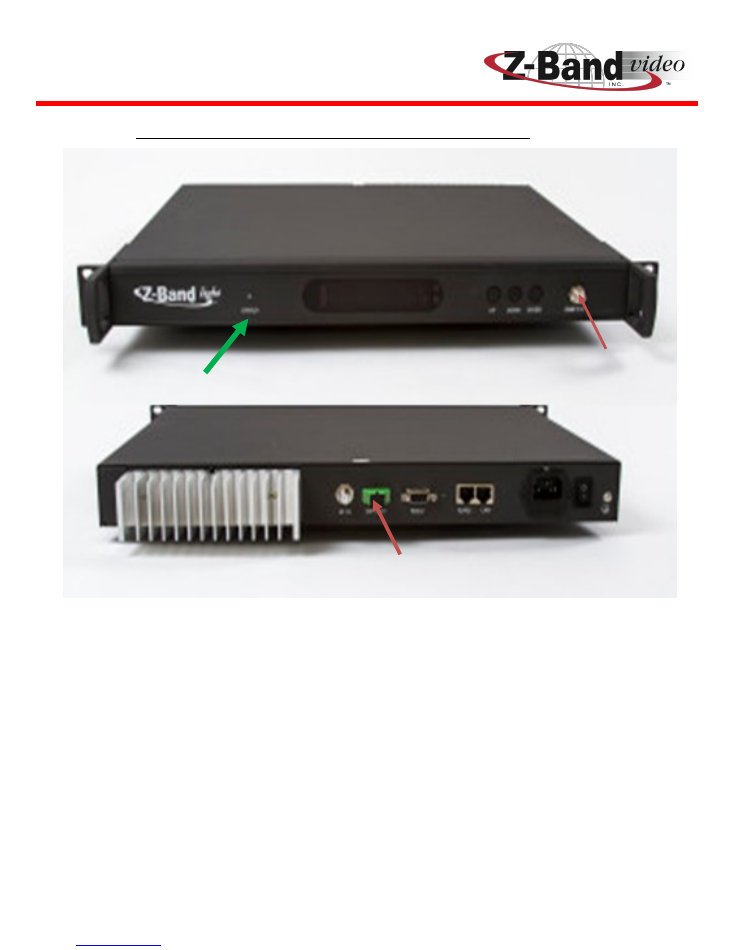
Front & Rear View of Z-Band Light TX
Video Sources CATV/Headend 20dBmV + or –5
Fiber Output to Fiber Splitter
Figure 5
The Z-Band Light Transmitter accepts the coax Source signals at the “F”
connector input. The Status Light will be
Green
when the proper input levels
are received. The input level can be 20dBmV + or – 5,
but it is best to get
them as close to 20dBmV as possible so that variations in input levels over
time can automatically be compensated for by the + or—5 tolerance.
The Transmitter will
maintain the Flat Signal levels
from the SC/APC
Singlemode Fiber output to each destination GigaBUD 1000 Fiber receiver .
Status Light
www.z-band.com/866-902-2606
7
“GigaBUD 1000” Installation Guide
Front View (12 Port)
Rear View (12 & 24 Port) Fiber
Front View (24 Port)
MASTER SLAVE
RF VIDEO
BROWSER
PORT
GigaBUD
IP
POWER
STATUS
Video Hub
1000
4
2
6
10
12
RF VIDEO
BROWSER
PORT
GigaBUD
IP
Video Hub
1000
4
8
12
16
20
24
MASTER SLAVE
POWER
STATUS
CATV
Inbound
Outbound
Cascade
In
Cascade
Out
FIBER
INPUT
90-264 VAC
47-63Hz
150W
2A Fuse
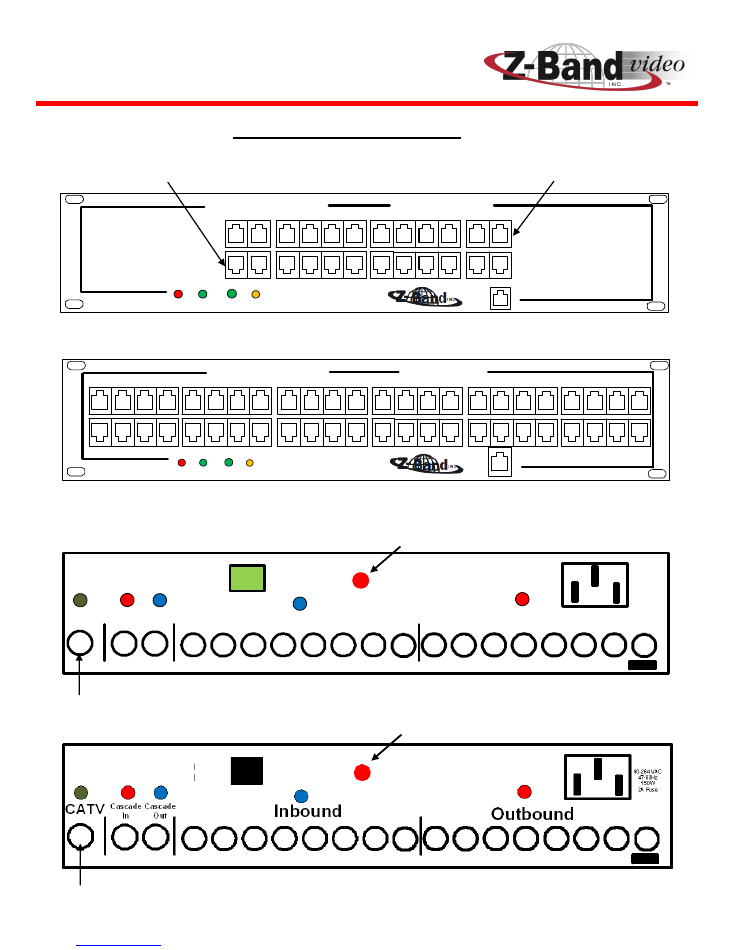
“GigaBUD 1000” Views
Rear View (12 & 24 Port) Non-Fiber
Figure 6
IP/AUX Input
IP/RF Output
Coax Source Input
Red Button for Pilot Tone on/off
Coax Source Input
Red Button for Pilot Tone on/off
www.z-band.com/866-902-2606
8
“GigaBUD 1000” Installation Guide
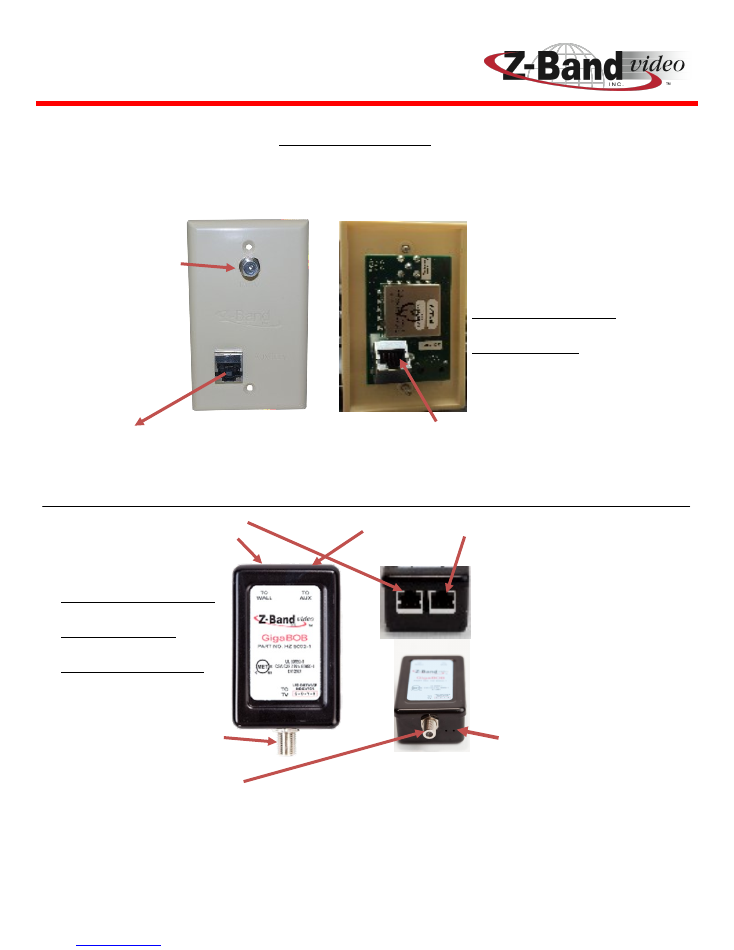
GigaBOB Views
Rear View
Front View
To TV or
Set-top Box
Auxiliary/IP Out
Horizontal Cable In
From Wall Outlet
Horizontal Cable In
Auxiliary/IP Out
Wall Mount Balun
with Diplexer
Free Hanging Balun
(Avail. With or
Without Diplexer)
Figure 8
Light/s On denotes
power from GigaBUD.
Color/s denote/s ap-
proximate distance
from GigaBUD.
Figure 7
From Wall Outlet
To TV or
Set-top Box
www.z-band.com/866-902-2606
9
“GigaBUD 1000” Installation Guide
Installation Requirements:
Category Cable:
Category 5E or better cable for horizontal wiring plant per ANSI/TIA-568-C Series Standard
Category patch cables
Category cable
must
be matched throughout a Z-Band System. Do
not
use a mixture of different
cables
Coax Cable:
Coaxial cable backbone cannot exceed
400’ if using RG-6, or 600’ if using RG-11
(Use single-mode fiber
for distances greater than 600’)
Use RG-6 coaxial cables to cascade the “GigaBUD 1000’s” in the same closet
Other Requirements:
35 dB amplifier with gain and tilt for Direct Cable Feed or to increase and flatten Headend signals to the
proper levels
RF meter capable of measuring analog and digital signals levels plus C/N for analog, and MER for digital
channels across the CATV spectrum
One GigaBOB for each TV or video-enabled PC in the System
Two-Way Splitter
Fiber Cable:
Use single-mode cable with SC/APC connectors
Optical wavelength: 1300
RF input power range to “Z-Band Light TX”: 20 dBmV + or - 5dBmV
Optical Meter capable of reading Single-mode SC/APC Terminated Fiber at 1300nm wavelength
Optical input power range to “GigaBUD 1000”: –1dBm to –4dBm
RF Input Levels:
Make sure that the input coming into the System is as follows (assume a 35 dB amplifier with gain and tilt is
used prior to input, if required in order to obtain proper signal levels):
Analog Only
Digital Only
Analog & Digital Combined
Level
23 dBmV
flat
20 dBmV
flat
23 (A) dBmV/ 17 (D) dBmV
C/N
43dB or greater
43 dB or greater
MER
36 dB or greater into GigaBUD
36 dB or greater into GigaBUD
Figure 9
www.z-band.com/866-902-2606
10
“GigaBUD 1000” Installation Guide
Installation Recommendations:
Category Cable:
Category 6 or better cable for horizontal wiring plant per ANSI/TIA-568-C
Coax Cable:
Terminate with Compression Connectors
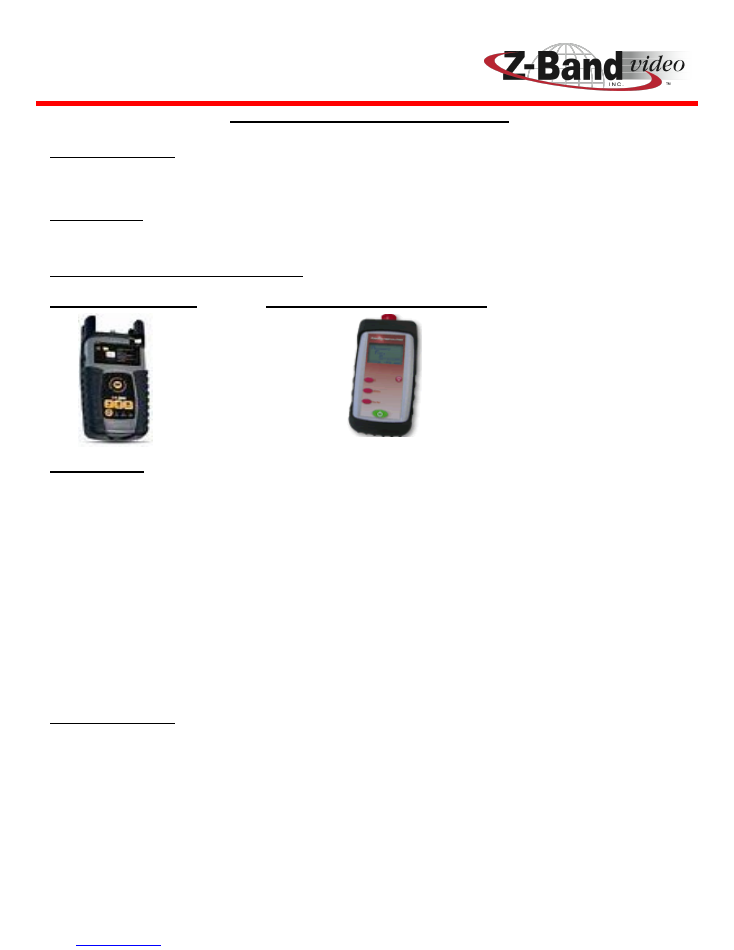
RF Signal and Fiber Test Meters:
RF Signal Meter
Fiber Optic Power Meter
Fiber Cable:
RF input power range to “Z-Band Light TX”: Set as close to 20dBmV Flat as
possible
Video Source Signal Levels and Noise Levels should be recorded for all
Channels prior to connection to the Z-Band Light Transmitter or to the
Master GigaBUD 1000/s
If Singlemode Fiber Patch Panels are Terminated with Connectors other than
SC/APC, special Patch cords must be acquired to address the Incompatibility .
RF Input Levels:
Make sure that the Signal Levels and Noise Levels are checked at the proper
locations (The proper locations for Signal Level readings are noted in each
specific installation drawing)
Spend the time needed to get the Source Signal and Noise levels to the
required levels . The Intelligent AGC of the Z-Band System will maintain the
Source Signal Quality to all of the Displays - nothing else to adjust.
Televes
H30 SERIES
Meter/Analyzer
Advanced Fiber Solutions
Model OM120A

www.z-band.com/866-902-2606
11
“GigaBUD 1000” Installation Guide
Interconnecting GigaBUD 1000s in the Backbone
When a GigaBUD 1000 receives a video input signal from the Source it is
automatically designated as a
Master
, and becomes a
Level 1
device. This is
true if the Source connection is a Coax connection to the “CATV” input of a
GigaBUD 1000 or a Fiber connection to the “Fiber Input” port (Note: A GigaBUD
1000 with an internal Fiber Receiver is always a Master, while all non-fiber
GigaBUD 1000s may be either a Master of a Satellite Device). When a non-fiber
GigaBUD 1000 receives a coax signal at the “Cascade In” port, it is automatically
designated as a Satellite device (may be a Level 2, 3, or 4 device). The process
for connecting GigaBUD 1000 units together is called
Cascading
.
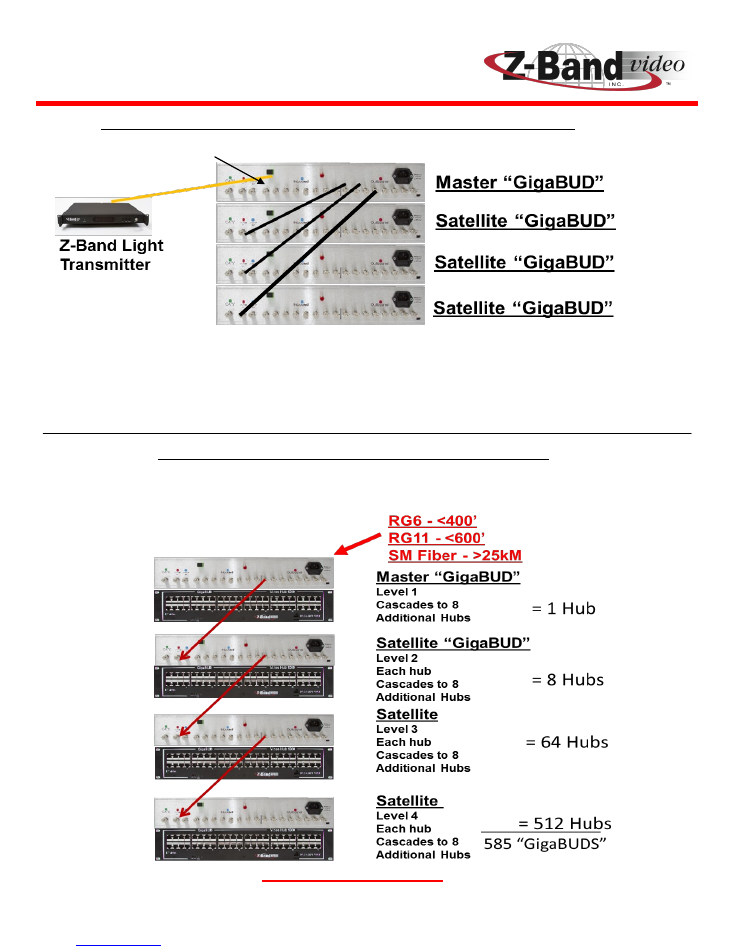
Each GigaBUD
1000 has 8 coax “Outbound “ ports which can be connected to the coax
“Cascade In” port of up to 8 Level 2 satellite GigaBUD 1000s. Each Level 2 device
can then connect to up to 8 Level 3 devices and each Level 3 device can connect
to up to 8 Level 4 devices. If all “Cascade Out” ports of all Level 1, 2, & 3 devices
are used, a single Master can Cascade together 585 GigaBUD 1000s.
Cascading must be limited to 4 Levels.
Video Quality, in a Coaxial Backbone configuration, uses a “240 MHz Pilot
Tone”, in the guard band between channels 26 & 27 ,from each Master GigaBUD
1000 to all levels of it’s Satellite GigaBuds. This may cause interference with
these adjacent channels. In order to prevent the potential interference, the
GigaBUD 1000 enables turning off the pilot tone after the AGC has set the signal
levels to each Satellite device. However, in the event of a power outage, the
Master devices will re-power to a “Tone On” state. The Pilot Tone, at each
Master must then be Manually turned off.
Re-mapping channels 26 & 27 to other available channels, if possible will
eliminate this potential inconvenience.
www.z-band.com/866-902-2606
12
“GigaBUD 1000” Installation Guide
Example of Fiber Master & Coax Backbone in a closet
-1 to –4dBm
Example of Coax Backbone between closets
Do Not Exceed 4 Levels
Level 1
Level 2
Level 2
Level 2
Figure 10
Figure 11
Figure 10
depicts the Cascade connections that are typical in a closet containing a Fiber
Master. Notice that all of the Satellite devices are Level 2; direct connection from the
“Outbound” ports of a Master
Figure 11
depicts a progressive 4 Level coax Cascade from a Master and Level 2 and Level 3
satellite devices.
www.z-band.com/866-902-2606
13
“GigaBUD 1000” Installation Guide
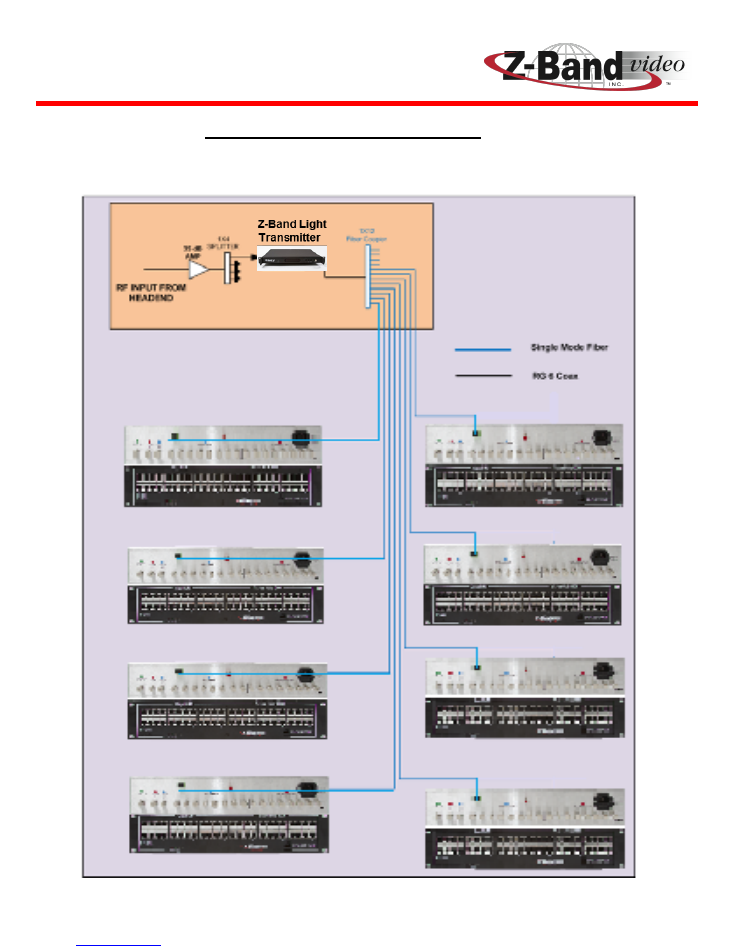
Fiber Backbone to Every Closet
Figure 12
Figure 12
depicts the fiber connections from a Z-Band Light
Transmitter to a Fiber Master in each closet of a building.
www.z-band.com/866-902-2606
14
“GigaBUD 1000” Installation Guide
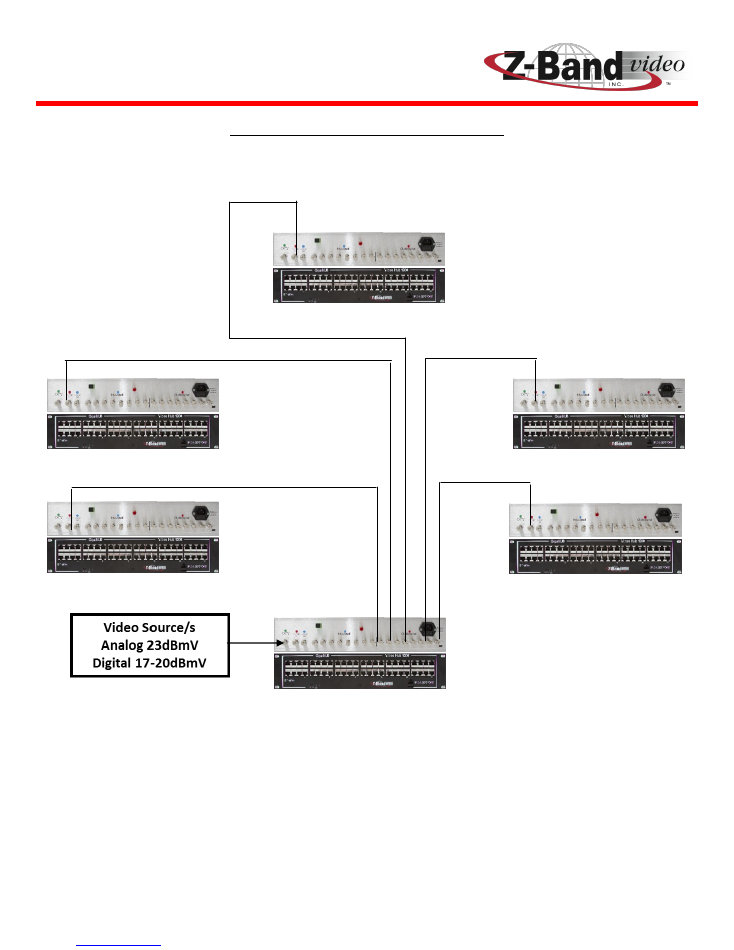
Coax Backbone to Every Closet
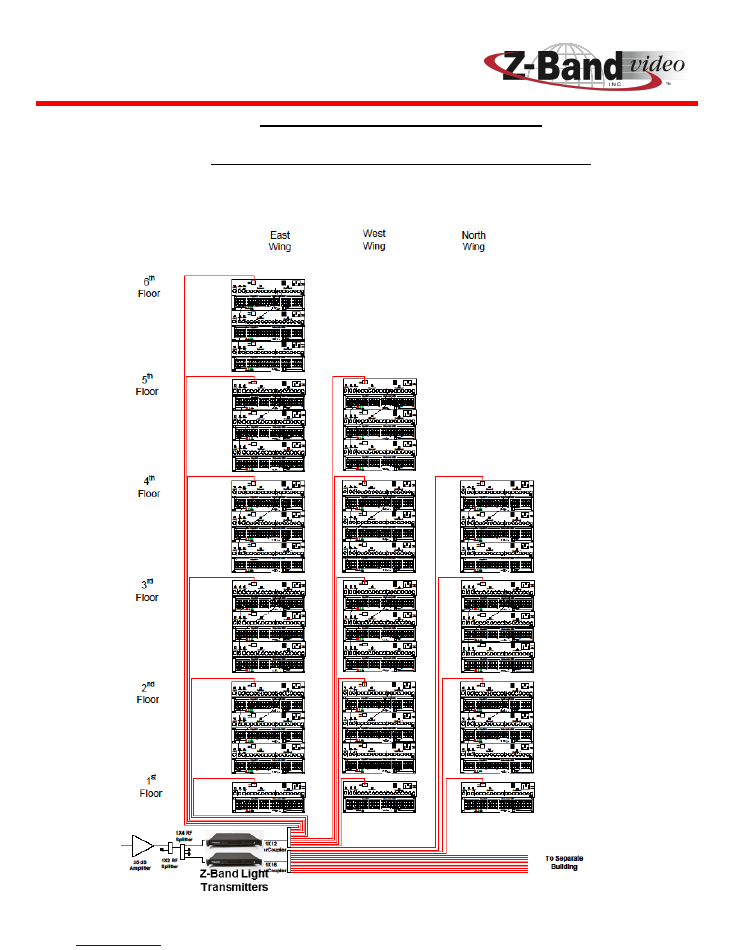
Figure 13
IDF 1
MDF
IDF 3
IDF 2
IDF 5
IDF 4
Figure 13
depicts the coax connections from a non-fiber GigaBUD 1000 Master
to Level 2 Satellite devices in each closet of a Building.
www.z-band.com/866-902-2606
15
“GigaBUD 1000” Installation Guide
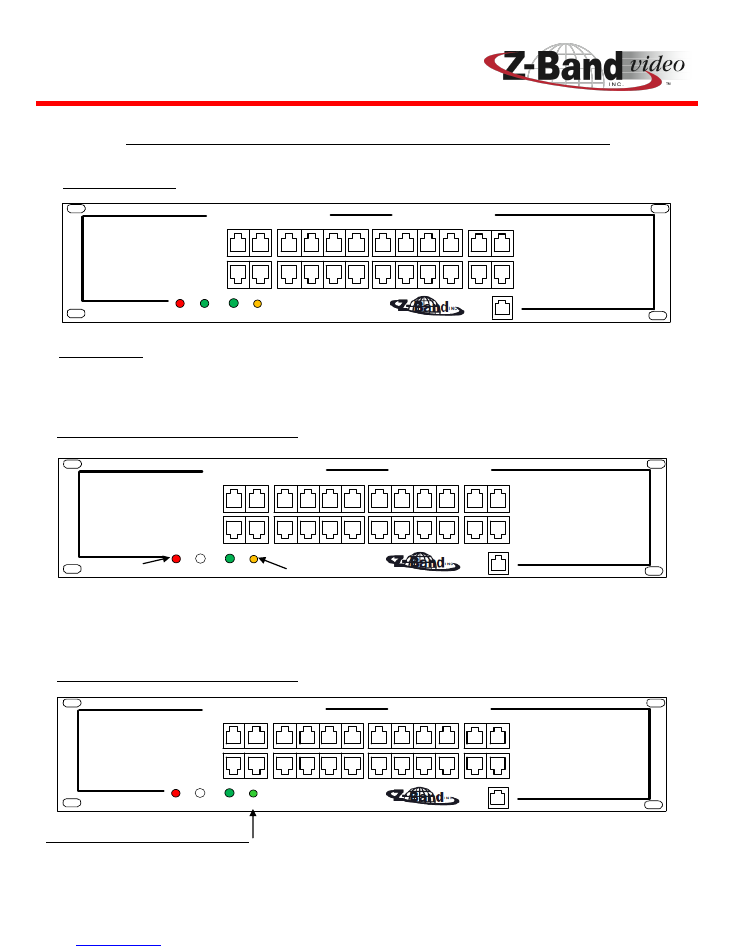
Fiber Backbone to Every Closet,
Coax Backbone Cascade within the Closets
Figure 14
Figure 14 depicts a typical Campus installation using a Fiber Backbone to each closet in
multiple buildings, and Coax Cascades within each closet.
www.z-band.com/866-902-2606
16
“GigaBUD 1000” Installation Guide
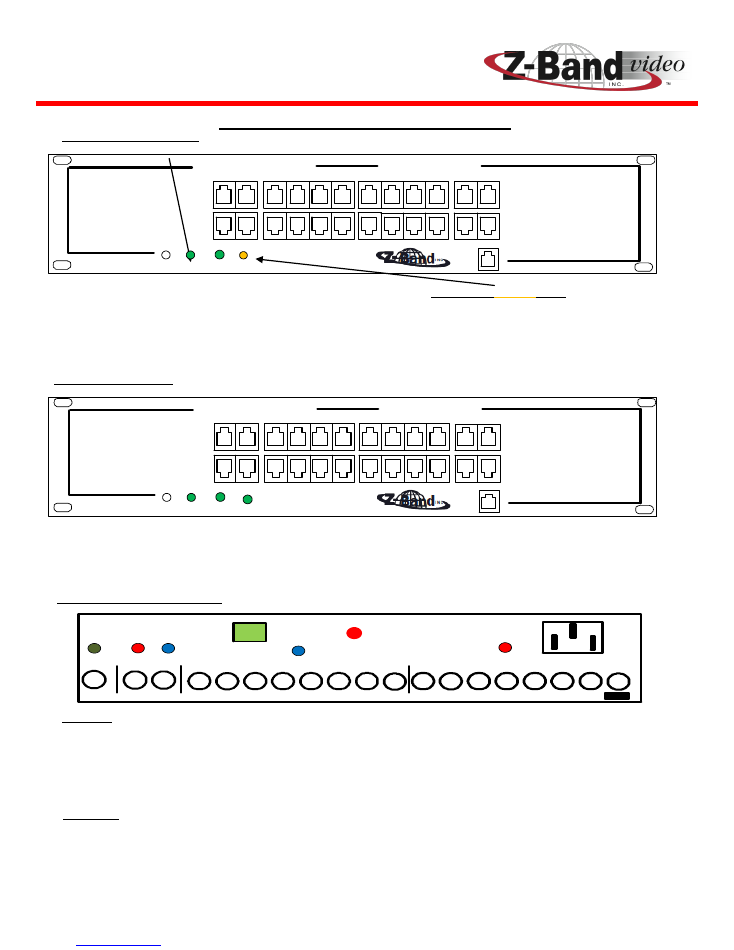
FRONT INDICATORS AND RED BUTTON ON REAR:
Initial Power-Up
All four lights indicate the System is searching for a source and whether it will be a Master or a
Satellite unit. Depending on what source is connected will provide the light sequence indicated as
shown below. When this light sequence is shown, the unit will be in “Native State”.
When there is a signal that goes into “CATV IN” port or the “FIBER IN” port the
Red
master light turns
on. The pilot tone is a unique signal sent out so that the Satellite units connected can set their levels
properly for signal balance. A
yellow
“Fourth” light indicates that the pilot tone is on and is active.
Master (CATV Wired or Fiber) Pilot
Master (CATV Wired or Fiber) Pilot
While a feed is hooked into CATV and then red button is held down the pilot tone will be switched
off. A
green
light on the fourth position indicates that the pilot tone is turned off.
MASTER SLAVE
RF VIDEO
BROWSER
PORT
GigaBUD
IP
POWER
STATUS
Video Hub
1000
4
2
6
10
12
MASTER SLAVE
RF VIDEO
BROWSER
PORT
GigaBUD
IP
POWER
STATUS
Video Hub
1000
4
2
6
10
12
MASTER SLAVE
RF VIDEO
BROWSER
PORT
GigaBUD
IP
POWER
STATUS
Video Hub
1000
4
2
6
10
12
Figure 15
www.z-band.com/866-902-2606
17
“GigaBUD 1000” Installation Guide
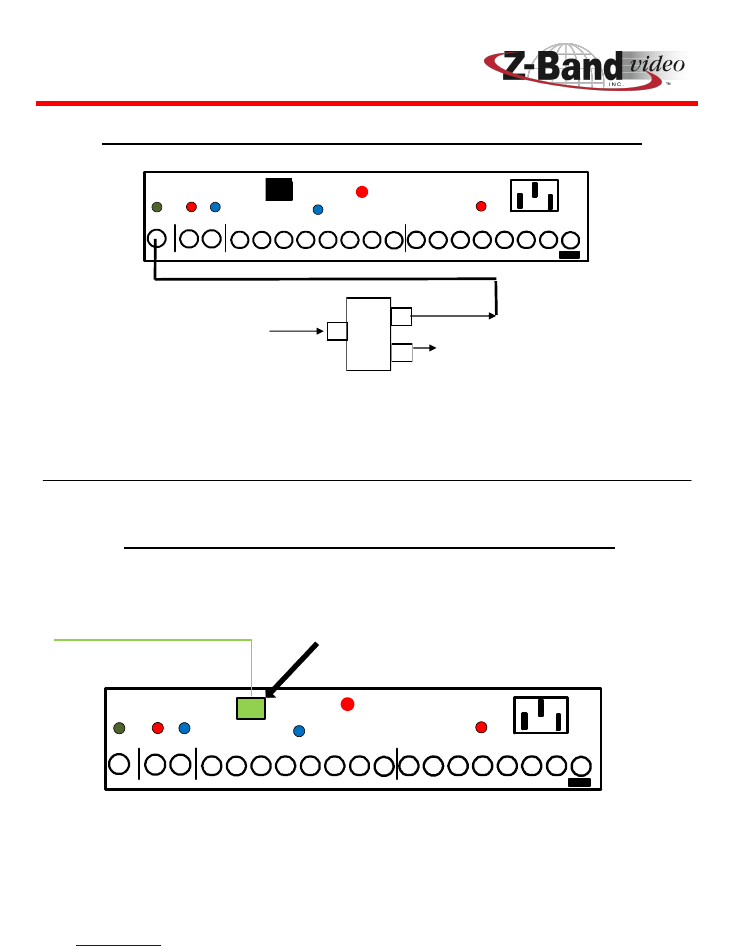
Satellite (Unlocked)
The lights for this mode indicate that the unit is a Satellite unit. A blinking
amber
light means there is
a RF signal on the “Cascade In” port. Unlocked means the System is self-adjusting to set itself to the
proper levels based on distances between itself and the Master unit. Once it has settled, it will ap-
pear as 3 green lights as shown below.
Satellite (Locked)
After about a 10 seconds, the unit will lock in the parameters it has adjusted to for a balanced
System. The amber light will no longer blink and remain solid
green.
Note: If power is disrupted, the
unit will return to native state.
“GigaBUD 1000” FUNCTIONS:
Master
Satellite
While in Master and the button is held for ~5 seconds, the unit will stop broadcasting the tone and the
light will change from yellow to green. Holding the red button again will turn the tone back on. Resetting
the power from this point will return the unit to master with the tone being broadcast.
While in Satellite mode with no feed into cascade in and the button is held for ~5 seconds, the unit will
switch to a native state, all four lights will be on. When a feed is present then the red button
Function is disabled.
CATV
Inbound
Outbound
Cascade
In
Cascade
Out
FIBER
INPUT
90-264 VAC
47-63Hz
150W
2A Fuse
RED BUTTON PURPOSE:
MASTER SLAVE
RF VIDEO
BROWSER
PORT
GigaBUD
IP
POWER
STATUS
Video Hub
1000
4
2
6
10
12
MASTER SLAVE
RF VIDEO
BROWSER
PORT
GigaBUD
IP
POWER
STATUS
Video Hub
1000
4
2
6
10
12
Figure 16
www.z-band.com/866-902-2606
18
“GigaBUD 1000” Installation Guide
SERVICE PROVIDER TO Non-Fiber GigaBUD INTERFACE:
CATV
Inbound
Outbound
Cascade
In
Cascade
Out
FIBER
INPUT
90-264 VAC
47-63Hz
150W
2A Fuse
CATV / Headend
Testing Point
Putting the splitter in the System will allow for reading the input signal level and
quality (MER or C/N) without disconnecting the System.
Master
GigaBUD
CATV
Inbound
Outbound
Cascade
In
Cascade
Out
FIBER
INPUT
90-264 VAC
47-63Hz
150W
2A Fuse
Single-Mode Fiber
SC/APC Connector
-1 to
–
4 dBm Input
Fiber Configuration - Master Only
1 X 2 Splitter
Analog 23dBmV
Digital 17 to 20dBmV
SERVICE PROVIDER TO Fiber GigaBUD INTERFACE:
Figure 17
Figure 18
www.z-band.com/866-902-2606
19
“GigaBUD 1000” Installation Guide
Satellite/Satellite Cascade Configuration
Bi-Directional CASCADE CONFIGURATIONS:
Master / Satellite Cascade Configuration
CATV / Satellite
Headend
CATV
Inbound
Outbound
Cascade
In
Cascade
Out
FIBER
INPUT
CATV
Inbound
Outbound
Cascade
In
Cascade
Out
FIBER
INPUT
COAX
Master
Level 1
Slave
Level 2
COAX
COAX
COAX
90-264 VAC
47-63Hz
150W
2.0A Fuse
90-264 VAC
47-63Hz
150W
2.0A Fuse
RG-6/11
RG-6/11
Amplifier Adjust to
20 dBmV Digital
23 dBmV Analog
Used for
Bi-directional
applications
CATV
Inbound
Outbound
Cascade
In
Cascade
Out
FIBER
INPUT
CATV
Inbound
Outbound
Cascade
In
Cascade
Out
FIBER
INPUT
COAX
Slave
Level 3
Slave
Level 4
COAX
COAX
COAX
To Master or Level 2 Slave
From Master or Level 2 Slave
90-264 VAC
47-63Hz
150W
2.0A Fuse
90-264 VAC
47-63Hz
150W
2.0A Fuse
Used for
Bi-directional
applications
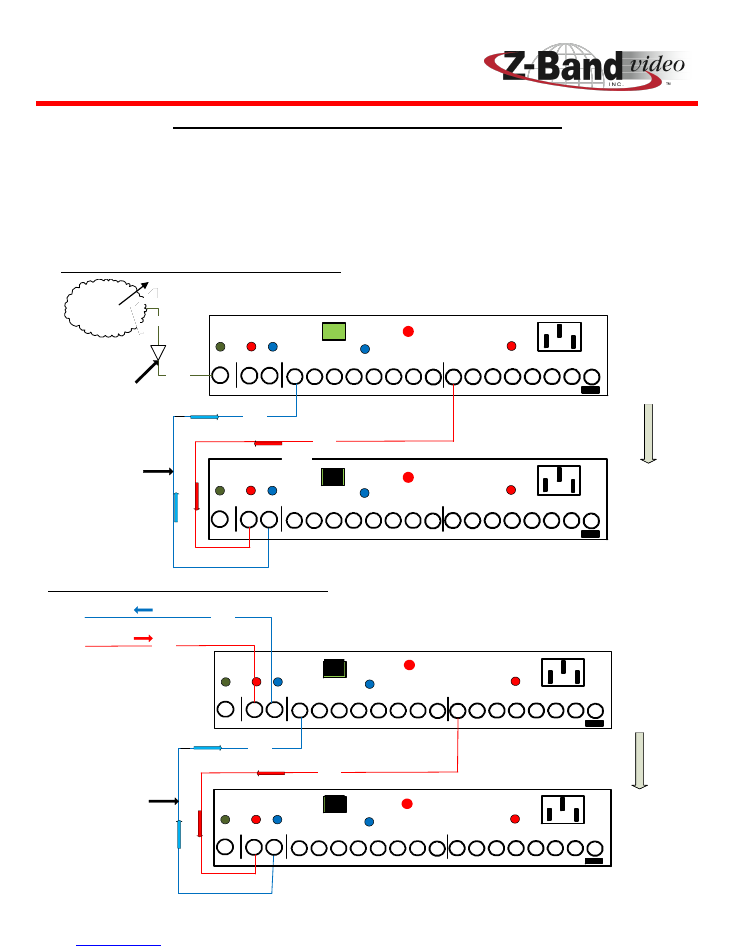
Some installs will require a return path for video on demand and other special features.
In the event that the system uses a DOCSIS or FSK return, it will be necessary to provide
a Bi-Directional Cascade Backbone, as shown below. In addition, Diplexer GigaBOBs will
be required at all displays. If an IP based return path is used, Bi-Directional cascading is
not required.
Figure 19