Full Text Searchable PDF User Manual
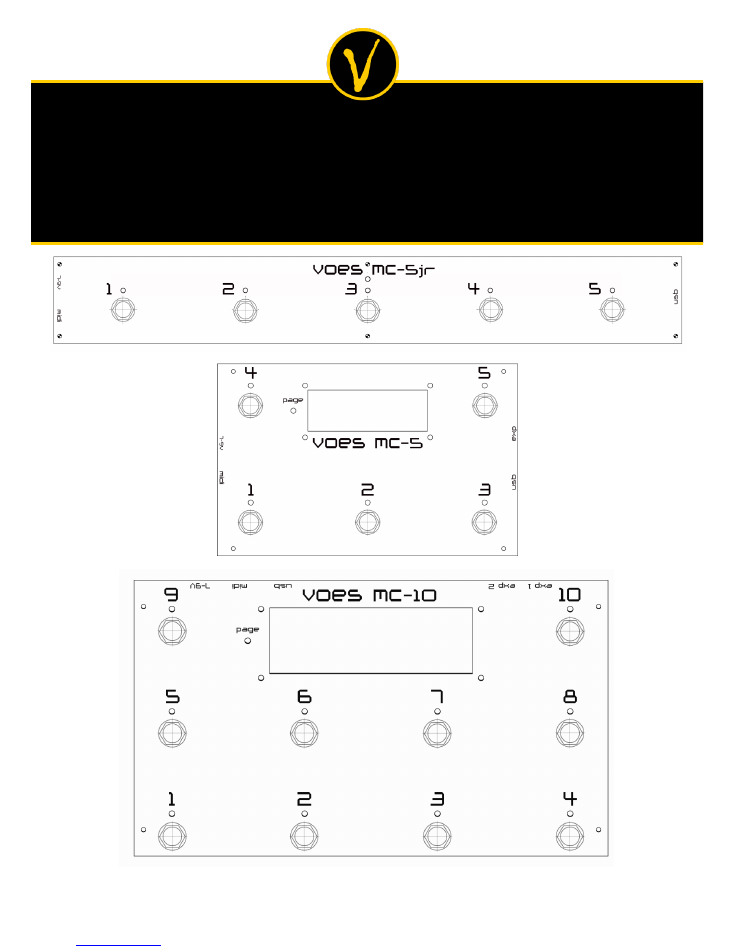
Voes Midi Controllers
1
firmware v1
Voes Midi Controllers
mc-
5jr
, mc
-5 &
mc
-10
user manual
v 1.0.23

Voes Midi Controllers
2
1.
Introduction
The
MC-5jr, MC-5
and
MC-10
are compact, intelligent and user-friendly Midi Controllers.
Common features:
7-pin MIDI out
Power: 7-9v AC/DC 500mA (2.1mm connector or Midi-7)
(power supply not included)
USB connection for easy-to-use editor
4 commands for each button
17 available commands: none, PC, CC on/off, CC off/on, CC on only, CC off only, CC custom,
Expr 1 CC swap, Button on/off, Scenes, Bank up/down, Program up/down, Page select, All
Other Leds Off, Bank Select.
Advanced commands: Global, Steps and Groups
2 pages and press-and-hold function
Suited for scenes (
Fractal Audio Systems
™)
MC-5jr unique features:
5 hardware buttons, 6 leds (5 bicolor)
No Expression Pedal
No LCD display
2 pages with each 5 custom
programmable software buttons
Dimensions approx.: 40cm x 5,5cm
Weight approx.: 480gr
MC-10 unique features:
10 hardware buttons,
11 leds (10 bicolor)
2 inputs for Expression Pedals
2x16 Big LCD display
2 pages with each 10 custom
programmable software buttons
Auto engage/disengage Expr. Pedal 1
Dimensions approx.: 25cm x 15cm
Weight approx.: 890gr
MC-5 unique features:
5 hardware buttons, 6 leds (5 bicolor)
1 input for Expression Pedal
2x16 Normal LCD display
2 pages with each 5 custom
programmable software buttons
Auto engage/disengage Expr. Pedal 1
Dimensions approx.: 18cm x 11,5cm
Weight approx.: 470gr
Voes Midi Controllers
3
2.
Installation
1.
Download the latest editor, driver, firmware and manual on
www.voes.be.
2.
Unzip the file.
3.
Connect the
MC-5jr/5/10
to your computer (Windows 7 or higher).
Let Windows detect the device (it will report driver not found). If a window pops up asking to
search for a driver, just close it or click
Cancel
.
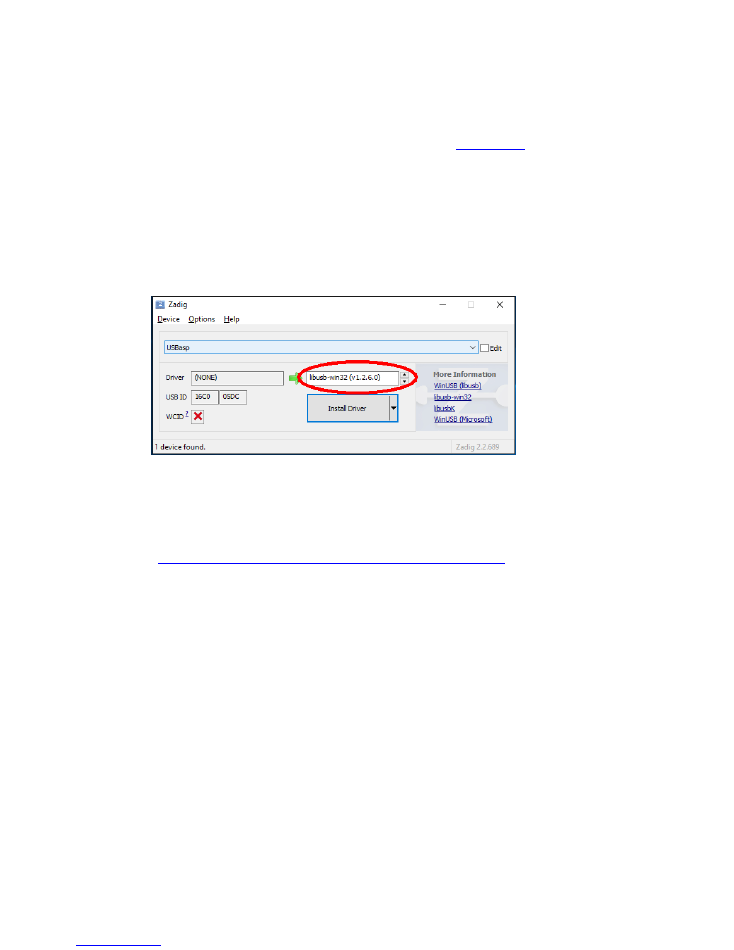
4.
Run
Voes MC-driver
(located in the folder
manual and driver
).
Do not update if asked.
Select
libusb-win32 (v1.2.6.0)
and click Install Driver.
5.
Start
Voes MC-editor.
If you get an error, you will need to install
Microsoft Dot Net Framework 4
or higher .
(
https://www.microsoft.com/en-us/download/details.aspx?id=17851
)
Voes Midi Controllers
4
3.
The Editor
Instead of using precious resources for editing on the hardware, which is a PITA to use, we thought it
would be better to give you an excellent, easy to use Editor and extra features.
The
MC-5jr/5/10
has 10/20 software buttons, divided over 2 pages. Each button has up to 4
commands. As there are only 5/10 physical buttons, there has to be a way to select the
other
5/10
buttons. You can do this by either creating a
Page
button, which toggles between buttons 1-5/1-10
and 6-10/11-20, or by using press-and-hold to toggle each button separately. A combination of both
is also a possibility.
3.1 Overview
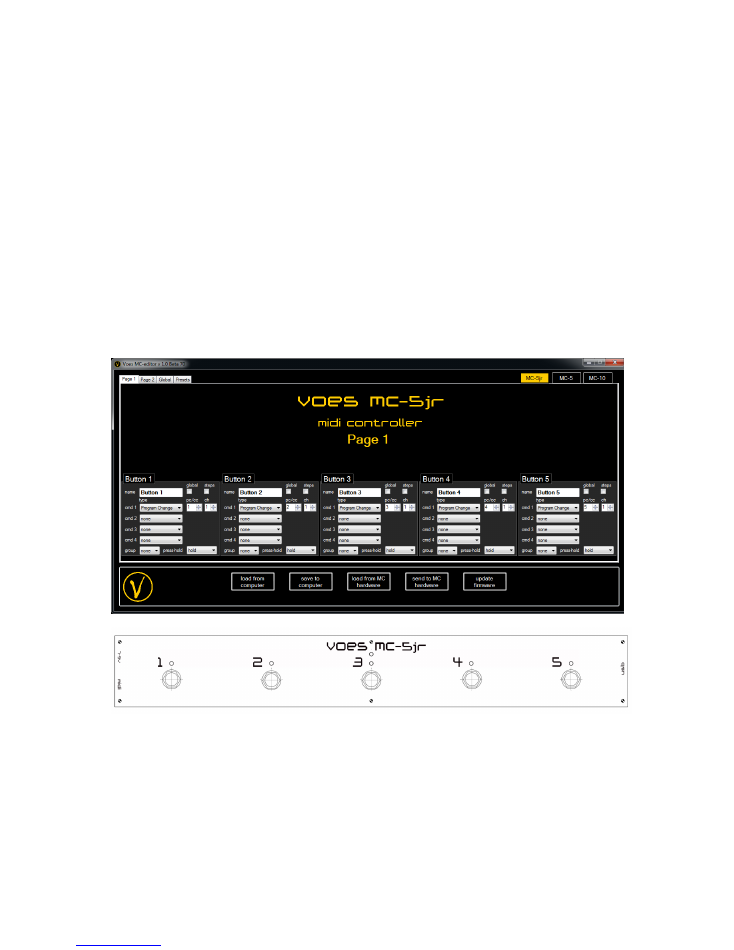
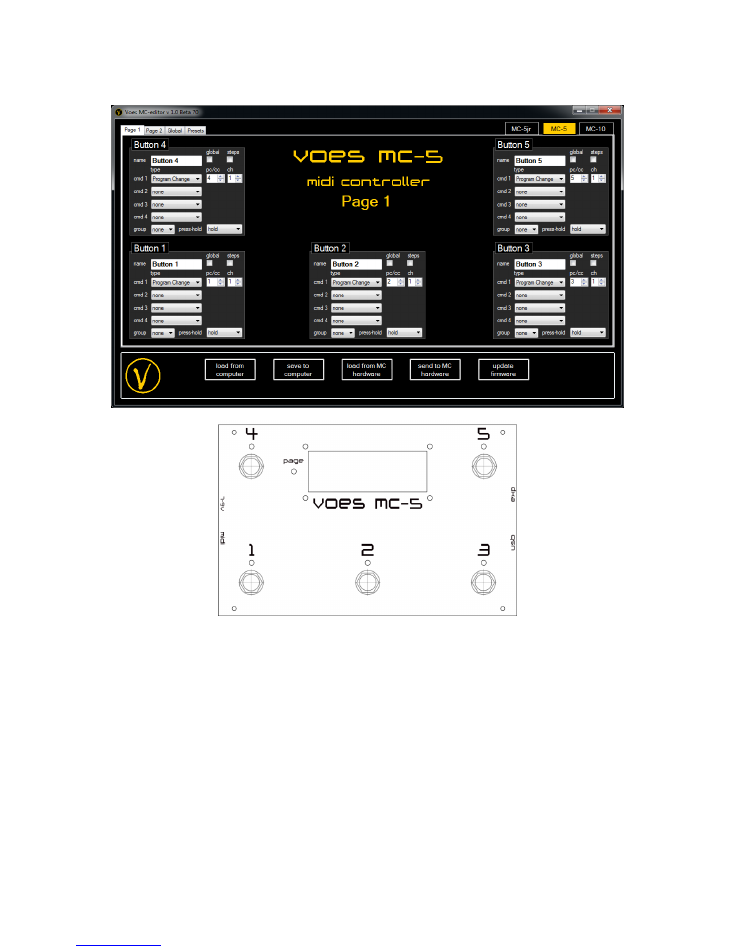
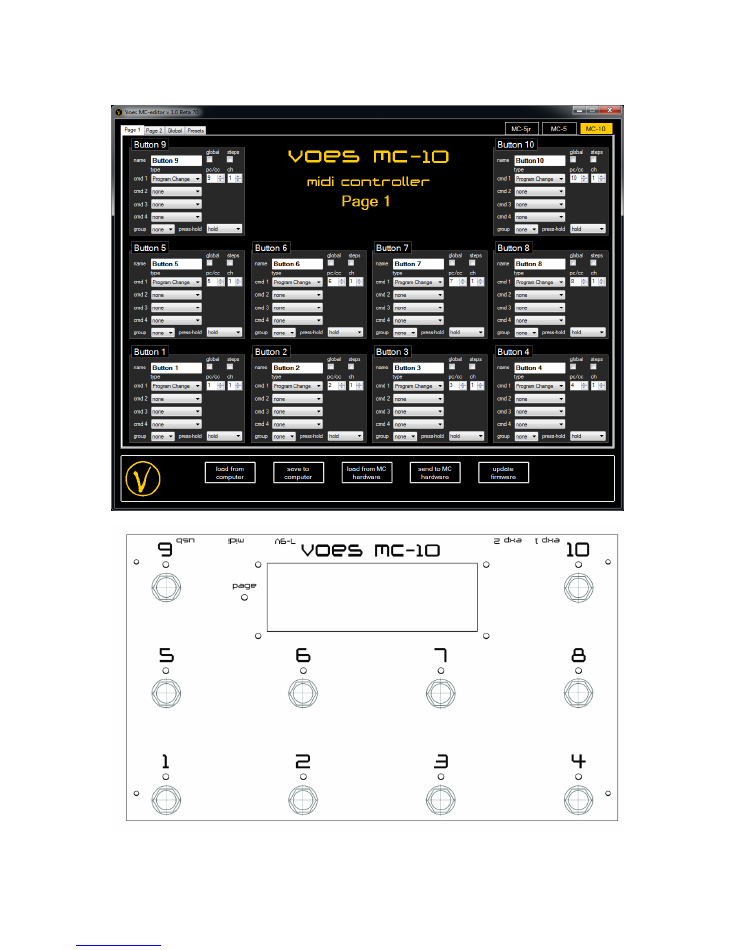
The
MC-5jr/5/10
has the same layout as the hardware, making programming a breeze.
MC-5jr
Voes Midi Controllers
5
MC-5
Voes Midi Controllers
6
MC-10
Voes Midi Controllers
7
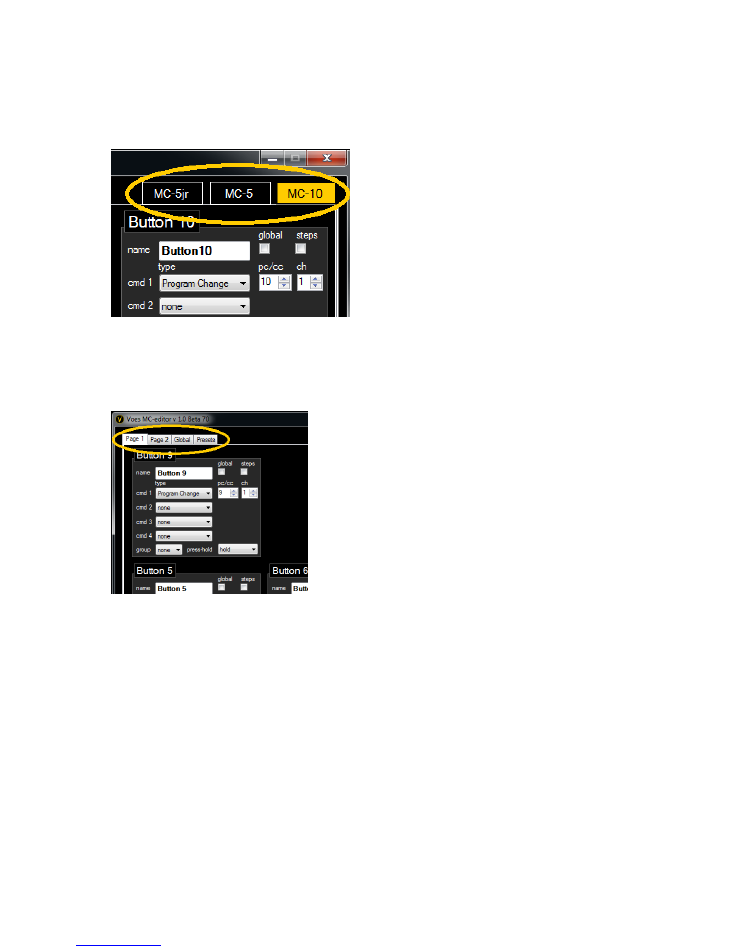
3.2 Switching between MC-5jr, MC-5 and MC-10
You can switch between MC versions in the top right corner. The chosen version is saved on data-
files you create. Data-files are compatible and exchangeable between MC-5jr, MC-5 and MC-10.
3.3 Tab-pages
In the top left corner you can find the tabs
Page 1, Page 2, Global
and
Presets
.
Page 1
gives you an overview of buttons 1-5/1-10,
Page 2
of buttons 6-10/11-20.
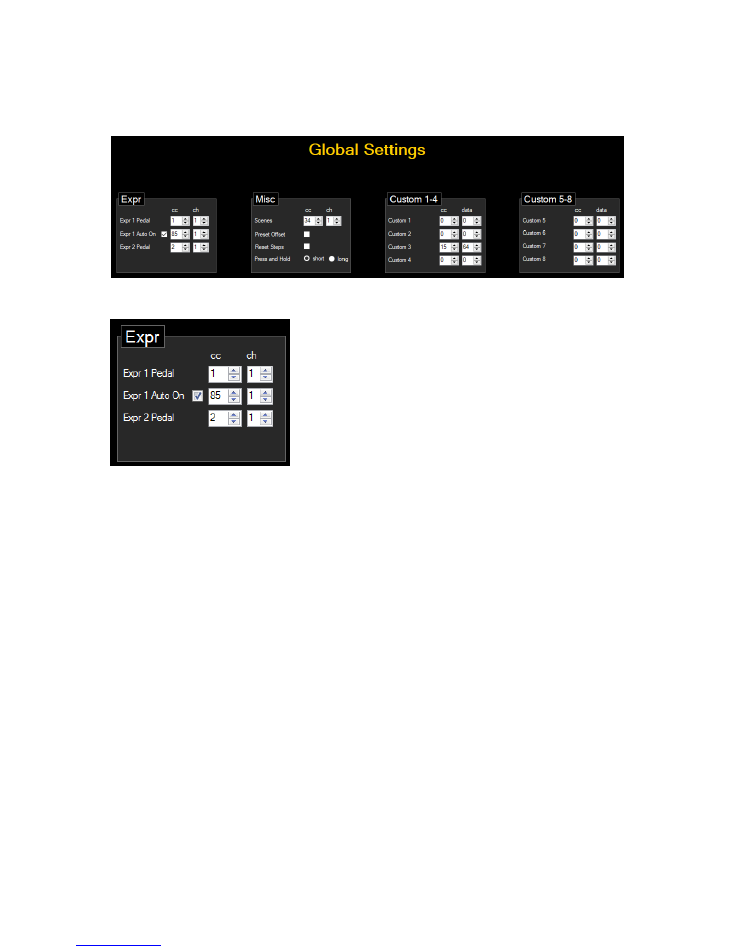
Global
tab is for editing Global Settings, see section 4.
Presets
tab is discussed in section 5.
(not available on the MC-5jr)
3.4 The Button
On other Midi Controllers, a button has 6 parameters for each command.
(Channel On, Command
On, Value On, Channel Off, Command Off, Value Off).
We reduced this to 2 parameters: Channel and
Command, making programming easier.
Voes Midi Controllers
8
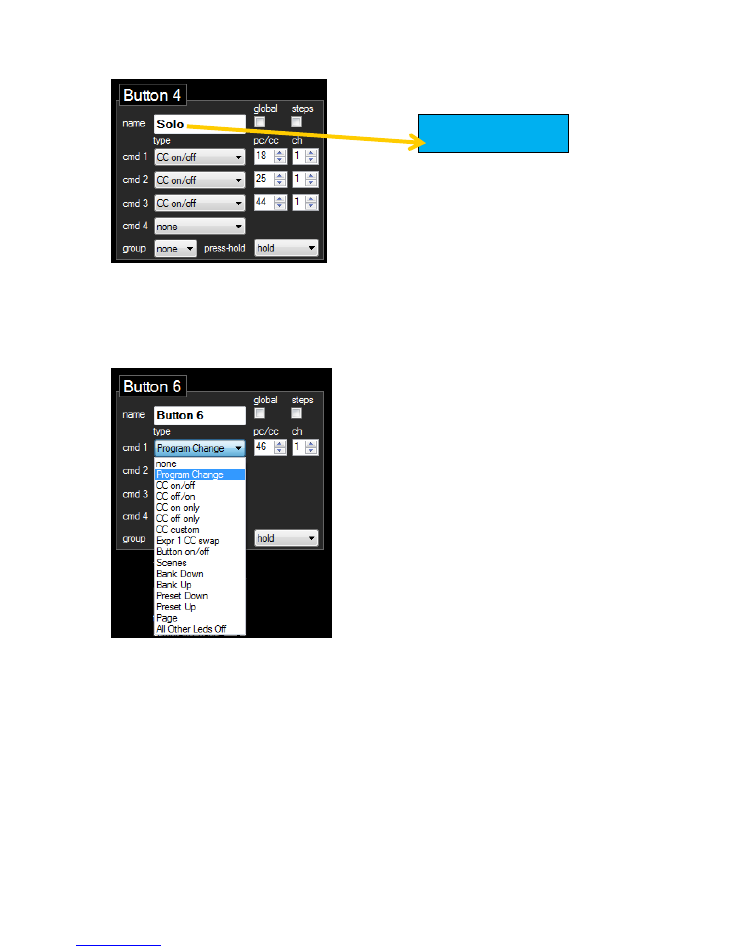
Each button can be
named
. If the first command is not a Program Change, this text is displayed on
the second line on the
MC-5/10
LCD. Every button can handle 4 commands. Each command has its
own
Type, PC/CC/Nr
and
Ch
(midi channel).
17 different
Types
are available (10 on command 2, 3 and 4).
None
None does nothing! If steps is active, this command will be skipped.
Program Change
Program Change transmits a program change
PC
on a midi channel
Ch
(1-16).
Depending on
Preset Offset
in
Global Settings (see section 4
), PC range is 0-127 or 1-128.
You can change the name of the first 64 presets
(see section 5)
.
P002 Vox AC30
Solo
Voes Midi Controllers
9
CC on/off
ON sends a control change
CC
(1-127) on
Ch
(1-16) with
Value
127
(maximum).
OFF sends exactly the same
CC
with
Value 0
(minimum).
CC off/on
This is the opposite of the previous type.
ON sends a control change
CC
(1-127) on
Ch
(1-16) with
Value
0
(minimum).
OFF sends exactly the same
CC
with
Value 127
(maximum).
CC on only
This type always sends
Value 127
on each press on
CC
(1-127) on
Ch
(1-16). This command is
ideal for Tap-tempo.
The corresponding led will blink briefly.
CC off only
This type always sends
Value 0
on each press on
CC
(1-127) on
Ch
(1-16).
The corresponding led will blink briefly.
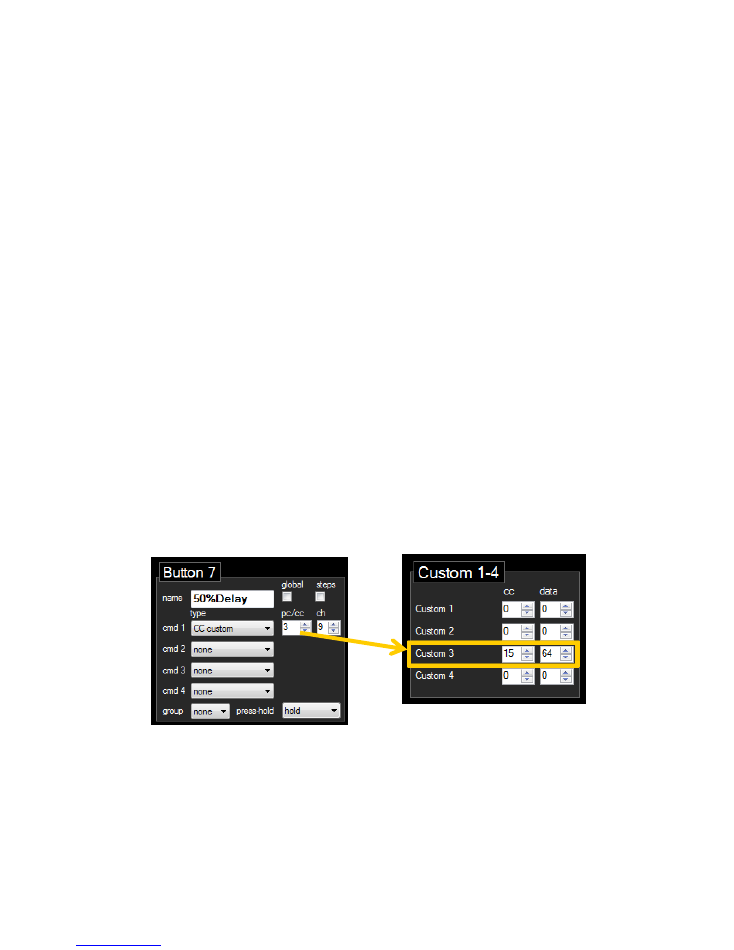
CC custom
A bit different is
CC custom
. It points to a custom
CC
and
Value
command found in
Global
Settings
(
see section 4).
E.g.
CC custom 3
sends
CC 15
with
Value 64
on
Ch 9.
The corresponding led will blink briefly. A total of 8 CC customs are available.
Expr1 CC Swap
(not available on the MC-5jr)
Expr1 CC Swap is a nice feature to change your Expr1 Pedal, e.g. from Wah to Volume.
ON replaces the
CC
and
Ch
of the regular Expr1 settings.
OFF returns to the regular settings found in
Global Settings (see section 4
).
Voes Midi Controllers
10
Button on/off
Turns another Button On or Off.
Caution!
You can create and endless loop. E.g. Button 1 turns Button 2 On and Button 2 turns
Button 1 On.
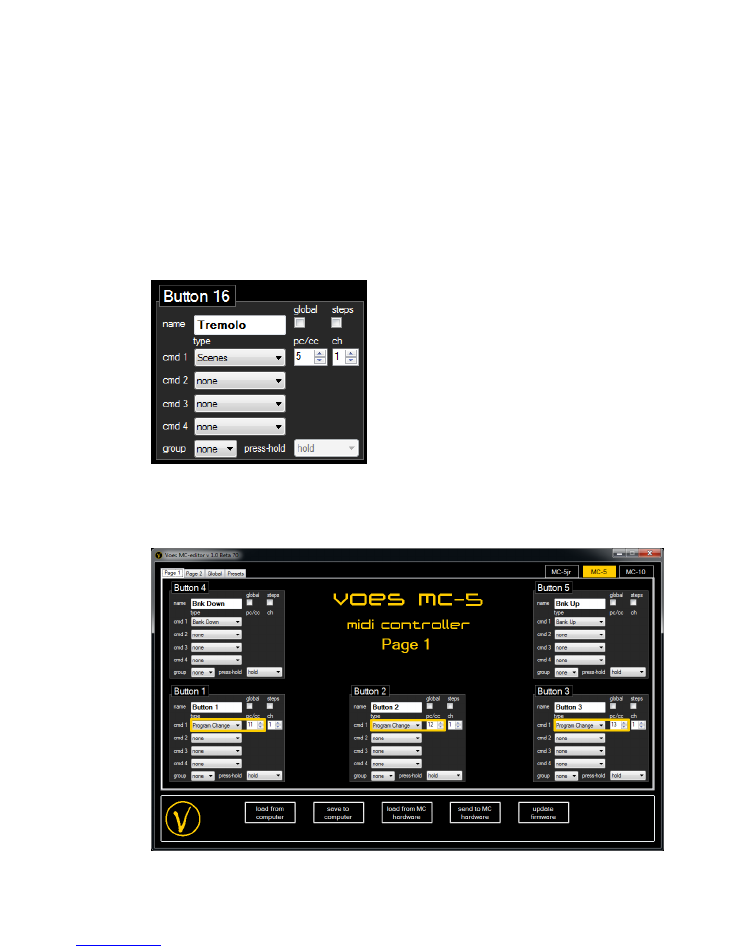
Scenes
(only available as first command)
The
MC-5jr/5/10
is capable of handling scenes, a
Fractal Audio Systems
™ feature.
When a Scene button is activated, all other Scene buttons will be turned off. Scenes CC
(default CC34) can be changed in
Global Settings
(
see section 4)
.
Bank Down / Bank Up
(only available as first command)
Bank Down/Up selects the first preset number and decreases/increases it with the count of
all the presets on both pages.

Voes Midi Controllers
11
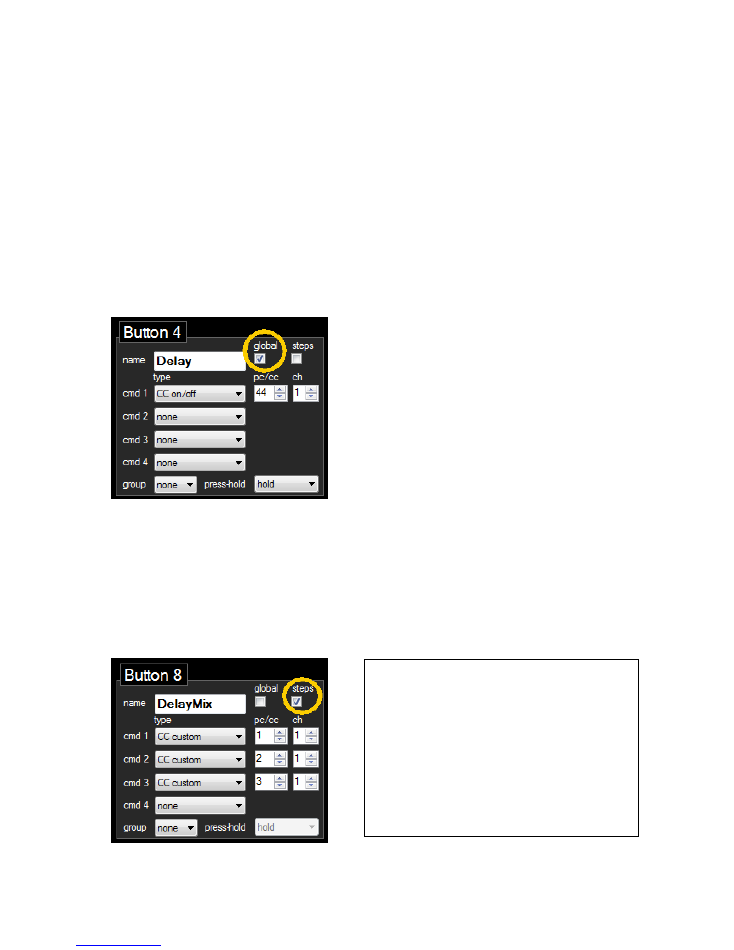
E.g. buttons 1, 2 , 3 are defined as
Program Change
Buttons with respective values 11, 12, 13.
If you push button 5
Bank Up
, the
MC-5jr/5/10
will seek the first PC value (11) and will add
the count of all PC buttons (3) giving you 11 + 3 = 14, 15, 16.
On the first line of the LCD, Bank and preset range are shown.
Second line shows 7 characters of the first preset name and the
last preset name of the bank to help you orientate.
Preset Down/Preset Up
(only available as first command)
Preset Down/Up is a function that is not often included in other Midi Controllers. You can
decrease/increase the current preset number. Only useful when 0 or 1 preset is programmed
on a Page.
If no preset is programmed on a Page, default start preset is 1 on Midi Channel 1.
Page
(only available as first command)
There are two ways to select another page.
Using a
Page
button toggles between page 1 and 2, and changes all buttons at once. The
page-LED (above LED 3 on the
MC-5jr
/ along the LCD on the
MC-5/10
) will be ON to indicate
you’re on page 2.
(Be aware that in order to go back you need to program a
Page
button on each page.)
Or you can change one button to its respective button on the other page by press-and-hold
(see
section 3.5)
. E.g. press button 2 activates button 2, press-and-hold button 2 activates
button 12. press-and-hold button 2 again activates button 2.
Buttons on Page 1 are indicated by a blue or green led. Buttons on Page 2 by a red led.
If the first command is a Program Change the preset name will be displayed on the first line
of the
MC-5/10
LCD. Presets on Page 2 have “*” as prefix.
P002 Vox AC30
P012*Badger18
Bank 2 P9-16
Supro ..Dumble
Voes Midi Controllers
12
All Other Leds Off
In some cases, there might be a conflict with the visual leds on/off layout and the actual
on/off state of the connected musical instrument. Using the
All Other Leds Off
command can
solve this problem.
Bank Select
(only available as first command)
When clicking on a
Bank Select
button, all leds will turn red and all buttons are connected to
their respective Bank number. E.g. clicking on button 3 will bring you to bank 3. After
selection, buttons will go back to their programmed state.
3.5 Global, Steps, Group, Press-and-Hold
Global
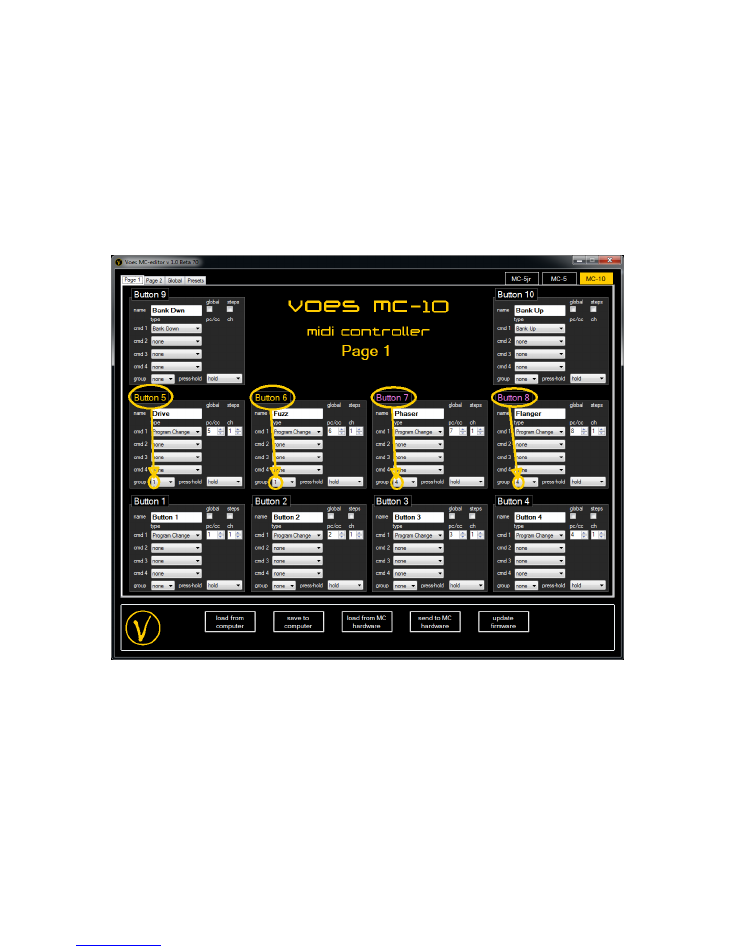
Global buttons in On status, will be retriggered on a Program Change. Global buttons are only global
on their page.
When using groups, this function is not available.
Steps
When activated, only one command will be executed. When using groups, this function is not
available.
E.g. on the left:
first press
command
1
second press command
2
third press
command
3
fourth press
command
1
(4 is skipped since it’s command is set to
None
)
fifth press
command
2
…
Voes Midi Controllers
13
With Steps you can’t use
Expr 1 CC Swap
and
Button on/off
. These commands will be changed to
nothing.
If
Reset Steps
is enabled, which you can find in
Global Settings (see section 4
), steps will reset to the
first step after 1 second of non-use.
Groups
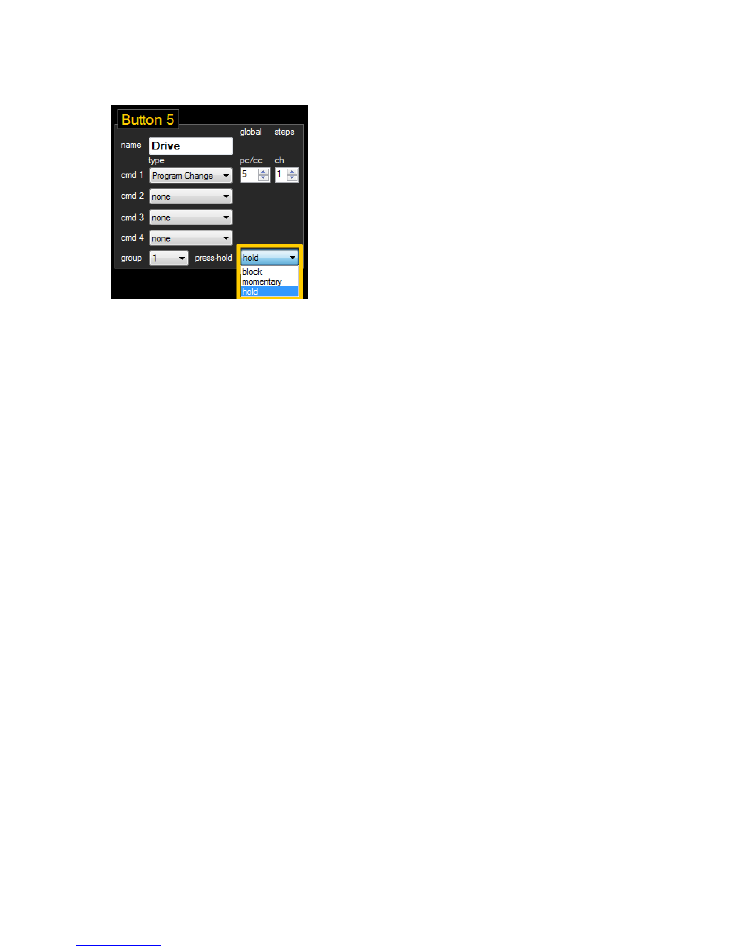
You can group buttons in one of
4
different button groups. Selecting a button group changes the
color of the button (on the editor!) into yellow (1), orange (2), green (3) or purple (4).
If a button is pressed, which is part of a button group, all other buttons in that group will be turned
OFF and then the selected button will be activated. It’s a very nice feature if you have FXs that are
similar but never used together (like different drives) and this feature will avoid tap-dancing.
Group buttons are only grouped together on their respective page.
When using groups,
global
and
steps
are not available because it can cause conflicts.
Voes Midi Controllers
14
Press-and-Hold
Using a Page button toggles between buttons 1-5/1-10 and 6-10/11-20.
You can also toggle each button separately by press-and-hold.
When activated, it will change a button to the respective button on the other page by press-and-
hold. E.g. press-and-hold button 4 activates button 14, press-and-hold button 12 activates button 2.
The press-and-hold time is approximately 0.5 seconds (short) or 1 second (long) depending on the
setting in
Global Settings (see section 4
).
Each button on the 1
st
page can be set to one of three types:
Block
: press-and-hold does not work.
Momentary
: press-and-hold will activate the button on the 2
nd
page once and will return back to the
1
st
page on the next press.
Hold
: press-and-hold will activate the button on the 2
nd
page and stay there.
Buttons on the 2
nd
page are always type hold.
Voes Midi Controllers
15
4.
Global Settings
4.1 Expr
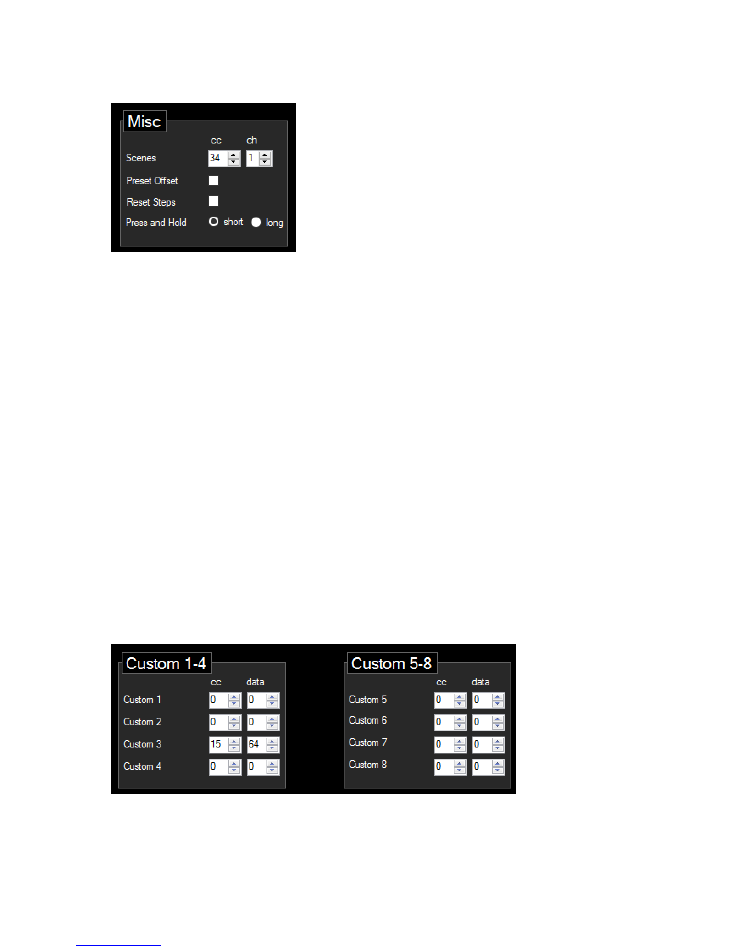
Expr 1 Pedal
CC
(1-127) on midi channel
Ch
(1-16). Do not forget to calibrate your pedal!
(see section 7)
Expr 1 Auto On
E.g. Wah Freq is controlled with CC 1, Wah On/Off is controlled with CC 85.
Instead of sacrificing a button to turn the Wah On/Off, you can use the
Auto On
feature.
Set Expr 1 Pedal CC to
1
and set Expr 1 Auto On
checked
and to CC
85
.
Moving Expression Pedal 1 higher than 5%, turns Wah On. If it is below 5%, it will turn Off.
Expr 2 Pedal
(only available on MC-10)
CC
(1-127) on midi channel
Ch
(1-16). Do not forget to calibrate your pedal!
(see section 7)
(not available on the MC-5jr)
Voes Midi Controllers
16
4.2 Misc
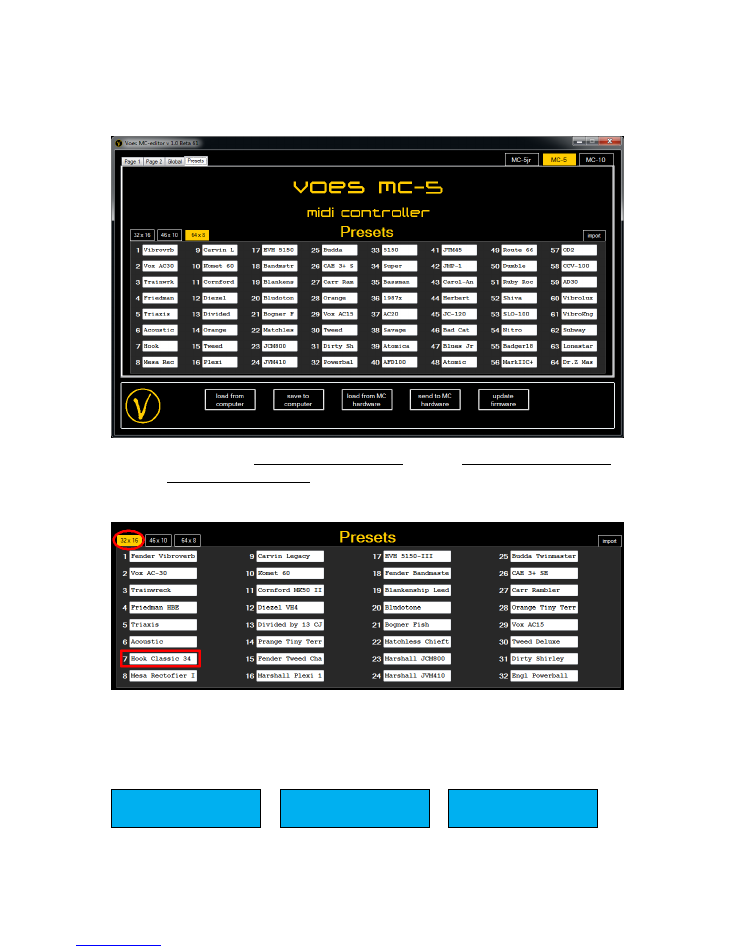
Scenes
MC-5jr/5/10
is capable of handling scenes, a
Fractal Audio Systems
™ feature. Here you
define the Scenes CC (default 34).
Preset Offset
Set PC range to 0-127 or 1-128.
Reset Steps
If enabled, steps will return to the first step after 1 second of non-use.
Press and Hold
Choose between a short or long time to engage press and hold.
4.3 Custom
A normal CC on the
MC-5jr/5/10
sends
Value 0
(minimum) or
127
(maximum). In most cases this is
sufficient.
However sometimes you might want to have different values. You can save eight custom
CC
(0-127)
and
value
(0-127) values. On a button you can select one of those with a
CC custom
command.
Voes Midi Controllers
17
5.
Presets
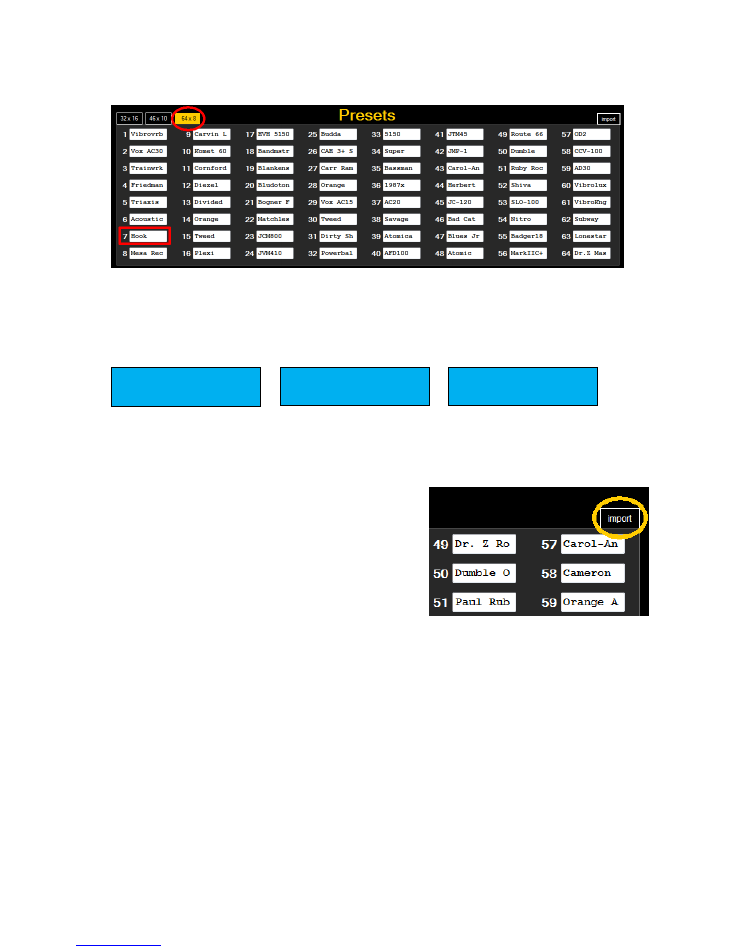
Here you can name the first 32 presets with 16 characters or the first 46 presets with 10 characters
or the first 64 presets with 8 characters. Your choise!
Preset names 32 x 16
Whenever a Program Change is the first command of a button, this name will be displayed on the
MC-5/10
LCD. Presets higher than 32 will be displayed as
“Preset xxx”
. Presets on Page 2 have “*”
added.
e.g.:
(not available on the MC-5jr)
Hook Classic 34
Preset 007
Diezel VH4
Preset 012*
Preset 033
Voes Midi Controllers
18
Preset names 46 x 10 or 64 x 8
Whenever a Program Change is the first command of a button, this name will be displayed on the
first line of the
MC-5/10
LCD. Presets higher than 46 (46x10) / 64 (64x8) will be displayed as
“Preset
xxx”
. Presets on Page 2 have “*” as prefix.
e.g.:
Importing preset names
Use the
import
button in the right corner to import
preset names from any
TXT
or
CSV
file.
One preset per line. Names will be automatically truncated.
P007 Hook
P012*Diezel
P065 Preset 065
Voes Midi Controllers
19
6.
Load/Save/Update
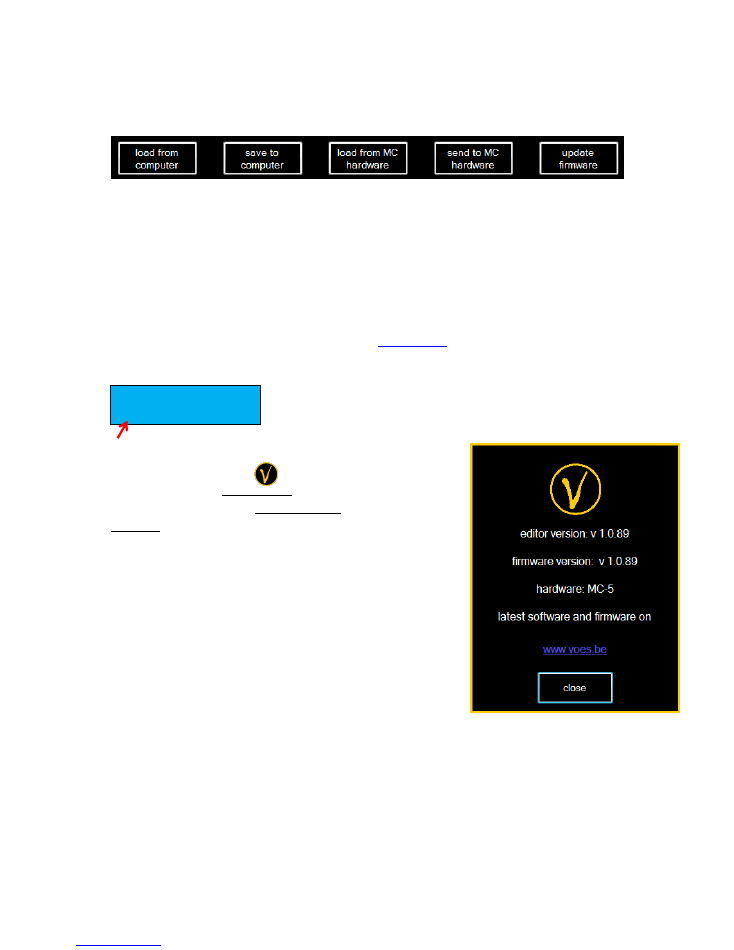
You can save and load settings from/to the computer and from/to
MC-5jr/5/10
.
Data-files are compatible and exchangeable between
MC-5jr
,
MC-5
and
MC-10
.
When sending data-files to
MC-5jr/5/10,
please wait until the
MC-5jr/5/10
reboots.
Updating firmware
Most recent firmware and software can be found on
www.voes.be
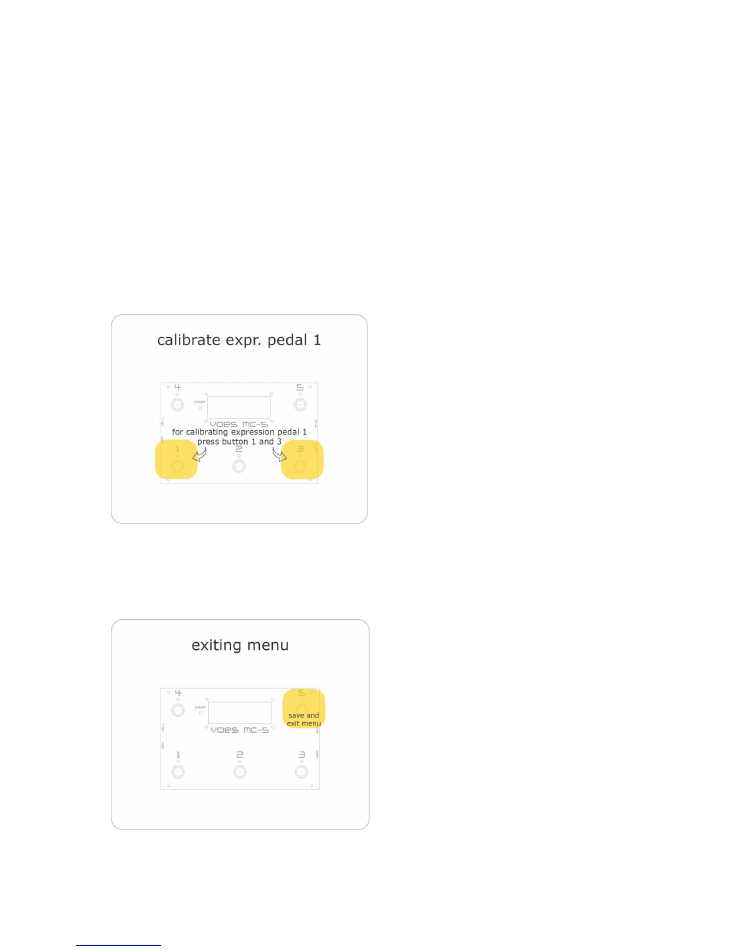
Booting the
MC-5/10
will display the installed firmware:
Another way to find the firmware version (especially useful for the
MC-5jr
) is by clicking on the logo in the left bottom corner. An
info window with the editor version will appear. If data is loaded
from the
MC-5jr/5/10
,
both firmware version and connected
hardware are shown.
When updating firmware, keep in mind that the firmware file needs
to be placed in the program directory.
A batch program will be started. Wait until it stops, and close the
window.
(We could make it auto close, but if any error appears it’s
easier to report this way.)
Voes MC-5jr/5/10
v1.0.89
Voes Midi Controllers
20
7.
Calibrating Expression Pedals
Before using an expression pedal, it needs to be calibrated. This can of course not be done on the
editor but on only the
MC-5jr/5/10
itself. You only need to do this once (Calibrating values are saved
in memory).
Important!
After you calibrate your pedals, use the editor to back up your settings.
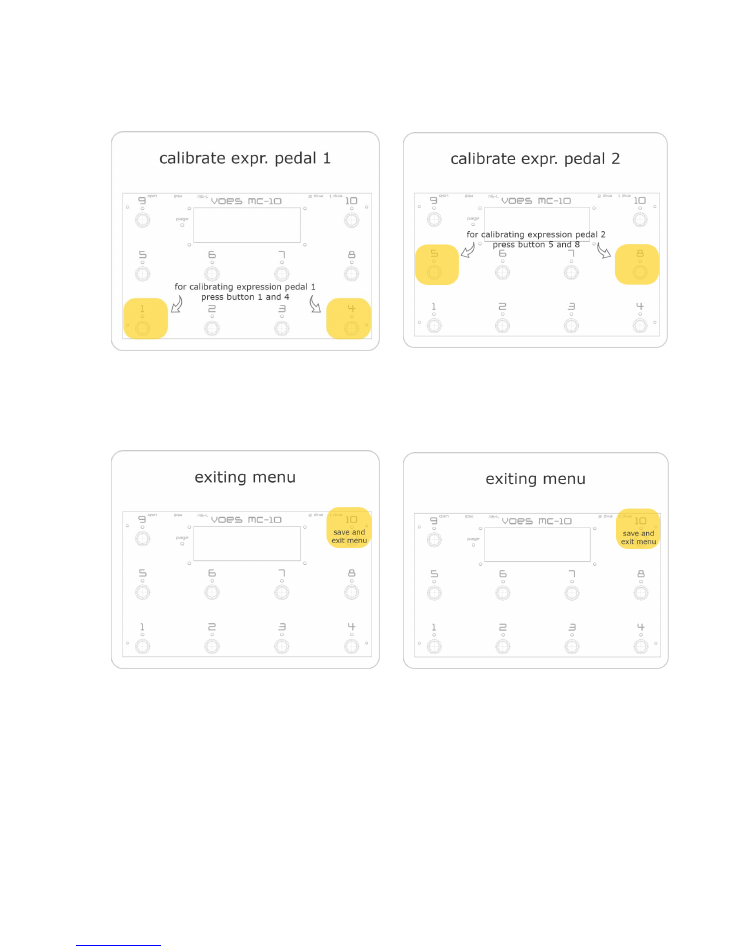
To activate the calibrating menu, use following instructions:
MC-5
move expr. pedal 1
a progress bar moves on the LCD
Voes Midi Controllers
21
MC-10 expr pedal 1 MC-10 expr pedal 2
move expr. pedal 1
a progress bar moves on the LCD
move expr. pedal 2
a progress bar moves on the LCD