Full Text Searchable PDF User Manual

INSTRUCTION MANUAL
Model Number: MC0188
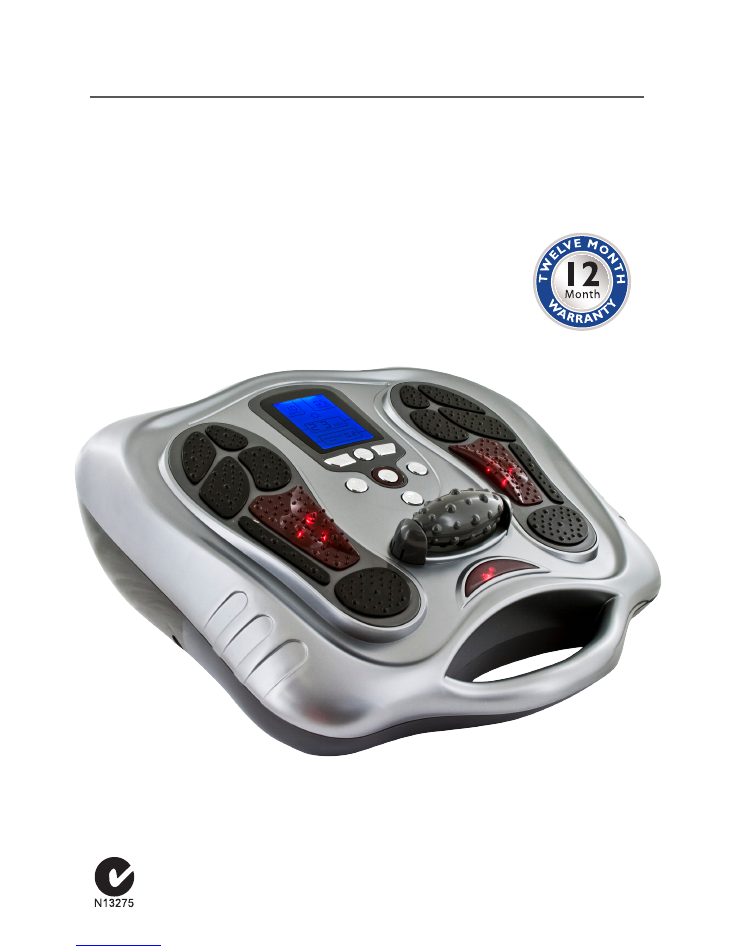
INFRARED STIMULATING
FOOT MASSAGER
Health by Vitalcare

1
IMPORTANT SAFETY INSTRUCTIONS
Store this instruction manual in a safe place, along with your warranty card, purchase
receipt and packaging box for future reference. Please pay particular attention to the
safety information and familiarise yourself with the procedure before assembling the unit.
• Check that you have all the component parts on page 4 of the manual and
familiarise yourself with each part before proceeding.
• Take all the fittings out of the plastic bag and separate them into their groups.
• Ensure you have enough space to lay out all the parts before assembly.
WARNINGS
• Long term effects of chronic electrical stimulation are not known.
• Safety not determined for use during pregnancy
• Persons with heart problems: DO NOT USE.
• Persons with suspected or diagnosed epilepsy: DO NOT USE.
• DO NOT stimulate over the carotid sinus nerves (or any part of the front of the
throat) especially in persons with known sensitivity to the carotid sinus reflex.
• DO NOT place over the front of the neck or mouth. Severe muscle spasms of
the laryngeal and pharyngeal muscles may occur. The contractions may be strong
enough to close the airway and obstruct or stop breathing.
• DO NOT apply transcerebrally (through the head).
• DO NOT apply current through the chest (transthoracic) as introduction of
electrical current through the heart may cause arrhythmias.
• Machine must not be used over swollen, infected or inflamed areas or skin eruptions,
e.g. Phlebitis, Thrombophlebitis, Phlebothrombosis, Varicose Veins etc. Emboli in the
calf or elsewhere can dislodge and cause pulmonary embolism or stoke.
• This machine must be kept out of reach of children.

2
PRECAUTIONS & GUIDELINES
DO NOT USE WHEN:
• There is tendency to hemorrhage acute trauma or fracture.
• DO NOT use following a recent surgical procedure when muscle contraction
may disrupt the healing process.
• DO NOT use when menstruating.
• DO NOT use where sensory nerve damage is present by a loss of normal skin.
Some persons may experience skin irritation or hypersensitivity due to the electrical
stimulation or electrical conductive medium used. The irritation can usually be
reduced by use of an alternative conduction medium, or electrode placement.
THIS IS NOT A MEDICAL DEVICE. THIS UNIT IS INTENDED TO
BE USED ONLY FOR GENERAL PHYSICAL CONDITIONING.
NO MEDICAL CLAIMS ARE IMPLIED OR WARRANTED BY THE
USE OF THIS PRODUCT.
IMPORTANT GUIDELINES
This Infrared Stimulating Foot Massager is extremely safe and simple to
use - However VITALCARE does not take any responsibility for any harm
caused due to misuse of the product. As a safeguard we suggest that if you
have the following conditions, seek advice before using the machine:
• After childbirth
• Persons using a heart pacemaker or with cardiac condition
• Epilepsy
• Multiple Sclerosis.
• Phlebitis in its active phase (Inflammation of a vein)
• Where tissue is inflamed through disease or injury.
• Recent scar tissue
• Varicose veins in its later stages
• During the heavy days of your period do not use the unit on your abs.

3
PRODUCT DESCRIPTION
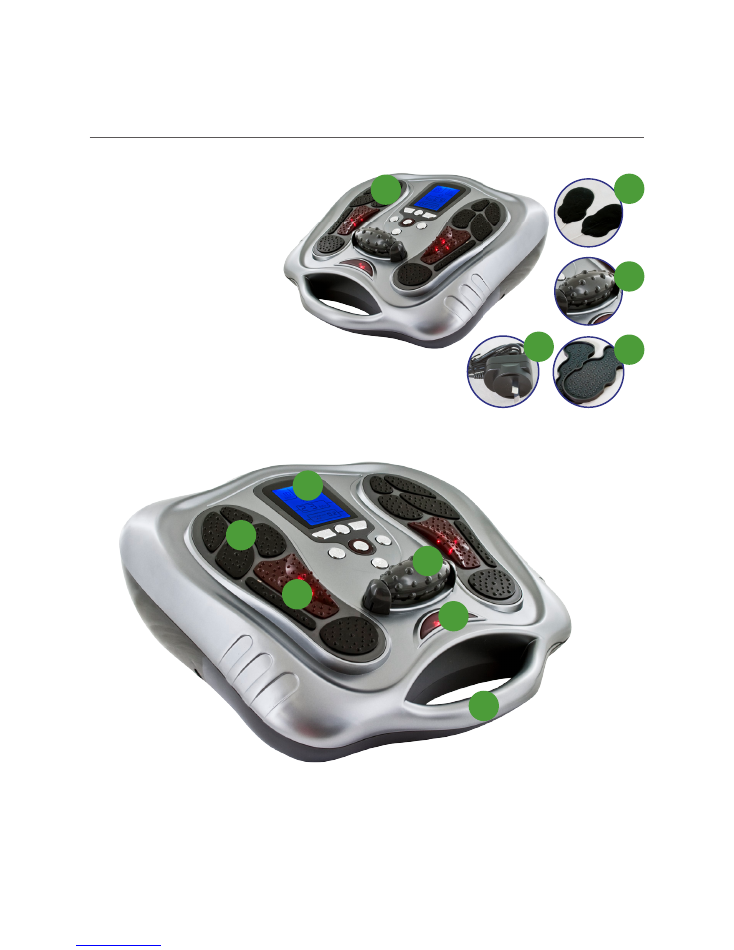
A. Stimulating area for feet
B. Infrared light foot plate
C. Sole roller massager
D. Infrared light
E. LCD screen with blue LED light
F. Carry Handle
THIS SET INCLUDES:
1. Infrared Stimulating
Foot Massager
2. 4 x stimulating massage
gel pads with wire cable
3. 2 x interchangeable
sole massager rollers
4. Power Adaptor
5. 2 x Gel pad protectors
6. User Manual
A
1
2
5
3
B
F
E
D
C
4

4
HOW TO USE THE LCD SCREEN
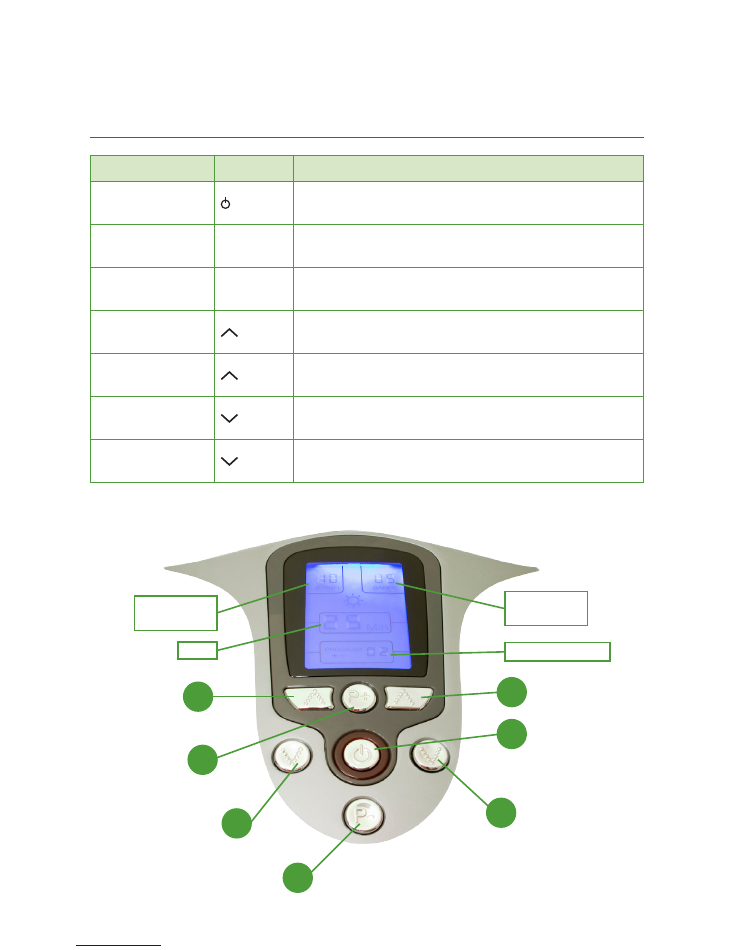
LOCATION IMAGE BENEFITS
A
To switch the unit on/off
B
P+
Choose from 1 of the 10 pre-programmed massage
programs ~ Upward
C
P-
Choose from 1 of the 10 pre-programmed massage
programs ~ Downward
D
Increase the output intensity of band 1 (Left hand
size) FROM 1- 40 LEVEL
E
Increase the output intensity of band 2 (Right hand
size) FROM 1- 40 LEVEL
F
Decrease the output intensity of band 1 (Left hand
size) FROM 1- 40 LEVEL
G
Decrease the output intensity of band 2 (Right hand
size) FROM 1- 40 LEVEL
A
B
F
G
E
D
C
Timer
Program Indication
Band 1
Intensity Level
Band 2
Intensity Level

5
CHANGING THE SOLE MASSAGER ROLLER
INSTALLING THE BATTERY
1. The battery compartment is located at the back of the unit.
2. Remove the battery cover from the unit
3. Insert 3 new 1.5V size C batteries with the and marks correctly aligned.
NOTE ON BATTERIES:
• Do not mix different types of batteries or an old battery with a new one
• To prevent the risk of leakage or explosions, never recharge the batteries, apply
heat or take them apart.
• When not using batteries, remove them to prevent battery drain.
• If liquid leaks from the batteries, throw them away. Thoroughly clean the battery
compartment with a dry cloth.
1. To take out the roller, pull the two side brackets upwards
2. The roller will then be released
3. Change to a new roller and push the two brackets back downwards into place.

6
CONNECTING THE POWER ADAPTOR
1. Connect the adaptor jack of the adaptor to the adaptor jack of the unit
2. Plug in the power adaptor to the wall socket. (Make sure that the input voltage
of the wall socket is suitable for the supplied adaptor)
HOW IT WORKS
1. In order to increase the conduction, apply some water on the sole of your foot.
2. Place your feet on the massager.
3. Press the “
”
button for 3 seconds to turn on the unit. The LCD screen will
light up in blue.
4. Then you can adjust the mode by pressing “P+” & “P-“ to select different
programs. Maximum 10 programs.
5. Gently increase the intensity setting by pushing the “ ” button, or decrease
the intensity setting by pushing the “ ” button. (Left button for “Band 1”, right
button for “Band 2”.) Maximum 40 levels.
6. You can adjust the program anytime, but once the program has been re-adjusted,
the intensity will return to ‘0’, in order not to shock the user from the new
program. The user will need to re-adjust the intensity.
7. To terminate the massage period, user can turn off the unit anytime by pressing
the “
”
button for 3 seconds.
Tip: Start massage at a low setting to begin, then gently increase.
AUTO FUNCTIONS
• The unit has an auto timer, it will start to count down from 25 minutes, and will
shut off after 25 minutes of massage.
• If you change the massage program within the 25 minutes, the timer will count
down from the original leftover time.

7
USING THE STIMULATING GEL PADS
1. Connect the output wire to the Stimulating Massage Gel Pads.
2. Then connect the other end of the output wire to the output jack of the machine.
3. Remove the protecting film from the adhesive pads.
4. Attach the Stimulating Massage Gel Pads to the skin steadily.
5. Press the “
”
button for 3 seconds to turn the unit on and adjust the stimulating
mode and output intensity as you wish. (The display will show the mode and the
level that you selected and start to count down)
CAUTION
• Never stick two adhesive pads to each other.
• Keep the adhesive gel pads clean, and never put them under high temperature
and direct sunshine.
• If the stimulating massage gel pads are insufficiently adhesive or dirty, wipe with a
wet cloth or change to new ones. Don’t clean the stimulating massage gel pads
with any chemicals.
• For protecting the gel pads, always put them on to the gel pad protector after use.
• Do not increase to high level or above comfort level.
• The appliance is not intended for use by persons (including children) with reduced
physical, sensory or mental capabilities, or lack of experience and knowledge, unless
they have been given supervision or instruction concerning use of the appliance by
a person responsible for their safety.
• Young children should be supervised to ensure that they do not play with the appliance.
WARNINGS
• Do not remove the silicon pads when the device is working.
• Make sure the unit is off before connecting the silicon pad cable to the device.
• Don’t use on wounds or problem skin.

8
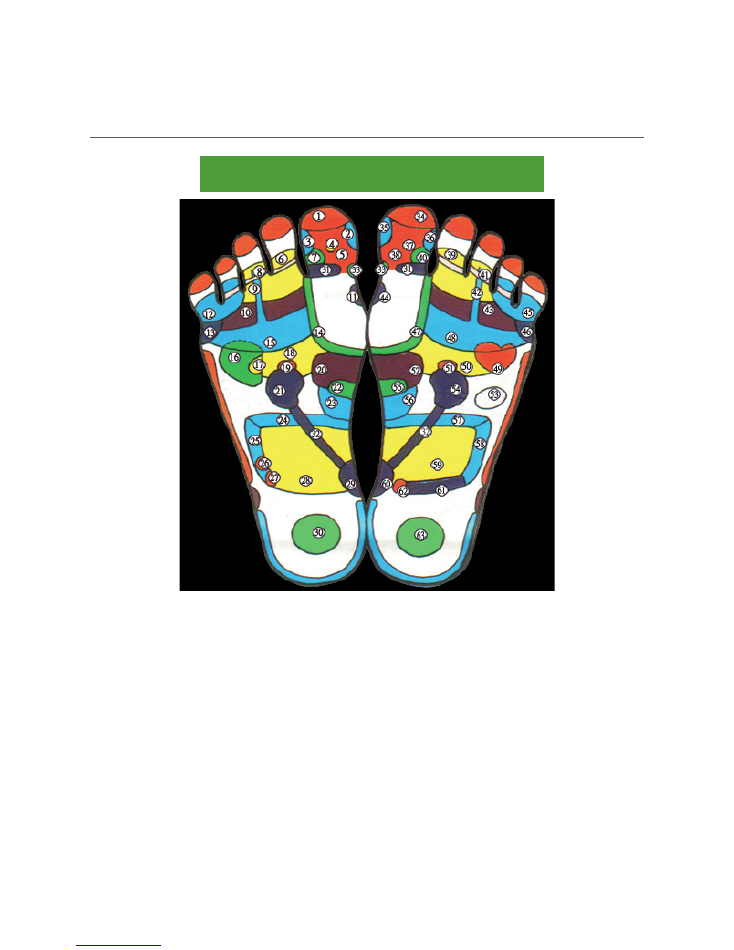
REFLEXOLOGY CHART
A reflexology chart shows the “reflex zones” worked by reflexologists on the soles of the feet. Similar
maps exist for the position of the reflexes on the hands, ears and internal organ of your body.
1.
Frontal Sinuses
2.
Nose
3.
Trigeminal Nerve
4.
Pituitary Gland
5.
Cerebrum
6.
Eye
7.
Cerebellum
8.
Back of head nerves
9.
Bronchi
10. Trapeziums
11. Parathyroid
12. Ear
13. Shoulder
14. Thyroid Glands
15. Lung
16. Liver
17. Gall Bladder
18. Solar Plexus
19. Adrenal Glands
20. Stomach
21. Kidney
22. Pancreas
23. Duodenum
24. Transverse colon
25. Ascending colon
26. Ileocecal Calve
27. Appendix
28. Small Intestines
29. Bladder
30. Genital Glands
31. Neck
32. Ureters
33. Cervical Vertebra
34. Frontal Sinuses
35. Nose
36. Trigeminal Nerve
37. Pituitary Gland
38. Cerebrum
39. Eye
40. Cerebellum
41. Back of head nerves
42. Bronchi
43. Trapeziums
44. Parathyroid
45. Ear
46. Shoulder
47. Thyroid Glands
48. Lung
49. Shoulder
50. Solar plexus
51. Adrenal Glands
52. Stomach
53. Spleen
54. Kidney
55. Pancreas
56. Duodenum
57. Transverse Colon
58. Descending Colon
59. Small Intestines
60. Bladder
61. Rectum
62. Anus
63. Genital Glands
THIS IS NOT A MEDICAL DEVICE. THE BELOW INFORMATION
ABOUT REFLEXOLOGY IS INFORMATIONAL ONLY.

9
TECHNICAL SPECIFICATIONS
• Battery power supply: 3 x C size batteries (not included)
or AC adaptor (included)
• Input: 230V ~ 50Hz or 12V ~ 50Hz
• Output: 4.5V DC 100mA
• Power Consumption: 0.45W

10
NOTES:

Distributed by Tempo (Aust) Pty Ltd ABN 70 106 100 252
PO Box 6056, Frenchs Forest DC, Australia NSW 2086
Customer Help Line : 1300 886 649 (AU) | 0800 836 761 (NZ)
Telephone: (02) 9975 2199 Fax: (02) 9975 2688
Email: info@tempoaustralia.com.au