Full Text Searchable PDF User Manual

UHWK “How To” Guide
Getting Started
•
Ready to go out of the box. Just give the battery a charge beforehand and
good to go.
•
Multiple elastic bands for easy attachment
•
Multiple helmet mounts for all different kinds of sports helmets
•
Camera Mounting Guide
1.
Hat/Helmet. If the Field of View is not perfect for your type of
hat/helmet or posture, there are 2 different size spacers designed to
be stuck/placed mid-way behind the camera to change the angle.
2.
The UHWK can also be chest mounted using the thinner elasticated
strap
3.
UHWK because of ergonomic profile and design can also easily be
worn on the forehead.
•
USB charging/uploading cable
•
Light Indicators
1.
Blue – Charging
2.
Solid Red – On and recording
3.
Flashing Red – Memory Card Full
•
Bleep Indicator
1.
Two Bleeps – Camera on and recording
2.
One Bleep when Switched Off
Micro Sd Card
•
A 8Gb Micro Sd Card is supplied pre installed. It is advised to use a Class 10
Micro SD card with 80mbs read speed to maximise the performance and
minimise download time of your video on to your computer. The UHWK
will take a maximum of a 32gb card, any larger and it won’t work.
Maximum video storage guide below at 1080Hd. Increases if shooting at
720p

1.
8gb - 1.5 hours of recording
2.
16gb - 3 hours
3.
32gb - 6 Hours
•
Carefully slide the micro sd card into the micro sd card slot until the card
clicks into place. Note that the card is only designed to go in one way, so if
not sliding in do not force it. As a guide the micro sd card should be
inserted with the metal contacts facing the same way as the lens. You
need to push the card in past flush to have the spring mechanism secure
the card in place.
View and Use Content/Computer/Mobile Device
•
Computer
. You have 2 options to download and manage your content
1.
Attach the UHWK via USB data cable to your computer
2.
Remove the micro sd card, place into SD card adapter and insert into
your computer.
•
UHWK should populate desktop, if this doesn’t occur, find the camera
where you would normally find your USB drive devices. E.g., in your
“Finder” on Mac
•
Once found, click on “DCIM” folder and then select “MOVIE”, your content
should now be visible and to play.
•
Use with any type of video editing software you’re familiar with (iMovie,
Windows Media Player)
•
Mobile Device
– Phone or Tablet (iOS and Android)
View, share and manage your content on the move by using our
i-FlashDevice HD. This is a simple to use adapter, insert your sd card
into the unit which is compatible with both iOS and Android mobile
devices
1.
Android. No App required. Video’s will just appear in your file
manager.
2.
iOS. When used for the first time you will be prompted to download
the i-FlashDevice App. If this is not automated you can search for this
manually or use the QR code on the packaging. Once App installed
and the unit hooked up to your mobile device your files will be under
Device Storage on App home page.

Changing Camera settings
•
Connect your UHWK to computer, find camera on computer and select
“SETTING.TXT” folder.
•
You can now customise:
o
Light exposure (higher exposure for darker settings, vice versa)
o
Light frequency (different countries have different compatible Hz)
o
Video quality (1080p or 720p)
o
Buzzer (turn on/off camera beep)
o
Audio (turn on/off ability to record audio)
•
Under “FORMAT” at the top, input the corresponding value to what you
want to change, for instance, if 1080p is preferred quality to capture
content change the value next to “VideoSwitch” to 0. To ensure the
appropriate change occurs, change “UPDATE” value from “N” to “Y” in the
second row of the “SETTING.TXT” box and then select File and Save
Battery Care
•
Only use the USB charger provided with the camera to protect the camera
and prolong life of the battery.
•
Do not to overcharge the battery. Typically the battery should take an
hour and half to charge from empty. It’s is not ideal leaving the camera
plugged in for long periods of time.
•
Typically you will get 1 hour 50 mins of record time when using 720p. This
will reduce slightly when using 1080

Troubleshooting
•
When camera is turned on you will hear two beeps and the hawk will light
in red. If your camera turns off soon after turning on, this suggests a
problem with the sd card or that the card is full. See below resolution
o
Memory card is full. To empty, ensure that all files on the card are
moved to the “Trash” or deleted and that the “Trash” is then
emptied
o
If above is not successful perform a reformat of the sd card (Note –
This will delete any saved video). Reformat guidance for Windows
and Mac can be found on the last 2 pages of this guide.
•
To charge, simply plug the USB cord into your UHWK and then connect to
a wall adapter or your computer and the hawk will illuminate blue. Once
fully charged, the blue light will turn off and no illumination will be
occurring
•
Should these simple fixes not work, find the “Reset” option next to the
charging port on the camera, select an item small enough to engage the
“Reset” button and depress for 10-15 seconds. Your UHWK should be
reset and ready to go!
•
If you still have questions, email
info@mycrocamuk.co.uk
and we will tend
to your inquiry right away!
Re-Formatting a memory card using a Windows PC
1.
Connect your microSD to your computer using the appropriate adaptor.
Save all the files from your SD card that you want to keep to your
computer as these will be lost.
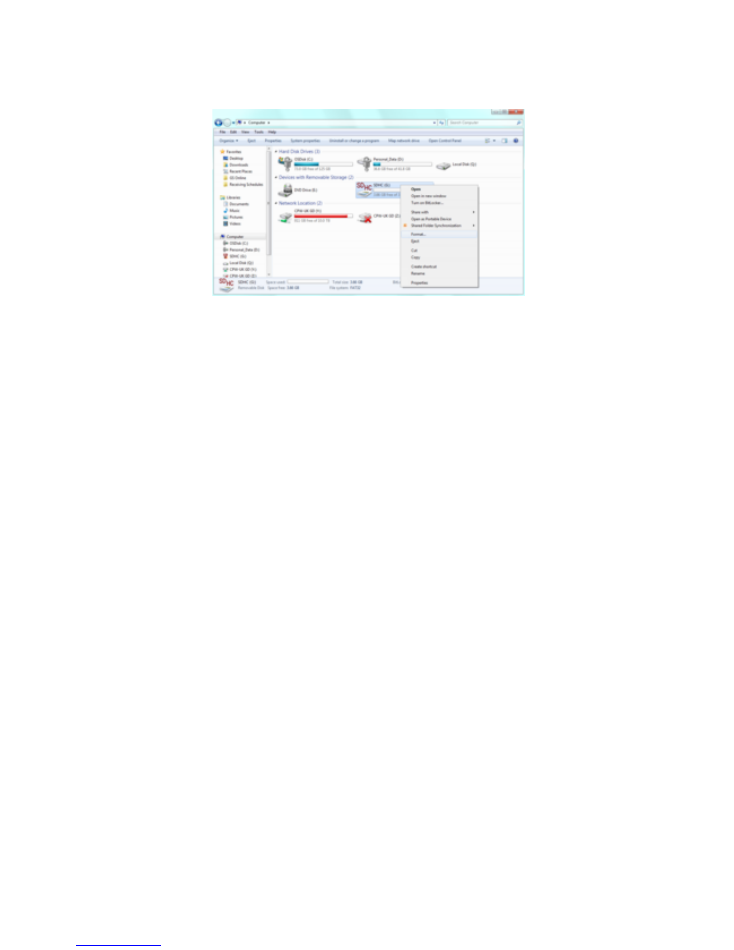
2.
Open My Computer by clicking on the Start button and
clicking Computer – or by holding down the Windows key and the
letter E on your keyboard at the same time.
Make sure you can see your hard drives in the main window of My
Computer, as in the image above. If you can't see your drives, click
on Computer from the left-hand menu.
3.
When you see your drives, you will see your SD card listed under Devices
with removable storage. Right-click on your SD card to view the context
menu.
4.
Click on Format... to view the formatting options.
Make sure that the File System is set to FAT32.
5.
Tick the box next to Quick Format. This will limit the process to the barest
essentials, making the whole process much faster.
6.
Finally, when you're ready, press the Start button and wait for the
progress bar to fill up. When it's finished, remove your microSD card and
place it back in to your UHWK camera.

Re-Formatting a memory card using a Mac
The following link for a video tutorial may be of help, if not written guide
below.
https://www.youtube.com/watch?v=XwA6F0R6Adg
1.
Connect SD card to Mac computer by using an external card reader.
Save all the files from your SD card that you want to keep to your
computer before moving to step 2. Formatting the SD card deletes
all the data off of the card.
2.
Open Disk Utility. To do this, click on the magnifying glass in the top-
right corner of your computer screen. Type “disk utility” in the
search box that opens, then click on the “Disk Utility” Application
that comes up.
3.
Find the SD card in the left side of the window. It’ll be named if you
have named the card, if not will be something like NO NAME or
UNTITLED.
4.
Click the ERASE tab in the middle of the window.
5.
Next, click on the “Format” dropdown menu. Select “FAT32”
6.
A message will appear asking, “Are you sure you want to erase the
partition “[YOUR SD CARD NAME]?” Click “Erase”. Now the
computer will delete the contents of your SD card and format it.