Full Text Searchable PDF User Manual

MANUAL DE USUARIO
CALENTADOR INSTANTANEO
TITÁN PLUS

1
INDICE DE CONTENIDO
Sección
Página
Información General .......................................................................................................... 2
A. General
1. Esquema general ............................................................................................................ 4
2. Aplicaciones ................................................................................................................... 4
B. Instalación
1. Ubicación del calentador .............................................................................................. 4
2. Instalación del agua ...................................................................................................... 5
3. Instalación eléctrica ...................................................................................................... 6
C .Funcionamiento ............................................................................................................ 6
D. Garantía
1. Aplicación de garantía .................................................................................................. 7
2
INFORMACIÓN GENERAL
Este calentador para agua debe ser instalado conforme a códigos eléctricos e hidráulicos locales. La
garantía para este calentador para agua tiene efecto sólo cuando el calentador de agua es instalado,
ajustado, y manejado conforme a este manual de instrucción, instalación y operación. El fabricante
de este calentador no se hará responsable de ningún daño resultado del incumplimiento de estas
instrucciones.
Este calentador para agua ha sido diseñado con el objetivo de calentar el agua potable. La
instalación y el empleo de este calentador para agua para algún otro propósito que la calefacción de
agua potable, pueden causar daño al calentador para agua y crear una condición riesgosa, lo cual le
hará perder la garantía.
No use este aparato si cualquiera de sus partes ha sido sumergida en el agua. Deberá ponerse en
contacto con el fontanero profesional responsable de la instalación para inspeccionar el equipo y
sustituir cualquier parte del sistema de control, que haya sido sumergida en el agua o presente daño.
Asegúrese que el voltaje sea suministrado correctamente al calentador para agua según el dato de
placa, mediante una caja de disyuntores apropiados para el calentador.
Este calentador para agua cuenta con un ánodo de sacrificio, el cual se usa para extender la vida del
tanque. El retiro de este ánodo, por cualquier razón, anulará la garantía.
Nota: el calentador debe ser revisado por un fontanero profesional o técnico calificado para su
reparación.
IMPORTANTE
Antes de proceder, por favor inspeccione el calentador para agua y los componentes para
prevenir un posible daño.
NO HAGA
la instalación con algún componente dañado. Si el daño es
evidente, por favor póngase en contacto con el distribuidor donde el calentador para agua fue
comprado o con el fabricante para adquirir las piezas de cambio.
ADVERTENCIA
El uso del calentador para agua produce altas temperaturas. Para evitar daños o heridas, no debe
haber ningún material almacenado contra el calentador y debe tenerse el cuidado apropiado para
evitar el contacto innecesario (sobre todo en niños) con el calentador para agua.
EN NINGÚN
CASO TENGA MATERIALES INFLAMABLES, COMO GASOLINA O PINTURA PARA SER
USADOS O ALMACENADOS EN LOS ALREDEDORES DE ESTE CALENTADOR DE AGUA.
Después de la lectura de este manual y las instrucciones de funcionamiento, seleccione la posición
para el calentador a nivel del piso, con una fuente de energía de fácil acceso y conexiones de agua
adecuadas.
3
Se recomienda que el calentador sea localizado cerca del punto de mayor uso de agua caliente para
prevenir la perdida de catee por los tubos.
Localice el calentador para agua de modo que el
acceso a panel de control y válvulas sea fácil y rápido.
La corrosión del calentador y el deterioro de los componentes pueden ser causados por la
calefacción de vapores químicos aerotransportados. Los ejemplos de los compuestos más típicos
potencialmente corrosivos son: el rocío de propelentes, limpiadores solventes, refrigerantes,
químicos de piscina, el calcio o el sodio clorhídrico, ceras y procesos químicos. Estos materiales son
corrosivos en niveles de concentración muy bajas con poco o ningún olor para revelar su presencia.
NOTA: EL DAÑO CAUSADO POR LA EXPOSICIÓN O VAPORES CORROSIVOS NO ESTÁ
CUBIERTO POR LA GARANTIA. NO UTILICE EL CALENTADOR DE AGUA SI LA EXPOSICIÓN
OCURRE. NO ALMACENE NINGÚN COMPUESTO POTENCIALMENTE CORROSIVO EN LOS
ALREDEDORES DEL CALENTADOR PARA AGUA.
Este calentador para agua debe ser localizado en un área donde la válvula de seguridad del tanque,
conexiones de línea de agua y la válvula de drenaje en caso de derrame no causen daño al área
adyacente al calentador o a los pisos de la estructura.
Si se abre el calentador con el propósito de limpieza o un servicio similar o cambios de algún
termostato, asegúrese de que el calentador se encuentra desconectado antes de realizar cualquier
operación de trabajo.
PELIGRO
La temperatura a 55°C (125°F) puede causar severas
quemaduras o daños a la piel expuesta.
Los niños discapacitados y los adultos mayores requieren
atención para el uso de agua caliente.
La válvula de seguridad es requerida.
4
A. GENERAL
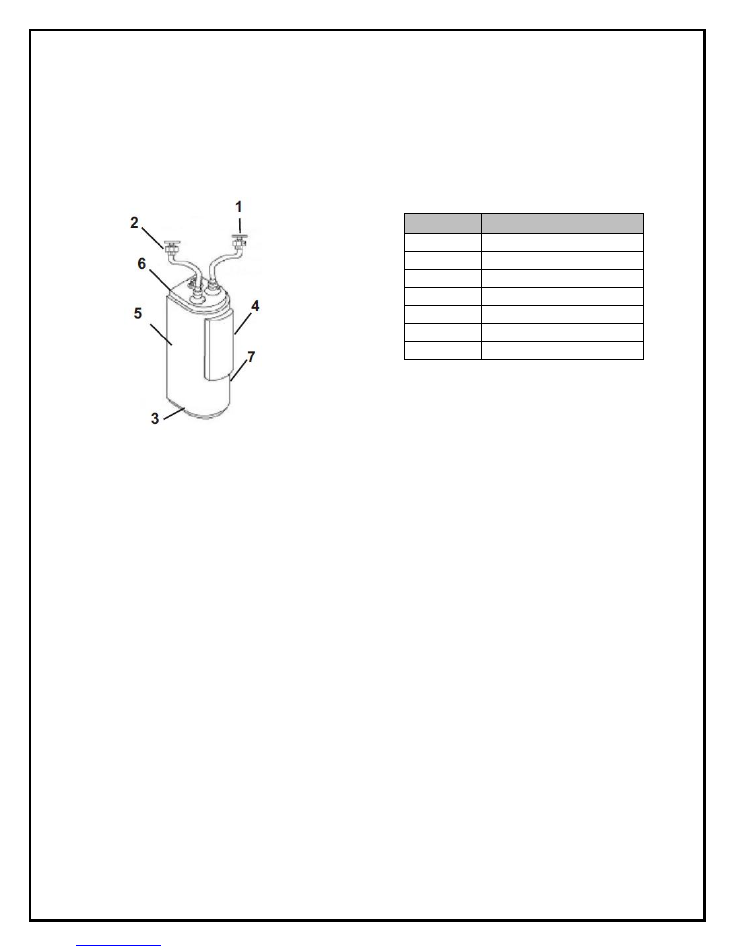
1. Esquema General
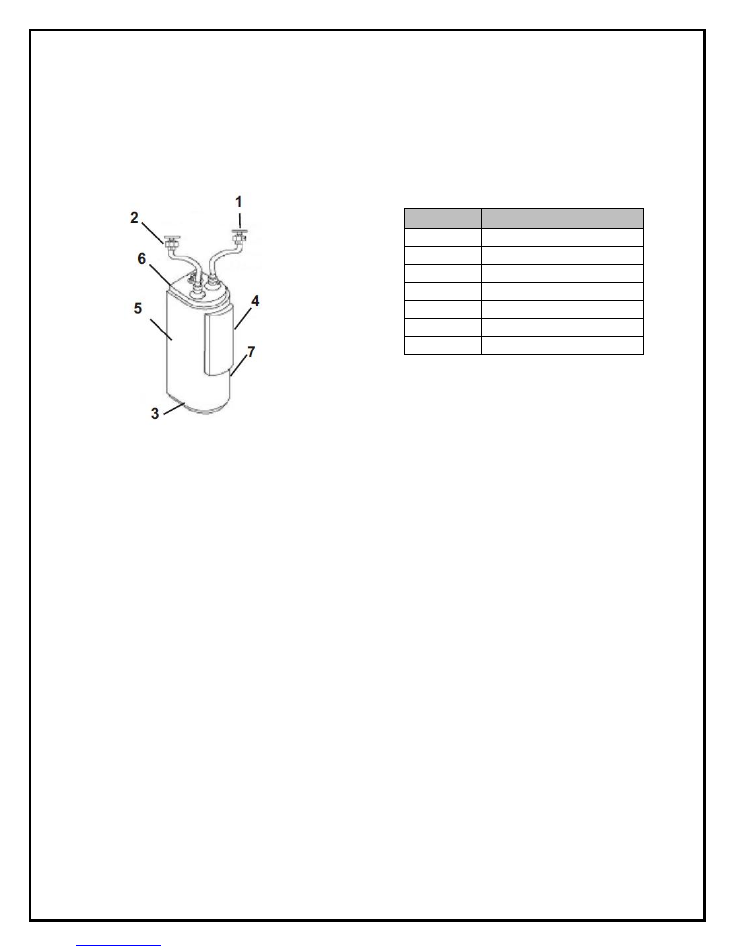
En la figura Nº 1 se presenta un diagrama general del calentador instantáneo con sus partes
descritas en el cuadro Nº1
Figura Nº1 Partes del Titán
Cuadro Nº 1 Partes del Titán
Parte
Descripción
1
Entrada de Agua
2
Salida de Agua Caliente
3
Acceso a Resistencias
4
Acceso a Termostatos
5
Cuerpo del Calentador
6
Platina de Anclaje
7
Conexión Eléctrica
2. Aplicaciones
Al calentador instantáneo TITAN PLUS se le pueden dar aplicaciones en: fregaderos, lavamanos,
baños, tinas, en general, en todos aquellos lugares en donde usted desee tener acceso a agua
caliente.
B. Instalación
Para realizar una buena instalación de su calentador instantáneo modelo Titán Plus, siga las
instrucciones, en el orden aquí indicado.
1. Ubicación del calentador.
El calentador instantáneo debe de ser instalado cerca o centralizado de las aplicaciones, además
debe estar protegido contra la humedad y las inclemencias del tiempo.
Puede ser instalado sobre una superficie o se puede fijar en una pared pero, debe ser instalado
SIEMPRE en forma vertical y lejos de los niños No se debe instalar en cielorrasos ni áticos o en
aquellos lugares donde el derrame de agua pueda causar daños a pisos de mobiliario, además es
preferible que en el lugar de la instalación se posea acceso a un desagüe o drenaje para evacuar el
agua que la válvula de seguridad libera.

5
2. Instalación del agua
En la figura Nº 2 se puede apreciar un diagrama que ayudará a realizar la instalación del agua,
además se encuentra con la descripción de las partes.
Figura Nº 2 Conexión al Sistema de Agua
Se recomienda seguir las siguientes instrucciones antes de realizar la conexión del agua:
Utilice los componentes y pegamentos adecuados que soporten el agua caliente.
En la entrada de agua fría se debe instalar como mínimo 1 metro de tubería de CPVC u otro
material resistente al agua caliente.
Nunca instale una válvula check cerca del calentador.
Pasos para la instalación de agua:
Instale 2 llaves de paso (de metal) a la entrada y salida del agua
Conectar la entrada de agua fría al niple indicado.
Asegúrese que la válvula vaya a un drenaje.
Instale la salida de agua caliente al niple indicado.
Antes de realizar la conexión eléctrica y habiendo realizado la instalación tal y como se indico
anteriormente, deje correr el agua por unos minutos para eliminar las cámaras de aire.
6
3.Conexión Eléctrica.
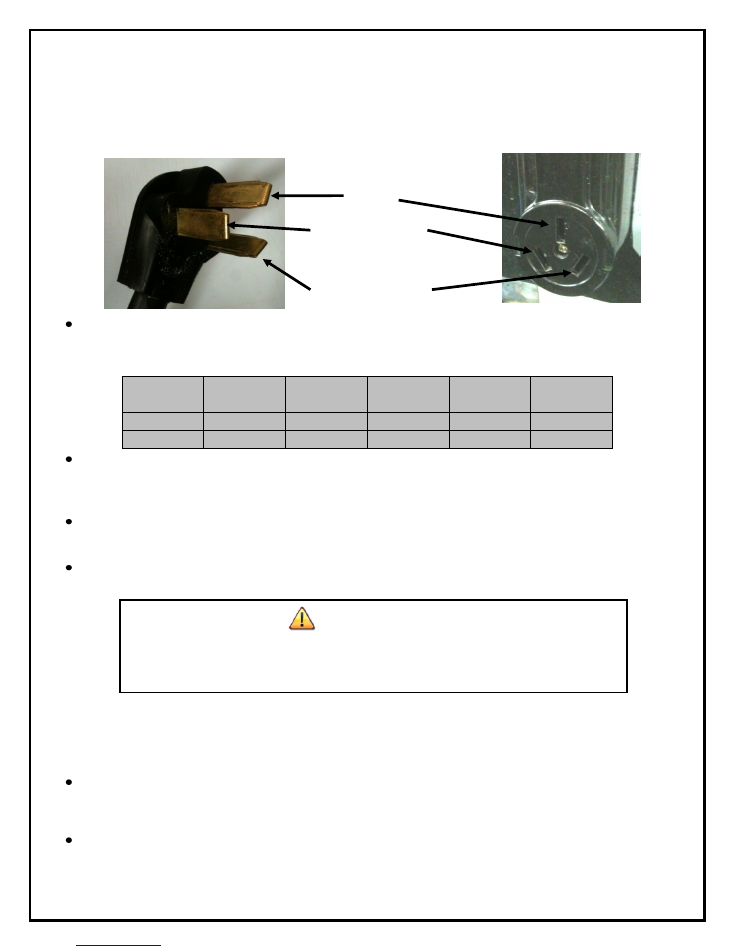
En la Figura Nº 3 muestra un diagrama que le ayudara a conectar eléctricamente su calentador.
Figura Nº 3 Conexión Eléctrica
Tierra
Línea Viva 120V
Línea Viva 120V
Utilice los componentes adecuados según el modelo que adquirió. Ver cuadro Nº 2
Cuadro Nº2 Componentes Adecuados para la Instalación
Modelo
Volumen
(Gal)
Potencia
(W)
Voltaje
(V)
Breaker
(A)
Cable
(AWG)
Titan-9
1,8
9000
220 ~ 240
2P/40A
#8
Titan-12
1,8
12000
220 ~ 240
2P/50A
#8
Conectar las líneas eléctricas desde el breaker hasta el calentador con el calibre indicado en
el cuadro Nº 2 evitando realizar empalmes de cables si está es su situación utilice conectores
especificados para tal caso.
Asegúrese de que las conexiones se encuentren fuertemente aseguradas y que no existan
falsos contactos.
Para ofrecer una protección continua contra el riesgo de descarga eléctrica, conecte
correctamente solo a circuitos con salidas a tierra.
IMPORTANTE
Antes de conectar el calentador a la instalación eléctrica asegúrese de que
el calentador se encuentre completamente lleno, dejando correr el agua
durante 2 minutos.
Conecte el breaker y así su calentador instantáneo se encontrará listo para empezar su
funcionamiento normal.
C. Funcionamiento
Si usted desea variar la temperatura del calentador tome en cuenta que a menor caudal se
obtiene mayor temperatura, a mayor caudal la temperatura disminuye Recuerde tener cuidado
con los riesgos de quemadura.
Si usted desea utilizar el calentador instantáneo con más de una llave abierta a la vez
asegúrese de que las aspersiones no dejen pasar más de 2 galones de agua por minuto

7
D. Garantía Limitada
1) Esta garantía comienza su aplicación desde la fecha de compra del calentador. A fin de hacer efectiva esta
garantía el comprador indispensablemente deberá presentar la factura de compra.
2) La garantía para el calentador será efectiva únicamente cuando la instalación la hayan realizado técnicos
calificados en electricidad, fontanería y mecánica de acuerdo con las instrucciones impresas en el manual de
instalación, el calentador debe ser instalado de tal manera que, si el tanque o cualquier conexión del mismo
presenta fugas de agua, no cause daños a la zona en la que fue instalado.
3) El tanque interno posee una garantía limitada de cinco años por fugas debido a defectos de fabricación o
por oxidación, durante los primeros dos años de uso, el fabricante reparara o sustituirá con un nuevo tanque,
sin ningún costo para el propietario. Para los restantes tres años, la garantía será del 50 % del costo de la
reparación o sustitución del mismo.
4) Las partes eléctricas como termostatos, resistencias y el Timer, poseen una garantía limitada de su
reemplazo por una única vez durante un periodo de un año. Queda a criterio Thermo Solutions Group SA
determinar si la pieza es defectuosa, en caso de que el problema no sea imputable al calentador, los costos
del repuesto y reparación deberá ser cubierto por el cliente.
5) Accesorios tales como válvula de seguridad y el cable de conexión eléctrico TSJ, tienen garantía de un
mes. Mangueras o tuberías de abasto no tienen ningún tipo de garantía.
6) El propietario deberá presentar su reclamo de garantía en el distribuidor o directamente al fabricante en su
centro de servicio ubicado en el cantón de Santa Ana en la provincia de San José. Si el propietario exige una
visita técnica al lugar donde se encuentra instalado el calentador, esta tendrá un costo adicional determinado
por el fabricante, el costo será estándar en una distancia de 30 km desde Thermo Solutions Group.
7) Thermo Solutions Group, SA, no se hace responsable por los daños materiales causados por instalaciones
inadecuadas, y que no cumplan con los requisitos del fabricante del producto, así como las normas y códigos
de construcción, eléctricos y mecánicos.
8) Los gastos de desmontaje y de mover el calentador hasta el centro de servicio en Thermo Solutions Group
S.A., estará a cargo del propietario, así como la reinstalación del mismo. Thermo Solutions Group S.A. no
asume ninguna responsabilidad o compromiso para ello.
9) Cualquier traslado para una revisión técnica, o la reparación de un calentador tendrá un costo adicional
determinado por Thermo Solutions Group S.A, toda visita técnica tiene garantía de treinta días naturales.
10) Si el cliente trae por sus propios medios el calentador al centro de servicio, y el calentador se encuentra
fuera del período de garantía, el cliente asumirá los costos de los servicios de revisión, mano de obra y
repuestos que se utilicen en la reparación.
Para información técnica, servicio o respecto a su garantía, puede llamarnos al teléfono 2203-4616 o
envíenos su mensaje a la dirección de correo electrónico info@thermosolutionsgroup.com
8
Si desea que técnicos de THERMO SOLUTIONS GROUP S.A. Le instalen
su calentador sírvase llamar al siguiente número:
Teléfono: 2203-4616
www.thermosolutionsgroup.com
USER’S MANUAL
INSTANTANEUS WATER HEATER
MODEL: TITAN PLUS

1
INDIX OF CONTENTS
Section
Page
General Information .......................................................................................................... 2
A. General
3. General Diagram ............................................................................................................. 4
4. Applications .................................................................................................................... 4
B. Installation
4. Location of Water Heater .............................................................................................. 4
5. Water Connections ........................................................................................................ 5
6. Electrical Connections .................................................................................................. 6
C. Operations ................................................................................................................... 6
D. Warranty
Limited Warranty .............................................................................................................. 7

2
GENERAL INFORMATION
This water heater should be installed in accordance with the electrical and hydraulic local code. The
warranty for this water heater applies only when the water heater is installed, adjusted and operated
in accordance with this instruction and installation manual. The manufacturer of this water heater will
not be liable for any damages caused by failure to comply with the installation and operations outline
in this manual.
This water heater has been designed to heat the water. The installation and use of this water heater
for any other purpose, can damage the water heater and create a hazardous condition, and will lose
the warranty.
Do not use this water heater if any part has been submerged in water. You should contact the
responsible professional plumber to inspect the installation of the heater and replace any part, which
has been submerged in water or present damage.
Make sure the correct voltage is supplied to the water heater according to the data plate, through a
suitable circuit breaker box to the heater.
This water heater has an anode rode, which is used to extend the life of the tank. The removal of this
anode rode, for any reason will void the warranty.
The heater should be checked by a professional plumber or qualified technician for repair
IMPORTANT
Before proceeding, please inspect the water heater and components to prevent damage. DO
NOT install some component damaged. If damage is evident, please contact the dealer where
the water heater was purchased or the manufacturer to acquire the part of change.
WARNING
The use of the water heater produces high temperatures. To avoid damage or injury, there must
be no materials stored against the heater and appropriate care should be taken to avoid
unnecessary contact (especially children) with the water heater. IN NO EVENT BE FLAMMABLE
MATERIALS, like GASOLINE OR PAINT TO BE USED OR STORED IN THE VICINITY OF THIS
WATER HEATER
After reading this manual and operating instructions, select the position for the heater at floor level,
with an energy source accessible and adequate water connections.
3
It is recommended that the heater is located near the highest point of use hot water to prevent loss of
heat by the pipes. Locate the water heater with easy a fast access to valves and control panel.
Water Heater corrosion and deterioration of the components can be caused by the heating of
airborne chemical vapors. Examples of typical compounds potentially corrosive are: spray
propellants, cleaning solvents, refrigerants, pool chemicals, calcium or sodium chloride, waxes and
chemical processes. These materials are corrosive at very low concentration levels with little or no
odor to detect their presence.
NOTE: DAMAGE CAUSED BY EXPOSURE OR CORROSIVE VAPORS IS NOT COVERED BY THE
WARRANTY. DO NOT USE THE WATER HEATER IF EXPOSURE OCCURS. DO NOT STORE
ANY POTENTIALLY CORROSIVE COMPOUNDS IN THE SURROUNDING WATER HEATER.
This water heater must be located in an area where the safety valve of the tank, water line
connections and the drain valve in the event of a spill will not cause harm to the area near to the
heater or the floors of the structure.
If you open the heater for the purpose of cleaning or a similar service or changes of any thermostat,
make sure the heater is disconnected before performing any work.
DANGER
The water temperature at 55°C (125°F) can cause severe
burns and damage to exposed skin.
Children, disable and the elderly require care for the use of hot
water.
The pressure relief valve is required see manual.
4
A. General
1. General diagram
Figure Nº 1 shows a general diagram of the instant heater and table Nº1 description of the parties.
Figure Nº1 Titan Parts
Table Nº 1 Titan Parts
Part
Description
1
Cold water Inlet
2
Hot Water Outlet
3
Resistors Access
4
Access thermostat
5
Heater Body
6
Holder
7
Electrical Connection
2. Applications
At TITAN PLUS instant heater can give applications: sinks, lavatories, toilets, tubs, in general, in all
those places where you want to have access to hot water.
B. Installation
In order to have a good installation of your titan plus, follow the instructions show bellow:
1. Location of the Heater
The instantaneous water heater must be installed near or centralized applications, and must be
protected from moisture and weather.
It can be installed on a surface or can be attached to a wall but ALWAYS be installed vertically and
away from children should not be installed on ceilings or attics or in places where water spillage could
cause damage to flooring furniture, it is also preferable that in place of the installation possesses
access to a drain or drain to drain water that the pressure relief valve releases.
5
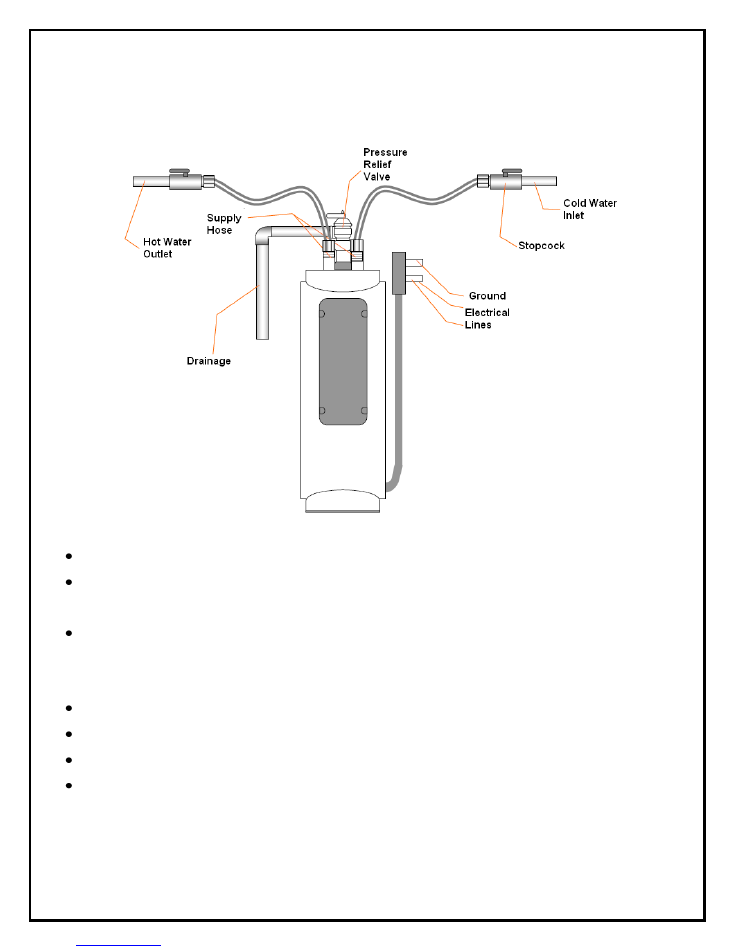
2. Water Connections
Figure N º 2 shows a diagram that will help install water also meets the description of the parties.
Figure Nº 2 Connections to the Water System
It is recommended to follow these instructions before connecting the water:
Use appropriate components and glues that support the hot water.
In the cold water inlet must be installed at least 1 meter CPVC pipe or other material resistant
to hot water.
Never install a check valve near the heater.
Steps for installation of water:
Install 2 valves (metal) to the inlet and outlet water
Connect the cold water inlet to the supply hose indicated.
Connect the hot water outlet to the supply hose indicated.
Make sure the pressure relief valve is put into drainage.
Before making the electrical connection and has done the installation as indicated above, run the
water for a few minutes to remove the air chambers.
6
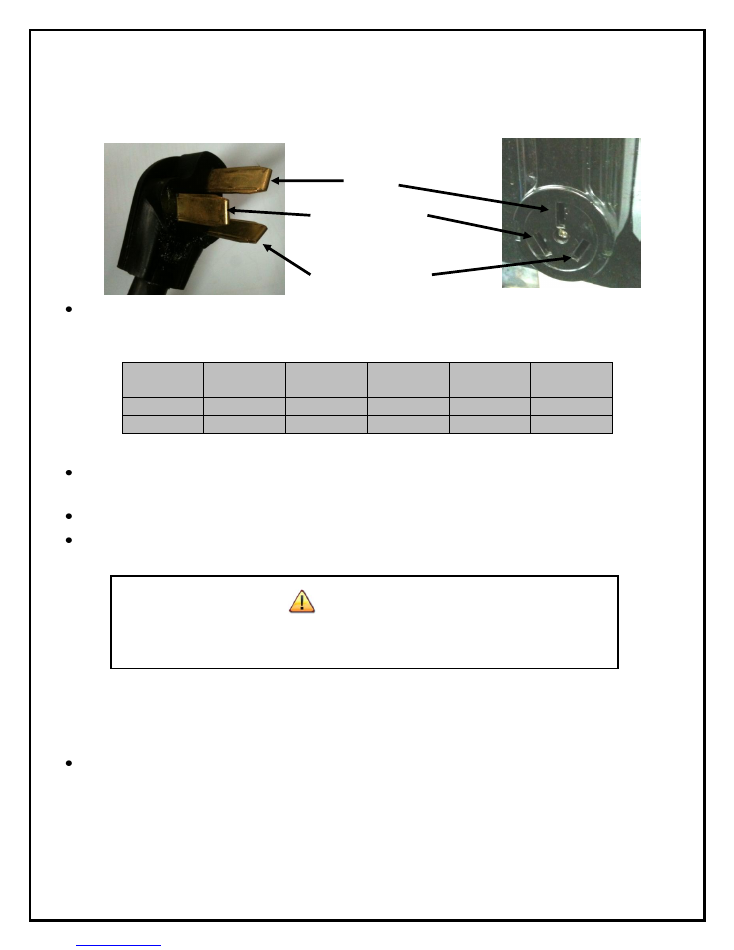
3. Electrical Connections.
Figure Nº 3 shows a diagram that will help you connect your water heater electrically.
Figure Nº 3 Electrical Connections
Ground
Live Line 120V
Live Line 120V
Use the appropriate components depending on the model you purchased. See Table Nº 2
Table Nº2 Suitable Components for Installation
Model
Volume
(Gal)
Watts (W)
Volts
(V)
Breaker
(A)
Cord
(AWG)
Titan-9
1,8
9000
220 ~ 240
2P/40A
#8
Titan-12
1,8
12000
220 ~ 240
2P/50A
#8
Connect the power lines from the breaker to the heater with the size indicated in Table No. 2
avoid splicing wires if your situation using connectors specified for that matter.
Make sure the connections are tightly secured and that no false contacts.
To provide continued protection against the risk of electric shock, connect to properly
grounded outlets only.
IMPORTANT
Before connecting the water heater to the electrical installation ensure that
the heater is completely fill, letting the water run for 2 minutes.
Connect the breaker and so its instantaneous heater will be ready to start normal operation.
C. Operation
If you want to change the temperature of the water out the heater, remember that less flow
gives a higher temperature and more flow gives a lower temperature. Remember to be careful
with the risk of burning.

7
Limited Warranty
1) This warranty begins his application from the date of purchase of the heater. In order to apply the
warranty the buyer indispensably must present bill of purchase.
2) The heater warranty shall be effective only when the installation is done for qualified technicians in
electrical, plumbing and mechanical according to the directions on the installation manual, the heater
must be installed in such a manner that if the tank or any connections the same have water leaks, not
cause damage to the area where it was installed.
3) The inner tank has a limited warranty of five years for leaks due to manufacturing defects or
oxidation during the first two years of use, the manufacturer will repair or replace with a new tank at
no cost to the owner. For the remaining three years, the warranty will be 50% of the cost of repair or
replacement thereof.
4) Electrical parts like thermostats, resistors and the timer, have a limited warranty for replacement
only once for a period of one year. It is up to Thermo Solutions Group, SA determine if the part is
defective, if the problem is not attributable to the water heater, the replacement and repair costs will
be paid by the customer.
5) Accessories such as a pressure relief valve and electric cable TGP have one month warranty. The
hoses and pipes do not have any warranty.
6) The owner must submit your warranty claim to the distributor or the manufacturer's service center
located in the canton of Santa Ana in the province of San José. If the owner requires a technical visit
to the place where the water heater is installed, this will have an additional cost determined by the
manufacturer, the cost will be standard on a distance of 30 km from Thermo Solutions Group.
7) Thermo Solutions Group, SA is not liable for damage caused by inadequate facilities, and does not
meet the manufacturer's requirements, standards and building codes, electrical and mechanical.
8) The costs of dismantling and transfer the heater to the service center in Thermo Solutions Group
SA will be the responsibility of the owner, and reinstalling it. Thermo Solutions Group SA assumes no
responsibility or commitment for it.
9) Any transfer to a technical review, or repair of a heater will have an additional cost determined by
Thermo Solutions Group SA, all technical visit is warranted for thirty calendar days.
10) If the customer brings their own water heater to the service center, and the heater is outside the
warranty period, the customer will bear the costs of review services, labor and spare parts used in the
repair.
For technical information, service, or regarding your warranty, you can call us at 2203-4616 or send
your message to the email address info@thermosolutionsgroup.com
8
If you want THERMO SOLUTIONS GROUP S.A. technicians will install your
water heater please call the following number:
Phone: 2203-4616
www.thermosolutionsgroup.com