Full Text Searchable PDF User Manual

Owner's manual
Manuel d'utilisation
Manuale uso e manutenzione
Bedienungsanleitung
Manual del propietario
Instruktionsbok
(En, Fr, It, Ge, Sp, Sw)
TIA-340/ 350S
970-42465-212 2005. 07

The engine exhaust from this product contains
chemicals known to the State of California to cause
cancer, birth defects and other reproductive harm.
It is important that you read, fully understand and observe
the following safety precautions and warnings. Careless
or improper use of the unit may cause serious or fatal
injury.
II est essentiel que vous lisiez et compreniez parfaitement
les consignes de sécurité et autres avertissements
suivants et que vous les observiez strictement.
L'utilisation inattentive ou inadéquate de cette machine
risque de provoquer des blessures graves ou fatales.
Importante leggere, comprendere a fondo e osservare le
seguenti precauzioni di sicurezza e avvertenze.
Disattenzione o un uso improprio dell'unitá possono
causare lesioni gravi o letali.
Es ist wichtig, dass Sie sich mit den nachfolgenden
Vorsichtsmaßnahmen und Warnungen vertraut machen
und diese befolgen. Unvorsichtige oder unsachgemäße
Handhabung dieses Gerätes kann zu schweren oder
sogar lebensgefährlichen Verletzungen führen.
Es importante que usted lea, entienda totalmente y
observe las siguientes precauciones y advertencias de
seguridad. El uso descuidado o incorrecto de la unidad
podrá causarle lesiones serias o fatales.
Det är viktigt att du noggrant läser bruksanvisningen för
att fullt förstå och följa försiktighetsmåtten för säkerhet
och varningarna. Om apparaten används slarvigt eller på
något olämpligt sätt kan det medföra en allvarlig skada.
Read, understand and follow all warnings and
instructions in this manual and on the unit.
Lisez, comprenez et suivez toutes les
instructions et tous les avertissements donnés
dans ce manuel et sur le produit.
Leggere con attenzione e seguire tutte le
avvertenze e le istruzioni all'interno del manuale.
Die in der Bedienungsanleitung und an der
Maschine angegebenen Warnhinweise und
Anweisungen sind zu lesen und zu befolgen.
Lea, comprenda y siga todas las advertencias
y demás instrucciones de este manual y las
que hay en la máquina.
Läs, förstå och följ alla varningar och
instruktioner i denna bruksanvisning och på
maskinen.
En
ATTENTION!
Fr
ATTENZIONE
I t
WARNUNG!
Ge
ATENCIÓN!
Sp
VARNING!
Sw
En
Fr
I t
Ge
Sp
Sw
En
Fr
I t
Ge
Sp
Sw
Les gaz d'échappement du moteur de cette machine contiennent des
produits chimiques considérés comme pouvant entraîner des cancers, des
malformations congénitales et autres troubles de la reproduction.
I gas di scarico del motore di questo prodotto contengono elementi chimici
noti allo stato della California come cause di cancro, difetti congeniti e altri
danni al sistema riproduttivo.
Die von diesem Produkt erzeugten Abtgase enthalten Stoffe, die vom
Bundesstaat Kalifornien als Erreger von Krebs, Geburtsfehlern und
anderen Fortpflanzungsschäden angesehen werden.
El gas de escape de este producto contiene productos químicos conocidos
por el Estado de California que causan cáncer, nacimiento con defectos y
otros daños de reproducción.
Motoravgasen från denna produkt innehåller vissa kemikalalier som staten
Kalifornien klassificerat som cancerframkallande, fosterskadande eller
reproduktionsstörande ämnen.
Always wear eye, head and ear protectors
when using this unit.
Utilisez toujours des lunettes de protection
ainsi qu'une protection pour la tête et les
oreilles lorsque vous utilisez ce produit.
Indossare sempre protezioni per gli occhi,
per la testa e per le orecchie quando usate
la macchina.
Tragen Sie bei der Anwendung der
Maschine stets Helm, Gsichts -und
Gehörschutz.
Utilizar siempre las protecciones para los
ojos, cabeza y oldos cuando trabaje con la
máquina.
Bär alltid ögon-, huvud-och hörselskydd vid
användning av maskinen.
Ge
En
Sp
Fr
I t
Sw
WARNING
En
Fr
I t
Ge
Sp
Sw
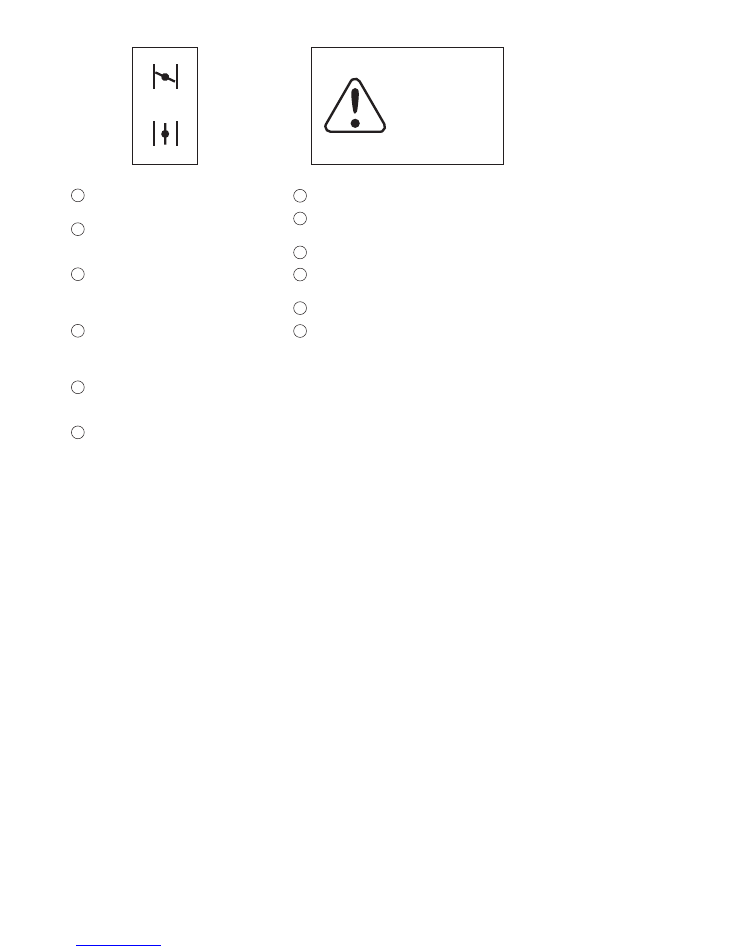
Explains choke position. Upper sign indicates
choke closed and the lower fully open.
Explique la position du starter. La figure
supérieure indique que le starter est fermé et la
marque inférieure qu'il est complètement ouvert.
Spiega la posizione della valvola dell'aria. II
segno superiore indica che la valvola dell'aria é
chiusa e quello inferiore indica che la valvola
dell'aria é completamente aperta.
Kennzeichnung der Choke-Position. Die obere
Markierung kennzeichnet den geschlossenen
Choke; die untere den vollständig offenen
Choke
Explica la posición del cebador. La señal
superior indica el cebador cerrado y la
inferior indica totalmente abierto.
Visar chokens position. Den övre indikatorn
visar att choken är stängd och den nedre visar
att choken är helt öppen.
Do not touch the bit when running the engine.
Ne touchez en aucun cas la méche quand le moteur
fonctionne.
Non toccare la punta quando il motore é in funzione.
Während des Betriebes des Motors den Bohreinsatz
nicht berühren.
No toquen la cuchilla mientras et motor en marcha.
Rör aldrig vid skäret när motorn går.
En
Fr
I t
Ge
Sp
Sw
Do not touch the
bit when renning
the engine.

Ge
What is what?
Warnings and safety instructions
Assembly procedures
Operating procedures
Maintenance
Specifications
En
1
2
8
9
13
21
Index
Read the operator's manual carefully.
Check that the cutting equipment is correctly assembled
and adjusted.
Start the unit and check the carburetor adjustment. See
"Maintenance".
Before using your new unit
¿Qué es qué?
Advertencias e instrucciones de seguridad
Procedimiento de montaje
Modo de uso
Mantenimiento
Especificaciones
Indice
Leer cuidadosamente el manual del operador.
Verificar que el equipo de corte esté correctamente
montado y ajustado.
Arrancar la unidad y comprobar el ajuste del carburador.
Ver la sección de "Mantenimiento".
Antes del uso de la unidad
Sp
Teilebezeichnungen
Warn- und Sicherheitshinweise
Zusammenbau
Betrieb
Wartung
Technische Daten
Inhalt
Bedienungsanleitung genau durchlesen.
Montage und Einstellung der Schneidausrüstung
kontrollieren.
Das Gerät starten und die Vergasereinstellung prüfen.
Siehe "Wartung".
Vor dem Gebrauch Ihres neuen Gerätes
Fr
Description
Précautions et consignes de sécurité
Montage
Utilisation
Entretien
Caractéristiques techniques
Sommaire
Lire attentivement le manuel d'utilisation
Vérifier que l'équipement de coupe est monté et réglé
correctement.
Démarrer la machine et vérifier le réglage du
carburateur. Voir "Entretien".
Avant l'utilisation de votre nouvelle machine
I t
Descrizione
Avvertenze ed istruzioni di sicurezza
Procedimento di montaggio
Funzionamento
Manutenzione
Specifiche
Indice
Leggere attentamente il manuale di istruzioni.
Controllare il montaggio e la registrazione del gruppo di
taglio.
Mettere in moto l'unitá e controllare la regolazione del
carburatore. Vedere "Manutenzione".
Prima di usare la nuova unitá
Sw
Vad är vad?
Varningar och säkerhetsanvisningar
Montering
Användning
Underhåll
Tekniska data
Innehåll
Läs igenom bruksanvisningen noggrant.
Kontrollera skärutrustningens montering och justering.
Starta apparaten och kontrollera förgasarinställningen.
Se "Underhåll".
Åtgärder före användning av en ny maski
1
3
8
9
13
21
1
4
8
9
13
21
1
5
8
9
14
21
1
6
8
9
14
21
1
7
8
9
14
21
4
2
12
11
5
8
6
1
3
10
9
7
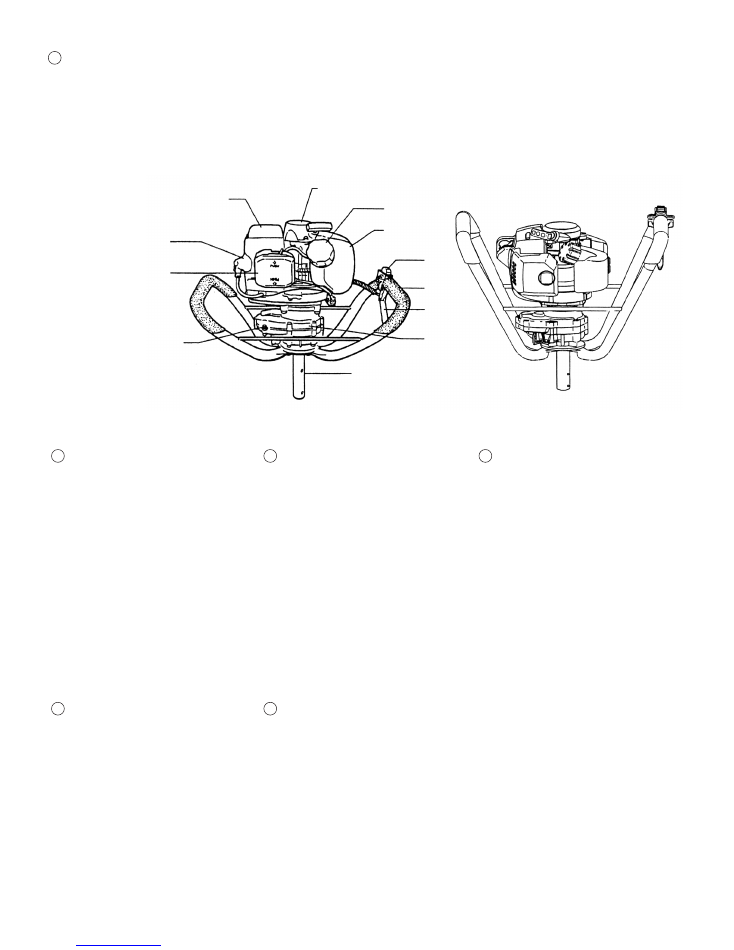
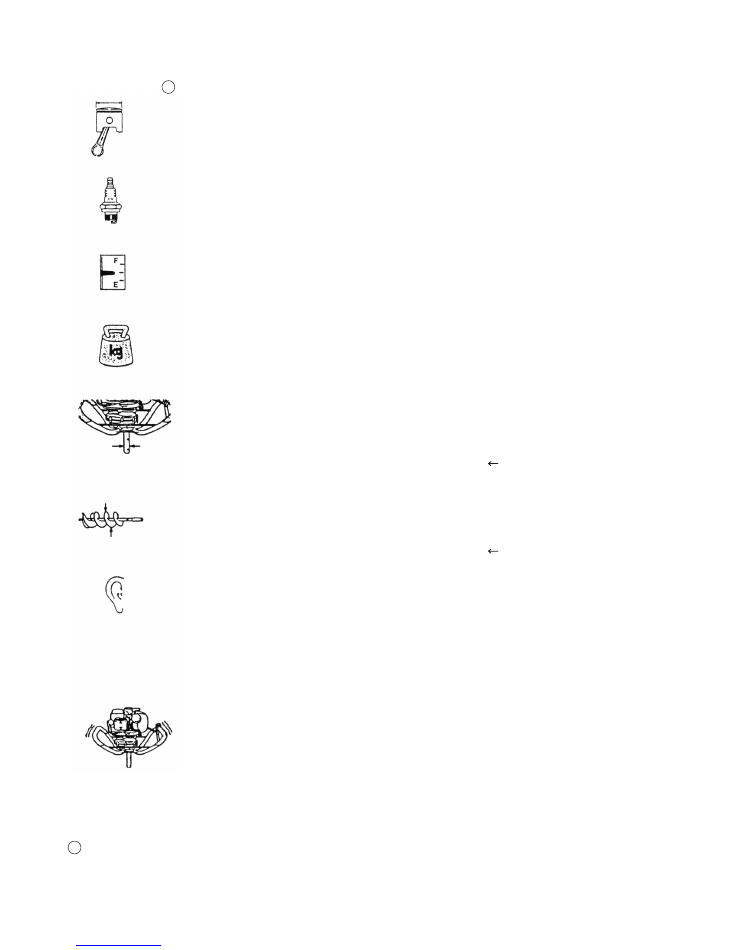
1. What is what?
1. Handle
2. Plug cap
3. Ignition switch
4. Muffler
5. Drive shaft
6. Throttle trigger
7. Recoil starter
8. Gear case
9. Fuel tank cap
10. Fuel tank
11. Grease hole
12. Air cleaner
1
En
Since this manual covers several models, there may
be some difference between pictures and your unit.
Use the instructions that apply to your unit.
Ge
Sp
Fr
I t
Sw
1. Description
1. Teilebezeichnungen
1. Vad är vad?
Comme ce manuel se réfère à plusieurs
modèles, il se peut qu'il y ait des différences
entre les images et votre machine. Suivez les
instructions concernant votre modèle.
Det kan hända att det finns skillnader mellan
den modell du har och den modell som visas
på illustrationerna, eftersom denna
bruksanvisning täcker flera modeller. Följ de
instruktioner som är tillämpbara för din maskin.
Da diese Bedienungsanleitung auf mehrere
Modelle zutrifft, kann es möglich sein, dass die
Bilder und Ihr Gerät verschieden sind. Befolgen
Sie die Anleitungen , die auf Ihr Gerät zutreffen.
1. Poignées de support
2. Capuchon de bougie
3. Interrupteur marche-arrêt
4. Silencieux d'échappement
5. Arbre d’entraînement
6. Levier de commande des gaz
7. Lanceur
8. Réducteur
9. Bouchon du réservoir de carburant
10. Réservoir de carburant
11. Trou de lubrification
12. Filtre à air
1. Handgriff
2. Zündkerzenkappe
3. Zündschalter
4. Schalldämpfer
5. Antriebswelle
6. Gashebel
7. Anreißstarter
8. Getriebekasten
9. Tankdeckel
10. Kraftstofftank
11. Schmierloch
12. Luftfilter
1. Handtag
2. Tändstiftshatt
3. Kortslutningsknapp (stopp)
4. Ljuddämpare
5. Drivaxel
6. Gasreglage
7. Startapparat
8. Växellåda
9. Lock till bränsletanken
10. Bränsletank
11. Smörjnippel
12. Luftrenare
1. Descrizione
Dato che questo manuale si riferisce a svariati
modelli, potrá verificarsi che vi siano delle
differenze tra la vostra macchina e quella
illustrata in figura. Usare le istruzioni che si
riferiscono al vostro apparecchio.
1. Impugnatura
2. Cappuccio candela
3. Interruttore di accensione
4. Silenziatore
5. Albero di trasmissione
6. Leva dell'acceleratore
7. Avviamento autoavvolgente
8. Carter riduttore
9. Tappo serbatoio
10. Serbatoio carburante
11. Foro per la lubrificazione
12. Filtro dell'aria
1. ¿Qué es qué?
Ya que este manual se refiere a varios modelos
es posible que haya diferencias entre las
imagenes y su aparato. Emplee las instrucciones
que se apliquen a su unidad.
1. Agarradera
2. Casquillo de la bujia de encendido
3. Llave de ignición
4. Amortiguador de ruido
5. Eje motor
6. Acelerador
7. Arrancador de retroceso
8. Caja de engranajes
9. Tapa del depósito de combustible
10. Depósito de combustible
11. Orificio de lubricación
12. Filtro de aire

Always wear a safety face shield or goggles.
Always wear heavy, long pants, boots and
gloves. Do not wear loose clothing, jewelry,
short pants, sandals or go barefoot. Secure hair
so it is above shoulder length.
Do not operate this tool when you are tired, ill
or under the influence of alcohol, drugs or
medication.
Never let a child or inexperienced person
operate the machine.
Wear hearing protection.
Never start or run the engine inside a closed
room or building. Breathing exhaust fumes can
kill.
Keep handles free of oil and fuel.
Keep hands away from drilling equipment.
Do not grab or hold the unit by the drilling
equipment.
When the unit is turned off, make sure the
drilling attachment has stopped before the unit
is set down.
When operation is prolonged, take a break
from time to time so that you may avoid
possible whitefinger disease which is caused
by vibration.
Inspect the entire tool before each use.
Replace damaged parts. Check for fuel leaks
and make sure all fasteners are in place and
securely fastened.
Replace parts that are cracked, chipped or
damaged in any way before using the tool.
Keep others away when making carburetor
adjustments.
Use only accessories as recommended for this
tool by the manufacturer.
Mix and pour fuel outdoors and where there are
no sparks or flames.
Use a container approved for fuel.
Do not smoke or allow smoking near fuel or the
tool or while using the tool.
Wipe up all fuel spills before starting engine.
Move at least 3 m away from fueling site before
starting engine.
Stop engine before removing fuel cap.
Empty the fuel tank before storing the tool. It is
recommended that the fuel be emptied after
each use. If fuel is left in the tank, store so fuel
will not leak.
Store tool and fuel in area where fuel vapors
cannot reach sparks or open flames from water
heaters, electric motors or switches, furnaces,
etc.
Do not drill any material other than that for
which it is intended.
Inspect the area to be drilled before each use.
Remove objects which can be thrown or
become entangled.
For respiratory protection, wear an aerosol
protection mask when drilling the area after
insecticide is scattered.
Keep others including children, animals,
bystanders and helpers outside the 5 m
hazard zone. Stop the engine immediately if
you are approached.
Hold the tool firmly with both hands.
Keep firm footing and balance. Do not
overreach.
Keep all parts of your body away from the
muffler and drilling attachment when the
engine is running.
Maintain the tool according to recommended
procedures.
Disconnect the spark plug before performing
maintenance except for carburetor adjust-
ments.
Keep others away when making carburetor
adjustments.
Use only genuine replacement parts as
recommended by the manufacturer.
Carry the tool by hand with the engine stopped
and the muffler away from your body.
Allow the engine to cool, empty the fuel tank,
and secure the tool before storing or trans-
porting in a vehicle.
Empty the fuel tank before storing the tool. It
is recommended that the fuel be emptied after
each use. If fuel is left in the tank, store so fuel
will not leak.
Store tool out of the reach of children.
Clean the unit carefully and store it in a dry
place.
Make sure engine switch is off when trans-
porting or storing.
When transporting in a vehicle, cover bit with
bit cover or rug.
WARNING!
2
2. Warnings and safety instructions.
Operator safety
Tool safety
Fuel safety
WARNING!
Never modify the tool in any way. Do not use
your drilling tool for any job except that for which
it is intended.
WARNING!
Indicates a strong possibility of severe personal
injury or loss of life, if instructions are not.
CAUTION!
Indicates a possibility of personal injury or
En
Maintenance safety
Drilling safety
If situations occur which are not covered in this
manual, take care and use common sense.
Contact your dealer if you need assistance.
Pay special attention to statements preceded by
the following words:
carpal tunnel syndrome. Therefore, continual and
regular users should monitor closely the condition
of their hands and fingers. If any of the above
symptoms appear, seek medical advice
immediately.
Transport and storage
equipment damage, if instructions are not
followed.
NOTE!
Helpful information for correct function and use.
CAUTION!
Do not disassemble the recoil starter. You may
get a possibility of personal injury with recoil
spring.
Antivibration systems do not guarantee that you
will not sustain whitefinger disease or

I t
Ge
Sw
3. Assembly procedures
8
En
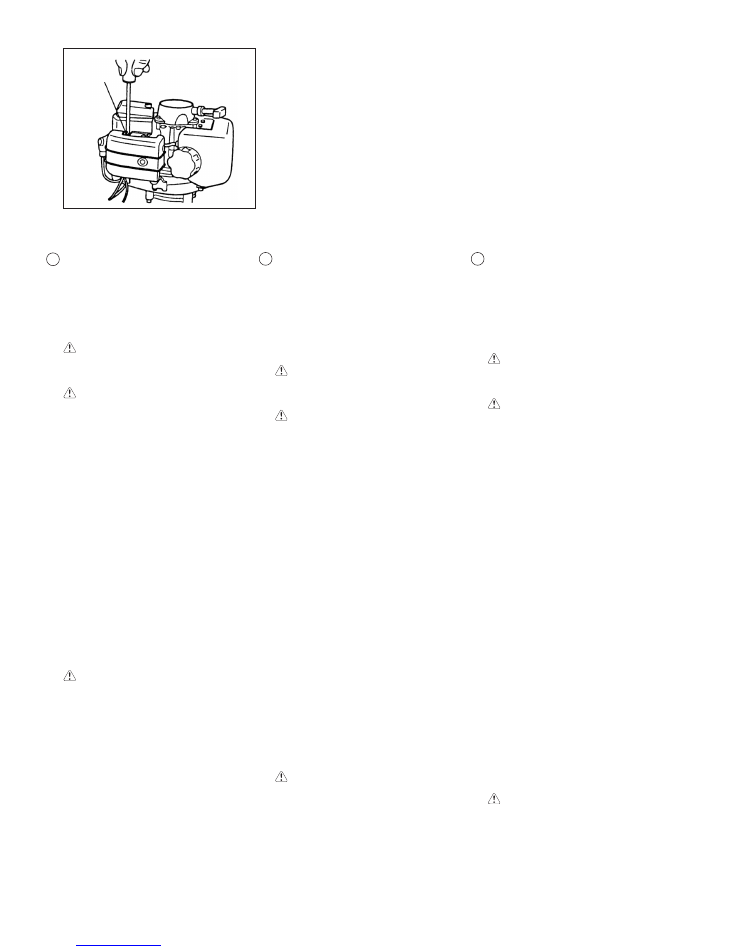
Assembling (Fig. 1-1)
Connect the bit to drive shaft (1) of the power
head and fix it with the snap pins (2) after setting
the fixing pins (3) and washers (2 pcs. each).
Selection of a Suitable Bit
Choose an auger bit according to material to be
bored.
In case of ice boring, use an ice bit. When
boring the earth, use one for earth boring.
3. Procedimento di montaggio
3. Procedimiento de montaje
Procedura per l'assemblaggio (Fig. 1-1)
Collegare la punta all'albero motore (1) del motore
e fissarla con le spine a scatto (2) dopo aver
disposto le spine di fissaggio (3) e le rondelle
(2 ciascuna).
Scelta della punta trivella più adatta
Scegliete per la vostra trivella una punta idonea
al materiale che dovete perforare.
In caso di terreno ghiacciato, usate una punta
per ghiaccio. Per il terreno agricolo, usate una
punta per terra.
Antes de usar (Fig. 1-1)
Conectar el barreno con eje propulsor (1) de la
unidad motriz y después de fijarse con los
pasadores de fijación (3) se colocarán las
chavetas hendidas (2) y las arandelas (2 piezas
respectivamente).
Selección de una barrena apropiada
Seleccióneses una barrena según el material
para perforarse.
En caso de perforación de hielo, empléese una
barrena para hielo. Al perforar el suelo,
empléese una barrena para perforar el suelo.
1
3
2
Fig.1-1
Fr
3. Montage
Montage (Fig. 1-1)
Emboîter la mèche sur l'arbre d'entraînement
(1) sur le bloc moteur et le fixer avec les
goupilles élastiques (2) après avoir placé les
chevilles (3) et les rondelles (2 pièces chacune).
Sélection d’une mèche appropriée
Sélectionner une mèche de forage appropriée
au matériau devant être foré.
Au cas où il s'agit d'un forage dans la glace,
employer une mèche à glace. Lorsque le sol
doit être foré, employer une mèche à sol.
Sp
3. Zusammenbau
3. Montering
Zusammenbau (Fig. 1-1)
Das Bohrwerkzeug mit der Antriebswelle (1)
des Motors verbinden und nachdem die
Haltestifte (3) samt Unterlegscheiben eingeführt
worden sind (jeweils 2 Stück) mit den Splinten
(2) sichern.
Wahl eines geeigneten Bohrers
Den Bohrer entsprechend des zu bohrenden
Materials wählen.
Beim Eisbohren einen Eisbohrer verwenden.
Wenn der Boden durchgebohrt wird, einen
Bodenbohrer verwenden.
Borrens montering (Fig. 1-1)
Anslut borrspiralen till drivaxeln (1) på motorn
och fäst den genom att först sätta dit sprintarna
(3) och brickorna och sedan låsa borrspiralen
med låspinnarna (2).
Val av lämplig borr
Välj borr efter materialet, som skall borras.
Använd en isborr vid borrning i is. Använd en
jordborr vid borrning i marken.

I t
The power auger is equipped with a two-
stroke engine. Always run the engine on
fuel, which is mixed with oil.
Provide good ventilation, when fueling or
handling fuel.
Fuel
Always use branded 89 octane unleaded
gasoline.
Use Tanaka two-cycle oil or a quality twocycle
oil at mixing ratio of 25-50:1 (Gasoline (A) :
Oil (B)), only for the state of California at 50:1.
Never use multi-grade oil (10 W/30) or waste oil.
Always mix fuel and oil in a separate clean
container.
Always start by filling half the amount of fuel,
which is to be used. Then add the whole amount
of oil. Mix (shake) the fuel mixture. Add the
remaining amount of fuel.
Mix (shake) the fuel-mix thoroughly before filling
the fuel tank.
Fueling
WARNING!
Always shut off the engine before refueling.
Slowly open the fuel tank, when filling up
with fuel, so that possible over pressure
disappears.
Tighten the fuel cap carefully, after fueling.
Always move the unit at least 3 m (10 ft.)
from the fueling area before starting.
Before fueling, clean the tank cap area carefully,
to ensure that no dirt falls into the tank. Make
sure that the fuel is well mixed by shaking the
container, before fueling.
La trivella motorizzata é equipaggiata con
un motore a due tempi. Utilizzare sempre
carburante mescolato con olio.
Effettuare il rifornimento del carburante in
luoghi ventilati.
Carburante
Utilizzare sempre benzina senza piombo tipo 89.
Utilizzare olio per motori a due tempi Tanaka o
un olio per motori a due tempi di buona qualitá
con un rapporto di miscela di 25-50:1 (benzina
(A) : olio (B)), solo per lo stato della California
di 50:1.
Non usare mai olio multigrado (10W/30) o olio
di scarto.
Mescolare sempre carburante ed olio in un
recipiente separato pulito.
Iniziare sempre col versare la metá del carburante
che deve essere usato. Successivamente
versare l'intera quantitá di olio. Mescolare
(agitare) la miscela. Aggiungere la restante
metá del carburante.
Mescolare (agitare) la miscela prima di versarla
nel serbatoio.
Rifornimento
ATTENZIONE!
Spegnere sempre il motore prima del
rifornimento.
Aprire lentamente il serbatoio del
carburante, in modo da eliminare un
eventuale eccesso di pressione.
Stringere bene il tappo del serbatoio, dopo
il rifornimento.
Prima di mettere in funzione l'attrezzo,
allontanare sempre l'attrezzo di almeno 3
metri dalla zona dove é avvenuto il
rifornimento.
Prima dei rifornimento, pulire la zona intorno al
tappo con cautela, per evitare la penetrazione
di sporco nel serbatoio. Controllare che la miscela
sia ben mescolata, agitando il recipiente, prima
del rifornimento.
La tarière est équipée d'un moteur deux temps
et doit toujours être alimentée en carburant
avec un mélange essence / huile.
Veiller à une bonne aération pendant
l'opération de remplissage du réservoir.
Essence
Toujours utiliser de l'essence sans plomb avec
un taux d'octane minimum de 89 (En France :
95 sans plomb).
Utiliser de l'huile deux temps Tanaka ou une
huile de qualité similaire en respectant la
proportion pour le mélange deux temps
25-50:1 (Essence (A) : Huile (B)).
Ne jamais utiliser d'huile Multigrade (10W/30),
ni d'huile usagée.
o Effectuez toujours le mélange dans un récipient
propre.
Toujours commencer par verser la moitié de
l'essence à mélanger. Verser ensuite la totalité
de l'huile. Mélanger en agitant le récipient.
Enfin, verser le reste de l'essence, puis agiter le
récipient afin de mélanger soigneusement le
carburant avant de faire le plein.
Faire le plein
ATTENTION!
Ne jamais faire le plein moteur en marche.
Ouvrir le bouchon de réservoir lentement,
afin de laisser échapper la surpression
éventuelle.
Serrer le bouchon soigneusement une fois
le plein fait.
Avant de mettre en marche la machine,
toujours l’éloigner d'au moins trois mètres
de l'endroit ou vous avez fait le plein
d'essence.
Respecter une propreté rigoureuse pendant le
plein. Essuyer autour du bouchon de réservoir.
Les saletés pouvant se trouver dans le réservoir
occasionnent des troubles de fonctionnement.
Veiller à ce que le mélange soit bien homogène
en agitant le récipient avant de faire le plein.
4. Operating procedures
9
Fuel (Fig. 2-1)
En
Fr
WARNING!
4. Procédés de fonctionnement
Carburant (Fig. 2-1)
ATTENTION!
4. Funzionamento.
Carburante (Fig. 2-1)
ATTENZIONE!
Fig.2-1
11
I t
Ge
Sw
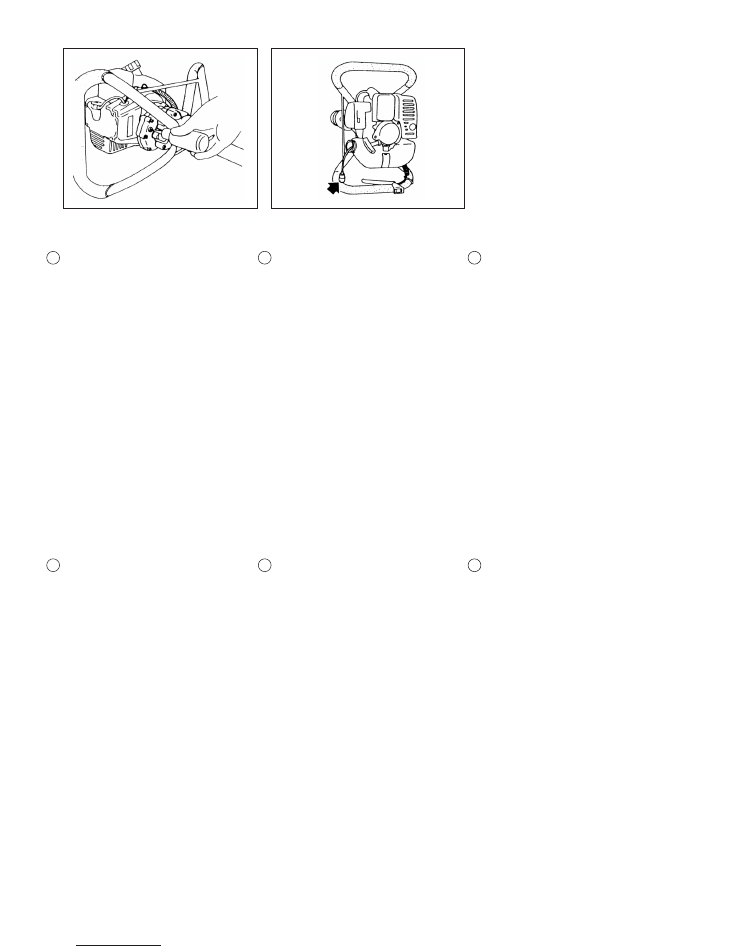
En
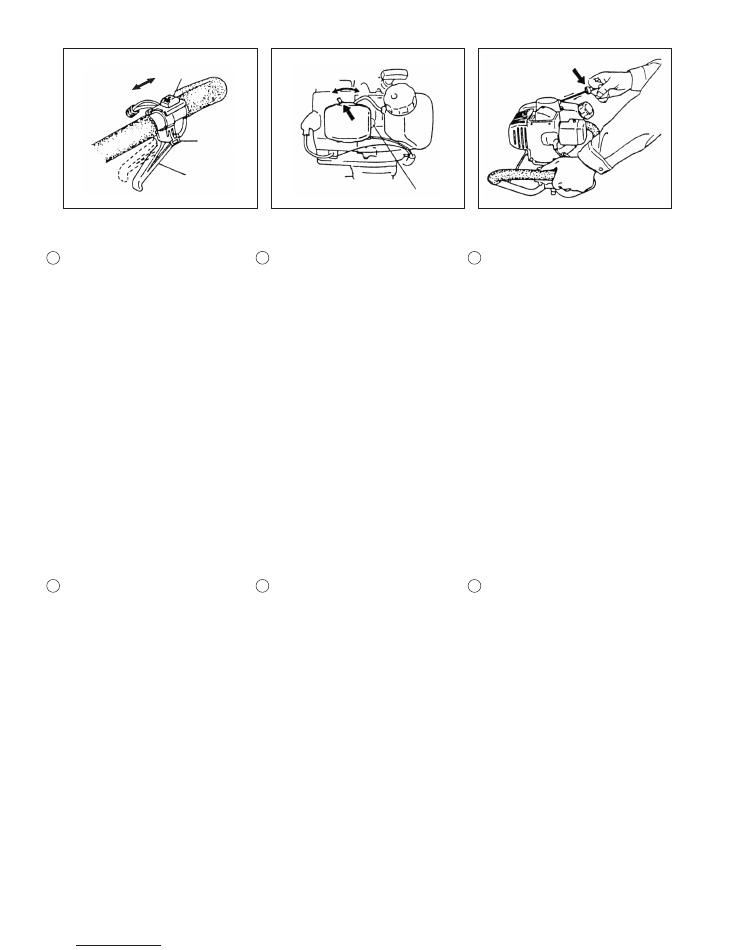
Starting
1. Set ignition switch (1) to (RUN) position.
(Fig. 2-2)
*Push priming bulb (1) several times so that
fuel flows through the bulb or return pipe.
(If so equipped) (Fig. 2-3)
2. If throttle lock (3) is equipped, pull the throttle
trigger (2) and keep pushing the throttle lock
(3) then, slowly release the lever to be locked.
(Fig. 2-2)
3. Set choke lever to (CHOKED) position.
(Fig. 2-3)
4. Pull the recoil starter handle briskly, taking
care to keep the handle in your grasp; and not
allowing it to snap back. (Fig. 2-4)
5. Once the engine is running, move the choke
to the run position. (Fig. 2-3)
NOTE!
At this stage if engine does not start, repeat
procedure from 2 to 4.
6. After starting the engine, allow the engine
about 2-3 minutes to warm up before
subjecting it to any load.
Fig.2-4
Procedura per l'avviamento
1. Spostare l'interruttore di accensione (1) su
(RUN). (Fig. 2-2)
*Premere ripetutamente il bulbo (1) della pompa
di pescaggio per far affluire la miscela al
carburatore attraverso il bulbo o il tubo di
ritorno (se la macchina ne é fornita). (Fig. 2-3)
2. Se il modello é equipaggiato con il fermo
dell'acceleratore (3), tirare la levetta
dell'acceleratore (2) tenendo premuto il fermo
dell'acceleratore (3), rilasciate quindi
lentamente la leva che rimarrá bloccata.
(Fig. 2-2)
3. Spostate la leva dello starter in posizione di
chiusura (CHOKED). (Fig. 2-3)
4. Azionate rapidamente l'impugnatura
avviamento stando attenti che non vi sfugga
di mano. (Fig. 2-4)
5. Una volta avviato il motore, spostare la leva
dello starter, presente sul filtro aria, nella
posizione “RUN”. (Fig. 2-3)
NOTA!
Se a questo punto il motore non si avviasse,
ripetete i passi dal 2 al 4.
6. Dopo aver avviato il motore, lasciate poi
scaldare il motore al minimo per 2-3 minuti,
prima di metterlo sotto carico.
Arranque
1. Fijar la llave de ignición (1) en la posición
(RUN) (encendida). (Fig. 2-2)
*Presione varias veces el bulbo de cebador
(1), de manera que el combustible fluya a
través del bulbo o de la tubería de retorno
(Si lo tiene equipado). (Fig. 2-3)
2. Si existe seguro de estrangulación, tire del
gatillo de estrangulación (2) y mantenga
pulsado el lock de estrangulación (3), luego
suelte lentamente ese gatillo para enclavarlo.
(Fig. 2-2)
3. Póngase la palanquita reguladors en la
pósicion tapada (CHOKED). (Fig. 2-3)
4. Tírese vigorosamente de la agarradera del
arrancador de retroceso haciendo cuidado
para retener la agarradera en el puòo sin
dejarla resaltar. (Fig. 2-4)
5. Al ponerse en marcha el motor, hágase girar
el regulador de aire a la posición de
funcionamiento. (Fig. 2-3)
NOTA!
Si el motor no se ponga en marcha durante
esta etapa, repítase el procedimiento de 2 a 4.
6. Una vea se pone en marcha el motor, deje
durante 2 o 3 minutos aproximadamente
para su precalentamiento.
1
Fig.2-3
Fig.2-2
Fr
Démarrage
1. Placer l'interrupteur marche-arrêt (1) en position
marche (RUN). (Fig. 2-2)
*Presser la poire de la pompe d'amorçage (1)
à plusieurs reprises pour que le carburant
puisse s'écouler de la poire ou le tuyau de
retour. (Si la machine en est munie.) (Fig. 2-3)
2. S'il y a un dispositif de blocage de la commande
de gaz (3), serrer le levier de la commande
des gaz (2) et maintenir la pression sur le
dispositif de blocage de la commande des gaz
(3), puis relâcher lentement le levier de
commande des gaz. (Fig. 2-2)
3. Régler la manette de starter sur la position
fermée (CHOKED). (Fig. 2-3)
4. Tirer légèrement la poignée du lanceur, en
faisant attention de retenir la poignée dans
ses mains, afin d’éviter un retour brutal de la
poignée. (Fig. 2-4)
5. Une fois que le moteur est en marche, remettre
la manette de starter sur la position de marche
(RUN). (Fig. 2-3)
REMARQUE!
Si le moteur ne se met pas en marche pendant
cette étape, répéter la procédure de 2 á 4.
6. Après avoir mis en marche le moteur, laisser
le moteur chauffer pendant environ 2 à 3
minutes avant de le soumettre á une
quelconque charge.
Sp
Anlassen des Motors
1. Den Zündschalter (1) auf (RUN) stellen.
(Fig. 2-2)
*Die Ansaugpumpe (1) mehrmals betätigen,
damit Kraftstoff durch die Pumpe oder das
Rücklaufrohr fließt. (falls vorhanden) (Fig. 2-3)
2. Falls eine Drosselsperre (3) vorhanden ist,
den Drosselauslöser anziehen (2) und die
Drosselsperre weiterschieben (3), dann den
Hebel, welcher zu sperren ist, langsam
entlassen. (Fig. 2-2)
3. Den Vergaserluftrichterhebel auf die
geschlossene Stellung (CHOKED) einstellen.
(Fig. 2-3)
4. Den Griff des Anreißstarters kräftig ziehen,
dabei den Griff gut festhalten und nicht
zurückspringen lassen. (Fig. 2-4)
5. Sobald der Motor läuft, den Choke auf die
Betriebsposition drehen. (Fig. 2-3)
HINWEIS!
Wenn der Motor bei dieser Etappe nicht
angelassen wirde, die Schritte 2 bis 4 wiederholen.
6. Nachdem der Motor angelassen wurde, den
Motor ungefähr 2-3 Minuten aufwärmen
lassen, bevor er irgendeiner Last unterzogen
wird.
Start
1. Skjut stoppknappen (1) i (RUN)-läge. (Fig. 2-2)
*Pumpa på handpumpens blåsa (1) tills bränslet
strömmar in i blåsan eller returledningen (om
sådana finns). (Fig. 2-3)
2. Om maskinen är utrustad med halvgasspärr,
så tryck in gasreglaget (2) och håll
halvgasspärren (3) intryckt . Släpp sedan
sakta gasreglaget. Detta låse gasreglaget i
läge för startgas. (Fig. 2-2)
3. Skjut chokreglaget till stängt läge (CHOKED).
(Fig. 2-3)
4. Dra i starthandtaget några gånger. Släpp ej
starthandtaget efter varje drag. (Fig. 2-4)
5. När motorn startar föres choken gradvis åt
höger (öppet). (Fig. 2-3)
OBSERVERA!
Följ igen anvisningarna från punkt 2 till punkt 4
om motorn inte startar.
6. Låt motorn efter motorstart gå i ca två till tre
minuter för att värma upp motorn innan den
belastas.
RUN
CHOKED
RUN
STOP
3
2
1
I t
Sw
1
RUN
STOP
T
Perforazione (Fig. 2-5)
ATTENZIONE!
Non toccare la punta quando il motore é in
funzione per evitare incidenti imprevisti.
Accertarsi di disattivare l'interruttore di
accensione prima di toccare la punta.
1. Serrate saldamente con entrambe le mani le
impugnature, per evitare che la trivella vi
sfugga di mano.
2. Disponete la punta della trivella esattamente
sul punto dove intendete eseguire la
perforazione, quindi mettete in rotazione la
punta. Questa operazione viene facilitata dalla
frizione centrifuga di cui é dotata la macchina.
3. Se durante il lavoro avvertite vibrazioni o
rumori anomali, spegnete il motore e
controllate la macchina.
4. L'uso prolungato della trivella puó risultare
notevolmente faticoso. Interrompete di quando
in quando il lavoro per riposarvi.
Arresto del motore (Fig. 2-6)
Diminuire gradatamente la velocitá del motore
fino al minimo e quindi regolare l'interruttore di
accensione (1) nella posizione di arresto (STOP).
12
En
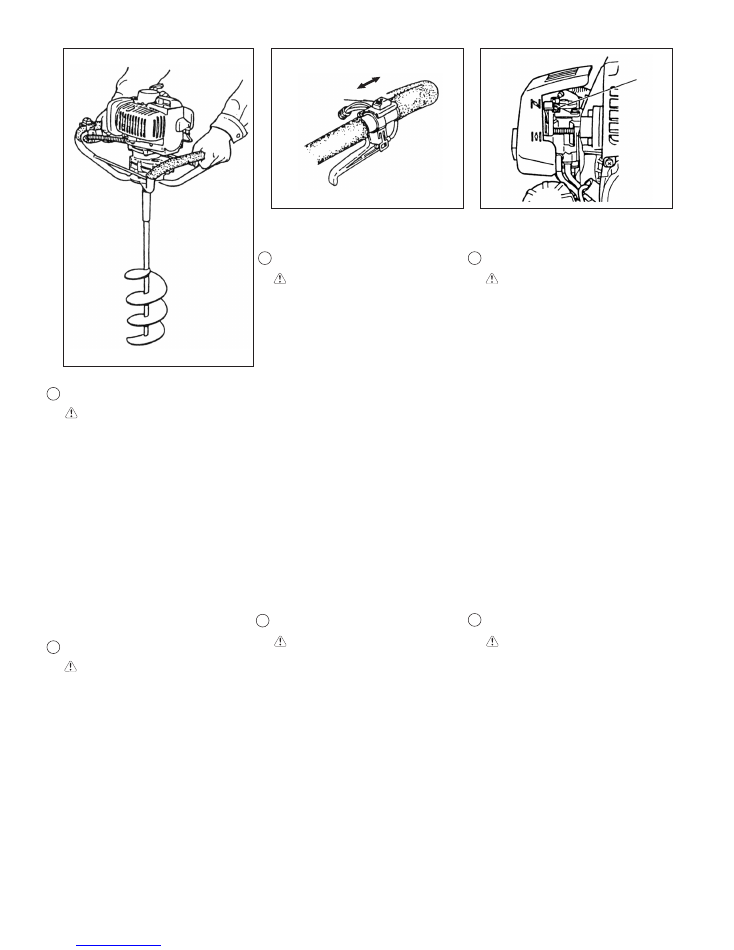
Drilling (Fig. 2-5)
WARNING!
Do not touch the bit when running the
engine to avoid unexpected accident. Be
sure to turn off the ignition switch before
touching it.
1. Hold the handle firmly with both hands so that
you may not be swung by the unit.
2. Locate the edge of bit right on the spot to dig,
and then drive the bit. This is an easy job
thanks to the built-in centrifugal clutch.
3. Stop the engine and inspect the unit if abnormal
vibration or noise is generated.
4. Long operation of the unit may tire you. Try to
take a break from time to time.
Stopping (Fig. 2-6)
Gradually decrease the engine speed to an idle
speed, and then slide ignition switch (1) to STOP
position.
Perforacion (Fig. 2-5)
LATENCION!
Para evitar cualquier accidente inesperado
no toquen la cuchilla mientras el motor en
marcha. Para tocar la cuchilla asequre
previamente el interruptor de ignicion en la
posición OFF.
1. Sujétese firmemente el cogedero con ambas
manos para que uno no se haga bascular por
el aparato.
2. Póngase el borde de la barrena exactamente
en el lugar de excavación y, entonces,
acciónese la barrena. Es un trabajo fácil
gracias al embrague centrifugo encerrado.
3. Deténgase el motor y examínese el aparato,
si haya ruido o vibraciones anormales.
4. Uno puede cansarse de un funcionamiento
prolongado. Descánsese de vez en cuando.
Paro del motor (Fig. 2-6)
Reduzca gradualmente la velocidad del motor
hasta que alcance a una velocidad de ralentí, y
luego posicione el interruptor de ignición (1) en
la posición de STOP.
Fig.2-5
Fr
Forage (Fig. 2-5)
ATTENTION!
Ne touchez en aucun cas la mèche quand le
moteur fonctionne afin de prévenir un accident
imprévisible. Veiller à bien placer l'interrupteur
marchearrêt en position OFF avant de toucher
la mèche.
1. Tenir fermement la poignée à deux mains pour
ne pas être entraîné par la machine
2. Placer la pointe de la mèche exactement à
l'endroit du forage et, ensuite, faire tourner la
mèche. C'est un travail aisé grâce à l'embrayage
centrifuge intégré.
3. Arrêter le moteur et vérifier la machine s'il y a
des vibrations ou des bruits anormaux.
4. On peut se fatiguer en faisant fonctionner
l'appareil pendant un certain temps.
Reposezvous de temps en temps.
Arrêt (Fig. 2-6)
Réduire peu á peu le régime du moteur
jusqu'au ralenti, puis placer l'interrupteur
marche-arrêt (1) sur la position STOP.
Sp
Bohren (Fig. 2-5)
WARNUNG!
Um unerwartete Unfälle zu vermeiden,
während des Betriebes des Motors den
Bohreinsatz nicht berühren. Vor dem
Berühren unbedingt den Zündschalter
ausschalten.
1. Den Griff fest mit beiden Händen halten, so
dass man vom Gerät nicht abgeschwenkt
werden kann.
2. Die Spitze des Bohrers an der Stelle ansetzen,
wo man bohren will Es ist eine leichte Arbeit
dank der eingebauten Schleuderkupplung.
3. Den Motor abstellen und das Gerät prüfen,
wenn ungewöhnliche Erschütterung oder
Geräusche auftreten.
4. Man kann wegen der langen Bedienung des
Gerätes müde werden. Man sollte sich
gelegentlich ausruhen.
Stoppen (Fig. 2-6)
Die Motordrehzahl allmählich bis auf
Leerlaufdrehzahl verringern, dann den
Zündschalter (1) in die STOP Stellung schieben.
Borrning (Fig. 2-5)
VARNING!
Rör aldrig vid skäret när motorn går för att
undvika olyckor. Slå alltid från tändningen
före vidröring av skäret.
1. Håll i borren med båda händerna och håll
borren stadigt på plats så att varken du eller
borren svänger runt när borrspiralen roterar.
2. Placera borrspetsen på stället, där du vill
börja borrningen. Sätt igång med borrningen.
Borrningen går lätt tack vare
centrigugalkopplingen.
3. Stanna motorn, om det uppstår kraftiga
vibrationer eller avvikande ljud. Kontrollera
borren och borrspiralen.
4. Längre tids borrning utan avbrott tröttar ut
dig. Ta då och då en paus under borrningen.
Hur motorn stannas (Fig. 2-6)
Minska motorns varvtal gradvis till
tomgångsvarvtalet och skjut sedan stoppknappen
(1) till läge OFF.
Fig.2-6
Fig.3-1
Ge
I t
MAINTENANCE, REPLACEMENT OR REPAIR
OF THE EMISSION CONTROL DEVICES AND
SYSTEMS MAY BE PERFORMED BY ANY
NONROAD ENGINE REPAIR ESTABLISHMENT
OR INDIVIDUAL.
Carburetor adjustment (Fig. 3-1, 1B)
WARNING!
The bit may be spinning during carburetor
adjustments.
WARNING!
Never start the engine without the complete
clutch cover and gear case assembled!
Otherwise the clutch can come loose and
cause personal injuries.
In the carburetor, fuel is mixed with air. When
the engine is test run at the factory, the carburetor
is basically adjusted. A further adjustment may
be required, according to climate and altitude.
The carburetor has one adjustment possibility:
T = Idle speed adjustment screw.
Idle speed adjustment (T)
Check that the air filter is clean. When the idle
speed is correct, the bit will not rotate. If
adjustment is required, close (clockwise) the
T-screw, with the engine running, until the bit
starts to rotate. Open (counter-clockwise) the
screw until the bit stops. You have reached the
correct idle speed when the engine runs
smoothly in all positions well below the rpm when
the bit starts to rotate.
If the bit still rotates after idle speed adjustment,
contact your service workshop.
WARNING!
When the engine is idling the bit must under
no circumstances rotate.
L'ENTRETIEN, LE REMPLACEMENT OU LA
REPARATION DES DISPOSITIFS ET
SYSTEMES DE CONTROLE DE
L'ECHAPPEMENT PEUVENT ETRE
EFFECTUES PAR N'IMPORTE QUEL ATELIER
DE REPARATION OU MECANICIEN DE
MOTEUR NON AUTOMOBILE.
Réglage du carburateur (Fig. 3-1, 1B)
ATTENTION!
II est possible que la mèche tourne pendant
le réglage du carburateur.
ATTENTION!
Ne jamais démarrer le moteur avant que le
carter d'embrayage et le réducteur soient
parfaitement assemblés. Autrement le carter
d'embrayage risquerait de se détacher et de
causer un accident corporel.
Dans la carburateur, l'air est mélangé à
l'essence. Le carburateur est pré-réglé lors des
essais en usine. Ce réglage peut nécessiter des
ajustements selon les conditions climatiques et
l'altitude. Le carburateur ne propose qu’une
possibilité de réglage.
T = Vis de réglage du ralenti.
Réglage du ralenti (T)
Vérifier que le filtre à air est propre. Quand le
régime de ralenti est correcte, la mèche ne doit
pas tourner. Si un réglage est nécessaire,
visser (dans le sens des aiguilles d'une montre)
la vis T, avec le moteur en marche, jusqu'à ce
que la mèche commence à tourner. Dévisser
(dans le sens inverse des aiguilles d'une
montre) la vis jusqu'à ce que la mèche s'arrête.
Le régime de ralenti correct a été atteint lorsque
le moteur fonctionne sans problème dans
toutes les positions en-dessous du régime de
rotation (nombre de tours/minute) à laquelle la
mèche commence à tourner. Si la mèche
continue à tourner même après avoir effectué le
réglage du régime de ralenti, veuillez contacter
votre agent Tanaka.
ATTENTION!
La mèche doit être absolument immobile
avec le moteur tournant au ralenti.
LA MAUTENZIONE, SOSTITUZIONE O
RIPARAZIONE DEI DISPOSITIVI E SISTEMI
DI COTROLLO DELLE EMISSIONI POSSONO
ESSERE ESEGUITE DA QUALSIASI
OFFICINA O TECNICO DI RIPARAZIONE
MOTORI NON VEICOLARI.
Regolazione del carburatore (Fig. 3-1, 1B)
ATTENZIONE!
Puó darsi che il trapano giri vorticosamente
durante gli aggiustamenti della carburazione.
ATTENZIONE!
Prima di mettere in moto, assicurarsi che il
coperchio della frizione e la scatola degli
ingranaggi siano montati correttamente, per
evitare che la frizione si stacchi e causi gravi
incidenti.
Nel carburatore, il carburante viene mescolato
con l'aria. Quando il motore viene collaudato in
fabbrica, il carburatore viene tarato. Puó essere
necessario ricontrollare la taratura a seconda
del clima e dell'altitudine della zona di impiego.
La regolazione del minimo del carburatore puó
essere effettuata con:
T = Vite di regolazione del minimo.
Regolazione del minimo (T)
Controllare che il filtro dell'aria sia pulito. Se il
minimo é corretto, la punta non gira. Se é
necessario regolare il minimo, chiudere la vite a
T (in senso orario) con il motore in moto, fino a
quando la punta comincia a girare. Riaprire poi
la vite (in senso antiorario) fino a quando la
punta si ferma. II minimo é corretto quando il
motore gira regolarmente in ogni posizione, al
di sotto del regime di giri necessario alla punta
per iniziare a girare.
Se la punta continua a girare dopo la
regolazione del minimo, contattare un centro di
assistenza.
NOTA! (Fig. 3-1)
Le aperture (i ritorni) standard delle viti L/H
dalle posizioni di fissaggio leggero in sede sono
le seguenti:
ATTENZIONE!
Con il motore al minimo, la punta non deve
assolutamente girare.
T
13
En
Fr
Fig.3-1B
5. Manutenzione
5. Maintenance
5. Entretien

15
Fig.3-2B
Fig.3-2
I t
Ge
Sw
Filtre à air (Fig. 3-2, 2B)
Nettoyer le filtre à air régulièrement pour éviter:
Les troubles de fonctionnement du carburateur.
Les problèmes de démarrage.
Les pertes de puissance.
L'usure prématurée des organes du moteur.
Une consommation anormalement élevée.
Nettoyer le filtre à air tour les jours, plus
fréquemment en milieu à forte teneur en
poussières.
Nettoyage du filtre
Démonter le carter de filtre et sortir l’élément du
filtre. Le laver dans de l'eau savonneuse
chaude. Veiller ensuite à ce qu'il soit bien sec
avant de le remonter. Un élément de filtre à air
ayant servi longtemps ne peut être
complètement nettoyé. Pour cette raison,
l’élément doit être remplacé régulièrement par
un élément neuf. Toujours remplacer un filtre
endommagé.
Luftfilter(Fig. 3-2, 2B)
Luftfiltret måste vara rent för att undvika:
Felaktig förgasarfunktion.
Startsvåcigheter.
Effektsänkning.
Onödigt slitage av motorn.
Onormalt hög bränsleförbrukning.
Rengör filtret dagligen eller oftare om maskinen
används på speciellt dammiga arbetsområden.
Rengöring av luftfilter
Tag bort luftfilterkåpan och filtret. Tvätta det i
varmt såpvatten. Kontrollera att filtret är torrt
innan det monteras. Ett använt filter kan inte
rengöras helt och hållet. Det bör därför bytas ut
med jämna mellanrum. Ett skadat filter måste
alltid bytas ut mot ett nytt.
Luftfilter (Fig. 3-2, 2B)
Luftfilter regelmäßig von Staub und Schmutz
reinigen, zur Vermeidung von:
Vergaserstörungen.
Startschwierigkeiten.
Leistungsminderung.
Unnötigem Verschleiß der Motorteile.
Unnormal hohem
Kraftstoffverbrauch. Luftfilter täglich reinigen,
bei schwierigen Verhältnissen öfter.
Reinigung des Luftfilters
Den Luftfilterdeckel abnehmen und den Filter
herausnehmen. Den FFilter in warmer
Seifenlauge auswaschen. Bevor er wieder
montiert wird, muss der Filter ganz trocken
sein. Ein Luftfilter, der lange Zeit verwendet
wurde, wird nie vollkommen sauber. Der
Luftfilter ist daher in regelmäßigen Abständen
auszuwechseln. Ein beschädigter Luftfilter ist
immer auszuwechseln.
Air filter (Fig. 3-2, 2B)
The air filter must be cleaned from dust and dirt
in order to avoid:
Carburetor malfunctions.
Starting problems.
Engine power reduction.
Unnecessary wear on the engine parts.
Abnormal fuel consumption.
Clean the air filter daily or more often if working
in exceptionally dusty areas.
Cleaning the air filter
Remove the air filter cover and the filter. Rinse
it in warm soap suds. Check that the filter is dry
before reassembly. An air filter that has been
used for some time cannot be cleaned
completely. Therefore, it must regularly be
replaced by a new one. A damaged filter must
always be replaced.
Filtro dell'aria (Fig. 3-2, 2B)
II filtro dell'aria deve essere sempre pulito per
evitare:
Disturbi di funzionamento al carburatore.
Problemi di messa in moto.
Perdita di potenza del motore.
Usura precoce del motore.
Consumi elevati.
Pulire il filtro dell'aria almeno una volta al giorno.
Piú spesso se necessario.
Pulizia del filtro dell'aria
Togliere il coperchio del filtro. Lavarlo con acqua
calda saponata. Prima del montaggio assicurarsi
che il filtro sia asciutto. II filtro non potrá mai
essere pulito completamente. Pertanto deve
essere sostituito con regolaritá Sostituire
immediatamente un filtro danneggiato.
Filtro de aire (Fig. 3-2, 2B)
Este filtro debe limpiarse con regularidad
quitando polvo y suciedad a fin de evitar:
Perturbaciones en el funcionamiento del
carburador.
Problemas de arranque.
Pérdidas de potencia.
Desgaste innecesario de las piezas del motor.
Consumo de combustible excesivo.
Limpie el filtro de aire diariamente; si las
condiciones de trabajo son desfavorables, más
a menudo.
Limpieza del filtro de aire
Desmontar la cubierta del filtro y sacar éste.
limpiarlo con agua jabonosa caliente. Antes de
volver a montar el filtro, comprobar que está
seco. Un filtro de aire que ha prestado largo
servicio, nunca podrá quedar completamente
limpio, por lo que los filtros deberán sustituirse
por otros nuevos a intervalos regulares.
Cambie siempre los filtros que estén dañados.
En
Fr
Sp
USA
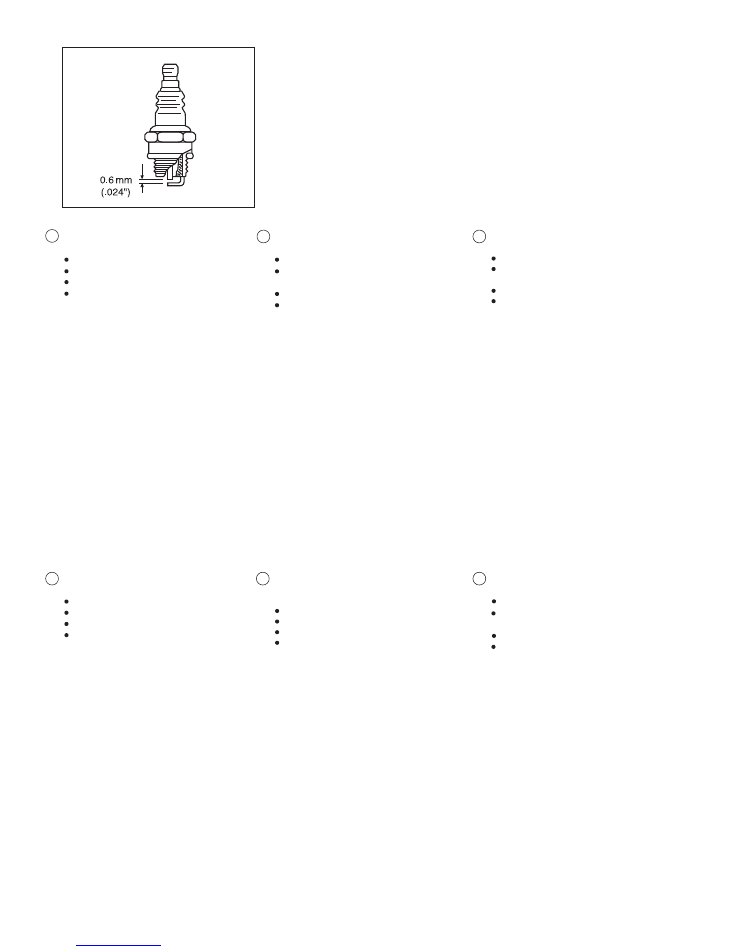
Spark plug (Fig. 3-3)
The spark plug condition is influenced by:
An incorrect carburetor setting.
Wrong fuel mixture (too much oil in the gasoline)
A dirty air filter.
Hard running conditions (such as cold weather)
These factors cause deposits on the spark plug
electrodes, which may result in malfunction and
starting difficulties. If the engine is low on power,
difficult to start or runs poorly at idling speed,
always check the spark plug first. If the spark
plug is dirty, clean it and check the electrode gap.
Readjust if necessary. The correct gap is 0.6 mm
(.024"). The spark plug should be replaced after
about 100 operation hours or earlier if the
electrodes are badly eroded.
NOTE!
In some areas, local law requires using a
resistor spark plug to suppress ignition signals.
If this machine was originally equipped with
resistor spark plug, use same type of spark plug
for replacement.
Bougie (Fig. 3-3)
L'état de la bougie est influencé par:
Un mauvais réglage du carburateur
Un mélange incorrect (trop riche en huile)
Un filtre à air sale
Des conditions d'utilisation difficiles (par temps
froid par exemple)
Ces facteurs contribuent à la formation de dépôts
sur les électrodes de la bougie et peuvent
entraîner des troubles de fonctionnement et des
difficultés de démarrage. Si la perçeuse
manque de puissance, si elle démarre mal ou si
son ralenti est irrégulier, toujours commencer
par vérifier l'état de la bougie. Si la bougie est
encrassée, la nettoyer et vérifier l'écartement
des électrodes (0,6 mm). La bougie devra être
remplacée après une centaine d'heures
d'utilisation ou plus tôt si les électrodes sont
endommagées.
REMARQUE!
Dans certaines régions, la réglementation locale
exige l'utilisation d'une bougie équipée d'une
résistance d'antiparasitage afin d'éliminer les
signaux d'allumage. Si cette machine était
équipée à l'origine d'une bougie avec résistance
d'antiparasitage, utiliser le même type de bougie
lorsque vous la remplacez.
Candela (Fig. 3-3)
Lo stato della candela é influenzato da:
Un carburatore mal registrato.
Una miscela di carburante ed olio non corretta
(troppo ricca di olio).
Un filtro dell'aria sporco.
Condizioni di esercizio difficili (climi freddi).
Questi fattori causano il formarsi di depositi sugli
elettrodi della candela, con conseguente difficoltá
di messa in moto e avarie. Se il motore é poco
brillante, difficile da mettere in moto o non tiene
il minimo, controllare sempre prima la candela.
Se la candela é sporca, pulirla e controllare la
distanza tra gli elettrodi. Rettificare se
necessario. La distanza corretta é di 0,6 mm. La
candela deve essere sostituita dopo circa 100
ore di funzionamento o prima se gli elettrodi
sono molto corrosi.
NOTA!
In alcune zone, le leggi locali richiedono l'impiego
di una candela resistore per sopprimere i segnali
di ignizione. Se questa macchina era
originariamente dotata di una candela resistore,
usare lo stesso tipo di candela per la sostituzione.
Zündkerze (Fig. 3-3)
Der Zustand der Zündkerze wird durch folgende
Faktoren verschlechtert:
Falsch eingestellter Vergaser.
Falsches Kraftstoffgemisch (zu viel Öl).
Verschmutzter Luftfilter.
Schwierige Betriebsverhältnisse. (z.B. bei kalter
Witterung)
Diese Faktoren verursachen Beläge an den
Elektroden der Zündkerze und können somit zu
Betriebsstörungen und Startschwierigkeiten
führen. Bei geringer Leistung der Bohrmaschine,
wenn der Motor schwer zu starten ist oder wenn
er im Leerlauf ungleichmäßig läuft, immer zuerst
die Zündkerze prüfen, bevor andere Maßnahmen
eingeleitet werden. Ist die Zündkerze verschmutzt,
so ist sie zu reinigen. Gleichzeitig ist zu prüfen,
ob der Elektrodenabstand 0,6 mm beträgt. Die
Zündkerze ist nach ungefähr 100 Betriebsstunden
bzw. bei starker Verrußung der Elektroden
auszutauschen.
HINWEIS!
In manchen Gebieten ist zur Unterdrückung von
Zündsignalen die Verwendung einer Zündkerze
mit eingebautem Widerstand vorgeschrieben.
Sollte die Maschine anfänglich mit einer solchen
Zündkerze ausgestattet gewesen sein, müssen
auch später stets gleichwertige Ersatzkerzen
verwendet werden.
Tändstift (Fig. 3-3)
Tändstiftet påverkas av:
Felaktig förgasarjustering.
Felaktig bränsleblandning (för mycket olja i
bensinen).
Smutsigt luftfilter.
Svåra arbetsförhållanden (t.ex. kyla).
Dessa faktorer orsakar beläggning på
tändstiftets elektrokder och kan innebära
motorstörningar och startproblem. Om motorn
lämnar låg effekt, är svårstartad eller går
ojämnt på tomgång så kontrollera tändstiftet
först. Om tändstiftet är smutsigt, rengör och
kontrollera elektrodavståndet. Justera om så
behövs. Avståndet skall vara 0.6 mm.
Tändstiftet skall bytas efter ca 100 timmars
körning eller tidigare om elektroderna är
kraftigt avbrända.
OBSERVERA!
I Vissa länder stipulerar lagen användandet
av motståndständstift för att undertrycka
tändstörningar. I det fall att denna maskin
levererats med motståndständstift, skall
samma typ av tändstift användas som
utbyteständstift.
Bujia (Fig. 3-3)
El estado de la bujía es influenciado por:
Carburador mal ajustado.
Mezcla incorrecta de combustible y aceite
(exceso de aceite).
Filtro de aire sucio.
Condiciones de funcionamiento difíciles.
(como clima frío)
Todos estos factores dan lugar a la formación
de sedimentos en los electrodos pudiendo
causar perturbaciones en el funcionamiento y
dificultades de arranque. Si en la cortadora se
nota falta de potencia, si los arranques son
difíciles y si el ralentí es inestable, controlar
siempre primero la bujía antes de adoptar otras
medidas. Si la bujía está muy sucia, limpiarla
y controlar la separación entre electrodos, que
ha de ser de 0,6 mm (0.024 pulg.). La bujía
debe cambiarse después de unas 100 horas
de funcionamiento o autes si los electrodos
están muy gastados.
NOTA!
En algunas áreas, los reglamentos locales
requieren el uso de una bujía de encendido de
rcsistencia para eliminar señales de ignición.
En el caso de que esta máquina estaba
equipada originalmente de la bujía de encendido
de resistencia, debe usar algún tipo de bujía
de encendido de resistencia como repuesto.
16
I t
Ge
Sp
Sw
En
Fr
Fig.3-3
17
Fig.3-5
Fig.3-4
I t
Ge
Sw
Transmission (Fig. 3-4)
Vérifier le niveau de graisse du réducteur et de
l'embrayage toutes les 50 heures d'utilisation en
retirant le bouchon de l'orifice de remplissage de
la graisse qui se trouve sur le côté du boîtier de
réducteur.
Si on ne peut pas voir de graisse sur les flans
des engrenages, remplir le réducteur avec une
graisse multi-usage au lithium de bonne qualité
jusqu'au 3/4.
Ne pas remplir complètement le réducteur.
Filtre à carburant (Fig. 3-5)
Vidanger tout le carburant qui se trouve dans le
réservoir de carburant et retirer la durite du filtre
du réservoir. Sortir la cartouche du filtre de
l'ensemble et rincer la cartouche dans de l'eau
chaude contenant un produit détergent.
Rincer soigneusement jusqu’à ce que toutes
traces de détergent aient été éliminées. Presser
la cartouche sans la tordre afin d'éliminer l'excès
d'eau et laisser celle-ci sécher à l'air libre.
REMARQUE!
Si la cartouche a durci du fait d’une accumulation
excessive de saletés, la remplacer par une
nouvelle.
Växel (Fig. 3-4)
Kontrollera smörjfettets nivå i växellådan varje
gång du använt maskinen i ca. 50 timmar. Tag
då bort proppen till smörjfettsintaget som sitter
på växellådan.
Om inget fett syns inne i växeln skall den
påfyllas med ett litiumbaserat universalfett av
hög kvalitet.
Fyll dock inte till fullo, utan bara till en 3/4-delars
nivå.
Bränslefilter (Fig. 3-5)
Tappa bränslet helt ur bränsletanken och drag
ut bränslefiltret från bränsletanken. Lossa
filterelementet ur hållaren och tvätta elementet i
varmt vatten med tvättmedel i. Tvätta elementet
ordentligt så att inget tvättmedelsvatten sitter
kvar på det. Kläm ur vatten. men vrid aldrig
elementet. Torka det sedan i luften.
OBSERVERA!
Byt ut elementet, om det är svårt att återmontera
det pga. nedsmutsning.
Getriebe (Fig. 3-4)
Die Schmierung des Getriebes etwa alle 50
Betriebsstunden durch Entfernen des
Schmierstopfens auf dem Getriebe prüfen. Falls
an den Getriebeflanken kein Schmierfett
sichtbar ist, dieses zu 3/4 mit einem guten
Mehrzweckfett auf Lithiumbasis füllen.
Das Getriebe nie ganz mit Schmierfett füllen.
Kraftstoffilter (Fig. 3-5)
Den Kraftstoff vollständig aus dem Tank ablassen
und die Kraftstoffleitung vom Tank lösen. Den
Filtereinsatz aus der Halterbaugruppe ziehen
und in warmem Wasser mit einem
Reinigungsmittel ausspülen.
Den Einsatz danach sorgfältig abspülen, bis alle
Reinigungsmittelreste entfernt sind. Wasser
herausdrücken (nicht auswringen!) und den
Einsatz dann an der Luft trocknen lassen.
HINWEIS!
Wenn der Einsatz durch starke Verschmutzung
hart geworden ist, muss er durch einen neuen
ersetzt werden.
Transmisión (Fig. 3-4)
Revisar el nivel de grasa de la transmisión o el
engranaje cada 50 horas de operación quitando
el tapón de grasa del lado de la transmissión.
En el caso de faltar la grasa de los flancos de
los engranajes, deberá llenarse la transmisión
con grasa de litio para usos múltiples hasta 3/4.
No llenar totalmente la transmisión.
Filtro de gasolina (Fig. 3-5)
Vaciar todo el combustible del tanque de
gasolina y sacar la línea de filtro de gasolina
del tanque. Sacar el elemento de filtro de la
unidad de soporte y lavar el elemento en el
agua caliente con detergente.
Lavar bien hasta que el detergente se haya
eliminado completamente. Exprimirlo sin torcer
para quitar el exceso de agua y dejar el
elemento secar por aire.
NOTA!
En caso de que el elemento esté duro por
exceso de suciedad acumulada, reemplazarlo.
En
Transmission (Fig. 3-4)
Check transmission or gear for grease level
about every 50 hours of operation by removing
the grease filler plug on the side of transmission.
If no grease can be seen on the flanks of the
gears, fill the transmission with quality lithium
based multipurpose grease up to 3/4.
Do not completely fill the transmission.
Fuel filter (Fig. 3-5)
Drain all fuel from fuel tank and pull fuel filter line
from tank. Pull filter element out of holder
assembly and rinse element in warm water with
detergent.
Rinse thoroughly until all traces of detergent are
eliminated. Squeeze, do not wring, away excess
water and allow element to air dry.
NOTE!
If element is hard due to excessive dirt build-up,
replace it.
Trasmissione (Fig. 3-4)
Controllare il livello di lubrificante della
trasmissione o dell'ingranaggio ogni 50 ore di
impiego circa rimuovendo il tappo del serbatoio
del lubrificante sul lato della trasmissione.
Se non si vedono tracce di lubrificante sui fianchi
degli ingranaggi, riempire la trasmissione con del
lubrificante multiuso a base di litio di qualitá fino
a 3/4.
Non riempire la trasmissione completamente.
Filtro carburante (Fig. 3-5)
Rimuovere tutto il carburante dal serbatoio
carburante e tirare il tubo del filtro carburante
dal serbatoio. Estrarre l'elemento del filtro dal
supporto e risciacquarlo in acqua tiepida con
detergente.
Risciacquare a fondo fino ad eliminare
completamente qualsiasi traccia di detergente.
Schiacciare senza torcere per eliminare l'acqua
in eccesso e lasciar asciugare l'elemento all'aria.
NOTA!
Se l'elemento é indurito a causa di un accumulo
eccessivo di sporcizia, sostituirlo.
Fr
Sp
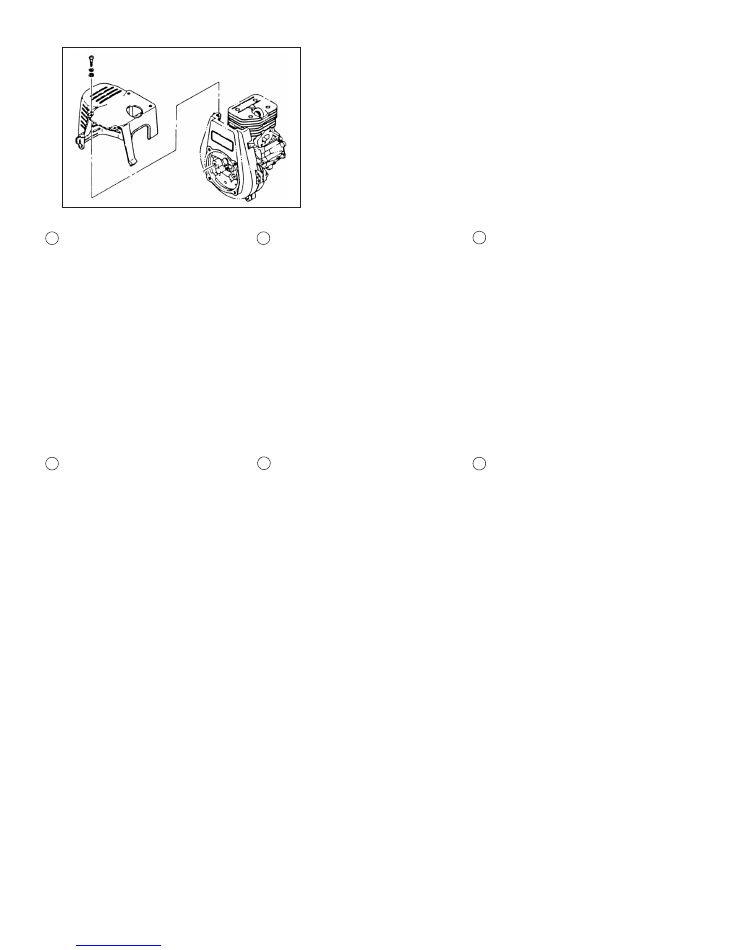
Cleaning the cylinder fins (Fig. 3-6)
When wood chips are caught between cylinder
fins (1), the engine may overheat, resulting in
lower output. To avoid this, always keep cylinder
fins and fan case clean.
Every 100 operating hours, or once a year,
(more often if conditions require) clean fins and
external surfaces of engine of dust, dirt and oil
deposits which can contribute to improper
cooling.
Nettoyage des ailettes du cylindre (Fig. 3-6)
Si des débris, sont coincés entre les ailettes du
cylindre (1), le moteur risque de surchauffer,
diminuant ainsi son rendement. Afin d'éviter une
telle éventualité, maintenir en permanence les
ailettes du cylindre et le carter de la turbine dans
un parfait état de propreté.
Après une centaine d’heures d'utilisation, ou
une fois par an (plus fréquemment si requis par
les conditions d'utilisation), nettoyer les ailettes
et la surface extérieure du moteur afin d'enlever
la poussière, les saletés et les dépôts d'huile qui
risqueraient d'empêcher un refroidissement
correct du moteur.
Pulizia delle alette del cilindro (Fig. 3-6)
Quando frammenti di legno si infilano fra le alette
del cilindro (1), il motore é soggetto a
surriscaldamento e conseguenti cali di potenza.
Per evitare ció, tenere sempre puliti le alette del
cilindro e il carter della ventola.
Ogni 100 ore di impiego, oppure una volta
all'anno (piú frequentemente se le condizioni lo
richiedono), pulire le alette e le superfici esterne
del motore eliminando polvere, sporco e depositi
di olio, che possono contribuire a causare un
raffreddamento non appropriato.
Reinigen der Zylinderrippen (Fig. 3-6)
Wenn sich Holzspäne u. dgl. zwischen den
Rippen des Zylinders (1) festsetzen, leidet die
Kühlwirkung, was Leistungseinbußen zur Folge
hat. Die Rippen und das Lüftergehäuse sollten
daher stets sauber gehalten werden.
Alle 100 Betriebsstunden oder einmal jährlich
(bei extremen Einsatzbedingungen in
entsprechend kürzeren Intervallen) die Rippen
und Außenflächen des Motors von Staub,
Schmutz und Ölablagerungen befreien, welche
die Kühlwirkung beeinträchtigen.
Rengöring av cylinderflänsarna (Fig. 3-6)
När smuts fastnar mellan cylinderflänsarna
(1) kan motorn bli överhettad, vilket minskar
motoreffekten. Håll alltid cylinderflänsarna och
flläkthuset rena för att undvika detta.
Efter varje 100 timmars användning, eller en
gång om året (oftare om nödvändigt), skall Du
avlägsna damm, smuts och olja från flänsarna
och motorns yttre ytor, eftersom dessa kan
orsaka försämrad kylning.
Limpieza de las aletas del cilindro (Fig. 3-6)
El motor puede recalentarse y perder la
potencia cuando queden atrapadas las astillas
de madera entre las aletas del cilindro (1).
Para evitar este problema, deben mantenerse
las aletas del cilindro y la caja del ventilador
siempre limpias.
Cada 100 horas de operaoión, o una vez al
año (o con más frecuencia cuando sea
necesario), limpiar aletas y la superficie
exterior del motor, eliminando sedimentos de
polvos, suciedad y aceite que causen el
enfriamiento inadecuado.
18
I t
Ge
Sp
Sw
En
Fr
Fig.3-6
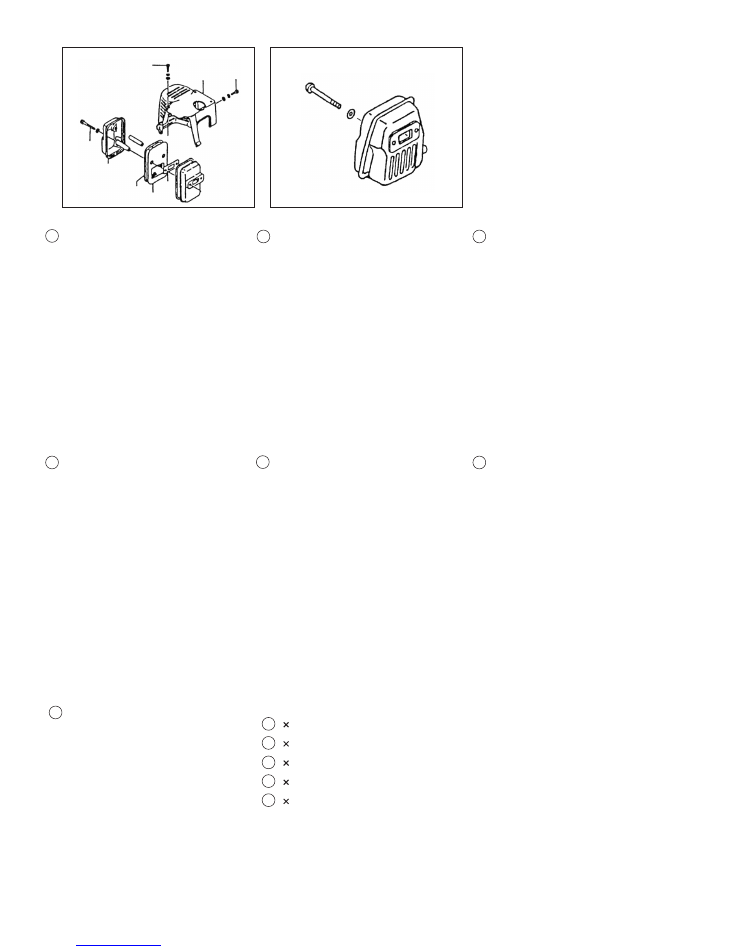
Cleaning the muffler (Fig. 3-7, 3B)
Remove the muffler and spark arrestor (if so
equipped), and clean out any excess carbon
from the exhaust port or muffler inlet every 100
hours of operation.
For long-term storage
Drain all fuel from the fuel tank. Start and let
engine run until it stops. Repair any damage
which has resulted from use. Clean the unit with
a clean rag, or the use of high pressure air
hose. Put a few drops of two-cycle engine oil
into the cylinder through the spark plug hole,
and spin the engine over several times to
distribute oil. Cover the unit and store it in a dry
area.
Nettoyage du silencieux (Fig. 3-7, 3B)
Démonter le silencieux et le pare-étincelles (si
la machine est équipée d'un tel dispositif) et
nettoyer régulièrement les résidus de carbone
déposés au niveau de l'orifice d'échappement et
de l'entrée du silencieux toutes les 100 heures
d'utilisation.
Lors d'un remisage prolongé
Vider le réservoir de carburant. Mettre en marche
le moteur et le laisser tourner jusqu'à ce qu'il
s'arrête de lui-même. Effectuer toutes les
réparations nécessaires concernant les pièces
endommagées pendant l'utilisation. Nettoyer la
machine en utilisant un chiffon propre ou à l'aide
d'un jet d'air comprimé.
Introduire quelques gouttes d'huile pour moteur
á deux temps par le trou de la bougie d'allumage
et actionner plusieurs fois le moteur pour bien
distribuer l'huile. Recouvrir la machine et la ranger
dans un endroit à l'abri de l'humidité.
Pulizia del silenziatore (Fig. 3-7, 3B)
Staccare la marmitta e il parascintille (se presente)
ed eliminare tutti i residui carboniosi dalla luce
di scarico o dall'apertura di entrata della marmitta
ogni 100 ore di impiego.
Deposito prolungato
Svuotare completamente il serbatoio del
carburante. Avviare il motore e lasciarlo girare
fino a quando non si ferma per mancanza di
carburante. Riparare eventuali danni che si
fossero verificati durante l'uso. Pulire l'attrezzo
con uno straccio pulito, o con un getto di aria
compressa. Versare alcune gocce di olio per
motore a due tempi nel cilindro attraverso il foro
della candela, facendo girare il motore alcune
volte per distribuire uniformemente l'olio.
Coprire l'attrezzo e riporlo in un luogo asciutto.
Reinigen des Schalldämpfers (Fig. 3-7, 3B)
Den Schalldämpfer und Funkenfänger (falls
vorhanden) alle 100 Betriebsstunden abnehmen
und Rußablagerungen im Auslassstutzen oder
Schalldämpfereinlass entfernen.
Längerfristige Lagerung
Den Kraftstoff vollständig aus dem Tank ablassen.
Den Motor starten und laufen lassen, bis er von
selbst stoppt. Eventuelle beim Gebrauch
entstandene Schäden instandsetzen. Das
Gerät mit einem sauberen Lappen oder
Druckluft gründlich reinigen. Einige Tropfen
Zweitaktmotoröl durch die Zündkerzenbohrung
in den Zylinder geben und den Motor einige
Male drehen lassen, damit sich das Öl gut
verteilt. Das Gerät abdecken und an einem
trockenen Ort lagern.
Rengöring av ljuddämparen (Fig. 3-7, 3B)
Tag bort ljuddämparen och gnistfångaren,
(om denna eventuellt är monterad), och rensa
sedan bort kol som sitter på avgaskanalen
eller Ijuddämparingången var 100 timmars
användning.
Långtidsförvaring
Tappa ur allt bränsle från bränsletanken.
Starta motorn och låt den gå tills den stannar.
Reparera samtliga skador som har uppstått
under arbetets gång. Rengör motorsågen
med en ren trasa eller blås den ren med
tryckluft. Droppa några droppar
tvåtaktsmotorolja i cylindern genom
tändstiftshålet och dra runt motorn några
gånger så att oljan sprids. Täck över
motorsågen och förvara den på en torr plats.
Limpieza del silenciador (Fig. 3-7, 3B)
Desmontar el silenciador y parachispas (si lo
tiene equipado), y limpiar cualquier exceso de
carbón de la boca de escape o entrada del
silenciador cada 100 horas de operación.
Para el almacenamiento durante largos períodos
Drenar totalmente el contenido del tanque de
combustible. Arrancar el motor y dejarlo en
funcionamiento hasta que se pare. Reparar
cualquier daòo que haya sufrido por el uso.
Limpiar la unidad con trapo limpio o sopletear
con la manguera de aire de alta presión.
Aplicar algunas gotas de aceite de motor para
motocicletas dentro del cilindro a través del
orificio de la bujía de encendido y girar el
motor varias veces para que se distribuya el
aceite. Cubrir la unidad y almacenar en un
lugar seco.
SPARK ARRESTOR (Fig. 3-7)
If your unit comes with spark arrestor screen
and your local regulation requires use of spark
arrestor for prevention against a possible fire,
please attach it to the muffler by removing muffler
protector and other related parts.
[The spark arrestor meets the regulation of SAE
J335-SEP90 and CSA CANS-Z62. 1-M77]
1) Remove screw (8) fastening muffler protector
(6) and the two screws (7) fastening the muffler
protector.
2) Remove screws (23), Exhaust pipe B (22)
and muffler special gasket (20). Set the spark
arrestor screen (21) between the muffler
special gasket and exhaust flange (24), then
put them together again.
19
I t
Ge
Sp
Sw
En
Fr
Fig.3-7
Fig.3-7B
Ge
En
Sp
Fr
I t
Sw
7
23
6
8
24
21
20
22

Maintenance schedule
Below you will find some general maintenance
instructions. For further information please contact
your service dealer.
Daily maintenance
Clean the exterior of the unit.
Check that the drilling attachment is properly
centred, sharp, and without cracks. An off-
centred bit induces heavy vibrations that may
damage the unit.
Check that the drilling attachment is sufficiently
tightened.
Check that nuts and screws are sufficiently
tightened.
Weekly maintenance
Check the starter, especially cord and return
spring.
Clean the exterior of the spark plug.
Remove it and check the electrode gap.
Adjust it to 0.6 mm, or change the spark plug.
Clean the cooling fins on the cylinder and check
that the air intake at the starter is not clogged.
Check that the gear case or transmission is
filled with grease up to 3/4.
Clean the air filter.
Monthly maintenance
Rinse the fuel tank with gasoline.
Clean the exterior of the carburetor and the
space around it.
Clean the fan and the space around it.
Entretien
Vous trouverez ci-dessous quelques conseils
d'entretien d'ordre général. Pour toute
information complémentaire, contactez votre
agent Tanaka.
Entretien quotidien
Nettoyer l'extérieur de la machine.
Vérifier que la mèche est bien centrée, affutée
et qu'elle ne présente pas de fissures. Une
mèche décentrée peut la machine.
Vérifier que l’outil de forage est correctement
fixé.
Vérifier le serrage de tous les écrous et de
toutes les vis, surtout les écrous fixant le filtre
à air.
Entretien hebdomadaire
Contrôler le lanceur, sa corde et son ressort
de rappel.
Nettoyer la bougie extérieurement.
La démonter et contrôler l'écartement des
électrodes, qui doit être de 0.6 mm. La
remplacer le cas échéant.
Nettoyer les ailettes de refroidissement du
cylindre et vérifier que la prise d'air située au
niveau du lanceur n'est pas obstruée.
Vérifier que boîtier du réducteur est remplie
aux 3/4 de lubrifiant.
Nettoyer le filtre à air.
Entretien mensuel
Nettoyer le réservoir de carburant à l'essence.
Nettoyer extérieurement le carburateur et son
logement.
Nettoyer la turbine et son logement.
Schema di manutenzione
Seguono alcune istruzioni di manutenzione
generale. Per ulteriori informazioni contattare il
proprio rivenditore.
Manutenzione giornaliera
Pulire la macchina esternamente.
Controllare che il dispositivo di foratura sia
centrato ed integro senza incrinature. Se la
punta é fuori centro, le forti vibrazioni generate
possono danneggiare la macchina.
Controllare che il dado del dispositivo d foratura
sia ben serrato.
Controllare che dadi e viti siano ben serrati.
Manutenzione settimanale
Controllare il dispositivo di avviamento, in
particolare il filo e la molla di ritorno.
Controllare l'esterno della candela.
Rimuovere la candela e controllare la distanza
tra gli elettrodi. Regolare su 0,6 mm o sostituire
la candela.
Pulire le alette di raffreddamento sul cilindro e
controllare che il collettore di aspirazione
dell'aria sulla messa in moto non sia intasato.
Controllare che la scatola degli ingranaggi o
la trasmissione sia ingrassata fino a 3/4.
Pulire il filtro dell'aria.
Manutenzione mensile
Lavare con benzina il serbatoio del carburante.
Pulire l'esterno del carburatore e l'area
circostante.
Pulire la ventola e l'area circostante.
Wartungsschema
Nachstehend folgen einige allgemeine
Wartungsanweisungen. Für weitere Auskünfte
eine Fachwerkstatt aufsuchen.
Tägliche Wartung
Die Bohrmaschine äußerlich reinigen.
Der Bohrvorsatz muss gut zentriert, scharf und
frei von Rissen sein. Ein schlecht zentierter
Bohrer verursacht Vibrationen, die das Gerät
beschädigen können.
Den Festsitz der Bohrvorsatzmutter
kontrollieren.
Kontrollieren, ob Muttern und Schrauben fest
angezogen sind.
Wöchentliche Wartung
Die Startvorrichtung, das Seil und die
Rückholfeder überprüfen.
Die Zündkerze äußerlich reinigen.
Die Zündkerze herausschrauben und den
Elektrodenabstand kontrollieren. Den Abstand
auf 0.6 mm einstellen oder eine neue
Zündkerze einschrauben.
Die Kühlrippen des Zylinders reinigen und den
Lufteintritt an der Startvorrichtung auf
Verstopfung kontrollieren.
Kontrollieren, ob das Getriebe oder das
Triebwerk 3/4 mit Schmiermittel gefüllt ist.
Luftfilter reinigen.
Monatliche Wartung
Den Kraftstoffbehälter mit Benzin reinigen.
Den Vergaser und seine Umgebung äußerlich
reinigen.
Den Lüfter und seine Umgebung reinigen.
Esquema de mantenimiento
Siguen a continuación algunas instrucciones
generales de mantenimiento. Si desea más
información, acuda al taller de servicio.
Cuidados diarios
Limpie la unidad por fuera.
Verificar que el aditamento de taladro esté
centrado, filoso y sin fisuras, La cuchilla
descentrada producirá vibraciones fuertes
que pueden dañar la unidad.
Comprueben el suficiente apriete de la
tuerca fijadora del aditamento de taladro.
o Compruebe que las tuercas y tornillos están
apretados.
Cuidados semanales
Compruebe el aparato de arranque en
especial, la cuerda y el muelle de recuperación.
Limpie la bujía por fuera.
Desmóntela y compruebe la distancia entre
electrodos que ha de ser de 0,6 mm, o
cambie la bujía.
Limpie las aletas de refrigeración del cilindro
y compruebe que no se ha obstruido la
admisión de aire.
Compruebe que la caja de engranajes o la
transmisión está llena en sus 3/4 partes de
g rasa.
Limpie el filtro de aire.
Cuidados mensuales
Enjuague el depósito de combustible con
gasolina.
Limpie el carburador por fuera y los
alrededores del mismo.
Limpie el ventilador y sus alrededores.
Underhållsschema
Nedan följer några allmänna
underhållsrekommendationer. För ytterligare
information, kontakta Din Serviceverkstad.
Daglig tillsyn
Rengör maskinen utvändigt.
Kontrollera att borrskäret har centrerats på
korrekt sätt och att det är vasst utan sprickor.
Ett excentriskt borrskär blir orsak till hårda
vibratiioner som kan skada borren.
Kontrollera att muttern, som fäster borrskäret,
dragits åt ordentligt.
Kontrollera att skruvar och muttrar är
åtdragna.
Veckotillsyn
Kontrollera startapparaten, speciellt lina och
returfjäder.
Rengör tändstiftet utvändigt.
Demontera tändstiftet och kontrollera
elektrodavståndet. Justera det till 0.6 mm
eller byt tändstift.
Rengör kylflänsarena på cylindern och
kontrollera att luftintagen vid startapparaten
inte är igensatta.
Kontrollera att växelhuset är till 3/4 fyllt med
fett.
Rengör luftfiltret.
Månadstillsyn
Rengör bränsletanken med bensin.
Rengör förgasaren utvändigt liksom utrymmet
runt omkring.
Rengör fläkten och utrymmet runt omkring.
20
I t
Ge
Sp
Sw
En
Fr
Engine Size (cm
3
) .................................................
Spark Plug ............................................................
Fuel Tank Capacity (litre).......................................
Dry Weight (kg)......................................................
Drive Shaft Diameter (mm)....................................
Max. Bit Size (mm) (Earth)....................................
Sound pressure level (dB(A))................................
Sound power level (dB(A))....................................
Vibration level (m/s
2
)
Right handle.....................................................
Left handle........................................................
Lp measured
95.4
Lp measured
112
4.1
4.3
5.66
7.81
33 (2.00cu. in.)
Lp measured
94.5
Lp measured
116
21
7. Specifications / Spécifications / Specifiche / Technische Daten / Especificaciones /
Tekniska data
MODEL
En
TIA-340
TIA-350S
8.0 (17.6 lbs)
150 (5.9 in)
NGK BPM-7A
or BPMR-7A
or equivalnet
0.9 (30.4 fl. oz)
31 (1.89 cu. in.)
7.5 (16.8 lbs)
25.0
CHAMPION CJ-6Y
or RCJ-6Y
or equivalnet
0.7(23.6 fl. oz)
NOTE : Equivalent noise level/vibration levels are calculated as the time-weighted energy total for noise / vibration
levels under various working conditions with the following time distribution : 1/2 idle, full speed.
*All data subject to change without notice.
En

Seiji Tanaka
Ge
En
Sp
Fr
I t
Sw
Declaration of conformity
Déclaration de conformité
Dichiarazione di conformità
Konformitätserklärung
Declaración de conformidad
Konformitetsdeklaration
We, Tanaka Kogyo Co., Ltd., 3-4-29 Tsudanuma, Narashino, Chiba, Japan
Nous,soussignés,
Noi,
Der unterzeichnete,
Nosotros,
Vi,
Declare under our sole responsibility that the product, engine drill model
Déclarons sous notre seule responsabilité que ce produit,,tarière à moteur thermique modèle
Dichiariamo sotto la nostra unica responsabilità che il prodotto, la trivella motorizzata modello
Erklärt unter eigener Verantwortung, dass das Produkt, Motor Bohrgerät Modell
Declaranos dajo,nuestra unica fesponsab lidad que el producto, táladró motorizado modelo Förklarar
Förklarar härmed pâ eget ansvar att denna produkt, motorborr modell
to which this declaration relates is in conformity with the essential safety requirements of directives.
à laquelle se rapporte la présente déclaration est conforme aux directives concernant les conditions de sécurité
essentielles.
al quale questa dichiarazione si riferisce, é conforme ai requisiti di sicurezza essenziali delle direttive:
Erklärung,gilt den wesentlichen Sicherheitsanforderungen der Directive entspricht:
que corresponde a esca declaraclön, satisface la(s) sigu ente (g) exigencia (s) de seguridad essenial (es) de las
directivas:
till vilken denna deklarátion tallhör, uppfyller samtliga väsentliga säkerhetskrav föreskrivna i berörda direktiv:
98/37/EC, 89/336/EEC, 2000/14/EC
The following standards have been taken into consideration ISO 3864, (EN ISO 12100-2)
Les normes suivantes ont été prises en considération.
Sono stati presi in considerazione i seguenti standard.
Die nachfolgenden Standards werden in Betracht gezogen.
Se han tenido en consideración las siguientes normas.
Vi har tagit hänsyn till följande standards.
Manufactured at : Chiba, Japan
Fait à:
Luogo:
Erstellt in:
Fabricado en:
Tillverkad av:
Signature:
Signature:
Firma:
Unterschrift:
Fimado:
Signatur:
Position:
Fonction:
Incarico:
Titel:
Cargo:
Befattning:
Serial No. up from B001001
A partir du No. de série
Num. di serie da
Serien-Nr. ab
No. de Serie de en adelante
Serienr fr.o.m.
Vice president
Vice président
Vicepresidente
Stellvertretender Vorsitzender
Vicepresidente
Vice President
TIA-340/ 350S