Full Text Searchable PDF User Manual
4K Action Camera i60
User Manual

01. Packaging
2
3
4
7
8
11
19
20
21
23
02. The Basics
03. Getting Started
04. Camera Menus
05. Camera Modes
1
06. Settings Mode
07. App Connecting
08. Battery
09. Frequently Asked Questions
10. Optional Accessories
1
CONTENTS
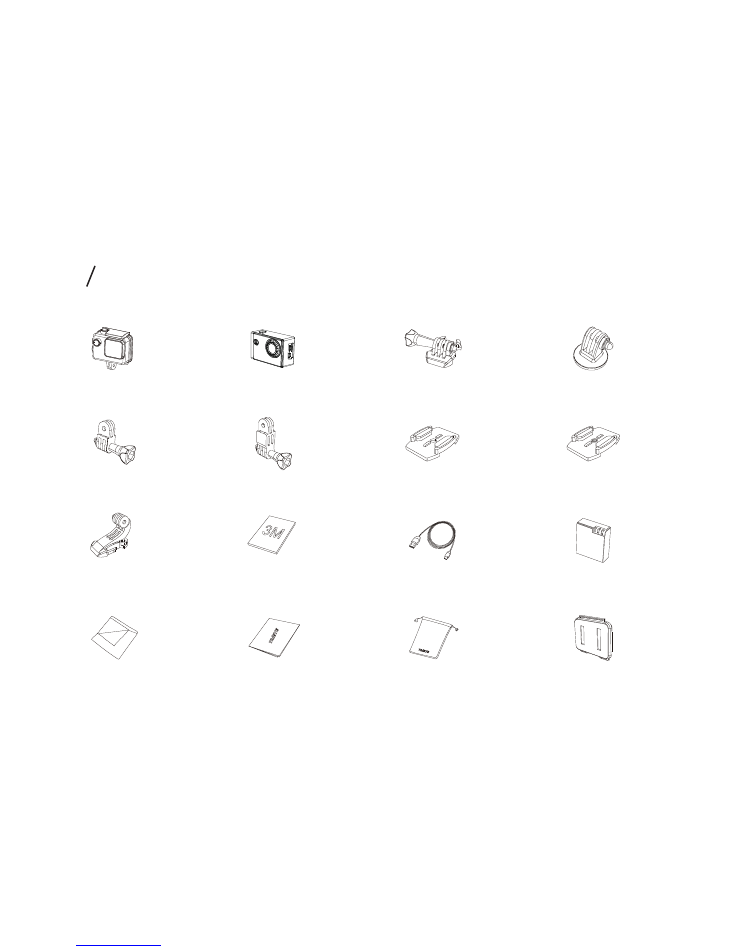
Vertical Quick
Release Buckle
Adhesive Sticker×2
Rechargeable Battery
USB Cable
Flat Adhesive Mount
Curved Adhesive Mount
3-way Arm B
3-way Arm A
Wiper
Additional Skeleton Backdoor
Quick Start Guide
Cloth Bag
4K Action Camera i60
Waterproof Housing
Quick Release Buckle
1/4’Tripod Mount Adapter
01 Packagings
2
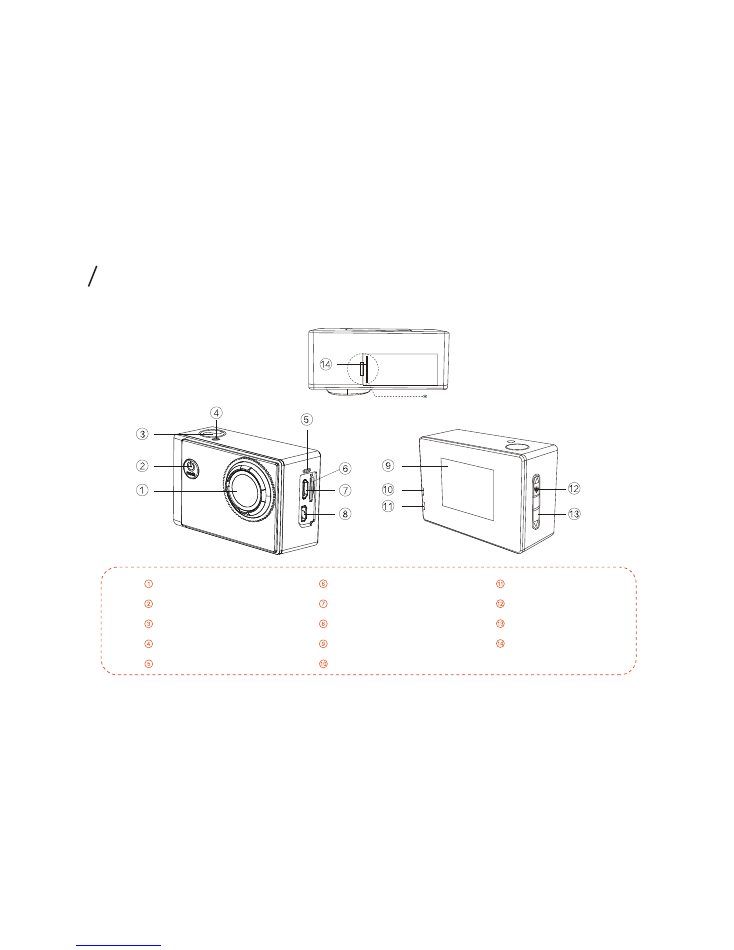
Lens
Power/Mode Button
Shutter/Select Button
Indicator Light
MIC
Status Indicator
Up/Wi-Fi Button
Down Button
Battery Cover
Micro SD Slot
USB Slot
HDMI Slot
1.5’’LCD
Charging Indicator
Please install the battery cover in this way
02 The Basics
3
Defaulted Settings
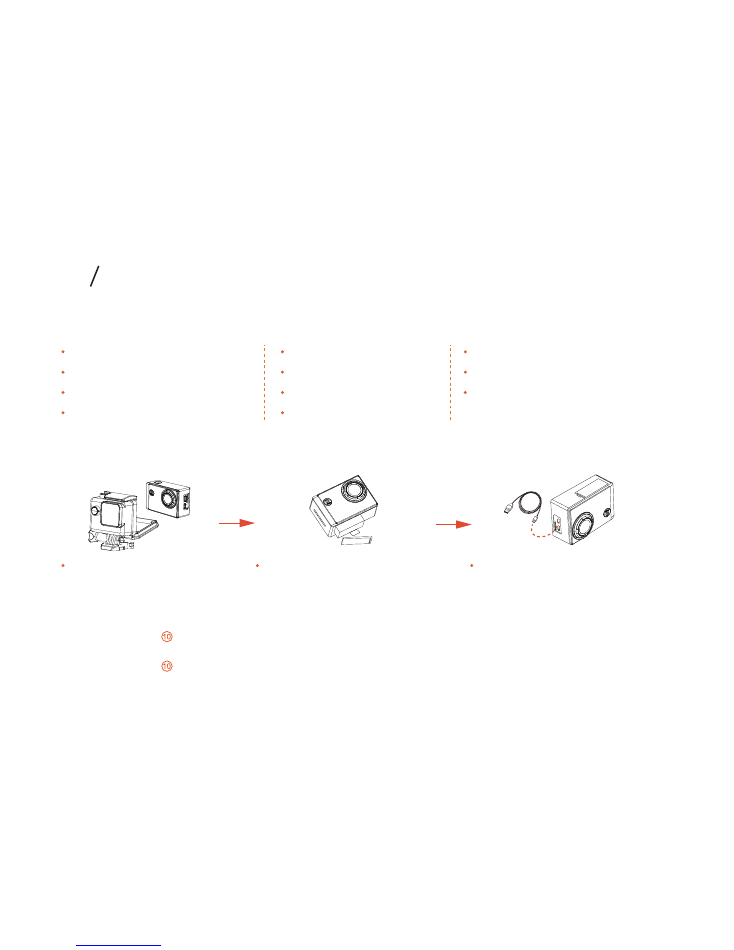
Charging the Battery
Open the backdoor of the
housing and take the camera
out.
NOTICE:
It won’t damage the camera and the battery to use the battery before it’s fully charged since it has some power.
Open up battery cover, insert the
battery and buckle up the battery
cover.
When the camera turns on :
The Indicator Light turns on during charging and turns off when charging is over.
When the camera turns off :
The Indicator Light turns on during charging and turns off when charging is over.
Charge the battery by connecting
the camera to a computer or other
USB charging adapter (5V,1A) with
the included USB cable.
OFF
OFF
OFF
English
OFF
ThiEYE*i60
1234567890
Self-Timer
Photo Burst
Timelapse Photo
Language
Wi-Fi
Wi-Fi Name
Wi-Fi password
Video Resolution
Photo Resolution
Timelapse Video
Slow Motion
1080P 60fps
12M
OFF
OFF
03 Getting Started
4
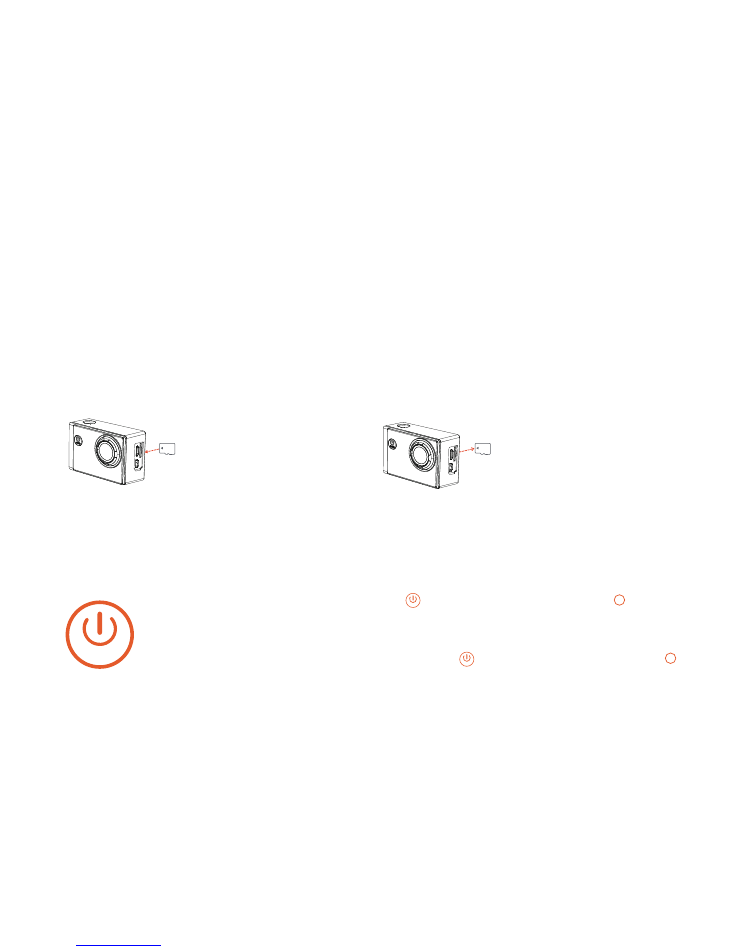
Inserting + Removing Micro SD Cards
Powering on + off
The camera i60 is compatible with microSD, microSDHC, and microSDXC memory cards (sold separately) from
4GB to 64GB capacity. You must use a microSD card with a Class 10 or a UHS-1 rating. ThiEYE recommends
using brand name memory cards for maximum reliability in high-vibration activities.
NOTICE:
When the camera is tested without a card, “No Card” will show up on the screen. Use care when handling memory
cards. Avoid liquids, dust, and debris. As a precaution, power off the camera before inserting or removing the card.
To Power On : Press the Power/Mode Button“ ”for 3 seconds. The Indicator Light flashes
and the sound indicator emits beeps and then your camera is on. And the defaulted mode
to start up is Video Recording Mode.
To Power Off : Press and hold the Power/Mode Button“ ”for 3 seconds. The Indicator Light
turns off and the sound indicator emits beeps and then your camera is off.
To Insert the micro SD Card:
Slide the memory card into the
card slot with the label facing
the screen on the back of the
camera. When fully inserted, the
card clicks into place.
To Remove the micro SD Card:
Place your fingernail against the
edge of the memory card and
lightly press it further into the
camera. The card springs out far
enough to be removed.
4
4
mode
mode
mode
5
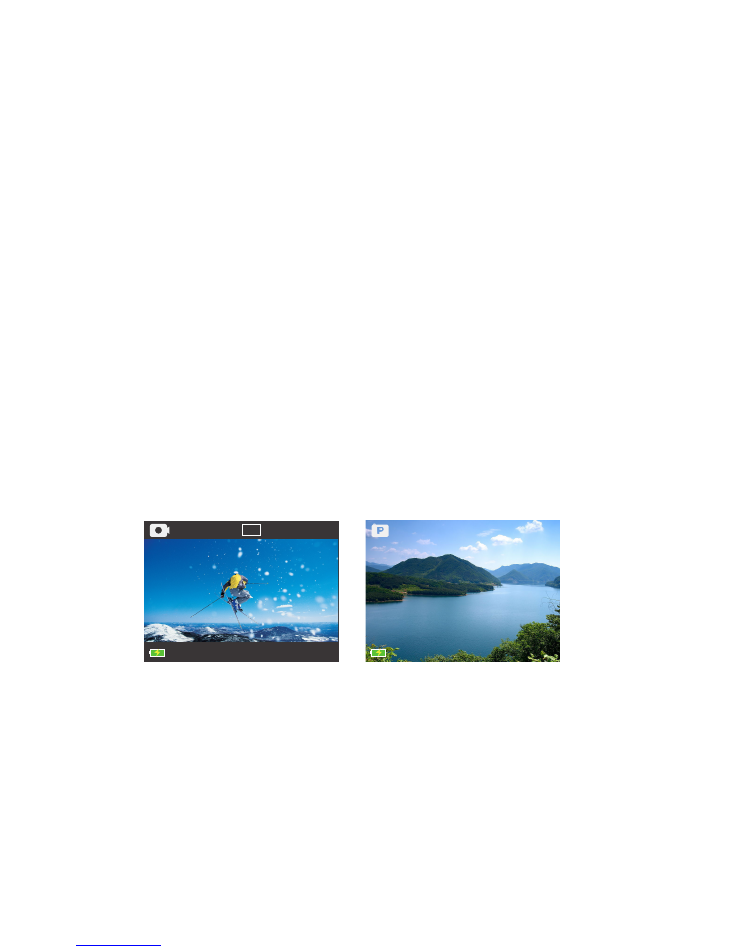
Video Recording
Photo Taking
Screen
Screen on + off
With a built-in 1.5 inch LCD screen you can frame shots, change settings, and play back the videos and the
photos. You can take it as a viewfinder , so it‘ll be easy for you to view and reset.
When you turn on/off the camera, the screen will turn on/off automatically.
NOTICE:
To make the battery work longer, you can set up the time of Display Off. For more information, see “Display Off” in
Settings Mode.
30fps 2.7K
15:03:56
6
12M
1256
HDR

Video Settings
Photo Settings
System Settings
Display Off
Volume
180° Turnover
Wi-Fi Name
Wi-Fi Password
Date & Time
Date Stamp
Language
Power Frequency
White Balance
System
Format
Factory Reset
System Info
Card Info
Photo Resolution
Self-Timer
Photo Burst
Timelapse Photo
Image Stabilizer
HDR
Exposure
ISO
Video Resolution
Timelapse Video
Slow Motion
Quick Shooting
Looping Record
Car Mode
Car Plate
Car Play Display
Voice Recording
04 Camera Menus
Video
Recording
Photo
Taking
Files
Camera
Settings
7

Camera Modes
Capturing Video
ThiEYE i60 is featured with several camera modes. Press the Power/Mode Button“ ”repeatedly to switch the
modes.
Press the ower/Mode Button“ ” repeatedly to switch to the mode you want.
1. View the menu via pressing Up /Down Button and keep your option in orange.
2. View the option under the menu via pressing shutter/select Button“ ”. Press Shutter/Select Button“ ”
again to choose your option and then the menu will be back.
To capture video, verify that the camera is in Video mode. And the Indicator Light keeps on.
To Start Recording : Press the Shutter/Select Button“ ”. The camera emits one beep and to shart up. While
recording, the Indicator Light and status Indicator flash and a red dot in the upper right of the screen
flashes.
To Stop Recording : Press the Shutter/Select Button “ ”to stop. The Status Indicator turns off and the red
dot in the upper right of the screen disappears.
If the memory card is full or the battery is out of power, your camera stops recording automatically. Your video is
saved before the camera powers off.
NOTICE:
With QuikCapture, you can quickly turn your camera on and immediately begin capturing video just by pressing the
Shutter/Select Button“ ”. While recording, you can press Up/Down Button to zoom in or out.
4
mode
mode
mode
mode
05 Camera Modes
8

Video Modes
Photo Modes
There are 4 video modes. For more information, see”Camera Modes”.
There are 4 photo modes. For more information, see”Camera Modes”.
Video Modes
Defaulted
Time Lapse Video
Slow Motion
Looping Record
Description
Defaulted
You can form a changing scene into a timelapse video.
You can slow down the speed of movement and capture the wonderful details.
You can record videos continuously. The latest video will overwrite the oldest
video when Micro SD card is full.
NOTICE:
You can record and edit the videos with ThiEYE App. Click here www.thieye.com for more information.
Photo Modes
Defaulted
Self-Timer
Photo Burst
Timelapse Photo
Description
Defaulted
You can set to delay 3/5/10s on shooting.
You can take 3/5/10 photos in one capture.
You can Capture photos at the interval of 3/5/10/30/60s.
9
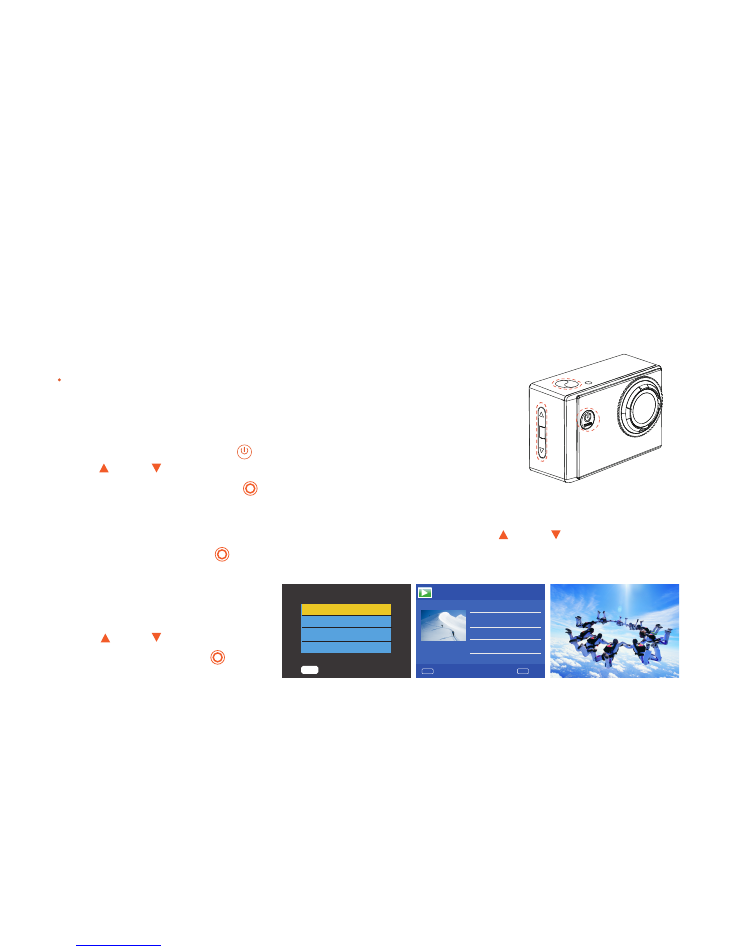
Play back videos
Files
On Screen of the Camera
Turn on the Camera
You can view the files on screen of the camera, computer, TV, smartphone, tablet.
You can play back the videos and photos on the screen of the camera directly.
Press the Power/Mode Button“ ” repeatly to the files mode. View the options
via Up /Down Button to choose Video or Photos and keep it in orange. Then
press the Shutter/Select Button“ ” to view videos or photos.
Play Back Videos
Choose the Video files and keep the video you want to view in orange via Up /Down Button. Then press
the Shutter/Select Button “ ”to play or pause.
Play Back Photos
Choose the Photo files and keep the
photo you want to view in orange
via Up /Down Button. Then press
the Shutter/Select Button“ ” to
play or pause.
mode
Videos/Photos
ok
Video
Photo
Play back photos
18/18
3/18
10
MODE
OK
1/1
0502-014411
0502-014412
0502-014413
0502-014414
00:00:04
2016.05.02
01.44
MENU
PLAY

On the Computer
Connect the camera to your computer using the included USB cable. Copy the files to your computer or ex-
ternal hard drive and you can play back the videos on camputer.
On TV
On Smartphone or Tablet
1.Connect the camera using micro HDMI cable to your TV/HD TV.
2. Turn on the TV. Choose the input way according to the port of the USB cable.
3. Turn on the camera. The screen will be off when television signal is input correctly.
4. View the files via pressing the Button on camera. For more details, see“Files”.
1. Connect your smartphone to camera via ThiEYE App. For more information, see “App Connecting ”.
2. You can play back videos and photos on smartphone or tablet via App.
Protect or Delect the Files
When you choose the videos or photos, press the Power/Mode Button“ ” to view the Protect and Delect
options. Press the Shutter/Select “ ” to protect or delete the files.
mode
11
ThiEYE i60 can take continuous photos at the interval of 3/5/10/30/60s of a changing
scene, then form into a time lapse video when play at normal video speed.
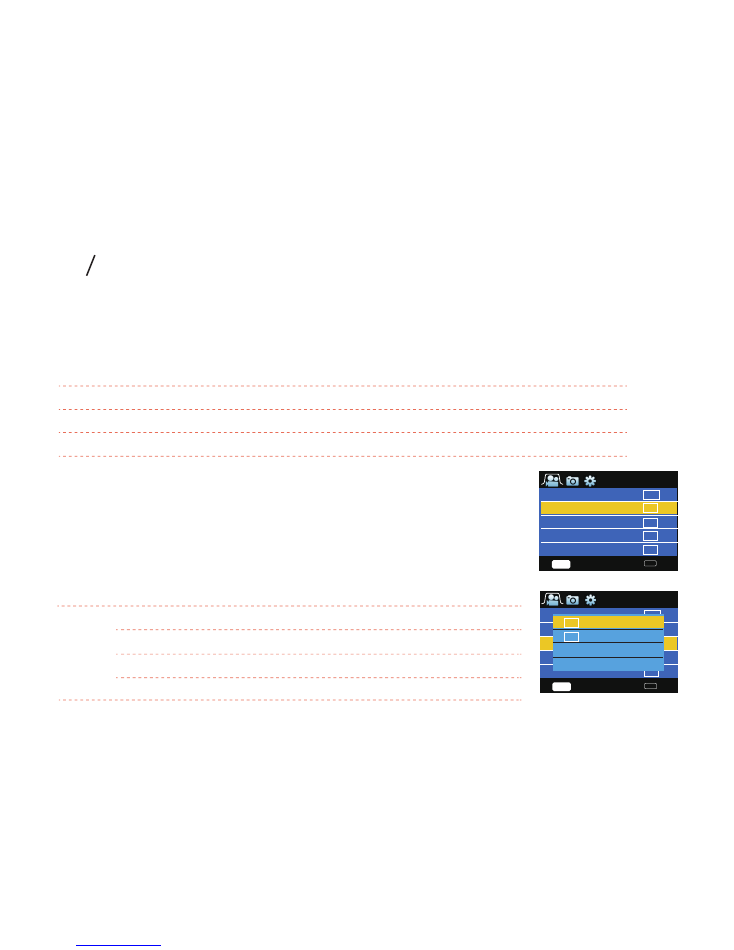
Video Settings
Timelapse Video
This function can slow down the speed of fast movement and make it useful to
capture the details. You can choose to turn it on or off.
Slow Motion
Resolution, FPS
ThiEYE i60 includes the listed video resolution below.
Video
FPS
Video Resolution
Aspect Ratio
4K
25fps
3840×2160
16:9
2.7K
30fps
2704×1520
16:9
1440P
30fps
1920×1440
4:3
1080P
30/60fps
1920×1080
16:9
720P
30/60/120fps
1280×720
16:9
Status
ON
Resolution
Recording Frame Rates
Playback Frame rates
Slow –down Rate
720P
720P
1080P
1080P
120fps
60fps
60fps
30fps
30fps
30fps
30fps
30fps
4
倍
2
倍
2
倍
无变化
06 Setting Modes
Slow Motion
Timelapse Video
12
MODE
1080
OFF
OFF
缩时录影
慢动作
快速录影
ok
OFF
OFF
RESOLUTION, FPS
OFF
OFF
Close
Open
ENTER
MOVE
MODE
1080
OFF
RESOLUTION, FPS
Slow Motion
Looping Record
Quick Capture
ok
OFF
OFF
OFF
Timelapse Video
ENTER
MOVE

With Quik Capture, you can begin capturing video when you press the Power/Mode Button “ ”. And it will
stop when pressing it again.
Quick Capture
Record and save videos every 1/3/5 min. For example, if you choose 5 min, the video you record will be saved
as 5-min units. The latest video will overwrite the oldest video when Micro SD card is full.
Looping Record
When the camera is connected with an car charger, the camera can be used as an automobile data recorder.
When the car is started , the camera will turn on and record automatically. And when the engine is off, the
video will be saved automatically and the camera will be off.
Car Mode
You can set the number of car plate according to your own need and “1234567”is the defaulted setting. You
can change the number via Up /Down Button and move via Power/Mode Button “ ”. When the last
number is finished, press Shutter/Select Button “ ” and exit.
Car Plate
NOTICE:
Please make sure that the battery has been put in the camera correctly when you want to use car mode, or when
the car is started , the camera won’t turn on and when the engine is off, the video won’t be saved automatically .
NOTICE: The video recorded in slow motion mode will paly back at the speed of 30fps. If you choose the resolution of 30fps
when recording, it has no change when playing back,even though you have chosen the slow motion mode.
mode
mode
13
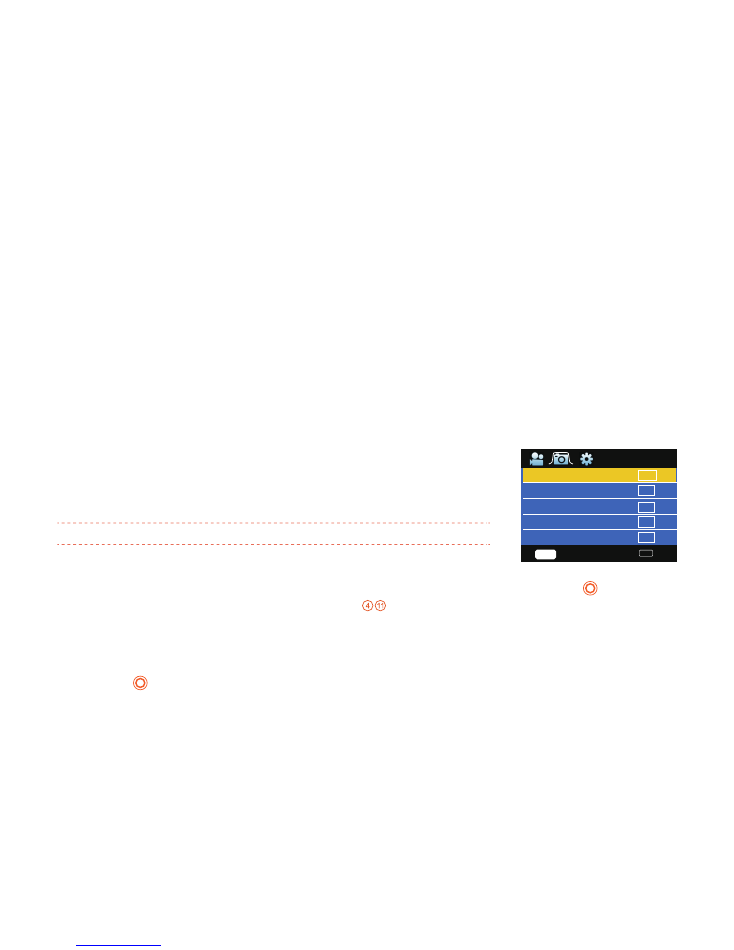
Photo Modes
Photo Resolution:ThiEYE i60 can take photos at the resolution of 12MP, 8MP, 4MP.
The smaller the resolution is, the less space of the Micro SD will be taken.
Photo Modes
You can set to delay 3/5/10s on shooting. When 3s is set and you press Shutter/Select Button “ ”, the
screen will count down from 3 to 1. And Indicator Light and Status Indicator twinkle. At the same time, the
camera will make a continuous sound of “click“ and take a photo after a sound of “beep“.
Self Timer
You can set one capture for 3/5/10 photos and continue burst. When 3 photos is chosen and the Shutter/Se-
lect Button “ ” is pressed, “Please wait” will appear on the screen . And 3 photos will be taken after 3 con-
tinuous sounds of “click“.
Photo Burst
You can choose to turn it on or off. When it’s on, the number will show up in the upper right corner, which can
help provide evidence for the accidents.
Car Play Display
You can choose to turn it on or off. When voice recording is on, you will record voice when you record a video,
otherwise you won’t record voice.
Voice Recording
Photo Resolution
Description
12MP
4000×3000
8MP
3264×2448
4MP
2304×1728
14
MODE
OFF
OFF
Photo Burst
Image Stabilizer
Timelapse Photo
ok
OFF
OFF
12M
Photo Resolution
Self Timer
ENTER
MOVE

Capture photos at the interval of 3/5/10/30/60s. When 3s is chosen and the Shutter/Select Button “ ” is
pressed, the camera will capture a photo at the interval of 3s and the Indicator Light will twinkle at the
same time.
Timelapse Photo
When the camera sense the vibration, the camera can forecast the direction and correct it via analyzing the
data. Thus it can improve the quality of photo.
Image Stabilizer
When the HDR is on, you can capture a photo with rich details regardless of the shadow or the highlight.
HDR
Exposure provides an adjustment from -2 to +2EV. EV is added 1.0 once, which means 1 time of light is
increased. You can according to your own needs to adjust the exposure of photos.
In the system settings mode, you can change the general settings about the camera.
Exposure
You can choose the ISO among AUTO, 50, 100, 200, 400, 800 and 1600. Higher ISO can turn the shadow to
bright. The bigger the ISO is, the faster the shutter speed is. At the same time,the quality of the photo will be
sacrificed.
ISO
System Settings
15
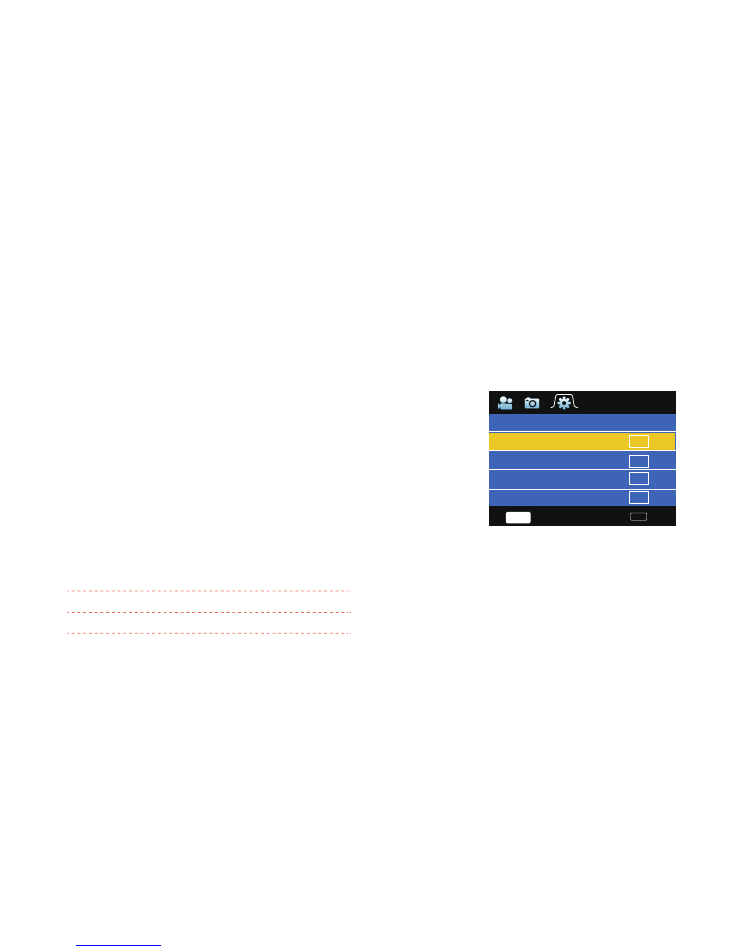
You can choose 0,1,2,3 class to adjust the volume. If you want to turn
off the voice,please choose 0 class. And the volume can work on
keypad tones and warning tones.
Volume
With 180° Turnover on, you can record videos and take photos normally
even if the camera is installed upside down.
180° Turnover
You can change the Wi-Fi name and Wi-Fi password.
Wi-Fi Name/Password
You can set 1/3/5m to make the screen off to reduce the battery use and make it longer life. You can also set
o minute and keep the screen light.
Display Off
NOTICE:
For more information, see “App Connecting”.
Setting
Description
Wi-Fi Name
Password
1234567890
(
Default
)
ThiEYE*i60
(
Default
)
180° Turnover
16
MODE
OFF
OFF
Wi-Fi Name/Password
Date Stamp
Date & Time
ok
OFF
OFF
Volume
180° Turnover
OFF
ENTER
MOVE

You can set the camera’s date and time. If you don’t use the camera for a long time, you need to reset the
date and time.
Date & Time
You can add the time on the video and photo. You can choose “Off”,”Date”,” Date & Time” based on your
needs.
The camera includes 9 languages: English, Chinese Simplified,ChineseTraditional, French, Spanish,Italian,Ger-
man, Russian,Japanese . And English is the defaulted language.
Date Stamp
Language
Power frequency decides video format. Setting power frequency to control recording fps and play back the
videos on TV.
Power Frequency
Setting
50HZ
(
System
)
60HZ
Description
North America/Korea/Japan/Taiwan
The most of other countries
17

White Balance
White balance can adjust the color tones of the videos and photos.
Setting
color temperature
Description
Auto
Daylight
Cloudy
Tungsten
Fluor H
2900K
4200K
5000k
Changing automatically with
the environments
6500k
Warm light
Warm light
Cold light
Cold light
Setting
Factory Reset
System Info.
Card Info.
The information of the SD Card’s storage
Description
The settings of the camera will be reset to default.
System firmware version
You can learn the basic information about the camera.
System
You can format your SD card and delete all the files.
Format
18
Connect i60 with ThiEYE App
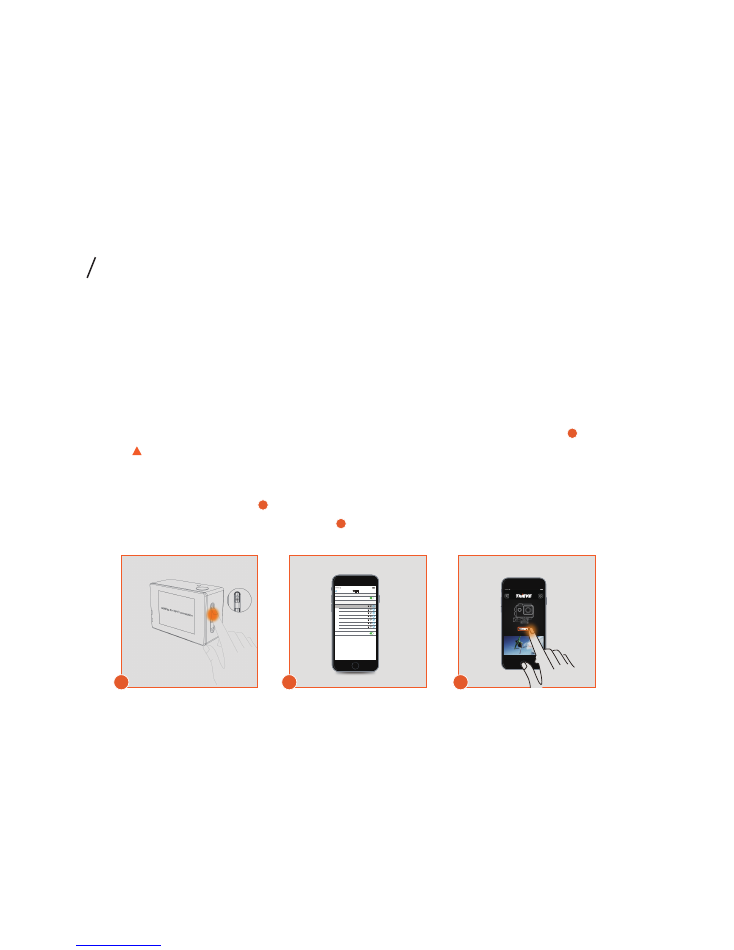
You can control your camera remotely on your smartphone or tablet via ThiEYE App. You can set the camera,
record videos and take photos , frame shots and play back instantly,edit the files and share to social media.
1. Download ThiEYE App from our official website www.thieye.com or App Store, Google Play to your smart
phone or tablet .
2. Turn on the Wi-Fi built-in camera. Verify that the camera is in video mode or photo mode.
a. Hold Up /Wi-Fi Button for 2-3s.
b. The LCD will show ‘Wi-Fi ON’ and information about Wi-Fi connecting in 2s.
3. Turn on the Wi-Fi on your smartphone or tablet. Connect your smartphone to Wi-Fi Network (Name:
ThiEYE*i60,Password: 1234567890).
4. Open the App and click the “Connect” Button.
07 App Connecting
1
Wi-Fi
Wi-Fi
15:31
Ask to Join Networks
Known networks will be joined automatically.If
no known networks are availabe,you will have
to manually select a network.
Settings
CHOOSE A NETWORK
AMAZON 01
AMAZON 02
Free Wi-Fi
Abby
Password is My Name
Out
ThiEYE*i60
2
CONNECT
3
1
2
3
19

Please turn off the screen to maximize battery life in a long-time activities. Extreme cold temperatures can de-
crease battery life. It also will increase power consumption in a higher resolution or frame rate.
ThiEYE i60 battery is designed fastener, thus maximizing the guarantee of reliability in strenuous vibration.
1. Please put your thumb on the
battery cover cave at the
bottom of the camera and cave
it up.
2. Pull the battery out through the
pulling-on piece.
The camera contains sensitive components, including the battery. Do not drop,disassemble,crush, bend or
puncture the camera.
Avoid exposing your camera to very cold or very hot temperatures.Low or high temperature conditions may
temporarily shorten the battery life or cause the camera to temporarily stop working properly. Avoid dramatic
changes in temperature or humidity when using the camera, as condensation may form on or within the
camera.
Maximizing Battery Life
Battery Storage and Handling
Pull out the Battery
Battery cover cave
Pull out
08 Battery
20

My i60 Won't Power On
Make sure your i60 is charged. To charge your camera, use the included USB cable and a computer or USB
charging adapter.
My Playback Is Choppy
Forget the Wi-Fi name or Password
Choppy playback is typically not a problem with the file. If your footage skips, one of these situations is likely
the cause:
a. Using an incompatible video player and change to use other video players.
b. The computer does not meet the minimum requirements for HD playback. The higher the resolution and
frame rate of your video, the harder the computer has to work to play it back. Make sure that your
computer meets the minimum requirements listed in Minimum System Requirements.
c. Playing your content directly from your camera over a USB connection. Transfer the file to the computer
to play back.
You can check the information of WiFi in system settings or set factory reset in default settings.
09 Frequently Asked Questions
21

Questions
No Card
Full Card
Earror Card
a. The SD card is full. You need to delete some files or change a new one.
b. The SD card is full. You need to delete some files or change a new one
c.
SD card is damaged. Change a new one..
Description
Without a SD card, the camera can’t record videos and take photos
The SD card is full. You need to delete some files or change a new one
Questions about Micro SD
22
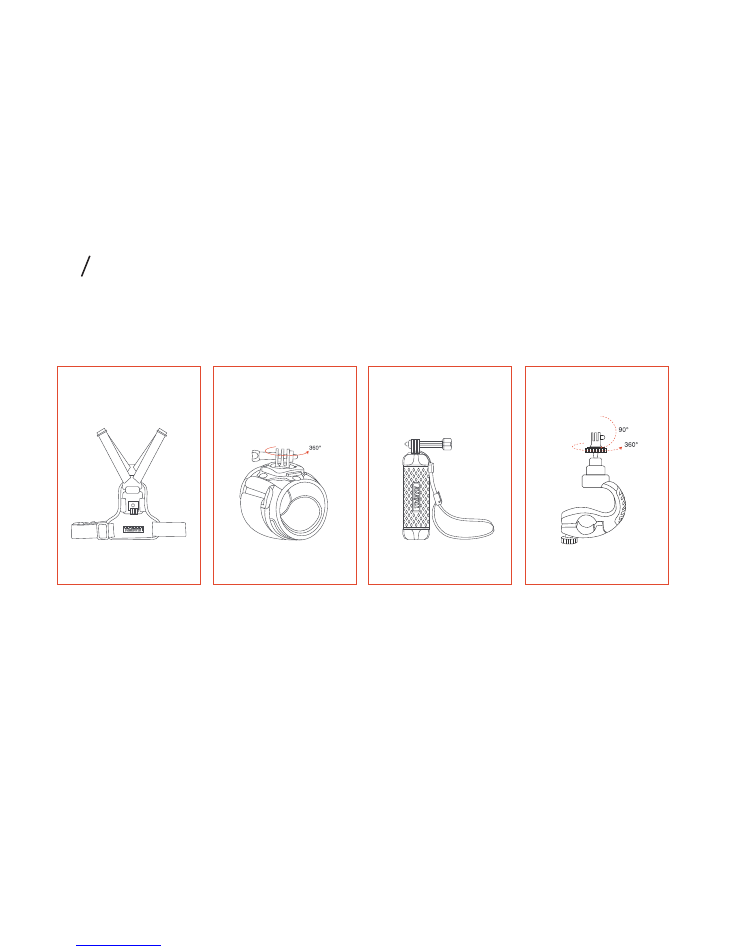
Chest Harness
Wrist Strap Mount
Floating Hand Grip
Bike Mount
10 Optional Accessories
23