Full Text Searchable PDF User Manual

Yield Technology Co., Ltd.
No. 5-7 Shia Shin Nan, Chungli
Taoyuan, TAIWAN R.O.C.
TEL:
(+886)
3-4533655
FAX:
(+886)
3-4531391
E-MAIL:
helge@ytc.com.tw
SuperGuard
GPS Vehicle Tracking System
----------
Operation Manual
----------
Compact GPS/GPRS Fleet Management Device VT-05C

Warranty
The Yield Technology Co., Ltd. (YTC) warrants to the purchaser that this product, under
normal use and conditions, will be free from defects in materials and workmanship for a
period of 12 months from the date of original purchase. If a product proves defective
during this warranty period, YTC, at its option, either will repair the defective product
without charge for parts and labor, or will provide an exchange for the defective product.
In order to obtain service under this warranty, the purchaser must notify YTC of the defect
before the expiration of the warranty period and make suitable arrangements for the
performance of service. The purchaser shall be responsible for appropriate packaging and
shipping with a carrier designated by YTC, with shipping charges paid by recipient (YTC).
This warranty shall not apply to any defect, failure or damage caused by improper use or
improper or inadequate maintenance and care, alterations, mishandling or accidents. YTC
shall not be obligated to furnish service under this warranty to costs incurred for
installation, to correction of antenna problems, removal or reinstallation or to damage to
video tapes, discs, speakers, accessories or vehicle electrical system.
The extend of YTC’s liability under this warranty is limited to the repair or replacement
provided above and, in no event, shall the company’s liability exceed the purchase price
paid for this product.
THIS WARRANTY IS GIVEN BY YTC IN LIEU OF ANY OTHER WARRANTIES,
EXPRESS OR IMPLIED. YTC AND ITS VENDORS DISCLAIM ANY IMPLIED
WARRANTIES OF MERCHANTABILITY OR FITNESS FOR A PARTICULAR
PURPOSE. YTC’S RESPONSIBILITY TO REPAIR OR REPLACE DEFECTIVE
PRODUCTS IS THE SOLE AND EXCLUSIVE REMEDY PROVIDED TO THE
PURCHASER FOR BREACH OF THIS WARRANTY. YTC AND ITS VENDORS
WILL NOT BE LIABLE FOR ANY INDIRECT, SPECIAL, INCIDENTAL OR
CONSEQUENTIAL DAMAGES IRRESPECTIVE OF WHETHER YTC OR THE
VENDOR HAS ADVANCE NOTICE OF THE POSSIBILITY OF SUCH DAMAGES.
Thank you for purchasing the
SuperGuard GPS/ GPRS Fleet
Management and Tracking device.
Please read all instructions carefully
before operation, to ensure your
complete understanding and to obtain
the best possible performance from
the unit.
Table of Contents
1.
Parts & Accessories
page 4
2.
SuperGuard Vehicle Unit - Features
page 6
3.
Preparations page
7
4.
Installation
page
8
5.
Vehicle Unit – LED Indicators
page 14
6.
Getting
Started
page
15
7.
SOS
Emergency
Button
page
16
8.
Activate/ Disable Vehicle Engine
page 16
9.
Locating and Tracking
page 17
10.
Vehicle
Monitoring
page
18
11. Technical Specifications
page 19
1. Parts & Accessories
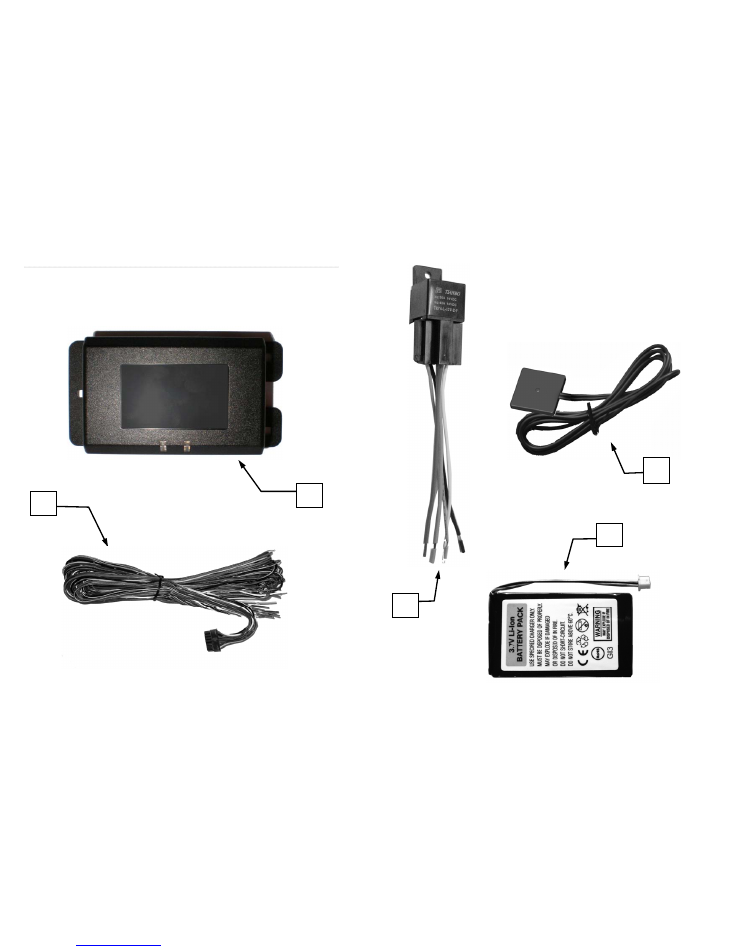
On receipt of your SuperGuard system, please check that all contents
are complete and correct.
4
1
2
1.
SuperGuard GPS/GPRS Main Unit
2.
16-PIN Wiring Harness
3.
SOS Emergency Button
4.
3.7V Rechargeable Li-Ion Battery pack
5.
Engine Immobilizer Relay
5
5
4
3
2. SuperGuard Vehicle Unit – Features
The SuperGuard SG-VT05 is a GPS vehicle tracking device, ideal for fleet
management and commercial data centers.
The SG-VT-05 is easy and quick to install, saving costly installation time
and fees.
Data exchange between device and server is maintained over GPRS and
Internet connection. All commands and configuration details can be sent
either through GPRS or SMS. An SMS only mode is also available.
Up to 3 authorized contact numbers can be configured to inquire vehicle
location through 2-RING phone call or short message command.
Alternately, you will be able to query device location and status over
Internet Website or GPRS enabled cell phones at all times.
You can setup and configure monitoring activities and alerts, using
Control Base software or Tracking Web services via Internet Explorer or
mobile on GPRS enabled cell phones.
Tracking schedules, live tracking and parameters including trip
information such as total travelled distance or trip distance in km can be
configured according to your needs.
You can define and load up to 4 restricted areas (Geo-Fence areas) to the
device and setup maximum speed alert.
The engine immobilizer allows you to disable the vehicle ignition
according to specified trigger times through GPRS or SMS command.
The device comes with one SOS Push Button designed for emergency
alarms to be sent to server and contact numbers. It should be placed at a
hidden place within reach of the driver on the dashboard.
You can configure and activate three power saving modes according to
ignition off time, no movement or no communication time.
6
3. Preparations
In order to install the SuperGuard Vehicle Unit properly, the
following preparations should be carried out:
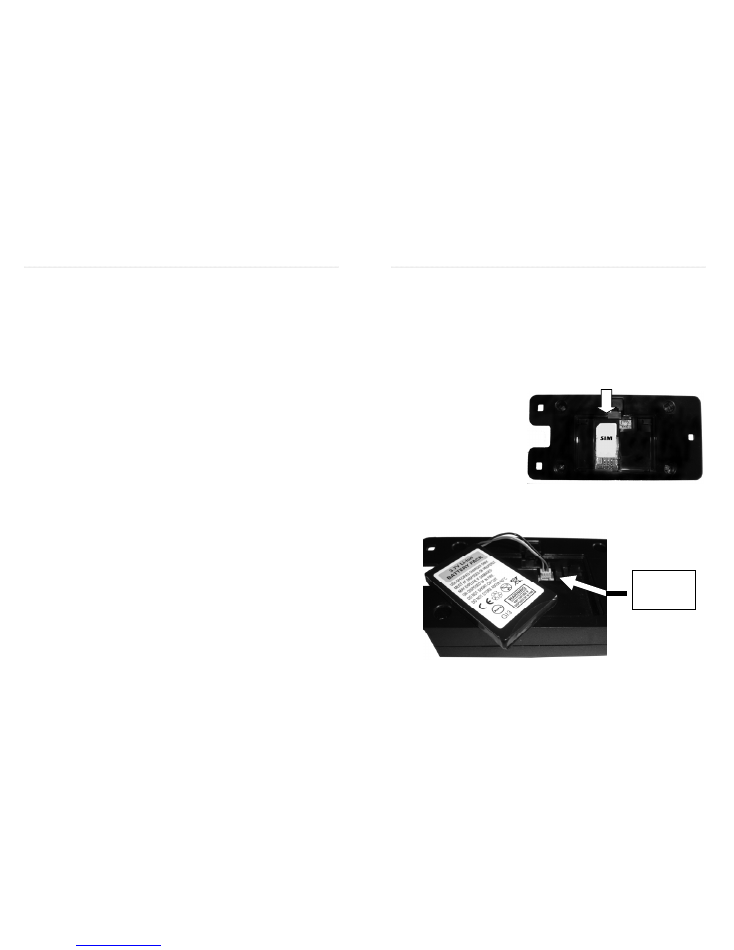
Prepare one operational GSM SIM card. Make sure that the SIM card can
operate without PIN protection and has GPRS with unrestricted Internet
access enabled (ask your GSM operator for APN and GPRS dial up
requirements). Empty the SMS storage of the SIM card using operational
GSM phone (please refer your GSM phone manual to do this).
1.
Open the battery
cover on the bottom
side of the device and
remove the battery.
2.
Insert the SIM card
into the SIM holder
in the direction as
shown in picture.
3.
Place the battery in the compartment and connect it to the
battery cable.
4.
Replace the battery cover.
7
Battery
Connector
4. Installation
The Vehicle Unit will only operate on 12 V systems with negative earth
(Negative to body).
o
Before starting installation, disconnect the vehicle battery and
observe other manufacturers safety instructions regarding
alarm systems, airbags or anti theft radio coding.
o
If you want to install the Vehicle Unit in the passenger
compartment, make sure that all antenna cables and wiring is
protected from sharp edges and is routed in such a manner that
it will not be pinched.
o
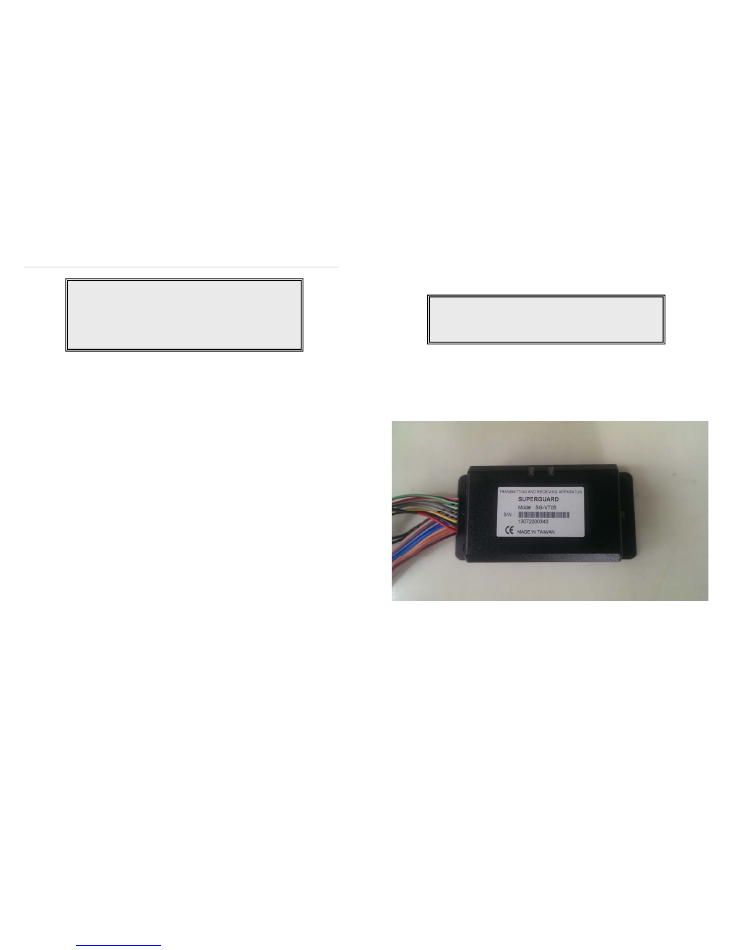
The device comes with built-in GPS antenna. It shall be
mounted vertically with its top facing the sky. The ideal
location is under the dashboard, close to the windscreen. The
device will not work if it is placed beneath metal or metallic
glass coatings.
o
The SOS button should be installed at a place on the dashboard.
It should be hidden but easily accessed in emergency cases. It
should be placed separate from dashboard controls and car
audio devices.
o
Do not connect the spare battery to the Vehicle Unit before you
have completed all electrical wiring and connections to the
device.
8
NOTE:
Please note that installation methods may
vary between vehicle models. For expert wiring
and connecting please contact a professional car
electronics workshop for installation support and
maintenance.
Connecting The Vehicle Unit:
When connecting, refer to the cable description and wiring diagrams
on the following pages.
9
NOTE: Finish all wiring and connections to the
correct vehicle outputs and inputs before you apply
the connector to the Vehicle Unit !
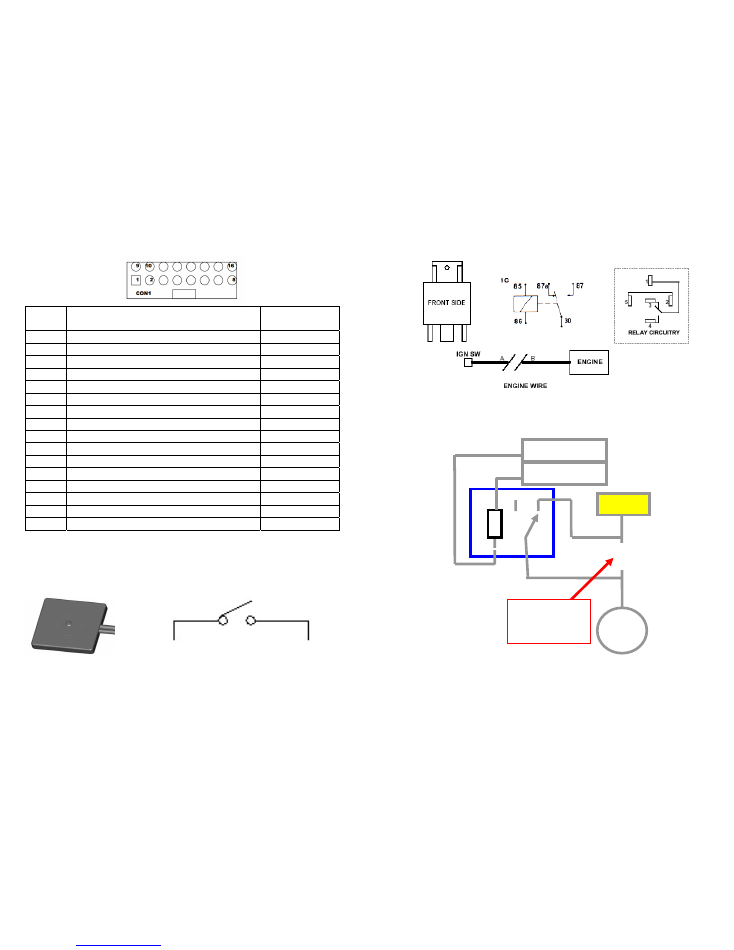
16-pin Wire Harness Description and Colors
PIN
No.
Cable Description
Color
1
+12V Battery Power Input (+)
Red
2
Power Ground (GND)
Black
3
ACC input (+12V)
Yellow
4
Connect to SOS Emergency Button (+)
Grey
5
Connect to door sensor input
Grey/ White
6
Immobilizer relay coil 85 (+)
Green
7
Immobilizer relay coil 86 (-)
Green/White
8
Analog input (AD1)
Red/ Black
9
Ground (GND)
Red/ White
10
Analog input (AD2)
Orange
11 Ground
(GND)
Orange/White
12
Switch Input/ Output (AD3)
Blue
13
reserved
(do not connect)
Blue/White
14
RS232 Rx in
Purple
15
RS232 Tx out
Pink
16 RS232
(GND)
Black
Installation of SOS Emergency Push Button
10
SOS Push Button
PIN 4 (Grey)
GND (Black)
Installation of Relay for Immobilizer function:
To apply the Engine Enable/ Disable Relay, connect the following
cables to the relay socket:
11
85
86
87
87a
30
Ign. Start
Engine
X
PIN 6 (green)
PIN 7
(green/white)
Cut "START"
wire at ignition
switch
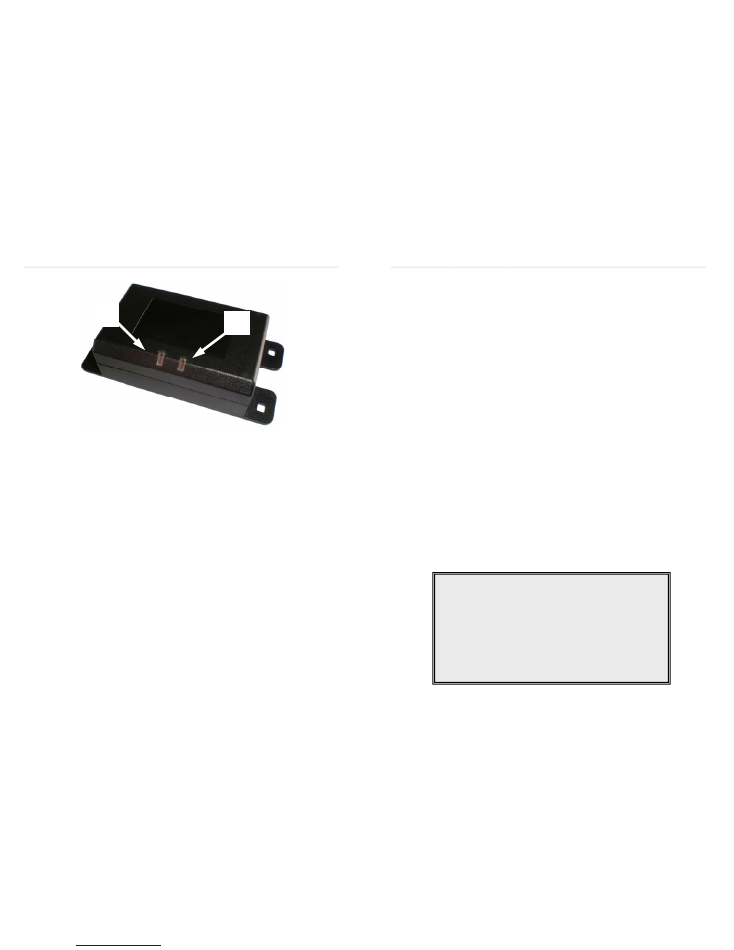
5. Vehicle Unit – LED Indicators
GSM Status LED (green)
If LED flashes once every 2 seconds (1/2s):
Device has registered successfully to GSM network.
If LED flashes once per second (1/1s):
Device is connected to GPRS network. Device is
online and able to receive commands over GPRS
and SMS and send data to server.
If LED stays on continuously:
Device Device is transmitting GPRS data to server
or is in a phone call.
If LED flashes rapidly (twice per second):
GSM error detected, such as SIM card not found or
communication command error.
GPS LED (blue)
If LED flashes (once per second):
Device has GPS lock.
If LED stays off:
Device is scanning for GPS signal, no GPS fix.
If LED stays on continuously:
Device is transmitting GPRS data to server.
14
6. Getting Started
After applying the wire harness to the Vehicle Unit, the device will
power up and automatically attempt to register to GSM network.
Provided that your vehicle and the device is positioned in a location
with clear un-obstructed view of the sky, the device will then start
scanning for GPS satellites to obtain its first GPS lock. This first fix
can take several minutes.
Before the device is able to operate properly, some mandatory setup
parameters need to be configured from the Control Base software or
Tracking Websites.
The following basic initializations, SIM card details and GPRS dial-up
information are required to be sent by SMS command in order to
establish communication with the server:
CCNO (included in SuperGuard Service): GSM number
assigned as Control Base number with full authorization
ID: Device ID (8 digits)
APN (Access Point Nodes) for GPRS dial-up
UserID and Password for GPRS dial-up (if required)
IP and Port of host server for data exchange
TO ACTIVATE YOUR EZT DEVICE, PLEASE CONTACT YOUR
DEALER OR TRACKING SERVICE PROVIDER.
15
IMPORTANT NOTE: Once your device has been
initialized, all following commands sent through
the Control Base have to use the same GSM
number (Control Center Number). To switch to a
different Control Center number at a later time,
you will need to send an Initialization command
with the modified Control Center number using
the original GSM number at the Control Base.

7. SOS Emergency Button
The SuperGuard system includes an SOS button that
can save your life in case of accidents, hijacking or
emergency cases.
The SOS button can be installed at a hidden place
within reach of the driver. Pressing this button will
start the following actions:
The Vehicle Unit will send an alarm message and GPS coordinates to
the Control Base. The Control Base software will find the street name
and closest intersection from a map server and send these details
through SMS short messages to all Contact numbers.
8. Activate/ Disable Vehicle Engine
Authorized contact numbers and Control Base
can enable or disable the engine through the
engine immobilizer via short message commands:
To use SMS command to lock the vehicle engine, type and send this
command to the Vehicle Unit command:
$ENG,1
To use SMS command to unlock the vehicle engine, type and send
this command to the Vehicle Unit:
$ENG,0
16
9. Locating and Tracking
Authorized users can interrogate the Vehicle Unit
to receive locations, street names and details. In
addition, they can poll and track their vehicles
through Control Base software or Tracking Web
services via Internet Explorer or mobile on GPRS
enabled cell phones.
Vehicle Tracking
From authorized contact numbers, you can get location details
directly from the VT-05C by sending the command $GOOGLE per
SMS to the device. The device will reply with Google Street
information, if available.
From the the Tracking Website or GPRS enabled cell phones you
are able to receive updated GPS locations any time and display
them on a map, and view online tracking history event and
communication reports.
From the Control Base or Websites, you are also able to query
locations, view real time movement and setup Tracking schedules
in intervals starting from 10 seconds.
The GPS odometer function can be configured to send travelled
distances for each trip (ignition on/ off signal required), and total
distance travelled.
Up to 500 positions can be stored to the device and uploaded as
batch data. ou will also be able to configure sleeping modes for the
GPS engine to reduce power consumption.
17

10. Vehicle Monitoring
Users are able to setup and configure
monitoring activities and alerts to the
Vehicle Unit, using Control Base software or
Tracking Web services via Internet Explorer
or mobile on GPRS enabled cell phones.
Geo-Fence Alarms
The Vehicle Unit can been configured with a set of up to four
restricted geographic areas (Geo-Fences).
The Vehicle Unit will send an alarm message and GPS
coordinates to the Control Base. The Control Base software will
find the street name and closest intersection from a map server
and send these details through SMS short messages to
authorized Contact numbers.
Over Speed Alarms
If the Vehicle Unit has been configured with a maximum speed
limit, the following activities will be triggered when the vehicle
speed exceeds the speed limit:
The Vehicle Unit will send an alarm message and GPS
coordinates to the Control Base. The Control Base software
will find the street name and closest intersection from a map
server and send these details through SMS short messages
to all Contact numbers.
The device will continue collecting data for over speed
report until the vehicle speed falls under a specified
threshold.
18
11. Technical Specifications
SIZE (L/W/H):
88 (119) x 58 x 30 mm
POWER SUPPLY: DC 9V ~ DC 24V
- 4mA ~ 10mA Standby current
- 100mA ~ 120mA operating (SMS)
- 250mA ~ 350mA operating (Talk time)
- 100mA ~ 150mA operating (GPRS online)
SPARE BATTERY: 3.7V 700 mAh
o
Battery standby time: 6 hours (apprx.)
o
Battery charging time: 2 hours (apprx.)
OPERATING TEMPERATURE: -20°C ~ +70°C
GSM MODULE: TELIT (quad band)
o
Operating Frequency:
GSM-850 (TX : 824Mhz ~849Mhz);
(RX : 869Mhz ~894Mhz)
E-GSM-900 (TX : 880~915Mhz);
(RX: 925Mhz ~ 960Mhz)
DCS-1800 (TX : 1710Mhz ~ 1785Mhz);
(RX: 1805Mhz ~ 1880Mhz)
PCS-1900: ( TX : 1850.2Mhz ~ 1909.8Mhz );
( RX : 1930.2Mhz ~ 1989.8Mhz )
o
TX Output Power:
GSM-850:
Max: 33dBm ± 5dB ; Min: 5dBm ± 5dB
E-GSM-900:
Max : 33dBm ± 5dB ; Min : 5dBm ± 5dB
DCS-1800
Max : 30dBm ± 5dB ; Min : 0dBm ± 5dB
PCS-1900:
Max : 30dBm ± 5dB ; Min : 0dBm ± 5dB

o
Sensitivity:
GSM-850: < -106 dBm
E-GSM-900: < -106 dBm
DCS-1800: < 104 dBm
PCS-1900 : < 104 dBm
GPS MODULE
o
Module: uBlox
o
Sensitivity: > -160 dBm
o
Protocol: NMEA-0183 V3.0
o
Projection: WGS-84
GPS ANTENNA:
o
Frequency band: 1575.42
±
2 Mhz
o
Gain: +24 dBi Active Antenna
o
Output Impedance: 50
Ω
INPUTS:
o
SOS Emergency button
o
Vehicle ignition (ACC)
o
Door Sensor
o
Analog Input 1
o
Analog Input 2
OUTPUTS:
o
RS232
o
Engine Out (relay to cut engine circuit)