Full Text Searchable PDF User Manual
SETTING THE VIDEO TIME/DATE STAMP
To set the time and date stamp that is displayed on
the video, follow these steps:
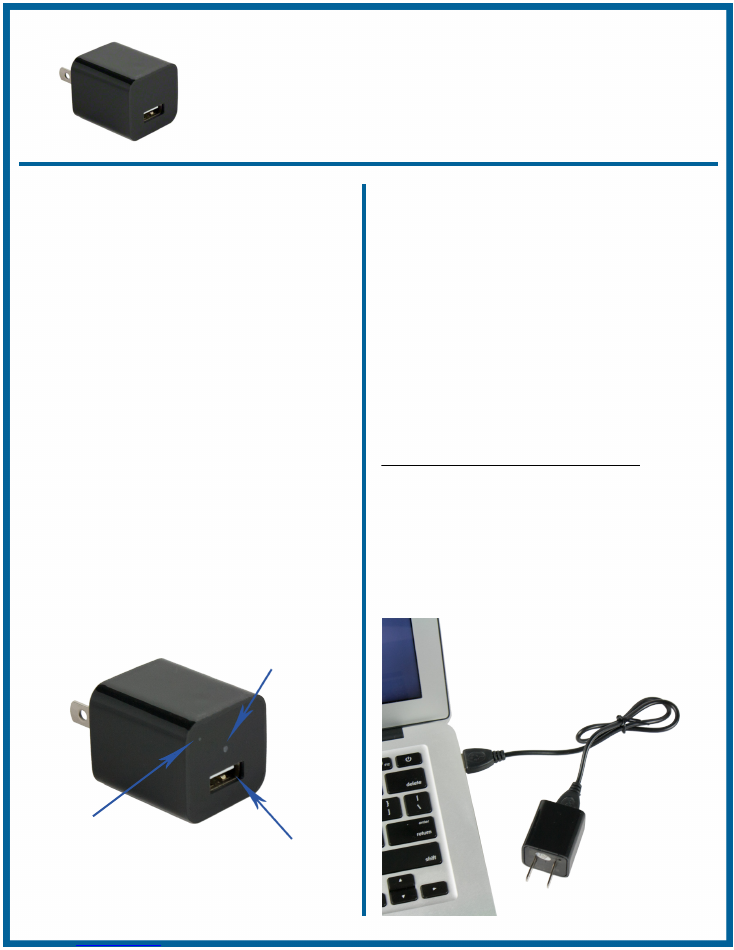
1. First, connect the wall charger camera to your
computer using the included USB connection cable.
Plug one end of the cable into the charger, and the
other into the USB port on your PC or Mac computer:
The camera comes equipped with 32GB of internal
memory built inside, so there are no memory cards to
worry about. There are also no switches or buttons,
which helps make this camera completely covert.
What makes this camera so easy to use is that you can
take it right out of the box, and plug it into the wall outlet
with no configuration needed.
The only optional setting you may want to adjust is the
time and date stamp that is displayed on the video,
which is quick and easy to set.
Getting Started
Functional USB Port
(To Connect to Computer
for File Transfer or to
Charge USB Devices)
LED Status
Indicator Light
Hidden Camera Lens
Product Diagram
• 1080P HD Mini USB Wall Charger Spy Camera
(32GB of Internal Memory Built Inside)
• USB Connection Cable
• Quick Start Guide
In the Box
The SpygearGadgets
®
1080P HD Mini USB Wall
Charger Hidden Spy Camera (Model #SG-HC240) is
a functional USB charger that also features a built in
high definition hidden camera. Videos are recorded to
32GB of internal memory and can be played back on
both PC and Mac computers.
The camera records in continuous recording mode,
and is easy to operate. It is ready to go out of the box
- just plug it into an AC outlet, and it will start
recording. With auto-overwrite “loop recording”, it will
record over the oldest files if the memory card fills up,
so you’ll never miss a moment of activity.
Overview
QUICK START GUIDE
1080P HD Mini USB Wall Charger Hidden Spy Camera
SPYGEARGADGETS
®
If you have any questions about setting up your
camera, please contact our tech support team at
support@spygeargadgets.com or visit our support
portal at http://support.spygeargadgets.com.
Our online support portal has detailed FAQs available
and step by step instructions to operate the camera.
Technical Support and FAQs:
Troubleshooting/FAQs
Q. Why is my video playback choppy?
A. Because the files are very large (due to HD quality), you may get
choppy playback when playing via USB. To solve this, copy videos
to your computer and play back directly from your computer.
Q. Can I switch to motion activated recording?
A. This device records in continuous recording mode only.
Q. My USB port isn’t reading the device?
A. First try restarting your computer, or try a different USB port.
Charging a USB Device
To use this device as a regular USB wall charger to
charge your phone or other small USB device, first plug
the charger camera into a regular AC power outlet (or
extension cord or surge protector). Next, use your
phone’s charging cable and plug the USB end into the
charger. The charger will provide power and charge
your device as long as it’s plugged into the outlet.
To view your recorded videos and photos, connect the
camera to your computer using the included USB as
described on the previous page.
Once the camera is connected, click “Open folder to
view files” and browse to the DCIM folder on the camera
drive. You’ll see a list of all the videos recorded by the
camera. Click on the video files to play. You can also
copy them to your computer or delete them.
Note: If the video is playing all black, your computer’s
video drivers may be out of date. We recommend
downloading VLC Media Player, a free download for
both PC and Mac computers available at
http://www.videolan.org/vlc.
Viewing Recorded Videos and Photos
The camera features an “auto overwrite” or “loop
recording” feature, which will automatically overwrite
the oldest files if the internal memory fills up, so you
won’t miss anything if the 32GB of memory fills up.
The charger camera records video continuously, so to
start recording, simply plug it into any standard AC
power outlet. It can be plugged into a wall outlet, or
even a surge protector. To adjust the viewing angle,
we recommend plugging it into an 3’ or 6’ extension
cord, which can then allow you to aim the camera in
whichever direction you need it.
After the camera is plugged into power, the LED
indicator will flash blue 3 times and then go out, which
indicates video recording has started. Video files will
be saved every 3 minutes, and the device will
continue to record until you unplug it.
Recording Video
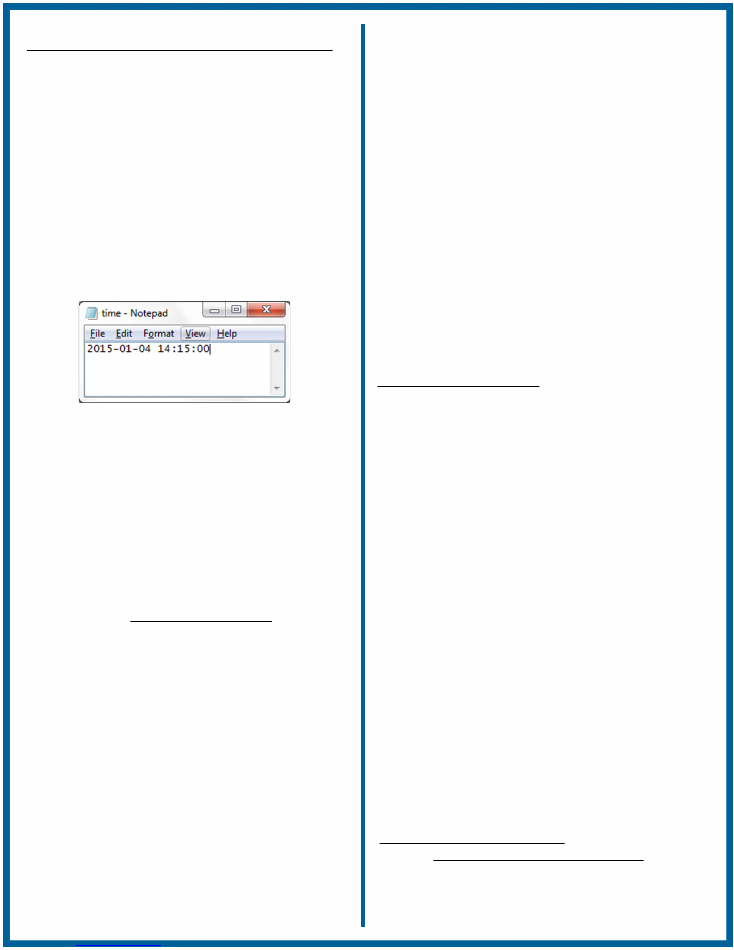
Y = YEAR
M = MONTH
D = DAY
H = HOUR
M = MINUTE
S = SECOND
SETTING THE TIME/DATE STAMP (CONTINUED)
2. Once connected to your computer, browse to the
drive associated with the camera (ie. “D:” or “E:”), and
open to find the “time.txt” file in the main directory.
Open the time.txt file, and edit the file with the current
time and date in the following format:
YYYY-MM-DD HH:MM:SS
So for example, if the current time and date was
January 4, 2016, 2:15PM, it would be typed out as:
NOTE: Make sure to delete the 3 trailing blank spaces
after the time. Also be sure to leave the single space
between the date and time. After you have entered the
date/time and deleted the spaces at the end of the
line, save and then close the time file. The next time
you record video, the new time/date stamp will be
applied. If the time stamp doesn’t apply correctly,
make sure you followed the time set process exactly.
If you have trouble with the time/set process, you can
view a detailed step-by-step guide and download a
sample file here: http://spyg.co/h240time.