Full Text Searchable PDF User Manual

XE-A101 Quick Start Guide
English
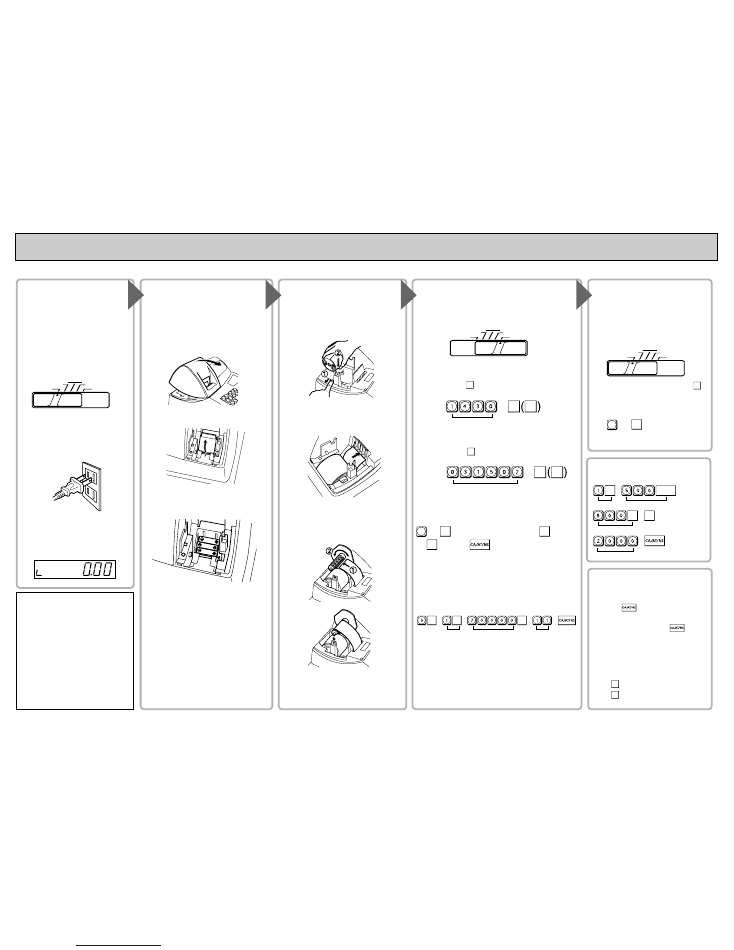
The following describes how to get your cash register ready to operate. Follow these steps when you use the cash register for the first time.
The buzzer will sound three times.
3. Now the cash register has been
initialized. The register display will
show “0.00” with “
l
” .
2. Insert the plug of the power cable
into the AC outlet.
IMPORTANT
This operation must be performed
without batteries loaded.
To ensure the cash register operates
properly, initialize it using the following
procedure:
1. Set the mode switch to the REG
position with the power cable
unplugged.
1
Initializing the Cash
Register
REG
X/F
Z/PGM
VOID
OFF
The following are supplied with your
cash register.
1 paper roll
2 drawer lock keys
1 instruction manual (English)
1 instruction manual (Spanish)
1 Quick Start Guide
1 ink roller (pre-installed)
1 take-up spool
For further information, please read the instruction manual.
Printed in Korea/Impreso en Corea O(TCADH2395BHZZ)
1
2
Installing Batteries
Install batteries for back-up of sales data
and programmed contents.
1. Push the printer cover forward and
detach it.
2. Open the battery cover next to the
paper roll cradle.
View from rear
3. Insert three new
“
AA
”
batteries.
(Batteries are not supplied with the
cash register.)
3
Installing a Paper
Roll
1. Push the paper roll release lever and
install the paper roll so that the paper
unrolls from the bottom.
2. Insert the paper straight into the
paper inlet, and press the
f
f
f
f
f
key.
The inserted end comes out at the
printing area.
3. (For journal printing) Insert the top
end of the paper into the slit in the
take-up spool shaft and wind the
paper two or three turns. Then place
the take-up spool on the bearing.
4. Attach the printer cover.
(For receipt printing, step 3 should be
omitted.)
4
Basic Programming
Set the mode switch to the Z/PGM postition.
5
Now, you are ready!
Before Starting Entries
Set the mode switch to the REG
postition.
NOTE
Your cash register is pre-programmed so that you can
use it with minimum set-up. To change the settings, see
the instruction manual.
Initial settings
Departments 1-4: Taxable 1
Departments 5-8: Non-taxable
where
R: Tax rate (0.0000% to 99.9999%)x10000
(Enter the rate in 6 digits. Leading zeros may be
omitted.)
Q: Minimum taxable amount (0.01 to 99.99)x100
(Smallest amount for which tax must be collected. )
*Up to 4 types of tax are programmable.
Example:
Setting Tax Rates (%)
Specify a tax rate (%) for calculation of tax on each
taxable subtotal using the following sequence:
Setting
the Date
Enter the date in 6 digits using the month-day-year
format. Press the
#/
SBTL
key once to program the next item
or twice to exit the programmig mode.
Example:
Setting the Time
Enter the time in 4 digits (“hhmm” format) using the 24 hour
system. Press the
#/
SBTL
key once to program the next item
or twice to exit the programming mode.
Example:
Before Starting Entries
Set the mode switch to the REG
postition.
Enter a clerk code (1-4) and press
CLK#
.
(Once the clerk code entered, re-entry
of the clerk code is not needed until
the clerk is changed.)
Clerk code
Registration Example
(When the Customer Pays by Cash)
Reading and Resetting
X Reports (reading)
Set the mode switch to the X/F position
and press
.
Z Reports (reading and resetling)
In the Z/PGM mode, press
.(In this
case, grand total resetting is not performed.)
Flash Reports (displayed but not
printed)
In the X/F mode:
Press dept. key for dept. sales reports
Press
#/
SBTL
for sales total reports
Press
CH
for cash-in-drawer reports
REG
X/F
Z/PGM
VOID
OFF
Time(2:30 p.m.)
#/
SBTL
#/
SBTL
Date(March 15, 2002)
#/
SBTL
#/
SBTL
Tax 1
#/
SBTL
@/TM
@/TM
Tax rate(7.0000%)
Min. taxable
amount($0.11)
9
➝
#/
SBTL
➝
Tax number (1-4)*
➝
@/TM
➝
R
➝
@/TM
➝
Q
➝
REG
X/F
Z/PGM
VOID
OFF
1
CLK#
View from rear
Clerk code
CLK#
1
5
3
7
Price and dept.
Price and dept.
Amount tendered
#/
SBTL
4. When the batteries are properly installed,
“
l
l
l
l
l
”
on the display will disappear.
Close the battery cover.
IMPORTANT
Improper use of batteries may damage
the cash register. Please take the
following precautions.
•Be sure that the positive (+) and negative
(-) poles of each battery are oriented
properly.
•Never mix batteries of different types.
•Never mix old batteries and new ones.
Please read the instruction manual for
other battery handling precautions.