Full Text Searchable PDF User Manual

Canadian Bunk Bed regulations.
13
bunk beds are
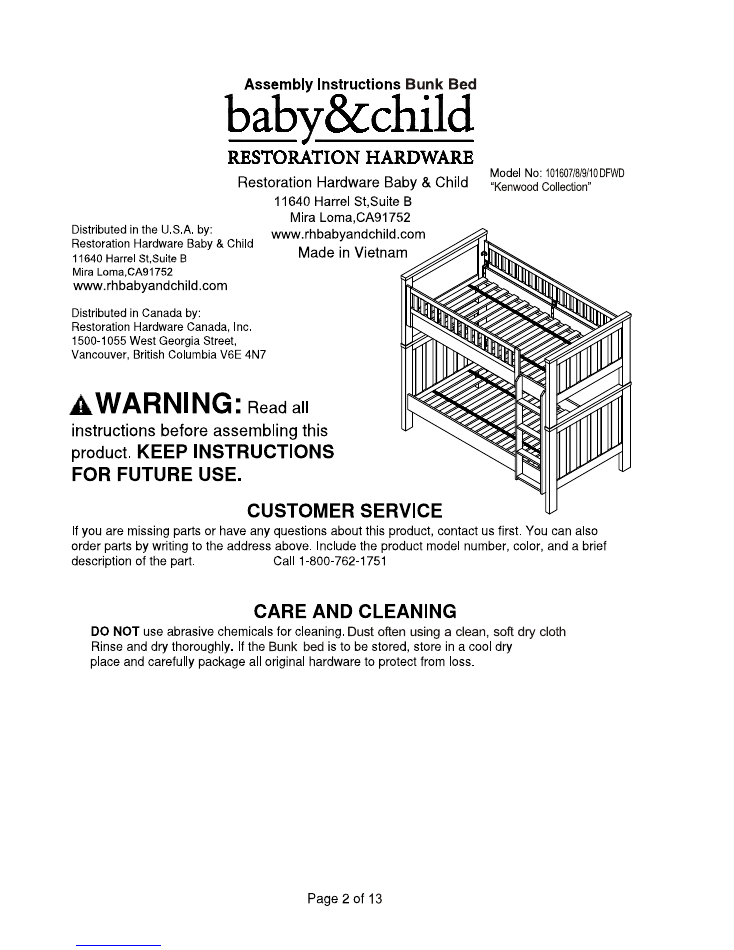
/GREY BUNK BED
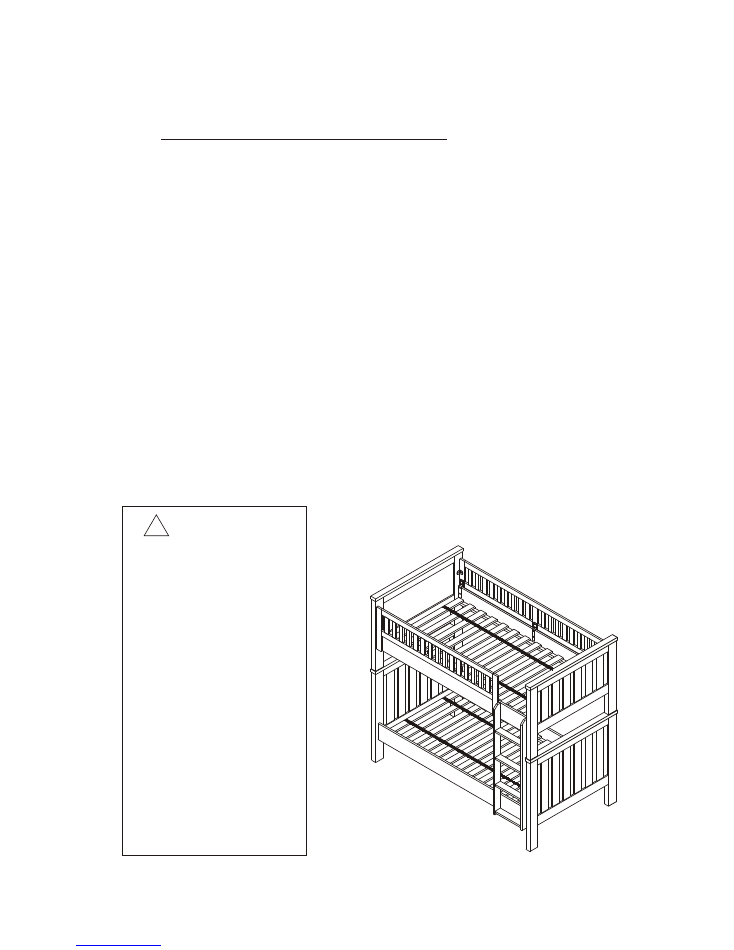
1. Follow the information on the
WARNINGS
appearing o n the u pper bunk end structure and on the
carton.
DO NOT REMOVE WARNING LABEL FROM BED.
2. Always use the specified size mattress or mattress support, or both to help prevent the likelihood of
entrapment or falls.
3. Surface of mattress must be at least 5 inches below the upper edge of guardrails on top bunk.
4. Do not allow children under 6 years of age to use the upper bunk.
5. Prohibit more than one person on upper bunk.
6. Periodically check and ensure that the guardrails, ladder, and other components are in their proper
position, free from damage, and that all connectors are tight.
7. Do not allow horseplay on or under the bed and prohibit jumping on the bed.
8. Always use the ladder for entering and leaving the upper bunk.
9. Do not use substitute parts. Contact Restoration Hardware for replacement parts
10. Use of a night light may provide added safety precaution for a child using the upper bunk.
11. Use guardrails on both sides of the upper bunk.
12. If the bunk bed will be placed next to a wall, the guardrail that runs the full length of the bed
should be placed against the wall to prevent entrapment between the bed and the wall.
13. The use of water flotation mattresses is prohibited.
14.
STRANGULATION HAZARD
- Never attach or hang items to any part of the bunk bed that are
not designed for use with the bed: for example, but not limited to, hooks, belts, and jump ropes.
15. Keep these instructions for future reference.
WARNING
TO HELP PREVENT SERIOUS
OR FATAL INJURIES FROM
ENTRAPMENT OR FALLS:
Never allow a child under 6 years
on upper bunk.
Use only mattress which is 74”-75”
long and 37 1 /2”-38 1/ 2” wide on
upper bunk.
Ensure thickness of mattress and
foundation combined does not
exceed 1
2
” and mattress is at
least 5” below upper edge of
guardrails.
Use guardrails on both sides of
upper bunk.
Prohibit horseplay on or under
bed(s).
Prohibit more than one person on
upper bunk.
Use ladder for entering and
leaving upper bunk.
STRANGULATION HAZARD -
Never
attach or hang items to any part of the
bunk bed that are not designed for use
with the bed: for example, but not limited
to, hooks, belts, and jump ropes.
DO NOT REMOVE THIS LABEL
!
IMPORTANT SAFETY INFORMATION FOR BUNK BED
Page 3 of 13
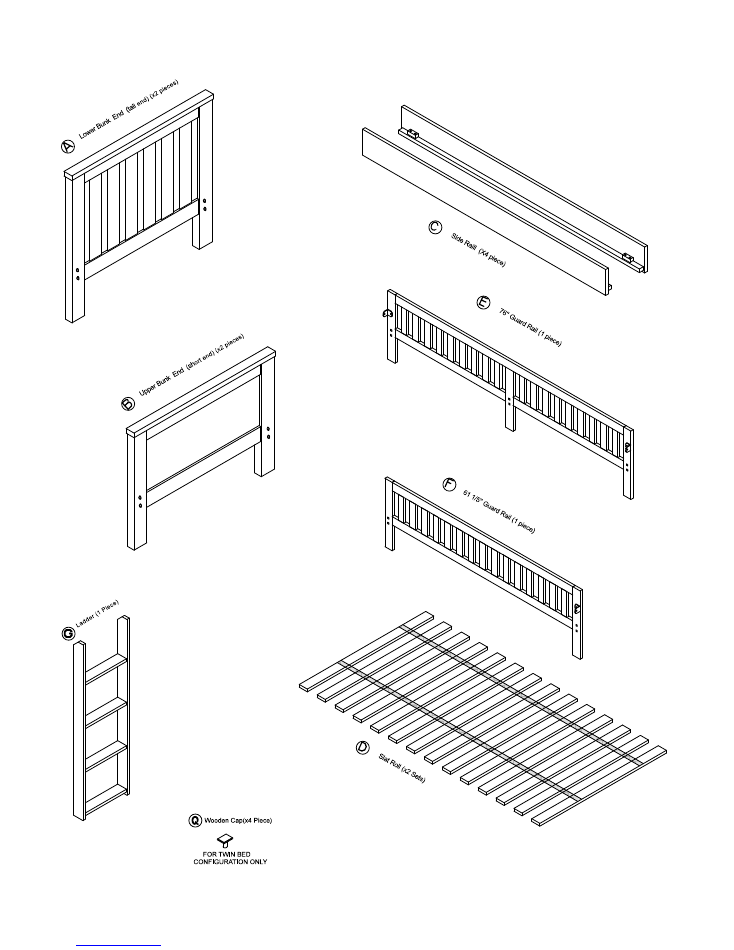
Parts Identification
Page 4 of 13
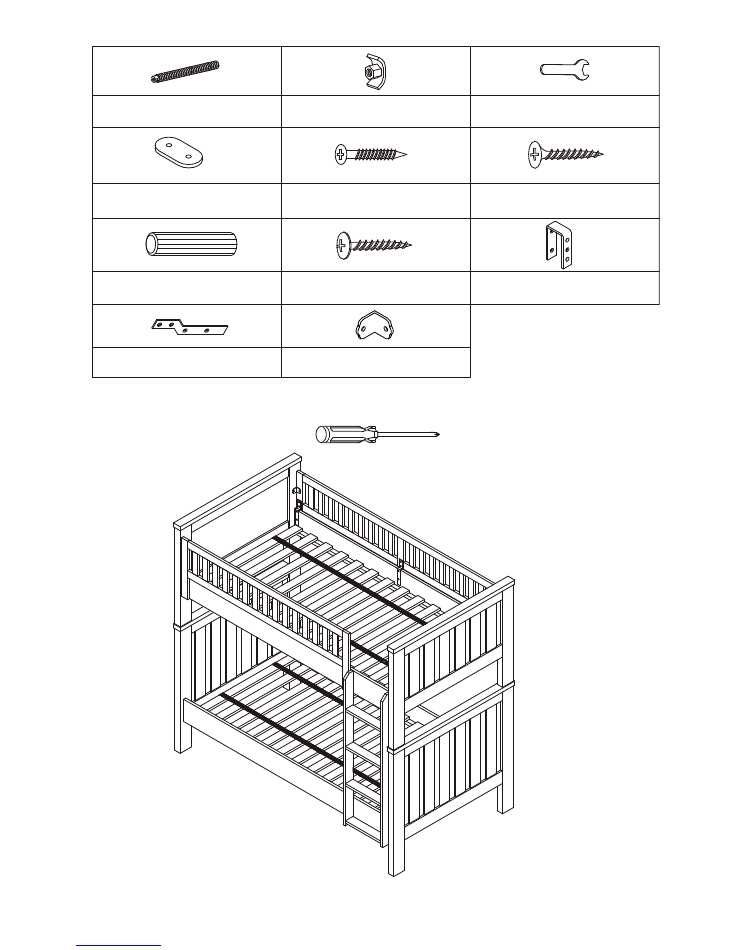
I -Curved slotted washer 35x17
16 pieces
H -Thread rod 5/16''x88mm 16 pieces
J - Wrench 5/16'' 1 piece
O - Slat roll screw #8x1 1/4" 8 pieces
N - Dowel pin 4'' long x4/5'' diameter
4 pieces
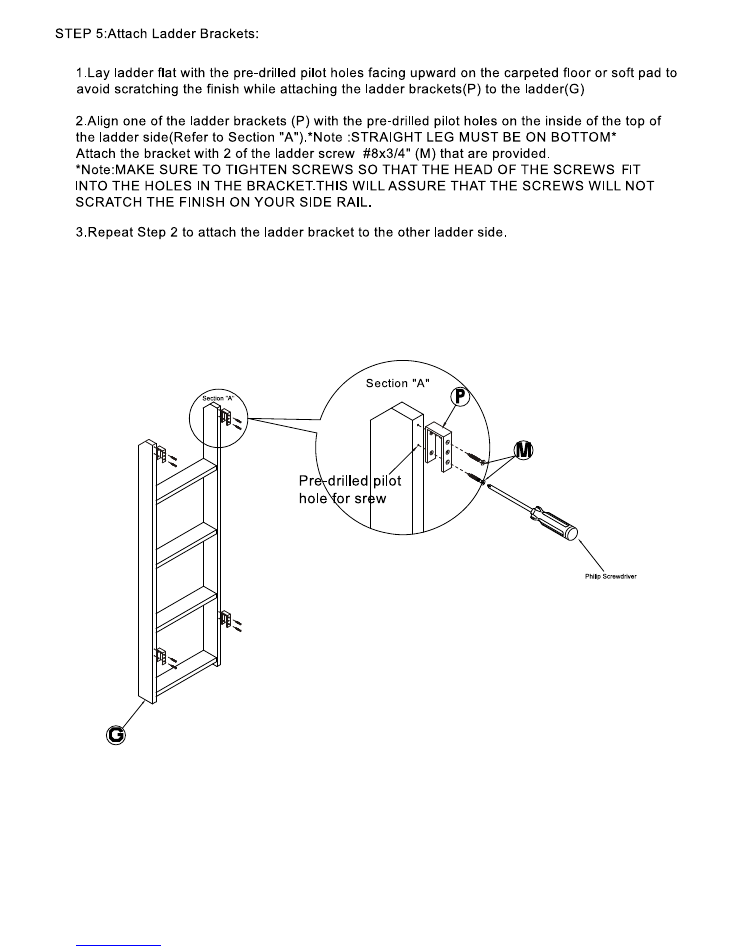
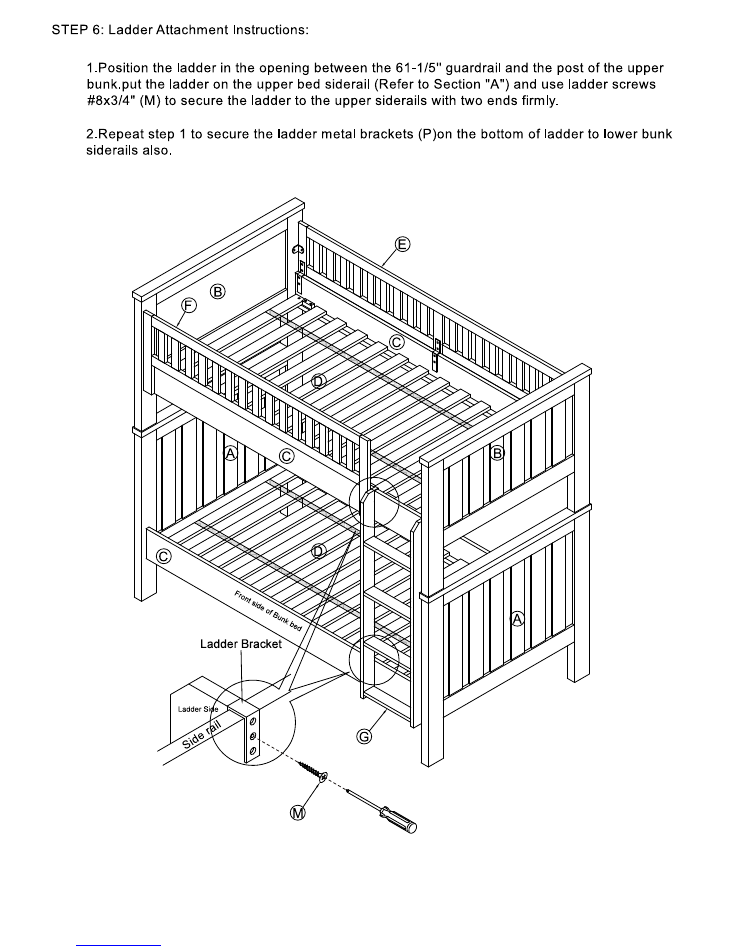
M - Ladder&Guardrail metal bracket
screw #8x3/4" 32 pieces
K - Guardrail oval metal plate
5 pieces
L - Guardrail L bracket& oval metal
plate screw #3x5/8" 13 pieces
P - Ladder bracket - 4 pieces
TOOLS NEEDED:
HARDWARE INCLUDED:
Philip Screwdriver(Not included)
Page 5 of 13
R - Metal bracket - 5 pieces
S- Guardrall L brackel - 3 pleces
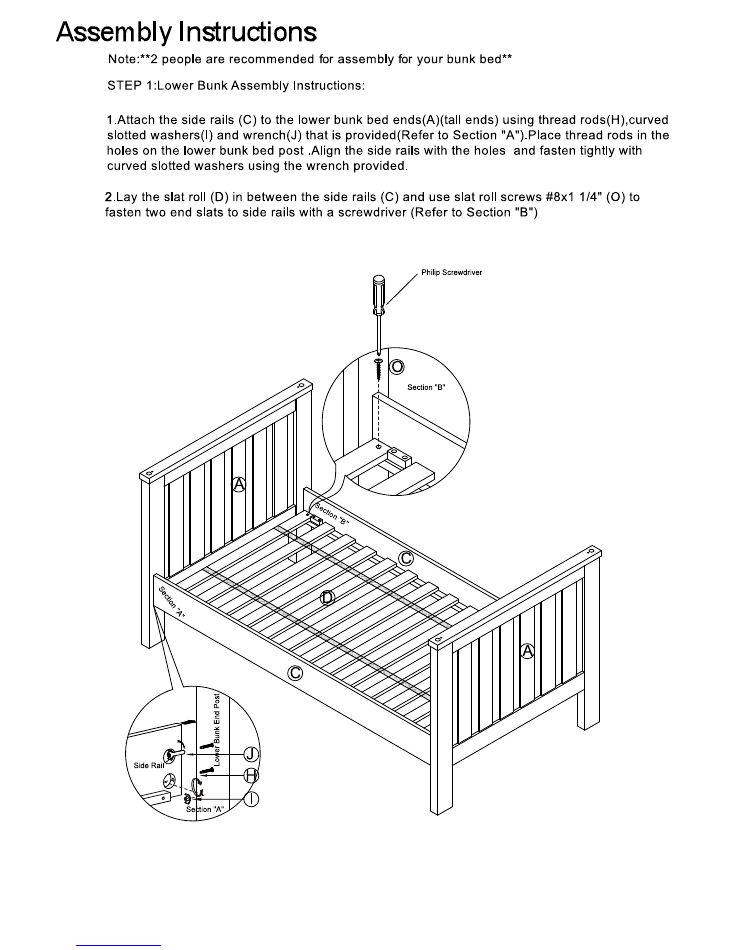
Page 6 of 13
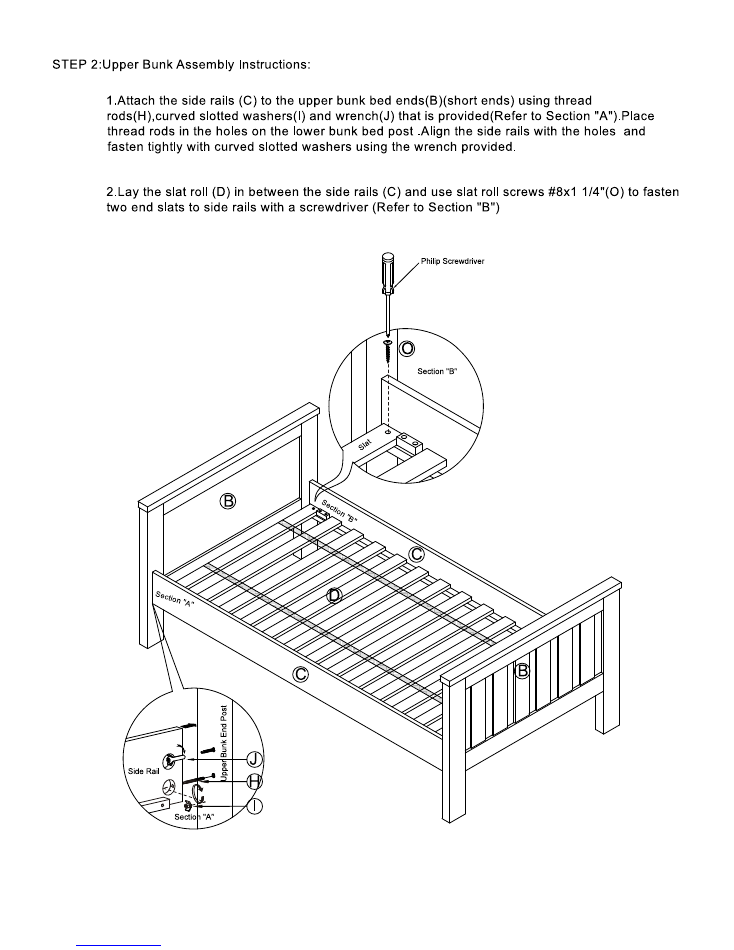
Page 7 of 13
Page 8 of 13
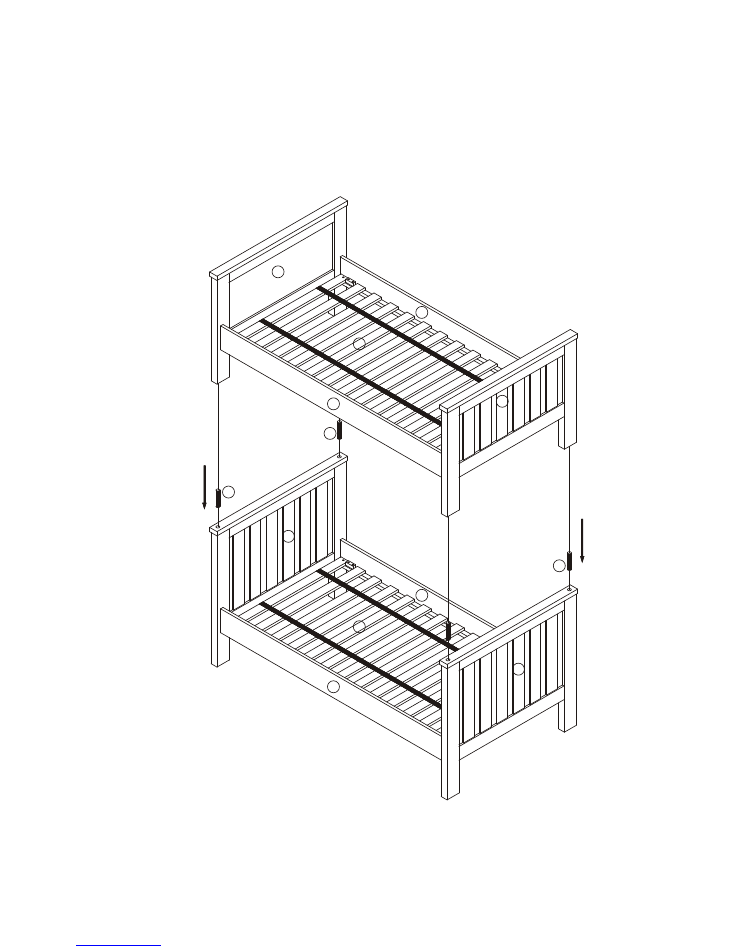
STEP 3:Lower&Upper Bunk Assembly Instructions:
1.Install 4'' long x4/5'' diameter wooden dowels into top of the posts of the lower bunk
2.Carefully place the upper bed which already assembled on top of the lower bed
B
B
B
C
C
D
A
A
C
C
D
N
N
N
Page 9 of 13
B
B
B
C
C
D
D
A
A
A
A
C
C
D
D
F
M
L
K
Bottom of side rail
L
L
E
E
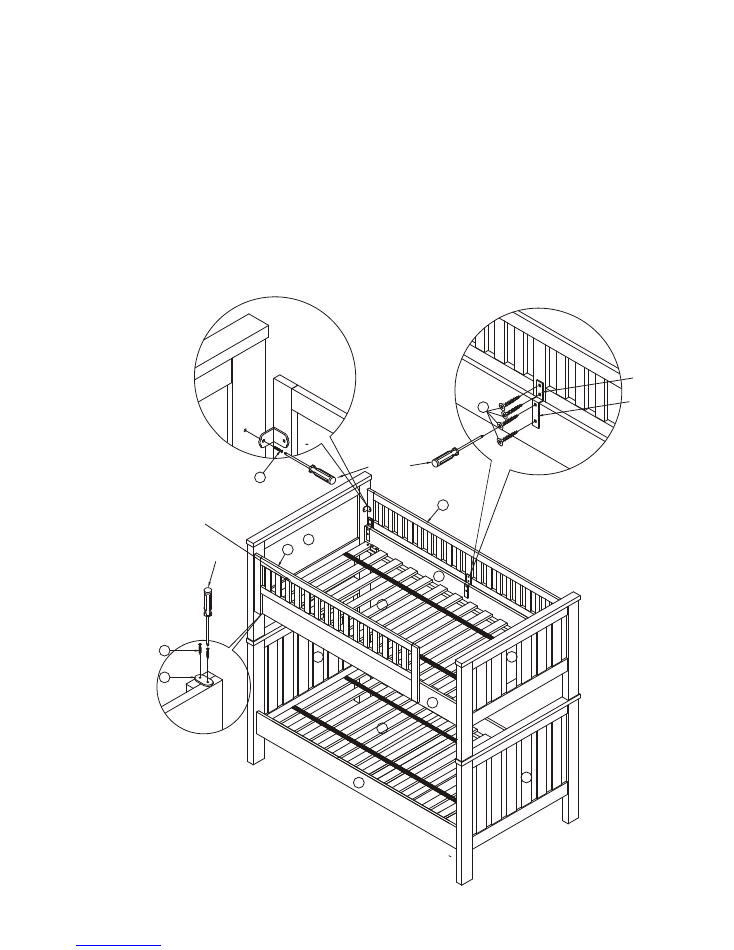
STEP 4:Guardrail Installation Instructions:
Section "C"
Secti
n
"
o
"C
Section "B"
Section "B"
Section "A"
Section "A"
Philip Screwdriver
Philip Screwdriver
Philip Screwdriver
61 1/5'' Guardrail can be
placed at either end of bed
i
f
Front
s de o
Bunk bed
C
C
1.Install 2 guardrails (E&F) as indicated below and in Section ''A''.The 61-1/5'' guard rail(F) can be
installed at either end of the bed that you desire.Attach guard rail (E&F) to be in position and fasten
metal bracket (R) short end two holes with 8x3/4" screws into pre-drill holes in the guard rail(E&F)
first,and then fasten the metal bracket long end two holes with 8x3/4" screws in the slat bearers on the
side rails (Refer to Section"A") .the metal bracket on the guard rails fit into slots in the slat bearers on
the side rails (C) (Refer to Section"A").Secure all brackets with #8x3/4" screws( M) that are provided.
2.Attach the L brackets (S) on the ends of the guardrails to posts of the upper bunk by using the
#3x5/8" screws(L) that are supplied with the guardrails and the screwdriver (Refer to
Section"B").Note:The L bracket (S)on the 61-1/5'' guardrail can be attached to either end
depending on which end of the bed you want your ladder to be.
3.Place and hold the oval metal plate(K)on the bottom of the guardrails for five positions and use
oval metal plate screws #3x5/8" (L)to secure guardrails and siderails together(Refer to Section
''C")
Metal bracket
short end
Metal bracket
long end
Page 10 of 13
Page 11 of 13
Page 12 of 13
UPPER BUNK MATTRESS DIAGRAM
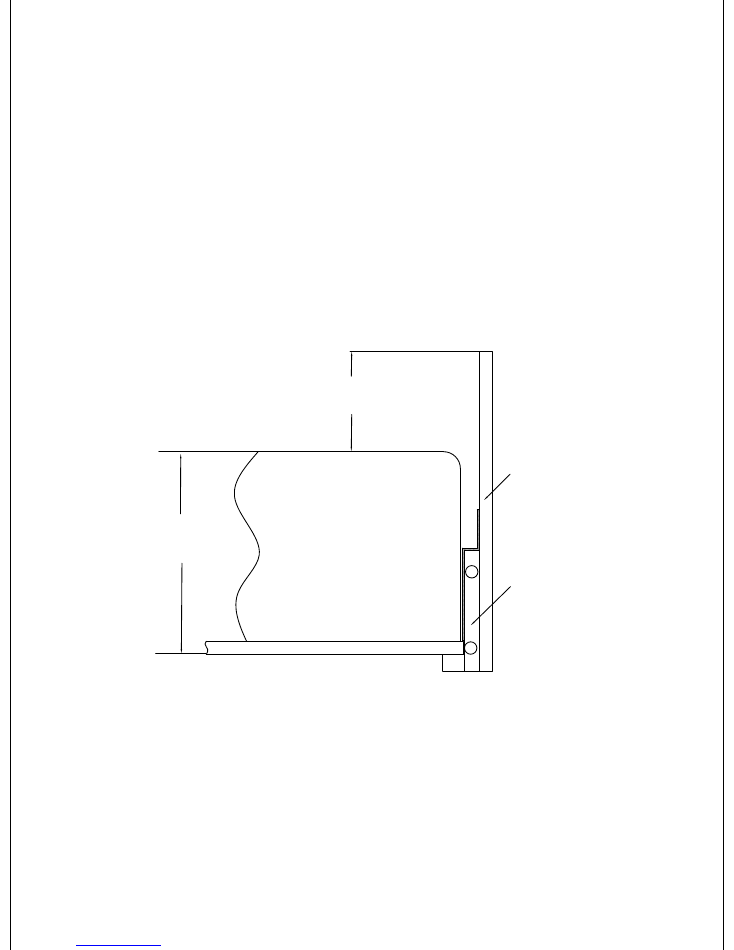
MATTRESS
SLAT ROLL
GUARDRAIL
SIDE RAIL
12''
MAXIMUM
THICKNESS
5'' MINIMUM DISTANCE
FROM TOP OF MATTRESS
TO TOP OF GUARDRAIL
BEDDING SPECIFICATION:
The following size mattress and Foundation are specified for use with this Bunkbed:
MATTRESS:37-1/2'' to 38-1/2'' X74'' to 75''x11''H max
SLAT ROLL (CONSISTING OF 14 SLATS)-: 39-1/2'' W X2-1/2'' L X1''H
**Note:MATTRESS AND SLAT ROLL MUST NOT EXCEED 12'' TOTAL THICKNESS
Be sure to adhere to these BEDDING SPECIFICATIONS,In order to avoid the possibility of
falling or entrapment, THESE SPECIFICATIONS MUST BE STRICTLY ADHERED TO!
Page 13 of 13
Twin Bed Assembly Instruction:
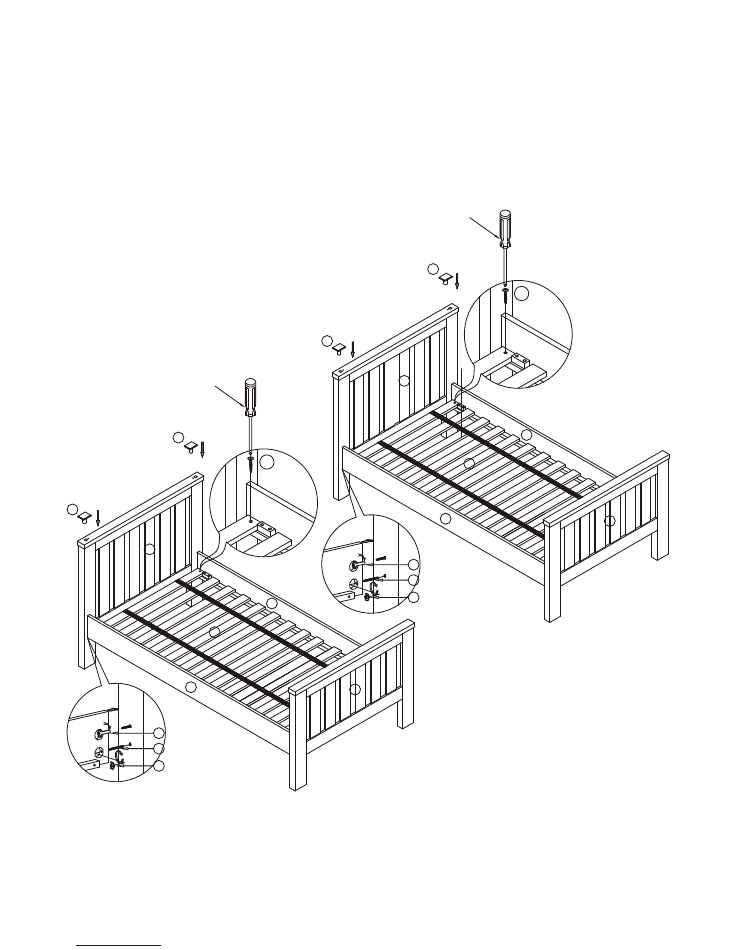
1.Attach the side rails (C) to the tall end(headboard) (A) & short end (footboard) (B) using thread
rods(H),curved slotted washers(I) and wrench(J) that is provided(Refer to Section "A").Place
thread rods in the holes on the tall & short bed post . Align the side rails with the holes and
fasten tightly with curved slotted washers using the wrench provided.
J
J
H
H
II
A
A
C
C
C
C
D
D
B
B
Q
Q
Side Rail
Side Rail
Section "A"
Section "A"
T
all End Post
T
all End Post
Section "B"
Section "B"
O
O
Sect
o
"
i n
B"
Sect
o
"
i n
B"
c
A
Se
tion "
"
c
A
Se
tion "
"
Slat
Slat
Q
Q
Philip Screwdriver
Philip Screwdriver
J
J
H
H
II
A
A
C
C
C
C
D
D
B
B
Q
Q
Side Rail
Side Rail
Section "A"
Section "A"
T
all End Post
T
all End Post
Section "B"
Section "B"
O
O
Sect
on "B"
i
Sect
on "B"
i
Sec
on "A
ti
"
Sec
on "A
ti
"
Slat
Slat
Q
Q
Philip Screwdriver
Philip Screwdriver
2.Lay the slat roll (D) in between the side rails (C) and use slat roll screws #8x1 1/4" (O) to
fasten two end slats to side rails with a screwdriver (Refer to Section "B").
3.Put the wooden caps (Q) on the tall end (headboard).
Bunk bed can convert to two twin beds, assemble beds following below instructions: