Full Text Searchable PDF User Manual
C-Series Widescreen
Multifunction Display
Quick reference guide
C90W, C120W and C140W models
86135-1

Safety notices
Warning: Ensure safe navigation
This product (including the electronic charts) is
intended for use only as an aid to navigation. It is
designed to facilitate the use of official government
charts, NOT REPLACE THEM. Only official
government charts and notices to mariners contain all
the current information needed for safe navigation,
and the captain is responsible for their prudent use. It
is the user’s responsibility to use official government
charts, notices to mariners, caution and proper
navigational skill when operating this or any other
Raymarine product.
Powering the display on
1. Press and hold the
POWER
button until the Raymarine logo
appears.
2. Press
OK
to acknowledge the warning window.
Powering the Display Off
1. Press and hold the
POWER
button until the countdown reaches
zero.
Note:
If the
POWER
button is released before the countdown
reaches zero, the power off is cancelled.
Adjusting the backlight
1. Press the
POWER
button.
The backlight level meter is displayed.
2. Using the rotary contol, adjust the backlight to the appropriate
level.
Simulator mode
The Simulator mode enables you to practice operating your display
without data from a GPS antenna, radar scanner, fishfinder or AIS
receiver.
The Simulator mode is switched on/off in the System Setup Menu.
Once enabled, you can use the Simulator:
• Before installation: Connect the display to a 12V DC power
supply, fused at 1 amp by attaching the red core from the power
lead to positive (+) and the black core to negative (-).
• After installation: Whilst in a marina or at anchor.
Note:
Incoming AIS safety messages cannot be displayed while
the display is in Simulator mode.
Note:
Any system settings made whilst in Simulator mode are not
transmitted via SeaTalk to other equipment.
Enabling the simulator mode
1. Press
Menu
.
2. Select the
System Setup
menu.
3. Select the
Simulator
item, and change its value to
On
.
3
Screen information
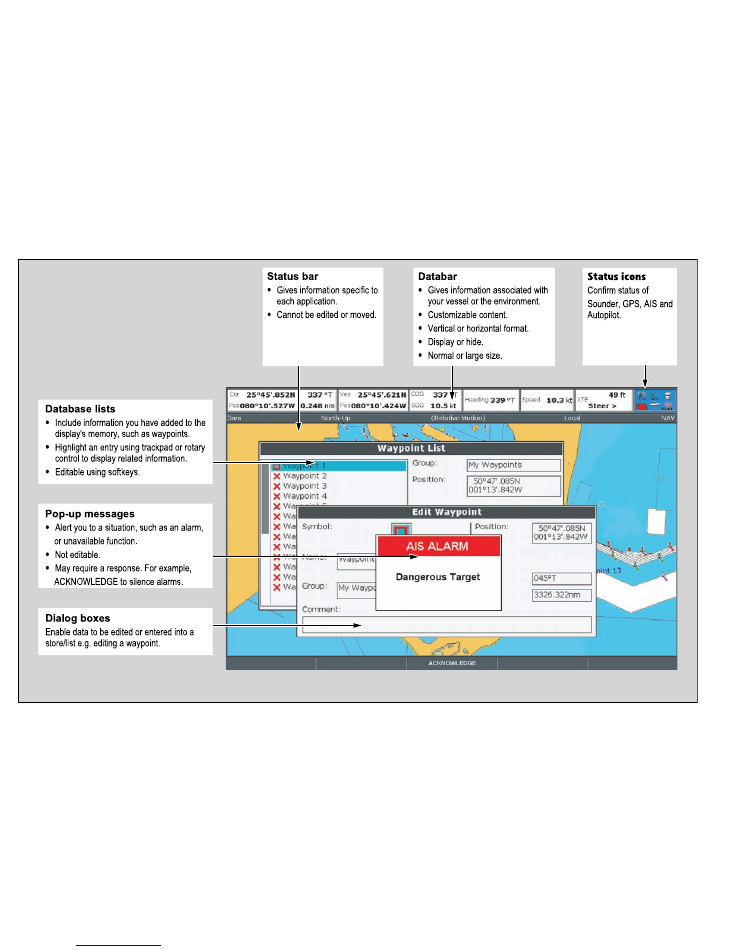
Status bar
•
Gives information specific to
each application.
•
Cannot be edited or moved.
Databar
•
Gives information associated with
your vessel or the environment.
•
Customizable content.
•
Vertical or horizontal format.
•
Display or hide.
•
Normal or large size.
Database lists
•
Include information you have added to the
display's memory, such as waypoints.
•
Highlight an entry using trackpad or rotary
control to display related information.
•
Editable using softkeys.
Pop-up messages
•
Alert you to a situation, such as an alarm,
or unavailable function
.
•
Not editable.
•
May require a response. For example,
ACKNOWLEDGE to silence alarms
.
Dialog boxes
Enable data to be edited or entered into a
store/list e.g. editing a waypoint.
Status icons
Confirm status of
Sounder, GPS, AIS and
Autopilot.
4
Controls
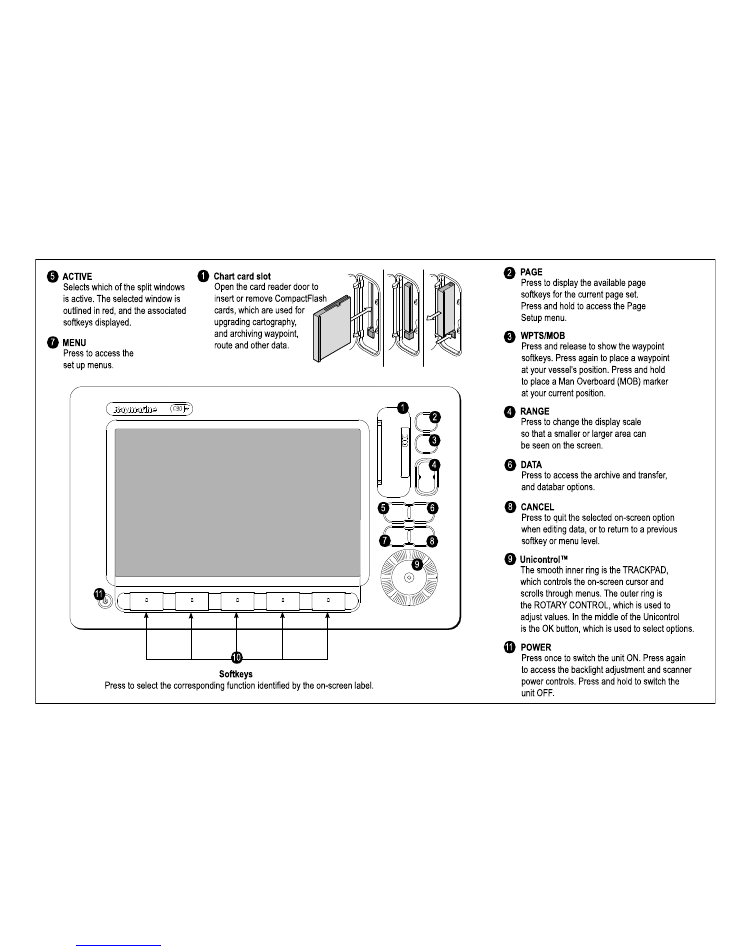
Unicontrol™
The smooth inner ring is the
TRACKP
AD,
which controls the on-screen cursor and
scrolls through menus.
The outer ring is
the ROTARY CONTROL, which is used to
adjust values. In the middle of the Unicontrol
is the OK button, which is used to select options.
ACTIVE
Selects which of the split windows
is active. The selected window is
outlined in red, and the associated
softkeys displayed.
MENU
Press to access the
set up menus.
RANGE
Press to change the display scale
so that a smaller or larger area can
be seen on the screen.
PAGE
Press to display the available page
softkeys for the current page set.
Press and hold to access the Page
Setup menu.
WPTS/MOB
Press and release to show the waypoint
softkeys. Press again to place a waypoint
at your vessel's position. Press and hold
to place a Man Overboard (MOB) marker
at your current position.
DATA
Press to access the archive and transfer
,
and databar options.
CANCEL
Press to quit the selected on-screen option
when editing data, or to return to a previous
softkey or menu level.
Chart card slot
Open the card reader door to
insert or remove CompactFlash
cards, which are used for
upgrading cartography
,
and archiving waypoint,
route and other data.
Softkeys
Press to select the corresponding function identified by the on-screen label.
1
2
3
4
5
6
7
8
9
10
1
2
3
4
5
6
7
8
9
1
1
1
1 POWER
Press once to switch the unit ON. Press again
to access the backlight adjustment and scanner
power controls. Press and hold to switch the
unit OFF
.
5
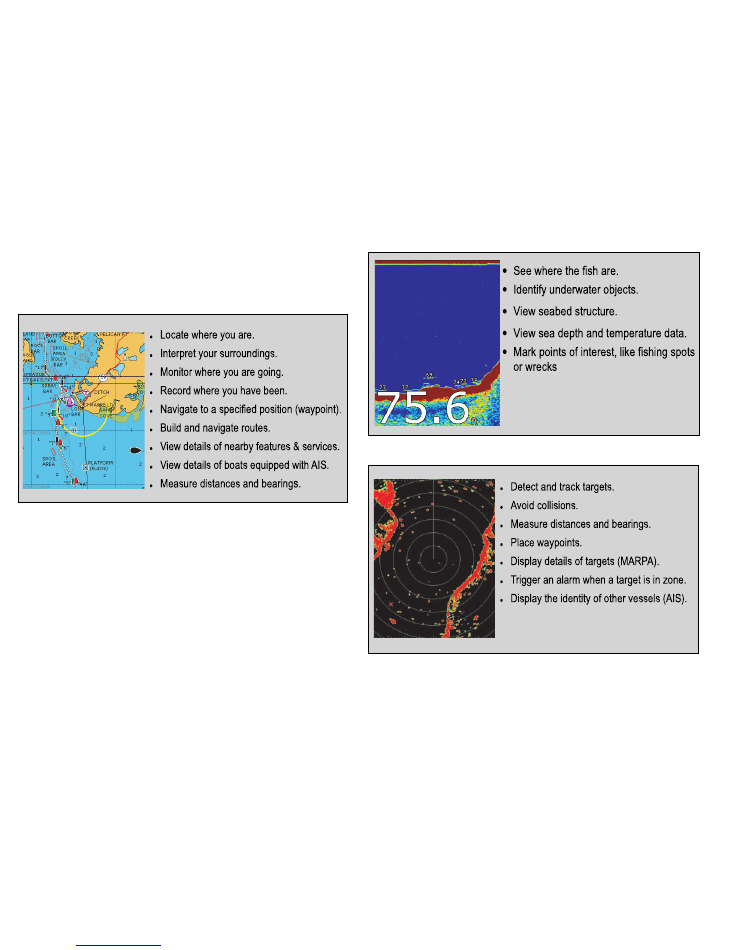
Applications
The C-Series multifunction display includes a number of
applications:
Chartplotter
•
Locate where you are.
• Interpret your surroundings.
• Monitor where you are going.
• Record where you have been.
• Navigate to a specified position (waypoint).
• Build and navigate routes.
• View details of nearby features & services.
• View details of boats equipped with
AIS.
• Measure distances and bearing
s.
Fishfinder
•
See where the fish are.
•
Identify underwater objects.
•
View seabed structure.
•
View sea depth and temperature data.
•
Mark points of interest, like fishing spots
or wrecks
Radar
•
Detect and track targets.
• Avoid collisions.
• Measure distances and bearings.
• Place waypoints.
• Display details of targets (MARP
A).
• Trigger an alarm when a target is in zone.
• Display the identity of other vessels (AIS).
6
Other applications
In addition to the core applications described above, your
multifunction display also includes the following applications:
•
3D chart
— an easy-to-use chart format providing a three
dimensional graphical view of land and sea contours around your
vessel. The 3D chart application requires upgraded cartography.
•
Data
— displays system and instrument data on your multifunction
display.
•
Engine
— enables you to view information in the form of gauges
and digital data, from up to three compatible engines.
•
Course Deviation Indicator
(CDI) — provides a graphical
representation of your vessel’s course in a ‘rolling road’ format.
•
Sirius weather
(North America only) — overlays historical, live,
and forecasted weather graphics on a world map.
•
Sirius radio
(North America only) — use your multifunction
display to control a connected Sirius Satellite Radio receiver.
Displaying applications
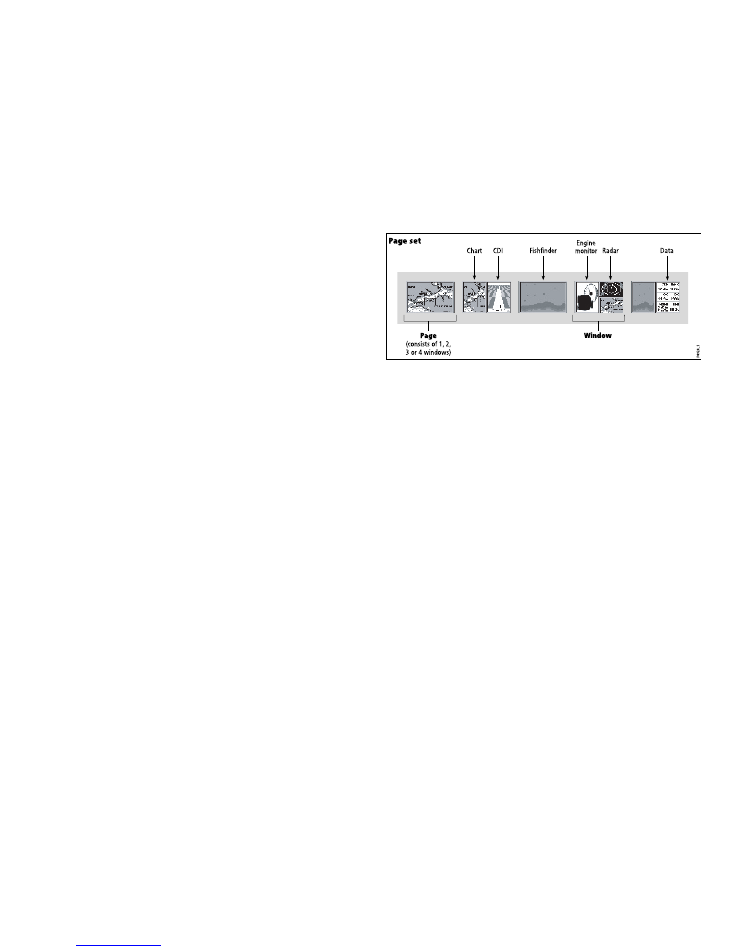
The various applications that make up your multifunction display
are shown in a series of screens known as page sets. There are
4 pre-configured and one empty page set to choose from. Each
page set contains 5 pages. These pages are made up of 1, 2, 3 or
4 windows combined in various formats. Each window can display
an application:
P
a g e set
Pa g e
(consists of 1, 2,
3 or 4 windows)
Window
D8928_1
CDI
Chart
Radar
Fishfinder
Engine
monitor
Data
If required, you can change the combination and layout of these
page sets to meet your particular needs.
Selecting a page set and application page
1. Press and hold the
PAGE
button until the Select Page Set dialog
appears.
2. Using the trackpad, highlight the required page set.
3. Press the
OK
button to select the highlighted page set. An
application page from that page set is displayed.
4. Press the
PAGE
button repeatedly to toggle between the
available application pages in the page set. Alternatively, use the
appropriate softkey to select the relevant application page.
Selecting an application window
1. When more than one application is displayed at any one time,
the active application window is highlighted with a red border:
2. Press the
ACTIVE
button to move the red border to another
window on the screen.
3. Press and hold the
ACTIVE
button to switch the currently
highlighted window to full-screen mode.
7
4. Press and hold the
ACTIVE
button to return the screen to
split-window mode.
Emergencies and warnings
You can use your multifunction display to mark the position of a man
overboard (MOB), or to sound an alarm when a particular situation
occurs.
An example is when a depth limit is reached, or a specified period of
time has elapsed.
Man overboard
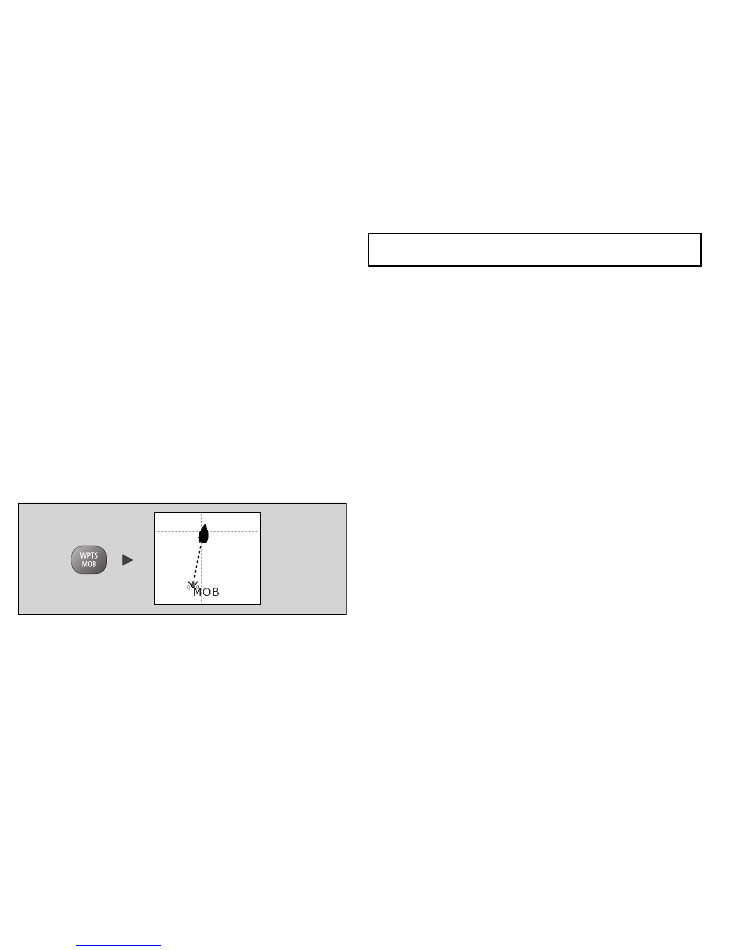
If you lose a person or object overboard, you can use the Man
Overboard (MOB) function to return to the spot.
The MOB function is available at all times on your multifunction
display, regardless of which application is running.
Activating the man overboard function
1. Press and hold the WPTS/MOB button for three seconds.
Note:
To obtain a MOB position, your multifunction display must
have a GPS position fix.
Cancelling a MOB alarm
1. Press and hold the
WPTS/MOB
button for four seconds.
Once the MOB alarm is cleared:
• the chart application motion mode is reset.
• the databar mode is reset.
• GOTO and route functions are restored.
Alarms
Alarms are used to alert you to a situation or hazard requiring your
attention.
When an alarm sounds, a message dialog is displayed, explaining
the reason for the alarm.
Cancelling alarms
1. Press the
ACKNOWLEDGE
softkey.
8


Raymarine plc
Anchorage Park, Portsmouth,
Hampshire PO3 5TD,
United Kingdom.
Tel: +44 (0) 23 9269 3611
Fax: +44 (0) 23 9269 4642
www.raymarine.com
Raymarine Inc.
21 Manchester Street, Merrimack,
New Hampshire 03054-4801,
USA.
Tel: +1 603.881.5200
Fax: +1 603.864.4756
www.raymarine.com