Full Text Searchable PDF User Manual
O
WL
T
OUCH
S
YSTEM

1056DOC – REV E
Page 2
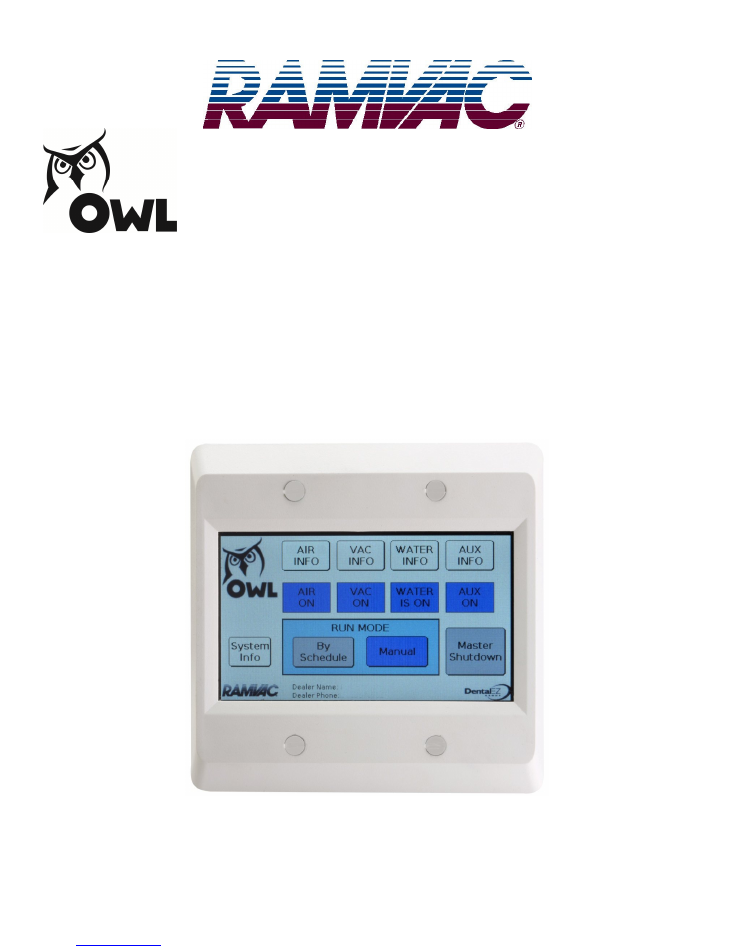
The OWL Touch incorporates a new full color touch screen display to provide easy control of your
dental utility room equipment. Simple, easy to understand screen layouts make navigation of this
powerful device a cinch.
Four different categories of devices can be controlled through a single OWL Touch panel:
Vacuum Units
RAMVAC brand vacuum units with the new S2 control can be easily plugged into the OWL Touch and
will display maintenance notifications, fault messages and other system data. However even non-
RAMVAC vacuum units can be controlled via an OWL Interface Control attached to the OWL Touch.
Air Compressors
RAMVAC Osprey air compressors featuring the new C2 control (Smart Control) are easily connected
and will provide similar information for the compressor units. Osprey compressors with a Basic control
or non-RAMVAC brand compressors can also be connected via the OWL Interface Control.
Water Valve
Any type of master water control valve utilizing a 24 volt solenoid valve can be easily turned on and
off with an OWL Interface Control.
Auxiliary Devices
Any type of system that can be turned on and off with a switch can be controlled by an OWL Interface
Control (up to 10 amps). Systems such as lighting, stereo or intercom can be attached to the OWL
Touch and turned on and off either manually or with the schedule.
Features
•
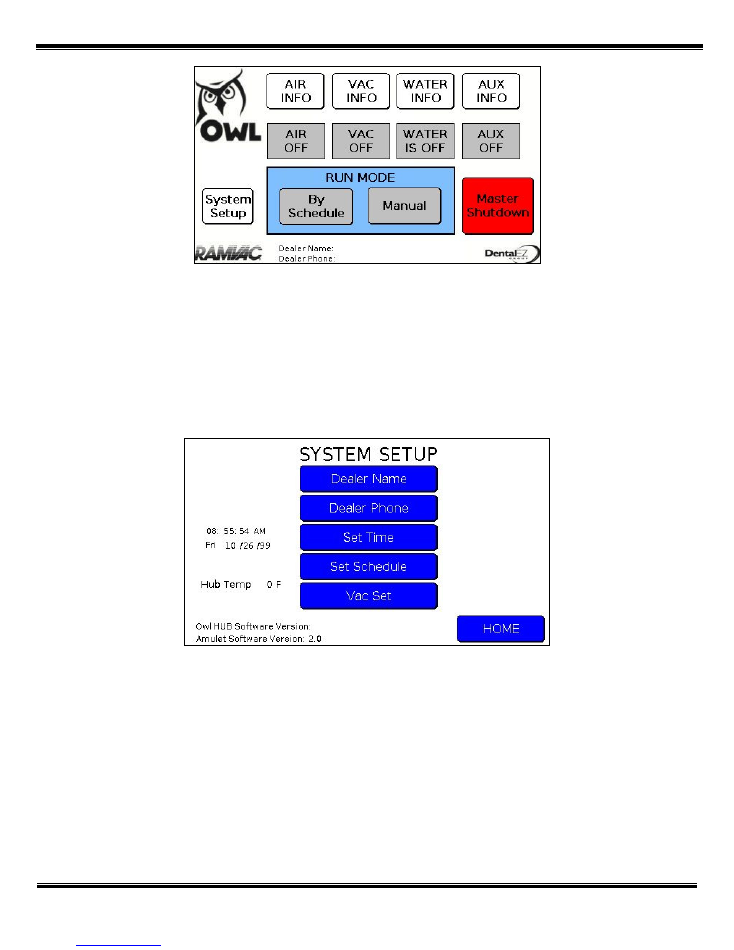
Home screen provides the ability to choose Manual or by Schedule run mode for the
equipment and includes a Master Shutdown button.
•
Manual mode allows the user to turn on or off each individual type of device, similar to a
standard remote switch panel.
•
Schedule mode automatically turns on or off all devices by a saved user defined weekly
schedule.
•
Master Shutdown turns off the entire utility room when activated. Simply push this button and
your utility room stays off until either the manual or Schedule mode is selected.
•
OWL Touch models are available with either a four, eight or sixteen port OWL Hub device.
•
Entire configuration from device, to hub, to OWL is easily connected with cat 6 shielded
cables.
1056DOC – REV E
Page 3
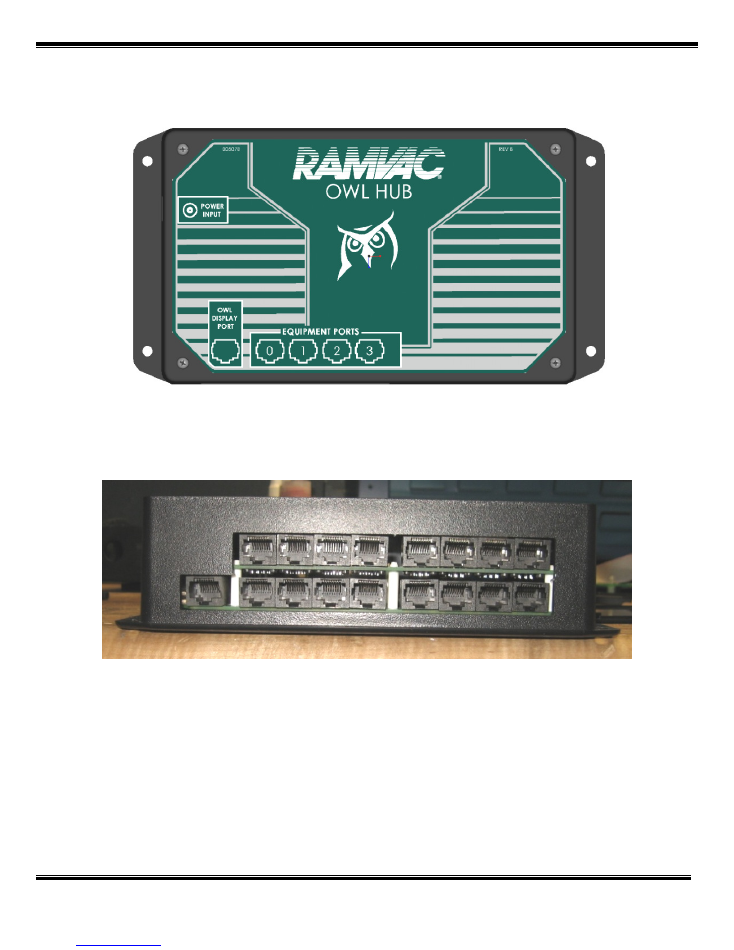
OWL Hub
OWL Hub Assembly comes in four port, eight port and sixteen port versions.
This is the number of devices that can be connected to the system.
1056DOC – REV E
Page 4
SYSTEM INSTALLATION
Parts List
Qty 1 OWL Touch Display with junction box. Mounts to standard 2-gang electrical box (not included).
Qty 1 OWL Hub
Qty 1 Power Supply
Note: RAMVAC offers shielded CAT6 Ethernet cables in various lengths for non-plenum installations.
•
IMPORTANT:
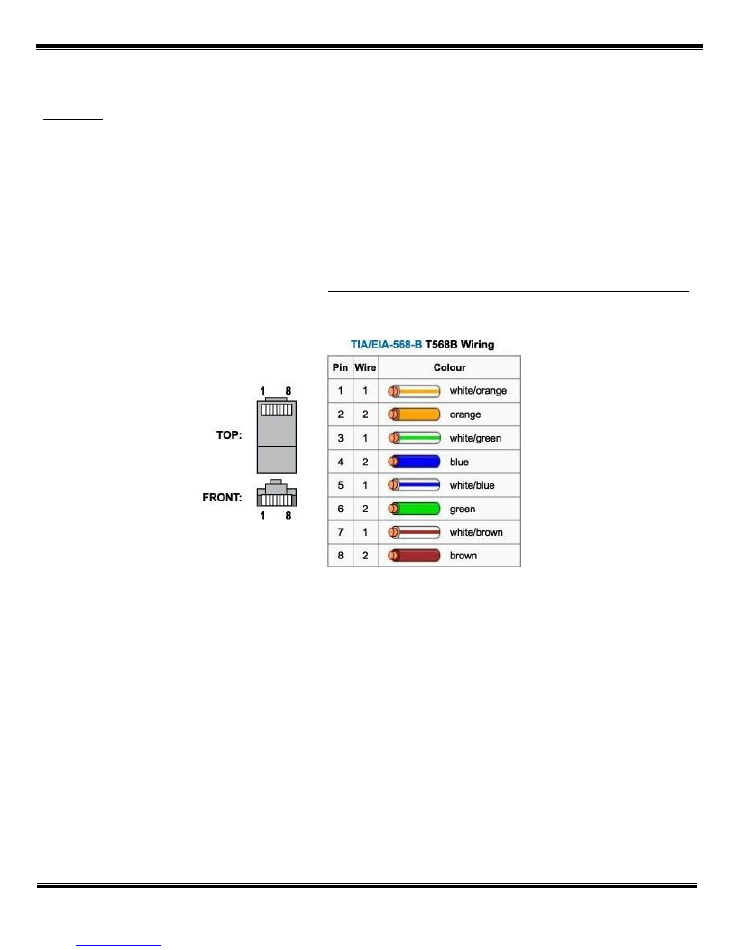
Ethernet wiring terminated by installers should follow TIA/EIA-568B pin-out
convention for Ethernet patch cables. Incorrect pin-out termination may damage this hardware.
•
Mount the OWL Hub in the utility room in a location central to all equipment being connected to
the system.
Carefully follow the cable connection sequence below in order to prevent
damage due to electrostatic discharge.

1056DOC – REV E
Page 5
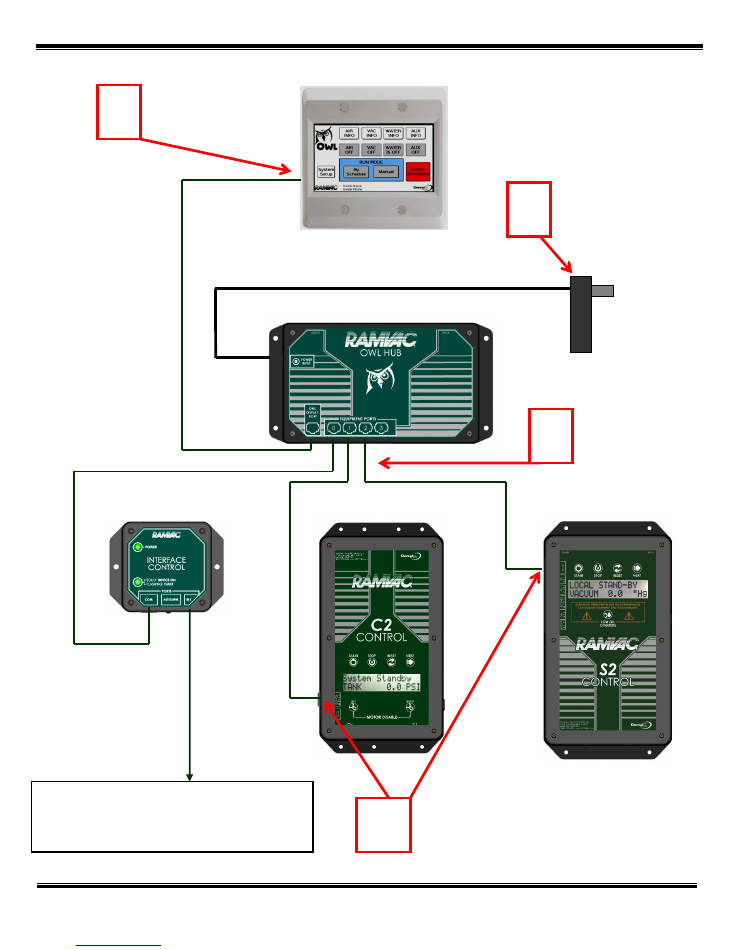
CABLE CONNECTION SEQUENCE
STEP 1:
Plug in the power supply and connect to the Owl Hub.
The Owl hub requires a 115 volt
outlet.
STEP 2:
Connect CAT6 Shielded Ethernet cables (standard RJ-45 connectors) to the Owl Hub for
all devices being controlled by the system as well as the cable running from the office area for the
Owl Touch panel.
DO NOT CONNECT THE CABLE AT THE TOUCH PANEL IN THE OFFICE
AT THIS TIME.
STEP 3:
Next connect Ethernet cables to the COM port on device(s) being controlled by the Owl
system: C2 Control, S2 Control or Interface Control.
STEP 4:
Finally, connect the Ethernet cable to the Owl Touch panel located in the office area.
See the diagram below for an overview of system wiring and connection sequence.
1056DOC – REV E
Page 6
•
WATER VALVE
•
NON-RAMVAC VACUUM PUMP
•
NON-RAMVAC AIR COMPRESSOR
•
AUXILIARY DEVICE
PLUG IN
POWER SUPPLY &
CONNECT TO HUB
CONNECT ALL
CABLES TO HUB
PORTS
CONNECT CABLES TO
DEVICE "COM" PORTS
CONNECT
ETHERNET CABLE
TO OWL TOUCH
STEP
1
STEP
3
STEP
4
STEP
2
1056DOC – REV E
Page 7
TOUCH PANEL MOUNTING
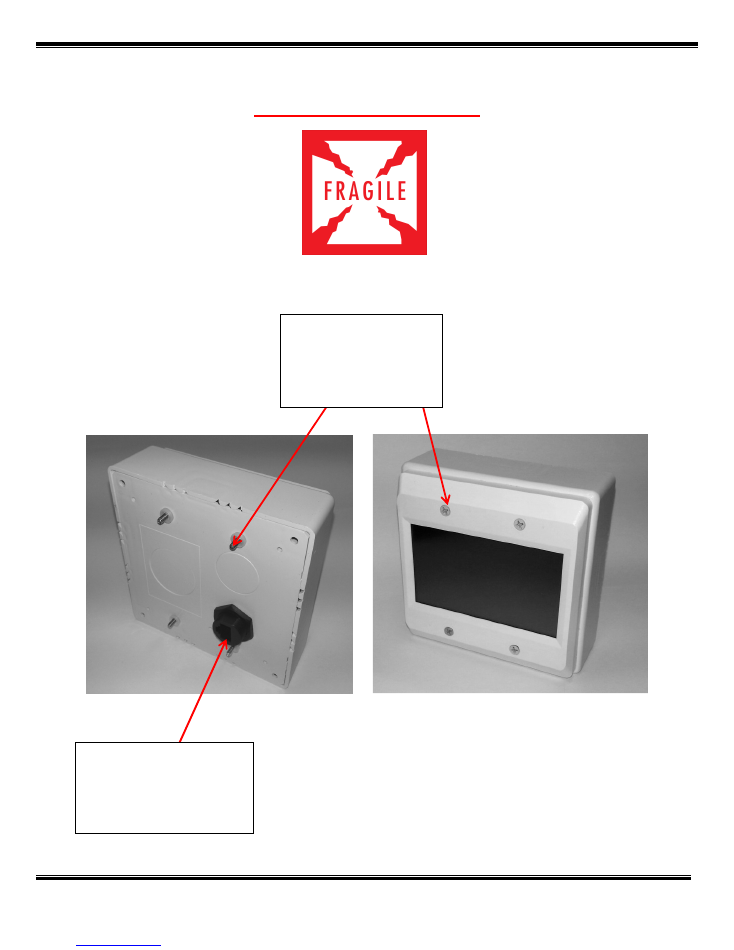
ATTENTION!!! DELICATE GLASS
Do not over-tighten mounting screws. Tighten carefully only until unit is secure.
Touch panel
enclosure mounts to
standard two-gang
wall box with 4
included screws.
Ethernet cable
connection will be at the
bottom of the box for
proper screen
orientation.
1056DOC – REV E
Page 8
•
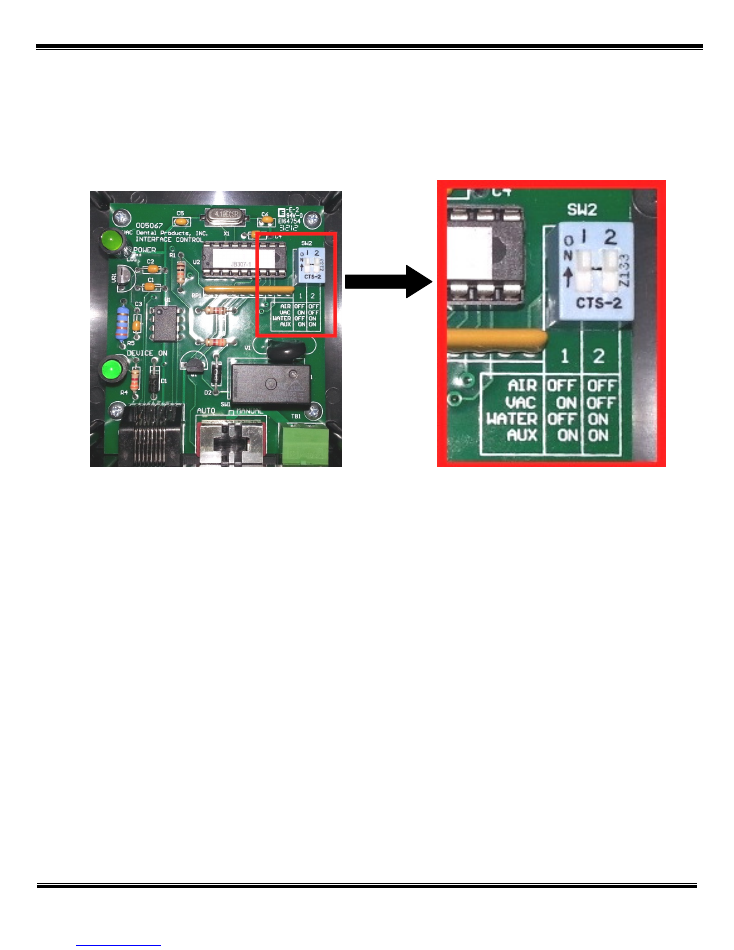
If an Interface Control is included in the system the dip switch settings will need to be selected
to tell the OWL system what type of device is being controlled. Remove the four screws
holding the front cover on the Interface Control. The dip switch selector has two switches that
can be configured for AIR, VAC, WATER or AUX.
Owl Interface Control PCB Board
Follow the position settings printed on the circuit board to set the device to the appropriate
setting. Reinstall the cover. Connect the two-pin "RLY" terminals to the circuit that controls the
on/off functionality of the device being controlled.
•
Power up all equipment being controlled by the OWL System so that they are in a stand-by
non-running state. The LCD screen on RAMVAC compressors and vacuum units should light
up. Each vacuum or compressor should display "Local Standby" on the C2 or S2 Control LCD
screen. Also ensure the screen is illuminated on the OWL Touch Display in the office area.
The system is now ready to be programmed.
1056DOC – REV E
Page 9
BASELINE PROGRAMMING
•
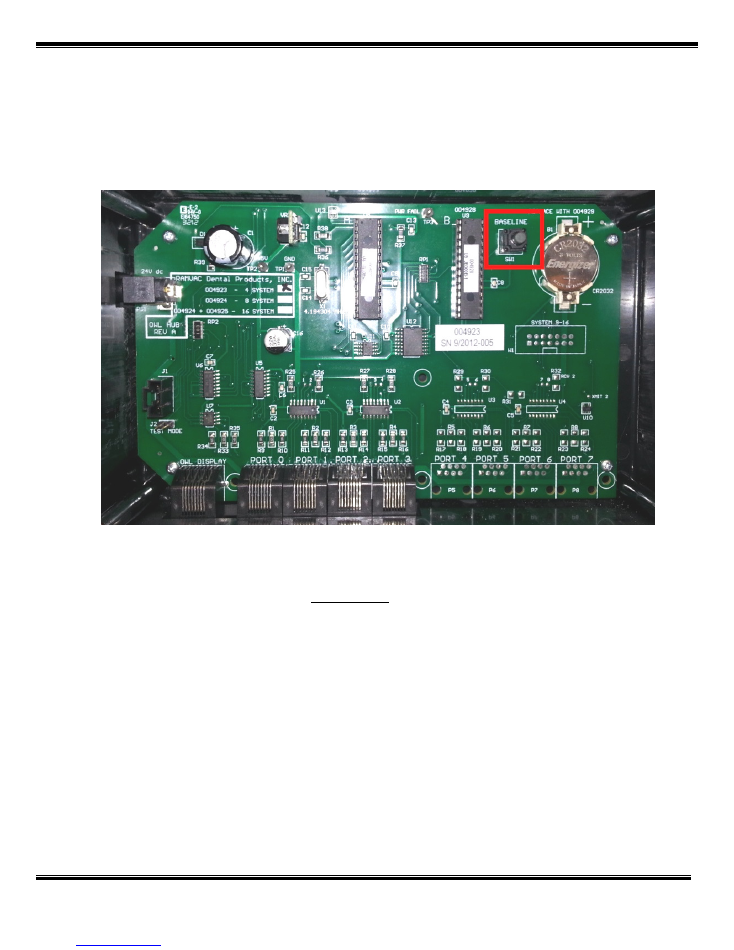
Once all equipment has been connected and powered on, remove the front cover from the
OWL Hub. Locate the grey "Baseline" button on the circuit board. This is the only button on the
Hub circuit board.
Owl Hub PCB Board
Press and hold Baseline button for
10 seconds
. All equipment is now ready to be operated by
the OWL Touch system. All C2 and S2 screens should display "OWL Stand-by".
•
IMPORTANT
:
All air compressors are to be connected to the same air piping network and
should not be isolated pneumatically. Compressors controlled by the Owl Touch system will
run simultaneously to maintain a common system air pressure.
OWL T
OUCH
P
ROGRAMMING
1056DOC – REV E
Page 10
HOME SCREEN
Initial Setup
Dealer name and phone number can be programmed so that it is displayed on the bottom of the
home screen. Touch the “System Setup” button from the home screen. The screen below is now
shown.
Select Dealer Name and Dealer Phone to access the keyboard and type in the appropriate dealer
information. Select Exit from the keyboard screen to store the information.
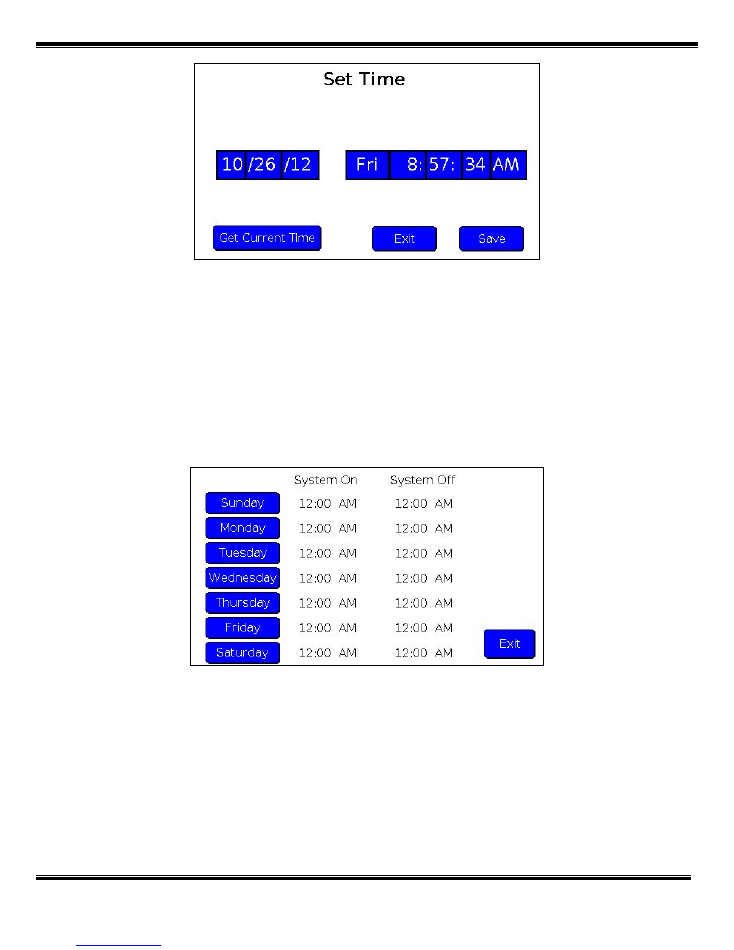
The date and time of day will need to be set in the OWL Touch.
•
From the System Setup screen and select “Set Time”. The screen below will now be shown
1056DOC – REV E
Page 11
•
The date and time is adjusted by simply pressing each field shown on the screen. Once the
date and time are correct select Save and then Exit.
The daily schedule in the OWL Touch will need to be programmed next. Each day of the week can be
set. Note this is an optional feature that allows the OWL system to activate all connected equipment
on the programmed schedule. Alternatively the system can be operated in “Manual” mode from the
“Home” screen if desired.
•
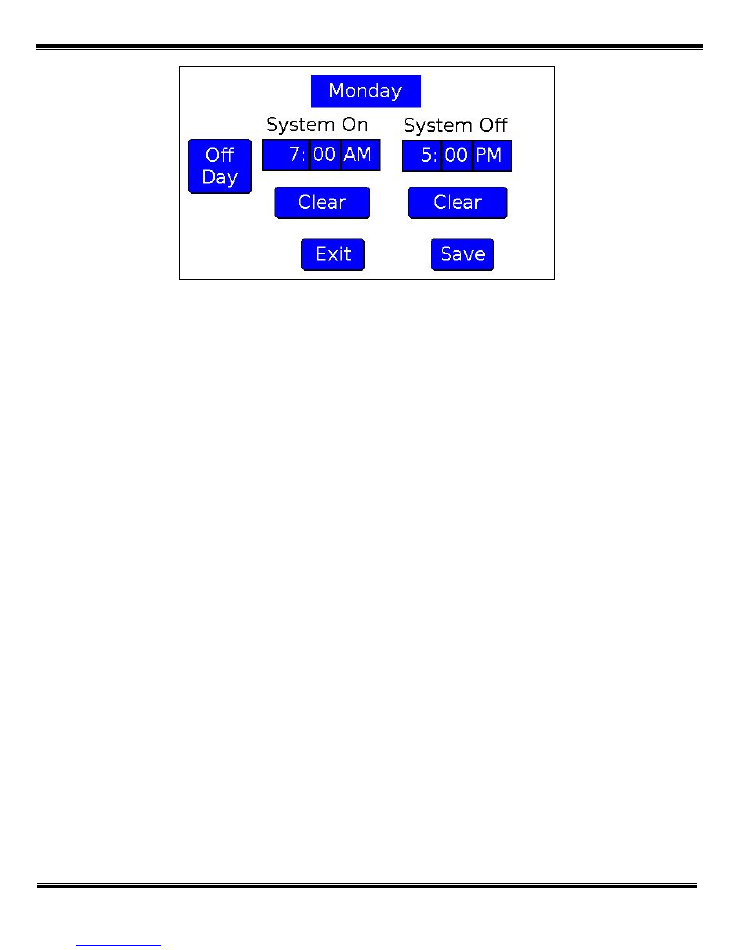
From the System Setup screen select “Set Schedule”. The screen below is now shown.
•
Select each day of the week to set the time the system should turn on and off. When selecting
a day of the week the following screen is displayed.
1056DOC – REV E
Page 12
•
Each field can be touched to adjust the desired “System On” and “System Off” time. If the
current day being programmed is a non-work day, select the "Off Day" button to set the
system not to run that day. Select “Save” and “Exit” to return to the weekly calendar. Continue
through each day of the week to set the desired work schedule.
•
Confirm the “System On” and “System Off “ times on the weekly schedule screen then select
“Exit” to return the “System Setup” screen.
Setup for Multiple Vacuum Systems
The following procedure is used to set the “Low Vacuum Set Point” for systems with more than one
RAMVAC power unit. The OWL uses this parameter to automatically turn on more power units when
vacuum level drops below the set level. When vacuum level is higher than the “Low Vacuum Set
Point”, the OWL system runs only one power unit to conserve power and optimize runtime.
•
IMPORTANT:
Verify that all vacuum devices inside the clinic are closed and that no vacuum
will be used during the following setup procedure.
•
From the home screen select “Manual” in the blue “Run Mode” box.
•
Select the grey “Vac Off” button which will turn blue and then display “Vac On”. One or more
vacuum units should now be running.
•
Select “System Setup” from the home screen
1056DOC – REV E
Page 13
•
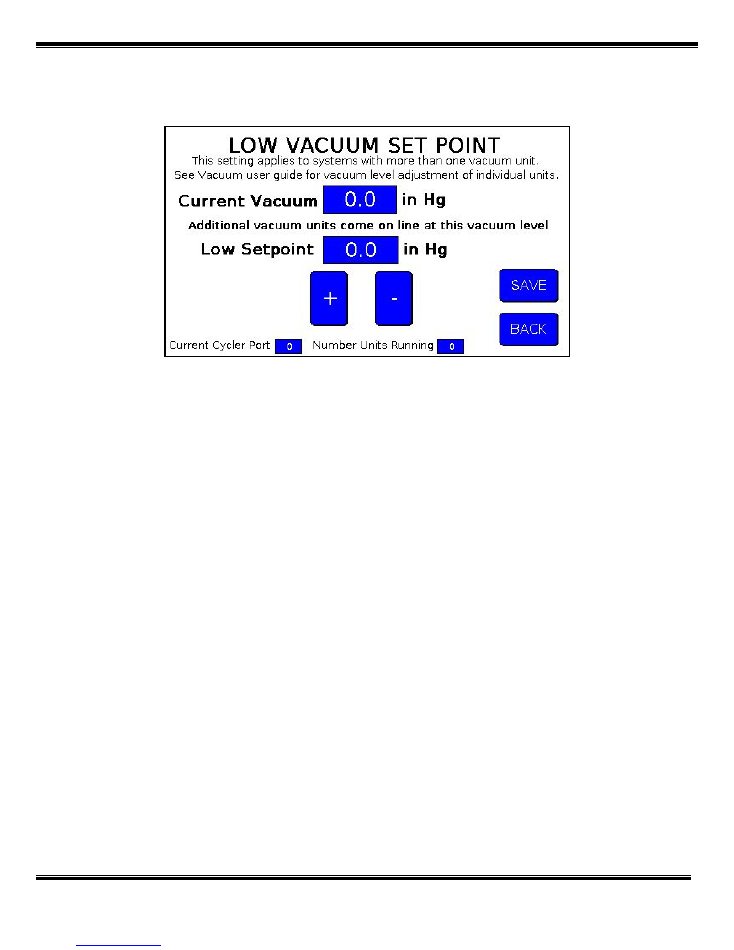
Select “Vac Set”. The menu below is now shown.
•
The current vacuum level is indicated in the top field.
•
Notice the number of units currently running on the bottom of the screen. If more than 1 unit is
running, use the "-" button to adjust the “Low Set point” value so that it is several inches Hg
lower than the Current Vacuum level and then select “Save”.
•
IMPORTANT
: Verify the number of units now running is 1.
•
After verifying that only 1 unit is running, use the "+" and "-" buttons to adjust the "Low Set
point" to 1” Hg less than the “Current Vacuum” level. For example if the “Current Vacuum”
level is 8.5” Hg, the low set point value should be 7.5” Hg.
•
Select “Save” and then “Back” to return to the “System Setup” screen. Select “Home”.
OWL Programming is now complete.

1056DOC – REV E
Page 14
OWL SYSTEM OPERATION
Two “Run Modes” are available from the OWL Touch “Home Screen”. The system can be operated in
either “Manual” or “By Schedule” modes to turn on connected equipment.
MANUAL MODE
This mode allows connected equipment to be turned off and on using the four ON/OFF buttons
directly above the run mode box. These buttons are comparable to traditional wall panel push buttons
that simply turn equipment on or off.
BY SCHEDULE
Select this mode to have all connected equipment turn on and off automatically per the weekly
schedule that was programmed earlier in this procedure.
MASTER SHUTDOWN
When “Master Shutdown” is selected the button will turn red which indicates the system is off and will
not run according to the Schedule. Devices also cannot be operated using the on/off buttons as
when in manual mode. All RAMVAC vacuum pumps and compressors will remain in stand-by until
one of the two run modes is activated.
Note this is not a safety interlock.
See vacuum unit and/or
compressor user manual for guidelines on electrical and pneumatic isolation for maintenance
procedures.
© Copyright 2012 RAMVAC Dental Products. All rights reserved.
No part of this publication may be copied or distributed,
transmitted or transcribed in any form or by any means
without the expressed written permission of
RAMVAC Dental Products, Spearfish, SD 57783
212 North Main Street
Spearfish, SD 57783
(800) 5-RAMVAC
FAX (605) 642-3776
www.ramvac.com
EXCLUSIVELY FROM
ISO 13485 Certified
212 North Main Street, SPEARFISH, SD 57783
TOLL FREE:
800-5-RAMVAC
(800-572-6822)
PHONE: (605) 642-4614
•
FAX (605) 642-3776
e-mail:
ramvac@ramvac.com
website:
www.ramvac.com
The Integrated Supplier
PHONE: (866-DTE-INFO)
Website: www.dentalez.com