Full Text Searchable PDF User Manual

MultiServ Multiband Antennas
QS Series Antenna Installation Guide
INS-AS-004024_E
Page 1
The Quintel QS Series MultiServ
TM
Multiband Multi Port Antennas with patented QTilt™
technology uniquely delivers multiple independent services in single slim-line antennas. This
enables existing antenna constrained network sites to be upgraded to add new services such as
LTE in the 700, AWS & WCS bands with the replacement of one antenna.
The Quintel MultiServ
TM
Multiband Multi Port Antennas are an ideal solution for independently
optimizing multiple services when rapidly introducing new technologies. Technology agnostic,
each band provides flexibility for existing and future technologies such as GSM, CDMA, UMTS,
LTE and advanced 2Tx4Rx and 4Tx4Rx MIMO implementations.
The tilt of each band is controlled independently via internal RET actuators compliant to AISG1.1, AISG2.0 and 3GPP protocols.
Depending on the model, the antenna provides a total of 2, 3, 4 or 6 independent tilts. Detailed specifications for each antenna model
can be found in their respective datasheets. Datasheets are available for download at the following link:
http://www.quintelsolutions.com/datasheets-patterns.html
Table of Contents
1
INSTALLATION OVERVIEW ............................................................................................................... 2
1.1
M
OUNTING
H
ARDWARE
F
EATURES INCLUDE
: ...................................................................................... 2
1.2
S
UPPLIED
M
OUNTING
H
ARDWARE
................................................................................................... 2
1.3
M
OUNTING
H
ARDWARE
M
ECHANICAL
S
PECIFICATIONS
......................................................................... 2
2
HEALTH & SAFETY ............................................................................................................................ 3
3
UPPER ARM & MOUNT ASSEMBLY: AS-001182, SUPPLIED AS PART OF AS-000977 .......................... 4
4
TILT ANGLE INDICATOR GUIDE FOR MULTIPLE ANTENNA PRODUCTS………………………………….6, 7 & 8
5
LOWER MOUNT ASSEMBLY: AS-001184, SUPPLIED AS PART OF AS-000977 ............................ 9 & 10
6
OPTIONAL LIGHTNING FINIAL AS-001034 ...................................................................................... 11
7
AISG & RF CONNECTIONS FOR 6-PORT ANTENNAS, SBT AND NON-SBT VERSIONS ........................ 12
8
AISG & RF CONNECTIONS FOR 8-PORT ANTENNAS, SBT AND NON-SBT VERSIONS ........................ 13
9
AISG & RF CONNECTIONS FOR 10-PORT ANTENNAS SBT AND NON-SBT VERSIONS ....................... 14
10
AISG & RF CONNECTIONS FOR 12-PORT ANTENNAS, SBT AND NON-SBT VERSIONS ...................... 15
11
AISG CONTROLLER DISPLAY ........................................................................................................... 16
11.1
E
XAMPLE OF
4-T
ILT
QS66512-2
D
ISPLAY
....................................................................................... 16
11.2
E
XAMPLE OF
6-T
ILT
QS66512-3
D
ISPLAY
....................................................................................... 17
12
AISG CONTROLLER DISPLAY – QSX65X-3 MODELS……………………………………………………………………….18
12.1
E
XAMPLE OF
4-T
ILT
QS6658-3
D
ISPLAY
…………………………………………………………………………………………18
13
RET CONTROL ................................................................................................................................ 19
Features
Antenna component with:
•
Product families providing multiple frequency
options refer to specific data sheets per technical
specifications.
•
Simple Antenna swap out.
•
Variable electrical tilt.
Supports MIMO services with 2Tx4Rx & 4Tx4Rx capability
depending on model
AISG & 3GPP compliant internal Remote Electrical Tilt (RET)
RET configurable for AISG 1.1/2.0 and 3GPP software via
upload
Provides Multi antenna Ports in a slim-line form factor
Models with -5 suffix support AISG over RF through internal
Smart Bias-T’s (SBT)
Quick Facts:
Product #: QS Family
6,8,10 & 12 Ports
SBT & Non-SBT Variants
Polarisation: XXX
Height:
52”, 72” & 96”
Beam Width: 65
°

MultiServ Multiband Antennas
QS Series Antenna Installation Guide
INS-AS-004024_E
Page 2
1
Installation Overview
This document describes the installation and configuration details for the Quintel antennas as summarized on page1.
Included is a description of the antenna mounting options, antenna port identification and AISG connections for each
specific antenna models.
The mounting kit types supplied with the antenna are detailed below. These kits enable the antenna to be pole mounted
with pre-set mechanical down tilt (-2
°
to 10
°
).
NOTE: Images contained in this document are of QS6658-3 product line and may not represent all antennas;
however the bracket components and their installations are common.
1.1
Mounting Hardware Features include:
•
Tilt adjustment arm for mechanical tilt.
•
Pipe diameter: 30-120mm (1.18 – 4.72 inches) standard.
1.2
Supplied Mounting Hardware
•
AS-001184
Lower antenna mounting bracket assembly
•
AS-001182
Upper antenna mounting bracket assembly. (Adjustable from -2
°
to 10
°
)
•
AS-001034
Optional Lightning Finial
1.3
Mounting Hardware Mechanical Specifications
•
Weight of kit, kg (15.6 lbs)
4.6 kg (10.1 lbs) AS-001182 Upper mounting bracket
2.0 kg (4.4 lbs) AS-001184 Lower mounting bracket
0.4 kg (0.9 lbs) AS-001034 Lightning finial
•
Mounting kit material
Aluminium & Galvanized steel
•
Packaging material
Plastic sleeve
Tools Required
•
18mm (no Imperial equivalent) AF deep socket, spanner wrench
•
18mm Box-End Torque Wrench (40-65 ft lbs)
•
16mm AF socket
and spanner wrench
•
13mm socket and Box-End Torque Wrench (16 ft lbs)
MultiServ Multiband Antennas
QS Series Antenna Installation Guide
INS-AS-004024_E
Page 3
2
HEALTH & SAFETY
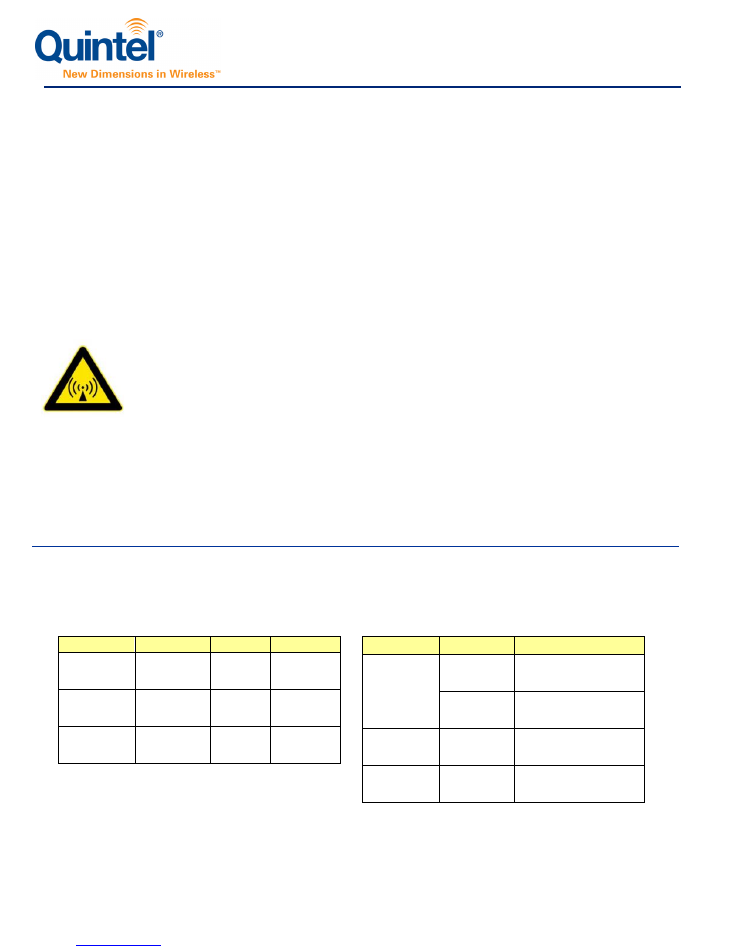
All operations relating to the installation of the Quintel range of antenna systems must be executed in accordance
with industry approved safety standards and practices.
The installer shall also follow the safety practices recommended by the BTS provider to insure that the BTS
operation is not compromised.
Safety Handling of Antennas
The installation of antennas and associated electrical equipment and systems should only be carried out by qualified
persons. Antenna units may be heavy and should be handled by experienced persons with the aid of suitable lifting
equipment only. Antenna casings are fragile and are susceptible to damage from impact and weight on the radome. When
antenna units are stored ready for use, they should be supported to prevent any damage.
High Frequency Radiation Hazard
The RBS, antenna line equipment, and the antennas generate high frequency electric and magnetic
fields when in operation. It is important that all personnel working with the installation and
maintenance of transmitting equipment and antennas have a suitable level of knowledge of RF safety.
The following cautions described below should be observed:
Caution
Excessive RF exposure can result in potentially adverse health effects. If it is suspected that RF
exposure limits may be exceeded, ensure that transmitting antennas are switched off, or reduce output
power whilst working with, or near, antennas.
Caution
Do not stand or work in front of an operational antenna, unless it has been verified or documented that
RF exposure levels are within specified safety limits.
Caution
Always be aware of other RF transmission antennas located close to the antenna you will be working
with. If the RF exposure level is unknown, contact the equipment operator or ensure that
measurements are done to verify that levels are below specified safety limits before starting work.
Caution
Broken or disconnected RF cables can lead to exposure levels reaching, or exceeding, specified
safety limits. Repair or reconnect cables before starting work. Opening of enclosed units is not
permitted.
UNPACKING
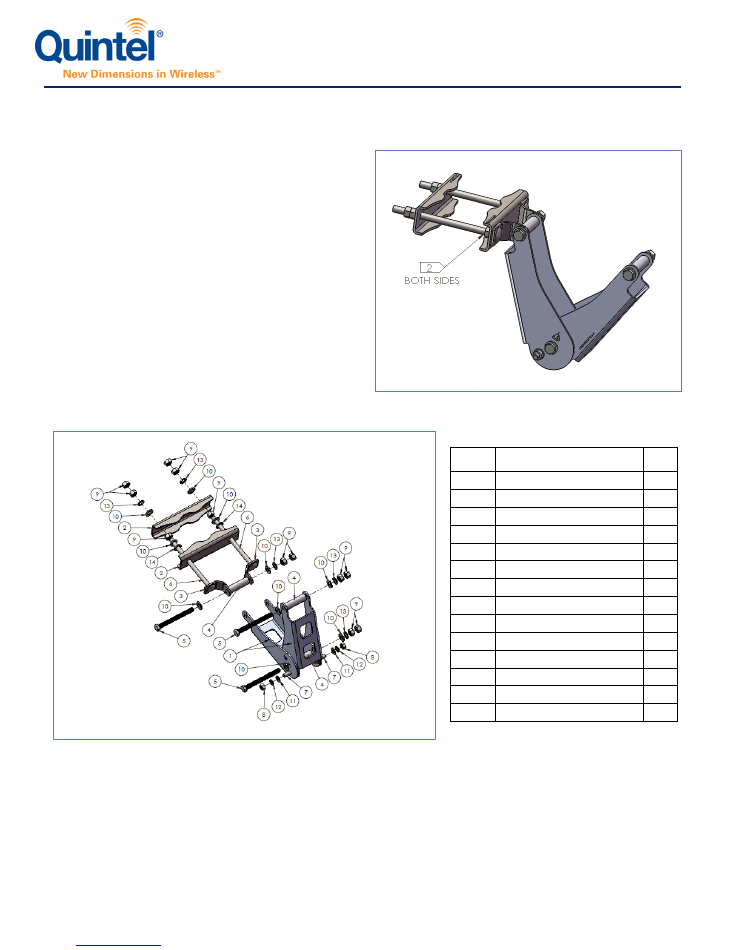
Make sure that the antenna and the accessory items listed below are provided and have not been damaged during transport:
Table 1: Mounting components shipped with antenna Table 2: Torque Settings
Kit
Description
Quantity
Item No.
Upper Arm &
Mount Assy.
Quintel Kit #
AS-001182
1
See
Page 3
Lower Arm &
Mount Assy.
Quintel Kit #
AS-001184
1
See
Page 6
Lightning
Finial
Quintel Kit #
AS-001034
1
See
Page 8
Location
Size
Rating
Upper &
Lower
Mounting
Kit(s)
M12
88 Nm (65 ft.-lbs.) (Unless
otherwise stated)
M10
50 Nm (37 ft.-lbs.)
Upper/Lower
Pole Clamp
Mount Only (4)
M12
54 Nm (40 ft.-lbs.)
(Optional)
Finial
M8
21 Nm (15.7 ft.-lbs.)
MultiServ Multiband Antennas
QS Series Antenna Installation Guide
INS-AS-004024_E
Page 4
3
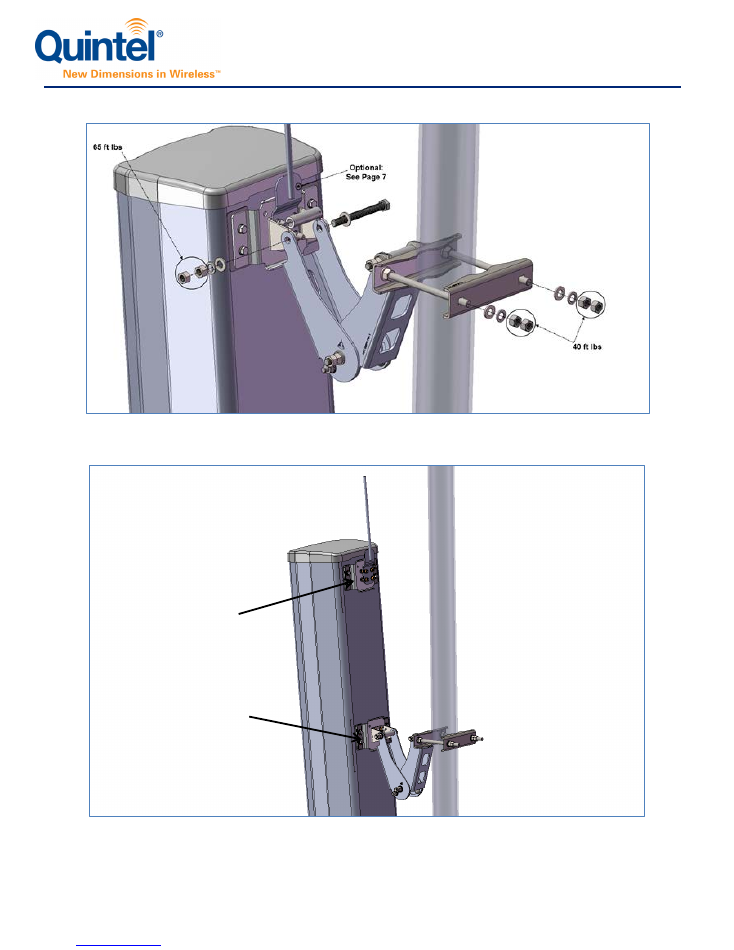
Upper Arm & Mount Assembly:
AS-001182, supplied as part of AS-000977
1. All bolts assembled loosely
until installation except where shown.
2. Torque M12 bolts where shown to 65 Ft. Lbs (88 N-m).
3.
NOTE:
•
The addition or replacement of any
items supplied in this kit may compromise
structural integrity.
Figure 1: Upper Arm
Figure 2: Upper Arm Exploded View
ITEM
NO.
PART NUMBER
QTY.
1
MEC-008937
2
2
MEC-008938
2
3
MEC-008939
2
4
MEC-008956
3
5
Bolt-M12x1.75x120 ISO 4014
3
6
MEC-010791
2
7
MEC-010792
2
8
Nut-Hex M10x1.5 B18.2.4.1M
2
9
NUT-Hex M12x1.75
12
10
Washer DIN 125 - A 13
10
11
Washer DIN 125 - B 10.5
2
12
Washer-Split Lk M10
2
13
Washer-Split Lk M12
5
14
Washer-Split Lk M14
2
MultiServ Multiband Antennas
QS Series Antenna Installation Guide
INS-AS-004024_E
Page 5
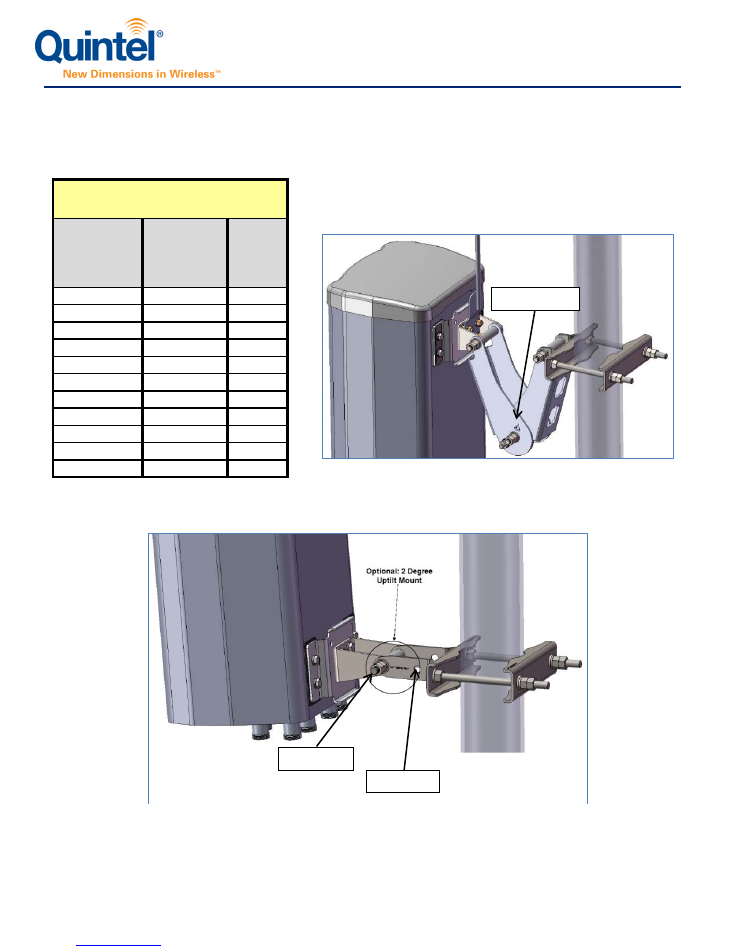
Upper arm mount position for 4FT & 6FT antenna models.
Figure 3: Pole Mount of Upper Arm & Mount Assembly (AS-001182)
Upper arm mount position for 8FT antenna models.
Figure 4: Upper Arm Mount Position for 8ft Antenna Models (AS-001182)
Figure 4: Upper Arm Mount Position For 8ft Antenna Models
NOTE:
•
Use of a digital inclinometer is recommended for antenna positioning accuracy.
•
See above illustrations and Table 2 on page 4 for torque settings.
(88 Nm)
(54 Nm)
Do not use the upper arm
mount on this mount bracket
Upper arm mount position
Do not use the upper arm
mount on this mount bracket
Upper arm mount position
Do not use the upper arm
mount on this mount bracket
Upper arm mount position
MultiServ Multiband Antennas
QS Series Antenna Installation Guide
INS-AS-004024_E
Page 6
4
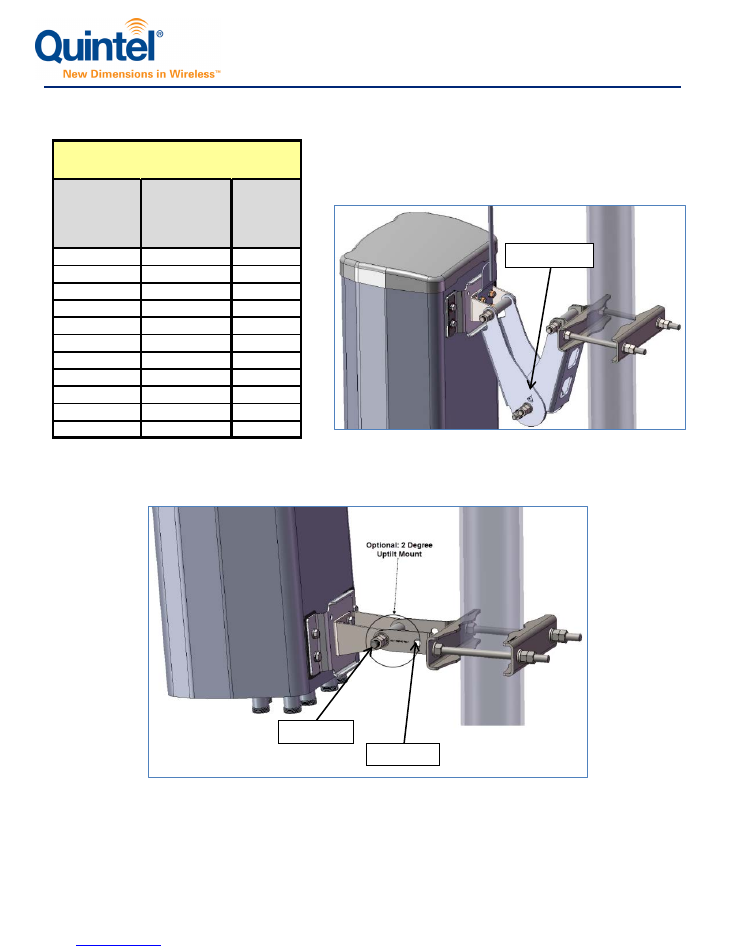
Tilt Angle Indicator Guide for various Antenna Products
4.1.1 Tilt Angle Indicator Guide for
4FT 65Deg 6/8/10/12P Products
Angle
(Degrees)
Lower arm
Position 1
Angle
(Degrees)
Lower arm
Position 2
Indicator
0
-2
1.0
1
-1
2.0
2
0
3.3
3
1
4.5
4
2
5.7
5
3
6.9
6
4
8.0
7
5
9.1
8
6
10.5
9
7
11.8
10
8
13.0
Tilt Indicator Table for 4FT 65Deg
6/8/10/12P
Figure 6: 2 Degree Up Tilt Mount
Position 2
Position 1
Tilt Indicator
Figure 5: Tilt Indicator
MultiServ Multiband Antennas
QS Series Antenna Installation Guide
INS-AS-004024_E
Page 7
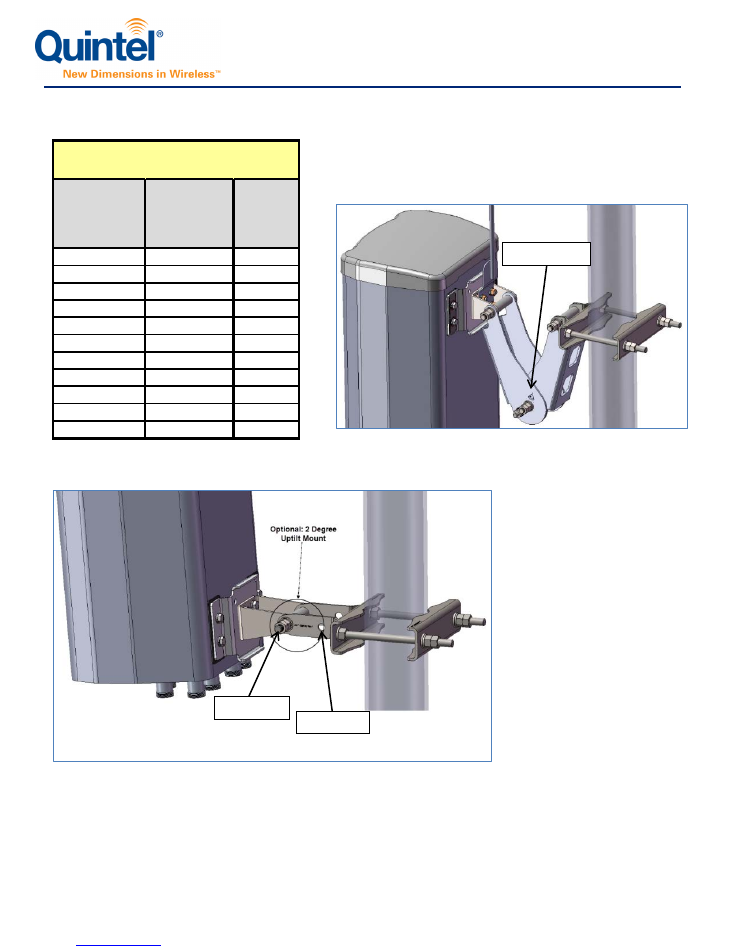
4.1.2 Tilt Angle Indicator Guide for 6&8FT 65Deg 6/8/10/12P Products
Angle
(Degrees)
Lower arm
Position 1
Angle (Degrees)
Lower arm
Position 2
Indicator
0
-2
0.0
1
-1
1.5
2
0
3.0
3
1
5.0
4
2
6.5
5
3
8.3
6
4
10.0
7
5
12.0
8
6
14.0
9
7
16.0
10
8
18.5
Tilt Indicator Table for 6&8FT 65Deg
6/8/10/12P
Figure 6: 2 Degree Up Tilt Mount
Position 2
Position 1
Tilt Indicator
Figure 5: Tilt Indicator
MultiServ Multiband Antennas
QS Series Antenna Installation Guide
INS-AS-004024_E
Page 8
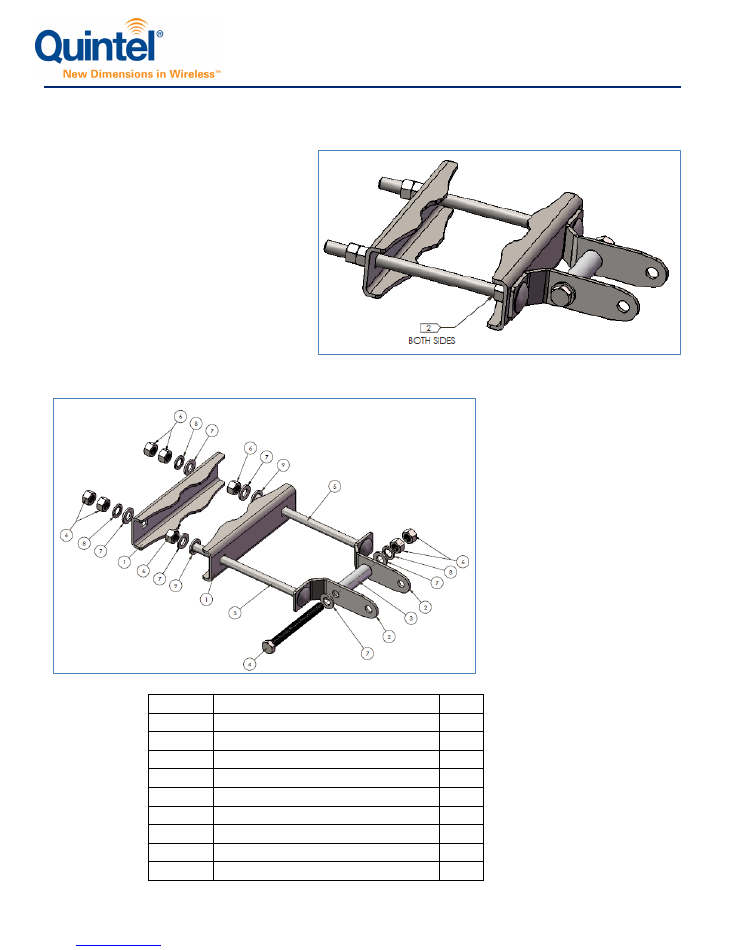
4.1.3 Tilt Angle Indicator Guide for 6&8FT 45Deg 6/8P Products
Angle (Degrees)
Lower arm
Position 1
Angle
(Degrees)
Lower arm
Position 2
Indicator
0
-2
0.0
1
-1
1.6
2
0
3.2
3
1
4.9
4
2
6.5
5
3
8.2
6
4
10.0
7
5
11.8
8
6
13.8
9
7
15.8
10
8
18.0
Tilt Indicator Table for 6&8FT 45Deg 6/8P
Figure 6: 2 Degree Up Tilt Mount
Tilt Indicator
Figure 5: Tilt Indicator
Position 1
Position 2
MultiServ Multiband Antennas
QS Series Antenna Installation Guide
INS-AS-004024_E
Page 9
5
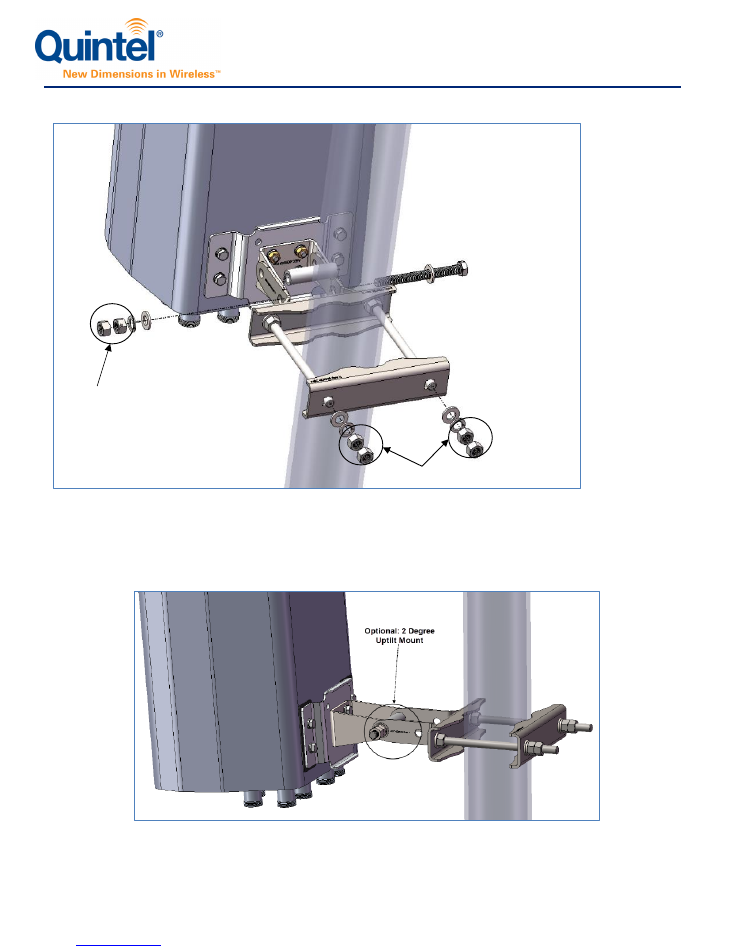
Lower Mount Assembly:
AS-001184, supplied as part of AS-000977
1. All bolts assembled loosely
until installation except where shown.
2. Torque M12 bolts where shown to 65 Ft.
Lbs (88 N-m).
3.
NOTE:
•
The addition or replacement of any
items supplied in this kit may
compromise
structural integrity.
Figure 7: Lower Mount Assembly
Figure 8: Lower
Mount Assembly
Exploded View
ITEM NO.
PART NUMBER
QTY.
1
MEC-008938
2
2
MEC-008940
2
3
MEC-008956
1
4
Bolt-M12x1.75x120 ISO 4014
1
5
Bolt-Carriage M12-1.75x200 ISO 8677
2
6
NUT-Hex M12x1.75
8
7
Washer DIN 125 - A 13
6
8
Washer-Split Lk M12
3
9
Washer-Split Lk M14
2
MultiServ Multiband Antennas
QS Series Antenna Installation Guide
INS-AS-004024_E
Page 10
Lower arm mount position for all antenna models.
Figure 9: Pole Mount of Lower Mount Assembly (AS-001184)
NOTE:
•
Use of a digital inclinometer is recommended for antenna positioning accuracy.
•
See above illustration and Table 2 on page 4 for torque settings.
Figure 10: Illustration showing 2 Degree Up Tilt
54 Nm
88 Nm
65 ft lbs
40 ft lbs
MultiServ Multiband Antennas
QS Series Antenna Installation Guide
INS-AS-004024_E
Page 11
6
Optional Lightning Finial AS-001034
Does the mast require lightning protection?
The lightning finial is to be fitted where the antenna extends
above the top of the tower or building. The finial is best
installed prior to the antenna installation on the tower/pole.
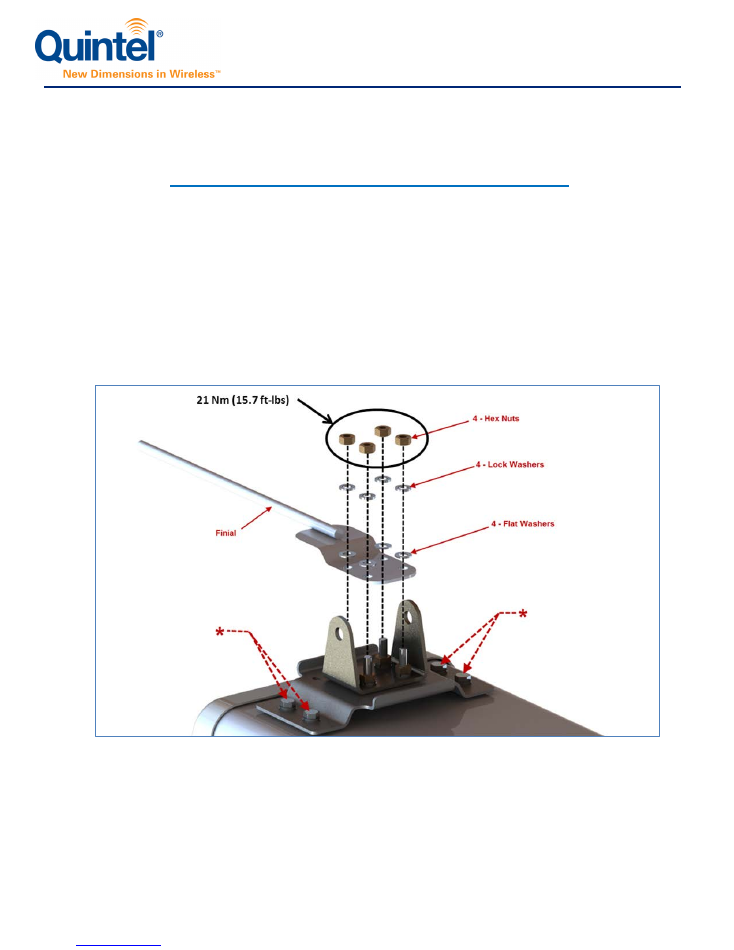
Step 1: Place finial on top of washers
Step 2: Add 4 - Flat washers, 4 - Lock washers, and 4 – M8 - Hex nuts
Step 3: Torque per Table 2
*DO NOT LOOSEN OR TIGHTEN BOLTS GOING INTO ANTENNA OR WARRANTY IS VOIDED
Figure 11: Lightning Finial Assembly
MultiServ Multiband Antennas
QS Series Antenna Installation Guide
INS-AS-004024_E
Page 12
7
AISG & RF Connections for 6-port Antennas, SBT and non-SBT
versions
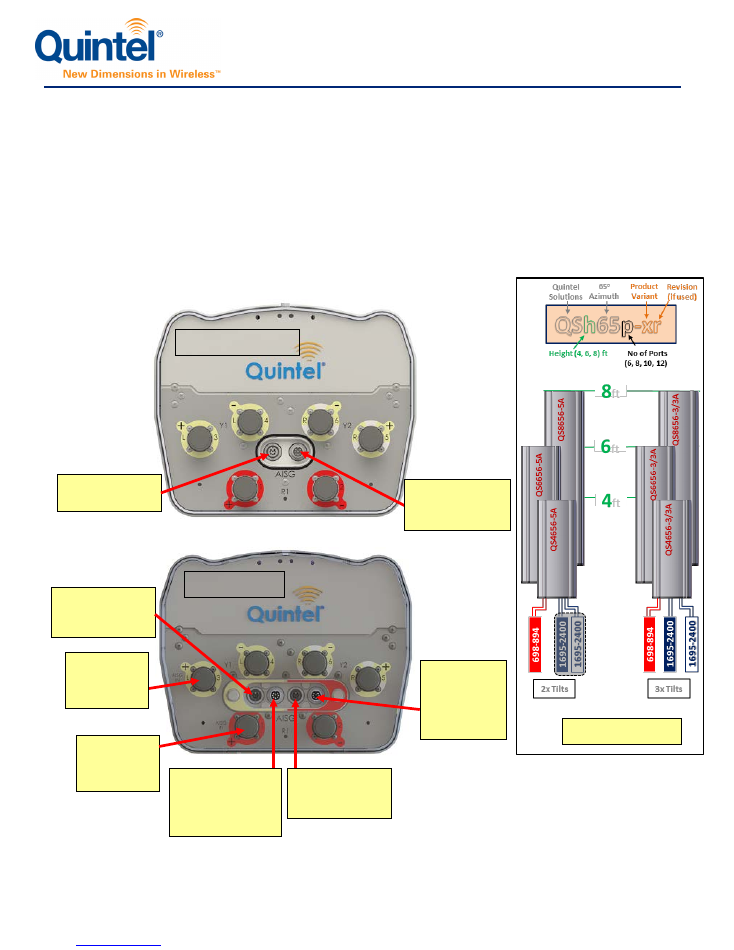
These diagrams refer to 6-port models of all lengths. The antennas are factory configured for AISG 2.0.
The Device type classification is
Type 1
.
All AISG RET Devices are communicating through the single or dual input and output DIN connectors or using
“AISG over RF” on the antenna connector plate as shown below.
Wire the AISG connections and attach the antenna jumpers according to the RFDS (Radio Frequency Design
Specification) supplied by engineering.
Figure 12: AISG & RF Connections for 6-port Antennas
AISG output for
daisy-chain
.
AISG input from
home run cable
or daisy-chain.
Non-SBT Option
SBT Option
High-band
AISG output for
daisy-chain
.
High-band AISG
input from home
run cable or
daisy-chain.
Low-band
AISG input
from home
run cable or
daisy-chain.
Low-band AISG
output for
daisy-chain
.
High-band
AISG over
RF input.
Low-band
AISG over
RF input.
Example Above
MultiServ Multiband Antennas
QS Series Antenna Installation Guide
INS-AS-004024_E
Page 13
8
AISG & RF Connections for 8-port Antennas, SBT and non-SBT
versions
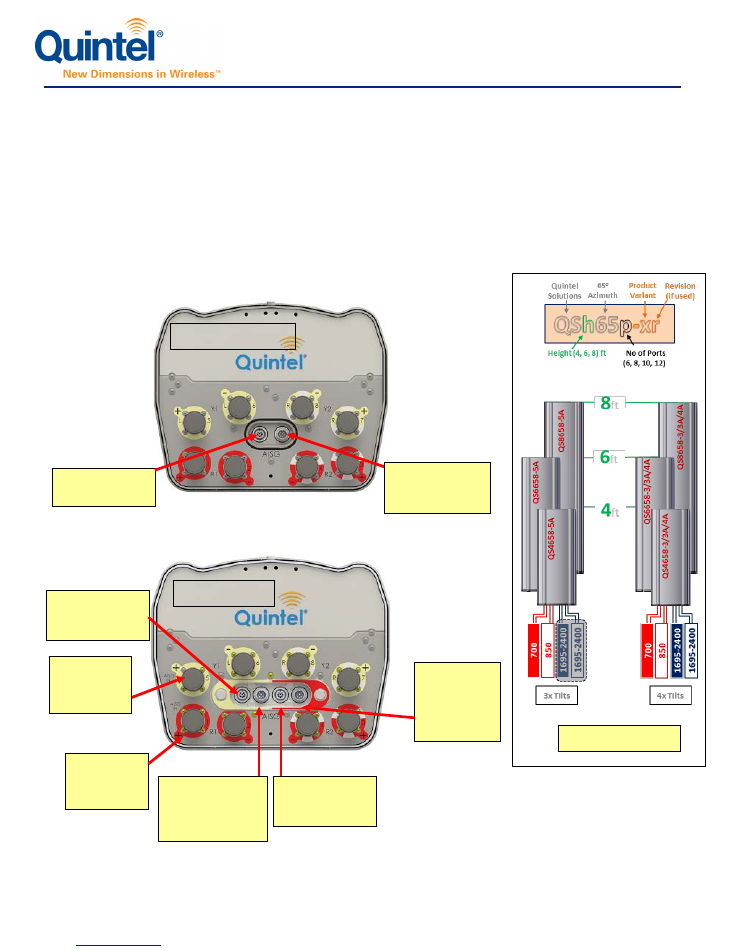
These diagrams refer to 8-port models of all lengths. The antennas are factory configured for AISG 2.0.
The Device type classification is
Type 1
.
All AISG RET Devices are communicating through the single or dual input and output DIN connectors or using
“AISG over RF” on the antenna connector plate as shown below.
Wire the AISG connections and attach the antenna jumpers according to the RFDS (Radio Frequency Design
Specification) supplied by engineering.
Non-SBT Option
AISG output for
daisy-chain
.
AISG input from
home run cable
or daisy-chain.
High-band
AISG output for
daisy-chain
.
High-band AISG
input from home
run cable or
daisy-chain.
Low-band
AISG input
from home
run cable or
daisy-chain.
Low-band AISG
output for
daisy-chain
.
High-band
AISG over
RF input.
Low-band
AISG over
RF input.
SBT Option
Figure 13: AISG & RF Connections for 8-port Antennas
Example
Above
MultiServ Multiband Antennas
QS Series Antenna Installation Guide
INS-AS-004024_E
Page 14
9
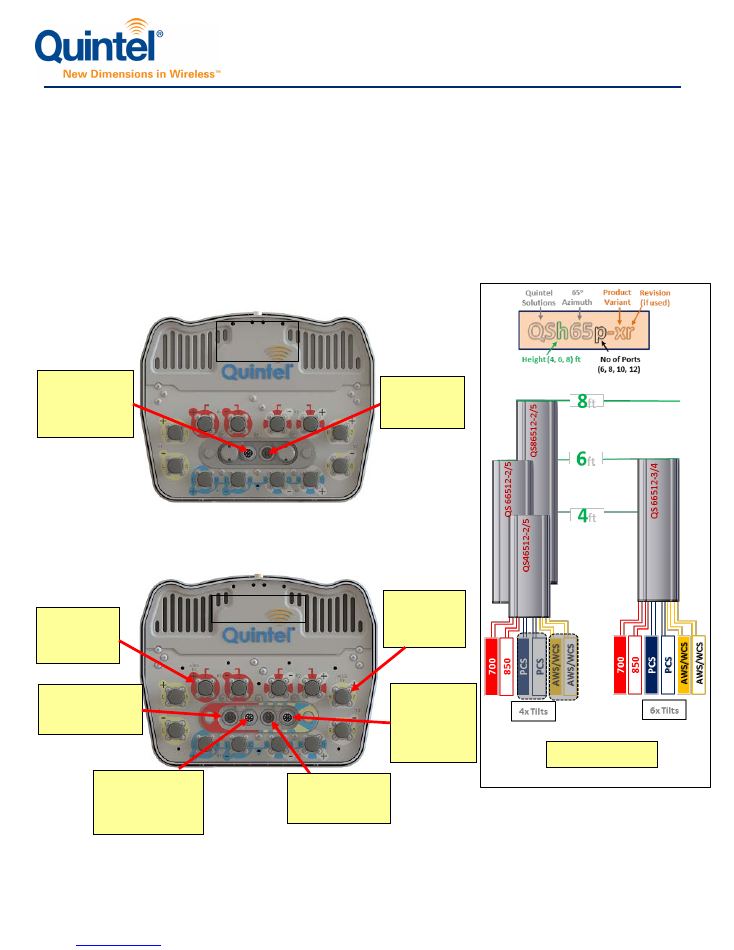
AISG & RF Connections for 10-port Antennas SBT and non-
SBT versions
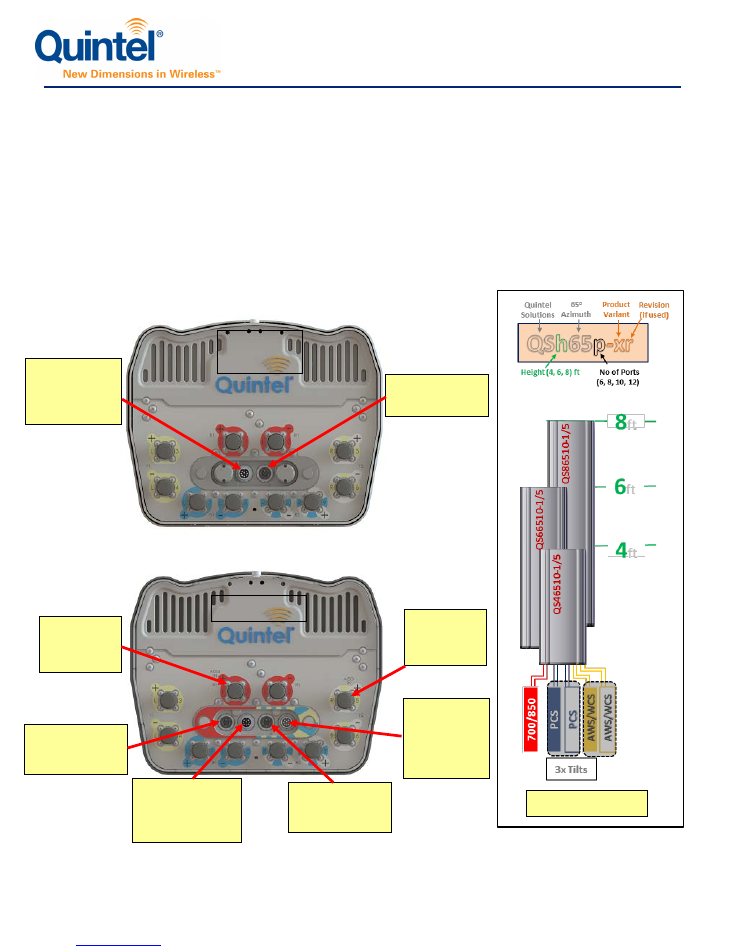
These diagrams refer to 10-port models of all lengths. The antennas are factory configured for AISG 2.0.
The Device type classification is
Type 1
.
All AISG RET Devices are communicating through the single or dual input and output DIN connectors or using
“AISG over RF” on the antenna connector plate as shown below.
Wire the AISG connections and attach the antenna jumpers according to the RFDS (Radio Frequency Design
Specification) supplied by engineering.
AISG Output
for daisy-chain.
AISG input
from home
run cable or
daisy-chain.
Figure 14: AISG & RF Connections for 10-port Antennas
High-band
AISG output for
daisy-chain
.
High-band AISG
input from home
run cable or
daisy-chain.
Low-band
AISG input
from home
run cable or
daisy-chain.
Low-band AISG
output for
daisy-chain
.
High-band
AISG over
RF input.
Low-band
AISG over
RF input.
Non-SBT
Option
SBT Option
Example Above
MultiServ Multiband Antennas
QS Series Antenna Installation Guide
INS-AS-004024_E
Page 15
10
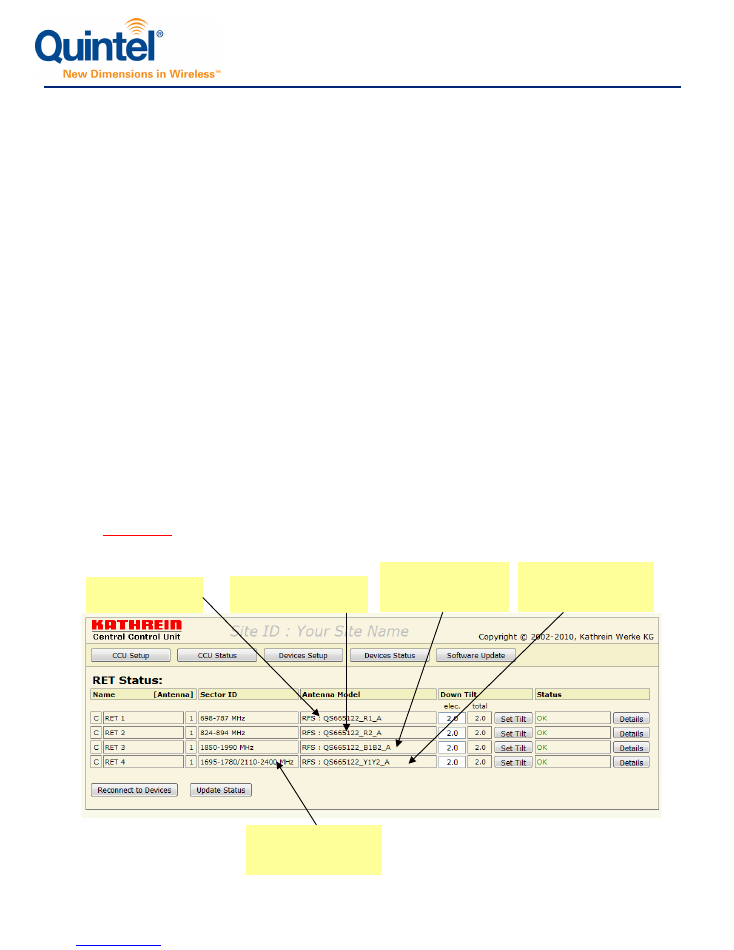
AISG & RF Connections for 12-port Antennas, SBT and non-
SBT versions
These diagrams refer to 12-port models of all lengths. The antennas are factory configured for AISG 2.0.
The Device type classification is
Type 1
.
All AISG RET Devices are communicating through the single or dual input and output DIN connectors or using
“AISG over RF” on the antenna connector plate as shown below.
Wire the AISG connections and attach the antenna jumpers according to the RFDS (Radio Frequency Design
Specification) supplied by engineering.
Figure 15: AISG & RF Connections for 12-port Antennas
AISG input
from home
run cable or
daisy-chain.
Non-SBT
Option
SBT Option
High-band
AISG output for
daisy-chain
.
High-band AISG
input from home
run cable or
daisy-chain.
Low-band
AISG input
from home
run cable or
daisy-chain.
High-band
AISG over
RF input.
Low-band
AISG over
RF input.
AISG
Output for
daisy-chain
.
Low-band AISG
output for
daisy-chain
.
Example Above
MultiServ Multiband Antennas
QS Series Antenna Installation Guide
INS-AS-004024_E
Page 16
11
AISG Controller Display
11.1
Example
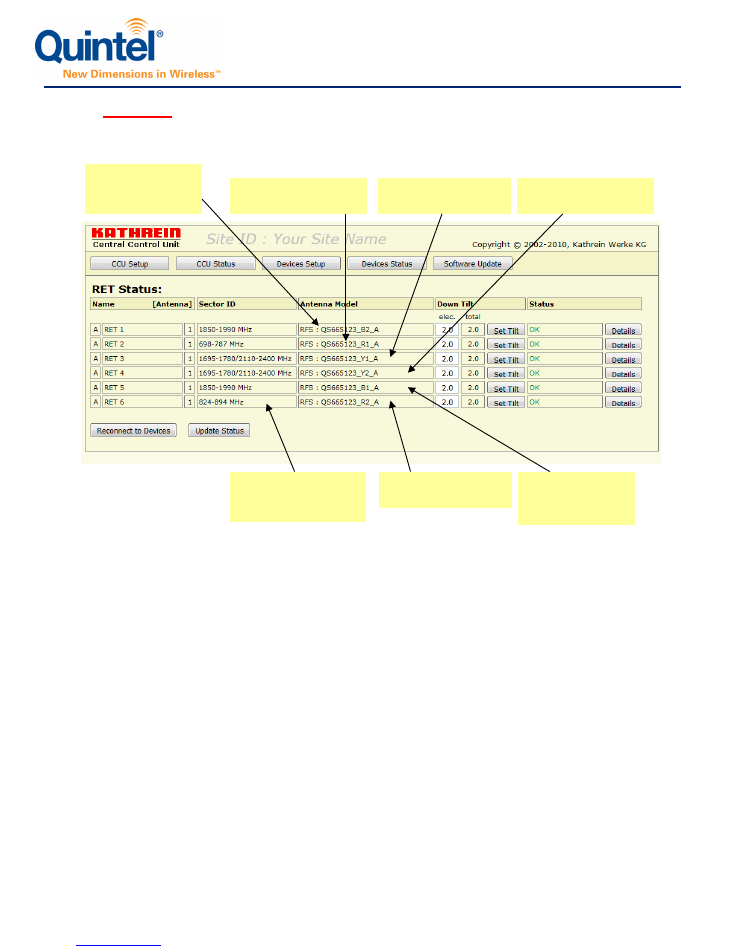
of 4-Tilt QS66512-2 Display
The antenna models listed below will use the following naming convention:
a) All 6-port antenna models, Example: QS6656-XR where X=model and R=revision
b) All 8-port antenna models, Example: QS6658-XR where X=model and R=revision
c) All 10-port antenna models, Example: QSX6510-XR where X=model and R=revision
d) All 12-port antenna models, Example: QSX6512-XR where X=model and R=revision
The naming convention used in the AISG display corresponds to the antenna port labels on the bottom of the antenna.
R1 – Low band ports, refer to data sheet for details.
R2 – Low band ports covering, refer to data sheet for details.
Y1 – High band left ports, refer to data sheet for details.
Y2 – High band right ports, refer to data sheet for details.
B1 – High band left ports, refer to data sheet for details.
B2 – High band right ports, refer to data sheet for details.
Y1Y2 – High band left and right ports, refer to data sheet for details.
B1B2 – High band left and right ports, refer to data sheet for details.
The tilts for each device and sector naming conventions should be set according to the RFDS (Radio Frequency Design
Specification) supplied by engineering and in a manner appropriate to the AISG controller being used. Please refer to
the AISG controller manufacturer’s documentation for further information.
PCS high band Left
& Right common tilt
entry.
AWS/WCS high band
Left & Right common
tilt entry.
850MHz single tilt by
band entry.
700MHz single tilt
by band entry.
Sector ID set by user.
Information for
reference only.
MultiServ Multiband Antennas
QS Series Antenna Installation Guide
INS-AS-004024_E
Page 17
11.2
Example
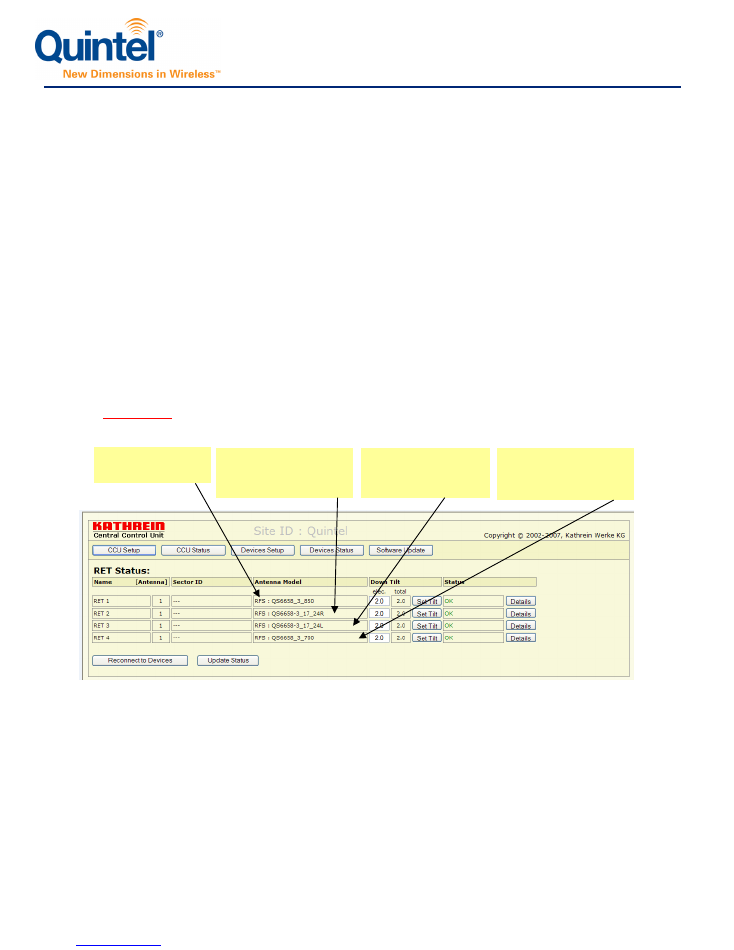
of 6-Tilt QS66512-3 Display
AWS/WCS high band
Left single tilt entry.
AWS/WCS high band
Right single tilt entry.
700MHz single tilt by
band entry.
PCS high band
Right single tilt
entry.
850MHz single tilt by
band entry.
PCS high band
Left single tilt
entry.
Sector ID set by user.
Information for
reference only.
MultiServ Multiband Antennas
QS Series Antenna Installation Guide
INS-AS-004024_E
Page 18
12
AISG Controller Display – QSX65X-3 Models
12.1
Example
of 4-Tilt QS6658-3 Display
1710-2400MHz Left
single tilt by band
entry
The antenna models listed below will use the following, older naming convention:
a) All 6-port antenna models without a trailing revision letter, Example: QS6656-3
b) All 8-port antenna models without a trailing revision letter, Example: QS6658-3
Example: This diagram refers specifically to antenna model QS6658-3, with a total of four (4) RET devices:
One for independently tilting 700MHz – Labeled RFS: QS6658_3_700
One for independently tilting 850MHz – Labeled RFS: QS6658_3_850
One for independently tilting 1710-2400MHz on the Left hand array – Labeled RFS: QS6658-3_17_24_L
One for independently tilting 1710-2400MHz on the Right hand array – Labeled RFS: QS6658-3_17_24_R
The tilts for each device and sector naming conventions should be set according to the RFDS (Radio Frequency Design
Specification) supplied by engineering and in a manner appropriate to the AISG controller being used. Please refer to
the AISG controller manufacturer’s documentation for further information.
700MHz single tilt by
band entry.
1710-2400MHz Right
single tilt by band
entry
850MHz single tilt
by band entry.
MultiServ Multiband Antennas
QS Series Antenna Installation Guide
INS-AS-004024_E
Page 19
13
RET control
For direct RET control via a PC, it is recommended to use the RFS PA-USB/485 protocol adaptor, details can be found at
http://www.rfsworld.com/userfiles/pdf/pa_usb485_datasheet_revc.pdf
, along with user instructions and software driver details at
http://www.rfsworld.com/WebSearchECat/datasheets/media/?q=images/Site_Optimization_Products/412818_PA-
USB485_Installation_Instructions.pdf
.
It is required that any direct power connection to the RET device shall be a “limited power source” that does not exceed 100 Watts.
Please refer to relevant Network Operator Operating Procedures regarding connecting and programming RET devices with OEM
eNodeBs.
External AISG & RF Cable connections
For all external RF and AISG cable connections it is recommended that they are weather proofed in accordance with the cable
manufacturers and network operator’s guidelines for weather proofing. Failure to do so, may lead to degradation in the product
performance or in worse case a product failure.
Important Note:
The installation, maintenance and removal of an antenna requires qualified personnel.
Antenna systems must be inspected at least once a year and after any severe weather by
qualified personnel to verify maintenance and condition of equipment.
Technical Support
Please contact technical support at the appropriate number or email contact listed below should you have any questions regarding
this installation guide.
About Quintel
Quintel is a leading innovator in the design, development, and delivery of network-efficient antenna solutions for wireless operators
worldwide. The company’s products enable global wireless operators to independently deploy and optimize multiple air interfaces or
services on a single standard antenna platform. Quintel is the only antenna maker whose products can increase a wireless
network’s capacity and provide additional services, without increasing the number or size of antennas. Quintel is headquartered in
Rochester, New York with additional offices throughout North America and Europe.
More information about Quintel is available at
www.quintelsolutions.com
.
www.quintelsolutions.com
World HQ
Tel (Americas): +1 (585) 420-8720
Fax (Americas): +1 (650) 472-9186
Email:
info@quintelsolutions.com
Technical Support (World HQ)
Tel (Americas): +1 (602) 692-8600
support@quintelsolutions.com
For general company information, please email:
info@quintelsolutions.com
THIS DOCUMENT PROVIDES A GENERAL DESCRIPTION OF THE PRODUCT AND SHALL NOT FORM PART OF ANY CONTRACT.
© 2017 Quintel Technology Limited. All rights reserved. Quintel and the Quintel logo are registered trademarks Quintel Technology
Limited.