Full Text Searchable PDF User Manual
User Manual
Thank you for choosing Mansion iLock X2
Please read the instructions before use in order to
understand the correct operation of the product.
CONTENTS:
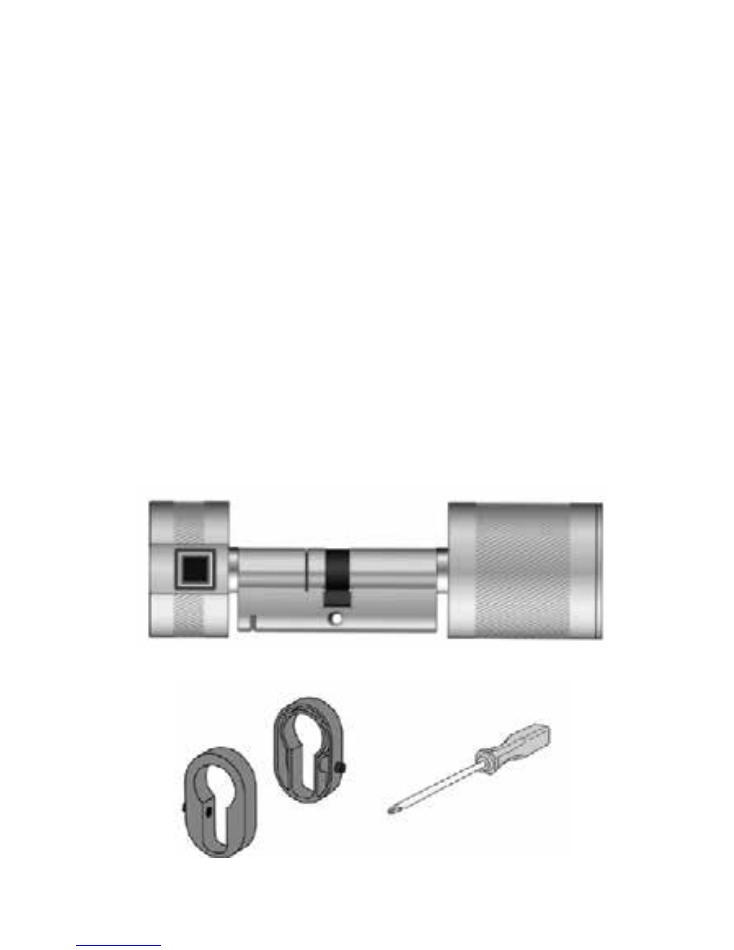
1 x Mansion iLock X2
2 x Lock Case
4 x AAA Batteries
1 x Screwdriver
!
!
Spindle
Semi-Conductor
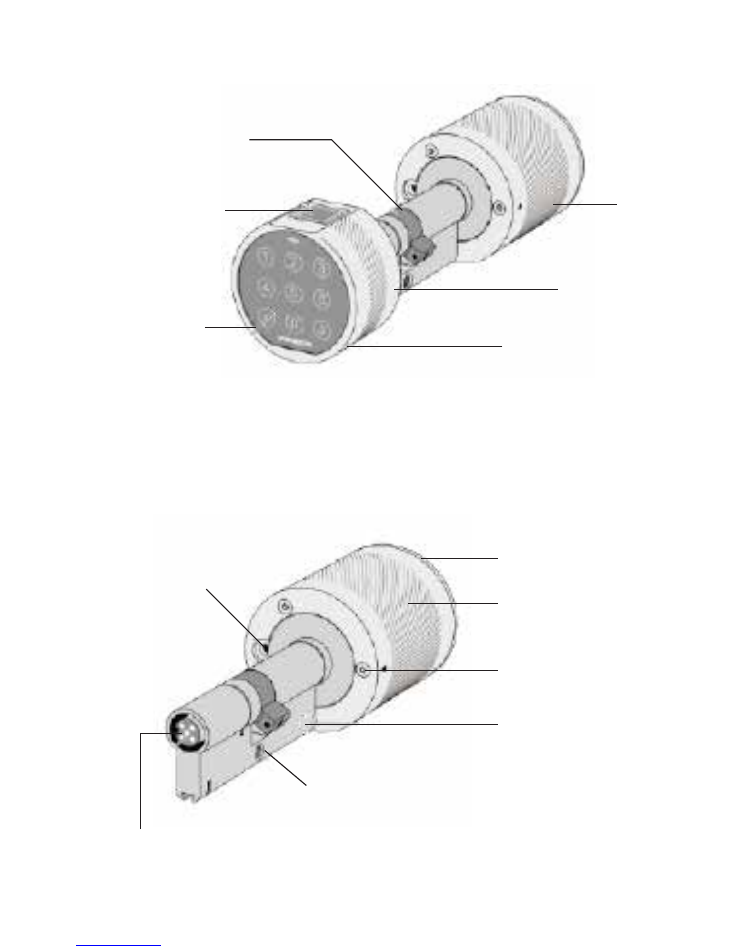
Fingerprint
Collector
Password
Keyboard
Inner
Knob
Outer
Knob
Emergency
Power Supply
Interface
Back Cover Of
Inner Knob
Inner Knob Case
Triangle Mark
Fixing Screw Hole
Regulating Screw
Adjusting Hole
Outer Knob Touch Points
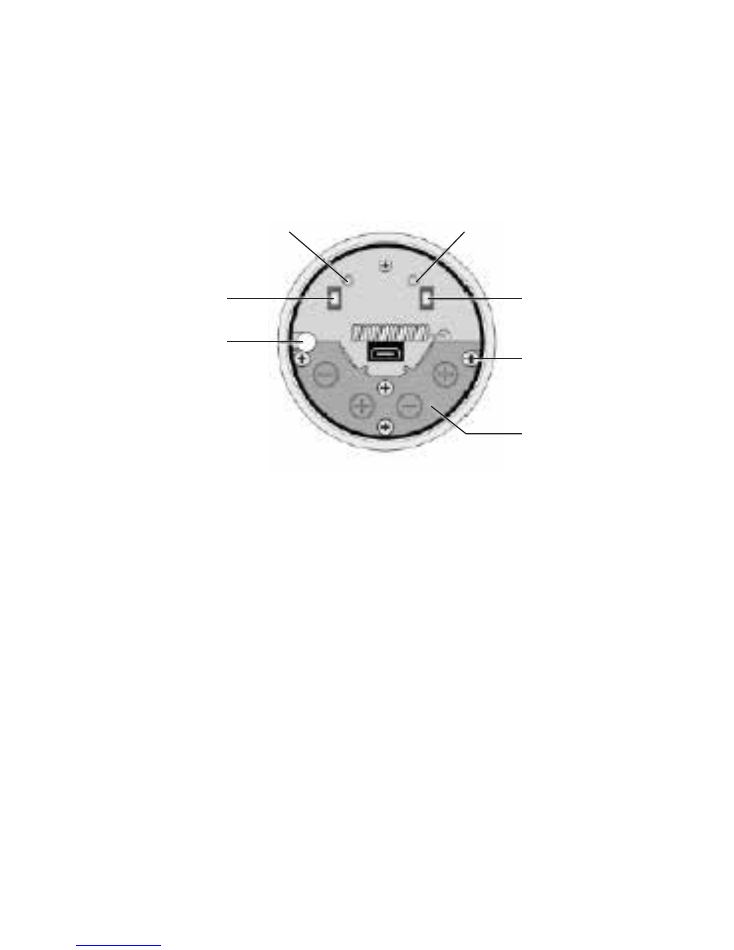
L2
Network Key
Screw x 4
Battery Cover
Recovery
Key
L1
Adjusting Hole
(in lock body)

1. Lock and Unlock Function
a.
To Unlock: At the door, enter the correct fingerprint or
password, then turn the outer knob to open the door lock
until you hear
“Welcome home”
after a successful verifi-
cation. Five seconds later, the outer knob automatically
recovers to idle state so that the door can't be unlocked.
b.
On Exit: At the door, enter the correct fingerprint or
password, then turn the outer knob to double lock the
door until you hear
“Bon voyage”
after a successful
verification. Five seconds later, the outer knob automati-
cally recovers to idle state so that the door can't be
unlocked. The Door is successfully locked
2. Tamper Alarm Function
If the outer case of the lock body is removed or opened
forcibly, the lock cylinder will give off a high-pitched alarm
sound.
3. Random Password Function
Input random numbers before or after the correct pass-
word to prevent malicious theft.
Part1:
Functions

5. Pseudo Password Function
a.
When a wrong password is input continuously five
times, the keypad will be automatically locked for three
minutes. It will not recognize any password during that
period, but the correct fingerprint can be entered to
remove the locked password.
6. Thief-Proof Function
a.
Protect Mode: At the door, long press the “#” key for
two seconds after successful verification until you hear
“On Protection”.
b.
When a wrong fingerprint is input continuously five
times, the keypad will automatically be locked for three
minutes. It will not recognize any fingerprint during that
period, but the correct password can be entered to
remove the locked fingerprint.
b.
Unprotect: At the door, if the fingerprint / password is
verified successfully, the protection is lifted.
If the door is opened under protection mode, the lock
cylinder gives off a high-pitched alarm.
4. Touch Function
A touch sensor on the password keyboard and fingerprint
contact offer a more comfortable user experience.
7. Voice Prompt
Voice prompts
“Welcome home”
and
“Bon Voyage”
can
be heard every time the door unlocks. These can be
turned off in the setting menu.
8. Low-Voltage Alarm
When the batteries are running down, it gives off a
warning prompt “low-voltage, please replace the battery
in time”.
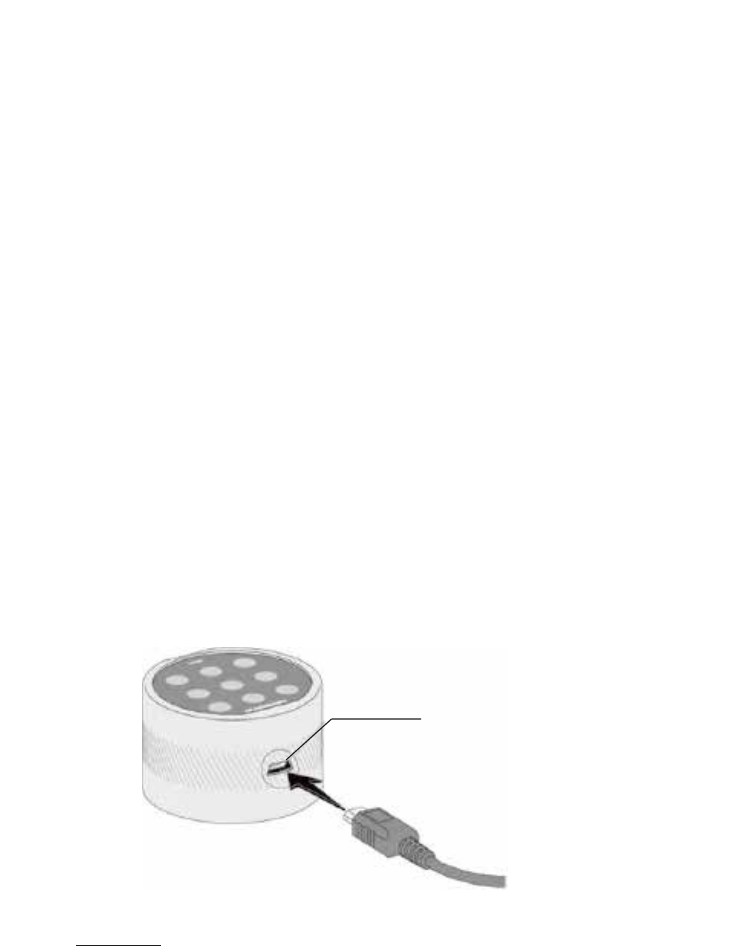
9. Emergency Power Supply
If the fingerprint or password fails to be recognized due to
a delayed replacement of batteries, connect the
Micro-USB interface on the outer knob with a portable
battery and then open the door normally. After that,
please replace the batteries in the lock cylinder immedi-
ately
Emergency
Battery Interface
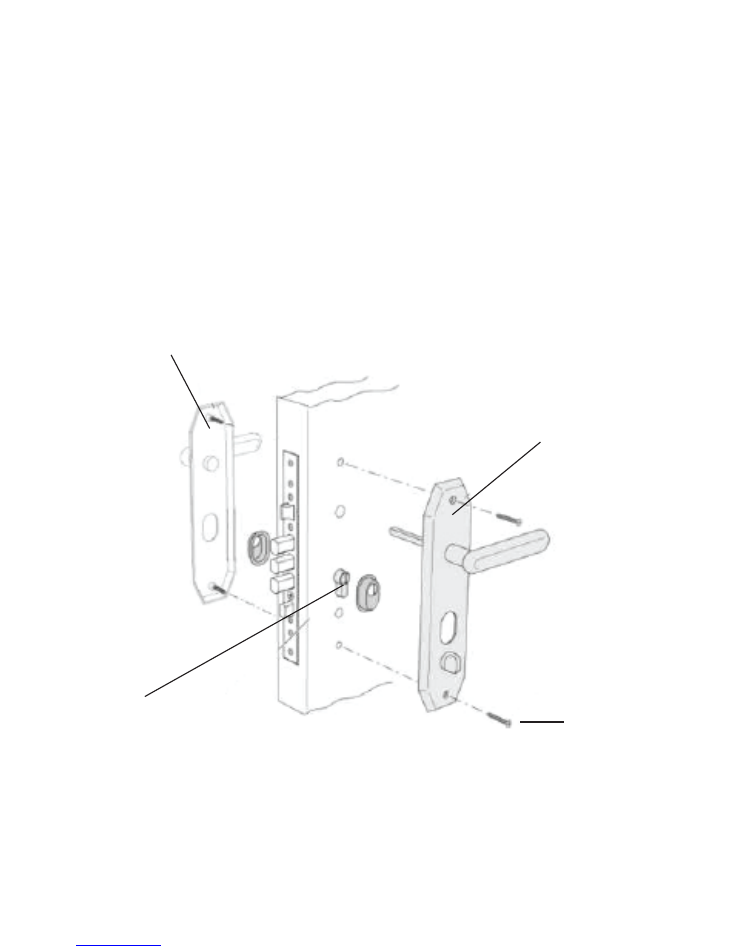
1: Remove the Original Lock Cylinder
Part2:
Installation
Using the screw driver, unfasten the screws from the
inside of the door and remove the panel and accessories.
Inner Plate
Outer Panel
Lock Cylinder
Screw
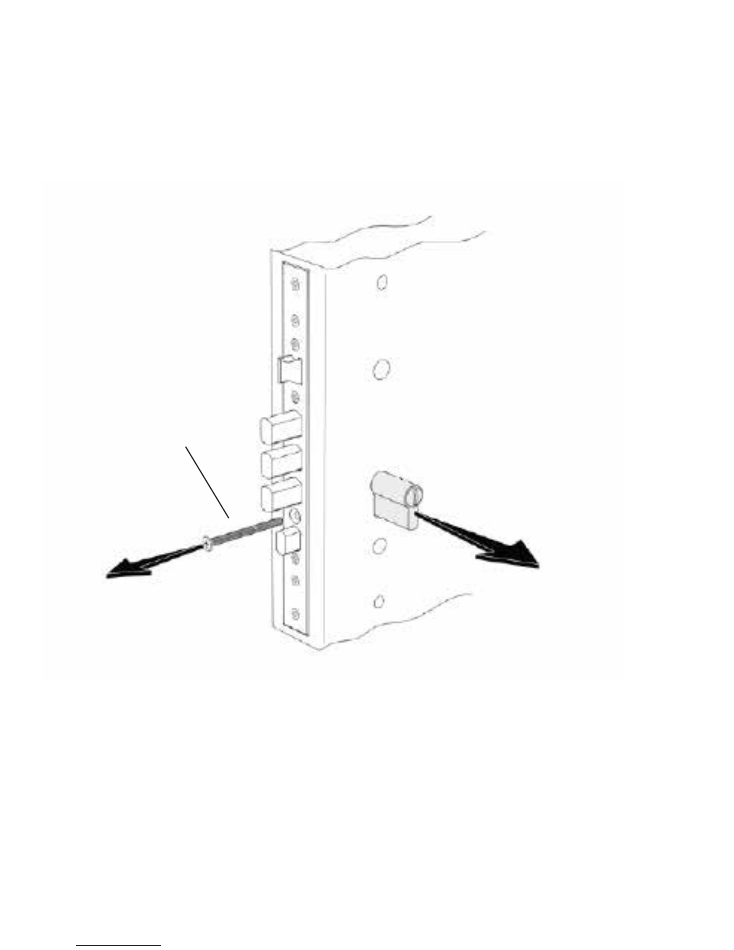
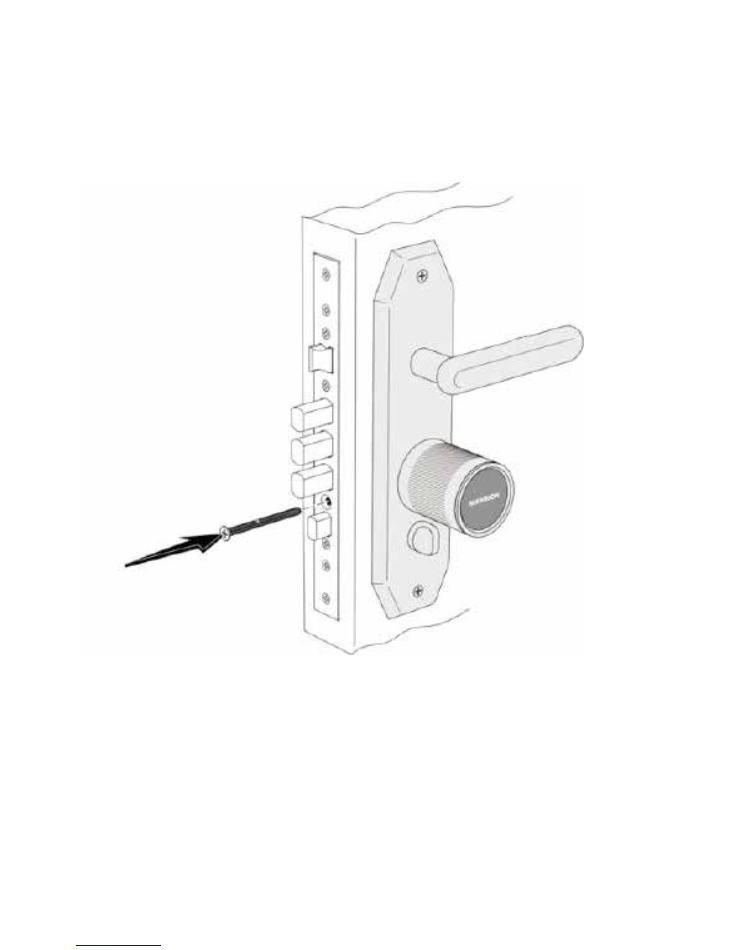
2.
Unfasten the screws to remove the lock cylinder from
the side of the door.
Screw
Note:
Insert the key into the lock cylinder and rotate to an
appropriate angle, then the lock cylinder can be removed.
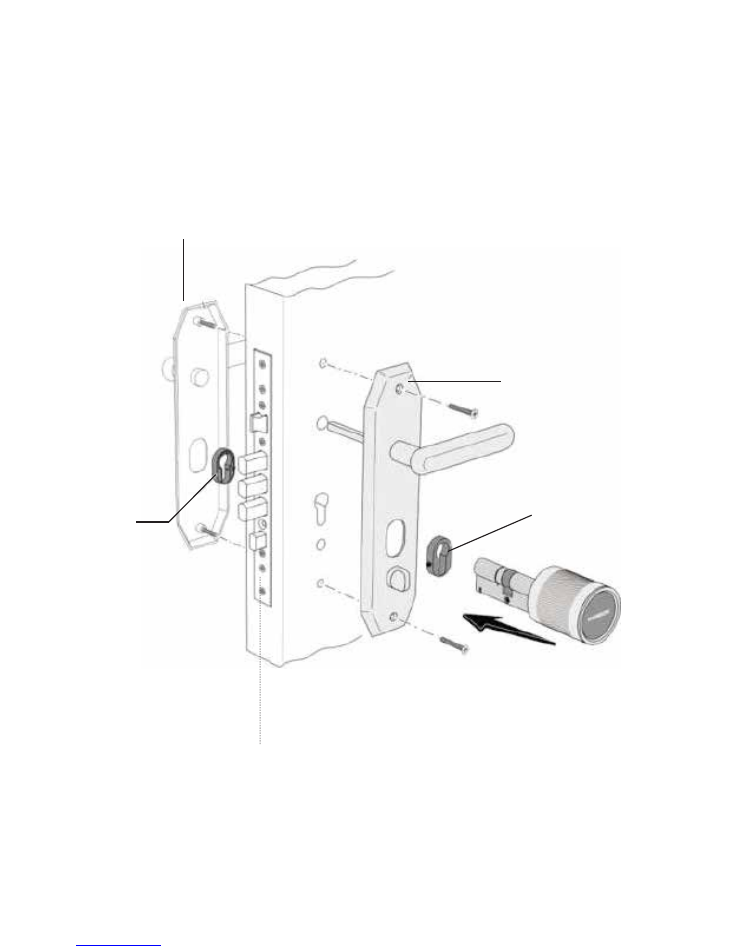
Installing the lock
1.
Fix on the original panel and install the lock cylinder of
iLock X2 from inside the door.
OUTSIDE
THE DOOR
INSIDE
THE DOOR
Outer Panel
Inner Panel
Lock
Case
Lock
Case
2.
Fix on the lock cylinder and fasten screws.
INSIDE THE DOOR
Screw
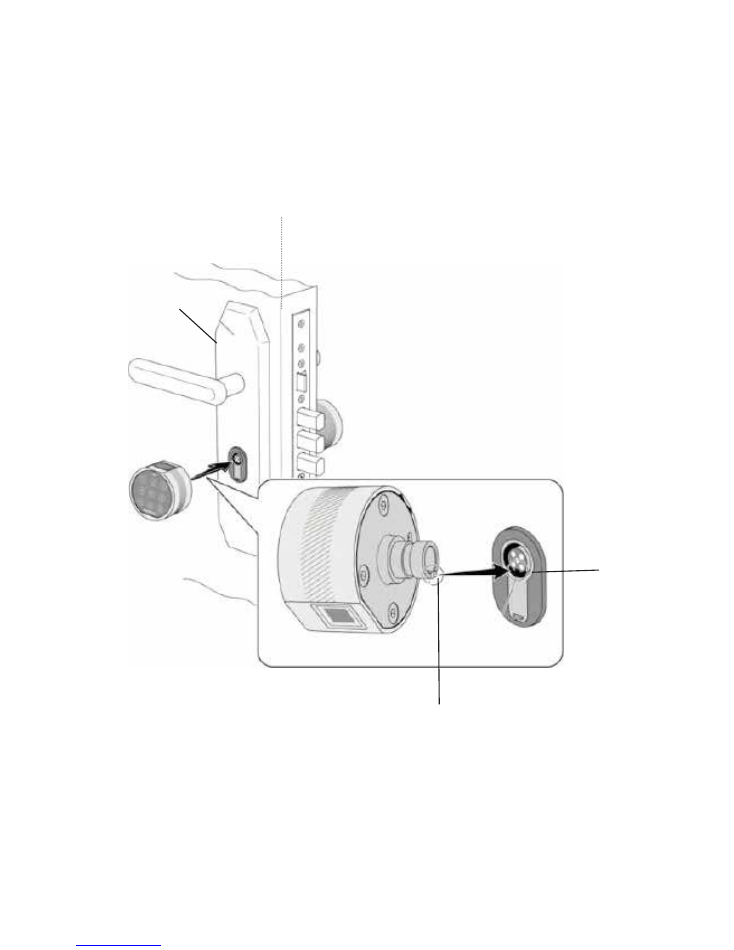
3.
Insert the outer knob into the lock cylinder from the
outside of the door.
OUTSIDE THE DOOR
INSIDE THE DOOR
Outer Panel
Convex Key
Mounting
Groove
Note:
Align the convex key on the outer knob with the mounting
groove in the lock cylinder.
4.
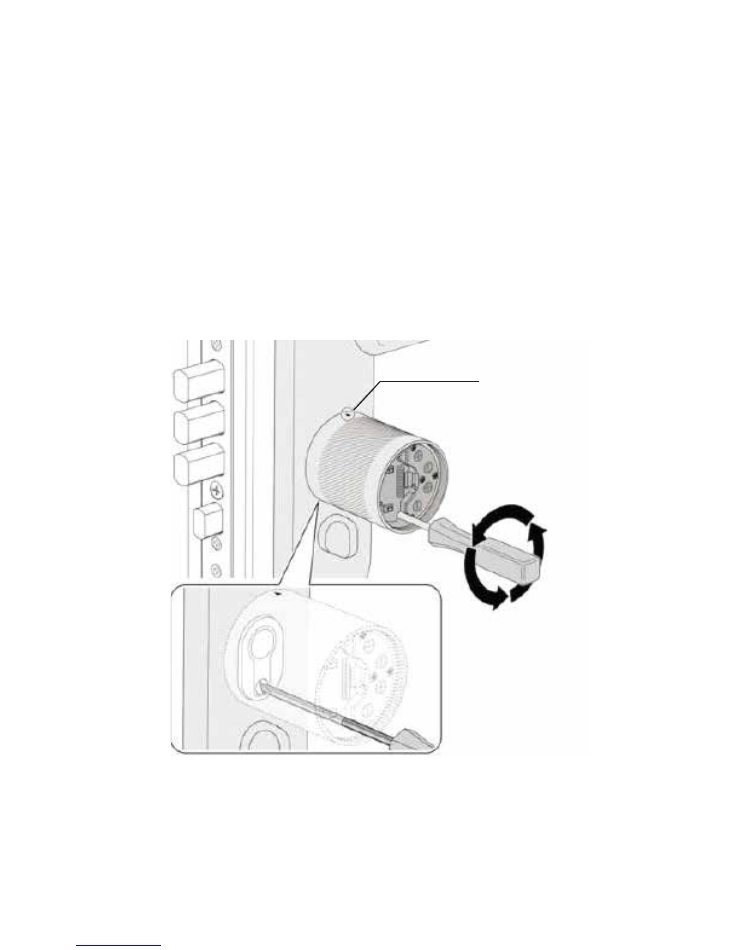
Fix on outer knob
a.
Rotate the triangle mark on the inner knob case to the north.
b.
Do not move the inner knob case, rotate the outer knob to
align the battery box with the adjusting hole on the case (as is
shown in figure)
c.
Insert a straight screwdriver into two adjusting holes and turn it
anticlockwise to fix on the outer knob.
Marker Line
Rotate the straight
screwdriver
anti-clockwise
Note:
Fasten the screw by rotating anticlockwise, while loosen-
ing in the opposite direction.
5. Battery Installation
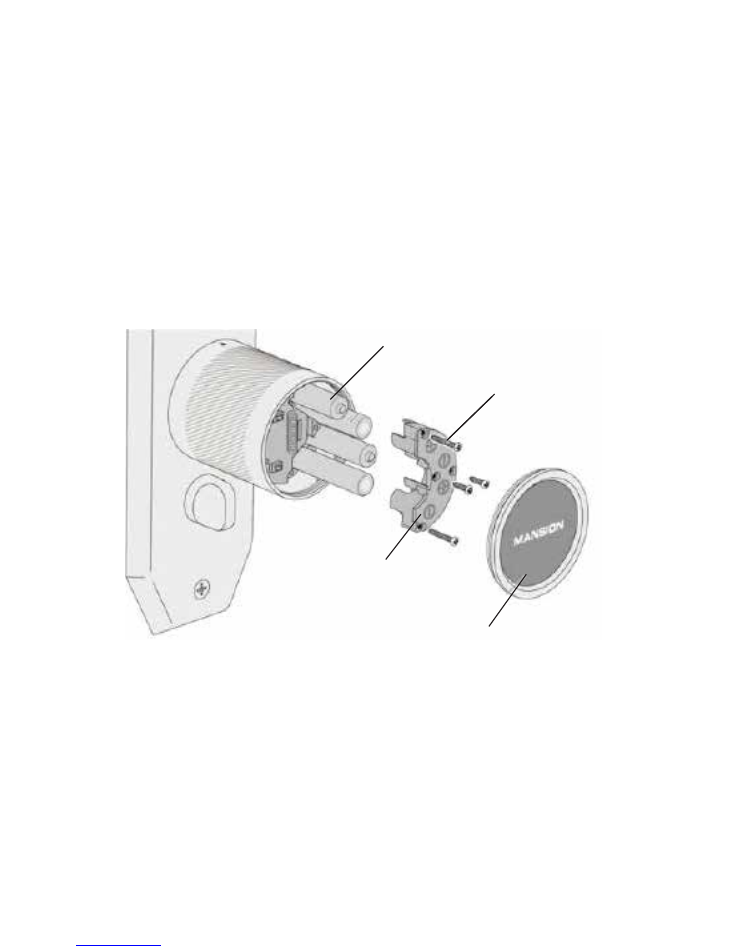
a.
Open the back cover of the inner knob.
b.
Use a cross screwdriver to unfasten four screws on the cover
of the battery box and remove the battery box.
c.
Put four AAA batteries in the battery box (pay attention to the
positive and negative electrode), then fasten the cover of the
battery box.
Cover Of
Inner Knob
Screw x 4
Cover Of
Battery Box
AAA Batteries x 4
Hardware of Mansion iLock X2 has been installed
completely. Congratulations!

Part3:
Lock Settings
a.
Touch the keyboard and press “#” key for three times
to enter into the setting state.
1. First Login
Any fingerprint or password cannot open the door in the
factory state, so please follow the following procedures to
log in for the first time:
b.
First input the initial password “0123456” and press the
“#” key for confirmation, you can hear a voice prompt
“please set up the first administrator password”
; then
input a password consisting of six to twelve digits, press
the “#” key for confirmation and input the same password
again. After that, you can enter into the main setting
menu and hear a voice prompt
“press 1, add fingerprint;
press 2, add password; press 3, delete user; press 4,
voice settings.”
c.
Press 1, 2, 3, 4 respectively to enter into the next level
menu, and exit after ten seconds without operation.
Note:
Press “ * ” key to exit or return to the previous menu.

2. Add Fingerprint
1.
Press the “#” key three times, input the administrator
fingerprint or password to enter into the main menu,
follow the voice prompt
“press 1, add fingerprint sub
menu”,
and then
“press 1, add administrator; press 2, add
ordinary user”.
Number the fingerprints or directly press
the “#” key following the voice prompt.
The system will automatically match the number. Input
fingerprints according to voice prompts. Note: press more
than five times after the voice prompt
“please press one
more time”
, the fingerprint system will inform the user of
successful enrollment. Otherwise, the system will require
“please press again”.
Please press the “*” key to return,
and re-input again following the steps above.
2.
The system can store a maximum of 100 fingerprints,
which are divided into the administrator fingerprint and
ordinary user fingerprint.
3.
In order to ensure proper registration and recognition,
please place the finger flat on the fingerprint collector
while enrolling and avoid using fingertip and finger side.

3. Add Password
1.
Press the “#” key three times, input the administrator
fingerprint or password to enter into the main menu,
follow the voice prompt “
press 2, add password sub
menu”
, and then
“press 1, add administrator; press 2, add
ordinary user”.
2.
Password length can vary from six to twelve digits
3.
The system can store 20 groups of passwords, which
can be divided into the administrator password and
ordinary user password.
4. Delete User
1.
Press the “#” key three times to input administrator
fingerprint or password to enter into the main menu,
follow the voice prompt
“press 3, delete user sub menu”
and then
“press 1, delete fingerprint; press 2, delete
password; press 3, delete fingerprint or password by
ordinal”
to delete enrolled users.
2.
Administrators can be deleted freely except for the last
one. Otherwise, the voice prompt will warn that “the only
administrator cannot be deleted”.

5. Voice Settings
Press the “#” key three times,
“input the administrator
fingerprint or password to enter into the main menu”
,
follow the voice prompt to press 4,
“press 1, voice setting
sub menu / turn the voice prompt on; press 2, turn the
voice prompt off”.
6. Thief Proof Settings
If the door is opened under protection mode, the lock
cylinder gives off a high-pitched alarm.
a.
Protect Mode: At the door, long press the “#” key for
two seconds after successful verification until you hear
“On Protection”.
b.
Unprotect: At the door, if the fingerprint / password is
verified successfully, the protection would be lifted.
7. Resetting Function
Long press the resetting button, you will hear a buzzer
every second as well as the prompt of
“resetting soon”
five seconds later. Press the “#” key for confirmation or
“+” key to exit, then press the “#” key, you will hear
“successful resetting”
.
Note:
After resetting, all user information will be emptied.

FAQ
1. What if the batteries run down?
iLock is powered by four AAA batteries, so if the batteries
are running down, it would give off an alarm to replace the
battery, but if you forget, a portable battery can be used
temporarily.
2. Can the lock identify accurately if my hands are
peeling or injured?
The broken fingerprint may affect the fingerprint recogni-
tion, so it is suggested that users enroll with their thumb,
forefinger and middle finger (little finger and the ring finger
are NOT allowed), so that, even if a finger is injured, users
can open the door with other fingers; alternately, if the
fingerprint is not recognized, users can use the password
to open the door as well.
3. Pseudo Password Function
a.
When a wrong password is input continuously five
times, the keypad will be automatically locked for three
minutes. It will not recognize any password during that
period, but the correct fingerprint can be entered to
remove the locked password.
b.
When a wrong fingerprint is input continuously five
times, the keypad will automatically be locked for three
minutes. It will not recognize any fingerprint during that
period, but the correct password can be entered to
remove the locked fingerprint.

®
Proteck Electronic Trading LLC.
Office # 705, Apricot Towers
Dubai Silicon Oasis - Dubai, UAE
+971-4-3929312
info@proteckglobal.com
For Technical Support
Call:
+971-4-3929312
Email:
info@eachgraincounts.com