Full Text Searchable PDF User Manual
STAIRCASE LOFT
BED
Assembly Instructions
Page 1 of 22
NE kids
2300 Prospect Dr. Christiansburg, VA 24073
www.ne-kids.com
NE
k i d s
Item No. 4090, 5090, 6090, 7090
1.
Follow the information on the warnings appearing on the upper bunk end structure and on the
carton. Do not remove warning label from bed.
2.
Always use the recommended size mattress or mattress support, or both, to help prevent
entrapment or falls.
3.
Surface of mattress must be at least 5 inches (127 mm) below the upper edge of guardrails.
4.
Do not allow children under 6 years of age to use the upper bunk.
5.
Prohibit more than one person on the upper bunk.
6.
Periodically, check and ensure that the guardrail, stairs, and other components are in their proper
position, free from damage, and that all connectors are tight.
7.
Do not allow horseplay on or under the bed and prohibit jumping on the bed.
8.
Always use the stairs for entering and leaving the upper bunk.
9.
Do not use substitute parts. Contact the manufacturer or dealer for replacement parts.
10.
Use of a nightlight may provide added safety precaution for a child using the upper bunk.
11.
Always use guardrails on both long sides of the upper bunk. If bunk bed will be placed next to the
wall, the guardrail that runs the full length of the bed should be placed against the wall to prevent
entrapment between the bed and wall.
12.
13. Keep these instructions for future reference.
!
!
STRANGULATION HAZARD
Never attach or hang items to any part of the bunk bed that are not designed for use with the bed;
including, but not limited to, hooks, belts and jump ropes
SIZE OF MATTRESS AND FOUNDATION
SAFETY WARNINGS
SAFETY FIRST!
All of NE kid’s Bunkbeds were
designed and manufactured with
your child’s safety as our top
priority.
Their unparalleled strength is a
bi-product of the safety design.
Our bunks meet all compliance
with ASTM F 1427-07 “Standard
for Bunk Beds” and Code of
Federal Regulations (CFR) 1213
“Safety Standards for Entrapment
Hazards in Bunk Beds” and
(CFR) 1513 “Requirements for
Bunk Beds”.
Safety is a cooperative effort
between us as the manufacturer,
and you as a guardian.
Please
read and consider the
warnings listed on this page
when choosing a mattress and
discussing rules of use with your
child.
REPLACEMENT PARTS
Replacement parts, including
additional guardrails, may be
obtained from any of
NE kids’
dealers.
Use only mattress, foundation and deck combined which is 74-75 inches long and 37 ½-38 ½ inches
wide on twin upper bunk or 53-54 inches wide on full upper bunk. Ensure thickness of mattress and
foundation combined does not exceed 8 inches and the mattress is at least 5 inches below upper edge
of guardrails
Page 2 of 22
NE kids
2300 Prospect Dr. Christiansburg, VA 24073
www.ne-kids.com
NE
k i d s
Enclosed please
simple step-by-step
instructions to help you quickly assemble
your product.
Before you begin we recommend
that you follow the steps below:
Please read the instructions thoroughly
Identify all parts and hardware
Gather the tool(s) necessary
2 adults required for assembly
To protect your parts
during assembly please
place them on a soft surface.To clean surface use
only water on a damp cloth. Do not use window
cleaners or cleaning abrasives as it will scratch
the surface and could damage the protective
coating.
CUSTOMER SUPPORT
If you are missing parts or need assistance with
your product, please contact the retailer from
whom you purchased the product. When you
call or email, please include the Product’s Item
Number and PO Number which is located on
the Production Tracking Sticker. This sticker can
be found on the bottom, inside or back of your
product.
1.
2.
3.
4.
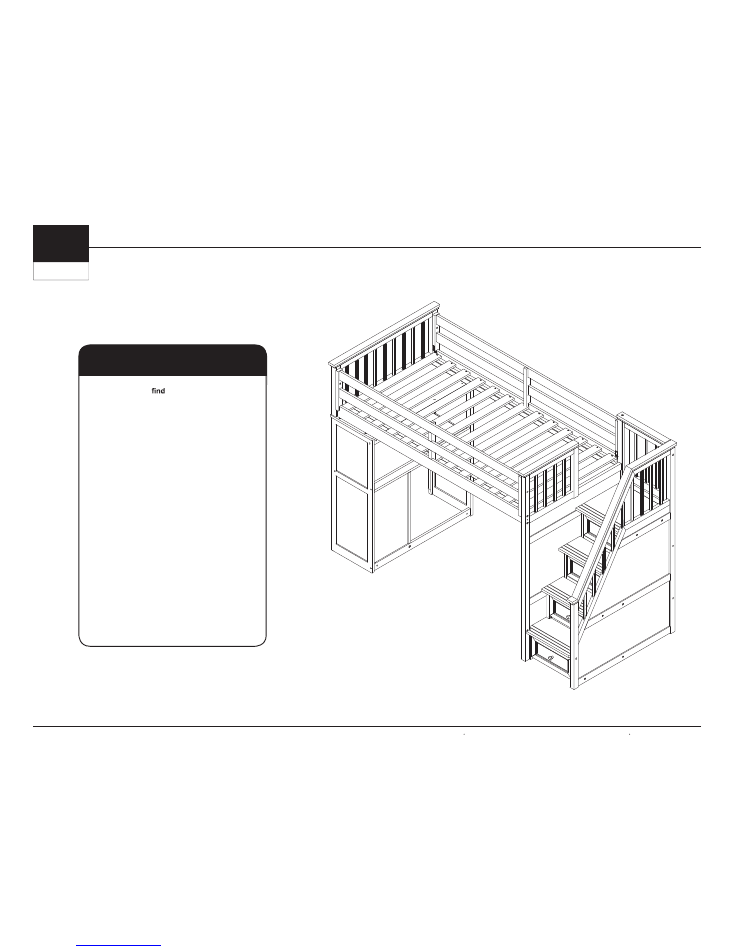
INTRODUCTION
STAIRCASE LOFT
BED
Item No. 4090, 5090, 6090, 7090
Assembly Instructions
Fully Assembled
Staircase Loft

STAIRCASE LOFT BED -
Assembly
Instructions
NE kids
2300 Prospect Dr. Christiansburg, VA 24073
www.ne-kids.com
NE
k i d s
Page 3 of 22
J
16mm Screws
X
8
Allen Wrench
X
1
K
L
M
N
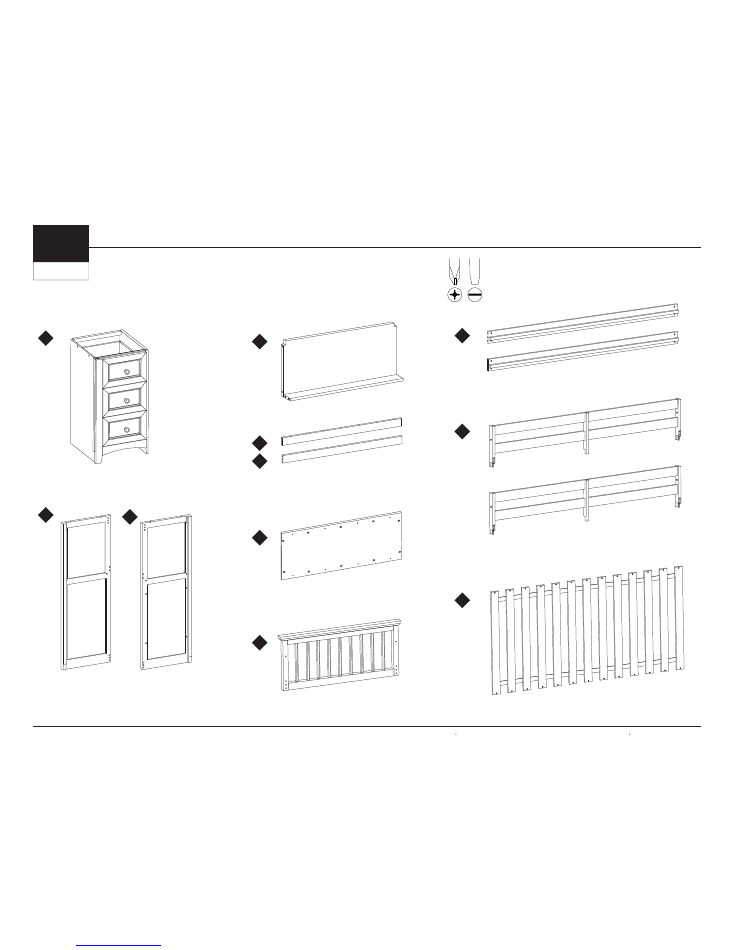
PARTS
LIST
Outer Staircase Support Panel
X
1
Back Staircase Support Panel
X
1
H
30mm Screws
X
26
1
2
3
4
Toy Box Top Support
X
1
Toy Box Side Supports
X
2
Toy Box Front
X
1
Toy Box Back
X
1
Toy Box Sides
X
2
Toy Box Bottom
X
1
7
8
9
10
5
6
C
60mm Bolts
X
20
F
Barrel Nuts
X
26
D
40mm Bolts
X
34
19mm Bolts
X
2
T-Nuts
X
2
A
110mm Bolts
X
2
B
90mm Bolts
X
8
G
ų
8 x 40mm Wood Dowels
X
12
E
45mm Screws
X
4
I
25mm Screws
X
2
Inner Staircase Support Panel
X
1
Staircase/Drawers
X
1
ų
10 x 40mm Wood Dowels
X
4
STAIRCASE LOFT BED -
Assembly
Instructions
NE kids
2300 Prospect Dr. Christiansburg, VA 24073
www.ne-kids.com
NE
k i d s
Page 4 of 22
PARTS
LIST (CONTINUED)
Desk Cabinet
X
1
Left & Right Desk Hutch Side Panels
X
1
Desk top
X
1
Desk Hutch Back Supports
X
1
(of each type)
Desk Hutch Top Panel
X
1
Headboard
X
1
Bed Side Rails
X
2
Guard Rails
X
2
Set of Slats
X
1
11
12
13
15
16
17
18
19
20
21
22
Other Tools Required
(Not Included)
ȑ
Phillips Screwdriver
ȑ
Flathead Screwdriver
Top
Bottom
STAIRCASE LOFT BED - Assembly Instructions
NE kids
2300 Prospect Dr. Christiansburg, VA 24073
www.ne-kids.com
NE
k i d s
Page 5 of 22
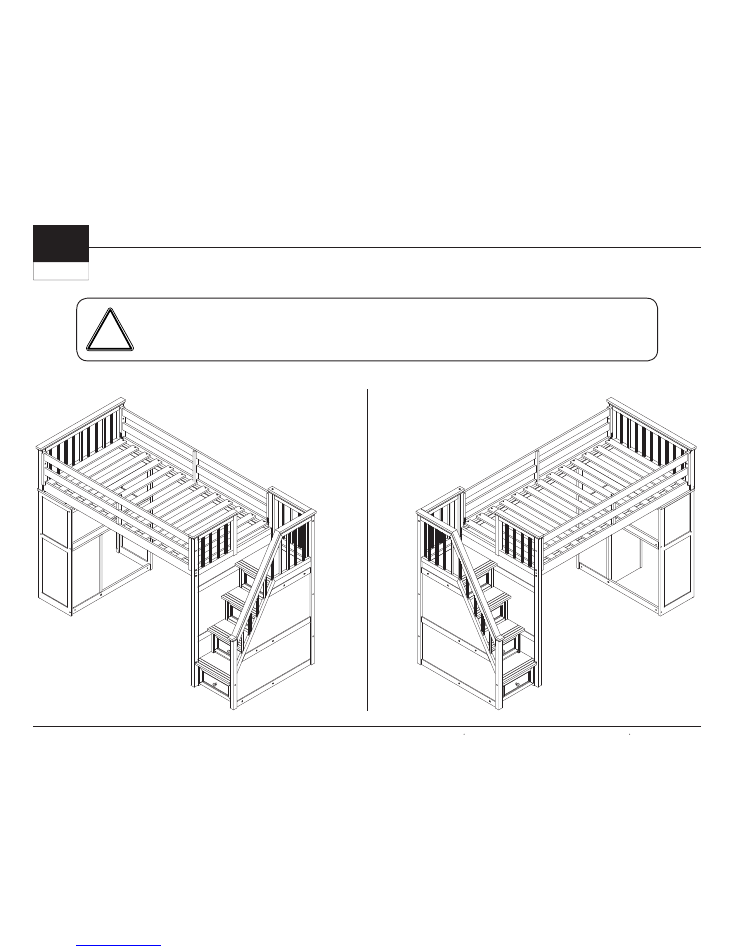
For
right-hand
side Staircase
assembly, please start at
Step 1
on
Page 6.
For
left-hand
side Staircase
assembly, please skip to
Step 1A
on
Page 9.
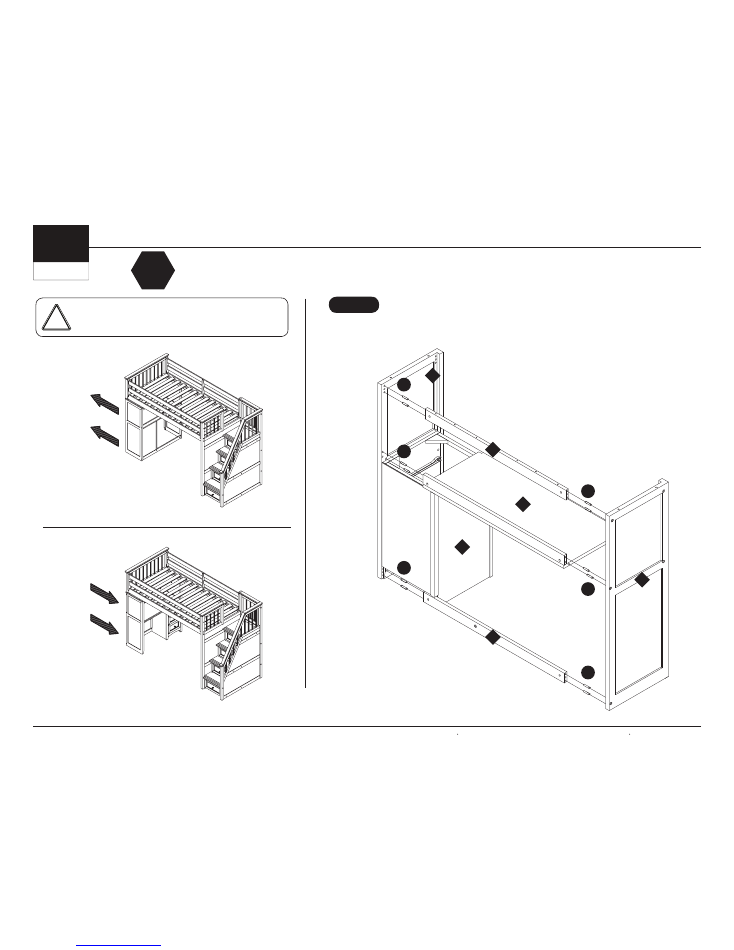
NOTE:
Before beginning assembly, decide exactly where the bed is to be placed
and on which ends you would like the the Desk and Staircase. Both the Staircase
and Desk can be placed at either end and reversed. See below.
!

STAIRCASE LOFT BED - Assembly Instructions
NE kids
2300 Prospect Dr. Christiansburg, VA 24073
www.ne-kids.com
NE
k i d s
Page 6 of 22
STEP
1
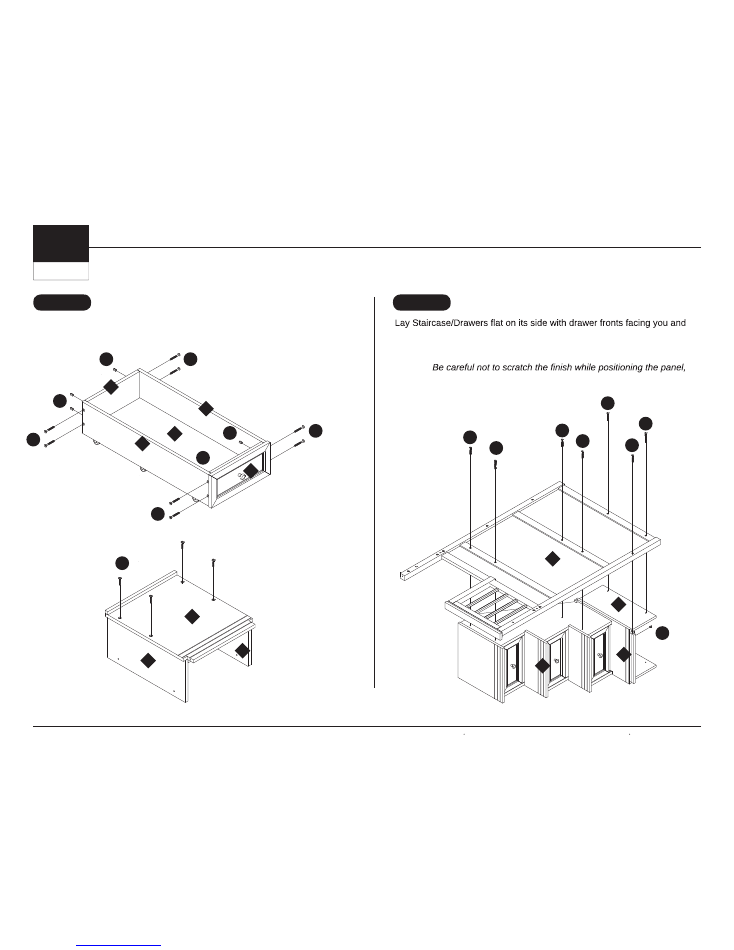
STEP
2
Assemble Toy Box and Support.
Steps 1-5: Right-hand Staircase assembly
the top facing right. Put Toy Box Support in place with the lip catching the
notch at the bottom of Staircase as shown. Gently lower and attach In
-
ner Staircase Support Panel making sure to align the open side with the
top stair.
this damage would not be covered under the warranty. We recommend
two adults for this step.
7
7
7
8
9
9
10
5
6
6
C
C
C
C
F
F
F
F
F
D
D
D
D
D
D
D
4
3
B
STAIRCASE LOFT BED - Assembly Instructions
NE kids
2300 Prospect Dr. Christiansburg, VA 24073
www.ne-kids.com
NE
k i d s
Page 7 of 22
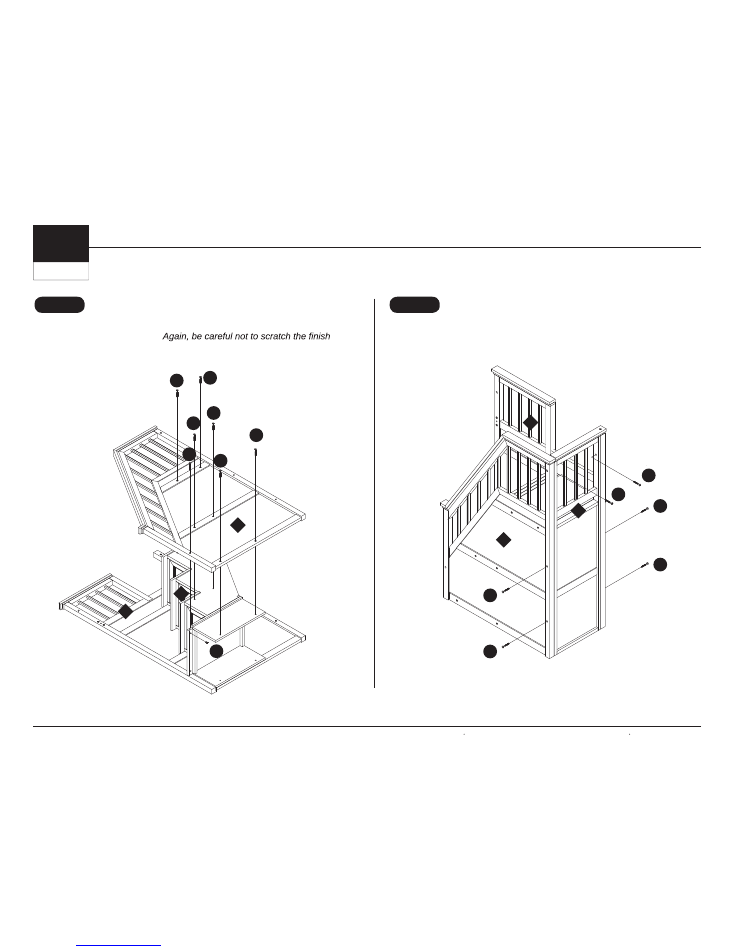
STEP
3
STEP
4
Turn partially assembled Staircase over then gently lower and attach the
Outer Staircase Support Panel.
while positioning the panel, this damage would not be covered under the
warranty. We recommend two adults for this step.
Stand Staircase upright and attach Back Staircase Support Panel.
D
D
D
D
D
D
D
D
F
1
1
4
2
3
3
C
C
C
C
B

STAIRCASE LOFT BED - Assembly Instructions
NE kids
2300 Prospect Dr. Christiansburg, VA 24073
www.ne-kids.com
NE
k i d s
Page 8 of 22
STEP
5
With two adults
, lift the Staircase into desired position.
Skip to
Step 6
on
Page 11
STAIRCASE LOFT BED - Assembly Instructions
NE kids
2300 Prospect Dr. Christiansburg, VA 24073
www.ne-kids.com
NE
k i d s
Page 9 of 22
Assemble Toy Box and Support.
7
7
8
9
9
10
5
6
C
C
C
C
F
F
F
F
D
the top facing left. Put Toy Box Support in place with the lip catching the
notch at the bottom of Staircase as shown. Gently lower and attach In
-
ner Staircase Support Panel making sure to align the open side with the
top stair.
this damage would not be covered under the warranty. We recommend
two adults for this step.
7
6
F
D
D
D
D
D
D
4
3
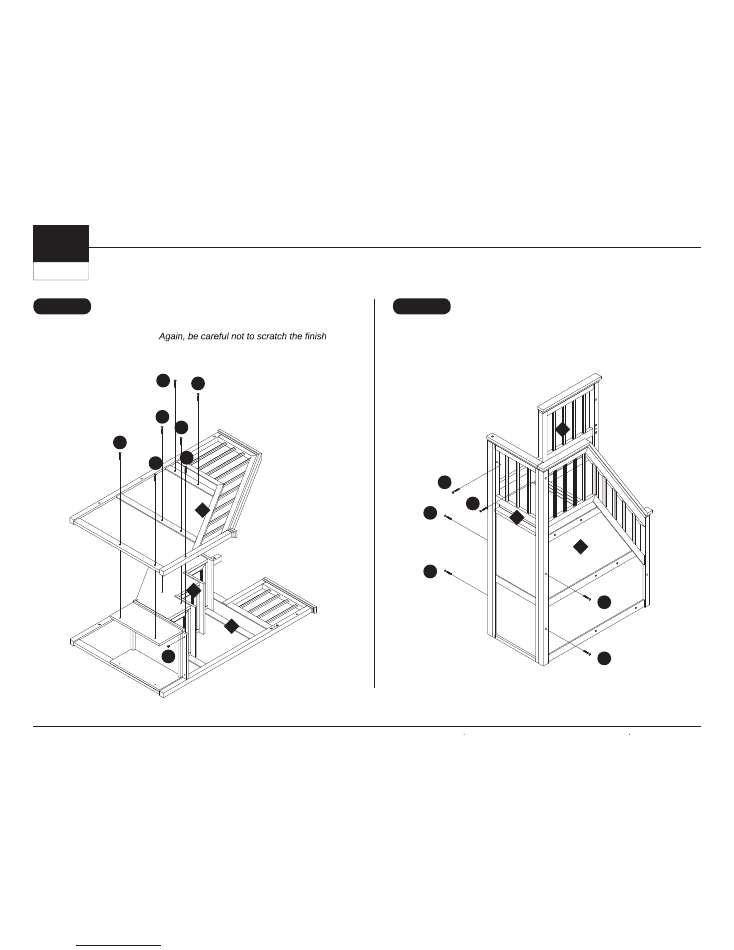
STEP
1A
STEP
2A
Steps 1A-5A:
Left
-hand Staircase assembly
B
STAIRCASE LOFT BED - Assembly Instructions
NE kids
2300 Prospect Dr. Christiansburg, VA 24073
www.ne-kids.com
NE
k i d s
Page 10 of 22
Turn partially assembled Staircase over then gently lower and attach the
Outer Staircase Support Panel.
while positioning the panel, this damage would not be covered under the
warranty. We recommend two adults for this step.
Stand Staircase upright and attach Back Staircase Support Panel.
D
D
D
D
D
D
D
D
F
1
1
4
2
3
3
C
C
C
C
STEP
3A
STEP
4A
B
STAIRCASE LOFT BED - Assembly Instructions
NE kids
2300 Prospect Dr. Christiansburg, VA 24073
www.ne-kids.com
NE
k i d s
Page 11 of 22
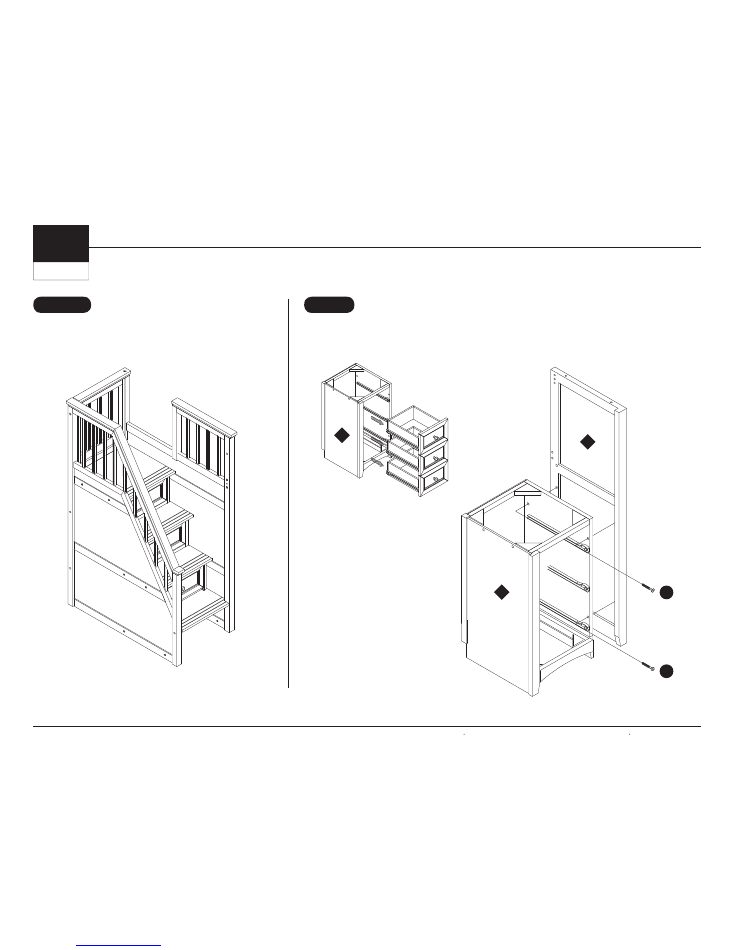
STEP
6
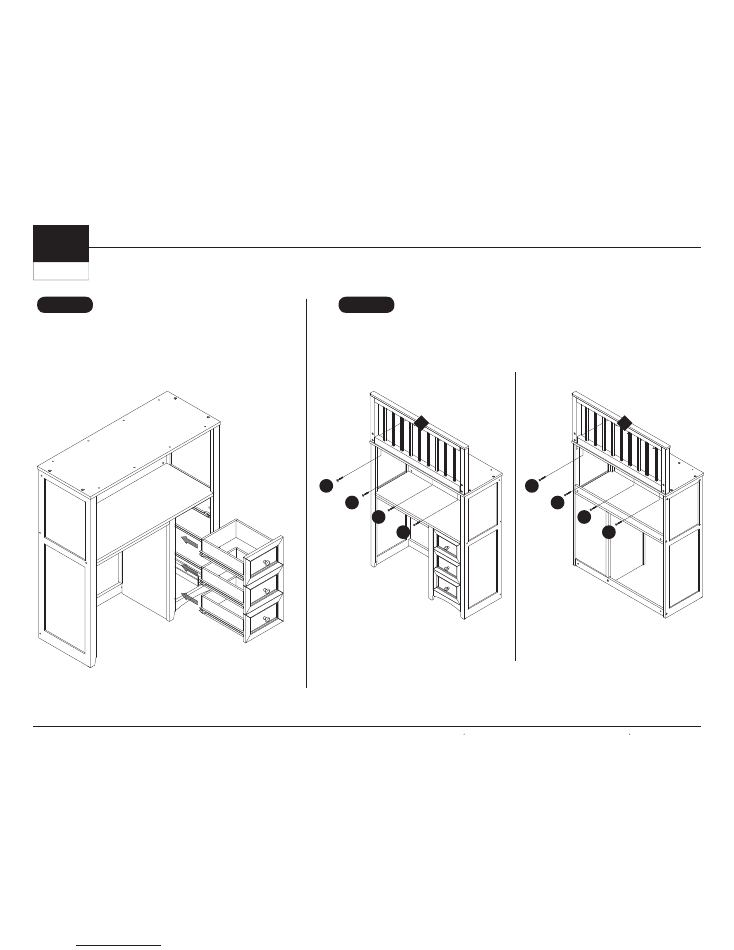
Remove drawers from Desk Cabinet before proceeding, then attach Right
Desk Hutch Side Panel.
11
Steps 6-10: Desk Hutch assembly
With two adults
, lift the Staircase into desired position.
STEP
5A
D
D
11
13
X
2
X
2
STAIRCASE LOFT BED -
Assembly Instructions
NE kids
2300 Prospect Dr. Christiansburg, VA 24073
www.ne-kids.com
NE
k i d s
Page 12 of 22
STEP
7
Fit Desk Hutch Back Supports, Desk Top, and
Left Desk Hutch Side Panel together using wood
dowels(12).
11
13
12
15
16
17
G
G
G
G
G
G
For
outside-facing
Desk
assembly, please continue with
Step 7
on
This Page.
For
inside-facing
Desk
assembly, please skip to
Step 7A
on
Page 15.
NOTE:
Before continuing assembly, decide whether
you would like the Desk to be
outside-facing
or
inside-facing
and follow instructions below .
!
Steps 7-9: Outside-facing Desk assembly
If you purchase this loft with the Chest End or as a bunk,
skip to those instructions now.
STOP
STAIRCASE LOFT BED -
Assembly
Instructions
NE kids
2300 Prospect Dr. Christiansburg, VA 24073
www.ne-kids.com
NE
k i d s
Page 13 of 22
Page 13 of 22
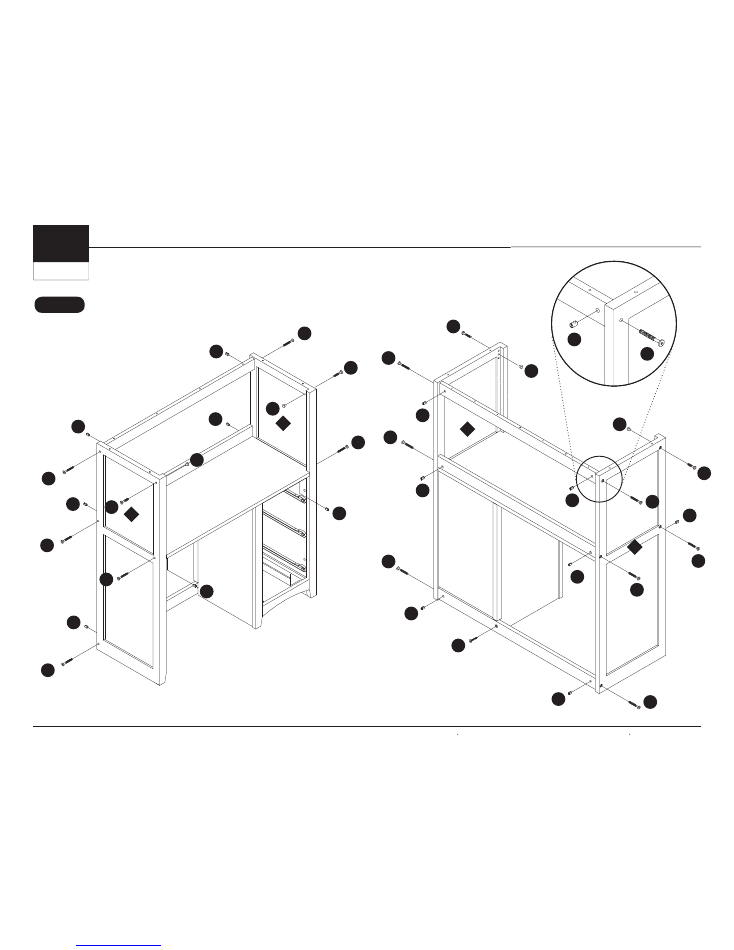
STEP
8
Secure Desk Hutch Side Panels
and Back Supports as shown.
FRONT VIEW
REAR VIEW
C
C
C
C
C
C
K
K
K
K
C
C
C
C
C
C
C
C
F
F
F
F
F
F
F
F
F
F
F
F
F
F
F
E
13
13
12
12
L
L
L
L
STAIRCASE LOFT BED - Assembly Instructions
NE kids
2300 Prospect Dr. Christiansburg, VA 24073
www.ne-kids.com
NE
k i d s
Page 14 of 22
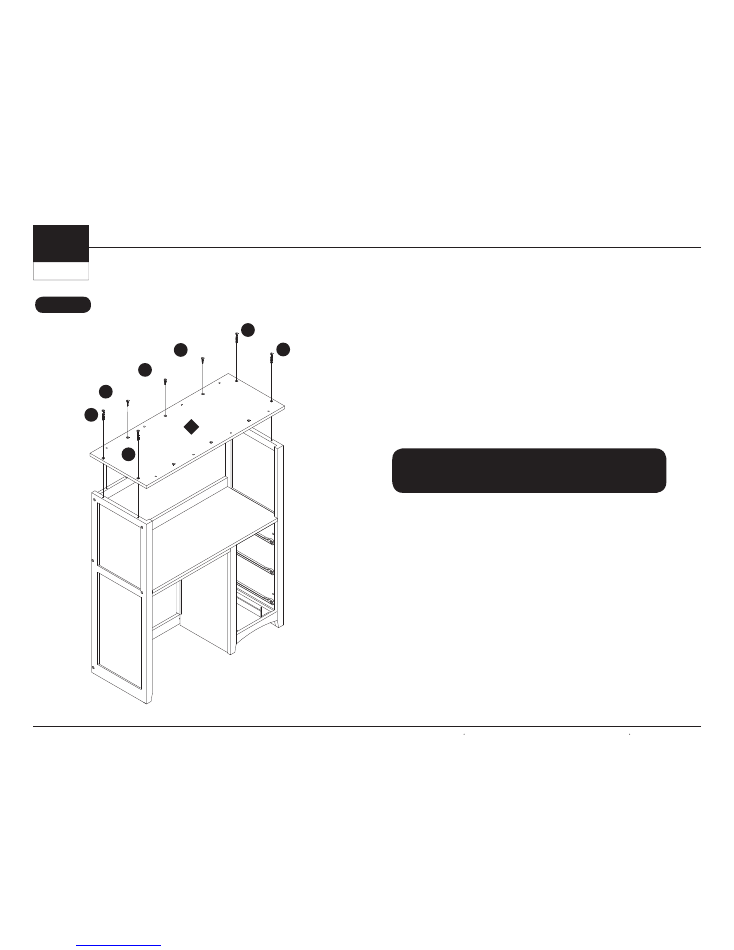
STEP
9
Attach Desk Hutch Top Panel.
D
D
D
D
E
E
E
Skip to
Step 10
on
Page 16
18
STAIRCASE LOFT BED -
Assembly
Instructions
NE kids
2300 Prospect Dr. Christiansburg, VA 24073
www.ne-kids.com
NE
k i d s
Page 15 of 22
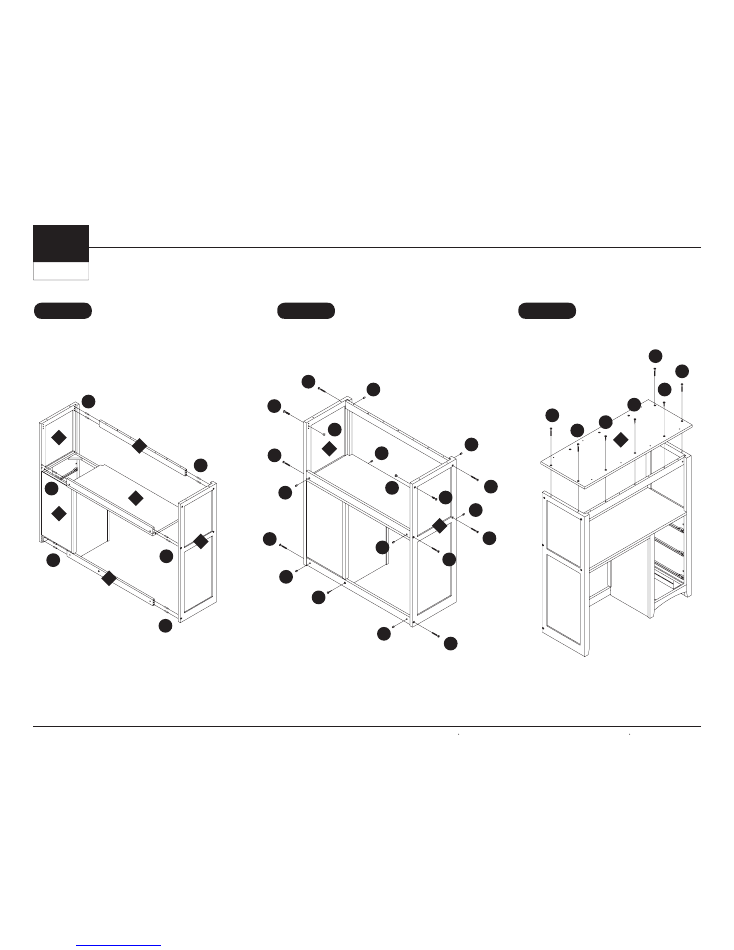
Steps 7A-9A: Inside-facing Desk assembly
STEP
7A
STEP
8A
STEP
9A
Fit Desk Hutch Back Supports, Desk Top, and
Left Desk Hutch Side Panel together using
wood dowels(12).
Secure Desk Hutch Side Panels and Back
Supports as shown.
Attach Desk Hutch Top Panel.
11
13
12
15
16
17
G
G
G
G
G
G
C
C
C
C
C
C
C
F
F
F
F
F
F
F
F
E
13
12
D
D
D
D
E
E
E
K
K
L
L
18
STAIRCASE LOFT BED - Assembly Instructions
NE kids
2300 Prospect Dr. Christiansburg, VA 24073
www.ne-kids.com
NE
k i d s
Page 16 of 22
STEP
11
Attach Headboard to the top of the Desk Hutch.
D
D
D
D
D
D
D
D
Steps 11-14: Upper Bed assembly
STEP
10
With two adults
, move the Desk Hutch into position
then replace the drawers.
For
inside-facing
Desk assembly
For
outside-facing
Desk assembly
19
19
STAIRCASE LOFT BED -
Assembly
Instructions
NE kids
2300 Prospect Dr. Christiansburg, VA 24073
www.ne-kids.com
NE
k i d s
Page 17 of 22
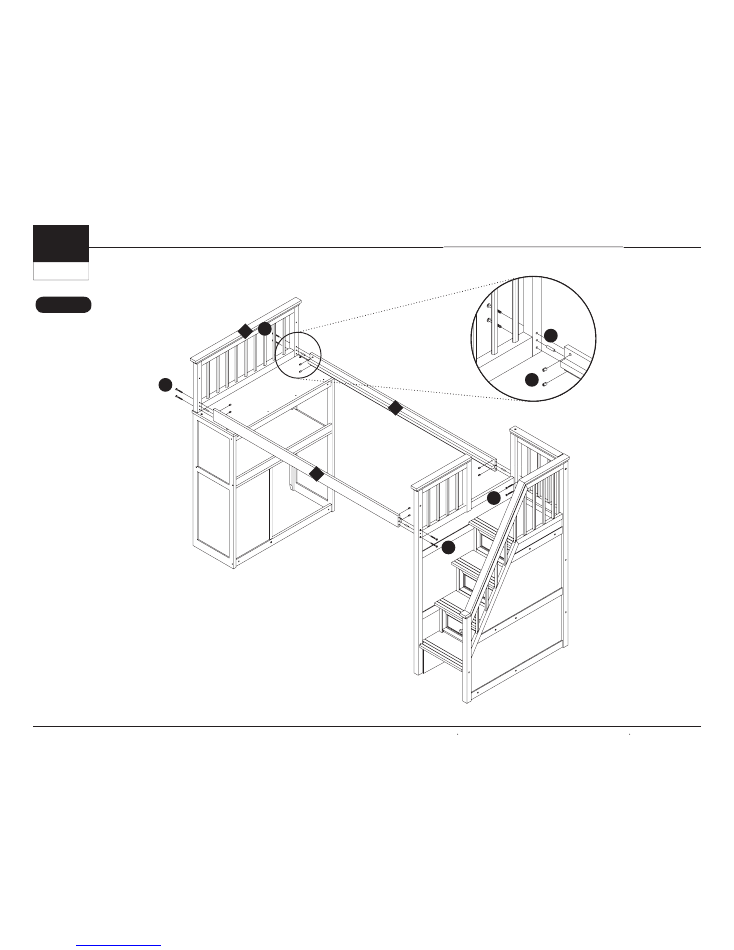
STEP
12
Attach Headboard/Desk
Hutch, Bed Side Rails and
Staircase.
F
A
M
B
B
B
Detail for all four corners
20
20
19
STAIRCASE LOFT BED - Assembly Instructions
NE kids
2300 Prospect Dr. Christiansburg, VA 24073
www.ne-kids.com
NE
k i d s
Page 18 of 22
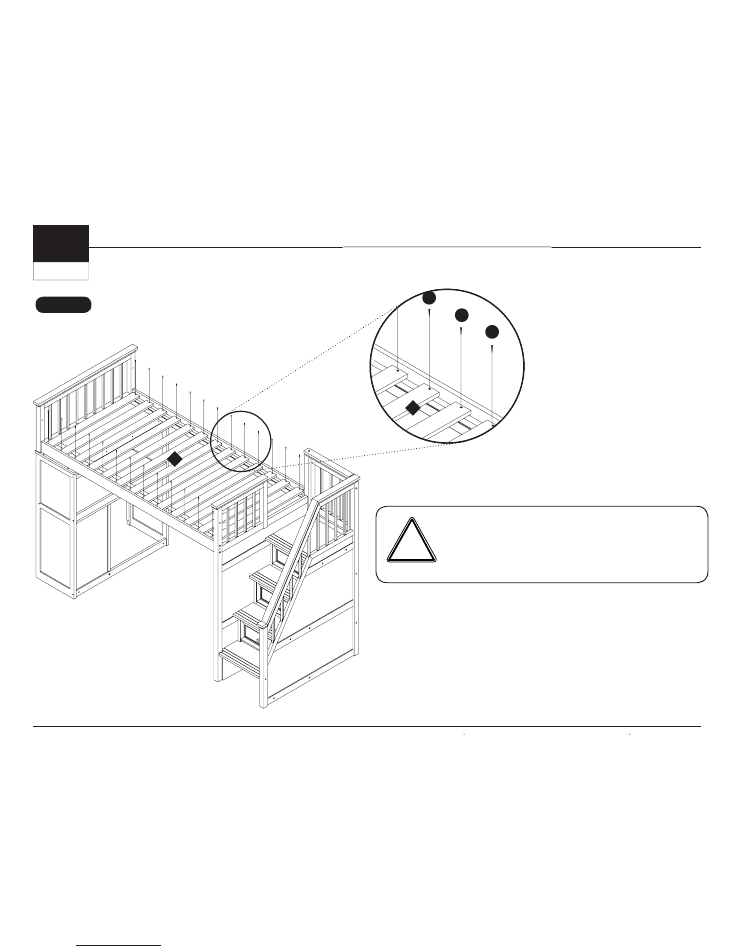
STEP
13
Lay slat roll between side rails and screw in slats to slat support as
indicated. Make sure rails are pulled into slats prior to screwing in place.
To help prevent serious or fatal injuries
SCREW
BOTH
SIDES
OF EACH SLAT TO THE SLAT SUPPORT.
Failure to do so
could result in the collapse of the entire slat roll,
and will void
your warranty.
WARNING
!
Attach Slats.
H
H
H
22
22
STAIRCASE LOFT BED - Assembly Instructions
NE kids
2300 Prospect Dr. Christiansburg, VA 24073
www.ne-kids.com
NE
k i d s
Page 19 of 22
Pa
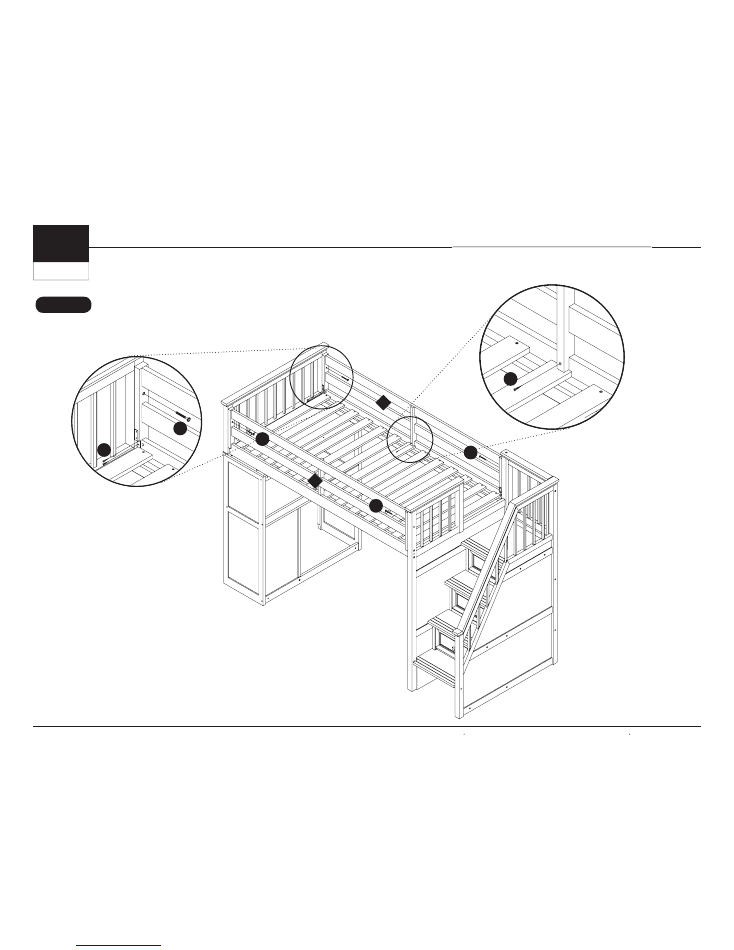
STEP
14
Attach Guard Rails.
Detail for all four corners
Detail for both sides
D
D
D
D
J
I
21
21
STAIRCASE LOFT BED - Assembly Instructions
NE kids
2300 Prospect Dr. Christiansburg, VA 24073
www.ne-kids.com
NE
k i d s
Page 20 of 22
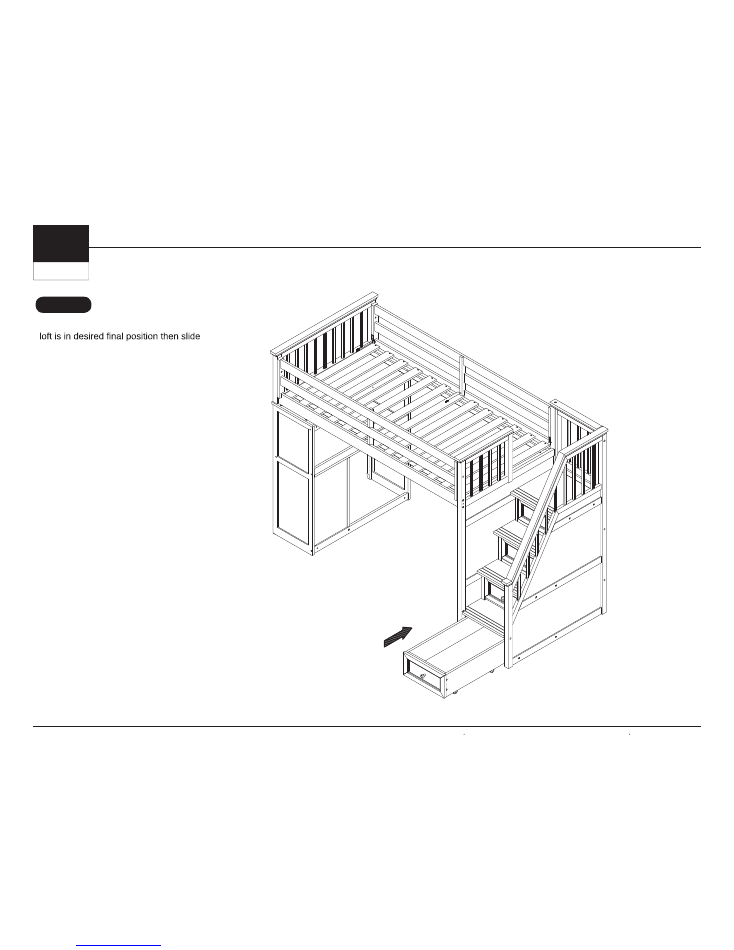
STEP
15
With at least two adults, make sure the
the Toy Box into place.
NE kids
2300 Prospect Dr. Christiansburg, VA 24073
www.ne-kids.com
1.
Do not allow climbing on any dresser/chest.
2.
Do not leave drawers open when not in use.
3.
Do not allow standing in drawers.
4.
Do not allow hanging from drawers.
5.
Do not allow standing on top of dresser/
chest.
6.
Do not place heavy objects in drawers.
7.
Do not place heavy objects on top of the
Dresser/chest which can be pulled down on
top of your child.
8.
To avoid head injury, do not allow your child
to play underneath open drawers.
9.
Hutches, mirror, etc. Must be securely
fastened to the dresser according to the
instructions enclosed with those items.
10.
Always monitor your child’s activity when in
the nursery.
!
WARNING
Important Safety Notice
Dresser/chest can tip (fall over) when not used as
intended.This could potentially result in serious injury
or death.
Keep your children and others safe by
following these simple rules:
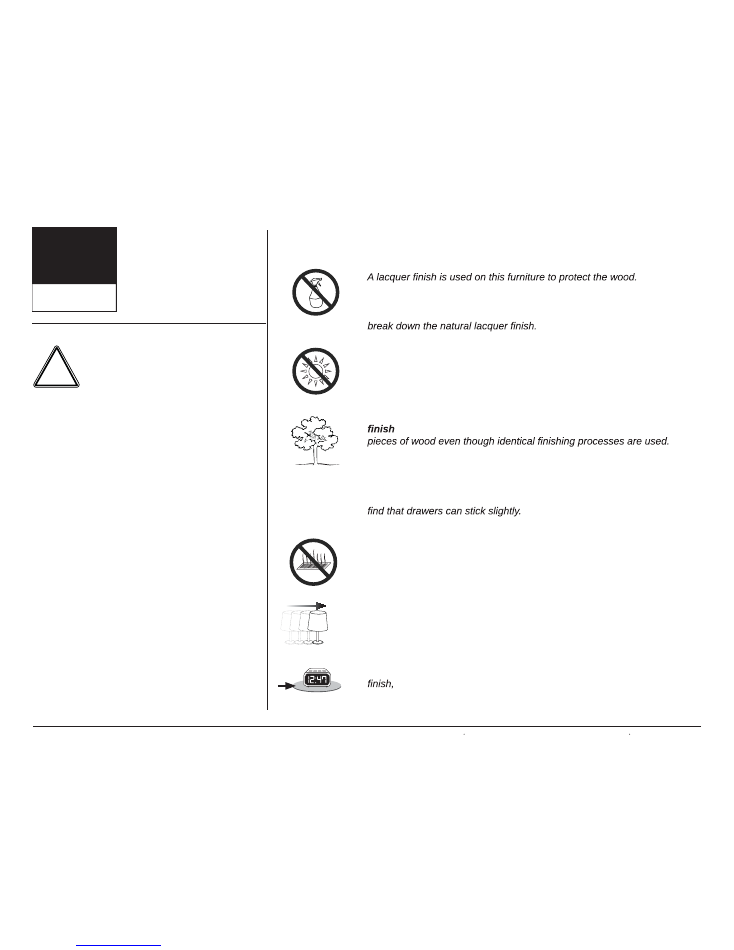
CARE
INSTRUCTIONS
ȑ
It is not
waterproof, clean spills immediately.
Dust using a slightly damp cloth,
making sure no standing water is left on the furniture.
DO NOT
use any
household cleaners, citrus-based polishes, wood soaps, or oils; they can
ȑ
Do not place furniture in direct sunlight.
Natural solid wood furniture
will naturally color as it ages, however, direct sunlight dramatically speeds
up the process.
ȑ
In natural wood furniture, the variations in texture and grain
will affect the
, making it impossible to guarantee an exact match between two
These
differences in character
are not defects
, but variations that make each
piece of furniture unique and beautiful.
ȑ
Solid wood naturally expands and contracts.
In high humidity you may
This will correct itself, and is not reason
for concern.
ȑ
Do not place furniture over heating or cooling vents.
Dramatic
changes in temperature can cause the wood to split.
ȑ
If you place objects such as lamps or plants on your case pieces
make sure to move them from time to time.
There may be a slight
discoloration where the object was. However, by exposing it to light the
color will catch up to the rest of the case.
ȑ
Plastic or foam footed items such as phones or clocks can damage this
use trivets under such items.
NE
k i d s
SCHOOLHOUSE
C O L L E C T I O N
Page 21 of 22
Limited 1-Year Warranty
NE kids
2300 Prospect Dr. Christiansburg, VA 24073
www.ne-kids.com
NE
k i d s
WARRANTY LIMITATIONS
Authorized Retailer
This warranty protects you only when you purchase NE Kids products from an
authorized NE Kids Retailer.
Household Use
This warranty applies only when you have purchased a NE Kids product for your
own normal indoor household use (including use as a gift to another for household
purposes) and not for resale or commercial use, which includes rental, business, and
institutional or other non-residential use.
Normal Use
This warranty applies under conditions of normal use only. This warranty does not apply
a manner inconsistent with its intended use. Additionally this warranty does not cover
damage resulting from inadequate maintenance, cleaning, or care or any condition
resulting from other than ordinary residential wear or from any use for which the product
was not designed.
Original Purchaser
This warranty applies only as long as the product continues to be held for use by the
original purchaser. The warranty cannot be transferred to subsequent owners or users
of the product, and it shall be immediately invalidated in the event that the product is
resold, transferred, leased or rented to any third party or person other than the original
owner.
Receipt of your Warranty Registration
The limited warranty set forth herein will be activated on the day of purchase. You must
submit your sales receipt as proof of original purchase as a condition precedent to
coverage under this limited warranty.
Product Modification
Kids will void this warranty.
Floor Samples or Products purchased “AS IS”
of purchase.
Assembly
Product must be assembled according to directions. Failure to assemble product
correctly shall void the warranty. Care instructions are enclosed, failure to follow these
instructions shall void your warranty.
Natural Wood
that do not pose a safety risk to the user are not considered manufacturers defects.
Differences
Because of craftsmanship and use of natural materials in NE Kids products, minor
variations can occur from piece to piece, as in the matching of color , grain, or texture
samples or printed illustrations and your furniture.
Transportation
We do not pay for shipping and handling on warranty items.
Claims
Any claim against this warranty must be presented in writing to the Authorized NE
Kids Retailer. The Authorized NE Kids Retailer will then contact NE Kids. If NE Kids
determines that replacement is impractical you will be furnished a substitute unit of the
same or similar color, design, style and quality unless NE Kids no longer carries the
product.
Digital photography of your furniture and the defective piece/area is absolutely
necessary to determine whether or not a manufacturing defect exists.
OTHER
There are no warranties other than those expressly set forth above.
NE Kids
expressly disclaims all implied warranties, including, without limitation, implied
Limitations of damages:
The warranties and remedies set forth are exclusive and in
lieu of all others, oral, written, express or implied, in no event will NE Kids be liable to
you for any damages, including incidental or consequential damages, arising out of the
use or inability to use this product. In no event will NE Kids’ responsibility exceed the
purchase price of the product or its replacement.
vary from state to state. Except for such other rights, the remedies provided under this
warranty state the limit of NE Kids’ responsibilities.
WRITTEN LIMITED WARRANTY
NE Kids warrants to the consumer, who makes the original purchase of NE Kids products, a 1-year warranty against defects in the material or workmanship of furniture
components. NE Kids will repair or replace any piece of furniture, which is defective in materials or workmanship.
imperfections in components, which substantially impair the usability of the product.
to preserving your rights under this warranty.
Page 22 of 22