Full Text Searchable PDF User Manual
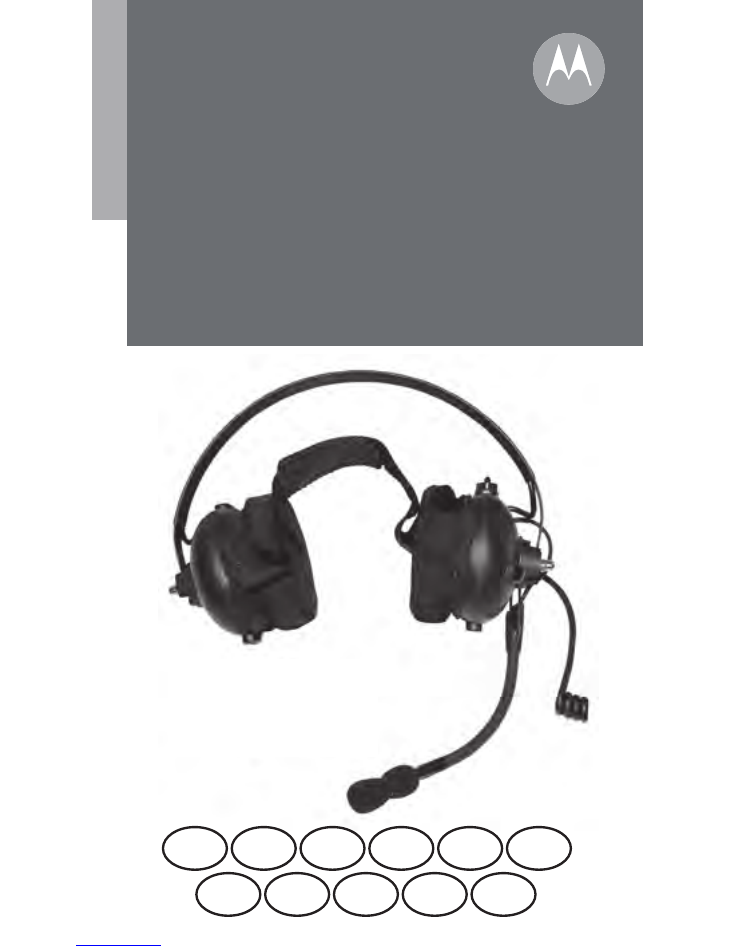
Heavy Duty Headset
User Guide
PMLN5277
EN
DE
FRC
BP
FR
ES
IT
PR
LAS
NL
RU

blank.fm Page 1 Monday, September 3, 2007 11:44 AM
1
En
gl
is
h
DESCRIPTION
The PMLN5277 Behind the Head Heavy Duty
Headset is intended for high noise
environments, to provide privacy and noise
isolation.
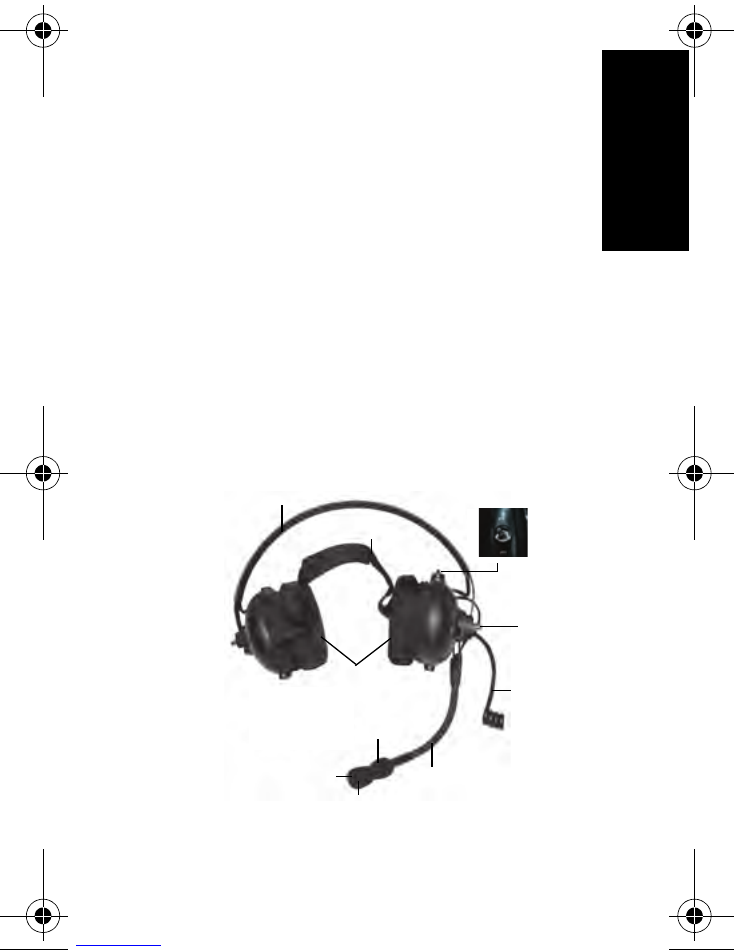
The headset consists of the following parts:
• Flexible Noise-Canceling boom
microphone
• Ear cup Push-To-Talk button
• Behind the Head support band
• Cloth strap over the head for additional
support
• Comfort Ear Seal with 24dB Noise
Reduction Rating (NRR)
• Push-To-Talk (PTT) / Voice Operated
Transmission (VOX) Switch
Figure 1.Behind the Head Model
VOX & PTT Switch
Over the Head Strap
Behind the Head Support band
Ear Seal &
Cloth Covers
Ear cup
Push-To-Talk
Button
Headset Windscreen
Mic O-ring
Noise Canceling Microphone
Flexible Boom Assembly
Cable
6875937M01_b_Eng.fm Page 1 Monday, December 13, 2010 3:44 PM
2
Englis
h
PUSH-TO-TALK (PTT) OPERATION:
1. Always switch the
radio OFF
before
connecting the headset.
2. Attach the audio connector to the radio
taking care not to over tighten the fixing
screw.
Note:
Once the headset has been installed the
radio speaker and the radio microphone
are both disabled. The user must speak
into the headset microphone and use
the headset speaker to listen to
incoming calls.
3. For Push-To-Talk operation, place the
PTT/VOX switch in the PTT mode.
Switch the radio ON. Care should be
taken not to set the volume level too
loud.
4. The flexible boom mounted Noise
Canceling microphone should be
positioned approximately 1.2 cm to 2.0
cm (½ inch to ¾ inch) from the user’s
lips. Adjust the flex boom assembly to
this position. Do not twist the Noise
canceling module with windscreen,
either clockwise or counterclockwise to
avoid poor noise cancellation
performance.
5. Press the
Ear cup Push-To-Talk button
located at the top of the left ear cup and
6875937M01_b_Eng.fm Page 2 Monday, December 13, 2010 3:44 PM
3
En
gl
is
h
speak into the headset microphone to
check that the two-way communication
is working, the
radio-in-transmission
light (LED)
will be illuminated.
6. Release Push-To-Talk button to receive
transmissions.
7. Always switch the
radio OFF
before
disconnecting the headset.
VOICE OPERATED TRANSMISSION (VOX)
OPERATION:
1. Always switch the
radio OFF
before
connecting the headset.
2. Attach the audio connector to the radio,
taking care not to over tighten the fixing
screw.
Note:
Once the headset has been installed the
radio speaker and the radio microphone
are both disabled. The user must speak
into the headset microphone and use
the headset speaker to listen to
incoming calls.
3. For VOX operation, place the PTT/VOX
switch in the VOX mode. Switch the
radio ON. Care should be taken not to
set the volume level too loud.
4. The flexible boom mounted Noise
Canceling microphone should be
positioned approximately 1.2 cm to 2.0
cm (½ inch to ¾ inch) from the user’s
6875937M01_b_Eng.fm Page 3 Monday, December 13, 2010 3:44 PM
4
Englis
h
lips. Adjust the flex boom assembly to
this position. Do not twist the Noise
canceling module with windscreen,
either clockwise or counterclockwise to
avoid poor noise cancellation
performance.
5. To transmit, speak clearly into the
microphone. The transmitter will remain
keyed for a short time after speaking.
REMOVING THE HEAVY DUTY HEADSET
1. Turn the
radio off
before removing the
heavy duty headset from the radio
accessory connector.
2. Remember to reattach the radio
accessory connector seal to the side of
the radio when an accessory is not in
use.
ACOUSTIC SAFETY
Exposure to loud noises from any source for
extended periods of time may temporarily or
permanently affect your hearing. The louder
the radio’s volume, the less time is required
before your hearing can be affected. Hearing
damage from loud noises is sometimes unde-
tectable at first and can have a cumulative
effect.
6875937M01_b_Eng.fm Page 4 Monday, December 13, 2010 3:44 PM
5
En
gl
is
h
To protect your hearing :
• Use the lowest volume neccessary to do
your job.
• Increase the volume only if you are in noisy
surroundings.
• Reduce the volume before connecting
headset or earpiece.
• Limit the amount of time you use headsets
or earpieces at high volume.
• When using the radio without a headset or
earpiece, do not place the radio’s speaker
directly against your ear.
• If you experience hearing discomfort, ring-
ing in your ears, or speeches that are muf-
fled, you should stop listening to your radio
through your headset or earpiece, and
have your hearing checked by your doctor.
6875937M01_b_Eng.fm Page 5 Monday, December 13, 2010 3:44 PM
6
Englis
h
REPLACEMENT PARTS
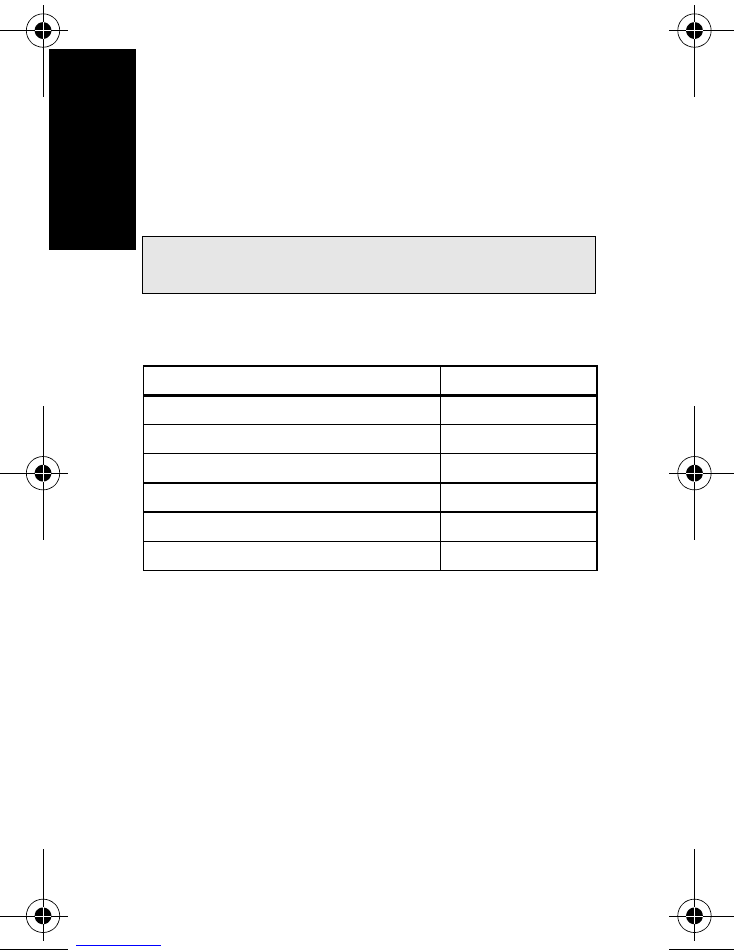
The replacement parts shown in Table 1 are
available for the PMLN5277 Heavy Duty
Headset.
Please contact your local Motorola
Representative or Dealer for details.
IMPORTANT NOTE:
The Heavy Duty Headset is not field repairable.
Table 1. Replacement Parts
Description
Part Number
Foam Ear Seal
75012068001
Cloth Covers
15012094001
Over the Head Strap
4204004K01
Mic O-Ring
6775998M01
Headset Windscreen
3578010A01
Eyeglass Pad
7575999M01
6875937M01_b_Eng.fm Page 6 Monday, December 13, 2010 3:44 PM
7
En
gl
is
h
NOTES
6875937M01_b_Eng.fm Page 7 Monday, December 13, 2010 3:44 PM

m
© 2008, 2010 by Motorola, Inc.
b
and Motorola are registered trademarks of
Motorola, Inc. All Rights Reserved.
b
et Motorola sont des marques déposées de
Motorola, Inc.Tous droits réservés.
b
y Motorola son marcas registradas de Motorola,
Inc.Todos los derechos reservados.
b
e Motorola são marcas registradas da Motorola, Inc.
Todos os direitos reservados. Impresso nos EUA.
b
und Motorola sind eingetragene Warenzeichen von
Motorola, Inc. Alle Rechte vorbehalten.
b
e Motorola sono marchi depositati di Motorola, Inc.
Tutti i diritti riservati.
b
e Motorola são marcas comerciais registadas da
Motorola, Inc. Reservados todos os direitos.
b
en Motorola zijn wettig gedeponeerde
handelsmerken van Motorola, Inc. Alle rechten
voorbehouden.
b
и
Motorola
являются
зарегистрированными
товарными
знаками
компании
Motorola, Inc.
Все
права
сохраняются
.
*6875937M01*
6875937M01-B
Backcover37.fm Page 1 Monday, December 13, 2010 3:48 PM