Full Text Searchable PDF User Manual
33
www
.matsunichi.com
33
1
www
.matsunichi.com
1
This detailed operation manual is provided for you to obtain information concerning product in-
troduction, operating instructions, functional settings and safety precautions. Please read all of the
documents provided prior to installation and operation of the player for the
fi
rst time.
Y
ou should keep
this manual for future reference.
W
e were careful when compiling the manual and we consider the information provided herein to be
reliable and correct. However
, product changes may occur during the production life cycle, so some
information may be slightly dif
ferent for your unit.
Y
ou are always welcome to give any comments
or suggestions. Matsunichi, Inc. (hereafter referred as Matsunichi) shall not be liable for any errors
contained herein or for any damages arising out of or related to this document or the information
contained herein.
Matsunichi shall not be liable for any damage due to the use of the unit or for any claims for dam-
ages brought by third parties.
Matsunichi shall not be liable for any data loss due to operation and use of the product, product
repair
, battery failure/replacement, or any other condition, and shall not be liable for any indirect loss
resulting therefrom.
Matsunichi reserves the right to make changes in the speci
fi
cations and other information contained
in this document without prior noti
fi
cation. Copyright 2007, Matsunichi, Inc.
All rights reserved.
Thank you for purchasing this product
Please visit our web site: www.matsunichi.com
2
2
www
.matsunichi.com
INDEX
Chapter
1
Overview
.................................................................3
1-1 PF1009M Digital Frame................................................................3
1-2 Device & System Requirement........................................................4
1-3 Accessories
Included....................................................4
1-4 Functions and Features........................................................7
Chapter
2
Connecting
......................................................9
Chapter
3
Function
application
.......................................1
1
3-1 Photo ..............................................................................12
3-2 Music.........................................................................14
3-3 Photo & Music...............................................................16
3-4 Movie............................................................................17
3-5 Files - (Copy - Delete -
T
ranscode)...................................................18
3-6 Clock / Calendar
.................................................................................... 21
3-7 Setup.................................................................................. 22
3-8 Changing the Frame ............................................................................. 25
Chapter
4
Appendix
....................................................26
4-1
T
e
chnical
specifications....................................................26
4-2
Care
and
Maintenance...................................................28
Limited
W
a
rranty
...........................................................29
3
www
.matsunichi.com
3
Chapter 1 Overview
1-1 PF1009M Digital Frame
Includes both cherry wood and black changeable frames
Listen to MP3 music
fi
les
V
iew JPEG (Up to 8K x 8K resolution), BMP
, GIF
, TIFF and PNG images
Supports
A
VI / Mpeg4 - part 2 V
ideo format (up to 704 x 576 resolution)
Supports Compact Flash (CF), Secure Digital (SD), xD, Multi Media Card (MMC) and
Memory Stick & Memory Stick Pro (MS) memory cards
Programmable Display Dimmer
Multiple Image - slide show ( 4 images on display )
Clock - Calendar with photo slide show of internal memory &
Alarm Clock.
Graphic menu operation, easy and convenient to use
Wireless Remote Control
Internal memory can store 500*+ pictures using transcoding technology
Auto Rotation & Date Stamp of image displayed (EXIF)
*
Number of images stored in internal memory may be different based on transcoding
setting in setup and original image size.
4
4
www
.matsunichi.com
The PF1009M has internal memory to store your
digital pictures but does not include an external
memory card in the packaging.
The external memory
card (SD / MMC / MS / xD / CF / MS Pro) or USB
mass storage device with music, video and photo
fi
les can be operated with this device.
System Requirements:
Minimum con
fi
guration of the PC required for
fi
le
upload/down
load:
Pentium MMX 2000 or above CPU;
An available USB port
Operating system: Microsoft Windows, Windows ME,
Windows 2000 Professional, Windows XP
or above.
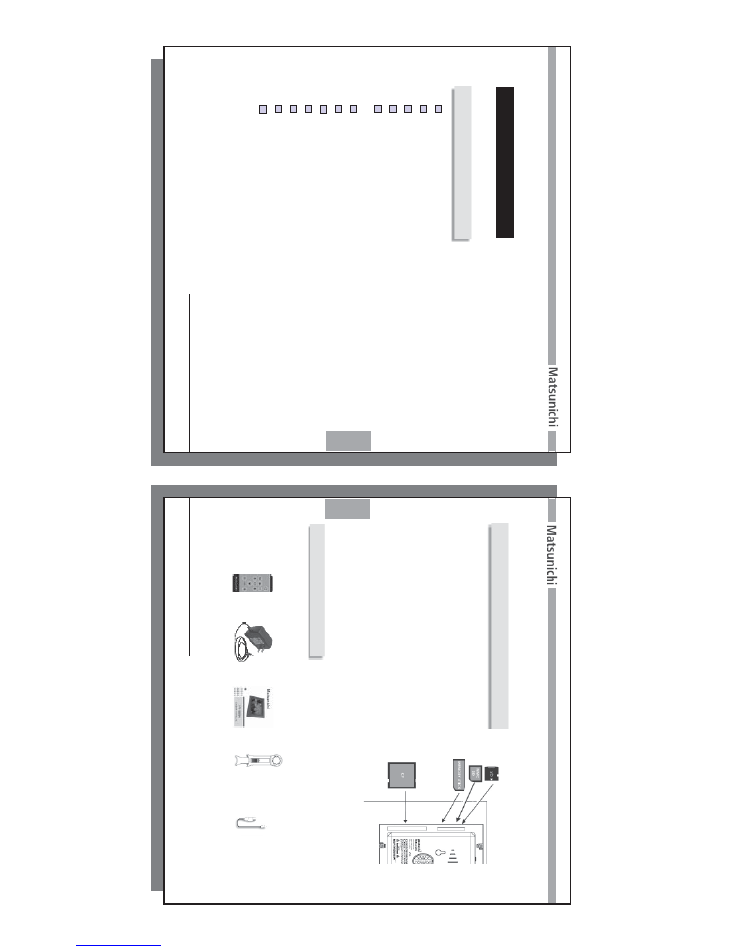
1-3 Accessories
Included
1-2 Device & System Requirements
Remote control
w/ Battery
Stand
AC Adaptor
User Manual
Y
our PF1009M comes with the following accessories. Please check that you have
everything listed below
. Please DO NOT
discard any of packaging material at this time.
USB Mini to
Ty
pe
A
USB
adapter cable
(optional if your PF1009M has
only one Mini
Ty
pe B USB
OTG Port)

5
www
.matsunichi.com
5
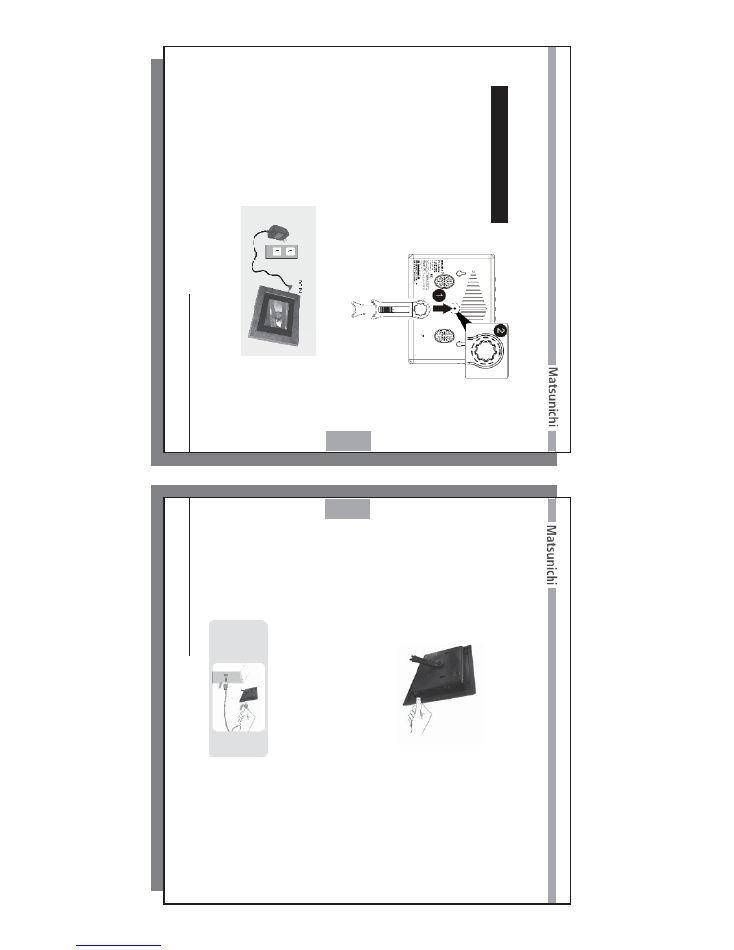
Remote Control Preparation & Use
The wireless remote control already has a battery installed.
To
enable the remote, you
will need to remove the battery protector as show below
.
1.
T
urn over the remote to the back cover
.
2. Pull the plastic tab to enable the battery in the remote.
Y
our remote is now ready for use.
Remote Control
Plastic T
ab
Pull
6
6
www
.matsunichi.com
Remote Control
Battery Holder
Release Clip
Handle
Using the Wireless Remote Control
The remote control works best when pointed
directly at the unit. Stay within a 30 degree
angle on either side of the unit.
Battery Polarity
To
replace the battery
, remove the battery holder from the remote control.
To
re-
move the battery holder
, use your thumb to squeeze the release clip in toward the
center
, while simultaneously pulling the handle out with your index
fi
nger
.
Place the battery into the holder as pictured below with the POSITIVE SIDE
(marked on battery as “+”) facing upwards and insert into the remote control to
complete the battery installation.
7
www
.matsunichi.com
7
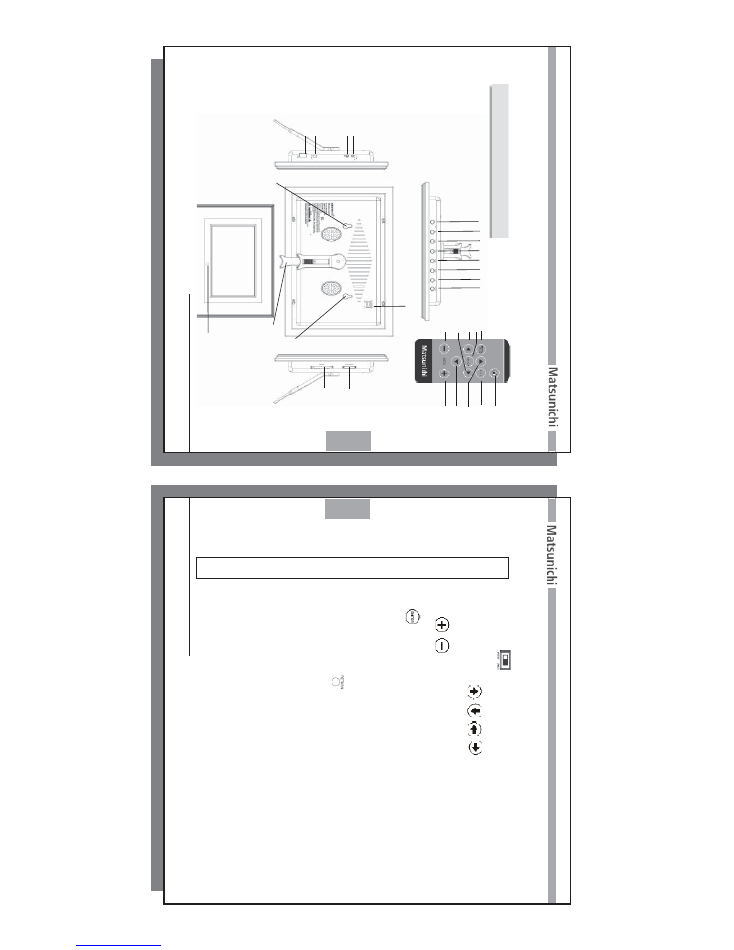
1-4 Functions
And Features
13
11
12
5
4
32
6
16
16
9
10
19
8
1
6
2
8
7
3
4
5
17
18
11
7
15
14
20
8
8
www
.matsunichi.com
Power On / Of
f
Used to turn Of
f or On the PF1009M.
Up / Down / Left / Right
/
/
/
Navigation keys. Press to choose previous / next option in the menu.
V
olume
/
Press to increase / decrease volume level.
Enter
Press to enter menu and sub-menus to con
fi
gure dif
ferent settings of the
player
. Also used to con
fi
rm selected option.
Power Adapter
Connector
Earphone Jack
Return to upper menu
or previous menu -
SD / MMC / xD / MS Card Slot
CF Card Slot
Wireless Remote receiver
Adjustable Rotation /
T
ilt Stand
W
all Mounting holes
Start slide show
Main menu (Returns device to Main menu)
USB Device or Host (OTG) Port
USB Host port (optional of some PF1009M models)
1
2-5
6-7
8
9
10
11
12
13
14
15
16
17
18
19
20
9
www
.matsunichi.com
9
a. Connect the player with the
stand as shown:
b. Connect the power adapter to the power outlet. Connect the DC-out port of the
AC
adapter to the DC-in port of the unit.
As shown below:
c. Insert a memory card into the appropriate socket (be careful to insert the card
properly). Move the power switch to ON position.
Y
ou are now ready to enjoy
your photos, music and video
fi
les.
Chapter 2 Connecting
10
10
www
.matsunichi.com
If your PF1009M has only one USB Mini OTG port, please use the USB Mini to
Type
A
cable adapter (supplied with accessories with PF1009M w/one USB Mini OTG
port).
e. Connecting to PC
(1) Position your PC properly so that you may access the USB port.
(Note: Some USB ports) may be found on the front panel instead of the back.
Contact your system vendor for detailed information if necessary).
(2) Plug the USB connector on the USB cable to your PC USB port.
(3)
T
urn on your PF1009M device, and then plug the smaller connector on USB
cable to the PF1009M USB DEVICE port.
d. Connect with a USB Mass Storage Device
Y
ou can also connect with a USB Mass Storage Device via the USB Port,
as show below:
11
www
.matsunichi.com
11
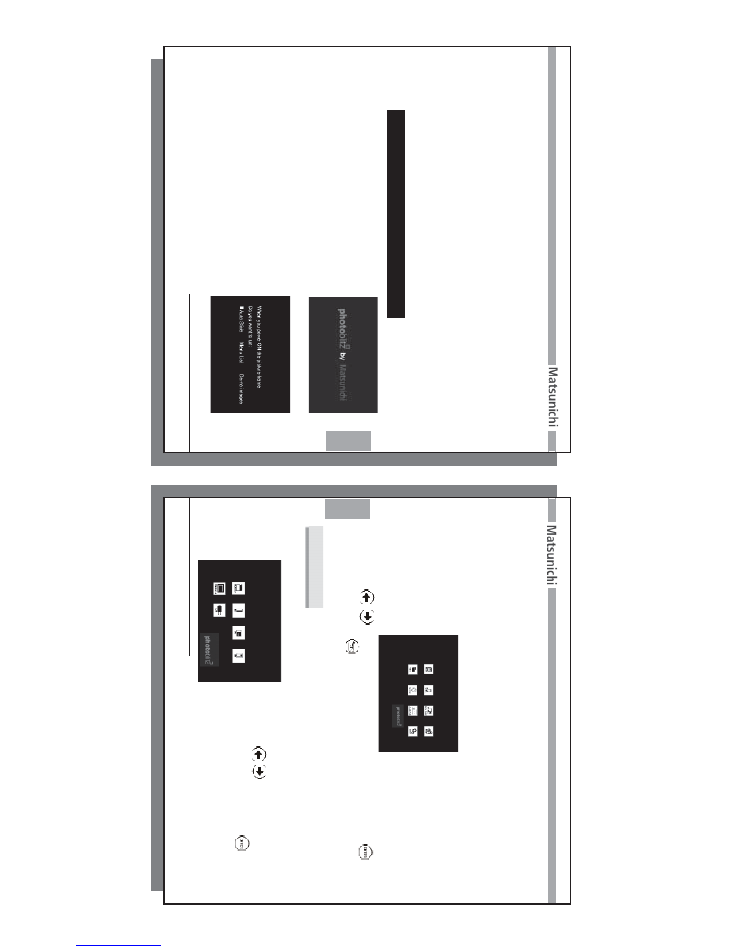
First
T
ime Powered ON Mode:
Message Prompt and User Preferences
The initial greeting looks like this:
When you power ON the PF1009M for
the
fi
rst time or after doing a factory
setting reset, you will be asked to de
fi
ne
the user settings (Auto Start Slideshow
,
Main Menu or Demo images).
These
settings will allow you to have the
PF
1009M
automatically start a slideshow
, go
to the main menu or display the demo images
when powered ON.
Chapter 3 Function
Applications
(5)
The system should detect the new hardware and install the driver for it
automatically
.
(6) When the driver installation is
fi
nished, the device is ready to use. If you would
like to con
fi
rm that the device has been properly installed on your computer
,
please double-click [My computer].
(7) Removable disks [H:] [I:] [J:] [K:][L:] appear on [My computer] (Removable disk
[H:] [I:] [J:] [K:][L:] represents the memory card such as CF / SD / MMC / XD / MS
and internal memory).
12
12
www
.matsunichi.com
Setting Options:
Auto Slide
- Device will automatically display a slide show when device is turned ON
(memory card or internal memory must contain photo
fi
les).
Menu List
- When the device is turned on, it will display the "Main Menu",
as shown
below:
Use the
/
navigation buttons to move through the selections and press
key to con
fi
rm.
Press"
" key or Menu Button on remote to go back to Main Menu.
Demo images
- Device will display Demo images when device is turned on.
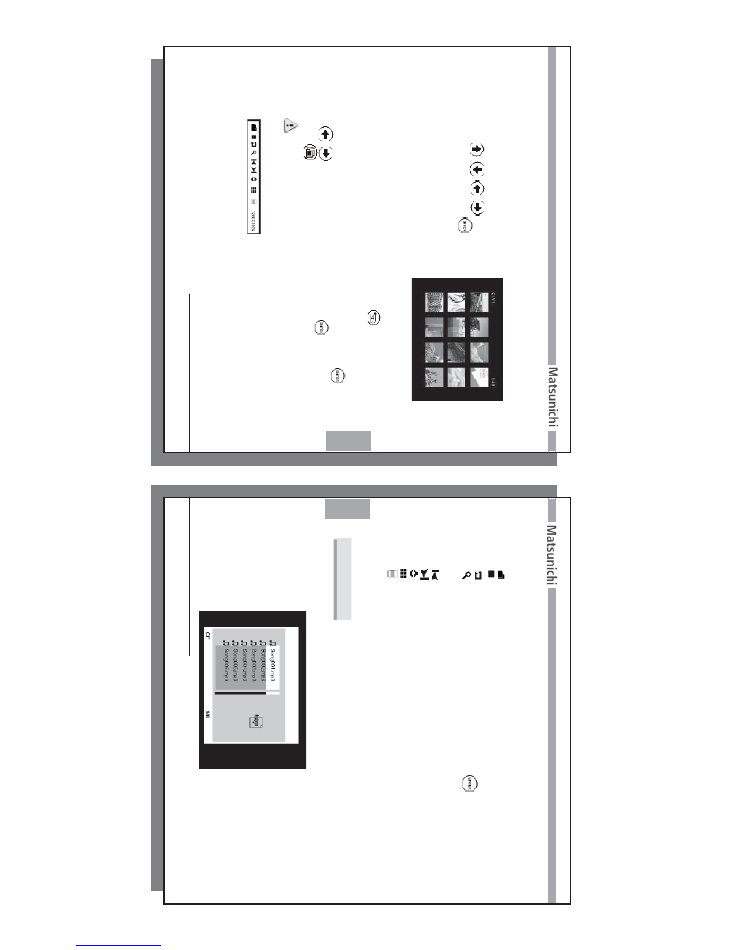
Choose “PHOT
O” from the Main menu and then select memory device (internal or
plugged in memory card) to enter the Photo Digest/Playback menu.
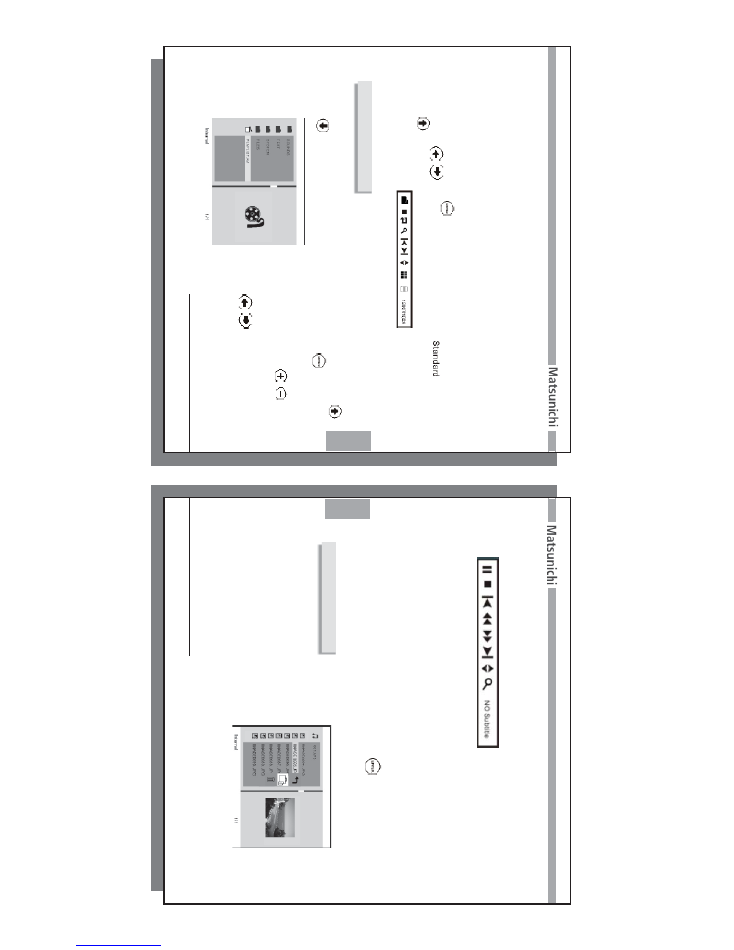
3-1 Photo
Then Use the
navigation buttons to
move through the selections and press
to con
fi
rm.
The device will then enter the
photo digest browser
, as shown below:
13
www
.matsunichi.com
13
1. If you select a folder in the photo digest browser
, the browser will open the
selected folder and display all of the
fi
les inside. Use
to go to the previous level.
2. If you select any image
fi
le displayed in the File Menu, the picture frame will
display this photo and the Function Bar will pop up while you press
. Use
/
to navigate the Function Bar functions. Use
to con
fi
rm
selection.
Use
on the remote control to start a slide show from the selected photo.
NOTE: If the Auto Start feature in the SLIDESHOW SETUP menu is set to
ON, the playback of all photo files at power up will begin.
Function Bar
Use
/
/
/
to
navigate this page, press
to
con
fi
rm your selection.
14
14
www
.matsunichi.com
3-2 Music
Choose “Music” in the menu to enter the device selection interface to choose an
available memory device from the device list and then enter the
fi
le
browser
.
A.
Slide show: Starts/Resumes Slideshow based on Slideshow Settings in Setup.
B.
Stop: Stop and return to previous menu.
C.
Rotate: Rotate current photo clockwise.
D.
Zoom: Zoom in 2X, 3X, 4X and 5X Zoom Modes. Use
buttons to scroll
after zooming into the photo.
At this time you can press Up, Down, Left,
Right keys for pan function.
E.
Previous: Displays previous photo.
F.
Next: Displays next photo.
G.
Photo ID: Shows photo properties.
H.
Thumbnail: Go to thumbnail digest. (There are 20 small pictures in one screen).
I.
Image copy: copy and store photo dispayed
fi
le to internal memory
(If transcoding in setup is Of
f, photo will be copied to internal memory without
any compression. If you have set the transcoding On to either L-M-H, the copied
photo will be compressed/resized and stored into internal memory)
15
www
.matsunichi.com
15
Action buttons menu - Music Menu:
Use the
/
button to access the action buttons, including:
a. Play / Pause
b. Stop: Stop and return to previous menu
c. Previous: Skip to previous track during playback of music
d. Fast reverse: Fast reverse 2X / 3X / 4X / 5X speed modes within the current track
during playback of music
e. Fast forward: Fast forward 2X / 3X / 4X / 5X speed modes within the current track
during playback of music
f. Next: Skip to next track during playback of music
g. Music
fi
le ID: Show music
fi
le
properties.
h. ID3
Tag: Display on screen ID3 tag information
Use the
/
navigation buttons to move through the selections and press
to
play
. Press
/
to adjust the music volume.
As shown below:
16
16
www
.matsunichi.com
3-3 PHOT
O & MUSIC
Choose “PHOT
O & MUSIC” in the Main menu to enter the device selection interface
to choose an available memory device from the device list and then enter
fi
le
browser
.
Use the
/
navigation buttons to move through the photo or music
fi
les
and
press
to play
. Press
/
to adjust the music volume.
Action buttons menu - File Menu
While playing a
fi
le,
Press
button to access the action buttons, including:
a. Play/Pause
b. Stop: Stop and return to previous menu
c. Previous: Skip to previous track during playback of music
d. Fast reverse: Fast reverse 2X / 3X / 4X / 5X speed modes within the current track
during playback of music
17
www
.matsunichi.com
17
e. Fast forward: Fast forward 2X/3X/4X/5X speed modes within the current track during
playback of music
f. Forward: Skip to next track during playback of music
g. Music
fi
le ID: Show music
fi
le
properties
h. ID3
Ta
g: Show ID3 tag information
I. Repeat Mode: Press
to select music playback repeat mode
Use the
/
button to access the action buttons, select "
" then press
to pop up another function bar
, as shown in the diagram:
Please refer to 3-1 PHOT
O for more details.
3-4 MOVIE
Choose “MOVIE” in the menu to enter the device selection interface to choose an
available memory device from the device list and then enter
fi
le browser
. Use the
/
navigation buttons to move through the selections and press
to play as
below:
While playing a movie, press
/
to
adjust the movie volume.
Action buttons menu - Movie Menu:
Use the
/
button to access the action
buttons, including:
18
18
www
.matsunichi.com
a. Play / Pause
b. Stop: Stop and return to previous menu
c. Previous: Skip to previous track during playback of Movie
d. Fast reverse: Fast reverse 2X / 3X / 4X / 5X speed modes within the current track
during playback of Movie
e. Fast forward: Fast forward 2X / 3X / 4X / 5X speed modes within the current track
during playback of Movie
f. Forward: Skip to next track during playback of Movie
g. Movie
fi
le ID: Show movie
fi
le
properties
h. Zoom: Zoom in 2X, 3X, 4X and 5X Zoom Modes. Use
buttons to scroll after
zooming into the movie
i. Subtitle: Set subtitle display ON / OFF
. If the movie
fi
le does not contain subtitles,
then screen will display "NO Subtitles"
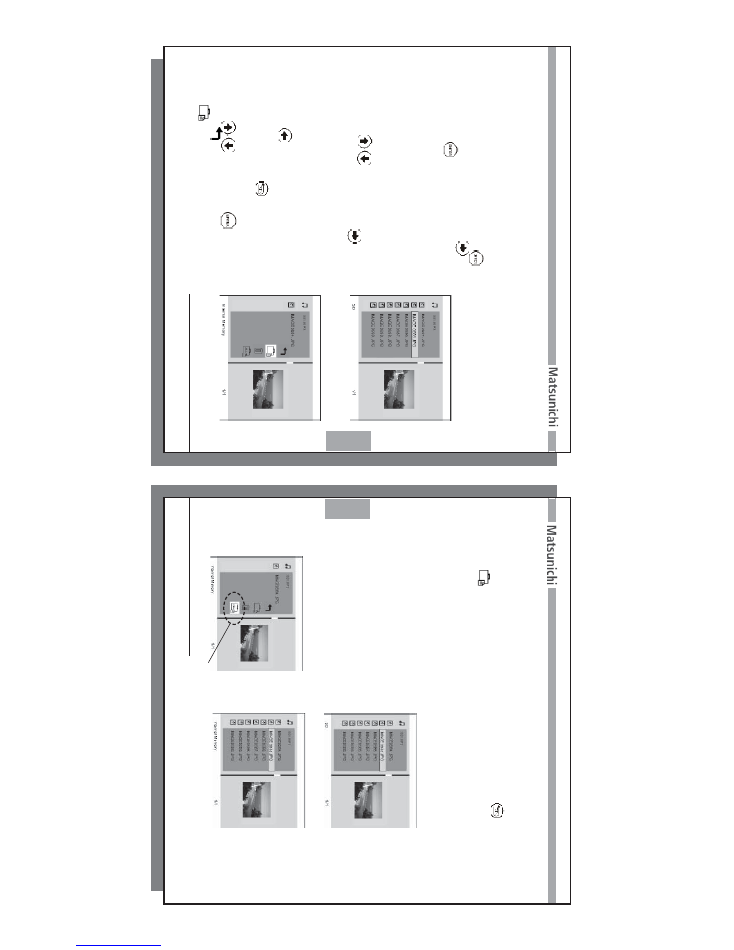
3-5 FILES
Choose “FILES” in the menu to enter the
device selection interface to choose an
available memory device from the device list
and then enter the File List browser
.
In addition to the viewing
fi
le list, the FILES
menu has the additional features of copying
(one memory device to another), deleting or
transcoding (resize / compress your image
fi
le to be store in the internal memory).
19
www
.matsunichi.com
19
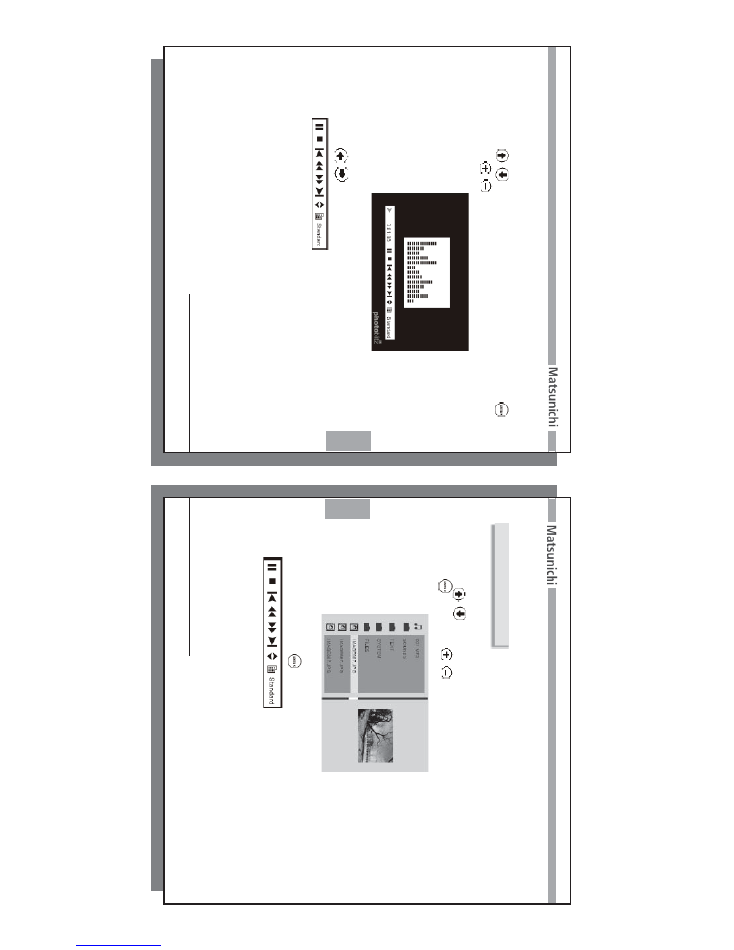
Diagram A2
COPY - DELETE - TRANSCODING FUNCTION
Diagram A1
A: Copy single file (no transcoding)
1. When you are viewing a photo, press
the function bar will pop up, press
to go to
then press Enter
, the photo
will be copied to Internal Memory
.
(See page 14)
2. From the FILES menu of selected memory
device you will see the
fi
le list as shown in the
Diagram
A1:
Use the
/
navigation buttons to move
through the source
fi
les and press
to mark
fi
les for copying (you will see the
fi
le highlighted in
orange).
After selecting the files to be copied;
To copy to another memory device:
Press
to return to Memory Device selection,
select and enter the destination memory device and
fi
le folder
, then press
the Function Bar will pop
up, as shown in the Diagram
A2:
Use
/
to Select, press
to con
fi
rm.
Press
to cancel the operation and exit. Press
to paste to current location.
Set transcoding to of
f in setup page,
There are two dif
ferent ways to copy a single
fi
le:
20
20
www
.matsunichi.com
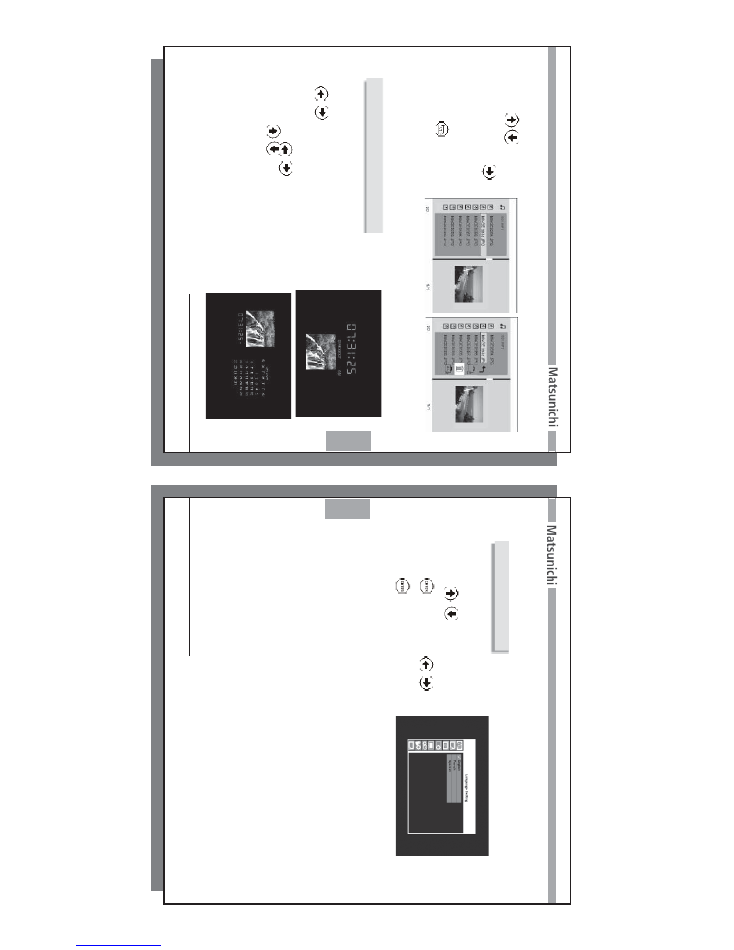
B: To transcode the selected files to internal memory
After the
fi
les you have selected have been highlighted in orange, press and
select
.
The size of the
fi
le stored in internal memory will be reduced based on
the trancode setting in setup (See page 23).
Diagram B1
Diagram B2
Diagram B3
C: COPY ALL- Transcode
All images of the directory of the memory
device selected in FILES menu will be
transcoded (resized / compressed) and
copied to the internal memory
. T
ranscoding
must be set to L-M-H to operate this feature.
After copying is
fi
nished, you will see that
the source
fi
les (as shown in the diagram
B1) have been copied to the destination (as
shown in the diagram B3) .
Repeat same procedure as Copy sigle
fi
le (see page 19).
The only dif
ference is
select copy all icon.
Copy All
Icon
21
www
.matsunichi.com
21
(T
o set time and date, please go to setup page)
Choose “CLOCK” in the menu to enter the system clock
interface, as shown in the diagram.
/
skip to previous or next picture.
Choose “CALENDAR” in the menu to enter the system
calendar mode.
/
to toggle to the previous / next
photo. Use
/
to change displayed previous / next
month, as shown in the diagram:
Note:
Slide show images shown on Clock/Calandar
are only from the internal memory of picture
frame. Instructions regarding how images
are stored in the internal memory can be found
on page 18 (3-5 Files).
3-6 CLOCK / CALENDAR
D: Delete
Use the
/
navigation
buttons to move through the
source
fi
les and press
to
mark
fi
les for deleting as show
in the diagram C1 (the
fi
les
will be highlighted in orange),
then press return to go
to the Copy/Delete menu,
select the
T
rashcan icon and
then press Enter to delete the
tagged
fi
les.
Diagram C1
Diagram C2
22
22
www
.matsunichi.com
Choose “SETUP” in the menu to
enter the system setting interface,
as shown in the diagram:
Use the
/
navigation buttons to
move through the selections and
press
to con
fi
rm.
Press
/
buttons to enter/exit options settings,
press
to con
fi
rm.
a. Language Setting
Choose English / French / Spanish
b. Photo Slide Show Setting
Slide transition time:
This setting allows
you to select the display time (3, 5,10
or 30 seconds) for each picture shown during a slideshow (factory default 10 seconds)
Slide transition Mode:
This setting allows you to select the type of transition used when switching from one
image to the next during a slideshow
. The photo transition choices are:
Normal, Random, Bottom_T
op,
Top_Bottom, Left_Right, Right_Left,
TopL_BottomR,
To
pR_BottomL, BottomL_T
opR, BottomR_T
opL, Horizontal_Close, Horizontal
_Open, H_inter Cross, V_inter Cross. Factory default on Random.
Multiple Images Mode
If set to “ON” the unit will display 4 photos on one screen after pressing the Slide Show
button on the device.
The display will show a larger photo on the left side and 3
smaller photos on the right side.
3-7 SETUP
23
www
.matsunichi.com
23
Photo Transcoding
This setting allows you to change
T
ranscode (Resize) ratio (High, Middle, Low and
OFF) or disable transcode function (factory default LOW).
This feature is used to
maximize number of images stored in the internal memory
.
T
ranscoded image
fi
les
are not recomended to be used to print color photos.
Always keep the original sized
images stored in a safe location.
Example: Orginal file is size is 3Meg Bytes transcoded files size could resized to
85K / 135K / 215K (L-M-H) and fit about 1500 / 950 / 595 internal images
Note: In order to perform the transcoding function, the size of the source
photo file has to be larger than 150K. If the source file is smaller than 150K,
the unit will only perform the copy function. The unit can only transcode photo
files and and can only store those files to Internal Memory.
c. Auto Start Mode
When powering ON the PF1009M, you can select the option to either automatically run:
Main menu, photo, music, movie, photo & music, clock, calendar
.
d. Display settings
Brightness: Use
/
to choose the most suitable screen brightness.
Contrast Use
/
to choose the most suitable screen contrast.
Color Use
/
to choose the most suitable screen color
.
e. Display Date Stamp
If set to “ON”, the unit
displays the date when the image was taken.
The date will
appear at the bottom right corner of the photo (when multiple image slide show is
enabled the date stamp will not be visible). (Default = Of
f)
24
24
www
.matsunichi.com
f. Clock Setting
Use
/
to select month/day/year and time options, press
/
to set.
Press
to return.
g. Alarm Setting
Use
/
to select time and alarm options, press
/
to set. Press
to
return.
h
.
Dimmer Setting
Use
/
to select month / day / year and auto dimmer ON / OFF options, press
/
to set. Press
to return. If you set auto dimmer ON, the screen backlight
will be shut down automatically at the start time and resume at the end time. Press
any key to resume before the end time.
i. Default
This will reset all settings to factory default mode.
After doing a factory reset, the
25
www
.matsunichi.com
25
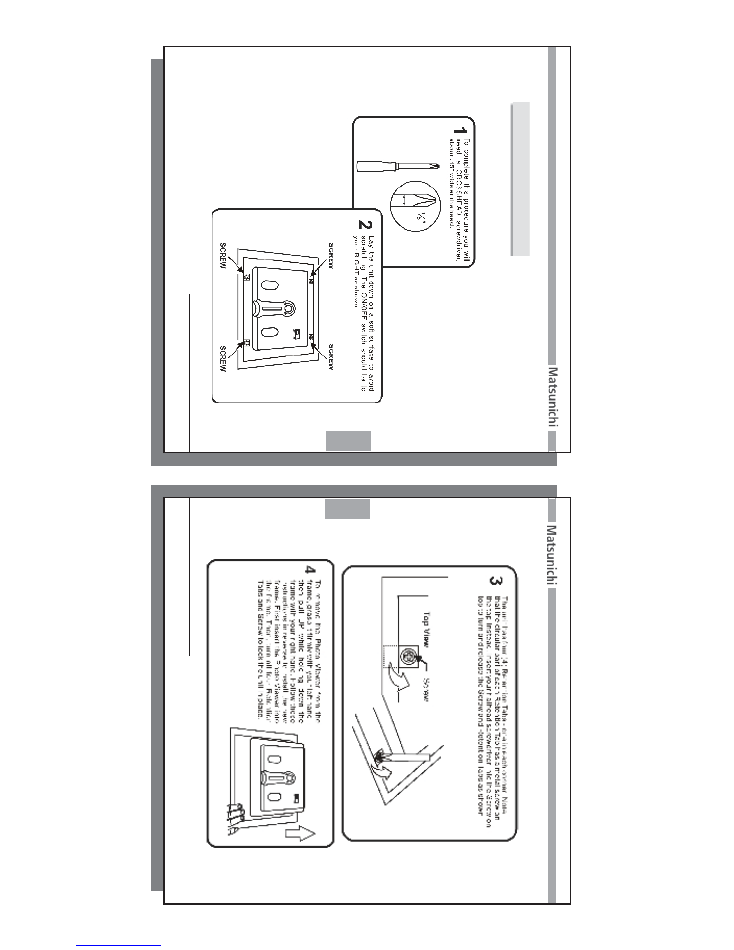
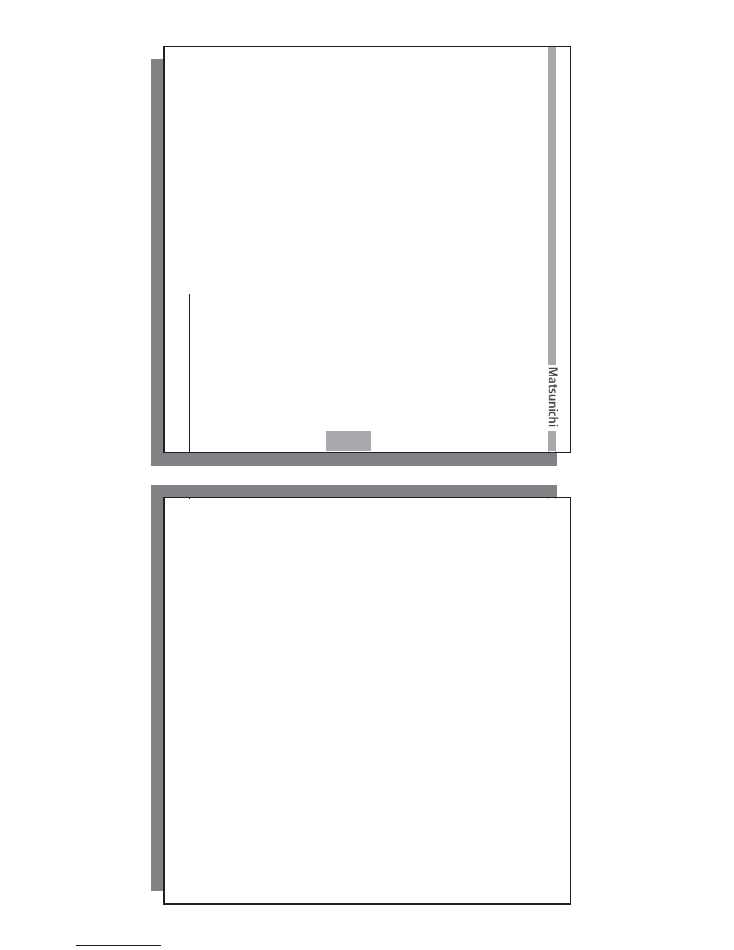
Follow these instructions to change the picture frame on your Digital Photo V
iewer
.
3-6 Changing the Picture Frame
26
26
www
.matsunichi.com

27
www
.matsunichi.com
27
Display
10.2” Digital
TFT
LCD
OSD Language
English, French and Spanish
Frequency Response
20 Hz ~ 20 kHz
Built in Memory
128M NAND (up to 500 pictures using transcoding technology)
Connectors
DC-in
Earphone
USB 2.0
Device / Host OTG
Dimensions
305.5 X 217.5 mm
Major types of memory cards supported
COMP
ACT
FLASH Card
Type I/II (CF)
MEMOR
Y
STICK (MS)
MEMOR
Y
STICK PRO (MS PRO)
SECURE DIGIT
AL
(SD)
MUL
TIMEDIA
CARD (MMC)
xD CARD (xD)
MEMOR
Y
DEVICE- V
ia USB HOST
connector
(Some memory device may be
incompatible with this photo frame)
Chapter 4
Appendix
4-1
Technical Speci
fi
cations
Power Supply
12V DC
Adapter
(Input:
AC 100~240 V)
Digital Music / V
ideo / Photo Format
MP3
MPEG-4 ASP
(up to 704 x 576 resolution)
JPEG (Up to 8K X 8K resolution),
BMP
, GIF
, TIFF and PNG
28
28
www
.matsunichi.com
Unplug apparatus during lightning storms or when unused for long periods of time.
Refer all servicing to quali
fi
ed service personnel.
Servicing is required when the unit has been damaged in any way
, such as when the
power-supply cord or plug is damaged, liquid has been spilled on the unit, the unit
has been exposed to rain or moisture, or when the unit does not operate normally
, or
has been dropped.
Power cord protection -
To
avoid any malfunction of the unit and to protect against
electric shock,
fi
re or personal injury
, please observe the following:
a) Hold the plug
fi
rmly when connecting or disconnecting the
AC power cord to this unit.
b) Do not connect or disconnect the
AC power cord with wet hands.
c) Keep the
AC power cord away from heating appliances.
d) Never put any heavy objects on the
AC power cord.
e) Do not attempt to repair or reconstruct the
AC power cord in any way
.
If smoke, odor or noise comes from the unit, turn of
f the power and disconnect the
AC power cord.
Placement -
A
void placing the unit in areas of direct sunlight, heating radiators,
closed automobiles, high temperatures (over 35° C (95° F)), high humidity (over
90%), excessive dust, vibration, or where the surface is tilted, as the internal parts
may be seriously damaged.
Do not place the unit on ampli
fi
ers or other equipment which may become hot.
This unit may interfere with the signal of broadcast televisions.
This is not a malfunc-
tion of the unit or the
TV
. T
o watch a
TV broadcast, turn of
f this unit
.
4-2 Care and Maintenance

29
www
.matsunichi.com
29
This product is warranted to be free of manufacturing and workmanship defects for
a period of 6 months from the date of purchase. In the event of a defect in material
or workmanship during the warranty period, we will refurbish, repair or replace the
defective product, at our discretion, once the defective product is returned by the
purchaser
. Matsunichi does not of
fer refunds.
This warranty is limited to servicing or replacement of the product only and shall not
cover any other damages.
This warranty does not cover any damage or problem
that results from misuse, abuse, or an act of God (such as
fl
ood). In no event shall
Matsunichi be liable for any loss of pro
fi
t or any other commercial damage, including
but not limited to special, incidental, consequential and other damages.
There are no
warranties which extend beyond the description on the face hereof.
This warranty gives you speci
fi
c legal rights, and you may also have other rights
which vary from state to state. Some states do not allow the exclusion or limitation of
incidental or consequential damages, so the above limitation may not apply to you.
In order to obtain warranty service, the original purchase receipt from an authorized
dealer must be retained as proof of purchase and a legible copy must be sent along
with the product to the Return Merchandise Center
. Y
ou must be issued a Return
Merchandise
Authorization (RMA) number by Matsunichi’
s Customer Service Center
before obtaining service.
To
receive an RMA, contact customer service at 1-510-661
0381 or
fi
ll out a return request online at www
.matsunichi.com/service.
Limited W
arranty
30
30
www
.matsunichi.com
Upon receipt of an RMA
number
, you must send the product back, postage prepaid
to:
Matsunichi Service Center
4032 Clipper Court
Fremont, CA
94538
RMA
# (assigned #)
The product must be returned to Matsunichi with an RMA
number clearly visible on
the outside of the package.
The product must be properly packaged and insured against shipping damage.
Any
packages received without an RMA
number will be refused.
Any shipping damage
resulting from improper packaging shall be the responsibility of the purchaser
.
The refurbished, repaired or replaced product will be returned to the purchaser
,
freight prepaid via UPS Ground only
, within 30 days from the date the returned prod-
uct is received by the Return Merchandise Center
.
31
www
.matsunichi.com
31
32
32
www
.matsunichi.com
Matsunichi, Inc.
4032 Clipper Court
Fremont, CA
94538
PF1009M
ver
:
1.0