Full Text Searchable PDF User Manual
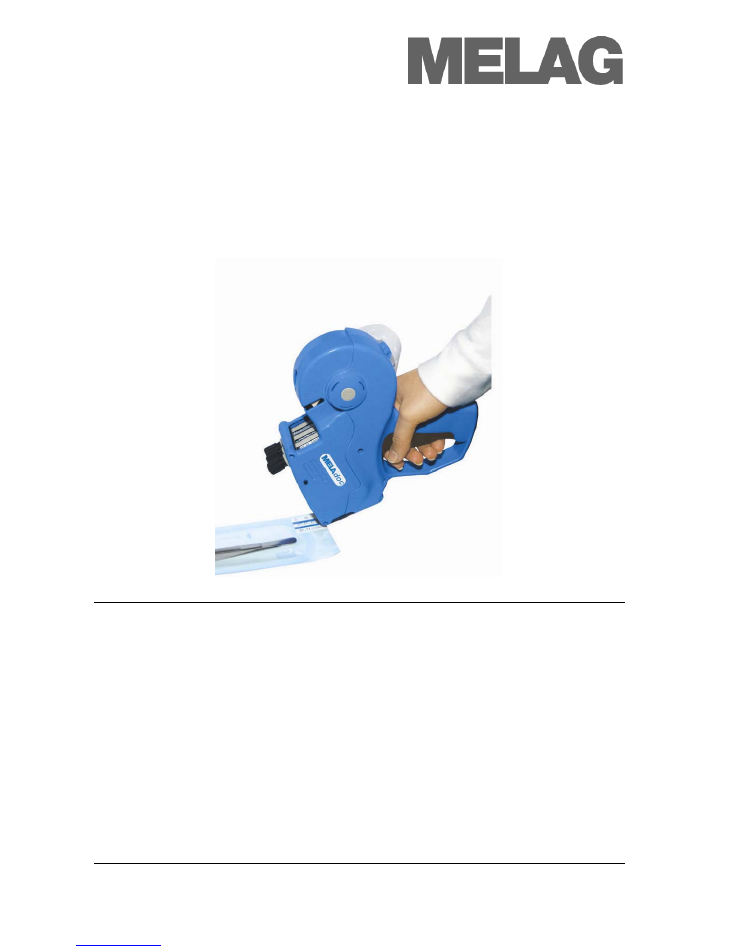
Operating Manual
MELA
doc
Label Printer
Dear doctor,
With your purchase of MELAdoc, you have acquired a device which only a few years ago was not to be found in a
doctor's or dentist's practice. The majority of your colleagues would doubtless have dismissed it as a "bureaucratic
inanity.”
The situation has changed fundamentally.
Hygiene standards for doctor's and dental practices have become very strict. It is especially important to observe the
recommendations from the Robert Koch Institute "Hygiene requirements for the treatment of medical products," and
§4 clause.2 of the Medical Devices Operations Ordinance, which requires that the “operator“ (i.e. yourself)
“…prepares the instruments in a suitable and validated procedure which ensures its verifiable success…“
Compliance with these requirements will be verified. The Infections Protection Act gives government authorities the
right to subject practices to rigorous inspection without any grounds for suspicion. Health authorities, local authorities
etc. are making increased use of this right in the form practice inspections, usually announced in advance.
Using MELAdoc and the corresponding labels means that you are able to label sterile equipment in terms of its
sterilization date, expiry date, batch number and clearance of the sterilized product, and enables you to fulfil all the
valid legal requirements.
Your MELAG team

Operating Manual MELA
doc
Label Printer
MELAG Medical Technology
Geneststraße 7-10
10829 Berlin
Germany
E-mail: info@melag.de
www.melag.de
Document: BA_GB_MELAdoc.doc/ Revision: 0 – 09/1981

Operating Manual MELAdoc label printer
3
Contents
Chapter 1 – What does the MELAdoc do? ................................................................................................................ 4
Documentation of the procedure clearance................................................................................................................... 4
Documentation of the batch clearance .......................................................................................................................... 5
Labelling and clearance of the sterilized equipment...................................................................................................... 5
Storage.......................................................................................................................................................................... 6
Chapter 2 – Batch documentation ............................................................................................................................. 7
Post-application documentation .................................................................................................................................... 7
Chapter 3 – Commissioning....................................................................................................................................... 8
Overview – Assembly of the label printer ...................................................................................................................... 8
Inserting the label roll .................................................................................................................................................... 9
Removing jammed labels ............................................................................................................................................ 11
Setting the date ........................................................................................................................................................... 12
Inserting the inking roller ............................................................................................................................................. 12
Removing the inking roller........................................................................................................................................... 13
Measures for use - example........................................................................................................................................ 13
Measures for use - example........................................................................................................................................ 14
Glossary..................................................................................................................................................................... 16
Appendix - Accessories............................................................................................................................................ 17

Operating Manual MELAdoc label printer
4
Chapter 1 – What does the MELAdoc do?
MELA
doc
serves the:
Documentation of the clearance decision
Labelling the medical product
Traceability.
Clearance:
Instrument preparation ends with the documented clearance for storage and use
(according to RKI: “Hygiene requirements for the treatment of medical products”). The
respective clearance decisions may only be carried out by authorized and expert personnel and
must be documented. The clearance procedure consists of the steps procedure clearance,
batch clearance and clearance of the sterilized equipment.
1. Documentation of the procedure clearance
2. Documentation of the batch clearance
3. Labelling and clearance of the sterilized equipment
4. Storage
5. Post-application
documentation
Documentation of the procedure clearance
Daily routine inspection and commissioning of large steam sterilizers is described in DIN
58946-6:2002. The norm for the operation of small steam sterilizers is currently being
formulated. We recommend:
A visual inspection
Visual inspection of the autoclave chamber, the door seal, door lock, and where
necessary, further checks in accordance with the manufacturers instructions
Inspection of the operating materials
Quality of the feed water (automatically with MELAG Euroklav
®
, Vakuklav
®
and
Cliniklav
®
25),
Cooling water provision, electricity provision
Printer paper
Steam penetration test
For large steam sterilizers: Bowie&Dick test.
For small steam sterilizers of the class “B”: Helix test.
For small steam sterilizers of the class “S”: Follow manufacturer’s instructions.
For the MELAG Euroklav
®
, you can use a Bowie&Dick test on porous basis of e.g. 3M.
Background:
Daily routine inspection using a Bowie&Dick test is described in DIN 58946-
6:2002 (operating large steam sterilizers). The norm design for the operation of small steam
sterilizers is oriented around the norm for large steam sterilizers. Differing from this, for class “B”
autoclaves instead of the Bowie&Dick test, we recommend a Helix test according to EN 867-5.

Operating Manual MELAdoc label printer
5
Documentation of the batch clearance
Batch clearance assesses and documents the success of the sterilization procedure.
Assessing the success of the process
The success of the sterilization procedure is assessed using the protocol print out, the
autoclave display or a software output.
A log print-out requires written evaluation. The print-out can be signed or a label can be
affixed to the rear side.
Controlling the batch indicators added
The use of an indicator system increases process reliability. The MELAcontrol
®
Helix
test body can be used as a batch indicator for class “B“ autoclaves or large steam
sterilizers.
Batch indicators
can increase reliability.
For further validation of the success of the
sterilization procedure we recommend adding batch indicators (e.g. MELAcontrol). The
impossibility of making a certain prediction of the likely appearance of a successfully
coloured indicator after five or more years (return discolouration), means that it is
necessary to make a written record of the successful colour change. It is not necessary to
store the indicators.
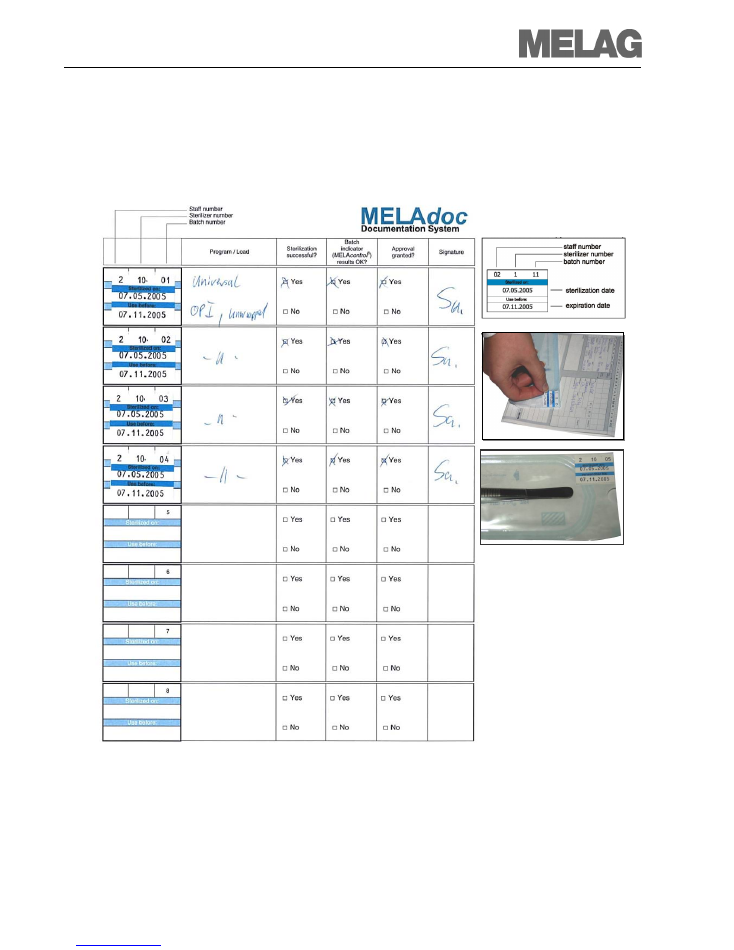
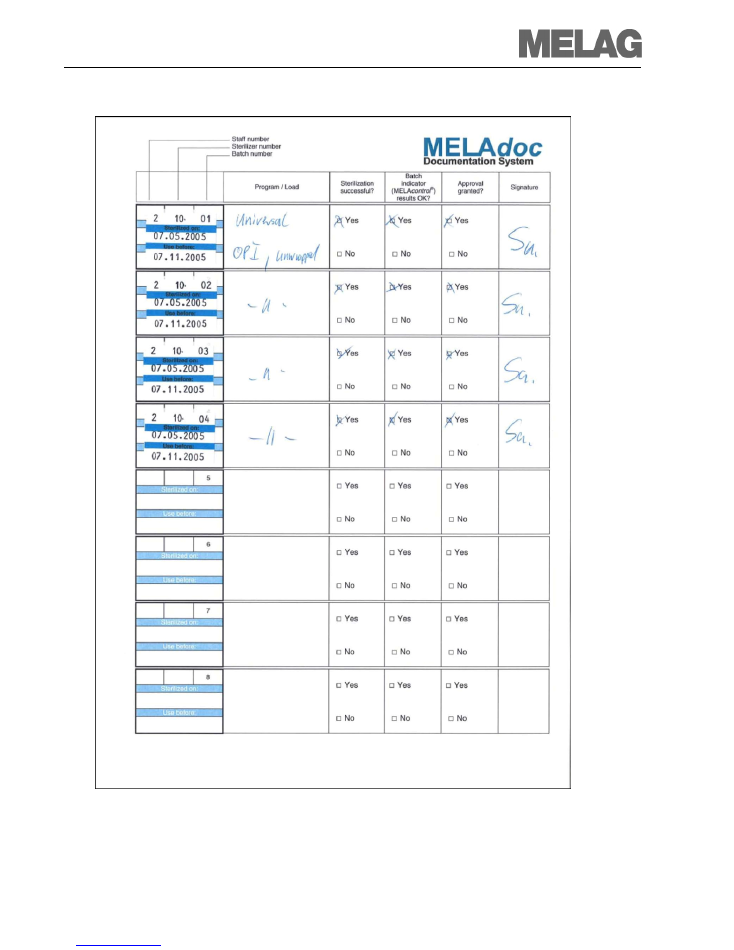
Documentation of the (daily) procedure clearance in the batch control sheet, consisting of
label, entry and signature.
Labelling and clearance of the sterilized equipment
Every sterilization package must be controlled and cleared after successful sterilization.
Visual control
The transparent sterilization packaging must be undamaged and dry. The container
must be closed securely or sealed with sterilization tape, so that any early opening
during the storage time can be recognized easily. Also check the labelling of the
container (information regarding the contents).
Controlling the treatment indicators
The treatment indicators on the transparent sterilization packaging or the sterilization-
tape used must have coloured successfully.
Labelling the sterile equipment
The sterile equipment is cleared by adding a label. It is possible that individual items
in a batch cannot be cleared e.g. due to damage to the individual transparent
sterilization packaging.
Operating Manual MELAdoc label printer
6
Storage
Loss of sterility
is dependent less on the length of the storage time as from external
influences during storage, as well as transport and handling. When opening the
packaging, dust and microorganisms deposited on the packaging during the storage
time can fall on the instruments, thus contaminating them. An ideal storage time can
thus not be generally specified.
Specification
of a suitable storage time is to be taken from the hygiene plan.
Responsibility for the storage conditions and length rests with the practice operator.
Damage to the sterilization packaging
usually follows isolated events and is not a
factor of time. Primary and secondary packaging may only be opened immediately
prior to use. Remove all dust on the packaging before doing so.
Primary packaging
is the sealed packaging system surrounding the medical product
and holding it sealed from all germs (DIN EN 868-1:1997-05).
Secondary packaging
is the packaging containing one or more medical products,
each of which enclosed in its own primary packaging (DIN EN 868-1:1997-05).
Responsibility
for maintaining the specified storage requirements and times rests
with the facility operator.
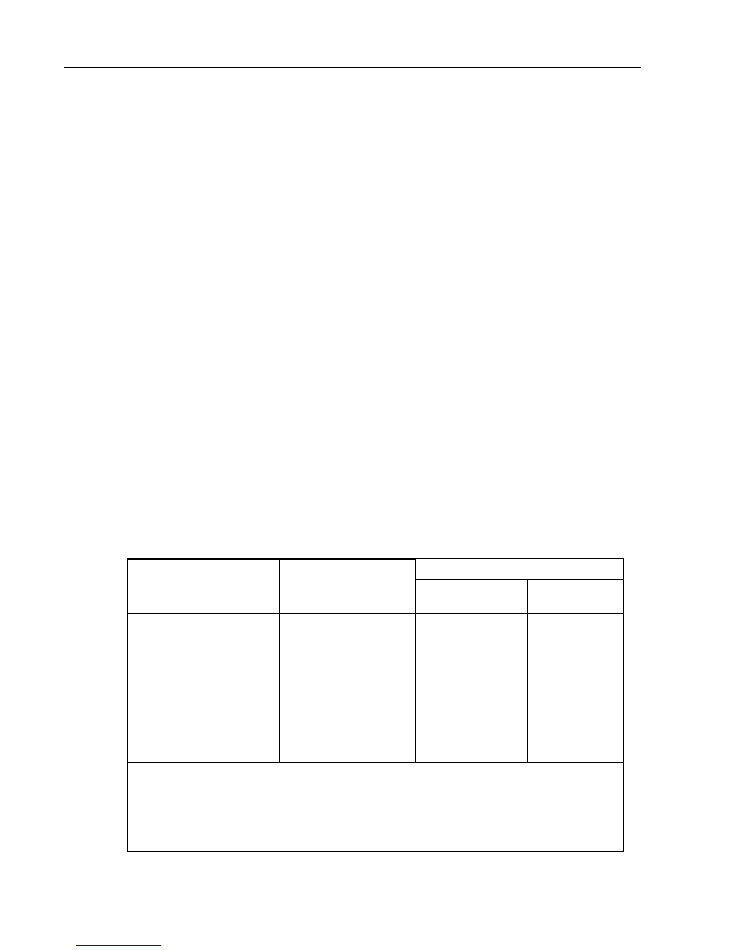
Storage length according to DIN 58953-8 from October 2003:
Storage period
Sterilized material
packaging
Packaging type
Unprotected
storage
1
Protected
storage
Paper bag in
accordance with DIN
EN 868-4 and heatable,
self-sealing transparent
bag and tubing of paper
and plastic composite
film in accordance with
DIN EN 868-5, or other
equivalent packaging.
Sterilized material in
primary or secondary
packaging
Serves provision
for immediate
use.
2
To be avoided
as method of
storage
6 months,
although no
longer than
expiry date
3
1)
On shelves in rooms which do not correspond with room class 1 as defined by DIN 1946-4
(Ventilation air conditioning) 1999-03, table 2
2)
Immediate use means application / use of the product within a maximum of 2 days / 48
hours.
3)
Experience has shown that exceeding the storage period when using this type of package
is not to be recommended for both practical and economical reasons.
Operating Manual MELAdoc label printer
7
Chapter 2 – Batch documentation
Batch documentation completes the batch clearance.
The documentation in the batch control sheet is to be completed with a label, entries and a
signature. An unsuccessful clearance must also be documented.
Post-application documentation
After use of the medical product, the labels can be removed from the packaging and fixed to the
operation protocol or in the patient records. This enables traceability via the patient records from
the application to sterilization process.
Operating Manual MELAdoc label printer
8
Chapter 3 – Commissioning
Overview – Assembly of the label printer
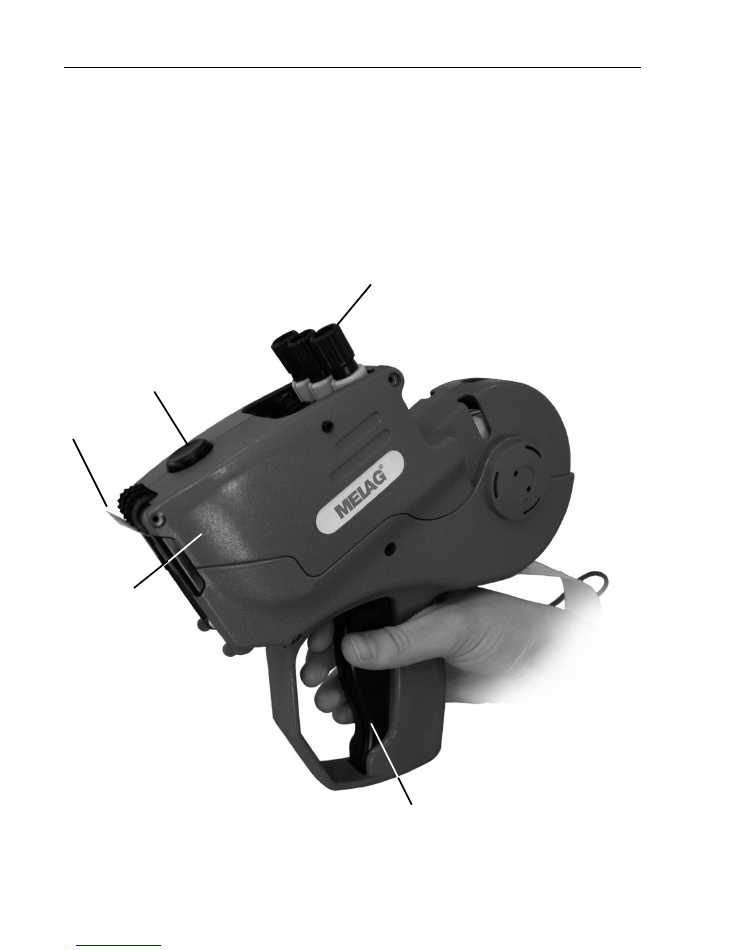
E) Label printing
trigger
C) Label ejection
B) Release
button to open
A) Setting wheel for
setting date
D) Hinged top
section
Operating Manual MELAdoc label printer
9
Inserting the label roll
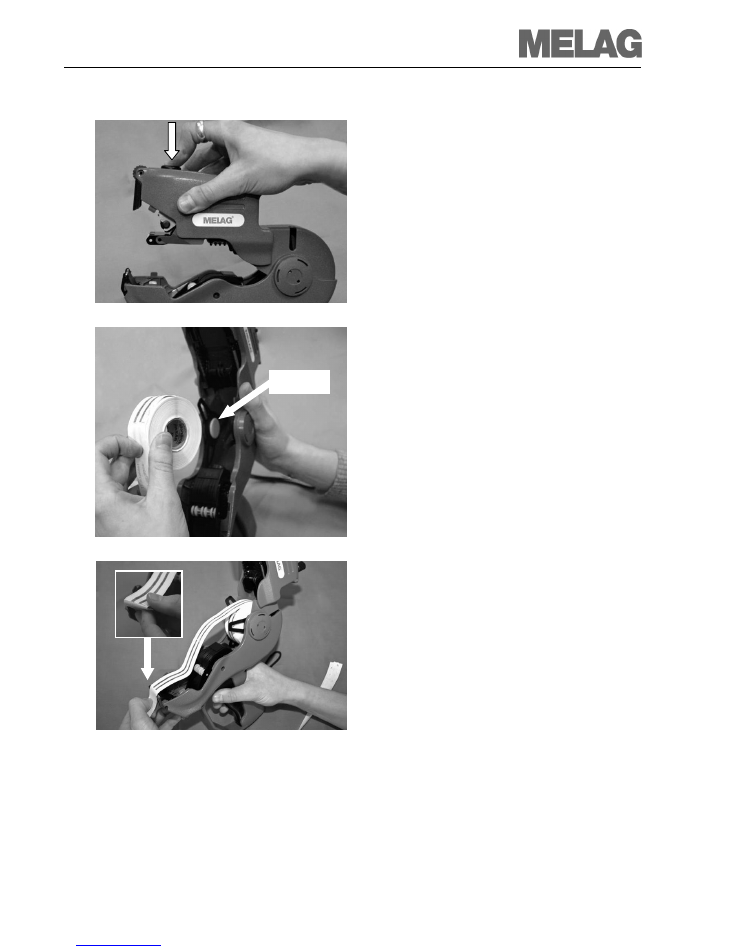
Opening the label printer
Press the black release button (see page 8,
overview, B)) located on the housing and
open the upper section of the label printer
backwards.
Inserting the label roll:
1. Remove the new label roll from its
packaging; extend around 18 cm and
dispose of the first 12 labels.
2. Push the roll into the bracket until it clicks
into position.
3. Lay the free strip over the label guide and
extend it c. 15 cm. The first label on the
strip must finish directly on the guide. To
ensure an improved grip at this point, kink
the strip (see detail left) and hold it in
position whilst closing the top section.
bracket
Operating Manual MELAdoc label printer
10
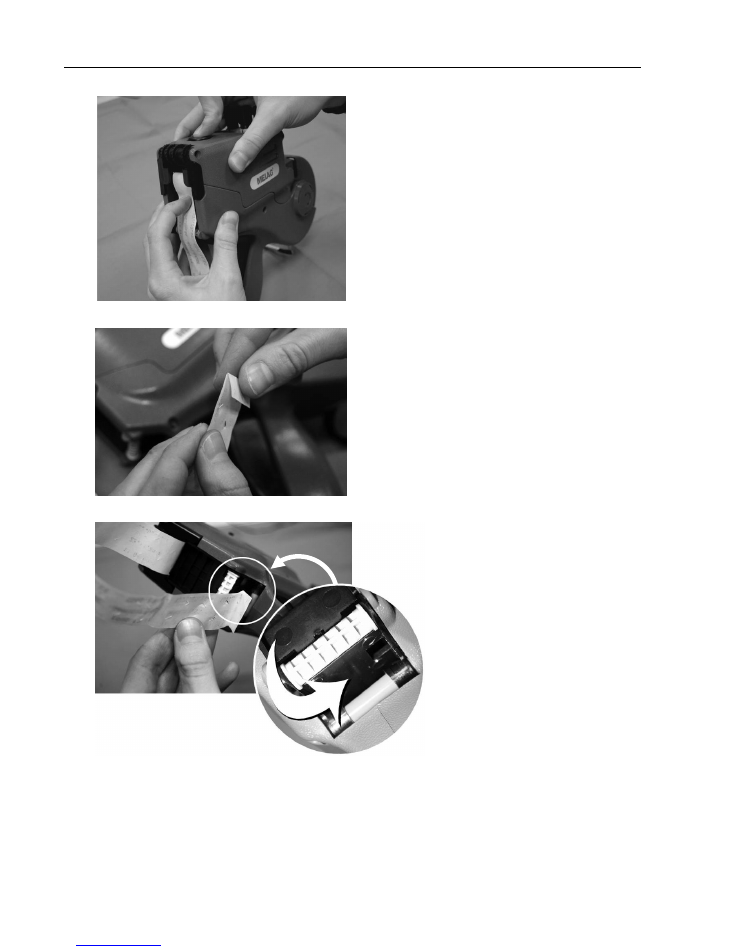
4. Close the label printer. Ensure that the
strip is held in position so that it is not
pulled into the machine. This is important
to ensure faultless central pressure.
5. Kink the free end of the label strip
downwards.
This makes it easier to feed the free strip
into the label printer as will be described.
6. Guide the hanging strip below into the
opening of the lower shaft located
underneath the white guide roll (see
detailed diagram left) and push in as far
as is possible.
Operating Manual MELAdoc label printer
11
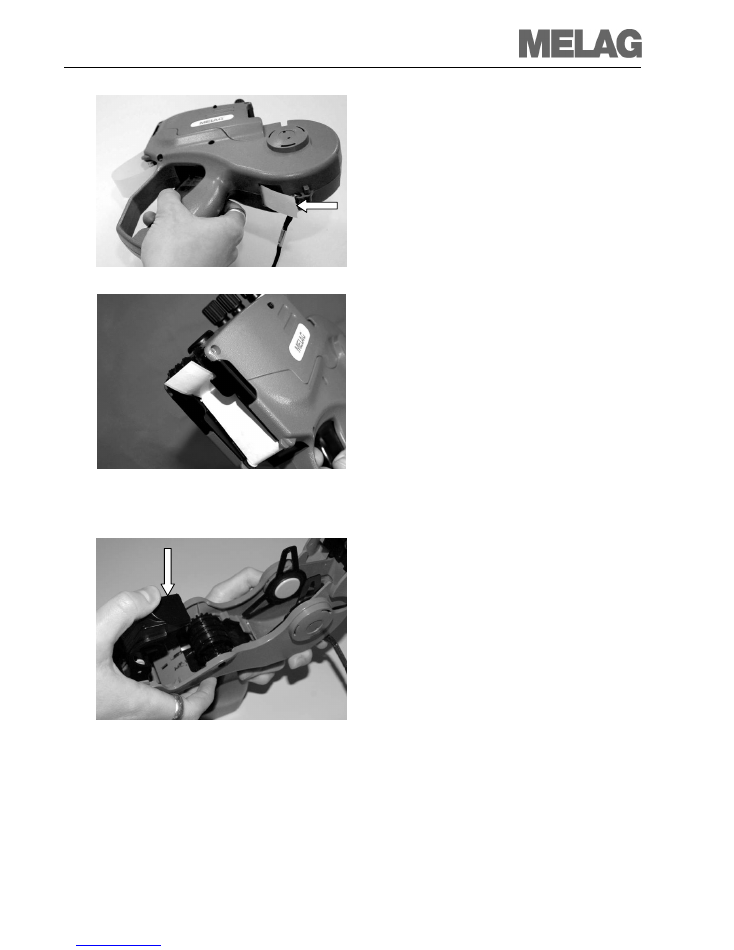
7. Press the trigger (page 8, overview, E)),
until the strip has been fully taken in and
has left the rear shaft (see diagram left).
The label strip may require feeding by
hand so that it is drawn in.
8. The first printed label issued from the
guide needs to be removed. It will have
been printed over several times.
The MELAdoc is now ready to print.
Removing jammed labels
1.
Open the MELAdoc (see page 9,
Opening the
label printer
) and pull out the label roll.
2. Remove all loose labels in the interior of
the label printer.
3. Open the label guide upwards and to the
left as shown in the diagram on the left. In
this way you can access and remove the
jammed labels.
4. Shut the label guide.
5. If necessary, use a standard label remover to remove adhesive residue.
6. The label roll can then be returned to the MELAdoc label printer.
Operating Manual MELAdoc label printer
12
Setting the date
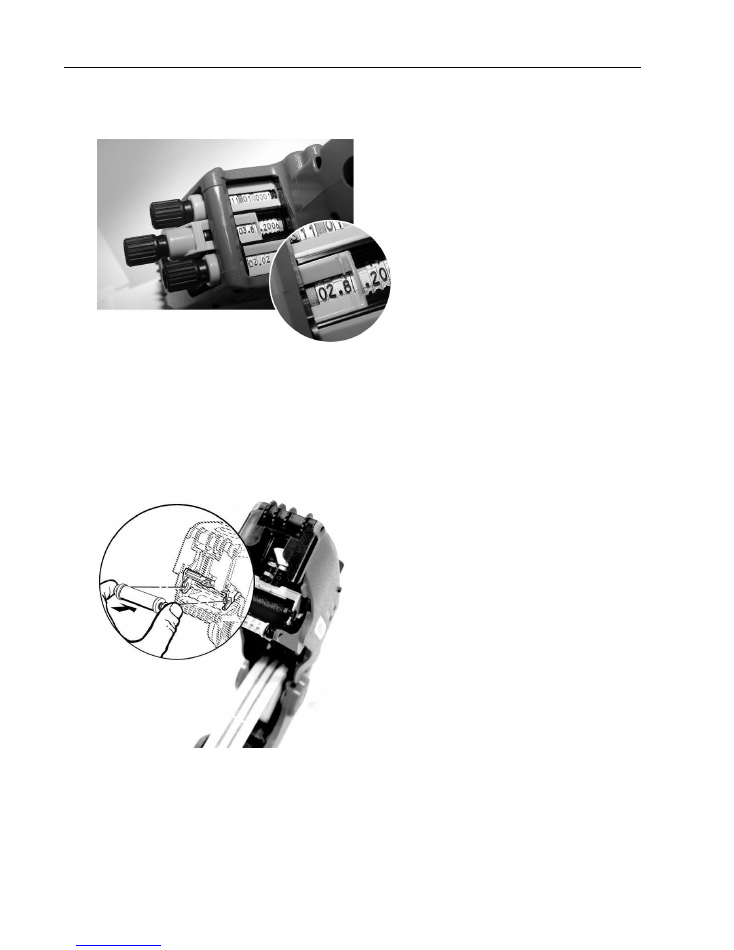
7. Pull out the setting wheel to change the personal number, date etc.
8. Move the marker (see detailed diagram) to the position to be changed. Turning the black
wheel sets the desired value.
9. After having set the value, return the wheel to its starting position.
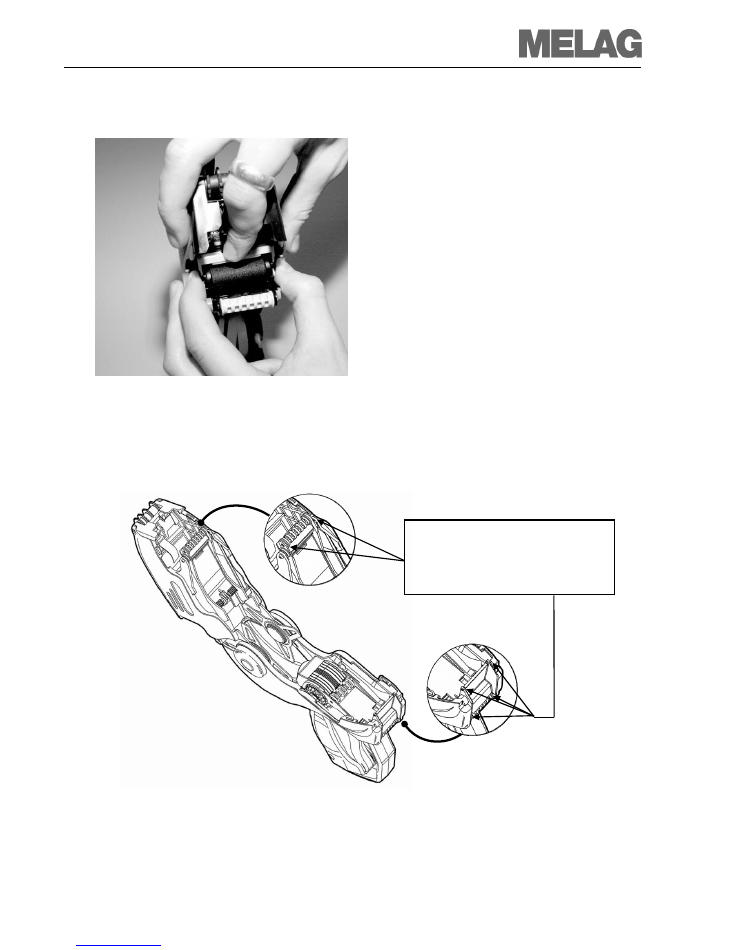
Inserting the inking roller
Open the device to insert the inking roller
(see page 9,
Opening the label printer
)
1. Open the packaging of the inking roller and
remove it.
2. Hold the inking roller horizontal by its ends
as depicted.
3. Insert the inking roller in the bracket using
a little pressure until it clicks.
Note!
Do not touch the inking roller at any point
other than at its both ends. Otherwise, the
ink will colour.
Operating Manual MELAdoc label printer
13
Removing the inking roller
Before removing the inking roller, it is
necessary to open the label printer.
1. Open the MELAdoc label printer as
described above.
2. Hold the inking roller by its ends as
depicted. Depress the lever-shaped
ejector button with the small arrow. This
releases the ends of the inking roller from
its anchoring and it can be removed.
3. The empty inking roller can be disposed
as domestic waste.
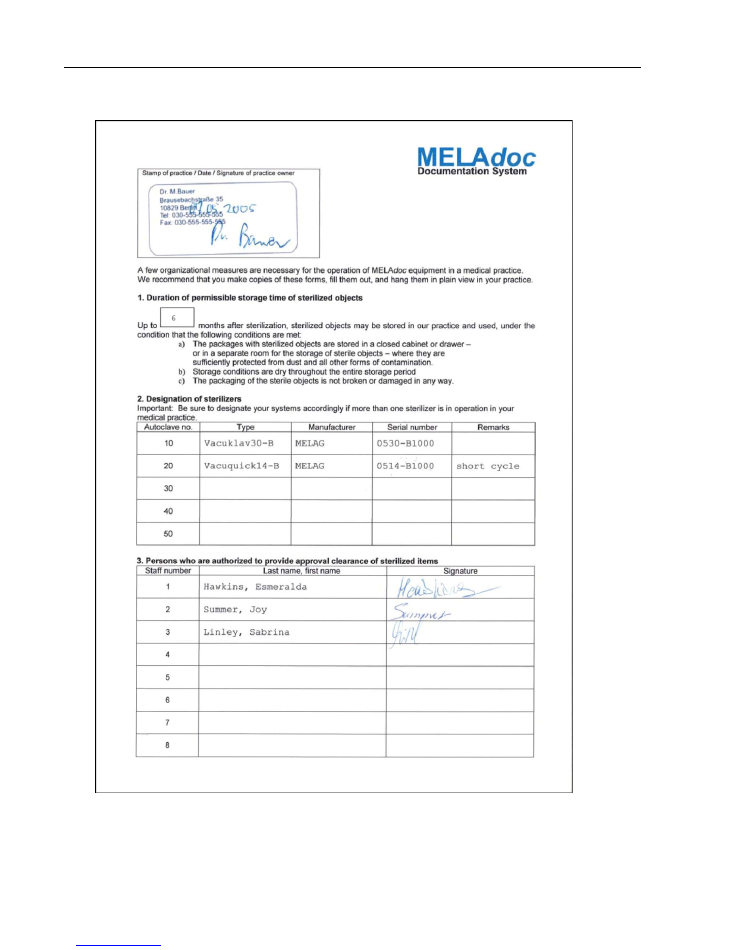
Maintenance:
To guarantee faultless functioning,
add a drop of standard silicone-based
lubricant at the locations indicated.
Operating Manual MELAdoc label printer
14
Measures for use - example
Operating Manual MELAdoc label printer
15

Operating Manual MELAdoc label printer
16
Glossary
Bowie&Dick test
Checks and simulates the steam penetration of a 7kg textile package. A load of this size is
usually not permitted for small steam sterilizers Moreover, experience shows that small
steam sterilizers are more often used to sterilize hollow articles than textiles. Of greater
practical relevance for hollow bodies is verification using a steam penetration test (Helix
test). The Helix test sets greater requirements for the autoclave than the Bowie&Dick test.
For the Helix-Test, MELAG recommends the
MELAcontrol
®
(Article No. 01080).
Vacuum test
In accordance with DIN 58946-6:2002, this test must be carried out for large steam
sterilizers on a monthly basis, as far as the manufacturer has not prescribed shorter test
intervals (e.g. daily). With small steam sterilizers, this test only serves the purpose of
trouble shooting when errors occur (e.g. upon a failed Helix test). As long as the
manufacturer has not issued any further specifications, the test should not be performed
on a daily basis.
Empty chamber sterilization
This procedure removes any condensate remaining in the steam conduits of a large
steam sterilizer from the previous day. This also serves to pre-warm the sterilizer.
Whether empty chamber sterilization is necessary is determined by the respective
manufacturer. MELAG autoclaves do not require empty chamber sterilization.
Indicators
The impossibility of making a certain prediction of the appearance (return discolouration)
of a coloured indicator (Helix test or Bowie&Dick test) after five or more years means that
it is necessary to make a written record of the successful colour change. It is not
necessary to store the indicators used.
Operating Manual MELAdoc label printer
17
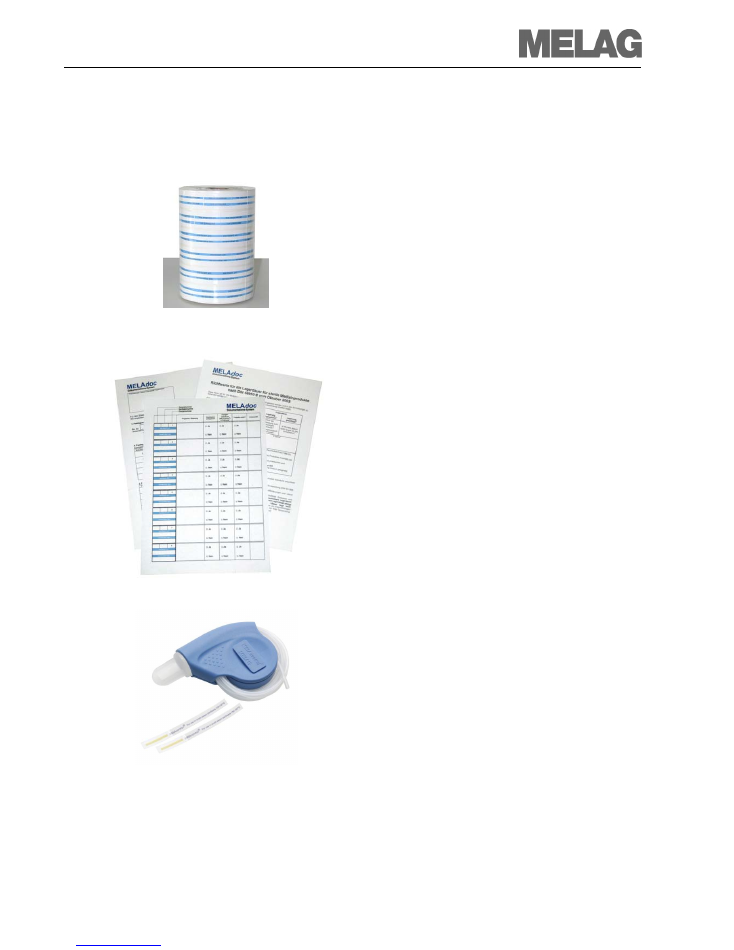
Appendix - Accessories
MELA
doc
labels
6 replacement rolls with 750 labels, including an
inking roller (Article No. 01096*).
MELA
doc
documentation sheets
1 block contains 100 sheets. We recommend
using a single sheet per day and per autoclave.
(Article No. 01091).
MELA
control
®
– Batch control system
MELAcontrol
®
is a test system for the purpose of
batch control and testing the functioning of the
fractionation of a pre-vacuum of a “class
B“ autoclave or a MELAG Cliniklav
®
25 in
accordance with EN 867-5.
The practice set consists of 1 test body (Helix)
and 250 indicator strips (Article No. 01080*).
* Exclusively available from a specialist stockist
www.melag.com