Full Text Searchable PDF User Manual

OWNER’S MANUAL
Use of more than one GFCI on the same electrical circuit
will render your spa-Ô inoperable. The spa-Ô requires
a dedicated outlet, see page 8 for more information on
electrical requirements.
Please read this owner’s manual carefully, as it is designed to provide you with instructions for the
safe use of your new spa-Ô.
IMPORTANT
UNSCREW AND REMOVE THE SHIPPING BLOCS FROM THE UNDERSIDE
OF THE SPA BEFORE INSTALLATION.
Spa-Ô manufactured by Lumi-O International Inc.
1-866-99LUMI-O
•
www.lumi-o.com
Online warranty registration
www.lumi-o.com
or call our spa-Ô customer service
at 1-866-99LUMI-O

TABLE OF CONTENTS
Table of Contents
2
Specifications
3
Important Safety Instructions
4 to 6
Selecting a Safe Location
7
Electrical Requirements
8
Filling and Start-Up Instructions
9 to 11
Control Reference Guide
12-13
Diagnostic Messages
14
Water chemistry and care
15
Care (continue)
16
Winterizing
17
Frequently Asked Questions
18
Troubleshooting Tips
19-20
Limited Warranty
21
Spa Cover Installation and Limited Warranty
22
2

SPECIFICATIONS
Thank you for choosing spa-Ô
• 5 seats: 4 ergonomic moulded seats ;1 deep rest seat
• 12 jets including 8 adjustable, directional hydrotherapy jets
- 10 back-massage jets
- 2 foot-massage jets that also facilitate water circulation and filtration
• 4 refreshment holders (bottle size)
• Full insulation – 4-season indoor or outdoor enjoyment
• Digital control for jets, temperature & L.E.D. light
- Automatic filtration cycle
• 2 independent air control valves for jets
• Dry weight: approx. 138 kg (305 lbs); filled weight: approx. 1,134 kg (2,500 lbs)
• Electrical: plug into dedicated 110-volt, 15-amp, outlet
• Pump: 1 HP - 2 speeds
• Heater: 1kW, can be upgraded to 4 kW (220 volts) (by a certified electrician to maintain warranty validity)
• Drain valve can be connected to a regular garden hose
• Dimensions: diameter – 213 cm (84”); Height: 74 cm (29”)
• Unique patented sliding step
• 76-mm (3”) thick vinyl cover included
• Holds 1,000 litres (220 US gal) of water
3
IMPORTANT SAFETY INSTRUCTIONS
This owner’s manual contains
IMPORTANT SAFETY INSTRUCTIONS
READ AND FOLLOW ALL INSTRUCTIONS CAREFULLY
“ KEEP THESE INSTRUCTIONS ”
Most cities, counties, states/provinces, and countries require permits for exterior
construction and electrical circuits. In addition, some communities have safety codes
requiring the property to be equipped with residential barriers such as fencing and/or
self-closing gates to prevent unsupervised access by children to pools or hot tubs. Be sure
to check with your local agencies for specific requirements.
THIS WARNING SIGN MUST BE POSTED BEFORE THE SPA IS USED!
THE SPA-Ô IS FOR RESIDENTIAL USE ONLY!
Any commercial or rental use will void manufacturer’s warranty
4
WARNING
SOAKING IN HOT WATER DURING PREGNANCY MAY CAUSE DAMAGE TO THE FOETUS.
CONSULT YOUR PHYSICIAN BEFORE USE
PREVENT DROWNING
SPA HEAT SPEEDS UP THE EFFECTS OF
ALCOHOL, DRUGS OR MEDICATION AND
CAN LEAD TO LOSS OF CONSCIOUSNESS.
IMMEDIATELY LEAVE SPA IF UNCOMFORTABLE OR SLEEPY.
PREVENT CHILD DROWNING
WATER ATTRACTS CHILDRENALWAYS BE SURE TO PUT SPA COVER
BACK ON AFTER EACH USE.

IMPORTANT SAFETY INSTRUCTIONS
When installing and using this electrical equipment, basic safety precautions should always be followed to prevent
any risk of personal injury or death.
1.
Never allow the spa to be used with less than two (2) people present.
Someone should be present in case the bather requires assistance due to injury, cramping, drowning, etc. Children should
never be allowed to use the spa without the direct supervision of a responsible adult.
2.
Always use care in and around your spa.
The spa has many rigid, unyielding parts and many areas become wet and slippery; these are all potentially dangerous
when rough play is allowed or if care is not used particularly when entering or leaving the spa.
3
.
Always use the appropriate outlet.
This unit is equipped with a 3-pin 120V 15A ground-fault circuit interrupter (GFCI). Always plug this equipment into an
appropriate outlet. The GFCI should only be plugged into a dedicated 110-volt /15-amp outlet.
4.
Prevent unauthorized access – Risk of Accidental Drowning
Extreme caution must be exercised to prevent unauthorized access by anyone, especially children. To avoid accidents, en-
sure that children are prevented from using this spa unless they are supervised by an adult at all times.
5.
Replace broken or missing drain cover immediately – Risk of Injury.
The suction fittings in this hot tub are sized to match the specific water flow created by the pump. Should the need arise
to replace the suction fittings or the pump, be sure the flow rates of the new fittings are compatible. Never operate the hot
tub if the suction fittings are broken or missing. Never replace a suction fitting with one having a lower flow rate than the
original suction fitting. Always use new, pristine, unrefurbished parts in your hot tub. Accidents can occur when long hair or
a body part becomes suctioned into a drain or outlet because the cover has been removed or is broken or blocked. Be sure
to clean the faceplate regularly. Children are particularly vulnerable, and they should be warned against this danger.
6.
Install away from all metal surfaces – Risk of Electric Shock.
In most case, the unit must be installed at least 1.5 m (5 feet) from all metal surfaces. As an alternative, a hot tub may be
installed within 1.5 m (5 feet) of metal surfaces if each metal surface is permanently connected by a minimum of 8 AWG
(8.4 mm²) solid copper wire conductor to the wire connector on the power pack provided for this purpose,
Consult city, county, state/provincial, and federal regulations for applicable requirements. Be sure to check with your local
agencies for specific requirements
7.
Keep electrical applicances away from spa – Risk of Electric Shock.
Do not allow any electrical appliance, such as a lamp, telephone, radio, television, etc, to be placed within 1.5 m (5 feet) of
a spa or water.
8.
Keep the water clean and sanitary at all times.
Your filter system will remove suspended particles from the water. Regular application of spa chemicals in proper quantities
will destroy harmful bacteria and prevent algae from forming. Your surface skimmer will remove insects, leaves, and other
debris from the water’s surface. Unsanitary water is a serious health hazard and so are unbalanced chemicals. Please see
your retailer for appropriate chemical balance to be maintained.
Accidents can occur when long hair or a body part becomes suctioned into a drain or outlet because the cover has been
removed or is broken or blocked. Be sure to clean the faceplate regularly. Children are particularly vulnerable, and they
should be warned against this danger.
THE GFCI SHOULD BE PLACED IN A DRY, SAFE PLACE
5

IMPORTANT SAFETY INSTRUCTIONS
9.
The water in your spa should NOT be warmer than 38°C-40°C (100°F-104°F).
The National Spa and Pool Institute considers a temperature of 100°F (38°C) safe and comfortable for a healthy adult. Most
healthy adults can enjoy this water temperature for as long as desired, although it may raise the body temperature to the
water temperature and eventually become uncomfortable (like a fever). At higher water temperatures the soaking time
should be shorter; never soak for more than 20 minutes when the water temperature is 102°F (39°C) or higher. If you are
planning a long rest in the spa, lower the water temperature closer to normal body temperature, about 98,6°F (36.6°C).
Some people find even lower water temperatures relaxing and pleasing. Try different water temperatures in the 98°-102°F
(36.6°-39°C) range until you find what temperatures suit you best.
A. Persons suffering from obesity or with a heart condition, low or high blood pressure, circulatory problems, or dia
betes should consult a physician before using a spa.
B. People with infectious diseases should not use the spa.
10. Prolonged immersion in hot water may induce heat stroke.
Heat stroke occurs when internal body temperature reaches a level several degrees above the normal body temperature
of 37°C (98.6°F). The symptoms of heat stroke include: dizziness, fainting, drowsiness, lethargy, increased internal body
temperature. The effects of heat stroke include: unawareness of impending hazard, failure to perceive heat, failure to
recognize the need to exit spa, physical inability to exit spa, unconsciousness which may result in drowning.
11. WARNING—Consumption of alcohol, drugs, or medication can greatly increase the risk of fatal
heat stroke in hot tubs or spas.
Despite the popular image of people in spas drinking wine or other alcoholic beverages, DO NOT consume alcoholic
beverages before or during spa use. Alcohol is a depressant which causes slower reflexes and drowsiness, especially in
conjunction with relaxing hot water. This can lead to sleep or unconsciousness and possibly result in drowning. Using your
spa with other people who are also drinking is not a preventative measure since they are likely to become similarly affected
by the combination of alcohol and soaking in hot water.
Soaking in hot water causes changes in the circulatory system, such as enlargement of blood vessels near the skin.
Therefore, people with a medical history of heart disease, circulatory problems, diabetes, and high or low blood pressure
should consult their physician before using a spa. Additionally, people taking medications causing drowsiness, such as
tranquilizers, narcotics, antihistamines, or anticoagulants should not use spas without their physician’s advice.
12. DO NOT
use glass or other breakable items in or around your spa. Do not remove spa cabinet panels and attempt to
make repairs. Do not attempt electrical repairs. Retain a certified licensed electrician to do so.
6

SELECTING A SAFE LOCATION
Your new spa will provide you and yours with hour upon hour of healthy, relaxing pleasure. The following
suggestions and recommendations will help you select a safe and compatible site for your spa, maximizing your
enjoyment.
1. No Overhead Power Lines
Do not locate your spa under or near overhead power lines or existing electrical circuitry whether these are under or above
ground. See a certified licensed electrician for additional information or to learn about security codes applicable to your
installation.
OUTDOOR INSTALLATION
Level, Sturdy Foundation
The installation site, whether it is a concrete slab or deck, must provide a solid foundation with a minimum load bearing
capacity of 366 kg/m² (75 lbs/ft²) OR MUST BE ABLE TO SUPPORT A TOTAL WEIGHT OF 1,150 1,365 KG (2,500 3,000 LBS).
Do not install your spa on a site prone to flooding.
For safe support, the structure must be sturdy and level to ensure even weight distribution once the spa is filled with
water.
INDOOR INSTALLATION
For indoor installation, the area where the spa is installed must have a 213-cm (85”) door.
Given the high levels of humidity and harmful corrosive effect of sanitation chemicals, the spa-Ô’s location in the house
should be equipped with adequate ventilation.
Drainage must be provided for splashing water.
It is strongly recommended to avoid installing the spa-Ô on the second floor of the house.
7

ELECTRICAL REQUIREMENTS -
DANGER – RISK OF ELECTRIC SHOCK
Installations that do not comply with the following procedures and requirements may expose users to electric shock.
Non-compliant installations will result in warranty nullification.
This hot tub’s electrical wiring must comply with all applicable requirements of the federal, provincial/state and
local building codes. The electrical circuit (outlet) must be installed by a certified electrical contractor and
approved by a local electrical installation inspection authority.
1.
Any metal surface located within 1.5 m (5 feet) must be grounded to the hot tub. Use an 8 AWG (8.4 mm²) solid copper
wire and attach it to the grounding lug on the power pack, located in the equipment compartment.
2.
Power supply installation must include a suitably rated ground fault circuit interrupter (GFCI) as required by NEC Article
680-42. The circuit breaker must be dedicated and should not be shared with any other appliance. It must be labelled
and easily accessible to users.
3.
The electrical circuitry for the hot tub must include a suitably-rated switch or circuit breaker to open all ungrounded
supply conductors in compliance with Section 422-20 of the National Electric Code, ANSI/NFPA 70. The disconnecting
means must be readily accessible to the hot tub’s occupant but installed at least 1.5 m (5 feet) from the hot tub water.
4.
Power supply must be hard wired into the power pack. DO NOT use extension or plug-type cords of any kind. The instal
lation of a shut-off box near the hot tub is also recommended. This box provides a quick and convenient method to shut
off power to the hot tub for emergencies and maintenance.
5.
Power supply wiring must be properly sized as per the NEC (National Electric Code). A grounding wire must be provided
that is as large as the largest current carrying conductor, but no less than 8 AWG (8.4mm²). Use copper wiring only.
6.
Open the front cover of the power pack, and follow the instructions and wiring diagram printed on the back of the
cover.
7.
All 120 VAC powered models must use the provided GFCI cord plugged directly into a dedicated grounded wall outlet.
CIRCUIT BREAKER REQUIREMENTS
A GFCI is included with your new spa-Ô. You should not use it in an outlet where another GFCI is already plugged. Two GFCIs
in contact will render the spa-Ô inoperable. If you need to take out the GFCI included with the spa-Ô, make sure you use
a 240 VAC 10 VAC 0 -15 amps capacity – 14-3 gauge wire. Do not use an existing breaker if its voltage and amperage is
unknown.
The spa-Ô must be connected to a dedicated GFCI circuit breaker that is not shared with any other equipment. Do not use
extension or plug type cords of any kind.
The GFCI must be protected from water, snow and extreme temperatures.
HEATER CONVERSION
For your spa’s specific instructions concerning 120 VAC to 240 VAC heater conversion see the back of your spa pack’s cover
plate. Please note that your warranty will only be valid with proof of conversion by a certified licensed electrician.
When configuring the output voltages on the spa-Ô System, remember to also consider the amperage of each component.
Be sure the total amperage draw does not exceed the capacity of the system’s circuitry and power supply.
Reminder: The spa equipment requires a dedicated 15 amp outlet. The use of an extension cord will void your warranty.
Carefully read all of the safety requirements before plugging in the spa. Make sure that the electrical cord has been
routed properly. Do not supply electrical power at this point.
8

FILLING AND START-UP INSTRUCTIONS
WARNING: DO NOT SUPPLY POWER TO AN EMPTY SPA!
IMPORTANT
UNSCREW AND REMOVE SHIPPING BLOCS BEFORE INSTALLATION
The following procedures should be followed on initial start-up and whenever the hot tub is drained and refilled during
routine maintenance.
STEP 1: FILLING
1.
Remove and save access panel screws. Use caution when reinstalling the screws. Do not over tighten.
2.
Open access panel.
3.
Find power cord with G.F.C.I. and inspect the full length of the cord for any damage before each use.
4.
Route G.F.C.I. power cord underneath the access panel through the cord channel in the front bottom access panel.
5.
The spa drain valve assembly includes a flexible drain pipe. Shut off valve and safety drain cap located in the equipment
compartment. Check to be sure that the drain valve is closed and that the drain safety cap is securely in place.
6.
Clear all the debris from your hot tub.
7.
Make sure all jets are open to allow as much air as possible to evacuate from the plumbing system while you are filling
the spa. When the spa is ready for use, the water level should be above the jets at all times.
8.
Take out the cap under the skimmer cover and fill with gravel; put the cap back in place.
9.
Fill the spa with cold (never hot) water to 150 to 200 mm (6” to 8”) below the top edge of the spa. Maintain water level
above the jets at all times. Use a garden hose to fill your hot tub.
NOTE: Do not use water from home water heater or softened water.
10.
As the water level rises, check inside the equipment compartment for water leaks. It may be necessary to tighten the
jets that may have loosened during shipping and delivery. There is no need to call for service; you can easily do this
yourself (see Troubleshooting Tips for instructions). If assistance is required, your dealer or maintenance service may
charge a small fee.
11.
Keep in mind that every person who enters the spa will create a certain amount of water displacement, depending on their
size and weight—as a result you may need to reduce the amount of water you normally have in the tub, so as to prevent the
water from splashing onto your topside control or flowing over the top of the hot tub.
9
FILLING AND START-UP INSTRUCTIONS (continue)
STEP 2: START UP
Please review the following procedures and power-up procedures before supplying power:
I – Connection
1.
Check the voltage at the main power panel to be sure you have the correct voltage for the POWER SYSTEM being used. Also,
be sure the voltage is within + or – 10% of the mean voltage. For 120 VAC it should be between 108 VAC and 132 VAC.
2.
Test and reset the GFCI. If it does not operate properly, do not apply voltage to the Power System until the problem has been
corrected.
II – Initial Set-Up
1.
Apply power by turning on your dedicated GFCI circuit breaker (120 VAC).
2.
When your spa is initially powered up, it will go into priming mode, indicated by PR on the display panel. During priming
mode press JET button repeatedly (10-15 times) and make sure all air is exhausted from the pump. The Priming Mode will take less
than 5 minutes and then the spa will begin to heat.
3.
Make sure the jets are all wide open.
4.
Press the JET button on the topside control panel to activate the spa. Rotate the air control valves to “Max” and observe the increased
jet action.
5.
While the pump is running, check again for water leaks at the drain joints, or fittings in the equipment compartment. If
water is leaking from one of these areas, there is no need to call for service, refer to Troubleshooting Tips to learn how to
tighten the fitting. If assistance is required, your dealer or maintenance service may charge a small fee.
6.
Once you are sure your spa has no leaks, adjust the temperature control to the desired level and turn off the high-speed pump.
10

11
FILLING AND START-UP INSTRUCTIONS (continue)
ADJUSTING HYDROTHERAPY JETS
The Hydrotherapy Jets are recessed and located in the wall of the hot tub.
These jets may be adjusted for both flow rate and direction:
• To adjust each jet’s direction simply rotate the eyeball fitting in the direction desired.
• To adjust each jet’s flow rate, rotate its outer faceplate counter clockwise to increase the flow or clockwise to decrease
the flow.
The bottom jets can not be closed or turned to prevent closure of all jets which would damage the spa.
AIR CONTROL ADJUSTMENT
The air control valve regulates the amount of air mixed with the recirculated water when the jets are running. Rotate the air
control in one direction to achieve the maximum jet pressure and therapeutic action. Rotate the air control in the opposite
direction to turn air off and allow the jets to recirculate water only.
SUCTION FITTING
There are two suction fittings in your spa located at the bottom of each seat. Keeping the suction fitting clean and
unclogged is critical to the safe operation of the spa.
Do not allow anyone to play with or near the suction fitting or skimmer. Suction from these fittings can cause injury and,
possibly, drowning.
SKIMMER
The spa’s automatic skimmer is designed to remove floating debris and contaminants, such as body lotion, by drawing
water through a specially formulated filter cartridge element. It is critical that this filter be routinely cleaned or changed.
(See your retailer for details.)
To clean the skimmer cartridge:
1. Shut off pump.
2. Lift the skimmer lid.
3. Turn counter clockwise and pull up the filter assembly.
4.
Remove the cartridge and thoroughly rinse with a garden hose in clear water until the cartridge is free from dirt and debris.
5. Return the cartridge to the filter assembly. Secure the filter to the skimmer by pushing it downward until it is fully seated
then turn clockwise to lock in place.
6.
CAUTION: Never use the spa while the cartridge is removed.

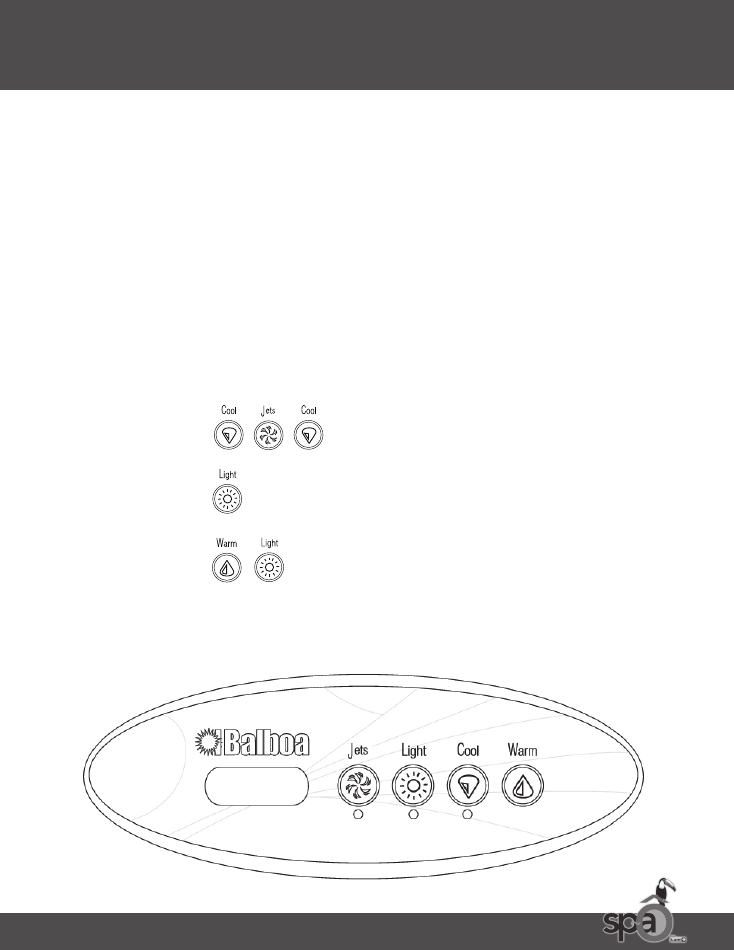
CONTROLS REFERENCE GUIDE
TEMPERATURE ADJUSTMENT
Temperature control can only be set between 26°C and 40°C (80°F - 104°F).
The last measured temperature is constantly displayed on the LCD.
Note: The last measured spa temperature displayed is current only when the pump has been running for at least 2 minutes.
On control panel, display the temperature setting by pressing Warm or Cool button once. To change the temperature setting,
press the Warm or Cool button again before the display stops flashing, each press of the Warm or Cool button will adjust
the temperature setting by 1°F.
After three seconds, the display will stop flashing and display the current spa temperature.
JETS
Firmly press the Jets button once to activate the low speed of the pump and twice for high speed. Firmly press the Jets
button again to turn off the pump. If the pump is left running at low speed, it will automatically shut off after 4 hours and, at
high speed, it will automatically shut off after 15 minutes. The low speed of the pump may run automatically at times to detect
the spa temperature and then to filter and/or heat to the preset temperature if needed, depending upon mode. When the low
speed turns on automatically, it cannot be deactivated from the panel; however, the pump can be put into high speed.
LED MULTI COLOR LIGHT
Turning the light switch quickly on and off will cause the spa’s lighting mode to change.
MODES
Your spa-Ô as been pre-programmed to “continuous” standard mode by the manufacturer. If you wish to have access to the other
modes (Ec-economical & Sl-sleep) you will need to set the #7 dipswitch to the “off” position. You will find the dipswitches in the
spa pack.
Standard Mode
(St) is programmed to maintain the desired temperature. Note the displayed spa temperature is current
only when the pump has been running for at least 2 minutes. “St“ will be displayed momentarily when you switch into
Standard Mode.
Economy Mode
(Ec) heats the spa to the preset temperature only during filter cycles. “Ec“ will display constantly when
temperature is not current, otherwise it will alternate with temperature display.
Sleep Mode
(SL) heats the spa to within 6.6º C (20ºF) of the preset temperature only during filter cycles. “Sl“ will display
constantly when temperature is not current, otherwise it will alternate with temperature display.
To change mode, press the Warm or Cool button, then the Light button. Repeat until you reach the desired mode. Once the
mode is shown on the screen, wait a few seconds before touching the arrows to ensure the spa stays on the mode you
have chosen.
12
13
CONTROLS REFERENCE GUIDE (continue)
PRESET FILTER CYCLES
The first filter cycle begins 6 minutes after the spa is powered on. The second filter cycle begins 12 hours later. Filter dura-
tion is programmable for 1 to 8 hours out of 12. The default filter time is 2 hours.
To program, press Warm or Cool button, then Jets. Press Warm or Cool button to adjust.
Press Jets to exit programming. The pump runs on low speed during filtration.
FREEZE PROTECTION
If the sensors detect a drop in heater temperature below 7ºC (45ºF), the pump will automatically activate to provide freeze
protection. The equipment stays on for 4 minutes more after the sensors detect that the spa temperature has risen to 7ºC
(45ºF) or higher. This is why it is highly recommended to start the spa only when temperatures exceed 0ºC (32ºF).
REMINDER
Change filtration cycle
repeat until desired cycle
Change lighting effect
press until desired effect is achieved
*Change mode
press until desired mode is reached
*available only on un-programmed model

DIAGNOSTIC MESSAGES
Message
Meaning
Action Required
No message on display.
Power has been cut off to the spa.
The control panel will be disabled until power returns. Spa
settings will be preserved until next power up.
--
Temperature unknown
After the pump has been running for 2 minutes the
temperature will be displayed.
HH
“ Overheat ” - The spa has shut down. One of the sensors
has detected 118 °F at the heater.
DO NOT ENTER THE WATER. Remove the spa cover and allow
water to cool. Once the heater has colled, reset by pushing any
button. If spa does not reset, shut off the power to the spa and
call you dealer or servuce organization.
OH
“ Overheat ” - The spa has shut down. One of the sensors
has detected that the spa water is 110°F
DO NOT ENTER THE SPA.
Follow same instructions as “ HH ”
IC
“ Ice ” - Potential Freeze condition detected
No action required. The pump will automatically activate
regardless of spa status.
SA
Spa is shut down- The sensor that is plugged into the Sen-
sor “ A” jack is not working.
If the problem persists, contact your dealer or service
organization. (May appear temporarily in an overheat
situation and disappear at cool.)
Sb
Spa is shut down. The sensor that is plugged into the Sensor
“ B ” jack is not working.
If the problem persists, contact your dealer or service
organization. (May appear temporarily in an overheat situation
and disappear at cool.)
Sn
Sensors are out of balance. If alternating with spa
temperature, it may just be a temporary condition. If
flashing by itself, spa is shut down.
If problem persist, contact your dealer or service
organization.
HL
A significant difference between temperature sensors has
been detected. This could indicate a flow problem.
Check water level in spa. Refill if necessary. If water level
is okay, make sur the pumps have been primed. If problem
persists, contact your dealer or service organization.
LF
Persistent low flow problems. (Displays on the fifth
occurrence of “ HL ” message within 24 hours.) Heater
is shut down, but other spa functions continue to run
normally.
Follow action required for “ HL ” message.
Heating capability of the spa will not reset automatically, you
may press any button to reset.
Dr
Persistent low flow problems. (Displays on the fifth
occurrence of “ HL ” message within 24 hours.) Heater
is shut down, but other spa functions continue to run
normally.Possible inadequate water, poor flow, or air bubbles in
detected in the heater. Spa is shut down for 15 minutes.
Check water level in spa. Refill if necessary. If water level is okay,
make sur the pumps have been primed.Press any button to
reset, or this message will automatically reset within 15 minutes.
If problem persists, contact your dealer or service organization.
Dy
Inadequate water detected in heater. (Displays on third
occurrence of “ dr ” message.) Spa is shut down.
Follow actions required for “ dr ” message. Spa will not
automatically reset. Press any button to reset.
Warning! Shock Hazard! No User Serviceable Parts.
Do not attempt service of this control. Contact your dealer or maintenance service for assistance. Follow all owner manual power connection instructions. Installation must be performed by
a licensed electrician and all grounding connections must be properly installed.
14
Note : Message indication on topside control will resemble “ Message ” in digital characters- inquire with dealer

15
WATER CHEMISTRY
It may be necessary to replace the hot tub’s water every 3 to 6 months. The frequency depends on a number of variables
including the frequency of use, number of users, attention paid to water quality maintenance, etc. You will know it is time
for a change when you cannot control studding and/or you can no longer get the water to feel or sparkle as it usually does,
even though the key water balance measurements are all within the proper parameters.
Always keep an adequate supply of chemicals on hand for your hot tub. You should familiarize yourself with the necessary
types and amounts of chemicals to maintain your water at clean and healthy levels. Your dealer stocks the necessary chemi-
cals and is a good source of information on chemicals, procedures, and testing conditions in your area.
NOTE: The importance of the chemical balance in the hot tub cannot be over-emphasized.
Spa water chemistry (or water balance) affects the safety of your equipment as well as the appearance of your spa water.
Water balance has five factors: pH, total alkalinity, calcium hardness, temperature and total dissolved solids. The pH level is
the most critical but total alkalinity and calcium hardness must also be monitored closely. Low calcium hardness can lead
to corrosion of equipment, while high calcium hardness can lead to scaling, cloudy water and staining. Water temperature
should never exceed 40°C (104°F), and total dissolved solids should be kept below 1,500 PPM.
Algaecides and sanitizing chemicals are either alkaline or acid. Sodium and calcium hyprochlorites are alkaline. Chlorine
gas and practically all other dry chlorine spa products are acid. There is on the market a number of bromine sanitizers.
Bromines are usually preferred since they don’t give off a strong chlorine odour.
SEE YOUR SPA WATER EXPERT FOR CORRECT BALANCE OF CHEMICALS FOR YOUR SPA AND FOR ADDITIONAL INFORMATION.
CARE
Check and adjust water conditions. You must maintain proper chemical balance to ensure safe sanitary conditions and to
prevent your spa from becoming a breeding place for bacteria.
1.
It is recommended that the spa be drained regularly depending on its size, location and the frequency of use.
2.
Clean filter and cartridge periodically.
3.
Keep the spa covered when not in use to reduce heat loss and to keep leaves, dirt, and other foreign materials from
settling in the water.

CARE (continue)
4.
Since the water capacity of your spa is far less than that of a swimming pool, the chemical reaction caused by the
presence of one or more persons in the spa is more rapid and pronounced. For these reasons, it is important to frequently
check the bromine level, the pH level and total alkalinity of water. Add the prescribed chemicals as necessary to maintain
the proper chemical balance.
5.
If questions or doubts arise regarding quantities and timing of chemical adjustments to be made to your spa, contact your
dealer who can assist you in planning the right program for your spa.
6.
Store all chemicals in a cool dry place and in such a manner as to prevent access by children and pets.
7.
When adding chemicals to your spa water, pour them towards the center of the spa with the pump running on high. Never add
chemicals to unheated water as this will affect chemical action.
CLEANING THE SPA
Do not use cleaners or compounds containing harsh abrasives. Also, avoid using heavy-duty rubbing or buffing compounds.
Use a soft liquid cleaner.
CARE OF VINYL HARDCOVER
Vinyl coated fabrics are perhaps the most maintenance-free fabrics ever produced and certainly will provide exceptional
service life if given the proper care. Almost all vinyl manufacturers now provide information concerning the necessary
cleaning procedures for their products. In reality, all care maintenance instructions are the same for all coated fabrics
regardless of their manufacturing origin.
Products are now on the market that are manufactured to enhance the beauty and service life of all vinyl. However, by us-
ing methods described below with minimal care and attention, you should enjoy years of satisfaction and pride with any
vinyl-coated fabric.
EVERYDAY SOIL
A gentle mixture of any mild soap and warm water will generally clean most common soil from the surface. Using a soft cloth,
wash the area to be cleaned and rinse. If stubborn dirt remains, such as a stain embedded in the grain of the vinyl, use a soft
brush, and if necessary, a touch of cleaning powder. In both situations, rinse and dry with a soft cloth.
16

17
WINTERIZING INSTRUCTIONS
CAUTION: READ THIS BEFORE DRAINING YOUR HOT TUB TO PREVENT ANY DAMAGE TO THE HOT TUB’S COMPONENTS.
Turn off power to the spa at the circuit breaker before draining the hot tub. Do not turn power back on until your spa has been completely refilled
with water. There are certain precautions to keep in mind when draining your hot tub. In extremely cold weather conditions, the plumbing or the
equipment of an outdoor hot tub may freeze. On the other hand, in hot weather conditions, it is important to protect the hot tub’s interior from
exposition to direct sunlight for long periods of time.
CAUTION : Drain waste water may contain chemical residue and unsanitary contaminants wich could be a hazard to
health or the environment. Drain to specified sanitary sewer only.
INSTRUCTIONS
Lumi-O highly recommends using a professional to close your spa to prevent any damage due to improper winterizing.
TURN OFF (UNPLUG) POWER AT THE GFCI CIRCUIT BREAKER BEFORE DRAINING.
DRAINING :
- Siphon the water from the spa with a garden hose.
- Allow to drain by gravity, opening the valve of the drain in the access door.
- Or use a submersible pump.
LINES :
Use a wet/dry vacuum appliance (Shop Vac) to remove water in the lines by blowing and suctioning. Place the wet vacuum
over each jet face for 30 seconds.
Make sure all water returns are open. Blow air in all openings until no more water is expelled from the jets and drains, and
all lines and water returns are empty.
PUMP :
Lift the spa, and remove the bleeder under the pump. Remove all remaining water with a sponge or towel. It is important to
tie back the bleeder once the water stops leaking.
ACCESSORIES THAT MUST BE STORED INDOORS:
Removable parts of the skimmer
Cartridge
Chemicals
Care accessories

FREQUENTLY ASKED QUESTIONS
SPECIFIC CARE
FILTER SYSTEM AND HEATER (SPA PACK) :
Can be stored outdoors only if completely dry.
COVER, SUPPORT AND WINTER COVER :
It is really important that no water infiltrates into the spa during winter.
You can install a wood structure or use a winter balloon (see retailer for details).
Wood structure :
Put some 2x4s every 30 cm (12”) and rest a 1-cm (½”) thick sheet of plywood on top, to ensure proper
ventilation. Store the cover in a safe place or put it over the wood structure.
Finally, cover your Spa-Ô completely with a winter cover.
Lumi-O offers a custom winter cover for the spa-Ô. Contact your dealer or Lumi-O at 1-866-99LUMI-O (1-866-995-8646).
N.B.: For the spring opening, outside temperatures must remain above freezing for at least three days in a row. Make sure
the spa is on a level surface.
FREQUENTLY ASKED QUESTIONS
Q.
I have noticed water on the outside of my hot tub. Is my hot tub leaking?
A.
A small puddle of water around the outside of your hot tub can be produced by water collecting and rolling off of your
cover. Check to see if the water is coming from your cover. If so, this is normal. If this is not the problem, you may want to
call your dealer and have a technician come out and examine your fittings.
Q.
My hot tub seems to be running all the time, is this normal?
A.
This is not a problem with your spa. There are a few reasons why your spa will run throughout the day.
1.
Your spa checks the temperature of water approximately every 20 minutes. In order to have the correct temperature, it
circulates the water in your tub for approximately 3 minutes.
2.
Should the spa pack determine that the temperature in your spa has changed; an adjustment will be made by the spa
pack. In most cases, a temperature loss is indicated and therefore, the pack will turn on the heating element for whatever
duration is necessary. In the case of a heat recovery pack, the motor will run producing heat for your hot tub water until
it reaches the right temperature.
3.
Your hot tub will heat at 1 kW (110 VAC). The duration of heating time will vary depending on a number of factors: cover,
outside temperature, wind, etc.
In addition to checking water temperature, your hot tub is pre-programmed to circulate the water for filtration. It is possible
for your hot tub to take a temperature reading and go into a filtration cycle at the same time. Typically, your filtration cycles
occur twice a day.
Q.
My hot tub motor does not shut off when I push the button to turn the motor off?
A.
Many hot tub user turn off their hot tub when exiting. However, it is important to know that your hot tub motor must be running
in order to heat the water (standard 1 kW-4 kW element or heat recovery). Therefore, your hot tub may continue to run if the water
temperature has dropped below the setting temperature. Heating your hot tub water overrides your ability
to turn off your hot tub motor.
18

19
TROUBLESHOOTING TIPS
Q.
*How do I program my topside?
A.
*not applicable for pre-programmed spas. Upon initial start up, your spa will go into priming mode, Pr. This will last for 5
to 7 minutes. Once the priming cycle has completed you can set your spa as desired. The Controls Reference Guide Section
of this Owner’s Manual provides step by step guidelines on how to set up your spa.
Q.
Who do I contact for servicing and/or troubleshooting my Spa?
A.
For servicing and troubleshooting, you should contact the dealer where you purchased your spa. Your sales agreement
will provide dealer contact information.
Q.
Can I use de-foamer in my spa?
A.
You should only use recommended chemicals to maintain your water balance. Your dealer will provide you with all the
chemicals you need as well as precise instructions on how to balance your pH, bromine and calcium levels to maintain
your spa in pristine condition.
TROUBLESHOOTING TIPS
In the event your SPA-Ô is not working the way it should, first review all the installation and operating instructions in this
manual. Check the message on the display panel and follow the appropriate troubleshooting instructions.
Note: If any of the manufactured installed supply cords are damaged, they must be replaced by authorized
servicing personnel.
NONE OF THE COMPONENTS OPERATE :
Check the following :
1.
Is power being supplied to the hot tub?
2.
Is the household circuit breaker tripping?
3.
If the answers to 1 & 2 are yes, call Lumi-O or your authorized dealer for service.
PUMP DOES NOT OPERATE, BUT THE LIGHT DOES
Press the JETS button:
The pump operates but no water flows to jets. Pump may not be properly primed. This can happen after the spa is drained
and refilled. Press the JETS button several times, never leaving the motor on for more than 5-10 seconds at a time.
POOR JET ACTION
1.
Press the JETS button to make certain the pump is on.
2.
Rotate the air control to the Max position.
3.
Make sure the water level is adequate.
4.
Check for dirty filter. Clean, if necessary.
5.
Make sure all jets are in the Open position
TROUBLESHOOTING TIPS (continue)
WATER IS TOO HOT
1.
Check preset temperature on topside control.
2.
Check for a Diagnostic Message (see Control System manual for details)
a.
OH - Overheat (spa is deactivated) DO NOT ENTER THE WATER.
i.
If the spa water has reached overheated status, remove the cover to help lower water temperature.
Overheating may occur if the filter cycle is set too long. The hot tub Control System should reset itself when the water
temperature reduces below 43ºC (106ºF). When the water temperature falls below the reset temperature, you can push any
button on the topside control to reset the Control System. If the hot tub will not reset, shut off power to the spa and call your
dealer or maintenance service.
* Under extreme and/or prolonged hot weather conditions, it is possible for the ambient temperature to exceed 43°C/106°F,
thereby affecting the water temperature of the hot tub and causing the tub to overheat. These conditions could cause the
tub sensors to produce an OH message and prevent the usage of your hot tub while these conditions prevail. The location
of your hot tub should be reconsidered to reduce the effect of ambient temperature. For example, you may need to prevent
direct sunlight on any surface of your hot tub. Regardless, do not enter your hot tub if the temperature climbs above 40°C
(104°F).
Your authorized spa-Ô dealer is a trained service repair center. Should checking the abovementioned steps fail to correct
the problem, call your dealer to arrange servicing for your hot tub.
WATER IS LEAKING FROM A JET
1. Insert the screwdriver under the jet faceplate and apply slight pressure; the faceplate should pop off the spa.
2. Insert the pliers’ jaws into the small holes on both sides, squeeze just enough to grip firmly and turn clockwise to tighten.
DO NOT OVER TIGHTEN.
20

21
LIMITED WARRANTY
Ten-Year Shell/Surface Warranty
Lumi-O offers a shell warranty against any manufacturing defects, excluding colour weathering, resulting in water loss for a period of ten years from
the date of manufacture as follows: 100% replacement of product for the first through third year, 50% replacement for the fourth through sixth year,
and 25% replacement for the seventh through tenth year. Any and all shipping, delivery, set-up, installation and/or disposal charges will be the sole
responsibility of the spa owner.
Two-Year Electrical Equipment Warranty
Lumi-O warrants the electrical and mechanical components, including the pump and heater control system, against malfunctions and defects in
materials or workmanship for a period of two years from the original purchase date. Refurbished parts may be used to satisfy warranty
replacement of electrical and mechanical parts. GFCI cord is covered by a 1-year warranty. Filter cartridges, light bulbs, cover locks, fuses and jets
are not included in this warranty. Those items are, however, warranted to be free from defects in materials and workmanship at the time of delivery
to the dealer.
One-Year Plumbing Warranty
Lumi-O warrants the factory installed plumbing components against defects in materials and workmanship for a period of one year from the original
purchase date. This warranty specifically covers jet fittings, internal plumbing, internal glue joints and hoses.
Extent of Warranty
This warranty is effective for spas sold by authorized dealers within North America. This warranty is given only to the original purchaser (upon
presentation of valid proof of purchase and identification) and terminates upon any transfer of ownership. Spas installed in commercial
applications (including rental spas or spas in rental premises) are excluded from any coverage whatsoever. This warranty does not provide coverage for the
insulated cover or any item attached to or installed on the spa after the date of manufacture (including non factory-installed ozone systems) although
these may be covered under other warranties. Travel, shipping, or mileage costs are not covered under this warranty and service travel charges will
be assessed to the purchaser by the dealer.
Warranty Performance
In the event of a defect covered under the warranty, notify your authorized spa-Ô dealer as soon as possible and use all reasonable means to protect
the spa from further damage. Upon proof of purchase, Lumi-O or its designated service representative will correct the defect subject to the terms and
conditions of this warranty. If Lumi-O determines that the repair of the covered defect is not feasible, Lumi-O reserves the right to have the dealer
provide a replacement spa equal in value to the original purchase price of the defective spa. In such instances, reasonable cost for the removal of the
defective spa, shipping cost for the replacement spa and delivery and installation of the replacement spa will be the responsibility of the spa owner. The
spa owner is responsible for providing access to perform the repair. In the event there is no authorized spa-Ô dealer or repair service in the owner’s
area, the hot tub can be shipped pre-paid by the owner to Lumi-O for evaluation and repair, as required, of the defect. Upon completion of the repair,
Lumi-O will then ship the hot tub back to the owner at Lumi-O’s expense. Lumi-O must be contacted in advance for packaging and shipping instructions.
Lumi-O reserves the right to inspect or designate a person to inspect any part that is claimed to be defective and covered by this warranty.
Acts Voiding Warranty
This warranty shall become void if the spa-Ô has been subjected to alterations, neglect, misuse or abuse; if any repairs have been attempted
by anyone other than a spa-Ô authorized service representative; or if failure is caused by an accident, act of nature or other causes beyond
Lumi-O’s control. The spa owner is liable for repair work performed by anyone other than the manufacturer or the manufacturer’s designated service
representative. Unwarranted alterations shall include: any component or plumbing change, electrical conversion or addition of alternate sanitation or
heating systems which contribute to component failure. Neglect, misuse and abuse include any installation, operation or maintenance of the spa other
than in accordance with the owner’s manual or use for which the spa was not designed, specifically the following: damage caused by the operation of
the spa with water temperatures outside the range of 0.6°C and 48°C (33ºF and 120ºF); damage caused by dirty, clogged or calcified filter cartridges;
damage to the spa surface caused by improper use of chemicals on the surface; damage caused by improper pH balance, improper calcium hardness
level or other improper water chemistry; damage to the spa surface caused by leaving the spa uncovered and in direct sunlight; damage caused by
allowing solar blankets to be stored in the folded position on the top lip of the spa; damage caused by failure to provide even and sufficient support
for the spa are considered abuse and may void this warranty. This warranty excludes damage such as discoloration and fading of jets, air adjustments
and top side controls.
Disclaimers
Lumi-O or any of its authorized agents shall not be held liable for injury or loss of use of your spa or other cost, expense or damage, whether incidental
or consequential, arising out of any defect covered by this Limited Warranty, including, without limitation, loss of use of the spa and cost of removal
of defective product, even if Lumi-O has been advised of the possibility of such damage. In no event, shall Lumi-O be liable for any reason or cause
in excess of the amount paid for the product by the dealer. Coverage under this Limited Warranty shall commence as of the original date of purchase
or as otherwise outlined above and the term of such coverage shall not extend for any reason whatsoever beyond the stated time periods. No other
warranties, written or implied, are valid. No agent, dealer, distributor, service company or other party is authorized to change modify or extend the
terms of this warranty.
Clause de non-responsabilité
Ni Lumi-O International Inc., ni aucun de ses agents autorisés, ne seront tenus responsables des blessures subies ou de la perte de jouissance
de votre spa ou d’autres coûts connexes ou corrélatifs, de dépenses ou dommages, soit connexes ou corrélatifs, découlant de toute défectuosité
couverte par cette garantie limitée, incluant, sans limitation, la perte de jouissance du spa et le coût de retrait du produit défectueux, même si
Lumi-O International Inc. a été avertie de la possibilité dudit dommage. En aucun cas, Lumi-O International Inc. ne sera tenue responsable, pour
aucune raison ni cause, d’un montant excédant le montant payé pour le produit par le dépositaire. La couverture de cette garantie limitée débutera à
compter de la date d’achat initiale ou telle que décrite autrement ci-haut, et la période de ladite couverture ne se prolongera pas au-delà des délais
énoncés. Aucune autre garantie, écrite ou implicite, n’est valide. Aucun agent, dépositaire, distributeur, entreprise de service ou autre partie n’est
autorisé à changer, modifier ou prolonger les termes de cette garantie.
In the event of a warranty claim, please contact your dealer to expedite processing.
SERVICE CALL
Please contact your dealer for more information.

22
SPA COVER INSTALLATION AND LIMITED WARRANTY
KEEP THESE INSTRUCTIONS
INSTALLATION INSTRUCTIONS
1. Correctly position spa cover on top of spa.
2. Extend tie-down straps and squeeze sides of each locking buckle to expose mounting holes.
3. Locking buckles may be locked and unlocked with enclosed key.
CAUTION: ALWAYS RELEASE ALL LOCKING BUCKLES BEFORE REMOVING COVER. REMOVE SPA COVER WHEN OPERATING SPA JETS.
WARNING! RISK OF ACCIDENTAL DROWNING!
Stay off cover – cover will not support weight of a person.
KEEP CHILDREN AWAY. CHILDREN OR OBJECTS CANNOT BE SEEN UNDER COVER.
Non-secured or improperly secured covers are a hazard. Failure to follow all instructions may result in injury or drowning.
Remove cover completely before entry of bathers – entrapment possible.
LIMITED WARRANTY
THE QUALITY OF MATERIALS AND WORKMANSHIP OF THE DELUXE INSULATED COVER IS UNDER WARRANTY FOR ONE (1)YEAR.
This warranty is in lieu of all other warranties, whether expressed or implied. Implied warranties that cannot be disclaimed
are hereby limited to the scope and duration of the warranties provided under this warranty.
SHOULD A DEFECT COVERED BY THIS WARRANTY BE DISCOVERED DURING THE TERM OF THE WARRANTY:
1. Purchaser is responsible for the return of the cover to the place of purchase or other authorized dealer, and all shipping
charges from the manufacturer and back to purchaser.
2. Manufacturer will, upon request, repair any defects covered by this warranty or replace cover, at manufacturer’s discretion.
3. Repaired cover or replacement cover shall be shipped to dealer within thirty (30) days of receipt at manufacturer’s plant.
4. Return shipment shall be at purchaser’s expense.
WARRANTY DOES NOT COVER IMPROPER USE OR THE FOLLOWING :
1. Excessive water chlorination or splashing of other chemicals on spa cover fabric.
2. Abrading, wearing or punching holes in spa cover by dragging it on rough surfaces or storing it against sharp objects.
3. Broken foam due to cover being submitted to excessive loads of snow or water or caused by persons or pets sitting, lying or
walking on cover.
4. Torn straps caused by carrying cover by straps; straps are provided for opening covers and to fasten cover down to spa.
MAINTENANCE AND CARE
Cover should be kept clean. Recommended cleaning procedure is to use a mild detergent. Should pools of rain water or ice
collect on top of cover, open zippers and allow to drain. Handle with care when installing or removing from spa.
THIS WARRANTY IS EXTENTED ONLY TO THE ORIGINAL PURCHASER OF THE SPA COVER.

23