Full Text Searchable PDF User Manual

www.labcold.com
IntelliCold® Pharmacy Refrigerator Operating Instructions
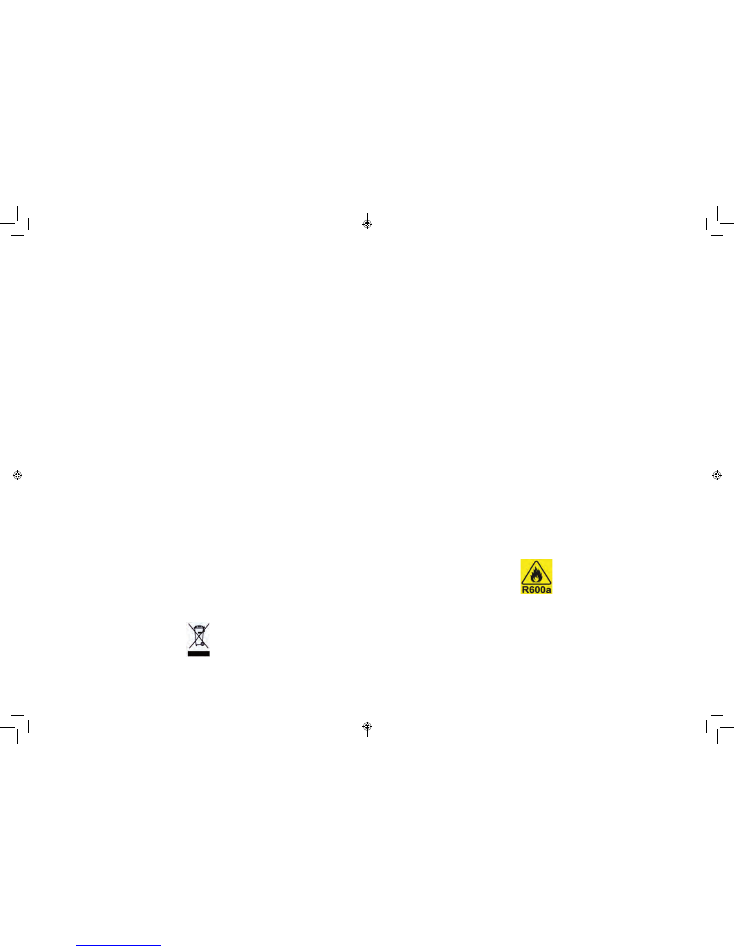
WEEE: Disposal at end of life.
This equipment, when being disposed of in an EU Member State, is subject to the Waste Electrical and Electronic
Equipment Regulations (WEEE) and must be recycled and disposed of in accordance with EU directive 2002/96/EC
as applied in local laws of that State at the time of disposal. This refrigerator contains fl ammable insulation gases
and must be disposed of in the appropriate way by competent persons. Ensure that none of the refrigerant circuit
pipes are damaged prior to disposal.
The symbol below on the appliance or accompanying documents indicates that this refrigerator should not be
treated as ordinary waste but must be taken to a special collection centre for the recycling of electrical equipment.
For more information regarding the treatment, recovery or recycling of this product, contact your competent local
offi ce, electrical waste disposal or vendor from whom you purchased the refrigerator.
As this item is designed for medical or scientifi c use, before presenting for collection and disposal it will be
necessary for the user to provide documentary evidence of decontamination and/or that it is entirely safe to handle
and dismantle outside of a controlled environment. Goods that cannot be so certifi ed fall outside the scope of the
Directive and remain the user’s responsibility to dispose of.
This refrigerator contains a fl ammable gas.
It MUST NOT be located in a room or area with a volume less than 10m
3
.
This refrigerator contains gas under pressure which may explode if heated.
Original instructions
WARNINGS
Servicing and repairs must be carried out by a suitably qualifi ed engineer.
Only engineers who have been trained in the safe handling and use of hydrocarbon
refrigerants can work on the refrigeration system. If you suspect a leak, do not touch as
the refrigerant can cause eye damage. Contact the manufacturer or its service agents
immediately.
If the power supply cord is damaged, it MUST be replaced by the manufacturer, its
service agent or similarly qualifi ed persons in order to avoid a hazard.
Do not use mechanical or other means to accelerate the defrosting process.
Keep clear of obstruction all ventilation openings in the appliance enclosure.
This refrigerator is climate class 4 and is designed to operate at +16°C to +32°C
ambient room temperature.
Do not damage the refrigerant circuit.
Maximum shelf loading 40 Kg/m
2
.
The noise level in normal operation is lower than 70 dB
Do not use electrical appliances inside the refrigerator.
Do not store explosive substances such as aerosol cans with fl ammable
propellant in this appliance.
Labcold RLDF/G refrigerators are for the storing of pharmaceuticals, medicines and
laboratory products for professional use by suitably trained, competent persons only.
Operating instructions for your
I
ntelli
C
old® Pharmacy Refrigerator
from
Labcold
Contents
Before use
...............................................................................................................1
A closer look
......................................................................................................2
Alarm battery back up.......................................................2
Remote connections .........................................................2
Plug in and switch on
........................................................................................3
Muting the alarm....................................................................3
Front Panel display
................................................................................................4
High/low temperature alarm .........................................4
Door alarm ............................................................................5
Internal Light.............................................................................6
Minimum/Maximum Temperature Recording
........................................7
Minimum/Maximum Temperature Re-set
...............................................7
Using the SD Card
................................................................................................8
Set the Timer...........................................................................9
Downloading data.............................................................11
Viewing data........................................................................12
Error codes............................................................................14
Door Lock (key)
...................................................................................................14
Digital Door Lock
..................................................................................................15
Caring for your fridge
.........................................................................................18
Loading.................................................................................18
Cleaning ...................................................................................19
Defrosting.............................................................................19
Trouble Shooting
..............................................................................................20
Useful Information
............................................................................................22
IMPORTANT: These operating instructions contain information essential to the
safe and reliable operation of your refrigerator. Failure to use your refrigerator in
accordance with these instructions may invalidate your warranty.
PLEASE RETAIN AND KEEP IN A SAFE PLACE FOR FUTURE REFERENCE
Need calibration?
Labcold are a UKAS calibration laboratory #8898
We can calibrate your refrigerator AND your independent
thermometer
We don’t just use UKAS traceable equipment, we use UKAS
methodology and training for assured technical competence
8898
1
Before Use
Thank you for purchasing a
Labcold
I
ntelli
C
old® Pharmacy Refrigerator. Your fridge has been
purposely designed and precision built for the safe storage of vaccines and other temperature
sensitive pharmaceuticals.
Although great care has been taken in the manufacture of your refrigerator, damage can occur
in transit. Before using for the fi rst time please remove all packaging and give your fridge a
thorough visual inspection. If any damage is suspected, please contact your retailer immediately
upon receipt of the product. Failure to do so may invalidate your warranty.
Setting Up
Place your fridge in the location in which it is to be used.
Do not place your fridge near a direct heat source or direct sunlight and leave at least 6cm all
round the unit for adequate ventilation. Models designed to be wall mounted do not need extra
space at the back because the cooling system is in the sides. Failure to do so may eff ect the
performance of your refrigerator.
Clean your fridge with mild soapy water to remove any dust that may have accumulated during
manufacture and dry thoroughly.
Ensure your fridge is level by adjusting the feet at the bottom of your fridge.
For models RLDF/G0501A, 1010A and 1510A, insert shelves by placing clips in the racking and
resting the shelf on top. When positioning the shelves, please remember to keep adequate room
for air circulation. Failure to do so may cause hot spots in the fridge.
YOUR REFRIGERATOR SHOULD NOW BE LEFT FOR AT LEAST TWO HOURS BEFORE
CONNECTING TO POWER FOR THE FIRST TIME
2
A Closer Look
Alarm Battery Back Up
Remote Alarm and
Labcold accessories
sockets
Insert 4 AA long life alkaline batteries (not supplied) in the holder
located on the right side of the unit
Batteries will only power the controller not the fridge.
Remote alarm and
Labcold
accessory sockets are located at the
back of the fridge. If you have a
Labcold
external alarm kit this
can be connected to the 2 pin connector on the left. The 4 pin
connector socket is for the
Labcold
accessory kit.
The maximum rating for the connection is 1A 30Vdc.
DO NOT CONNECT TO MAINS VOLTAGE
Door lock
Fan
Adjustable Feet
Adjustable Shelves
Maximum Load
10kg
Led Light
Front Panel Display
Battery Holder
(side of the fridge)
Serial Plate
SD Card
slot
Remote Alarm
and Accessory
Sockets
(back of fridge)
3
Plug in & switch on
Before plugging in your
Labcold
refrigerator for the first time make sure the power cable is free
from damage and check that your voltage corresponds to that on the serial plate.
It is recommended that you do not use extension cords or multiple socket adapters. Make sure
the power cable is not bent, pinched or compressed and that it can be easily accessed.
Once plugged in, the word
Labcold
will scroll across the display followed by a two digit model
number. Alarms will then show on the display and you may hear the audible alarm as the
fridge completes its start up diagnostic checks. This is because the controller is factory set to
alarm when it senses the temperature inside the refrigerator is above 8
o
C or below 2
o
C. The
refrigerator is now working and the sensors are detecting the ambient temperature. Once the
fridge has cooled sufficiently it will cease to alarm. You can press the ‘alarm mute’ button (see
figure 1 below) to cancel the alarms.
The display will then show the temperature inside the fridge correct to one decimal place. This
temperature is the actual temperature recorded by the probes inside the refrigerator and as
the fridge cools to the set point (factory set at 5
o
C) so the number on the display will descend
accordingly.
ALTHOUGH THE REFRIGERATOR WILL REACH 5
o
C AFTER AN HOUR (APPROX) YOU SHOULD
LEAVE THE FRIDGE RUNNING FOR 24 HOURS BEFORE FILLING WITH TEMPERATURE
SENSITIVE VACCINES AND PHARMACEUTICALS.
It is important that you reset the maximum/minimum temperature record after you have loaded
the refrigerator for the first time (please see page 7). This will ensure that your daily temperature
record is accurate when you start to use the fridge for storing medicines.
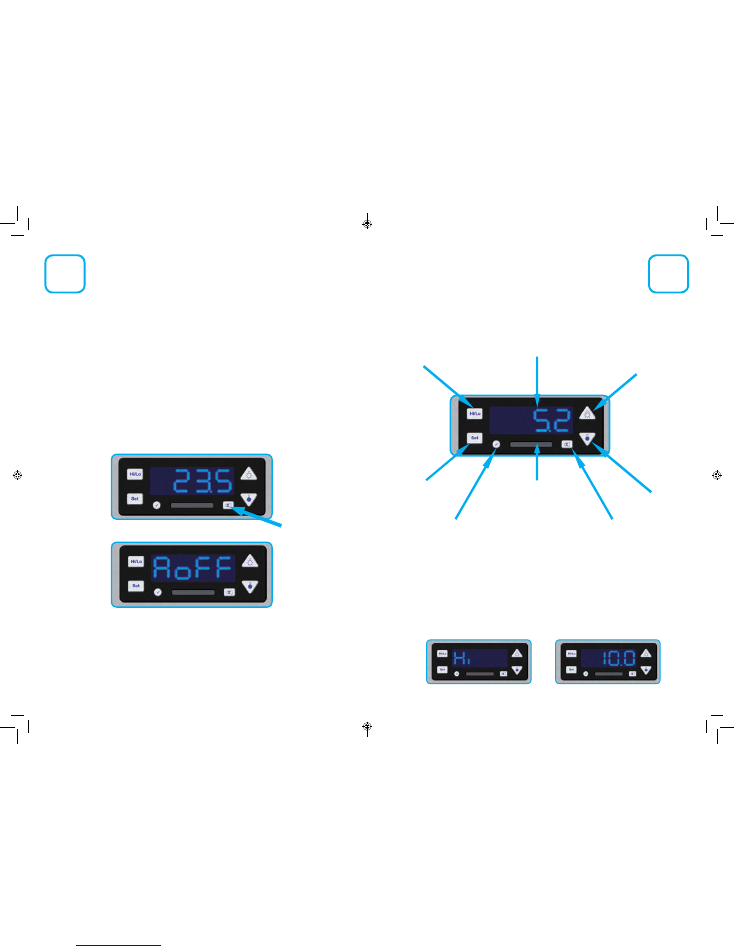
Figure 1 - Alarm mute button
Figure 2 - Alarm mute display
4
Front Panel Display
Opening for SD card
Press to view the
set point of the
fridge
Min/Max temperature
display
Light on
Light off
Confirm button
Alarm Mute Button
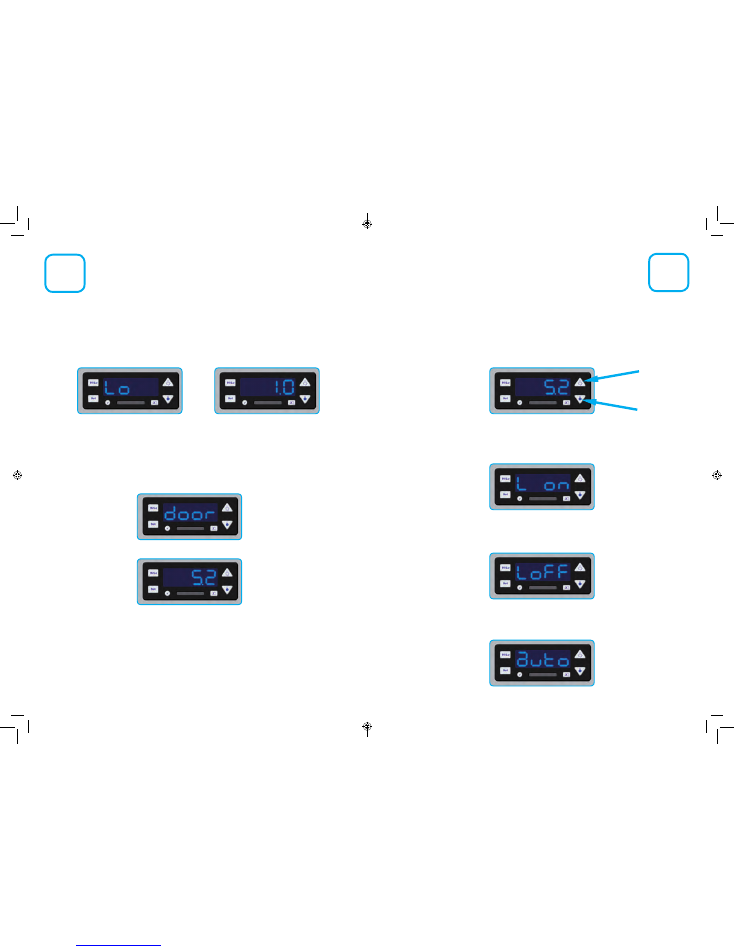
High/Low Temperature Alarm
If the temperature in your refrigerator rises above 8
o
C an alarm will sound and the front
panel will flash
Hi
and the current temperature inside the fridge. This information will display
alternately.
The cause of the rise in temperature should be investigated immediately. Usually, it is simply
because the door has been open for a long time or the fridge has been restocked, however, it
is recommended that you check the fridge to make sure that the temperature is returning to
normal after the alarm has been activated.
Digital temperature
display
The display on the front of the refrigerator is designed to constantly show the temperature
inside the fridge correct to one decimal place.
5
Door Alarm
If the door of the fridge is left open for more than 3 minutes an audible alarm will sound and
the front panel will flash
door
and display the temperature inside the chamber alternately.
If you want to silence the alarm if, for example, you are stocking the fridge, simply press the
‘alarm mute’ button under the temperature display (see page 3).
If the door has been left open for a prolonged period of time you may also experience a
Hi
alarm. This is because warm air from the room will have entered the fridge while the door
was open. It is recommended that you close the door and check that the temperature on the
display decreases until it settles around the set point.
IF THE ALARM IS MUTED IT IS TURNED OFF
THE REFRIGERATOR WILL NOT ALARM AGAIN FOR THE SAME INCIDENT
If the temperature in your refrigerator drops below 2
o
C an alarm will sound and the front panel
will alternately flash between
Lo
and the chamber temperature. There could be a number of
reasons for this, such as extremely cold items being placed in the fridge.
The cause of the drop in temperature should be investigated immediately and the refrigerator
should be monitored to check that it is returning to the correct temperature.
6
Internal Light
Your refrigerator is fitted with an energy saving LED light which is factory set to go on when
the door is opened and go out when the door is shut.
If you want to turn the light on temporarily you can press the ‘light on’ button and press the
‘light off’ button to turn it off again. The next time the door is opened, the light will return to
automatic mode.
If you want the light to stay on all the time, press and hold the ‘light on’ button until the display
shows
L on
. The light will now remain on irrespective of whether the door is closed or open.
If you want the light to remain off at all times, press and hold the ‘light off’ button until the
display shows
L off
. The light will now remain off irrespective of whether the door is closed or
open.
To return the light to automatic mode, simply press and hold both the ‘light on’ and ‘light off’
buttons until
auto
is shown on the display.
Light on
Button
Light off
Button
7
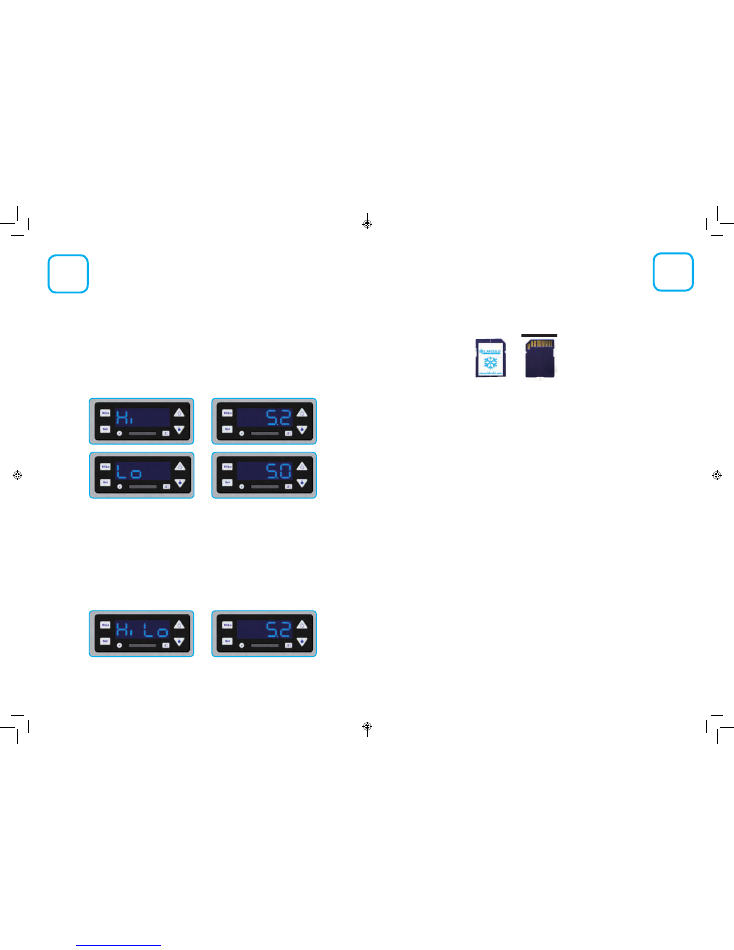
Min/Max Temperature Recording
The DH Green Book Chapter 3 recommends that: ‘temperatures in the refrigerator must be
monitored and recorded at least once each working day, and documented on a chart for
recording temperatures’.
Your
Labcold
pharmacy refrigerator records the maximum high and minimum low
temperatures when connected to mains electricity (if batteries are fi tted, it will record when
not connected). This information is stored until the fridge is reset.
This information can be accessed if you press the ‘Hi/Lo’ button and release. The display will
show
Hi
and then the highest temperature recorded since the last reset, then
Lo
and display
the lowest temperature.
Once you have taken the temperatures for the day it is important that you reset the fridge.
This is because the refrigerator will always display the high and low temperature since the last
temperature reset. The refrigerator does not automatically reset.
To reset the minimum/maximum temperature press the ‘Hi/Lo’ button and hold. An alarm
will sound and the current high and low temperatures will be displayed as above. Keeping
your fi nger on the button, the display will then change to fl ash
Hi Lo
then revert to normal
operation. This means you have successfully reset the minimum/maximum temperature
display and the previous high and low temperatures have been deleted.
8
When you register the warranty of your
Labcold
refrigerator (UK customers only, available for
purchase elsewhere), you will be sent an SD card. Although it looks like a card you may have
in your camera, this SD card will only work with your
Labcold
fridge and using it for any other
purpose may render it unable to have data from the fridge uploaded to it.
Your
Labcold
refrigerator automatically records performance information such as door
openings, temperatures etc. The SD card allows you to extract this information and store it
on your computer and/or print hard copy. The information stored in the controller will cover
the last 13 months and is not deleted from the fridges’ memory when downloaded. It is
recommended you perform a download of this data on a weekly basis and at least annually to
prevent data being over written and the download failing.
If you wish to store the data on the SD card and not your computer (which is preferable)
we recommend you get a new card every year to prevent data overwriting. New cards are
available at a small cost from
Labcold
. Please e-mail
sales@labcold.com
.
Only Labcold SD cards will work
with Labcold Fridges
Using the SD Card
Requirements
Your
Labcold
RLDF/G10A series pharmacy refrigerator is fi tted with the unique
I
ntelli
C
old®
controller which stores temperature data for up to 13 months. To transfer this data to your PC
you will require the following:
•
A pre-programmed
Labcold
SD card supplied on return of warranty registration (UK
customers only) or purchased separately. Only genuine
Labcold
SD cards will work with
Labcold
refrigerators.
•
An SD card reader (not supplied) or port.
•
CSV files will display on all PCs and Macs.
•
4 AA batteries (not supplied) fitted as shown on page 2 of the Operating Instructions.
This will ensure that temperature logging and the internal timer will continue to operate
during a power failure. Batteries must be changed yearly.
Please be aware that your
Labcold
SD card does not require any software to be downloaded
to your computer and will not copy your data nor automatically download data to your
computer.
YOU REQUIRE ONE LABCOLD SD CARD PER FRIDGE, OTHERWISE YOU RISK DATA BEING
LOST OR OVER WRITTEN
We do not recommend that you leave the SD card in the refrigerator SD card
slot as it may get broken or lost
Earlier models will reset to the set point ie 5⁰
C
. The correct high/low reading will replace
this reading as the refrigerator is used, however, if the high and low reading remains at 5⁰
C
please contact the service team on 01256 705 580.
Min/Max Temperature Reset
9
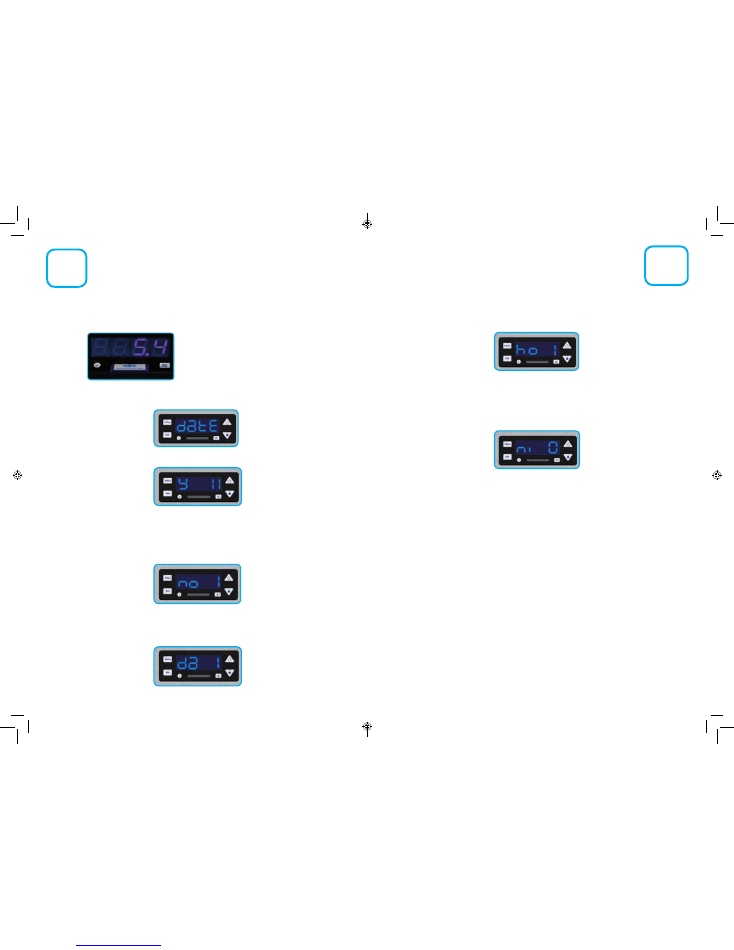
When you use your Labcold SD card for the first time it is essential that you set the
current date and time. To do this you need to insert your SD card, snowflake side up in
the slot underneath the temperature display as shown below.
The SD card will only go into the slot up
to the top of the snowfl ake and should not
be inserted any further
Once the card is inserted, wait 5 seconds then press the tick/confi rm button located to the left
of the card slot. The fridge will beep and then the word
date
will show on the display.
The display will then change to allow you to set the year.
10
Using the up and down buttons to the right of the screen, (the top button to increase the
number, the bottom to decrease), set the numbers to the last two digits of the current year ie
for 2017 select 17.
When you have set the correct year, simply press the tick button and the display will then
change to allow you to set the month
.
To set the month, use the up and down buttons on the right, with 1 being January, 2 being
February etc.
Press the tick button when you have the correct month. The display will then change to allow
you to select the day.
To set the day, use the up and down buttons on the right until the display shows todays date.
Press the tick button when you have the correct day. The display will then change to allow you
to set the time.
Firstly, you need to set the hour by using the buttons on the right of the display.
Press the tick button when you have the correct hour. The display will then change to allow
you to set the minutes.
Set the minutes by using the up and down buttons on the right. When you have the correct
digits, press the tick button.
The fridge display will now revert to showing the temperature and the internal timer inside
your controller is now set. The card can be removed. Once the timer is set, DO NOT reset it or
adjust it, even for changes to GMT or BST, otherwise you will lose data.
IF YOUR REFRIGERATOR DOES NOT HAVE BATTERIES INSTALLED AS A BACK UP, IN THE
EVENT OF A MAINS POWER FAILURE THE TIMER MAY NEED TO BE RE-SET. FOLLOW THE
INSTRUCTIONS ABOVE TO SET THE TIMER AND PLEASE BE AWARE THAT TEMPERATURE
DATA MAY BE LOST AS A RESULT.
Although the
Labcold I
ntelli
C
old® controller can store up to 13 months worth of temperature
data, it is strongly recommended that temperature data is downloaded every week and stored
to your computer or printed as a hard copy.
The refrigerator records the conditions inside the chamber every minute and all this
information is downloadable to your
Labcold
SD card.
IN THE UNLIKELY EVENT THAT YOU HAVE A PROBLEM WITH YOUR LABCOLD
REFRIGERATOR, THE SERVICE TEAM MAY ASK YOU TO DOWNLOAD TEMPERATURE DATA
TO HELP RESOLVE THE ISSUE.
Setting the Timer
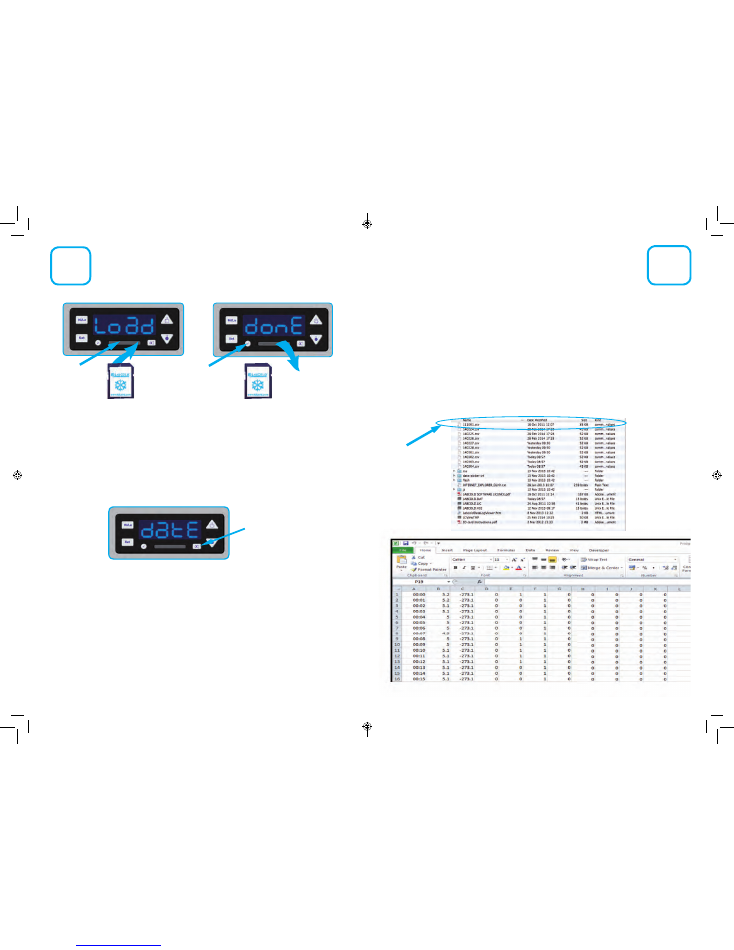
11
Insert your Labcold SD card in the SD card slot and press the tick button. It may take up to
5 seconds for the card to register. The display will change from showing the temperature to
showing the word
load
. To download the data, press the tick or confi rm button.
The display will then show the number of days the fridge has been running since the data was
last downloaded and count down as the data is copied to the card.
If the data has not been downloaded for a long time this may take some time
and/or the download may fail and may take several attempts to download fully.
When the data has fi nished downloading, the display will change to show
date
.
To NOT reset the timer, simply press the button with the cross on it (decline) located on the
right side of the SD card slot as shown above. The display will now show
done
,
Aoff
and then
revert to the current temperature, you can then remove your card. However, if you need to
reset the timer, you can now do so by following the instructions on page 9. Make sure all
current data is downloaded before you reset the timer otherwise data will be lost
The SD card now has all the temperature data copied to it since the timer was fi rst set on the
refrigerator or the last time the data was downloaded from the controller.
The
Labcold
SD card can now be inserted into a SD card reader attached to a computer.
Slot for
SD card
Confi rm button
Insert card printed side up
Remove card when the
display reads
done
12
Decline button
Viewing Data
Downloading Data
Please be aware that resetting the date or time may delete and alter data.
We recommend that once the timer is set it should not be altered unless absolutely
necessary, for example if the controller experiences a power loss.
Opening a CSV File
Insert your SD card in to a suitable card reader connected to your computer and open in the
the usual way.
The Labcold SD card and data download function are designed to allow the capture of
temperature data in CSV format which is readable by any spreadsheet application such as Excel
or Numbers. From this, data can then be viewed, saved and displayed graphically if required.
The CSV fi les will display in date order. The date is shown in reverse for ease of sorting so the
fi rst two digits are the year, followed by the month and then the day (YY.MM.DD). A fi le for
the 1
st
October 2011 is always displayed. This is test data only and is not a reading from your
refrigerator.
Test fi le only
13
14
Your
Labcold
pharmacy and vaccine fridge is fitted as standard with a door lock with 2 keys
unless the digital lock has been specified. To lock, push the key in gently and twist 90⁰
to the
left, to unlock twist 90⁰
to the right. The key can be safely removed from both the locked and
unlocked positions.
Keys should not be left in the lock as they protrude from the fridge. They could cause a
health and safety hazard or could be knocked, which may damage the lock.
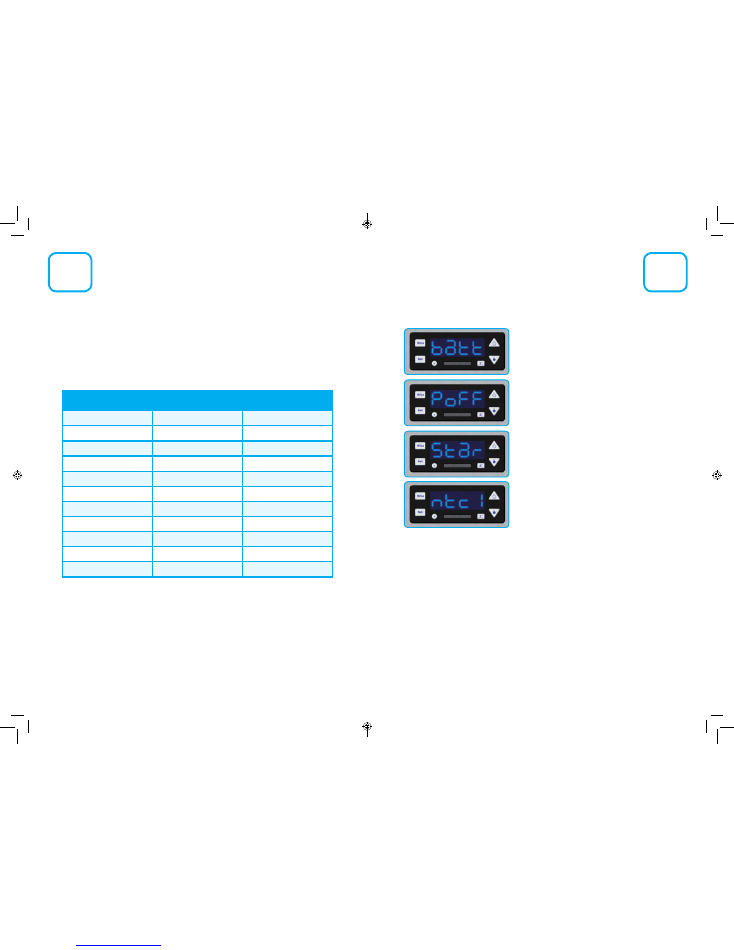
The display on your fridge is designed to display error codes. If you see one it is because the
controller, which performs continuous diagnostic system checks, has detected a problem.
Most require immediate action.
batt
- this means that the batteries
need changing. It will only display if
batteries are fitted and you can still use
the fridge safely
Poff
- when this displays it means
there is or has been a power failure. If
batteries are fitted this will display even
if the mains power is off
Start Error
- when this displays it
means there is a total system failure. Do
not use the fridge, remove contents.
Please contact your retailer
NTC
- when this displays it means that
the temperature probe has failed. Do
not use the fridge, remove contents.
Please contact your retailer
If, when the fridge is first plugged in the display shows
test
or it continually displays the first
two digits of the model number ie 02
(with no decimal point) or the display does not change
to an alarm state or show a temperature value after a few minutes, there is a system failure. Do
not use the fridge, contact your retailer.
If the display is blank it means either that the controller is not working correctly or the fridge
is not getting power. You can check this. If the light comes on when the door is opened and
you can hear the fridge working and it feels cold inside it means the display may be faulty. If
the light does not come on and the fridge does not feel cold do not use the fridge, please
remove contents and contact your retailer.
Error Codes
Door Lock
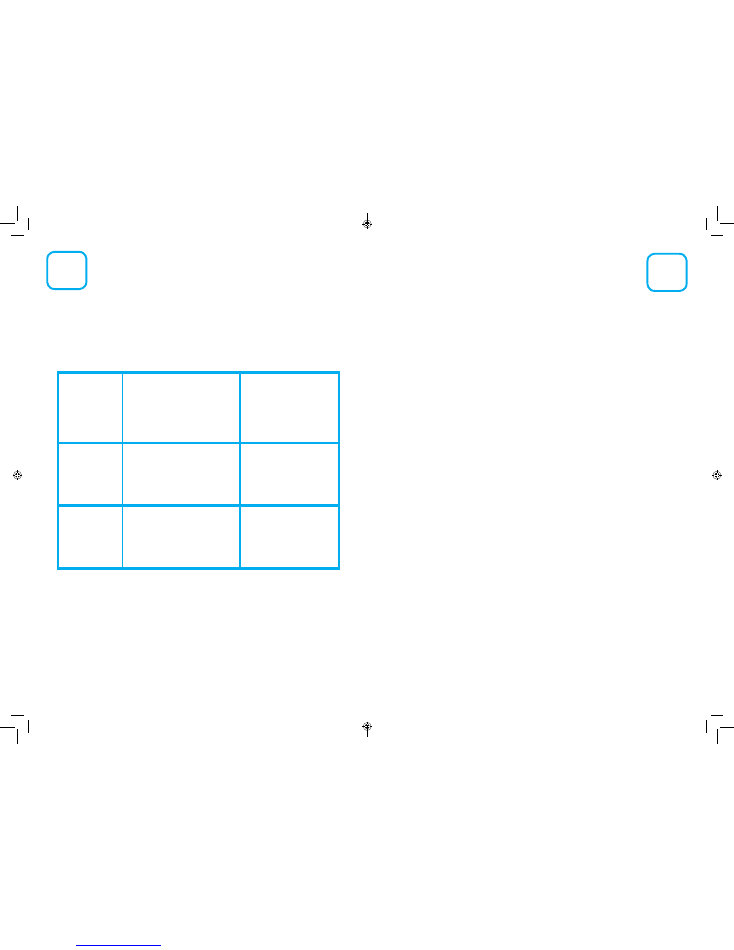
COLUMN
CODE
A
Time
Time of reading
B
T1
Temperature Probe 1
C
T2
Temperature Probe 2 ( if fitted)
D
1(on) or 0(off)
Door Open
E
1(on) or 0(off)
Compressor Running
F
1(on) or 0(off)
Fan Running
G
1(on) or 0(off)
Light on
H
1(on) or 0(off)
High alarm
I
1(on) or 0(off)
Low alarm
J
1(on) or 0(off)
Battery alarm
K
1(on) or 0(off)
Power off alarm
When you open the CSV file it will display readings taken every minute for the date chosen.
The data will show refrigerator data performance in addition to the temperature including
evidence of mains failure and extended door openings.
The columns read from left to right. The third column, column C, is for a second probe. If no
probe is installed this column will read at absolute zero (-273.1) which is normal and nothing
to worry about.
The codes for the other columns are as follows:
15
16
Digital Door Lock
If you have opted to have your IntelliCold Pharmacy Refrigerator fi tted with
Labcold
DIGILOCKDF
1000
the key lock will be removed and the digital lock fi tted in it’s place.
The digital lock has been designed to provide extra security for the contents of your pharmacy
refrigerator and is backed by a one year
parts and labour warranty.
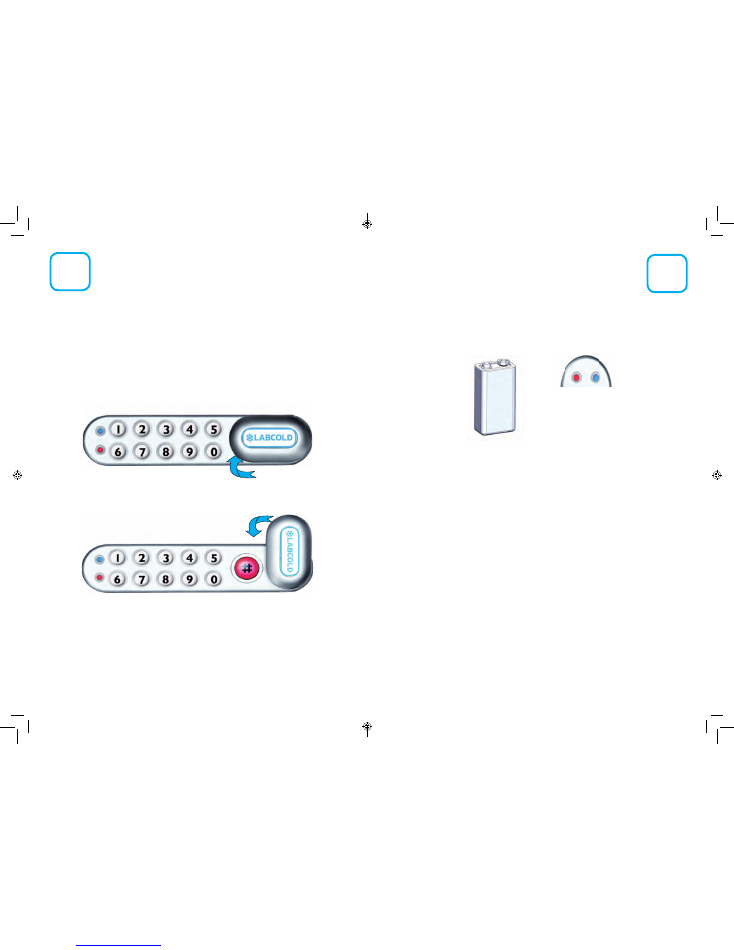
A Closer Look
Blue LED light
Indicates:
Correct code accepted
Red LED light
Indicates either:
Wrong code rejected
Low battery
→
→
Lock in closed position
→
Slide up to unlock
Lock in open position
→
Slide down to lock
# Button
Only available for use
when the lock is open.
Used to change access
codes.
→
Getting Started
Your DIGILOCKDF
1000
is supplied ready for use and fully tested. The door of your
I
ntelli
C
old®
refrigerator will be locked. In order to open the door the controller requires power, so please
follow the instructions for your refrigerator to connect to the mains.
We also recommend that you install 4 AA batteries (provided) in to the battery compartment
of the fridge located on the right hand side of the fridge near the base.
IF BATTERIES ARE NOT FITTED, THE LOCK WILL NOT OPEN NORMALLY IN THE
EVENT OF A POWER FAILURE
+
-
→ →
Contact points around LEDS
Red + | Blue -
Ð
Place the
battery terminals
on the correct
contact points
PP3 Battery NOT included
Opening the door
Once the refrigerator has power, you can now open the door using the factory set code of
2244
Put in the code and after every correct digit the blue LED light will fl ash, after the fourth digit
is entered the lock will makes a noise signifying it is unlocked. You can then slide the lock up
and open the fridge. If the red LED fl ashes it indicates you have entered the wrong digit and it
will not unlock. Enter the wrong code 3 times and you have to wait 10 seconds before you can
try again. If you DO NOT unlock within 4 seconds the door will re-lock automatically if the lock
remains in the closed position.
Power failure override
•
Place a PP3 9 volt battery on the contact points surrounding the LED lights
•
+ terminal to red LED contact point
•
- terminal to blue LED contact point
•
Enter the master code NOT user code
•
The lock will release
Locking the door
Shut the fridge door as usual and slide the lock 90⁰ in an anti clockwise direction
the DIGILOCKDF
1000
DOES NOT self lock
Programming the DIGILOCKDF
1000
It is advised that you change the factory set access codes for maximum security. Before you
can change the code, you must open the door using the code supplied. You also need the
factory set master code which is
11335577
because the lock must be open to change the
codes.
17
Changing the Access Code
The
master code is required to change the user code and the master code. Please note master
codes must be 8 digits long and user codes 4 digits. To begin changing the code, open the lock
using the user code and press the red # button by the lock. The blue LED will flash to indicate
the lock is ready for programming.
If you do NOT press a button within 4 seconds the red LED will flash and you need to
start the process again.
Change the master code
With the lock open key in:
# 11335577
01 | New master code | New master
code
The blue LED will flash twice to show
the change is successful
Write the new master code here
oooooooo
Change the user code
With the lock open key in:
# master code
02 | New user code
The blue LED will flash twice to show
the change is successful
Write the new user code here
oooo
Delete the user code
With the lock open key in:
# master code
03
The blue LED will flash twice show
the change is successful
Fridge can now only be
unlocked by the master code
Lost code procedure
If you loose the codes it is possible to return the lock to it’s factory set master code so you can
open the door. It is recommended that you perform the procedure with a colleague.
•
Turn off the mains power
•
Remove one of the batteries from the fridge while someone holds down the
button
•
Replace the battery and the blue LED will flash twice
•
Release the
button
•
Within 3 seconds press the
button 3 times
•
The blue LED will flash 3 times
The lock can now only be opened by the factory set master code 11335577 and all other
settings will be lost.
Caring for your Fridge
18
As with all refrigerators, your
Labcold
pharmacy and vaccine fridge, although designed to
provide you with many years of fault free service, will perform better if attention is paid to the
loading of the fridge and it is regularly cleaned and defrosted.
If you are storing vaccines in your
I
ntelli
C
old® pharmacy refrigerator, this should be recorded
in accordance with recommendations in the DH Green Book, Chapter 3 v2_1 page 28.
Loading
In order to ensure even temperature distribution throughout your refrigerator it is important
that :
•
The fridge is not overloaded. It is recommended the fridge is only partially filled (around
50%) and even at maximum stock level the content should not exceed two thirds (66%)
of the fridges’ capacity.
•
The contents are not packed too closely together.
•
The contents do no touch the wall or the bottom of the fridge and are stored away from
the fan.
•
When loading new stock in to the fridge, ensure product with the earliest expiry date
are at the front and used first.
•
After restocking the fridge, check the temperature 10 minutes later to ensure that the
fridge is cooling down, running satisfactorily and is not overstocked.
There are simple things you can do to help ensure your refrigerator performs at it’s best and
is less prone to issues:
Keep door openings to a minimum - door openings allow warm air to enter the refrigerator.
This has the effect of raising the internal temperature of the fridge which makes the cooling
system work harder increasing the incidence of ice.
Keep the refrigerator in an environment where the ambient temperature is between
+16°C to +32°C - this is the temperature range in which your refrigerator has been
tested to perform correctly. We cannot guarantee performance and therefore, do not
recommend usage outside of those parameters.
Keep the refrigerator serviced and calibrated - the DH Green Book Chapter 3 v2_1
page 28 recommends that all fridges storing vaccines have at least annual servicing
contract and calibration.
Labcold
can provide you with annual maintenance and
calibration, please ask for a quote if you would like us to help you with this.

19
20
Trouble Shooting
My refrigerator is not working?
•
Check that the fridge is plugged in and the plug socket is turned on
•
Try another appliance in the power socket. If this appliance works but your fridge
doesn’t, please contact your retailer
My fridge is making a gurgling noise
All
Labcold
refrigerators work by evaporating an environmentally friendly gas. This is what
causes the back of the refrigerator to get cold, and as part of this process the gas has to turn
back in to liquid. This is why sometimes you will hear liquid sounds coming from the fridge.
There is condensation on the glass door of my fridge
If the fridge door is left open too long, or the fridge is over full, or is working in a high ambient
temperature or humid conditions, condensation may form. This is a normal part of the
refrigeration process and as long as the temperatures remain in range, is nothing to worry
about.
Labcold
I
ntelli
C
old® Pharmacy Refrigerators are designed for temperate climates, 16⁰
to 32⁰C, with a humidity of 60% RH.
There is ice in my fridge
Small accumulations of ice on the cold plate are quite normal and should melt away after a
few minutes. Larger accumulations can occur for a variety of reasons:
•
The room is too warm or even damp
•
The temperature is set too low - please check the set point by pushing the
set
button.
•
Please contact the
Labcold
service team if the set point is too low (i.e below 3⁰C).
•
The door is left open too long
The fridge is rocking
This is because the refrigerator is not on a level surface. Check that the feet have been adjusted
so the top of the fridge is level and the refrigerator is standing on a hard surface.
How do I check the set point?
All
Labcold
pharmacy refrigerators have a factory set point of 5⁰C. This is the manufacturers
recommend temperature for the storing of vaccines. If you press the
set
button on the front it
will show the temperature the fridge is set to. Should you wish to change the set point please
contact the
Labcold
service team at
service@labcold.com
.
To defrost you should:
•
Leave unplugged with the door open for at least 6 hours at room temperature or until
any ice is melted. Do not use a sharp implement to remove ice as this will damage
the coating of the fridge
•
Dry thoroughly and remove any surplus water before returning to use
•
Leave cooling for at least 6 hours or until the temperature display show the correct
temperature for at least 30 minutes before reloading with temperature sensitive
contents such as vaccines or other pharmaceuticals.
It is essential that you unplug the refrigerator from the mains to prevent electric
shock and transfer the contents where they can be stored and monitored at the correct
temperatures before defrosting
Although your
Labcold
fridge features automatic off-cycle defrosting, it is recommended that
it is defrosted manually if there is a build up of ice. This can happen for a number of reasons, for
example in times of high humidity, if the door has been opened for a long time, the refrigerator
is overstocked or the ambient temperature is high.
Defrosting
Cleaning
When cleaning you should:
•
Remove the shelves and clean with weak soapy water. Do not use strong detergents
or bleach
•
Wipe the inside of the fridge in the same solution and dry with a soft cloth. Take care
to avoid the light fitting and ensure that the drain hole at the back of the fridge is
clear of debris
•
Wipe the door seal with a damp cloth. Do not use strong detergents or bleach
•
Gently remove the dust on the back of the fridge. Take care not to damage the pipes
It is essential that you unplug the refrigerator from the mains to prevent electric
shock and transfer the contents where they can be stored and monitored at the correct
temperatures before cleaning
It is recommended that your fridge is cleaned on a regular basis.
Labcold
I
ntelli
C
old® refrigerators constantly take readings of the air temperature inside the
refrigerator and averages and analyses the results. This means that if you have a separate
monitor it may alarm before the fridge controller, but the refrigerator will still alarm very
shortly afterwards and, if working correctly will do so long before the temperature poses a
threat to the contents.
Why doesn’t the alarm react instantly?
There is water at the back of the fridge
Your
Labcold
refrigerator automatically defrosts and ice and water may be observed at the
back. Any ice is melted and runs through the drain hole to the condensate removal tray at
the back of the fridge. Due to the heat produced by the fridge motor this should evaporate
but may occasionally cause water to be observed in the tray. This is perfectly normal and is
nothing to worry about.
21
My independent thermometer shows a diff erent temperature to the front of the fridge
Your
Labcold
I
ntelli
C
old® refrigerator has a probe placed at the rear of the fridge and the
temperature displayed is calculated by analysing and averaging the temperature data
collected by the probe. A thermometer placed in a diff erent part of the refrigerator may read a
slightly diff erent temperature especially if it is placed close to the door or at the top or bottom
of the fridge as these are the areas where the greatest temperature fl uctuations occur.
Do I really have to have my refrigerator calibrated?
The
I
ntelli
C
old® controller, which monitors your refrigerator, is designed to be accurate,
however, the DH Green book now advises that a refrigerator storing vaccines should be
calibrated annually. By calibrating your fridge annually you have documentary proof that the
temperature displayed on the front of the refrigerator is the same as that inside the chamber.
This may be important if the performance of the fridge is questioned by an offi cial body.
Labcold are a UKAS calibration laboratory No 8898 and are therefore capable of providing
calibration to ISO 17025 standards. Why not contact our service team at
service@labcold.
com
for more information?
My timer seems to lose and gain minutes
This is because the controller does not contain a proper clock but an oscillator which can
be aff ected by ambient temperature and power fl uctuations. It will still provide enough
information to show how long there may have been a temperature incursion so there is no
need to reset the timer as this is perfectly normal. Please be aware if you
do
reset the timer
you may lose data.
Useful Information
Your
Labcold
refrigerator comes complete with a one years parts and labour warranty.
However, if you register your refrigerator you will be entitled to a
5 year warranty
and will be
sent a
free
SD card for automatic 24 hour fridge data logging.
*
To register your warranty, please complete the enclosed warranty form or visit our web site
at
www.labcold.com
, click on the ‘Warranty Registration’ tab and follow the instructions. Full
warranty terms and conditions can also be viewed and downloaded from the
Labcold
website.
In the unlikely event that there is a problem with your refrigerator, you should contact your
retailer in the fi rst instance. If you bought your fridge directly from
Labcold
you should contact
our service team on:
01256 705 580
or Email them at
service@labcold.com
.
When you register your warranty or want to report a performance issue you will need to have
the following information to hand. Please fi ll this in as soon as you get your fridge so we can
help you as quickly as possible in the event of a problem.
Model Number
Serial Number
Retailer
Date Purchased
the professional choice for medical
and scientifi c refrigeration...
Labcold Ltd, Cherrywood, Chineham Park, Basingstoke, RG24 8WF, UK 01256 705 555
* 5 year warranty and free SD card available to UK customers only. Outside the UK, warranty is limited to one
year parts only .SD cards are available only as a chargeable extra.
22

www.labcold.com