Full Text Searchable PDF User Manual

K60i Wireless Communication System
User Guide
Release 1.2
May 23, 2019

K60i User Guide
Kwikbit K60i User Guide
Confidential & Proprietary
- 2 -

K60i User Guide
Kwikbit is a trademark of Kwikbit Inc.
©2016-2019 Kwikbit Inc. All rights reserved.
This equipment has been tested and found to comply with the limits for a Class B digital device,
pursuant to Part 15 of the FCC rules. These limits are designed to provide reasonable protection
against harmful interference in a residential installation. This equipment generates, uses and can
radiate radio frequency energy and, if not installed and used in accordance with the instructions,
may cause harmful interference to radio communications. However, there is no guarantee that
interference will not occur in a particular installation.
You can determine whether your equipment is causing interference by turning it on and off. If the
interference stops, it was probably caused by the equipment. If the equipment causes interference
to radio or television equipment, try to correct the interference by using one or more of the
following measures:
▪
Reorient or relocate the receiving antenna.
▪
Increase separation between the equipment and receiver.
▪
Connect the equipment into an outlet on a circuit different from which the receiver is
connected.
▪
Consult the dealer or an experienced radio/TV technician.
Any modifications to this product which are not authorized by Kwikbit Inc. could void your authority
to operate this equipment.
THE SPECIFICATIONS AND INFORMATION REGARDING THE PRODUCTS IN THIS MANUAL ARE
SUBJECT
TO
CHANGE
WITHOUT
NOTICE.
ALL
STATEMENTS,
INFORMATION,
AND
RECOMMENDATIONS IN THIS MANUAL ARE BELIEVED TO BE ACCURATE BUT ARE PRESENTED
WITHOUT WARRANTY OF ANY KIND. USERS MUST TAKE FULL RESPONSIBILITY FOR THEIR
APPLICATION OF ANY PRODUCT.
NOTWITHSTANDING ANY OTHER WARRANTY HEREIN, ALL DOCUMENT FILES AND SOFTWARE ARE
PROVIDED “AS IS” WITH ALL FAULTS. KWIKBIT DISCLAIMS ALL WARRANTIES, EXPRESSED OR IMPLIED,
INCLUDING, WITHOUT LIMITATION, THOSE OF MERCHANTABILITY, FITNESS FOR A PARTICULAR
PURPOSE AND NONINFRINGEMENT OR ARISING FROM A COURSE OF DEALING, USAGE, OR TRADE
PRACTICE.
IN NO EVENT SHALL KWIKBIT OR ITS SUPPLIERS BE LIABLE FOR ANY INDIRECT, SPECIAL,
CONSEQUENTIAL, OR INCIDENTAL DAMAGES, INCLUDING, WITHOUT LIMITATION, LOST PROFITS OR
LOSS OF DAMAGE TO DATA ARISING OUT OF THE USE OR INABILITY TO USE THIS MANUAL, EVEN IF
KWIKBIT HAS BEEN ADVISED OF THE POSSIBILITY OF SUCH DAMAGES.
Kwikbit K60i User Guide
Confidential & Proprietary
- 3 -

K60i User Guide
Table of Contents
Mechanical, Power and Environmental Specifications
Element and Network Management
Using the K60i Web User Interface (UI)
Initial System Setup and IP Configurations
Kwikbit K60i User Guide
Confidential & Proprietary
- 4 -

K60i User Guide
FCC Radiation Exposure Statement
Kwikbit K60i User Guide
Confidential & Proprietary
- 5 -

K60i User Guide
1 Preface
1.1 Preface overview
Thank you for choosing the K60i system from Kwikbit. This guide introduces you to system
concepts, system architecture and commonly used terms.
This preface describes:
●
Audience for this guide
●
Additional documentation
●
Where to go for more help
1.2 About this guide
This guide provides an overview of the K60i system, its components, its network
architecture, and how it is configured and a deployed.
This guide is intended for network and system administrators who must install, configure,
and manage K60i distribution networks. This guide is meant to provide an overview to the
system. This guide does not provide detailed information on installing or operating the
system.
It is assumed readers of this guide are familiar with:
●
Basic networking concepts
●
Layer 2 (link layer) of OSI model
●
Layer 3 (network layer) of OSI model
●
Routing and switching in networks
●
Radio frequency (RF) systems engineering
●
Virtual local area network (VLAN) technology
1.3 Additional documentation
If you cannot find the information you need in this guide, you may want to refer to the
following documents:
●
K60i Physical Installation Guide
●
Kwikbit Edge Controller User Manual
Kwikbit K60i User Guide
Confidential & Proprietary
- 6 -
K60i User Guide
1.4 Additional help
Kwikbit is committed to providing our customers with high quality technical support via the
following methods:
Web
www.kwikbit.com/support
support@kwikbit.com
Phone
+1 (952) 657-5628
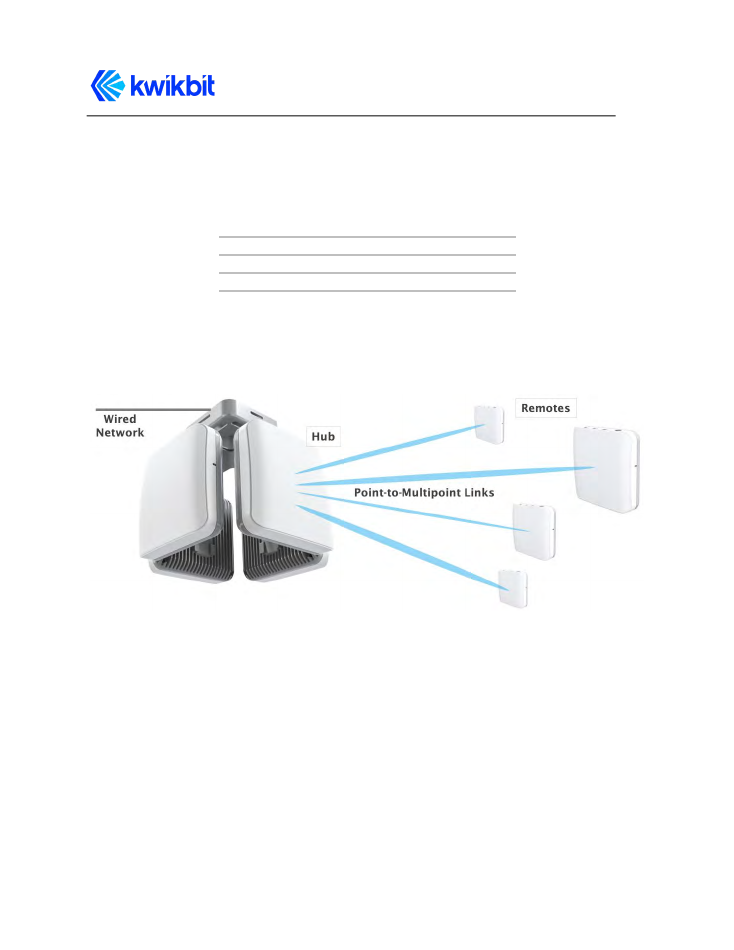
2 Kwikbit K60i System Overview
Figure 1: K60i System in a Point-to-Multipoint (PtMP)
Wireless Communication Application
Kwikbit is a leader in gigabit wireless distribution solutions that intelligently adapt to
challenging environments to maximize performance and reliability.
The K60i system operates in the 60 GHz unlicensed frequency band and is designed
primarily for line-of-sight (LoS) operation. Non-line-of-sight (NLoS) operation is possible
within short range and in the presence of reflective surfaces. By utilizing advanced
beamforming techniques, the K60i system automatically adapts in Point to Multi-Point
(PMP) communication configuration and is adaptable to changes in the operating
environment. The beam forming capability also makes system installation simple for
Kwikbit K60i User Guide
Confidential & Proprietary
- 7 -

K60i User Guide
non-technical staff as precise mechanical alignment, as required by previous generation 60
GHz systems, is not required.
The K60i system is designed for use in multiple applications including IoT backhaul
(sensors, security cameras, etc.), optical fiber extension, and corporate and enterprise data
backhaul services by providing 1 Gbps of symmetric throughput.
The K60i system operates in unlicensed Time Division Multiplexing (TDD) band 57.05 –
64.00 GHz in both Point to Point (PTP) and Point to Multi-Point (PtMP) configurations. Some
of the main product characteristics are shown in Table 1.
Table 1: Main K60i Characteristics
Duplex Mode
Time Division Multiplexing (TDD)
Physical Layer / Antenna
System
64 patch beamforming antenna
Operation Configuration
PtP and PtMP
Capacity
1.86 Gbps goodput aggregate
Symmetry
Dynamic downlink (DL) and uplink
(UP) based on offered load
Frequency of Operation
57.05 – 64.00 GHz
Channel Bandwidth
2.16 GHz
Network Interface
3x gigabit Ethernet
Form Factor
4.25 x 4.25 x 2” with integrated
antenna
The K60i system consists of the following components:
●
Hub Unit: control communication to one or more Remote Units
●
Remote Unit: scan for available Hub Units and connect to the Hub configured or
assigned via the Edge Controller
●
Edge Controller: Optional appliance computer that provides WebUI tools for
deployment planning, commissioning, network configuration, management,
Kwikbit K60i User Guide
Confidential & Proprietary
- 8 -

K60i User Guide
monitoring and fault isolation. Edge controller is highly recommended for networks
of medium and large scale.
The K60i Hub and Remote Units are identical from a hardware perspective, only differing in
software configuration. The K60i has a small form factor that can be easily and
unobtrusively deployed in many different indoor environments.
3 K60i System Description
Kwikbit’s K60i wireless indoor backhaul solution is designed to meet the requirements of
network planners where rapid and flexible deployment, high reliability, multi-gigabit
capacity and excellent latency performance are needed. Applications for the system include
IoT gateway aggregation, Wi-Fi access point backhaul, video camera connectivity and other
gigabit IP based applications. The system can function either as a Point-to-Point (PTP) or
Point-to-Multipoint (PMP) wireless Ethernet bridge.
Some of the main characteristics of the system include:
●
Time Division Duplex (TDD): The K60i solution features TDD access mode with
variable frame length.
●
Adaptive Modulation with Link Adaptation: The K60i system supports BPSK,
QPSK and 16QAM on both the downlink and uplink path to achieve high capacity in
the channel bandwidth (1.86 Gbps Ethernet layer throughput for combined
downlink and uplink traffic).
●
Beamforming: Use of the 60 GHz band allows extremely fast communication, but
also presents the challenge of limited propagation. Signals in the 60 GHz band are
also more susceptible to disruption from physical barriers than at lower
frequencies. The K60i system includes adaptive beamforming, a technique that
enables robust multi-gigabit communications at greater distances. Kwikbit’s
beamforming feature uses directional antennas to reduce interference and
automatically focus a signal between two devices into a concentrated beam. During
the beamforming process, devices establish communication and then fine-tune
their antenna settings to improve the quality of directional communication until
there is enough capacity for the desired data transmission.
One key benefit of Kwikbit’s beamforming is that if an obstacle blocks the line of
sight between two devices, for example, if someone walks between them, the
devices can quickly establish a new communications pathway. Another benefit of
the K60i beamforming is that non-technical personnel can quickly and easily install
the system. Precise physical alignment of the radios, as required with previous 60
Kwikbit K60i User Guide
Confidential & Proprietary
- 9 -

K60i User Guide
GHz products, is not required with the Kwikbit system. The beamforming feature
also enables the PMP communication capability of the system.
●
Power Management: The K60i system utilizes the scheduled access mode to
reduce power consumption. Devices connected with each other via a directional link
schedule the periods during which they communicate and, in between those
periods, they can sleep to save power. This capability allows devices to more
precisely tailor their power management to their actual traffic workload, reduces
potential co-channel interference and enables efficient spectrum utilization.
●
Advanced Security: The K60i system utilizes strong security mechanisms, including
Galois/Counter Mode, a highly-efficient mode of encryption that is designed to
support higher communication speeds. Encryption is based on the
government-grade Advanced Encryption Standard (AES) and is implemented in
hardware for performance and efficiency.
●
Integrated Antennas: The K60i units integrate a specially-designed, 64 element
antenna module that enables a peak EIRP of 40 dBm with a 90º azimuthal and 40º
vertical beam sweep range.
●
PMP with Dynamic Bandwidth Allocation: The K60i system can operate in PTP or
PMP configurations with up to eight Remotes. The capacity allocated to each
Remote is variable according to the requirements of connected devices.
●
Compact Form Factor: The K60i transceiver units are highly integrated, compact
(107x107x50mm), and low in weight (388g), so they can be easily mounted on most
ceiling structures and walls.
●
Connectivity: K60i backhaul devices include three standard RJ45 Gigabit Ethernet
ports, two of which supply PoE power to connected Wi-Fi access points, IoT
gateways, surveillance cameras and other payload communication devices.
The Kwikbit K60i system provides these network management features:
●
Each K60i unit incorporates a WebUI. This WebUI enables configuration, fault
management, and administration of the unit, as well as provides system state and
performance information.
Kwikbit K60i User Guide
Confidential & Proprietary
- 10 -
K60i User Guide
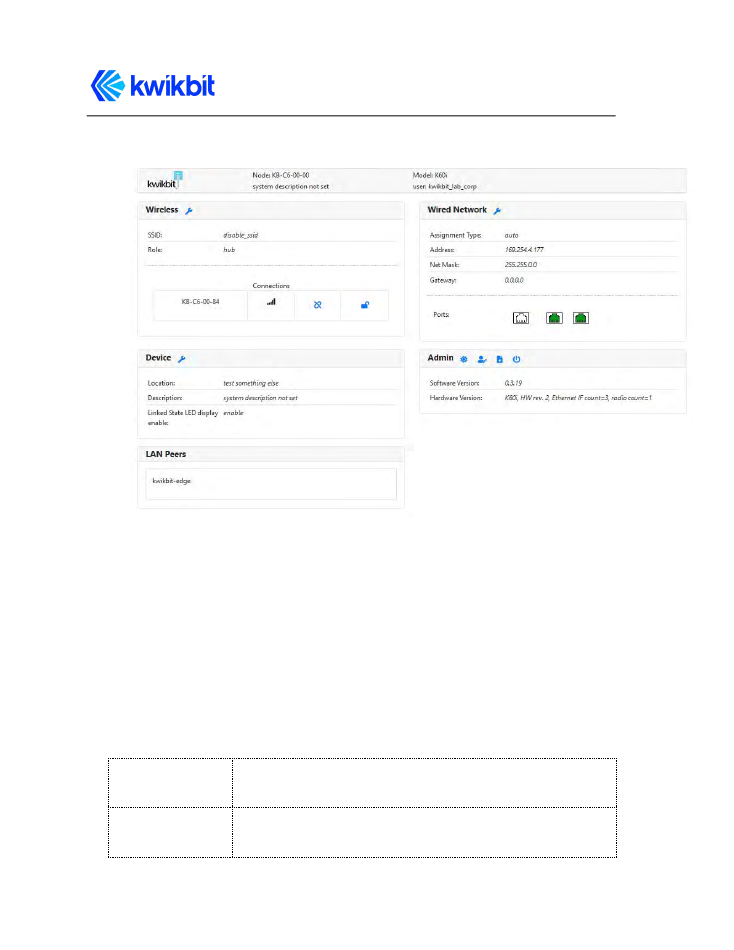
Figure 2: K60i Hub and Remote WebUI interface page
●
The Kwikbit Edge Controller is a very powerful part of the Kwikbit solution. The Edge
Controller connects through an Ethernet connection to the root K60i unit and
enables non-technical personnel to physically install an entire network without K60i
units being configured on the bench in advance. A local or remote IT resource can
design, commission and manage the network using the Edge Controller’s WebUI.
The Edge Controller can be connected to the cloud for remote management of
multiple locations.
4 Technical Specifications
4.1 System Specifications
Aggregate
capacity
Up to 1.8 Gbit/sec (Layer 2/ Ethernet)
Ethernet frame
type
Transparent bridging of all Ethernet types including VLAN
and VLAN stacking
Kwikbit K60i User Guide
Confidential & Proprietary
- 11 -

K60i User Guide
Latency
250 microseconds average
L2 switching
Complete Layer 2 switching with VLAN support
Security
AES 128 with automatic secure key distribution
Network
Attributes
Ethernet bridge, 802.1Q, DSCP/ToS/802.1p (IPv4/v6) and
802.1ad/ QinQ tagging
Network
Interfaces
3 x GigE RJ-45 (2x with PoE output)
Other Interfaces
LEDs indicators for power, link condition, signal strength,
and unit location
Provisioning
Zero-touch deployment and commissioning with Edge
Controller web application
Management
Web GUI and Edge Controller
4.2 Radio Specifications
Access
Technology
Single carrier beamforming physical layer
Duplex
Time Division Multiplexing (TDD)
Modulation
BPSK, QPSK; 8 levels of adaptive modulation and coding
schemes
Frequencies
57.05 - 64.00 GHz
Channel
Bandwidth
2.16 GHz
Antenna System 64 patch beamforming antenna with
90˚ horizontal and 40˚ vertical scan range
Kwikbit K60i User Guide
Confidential & Proprietary
- 12 -

K60i User Guide
Output power
(maximum)
40 dBm EIRP
Typical Range
100 meters
4.3 Mechanical, Power and Environmental Specifications
Configuration
Single-piece indoor unit with integrated antenna
Dimensions
(H x W x D)
107 x 107 x 50 mm
4.25 x 4.25 x 2 inches
Weight
388g / 13.7 ounces
Power Input
12-48 VDC
Power
Consumption
K60i only: 8 watts idle, 13 watts maximum
K60i + PoE: 58.4 watts maximum
Power Output
PoE available on 2 ports for Vin = 48 Vdc:
802.3af (15.4 watts) on RJ45 port closest to DC input and
802.3at (30 watts) on middle RJ45
Operating
temperature
0˚C to +45˚C
Humidity
Up to 95% non-condensing
UL
62368-1
ESD
IEC EN 61000-4-2
EMC
IEC EN 61000-4-3
Kwikbit K60i User Guide
Confidential & Proprietary
- 13 -
K60i User Guide
4.4 System Enclosure
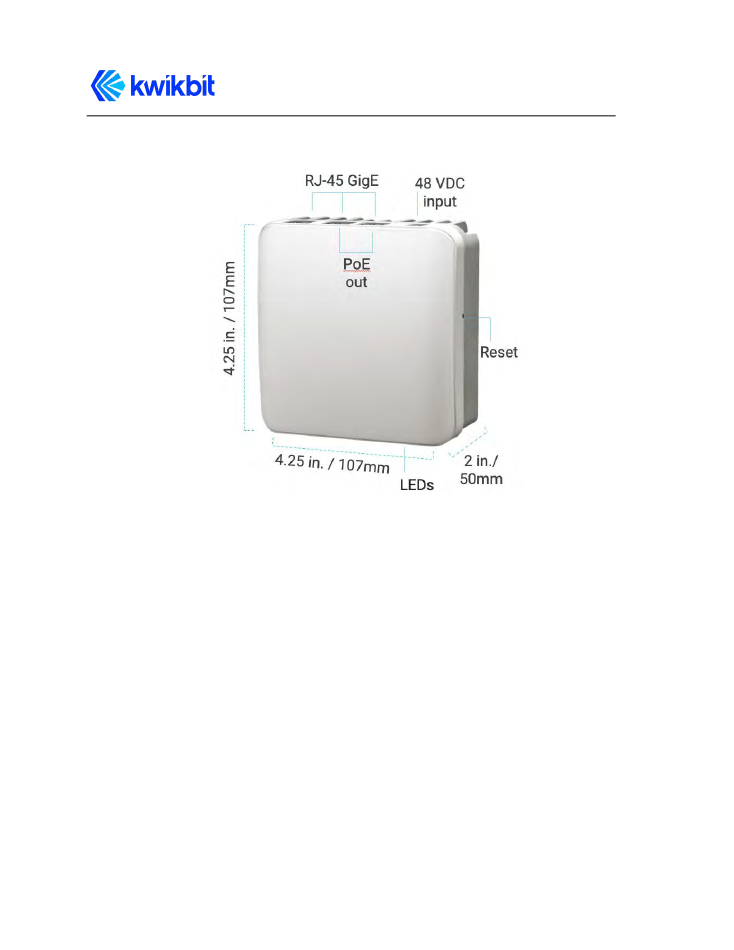
Figure 3: K60i Backhaul Unit (Hub and Remote)
The K60i enclosure is a rugged casing that can be supplied with multiple mounting bracket
configuration options, including: high bay, exposed ceiling, office ceiling T-bar, and wall
mount. The mounting brackets allow for a range of orientation flexibility to enable
mounting in challenging locations. The ceiling bracket can accommodate up to four units.
The wall bracket can accommodate one or two units. The installed units then can be
interconnected for medium and large network deployments.
The mechanical enclosure for the transceiver Module has a 48 VDC power connector, three
RJ45 connectors for Gigabit Ethernet network connectivity and an opening to the factory
reset switch. Two of the three RJ45 port connectors provide PoE compliant power output to
power devices connected to the network.
5 System Throughput
The K60i system uses time division duplexing (TDD) access mode, employing a single
frequency for both transmit and receive paths. The throughput for the downlink and uplink
depends on a downlink-to-uplink frame bandwidth ratio. The ratio is automatically
adjusted based on the offered load in each direction, taking into account all Remotes
connected to an Hub in PMP. Furthermore, the system’s throughput depends on the
Kwikbit K60i User Guide
Confidential & Proprietary
- 14 -

K60i User Guide
Modulation and Coding Rate (MCS) which varies according to link and signal conditions. The
following table details Ethernet uplink and downlink combined throughput for a K60i link.
Table 8: Throughput Performance for Cyclic Prefix of 1/8
MCS Index
Modulation
NCBPS
Repetitions
Code Rate
Data Rate
(Mbit/s)
1
π/2 BPSK
1
2
1/2
310
2
π/2 BPSK
1
1
1/2
620
3
π/2 BPSK
1
1
5/8
775
4
π/2 BPSK
1
1
3/4
930
5
π/2 BPSK
1
1
13/16
1007
6
π/2 QPSK
2
1
1/2
1240
7
π/2 QPSK
2
1
5/8
1550
8
π/2 QPSK
2
1
3/4
1860
6 Element and Network Management
The K60i system supports the following network management interfaces:
●
K60i Web Interface (WebUI). Accessible via HTTP(S), the K60i WebUI provides an
interactive visual toolset that allows an operator to modify the full configuration of
the K60i system as well as view state, fault, and performance indicator.
●
The Edge Controller WebUI application provides complete access to configuration,
state, performance and fault information for all K60i units in a network system.
The WebUI network management interface on the K60i system is accessible via HTTP(S).
Connect to the K60i system with your browser utilizing one of the following methods:
●
Local Name: Connect a K60i transceiver unit directly to your computer by plugging
an Ethernet cable into any of the K60i’s three RJ45 connectors. In the URL field on
your computer’s browser type https://KB-XX-XX-XX.local where KB-XX-XX-XX is
the Host name of the unit that appears on the sticker on the back of the unit. For
Kwikbit K60i User Guide
Confidential & Proprietary
- 15 -

K60i User Guide
example, if the unit Host name is KB-C5-6B-78, then the URL address of the unit is
https://KB-C5-6B-78.local. Your browser will display a warning stating that the
connection is not secure. You may ignore the warning and proceed connecting to
the unit. To avoid the warning, please go to the Kwikbit support website, download
the Kwikbit security certificate, and install it on your browser.
●
Management IP Address: An operator assigned, static, Automatic Private IP
Addressing (APIPA) or Dynamic Host Configuration Protocol (DHCP) IP address can
be used for remote management of the units. Both Hubs and Remotes need a
management IP address. For the Hub, the management IP Address is accessible
from the Ethernet side of the network, while for the Remote the management IP
Address is accessible from the wireless side (i.e., from behind the Hub). All traffic to
and from the management IP address can be encapsulated in an
operator-configurable VLAN.
The optional Kwikbit Edge Controller’s management application automatically discovers all
connected K60i devices on the network and establishes a secure connection to each one
utilizing a security certificate provided by Kwikbit and customized by the customer. For
more information on the Kwikbit Edge Controller device and associated applications, please
refer to the Kwikbit Edge Controller User Manual.
The K60i system provides the following network management functions:
1. Device configuration information and status is displayed on the WebUI page
interface as shown above in Figure 2. When the mouse cursor is hovered over an
Ethernet Port or wireless connections icon, detailed information is displayed. In the
Wireless section, the list of wirelessly connected devices is displayed. The list of LAN
connected devices is displayed in the LAN Peers section. The WebUI of a connected
device is established by clicking on the device’s name.
2. Configuration Management. The system configuration section covers several
functional areas:
●
Device
o
Device location
o
Device description
●
Wired Network
o
Device IP address assignment
▪
Static address
▪
DHCP – requires DHCP server
▪
Automatic Zero Configuration address assignment
o
Management VLAN
o
Ethernet ports
▪
Enable / Disable
▪
PoE Enable / Disable (port 2 and 3)
●
Wireless Network
Kwikbit K60i User Guide
Confidential & Proprietary
- 16 -

K60i User Guide
o
Device role
o
SSID
o
Airlink passcode
o
Channel frequency
o
Preferred Hub (if device configured as Remote)
3. Administration Operations:
●
Flash LEDs of the device – used to identify location of physically installed device
●
Change administration password of the device
●
Upgrade device software
●
Reboot the device
To reset the device to factory defaults:
●
cycle the power
●
during power-up, observe the LEDs: there should be two illuminated.
●
Keep your eyes peeled on the LEDs, after about a minute, a flashing pattern will
appear
●
the flashing pattern signals the start of a brief window of opportunity for you to
press the reset button (a round toothpick or an unfolded paper clip works good for
this).
●
Press the button and hold it until you see a distinctive flashing pattern
●
Once this distincting flashing pattern appears, release the button
●
the device is now operating at factory default settings
●
The login password is “kwikbit_root”
7 Ethernet Bridge Support
Designed to seamlessly integrate into existing Ethernet backhaul or general-purpose
networks, the K60i system is built for Ethernet connectivity services and provides network
functionality as a standard Layer 2 (L2) Transparent Bridge (IEEE 802.1d), whereby the K60i
cluster (a cluster being one Hub with its group of up to eight Remotes) is the bridge, and
the Ethernet ports on the Hub and associated Remotes are the ports of the bridge.
The embedded bridge functionality performs Media Access Control (MAC) address learning
(up to 4096 MAC addresses). This function allows the Hub to perform an optimal allocation
of radio resources by sending traffic to the Remote behind which the destination of that
traffic is located.
The K60i system allows network management traffic to be encapsulated in a dedicated
management VLAN and can transport standard Ethernet frames (up to 1518 bytes).
Kwikbit K60i User Guide
Confidential & Proprietary
- 17 -

K60i User Guide
8 Installation Planning
When planning the installation of K60i systems, refer to the Kwikbit K60i Install Guide and
delegate physical install to appropriately trained professionals. When unpacking K60i
backhaul units during install, be sure to do the following for each unit:
●
Locate the label on the unit casing that lists the Serial Number (SN) and Host name
of the unit
●
Record the SN on your registration card for future reference
●
Record the Host name for future reference when provisioning the system
After installation of the K60i backhaul units, perform the tasks described in Chapter 11
“System Provisioning”.
9 Using the K60i Web User Interface (UI)
9.1 Requirements
The K60i embedded WebUI allows for direct configuration of both Hub and Remote units. It
is a standard web application that runs directly on the K60i unit and is accessible through
the default port for HTTPS (443) at URL https://<Host name of the unit>. Your browser will
display a warning stating that the connection is not secure. You may ignore the warning
and proceed connecting to the unit. To avoid the warning, go to the Kwikbit support
website, download the Kwikbit security certificate, and install it on your browser.
The recommended browsers for the K60i WebUI are:
●
Google Chrome
●
Safari
Operating System (OS) support for K60i WebUI:
●
Windows
●
Mac OS X
●
Unix
●
Linux
Note: With the exception of IE9, the K60i WebUI supports the most recent web browser and
OS versions.
Required basic K60i unit configuration tasks can be performed using the units WebUI;
however, the Kwikbit Edge Controller can be used to quickly and efficiently plan,
Kwikbit K60i User Guide
Confidential & Proprietary
- 18 -

K60i User Guide
commission, configure and monitor small to large K60i networks. See the K60i Edge
Controller User Guide for details.
9.2 K60i Web UI Page
The K60i WebUI is a single page that provides device status as well as configuration
options.
9.2.1 Logging In
Use your browser to connect to K60i device’s WebUI as described above. It is not necessary
to login to the system in order to view the WebUI page. You will then be prompted to login
once you click on any one of the configuration tabs if you do not have a security certificate
installed on your computer. The security certificate based authentication option is available
when utilizing an Edge Controller to manage the network.
The default username and password is as follows:
User Name: root
Password:
kwikbit_root
The page remains read-only if you do not login to the system and only gives general system
information.
At the top of the WebUI screen, general node information including node name, node
description, model number and user is displayed. There are two network sections on the
page, Wireless and Wired.
The Wireless Network section displays the connection SSID, the unit role (Hub or Remote)
and all current wireless connections. If the unit is a Hub, all currently linked Remotes will be
displayed under connections. If the unit is a Remote, only one connection to a Hub can be
listed. Each connection displays the connected unit name as well as graphical
representation of the signal quality of the connection. By clicking on the connected device’s
name, a browser page of that device is opened. By hovering over the signal quality graphic,
detailed signal level information is displayed. You can change SSID and unit Role
configuration by clicking on the tool icon in the section banner, assuming you are an
authorized user.
The Wired Network section displays the unit’s assigned IP address and the status of the
three Gigabit Ethernet ports. By hovering over the Ethernet port icons, detailed port status
information is displayed. The unit’s IP configuration can be changed by clicking on the tool
icon in the section banner. Clicking on the Ethernet port icons allows a user to enable and
disable ports as well as turn PoE output on or off for ports one and two.
Kwikbit K60i User Guide
Confidential & Proprietary
- 19 -

K60i User Guide
The Device section displays and provides configuration capability for Device Location and
Device Description.
The LAN Peers section displays the names of all K60i units that are connected to the
current unit over a LAN connection. In most cases, these would be collocated units that
provide additional wireless connectivity from that location.
The Administration section displays the software and the hardware versions of the device
and includes controls to change user password, upgrade device software, flash device LEDs
for device identification, and to reboot the device.
10 System Provisioning
Network planning, installation procedure and commissioning are most efficiently
performed using the Kwikbit Edge Controller. In addition, the Edge Controller enables
centralized network operation view and management. Please see the Kwikbit Edge
Controller User Guide for detailed information.
If it is desired to provision a K60i network without the use of edge controller, the following
tasks associated with preparing a K60i system must be followed:
1. Initial system setup and IP configurations
2. Setting units’ roles
3. Setting SSID and airlink connectivity passcode
4. Setting communication channel frequency
10.1 Initial System Setup and IP Configurations
All new K60i units shipped from the factory are identical with a default software
configuration loaded. You must connect to the management interface in order to configure
the following system management parameters:
1. Connect your computer directly to the unit with an Ethernet cable. Once connected,
open a browser on the computer and enter the following URL:
https://KB-XX-XX-XX.local where KB-XX-XX-XX is the Host name of the unit that appears
on the sticker on the back of the unit. If the unit Host name is KB-C5-6B-78, for
example, then the URL address of the unit is https://KB-C5-6B-78.local. Initially, the
browser will display a warning stating that the connection is not secure. You may
ignore the warning and proceed connecting to the unit. To avoid receiving the
browser warning, please visit the Kwikbit support site, download the Kwikbit security
certificate and install it on your browser.
Kwikbit K60i User Guide
Confidential & Proprietary
- 20 -

K60i User Guide
2. After successfully opening the WebUI page, the unit’s IP address can be changed by
clicking on the Wired Network section tool icon:
●
When prompted for user name, enter root admin for the username and
kwikbit_root for password.
●
Select the desired address assignment protocol. If static address is selected,
enter the network mask and default gateway.
●
Click Submit and the unit will reboot with the new address assignment. Your
browser will automatically reconnect and display the page.
3. Click on the Wireless section tool icon to configure wireless communication
parameters:
●
Select the role of the unit. When configuring a PTP or PMP communication
system, only one of the wirelessly connected devices may be configured with
a Hub role. The units connecting to the Hub wirelessly must be configured as
Remotes.
●
Configure SSID, airlink passcode and channel frequency (not required on
remote). These parameters must match between the Hub and all wirelessly
connected Remotes in order to establish wireless communication.
●
If a configured Remote can connect to multiple Hubs, you may want to set
the optimal Hub in the Preferred Hub field.
●
There needs to be a Hub node configured with Network Root = enable.
Alternatively, each remote needs to be configured with “Preferred Hub”.
Lacking both of these will result in Remote nodes periodically scanning
attempting to locate the Root node.
●
Click Submit to save changes.
4. Click on the tool icon in the Device section to configure the Location at which the
device will be physically installed and the description of the device. Click Submit.
5. In the Admin section, click on the second icon to change the management interface
password.
The unit is now configured and ready to be installed.
Kwikbit K60i User Guide
Confidential & Proprietary
- 21 -

K60i User Guide
11 Appendices
11.1 Glossary
DHCP Dynamic Host Configuration Protocol
DL
Downlink
DNS
Domain Name System
FTP
File Transfer Protocol
Gbps
Gigabits per second
GHz
Gigahertz
HU
Hub Unit
IEEE
Institute of Electrical and Electronics
Engineers
L2
Layer 2
LAN
Local Area Network
LED
Light Emitting Diode
LoS
Line-of-Sight
MAC
Media Access Control
Mbps
Megabits per second
MCS
Modulation and Coding Scheme
MHz
Megahertz
NLoS
Non-Line-of-Sight
NMS
Network Management System
PC
Personal Computer
Kwikbit K60i User Guide
Confidential & Proprietary
- 22 -

K60i User Guide
PtMP
Point-to-Multipoint
PtP
Point-to-Point
QAM
Quadrature Amplitude Modulation
RF
Radio Frequency
RU
Remote Unit
SSID
Service Set Identifier
TDD
Time Division Duplexing
UL
Uplink
VLAN
Virtual Local Area Network
VDC
Volts Direct Current
11.2 FCC Statement
Any changes or modifications not expressly approved by the party responsible for
compliance could void the user’s authority to operate the equipment.
This device complies with part 15 of the FCC Rules. Operation is subject to the following
two conditions: (1) this device may not cause harmful interference, and (2) this device must
accept any interference received, including interference that may cause undesired
operation.
11.3 FCC Radiation Exposure Statement
This equipment complies with FCC radiation exposure limits set forth for an uncontrolled
environment. A minimum of 20 centimeters (11 inches) of separation between the K60i and
all persons shall be maintained.
Kwikbit K60i User Guide
Confidential & Proprietary
- 23 -