Full Text Searchable PDF User Manual

U S E R G U I D E

2
User guide
FILL IN AND RETAIN
The model and serial number are located on the bottom of the cleaner.
For your personal records, please enter the COMPLETE model and serial number in the spaces
provided and retain this information.
Your cleaner is model .................................................................................................................
and has serial number ................................................................................................................
It is suggested that you attach your sales receipt to this owner’s manual. Verification of date
of purchase may be required for warranty service of your JohnnyVac product.
Carton contents
Unpack cleaner from carton and
identify the parts shown. Remove
and dispose of cardboard packing.
A. Canister cleaner with tools
B. Power nozzle
C. Paper bag
D. Telescopic wand and hose
E. Mini air nozzle*
F. Hard Floor Tool
INDEX
1. IMPORTANT SAFETY INSTRUCTIONS ...... 3
2. COMPONENTS & ACCESSORIES ............. 4
3. ASSEMBLY ............................................ 5
4. OPERATION
4.1. ON/OFF switch .............................. 6
4.2. Check bag indicator ........................ 6
4.3. Variable suction control ................. 6
4.4. Wand storage clip .......................... 6
4.5. Polarized plug ................................ 6
4.6. Thermal protector .......................... 6
5. CLEANING
5.1. Power nozzle handle position ......... 7
5.2. Floor surface selector ..................... 7
5.3. Cleaning tools ............................... 7
6. MAINTENANCE – How to replace
6.1. Filter bag ....................................... 8
6.2. Filters
- Secondary filter
............................. 9
- Exhaust filter
................................ 9
6.3. Power Nozzle
- Belt replacement ......................... 10
- Brushroll replacement ................. 11
6.4. Mini air nozzle ............................. 11
7. TROUBLESHOOTING ............................ 12
8. WARRANTY ......................................... 13
*
* Optional

3
User guide
READ ALL INSTRUCTIONS BEFORE USING THIS APPLIANCE
GENERAL
• Use this appliance solely in accordance with these instructions.
• Use solely accessories recommended by the supplier. The use of other accessories may result in damage to the appli-
ance, thereby creating hazards for the user.
• This appliance is not intended for use by persons ( including children ) with reduced physical, sensory or mental capa-
bilities, or lack of experience and knowledge, unless they have been given supervision or instruction concerning use of
the appliance by a person responsible for their safety.
• Children should be supervised to ensure that they do not play with the appliance.
• Have any repair carried out solely by a qualified electrician. Never try to repair the appliance yourself.
ELECTRICITY AND HEAT
• Verify that the mains voltage is the same as that indicated on the type plate on the appliance before use.
• Always remove the plug from the socket when the appliance is not in use.
• Always remove the plug from the wall socket by pulling on the plug, not the power cord.
• Check the appliance’s power cord regularly to make sure it is not damaged. Do not use the appliance if the power cord
is damaged. Have a damaged power cord replaced by a qualified service department.
• When using an extension lead always make sure that the entire cable is unwound from the reel.
• Use solely approved extension leads.
• Avoid stumbling over the extension lead or power cord.
• Make sure the air vent is not covered or blocked.
• Make sure that the appliance and the power cord do not come in contact with sources of heat, such as a hot hob or
naked flames.
• Make sure that the power cord and the plug do not come in contact with water.
DURING USE
• Never use the appliance outdoors.
• Never use the appliance in a humid room.
• Make sure that your hands are dry before touching the appliance, power cord or plug.
• The power cord has a yellow and a red mark. Pull out the power cord to the yellow mark. Never pull out the power cord
beyond the red mark.
• Guide the power cord whilst it rewinds onto the reel, since otherwise the cord could become tangled or the plug could
strike back of the appliance. Take hold of the power cord near the mark, and allow it to gently slide through your fingers
back into the appliance.
• Make sure that the dust bag does not become pinched between the cover and the motor unit. This could damage the
appliance and/or the dust bag.
• Do not use the appliance to suck up: flowing or burning objects; glass splinters or other sharp objects; residues of
plaster, cement, stone, soot and similar; liquids or moist dirt.
• These objects could cause serious damage to the appliance and the filter system, and make it unsafe to use.
• Do not use the vacuum cleaner on wet rugs and carpets.
• Never insert objects in the air-exhaust vent.
• Make sure that the suction and exhaust openings are opened, and that the filters are not blocked. Blockages will cause
the appliance to overheat. Switch off the vacuum cleaner immediately! Once you have remedied the problem, wait 20 to
30 minutes to allow the vacuum cleaner to cool down completely. The vacuum cleaner will then be ready for use again.
• Keep the nozzle and the tubes away from the body while the vacuum cleaner is running. This could cause serious injury,
for example to the eyes or ears.
• Never roll the appliance over the cord.
• Switch off the appliance and remove the plug from the wall socket in the event of a malfunction during use, and before
filing or emptying the appliance, cleaning the appliance, fitting or removing an accessory, or storing the appliance after
use.
• Do not pick up the appliance if it falls in to water. Remove the plug from the wall socket immediately. Do not use the
appliance anymore.
• Never immerse the appliance, the power cord or the plug in water or other liquid. After washing the filters, make sure
they are thoroughly dry before returning them to the appliance
1- IMPORTANT SAFETY INSTRUCTIONS
4
User guide
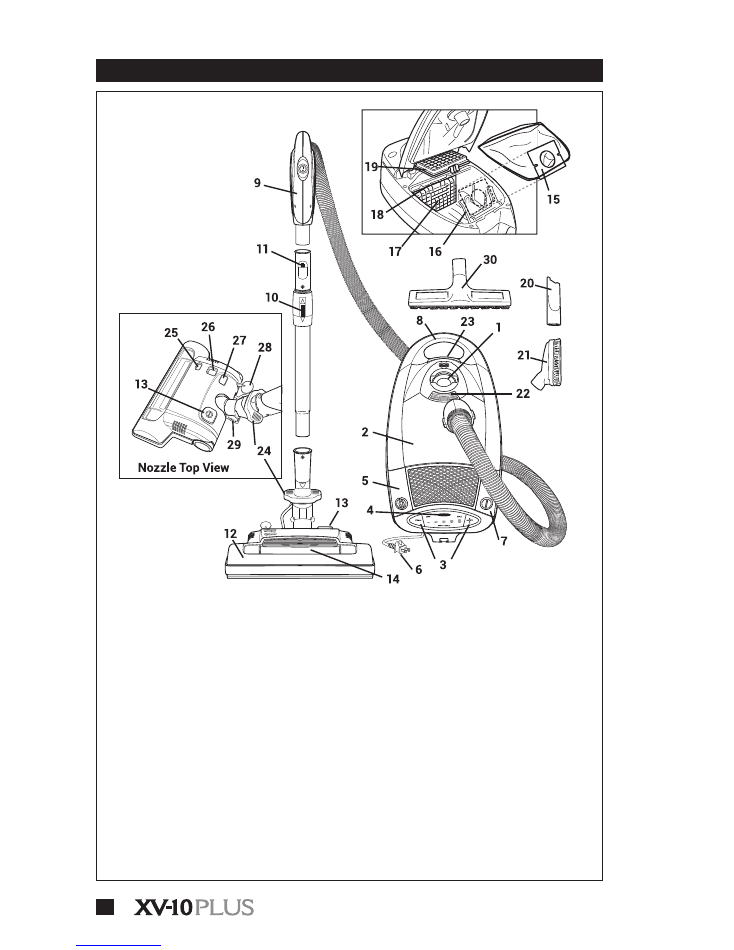
1. Intake
2. Top Cover
3. Variable Suction Control
4. Bag Full Indicator
5. Cordwinder Pedal
6. Power Cord
7. Power ON/OFF Pedal
8. Carrying Handle
9. Handle with Hose
10. Telescopic Wand
11. Wand Release Latch
12. Carpet & Floor Power Nozzle
13. Brushroll ON/OFF Switch
14. Headlight
15. Disposable Filter Bag
16. Bag Dock
17. Motor Filter Grill
18. Motor Filter
19. Hepa Media Filter
20. Crevice Tool
21. Combination Tool
22. Tool Lid Latch
23. Bag Lid Latch
24. Nozzle Release Latch
25. Overload Protector Reset
26. Carpet Height Indicator
27. Dirt Sensor
28. Carpet Height Adjusment
29. Handle Position Release
30. Hard Floor Tool
2- COMPONENTS & ACCESSORIES
5
User guide
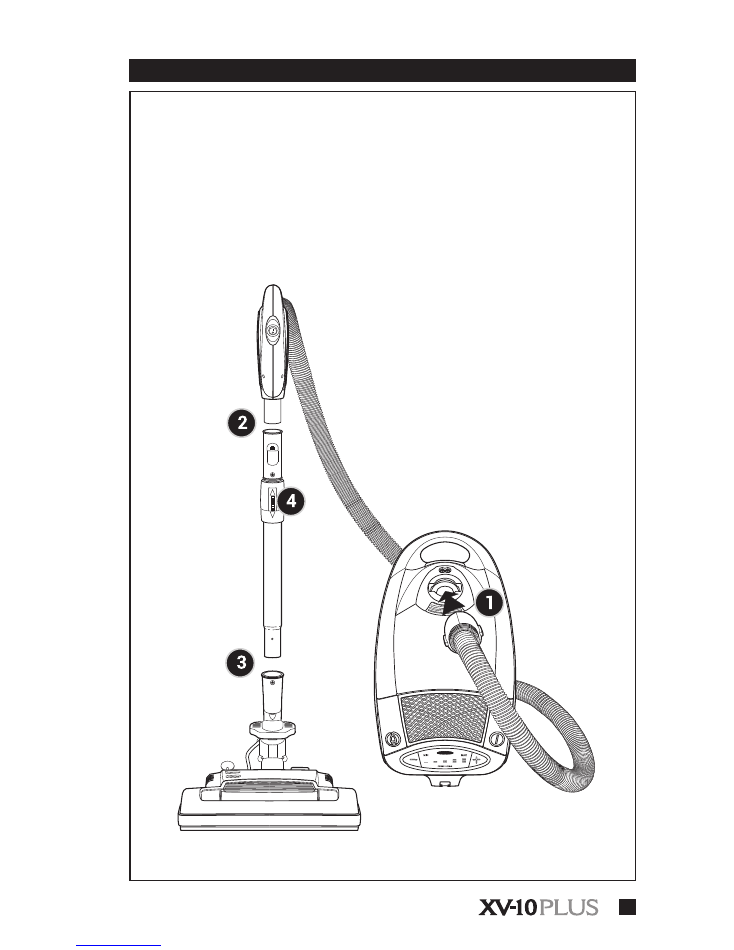
1. Connect hose by firmly inserting end of hose into
canister intake opening.
2. Firmly press handle nozzle into telescopic wand until
it locks in place.
3. Insert telescopic wand into power nozzle until button
locks.
4. Extend telescopic wand by holding telescopic wand
length adjustment and pulling power handle.
3- ASSEMBLY
Note : Accessory tools can be used with
the telescopic wand or handle alone.
6
User guide
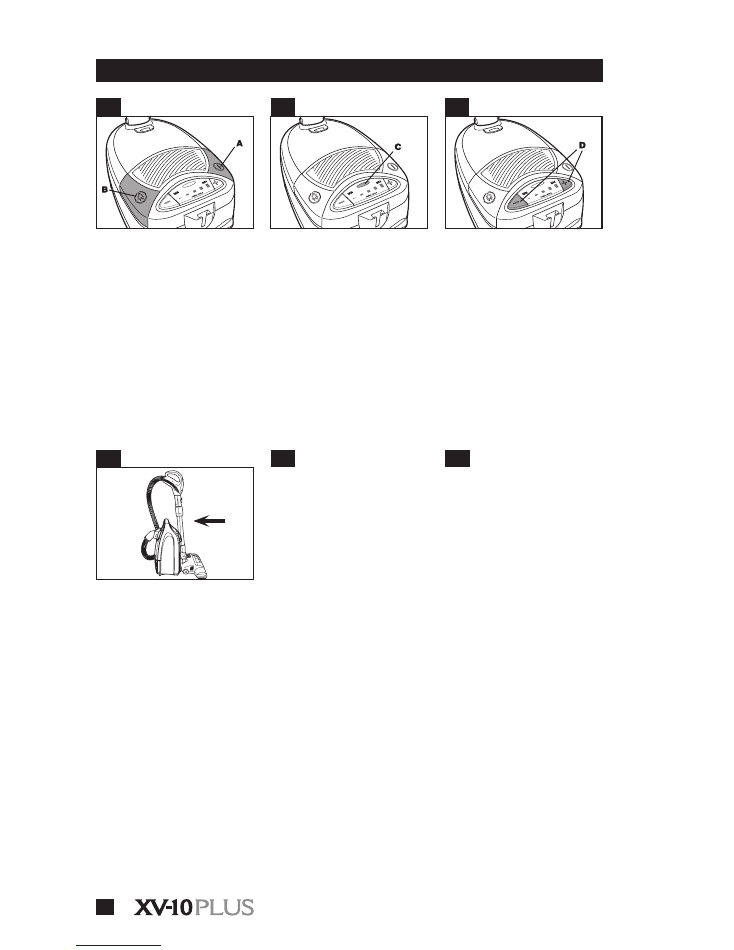
ON/OFF switch
• After assembling vacuum, plug the
cord into an electrical outlet. Turn the
vacuum ON by pressing the ON/OFF
pedal ( A ). To turn vacuum OFF press
the pedal again.
Note : The Cord Winder Pedal ( B )
is on the other side.
Variable suction
control
• The variable suction control ( D ) is
located on the top rear of the canister.
• Push the ( – ) button to reduce suc-
tion and to clean lightly soiled areas
or delicate fabrics. Push the ( + ) but-
ton for maximum cleaning power in
heavily soiled areas.
Polarized plug
• To reduce the risk of electric shock,
this appliance has a polarized plug
( one blade is wider than the other ).
This plug will fit in a polarized outlet
only one way. If the plug does not fit
fully in the outlet, reverse the plug. If
it still does not fit, contact a qualified
electrician to install the proper outlet.
• DO NOT CHANGE THE PLUG IN ANY
WAY.
Wand storage clip
• To save storage space, stand the
cleaner on end and hook wand stor-
age clip on botlom ot cleaner.
The
nozzle must be positioned down as
show.
• Lift up on wand to remove storage
clip from cleaner.
Check bag indicator
• When the indicator light comes on
( C ), open the canister and check
the filter bag. See page 8 for details
and instructions on how to replace a
filter bag.
4.1
4.4
4.3
4.6
4.2
4.5
IMPORTANT :
4- OPERATION
Thermal protector
• An internal thermal protector has
been used in your cleaner to prevent
overheat ing if a large item or clog
gets caught in the nozzle or at the
opening of the bag.
• When the blockage is not
removed, the thermal protector will
trip and cleaner will stop run ning.
• If this happens, turn cleaner OFF
and
disconnect cleaner from elec-
trical outlet.
Then disconnect noz-
zle and remove obstruction. Within
30 minutes the thermal protector
will cool and auto matically reset
and cleaning may resume.
• If cleaner does not operate, allow
addi tional time for thermal protec-
tor to reset.
Note : The canister must remain
unplugged during the 30 minute
cooling period.

7
User guide
PN handle position
• The handle has two positions when
used with the power nozzle upright
and operating.
• To lower handle to operating po-
sition, place your foot firmly on the
power nozzle and pull handle back.
Floor surface selector
Carpet or rug cleaning
• When using the power nozzle for
carpet and rug cleaning, push the
floor surface selector button toward
” ON“.
• This setting provides the suction
and agitator action necessary to deep
clean carpets. The nozzle adjusts
automatically to various carpet pile
heights.
Note : Turn surface selector switch
to the ”OFF“ position before turn-
ing on canister.
Hard surface floor cleaning
• The power nozzle can be used for
cleaning hard surface floors such as
wood, linoleum, vinyl, asphalt and
rubber tile, sealed cork, concrete and
terrazzo, as well as carpet.
• To set the power nozzle for hard
surface floor cleaning, push the floor
surface selector button toward ”OFF“.
This setting provides suction and no
agitator action. If you prefer, you may
use the hard floor tool to clean bare
floors.
• You will find it particularly conve-
nient when cleaning lightweight area
rugs to set the floor surface selector
button on ”OFF“ and continue clean-
ing the surrounding floor surfaces.
Note : The headlight will be ON in
both the ”ON“ and ”OFF“ floor sur-
face modes.
5.1
5.2
5- CLEANING
Select the proper tool
A.
Hard floor tool
may be used for
walls and very irregular hard surface
floors such as brick and slate.
B.
Combination tool
may be used
for carved furniture, table tops,
books, lamps, lighting fixtures, vene-
tian blinds, baseboards, shutters and
registers. May also be used for uphol-
stered furniture, draperies, tapestries,
mattresses and clothing.
C.
Powered hand tool
may be used
for upholstered furniture, carpeted
stairs, and hard to reach places.
D.
Crevice tool
may be used in tight
spaces, corners, and along edges in
such places as dresser drawers, up-
holstered furniture, stairs and base-
boards.
Attaching tools
• Tools may be attached directly to
the hand grip or to the wand. Firmly
push tool into the hand grip or wand.
Twist tool slightly to tighten or loosen
connection.
• Slide combination tool apart to re-
veal second tool.
Cleaning tools
• The cleaning tools are conveniently
stored in the cleaner underneath the
tool lid ( A ). Push the tool lid release
latch to open ( B ).
• The cleaning tools have many uses.
Select the tool best suited for the
cleaning task from the following de-
scriptions.
5.3
A
B
C
D
*
* Optional
8
User guide
Filter bag
When to replace
• Check the filter bag when the full
bag indicator light shows red.
• When the filter bag is filled with
dirt. the cleaner will not operate ef-
ficiently.
• Discard the used filter bag and re-
place with a new one.
Familiarize yourself with these home maintenance tasks as proper use and care of your cleaner will
ensure continued cleaning effectiveness.
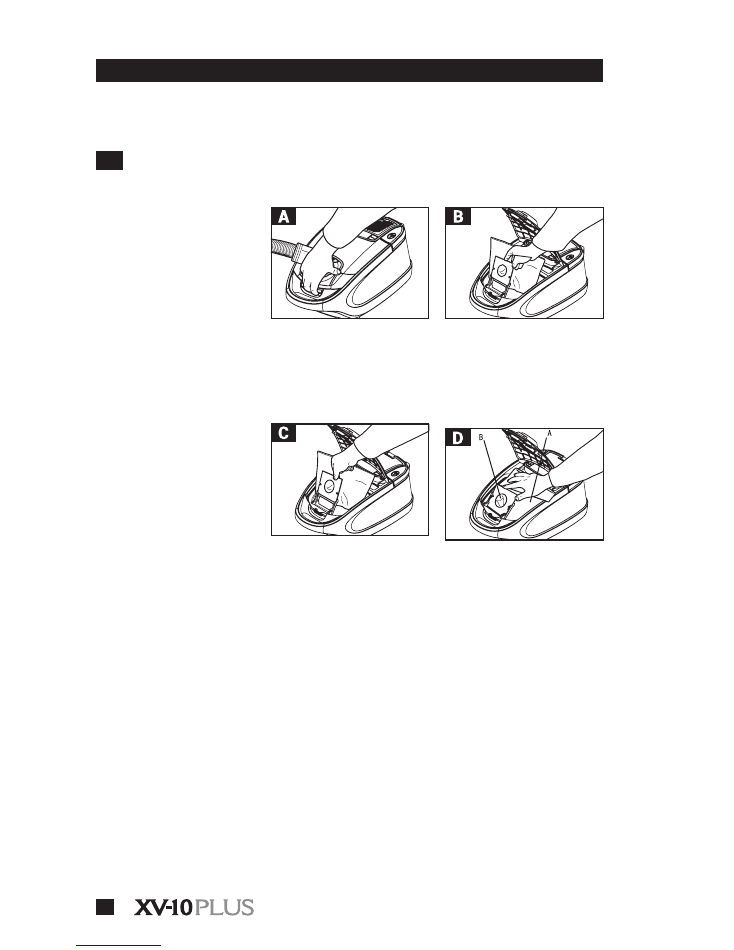
How to replace
• Disconnect cleaner from electrical
outlet.
• Rotate hose to the side. lift bag lid
latch and open bag lid.
• Carefully pull out used bag.
• Form new bag into a box-like shape.
• Slide bag collar
firmly
into holder.
• Push rear edge of bag into bag cavi-
ty below seal ( A ).
• Clear bag opening ( B ) by pushing
the pierced paper through opening
toward bag interior.
• Close bag lid.
Note : The canister bag lid will not
close without a filter bag in place.
6- MAINTENANCE
6.1
Caution
The full bag indicator light may
come on when picking up fine
materials, such as face pow-
der, flour, cornstarch, fireplace
ashes or fireplace soot. these
materials may seal the pores of
the filter bag and may cause the
filter bag to burst even though
the filter bag is partially full of
dirt. It is advised to change the
filter bag often when removing
material of this nature.

9
User guide
Filters
Secondary filter
How to clean or replace
•
Disconnect cleaner from elec-
trical outlet.
• The
secondary filter
, located behind
the grill in the bag compartment, pro-
tects the motor from dirt particles. If
filter becomes dirty, pull off grill and
lift out filter. Wash filter in warm wa-
ter or replace it with a new one. A
dry
f
ilter must be put back into cleaner.
• Do not operate cleaner without sec-
ondary filter in place.
Exhaust filter
How to replace
• The high efficiency exhaust filter
aids in the filtration process to return
clean air to the room.
• To remove this filter, open the grill
located at the back, unsnap the filter
latch and pull the filler out.
• Replace with a new filter.
Note : The filter should be re-
placed annually.
6- MAINTENANCE
( suite )
6.2
10
User guide
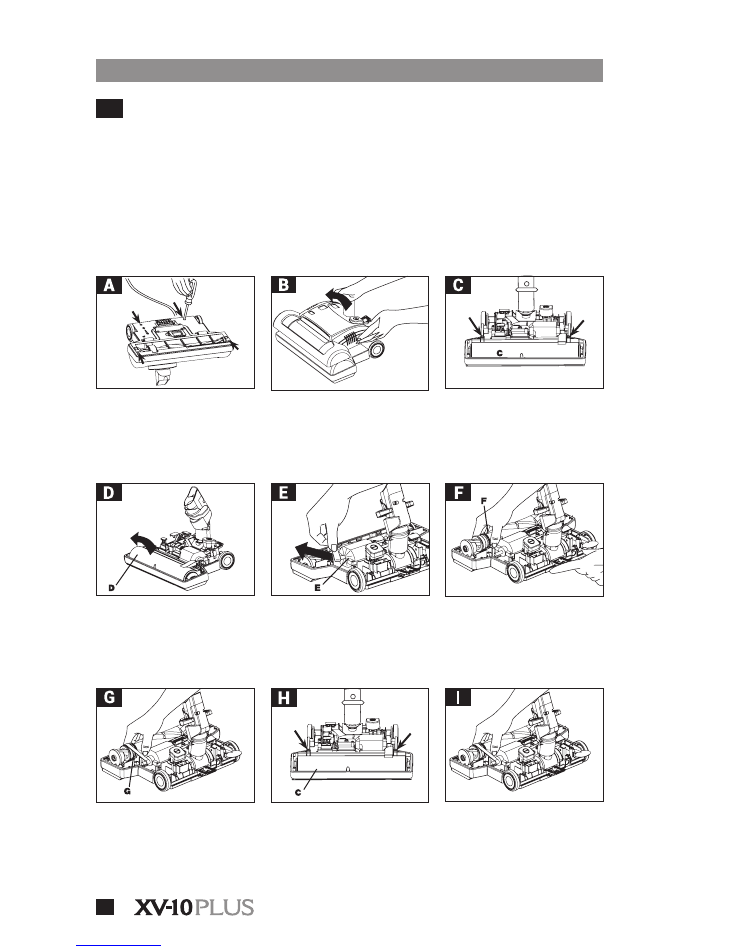
Power nozzle
• Lift up end of agitator brushroll. Re-
move old belt from agitator pulley ( F )
and replace with new belt. Lettering
on belt must be visible. Stretch belt
back and attach to motor pulley.
• Position hood on top of nozzle base.
• Turn nozzle over. Replace 2 short
screws at the back of nozzle and 2
long screws at the front.
•
Hold opposite end of agitator
brushroll in place. Push belt end for-
ward, rotating end plate ( G ) until it
slides into place. Turn agitator, mak-
ing sure it rotates freely.
• Replace brushroll cover ( C ) over
agitator brushroll. Replace 3 short
screws.
• Lift off brushroll cover ( D ).
• Remove brushroll cover ( C ) by re-
moving the 3 Phillips head screws.
• If belt is not broken but is stretched
or cut, pull it off the motor pulley ( E ).
6- MAINTENANCE
( suite )
6.3
• Return nozzle to original position
and lift off hood.
• Disconnect power nozzle from ex-
tension wand.
• To remove hood, turn nozzle over
and unscrew the recessed Phillips
head screws.
Belt replacement
• The belt in your power nozzle drives
the agitator. II has been designed
specifically for use in this cleaner and
is important for effective operation.
When to replace
• The belt should be checked from
time to time to be sure it is in good
condition. To check remove the hood
( see following section ).
How to replace
• Replace the bell if it is stretched,
cut, or broken.
11
User guide
Brushroll replacement
When to replace
• When the agitator brushroll brush-
es are worn, the brushroll should be
replaced.
• To check condition of brushes,
move edge of a card across bot-
tom plate while turning brushroll.
To maintain cleaning effectiveness,
replace brushroll if brushes do not
touch card.
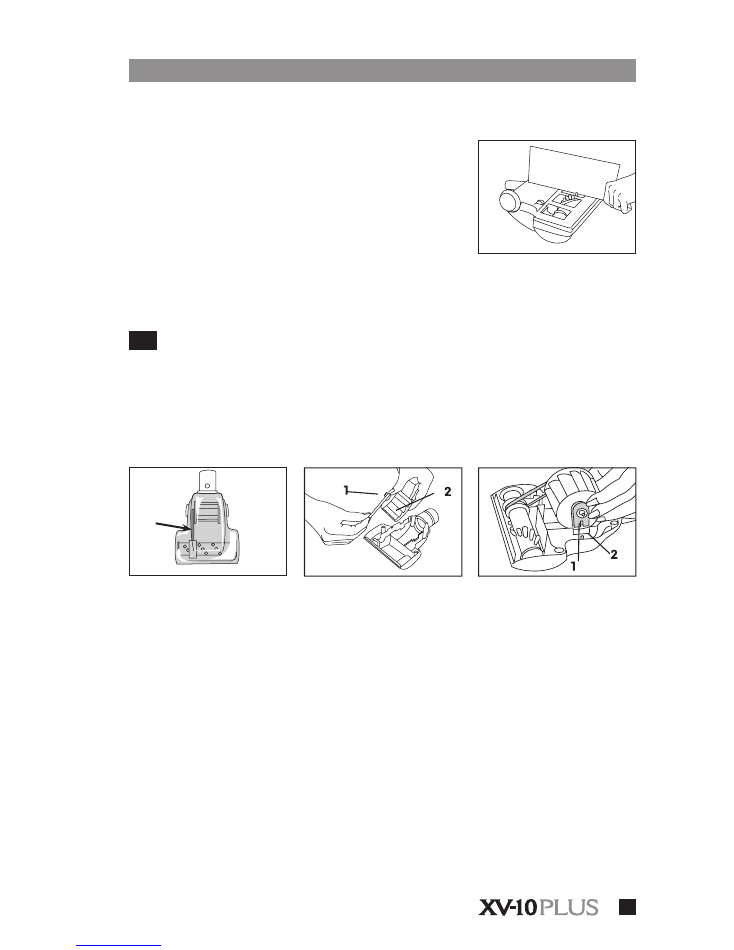
• The mini air nozzle belt is designed
to last a long time and is not normal-
ly replaced. However, if the belt is
cracked, gouged or broken, it should
be replaced.
Inspecting the belt
• The belt can be seen through the
top of the nozzle or by removing the
bottom plate and belt guard.
Replacing the belt
1. Remove bottom plate, belt guard
and brushroll.
2. Grasp turbine
( 1 )
and pull firmly
to remove.
3. Remove belt from turbine pulley
( 2 )
. Replace with new belt.
4. With flat sides of turbine retainers
( 1 )
pointing down. slide retainers
into grooves
( 2 )
on both sides of
tool housing and snap into place.
5. Replace brushroll, belt guard, and
bottom plate.
6- MAINTENANCE
( suite )
How to replace
Disconnect cleaner from electri-
cal outlet.
1. Remove hood, duct cover, belt and
brushroll as shown in Figs.
A
to
F
.
2. Discard old brushroll.
3. Replace new brushroll and belt as
shown in Figs.
G
to
I
.
Mini air nozzle
( optional )
6.4

12
User guide
Problem
Check
Solution
Vacuum does
not turn ON
• Power cord
• Plug in power cord. Make sure it is firmly into the wall
outlet.
• Power source
• If no power to outlet, check power source, fuse or circuit
breaker.
• Hose connection
• Make sure the hose is securely connected.
• Thermal protector
• Allow vacuum to cool per instructions ( see page 6 ).
Vacuum has
little or no
suction
• Filter bag
• Filter bag may be clogged or full. Check and replace if
necessary ( see page 8 ).
• Motor filter
• May be dirty or clogged. Clean or replace if necessary
( see page 9 ).
• Hose, wand or
accessories may be
clogged
• Clear obstruction.
• Hose connection
• Make sure hose is properly connected.
Power nozzle
won’t turn ON
• Hose power cord
• May not be properly connected. Plug hose firmly into
receptacle on nozzle.
• Belt
• Belt may be worn or broken. Check and replace if
necessary ( see page 10 ).
• Switches
• Make sure surface selector switch and/or brushroll switch
are both on ( see page 4 ).
• Thermal protector
• Allow vacuum to cool per instructions ( see page 6 ).
Vacuum still
does not operate
properly
• Review all the above
• Contact your dealer for service.
CHECK THESE FIRST
Service problems that appear to be major can often be solved easily. You can be your own troubleshooter
by reviewing this guide.
7- TROUBLESHOOTING

13
User guide
FOR
PARTS, ACCESSORIES & VACUUM BAGS
VISIT OUR WEBSITE AT
WWW.JOHNNYVAC.COM

NOTES


UG-X
V10-PL
US/EN-03/2015-V2
www.johnnyvac.com