Full Text Searchable PDF User Manual

USER MANUAL
Multi-Com Control Unit
INVISIO
V60

2
3
Incompatible Cables
19
Troubleshooting 20
System Reset
21
Attachment to Equipment
22
Fitting To Molle Webbing
23
Cable Management
24
Storage and Maintenance
25
Audio Tones
26
Glossary of Terms
27
Disclaimer 4
Overview 6
Getting Started
7
Hear-Thru Control
8
Hear-Thru Volume Steps
9
Transmit 10
PTT Assignment Examples
11
Received Audio
12
Received Audio Swap
13
Received Audio in Both Ears
14
Mute All Radios
15
Monitor Single Radio
16
Alternative State
17
Power Management
18
Contents

4
5
The information in this INVISIO User Manual (the “User Manual”) is subject
to change without notice and INVISIO is under no obligation to provide the
user with updates, amendments or modifications.
This User Manual describes the use of the INVISIO System (the “Product“)
which includes headset, control unit, cables and accessories.
EXCEPT WHERE PROHIBITED BY LAW, THE WARRANTY EXPRESSLY GRANTED
AS A PART OF INVISIO’S GENERAL TERMS AND CONDITIONS FOR DELIVERY,
AS TO PERFORMANCE, RESULT, OR OTHERWISE IS THE USER’S EXCLUSIVE
WARRANTY REMEDY.
INVISIO EXPRESSLY DISCLAIMS, AND USER EXPRESSLY WAIVES, ALL
OTHER WARRANTIES, DUTIES, AND OBLIGATIONS IMPLIED IN LAW,
INCLUDING THE IMPLIED WARRANTY OF MERCHANTABILITY, FITNESS
FOR A PARTICULAR PURPOSE OR OTHER WARRANTY OF QUALITY, OR
THOSE ARISING FROM A COURSE OF DEALING, CUSTOM, OR USAGE
OF TRADE, EXCEPT OF TITLE AND AGAINST PATENT INFRINGEMENT. THE
REMEDIES SET FORTH HEREIN ARE EXCLUSIVE.
By assembling and/or using the Product, the user agrees that he or she
has read and understood the entire User Manual, including, without
limitation, all instructions and warnings contained herein, prior to using
the Product. The user also agrees that he or she will ensure that any
additional or subsequent user of the Product will read, understand, and
comply with the User Manual, including, without limitation, all instructions
and warnings contained therein, prior to allowing that person to use the
Product.
The Product is designed exclusively for use by trained, professional
personnel (“Authorized Personnel”) performing their duties in their official
capacity. Under no circumstances should the Product be used in any
manner other than that described in this User Manual.
Opening or otherwise tampering with one or more of the control units,
headsets, or accessories voids any warranty. Only original, manufacturer-
approved accessories and batteries may be used with the Product.
The user must activate, adjust, clean, and maintain the Product in
accordance with this User Manual. Failure to activate, adjust, clean,
and maintain the Product in accordance with this User Manual voids
any warranty. In consideration of receiving the Product, the user hereby
agrees to the fullest extent permitted by law, as follows:
THE USER WAIVES ANY AND ALL CLAIMS AGAINST INVISIO AND ALL
RELATED PARTIES RESULTING FROM USE OF THE USER MANUAL, THE
PRODUCT, AND/OR ANY OF ITS COMPONENTS.
IN NO EVENT WILL INVISIO OR ITS RELATED PARTIES BE LIABLE FOR
DIRECT, INDIRECT, SPECIAL, INCIDENTAL, OR CONSEQUENTIAL
DAMAGES ARISING OUT OF THE USE OR INABILITY TO USE THE USER
MANUAL OR THE PRODUCT.
The user releases INVISIO and all related parties from any and all liability
for any loss, damage, injury, or expense that the user may suffer, as
a result of the use of the User Manual or Product, due to any cause
whatsoever, including, without limitation: strict liability, misrepresenta-
tion, negligence, gross negligence, or breach of contract on the part
of INVISIO and all related parties in the design or manufacture of the
Product and any of its components.
In the event of the user’s death or incapacity, all provisions contained
herein shall be effective and binding upon the user’s heirs, next of kin,
executors, administrators, beneficiaries, assigns and representatives
(the “User’s Representative”).
In any event, INVISIO’s liability to any user or User’s Representative for
any reason and upon any cause of action or any claim in contract, tort,
or otherwise with respect to the User Manual or the Product shall be
limited to the price paid to INVISIO for the unit that caused any alleged
damage.
No cause of action which accrued more than one (1) year prior to the
filing of a suit alleging such cause of action may be asserted against
INVISIO or any party which designed or manufactured any component
of the Product. All parties waive to the fullest extent permitted by law any
right to a trial by jury as to any claims relating or referring in any way
to the Product including, without limitation, any claims based in strict
liability, negligence, gross negligence, breach of warranty, and any
other claim based in law or equity.
Disclaimer
6
7
INVISIO
V60
Communication and Hearing Protection system enabling
hearing protection with ambient hear-thru and the ability to
control three communication devices simultaneously. Hear-thru
volume can be adjusted. The system is designed to meet or
exceed military specifications.
Getting Started
1. Connect headset & radio(s)
2. Turn on radio(s) - hear-thru starts automatically
3. Key PTT to transmit on radio
Start-up takes less than 2 seconds and there is an audio tone.
When using an INVISIO headset with hear-thru capabilities,
hear-thru starts automatically. To turn the hear-thru off, see
section on hear-thru control.
Turn Off
To turn off the V60 disconnect the radio cable(s) or turn the
radio off.
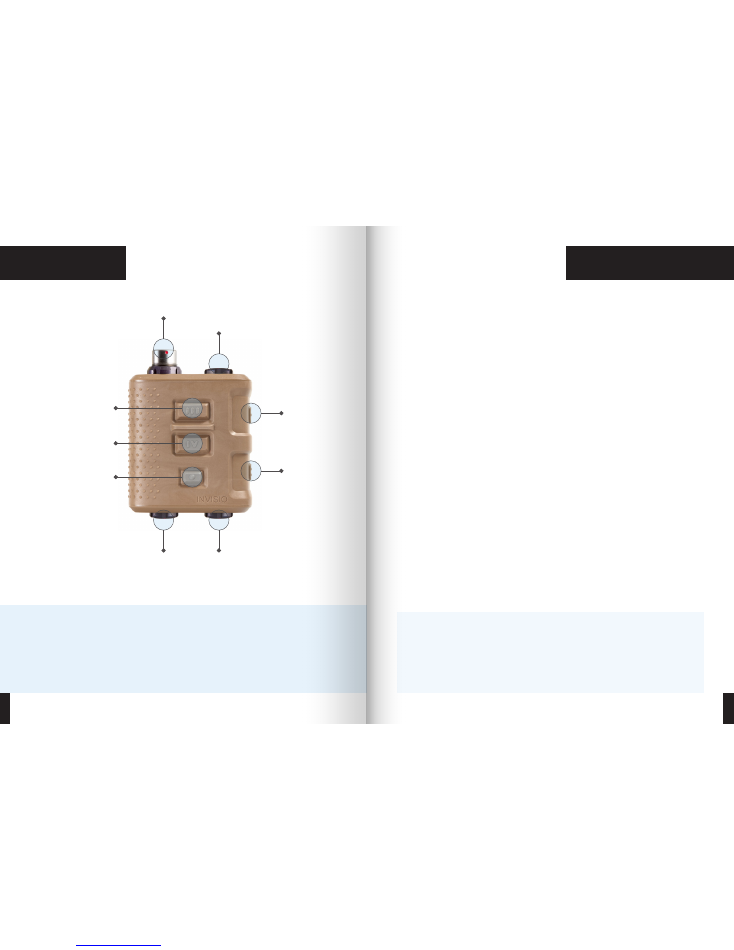
Overview
Getting Started
PTT 3
Mode Button
PTT 4
PTT 1
PTT 2
COM 1
COM 3
COM 2
Headset
Caution
• Avoid acoustic feedback by turning the V60 off during
headset fitting.
• High sound pressure levels may damage hearing.
Ensure radio volume is low at start-up.

8
9
Hear-Thru Volume Steps
Caution
Avoid acoustic feedback by turning the V60 off during
headset fitting.
Caution
• Turn the Hear-Thru Off or use Comfort Hearing when in
noisy vehicles to reduce noise exposure.
• Using Enhanced Hearing for extended periods may
increase noise exposure.
Long Press
• Turns hear-thru off
Short Press
• Turns hear-thru on or change hear-thru volume steps.
Hear-Thru Off
Hear-thru is turned off by a long press of the
Mode Button (~1second).
Audio Tone: 2 Beeps
Hear-Thru Adjustment
Hear-thru volume is adjusted by a short press of
the Mode Button.
Audio Tone: 1 Beep
Hear-Thru On
Hear-thru is turned back on by pressing the
Mode Button.
Audio Tone: 1 Beep
Hear-Thru Control
Comfort Hearing
Comfort Hearing has a gain of -10 dB.
Natural Hearing
Natural Hearing has a gain of 0 dB.
Enhanced Hearing
Enhanced Hearing has a gain of +10 dB.

10
11
Transmit
PTT Assignment Examples
Note
Different configurations of V60 cables can result in
unassigned PTT buttons and different functionality.
Transmit Modes
The V60 has different ways of transmitting depending on the
device and cables used. Examples include:
•
Push-To-Talk (PTT)
(e.g. 2-Way Radio)
•
Latching (Mute)
(e.g. Intercom System)
•
Open Mic
(e.g. Intercom System)
•
Call Answering
(e.g. Mobile Phone)
• Listen Only
(e.g. Minesweeper)
Please consult your representative for more information on
your system setup.
PTT Assignment
PTT buttons are dynamically assigned, with a rule of thumb
being PTT1 to COM1 and PTT2 to COM2. Keying two PTT’s
simultaneously is possible. When multi-net radios are
connected the following rules apply:
• Every connected device is allocated at least one
PTT button.
• Priority is COM1 through to COM3 for button allocation
when multi-net radios are connected.
Note
Certain cable and devices when connected will not utilise a
PTT button, for example a listen only cable.
COM Port
PTT Assignment
COM1: Single Net Radio
PTT1: COM1
COM2: Single Net Radio
PTT2: COM2
COM3: Single Net Radio
PTT3: COM3
COM Port
PTT Assignment
COM1: Dual Net Radio
PTT1: COM1/Net1
PTT2: COM1/Net2
COM2: Single Net Radio
PTT3: COM2
COM3: Single Net Radio
PTT4: COM3
Example 1
Example 2
12
13
Received Audio Swap
Received Audio
How Audio is Received
Note
COM1 supports dual net left and right audio. If a dual net
left and right audio cable is connected to COM2 or COM3,
only one net is audible. While transmitting, depending on
the headset, audio can be heard in one or both ears. Refer to
headset manual.
PTT Audio Tones
Tones are generated to indicate press and release of
PTT buttons.
Audio Tone
PTT Keyed: 1 Beep
PTT Released: 2 Beeps
COM
Default
COM1 / Net1
Left
COM1 / Net2
Right
COM2
Right
COM3
Left
Key Combo
1. Press and Hold: Mode Button
2. Press and Hold: PTT1
3. Press and Hold: PTT2
4. Release after 5 Seconds: All Buttons
Swap Default Audio Left-Right
Default audio routing can be swapped so that
COM1 is in right ear and COM2 is in left ear via
a key combination.
Audio Tone
Swap Audio: 1 Beep
Default Audio: 2 Beeps
COM
Swapped
COM1 / Net1
Right
COM1 / Net2
Left
COM2
Left
COM3
Right
Note
While transmitting in Default or Swapped audio mode, all
received audio can be heard in one or both ears. Refer to
headset manual.
14
15
Key Combo
1. Press and Hold: Mode Button
2. Short Press: PTT2
3. Release: Mode Button
Received Audio in Both Ears
Received Audio can be swapped between split
and dual ear via a key combination.
Received Audio in Both Ears
Received Audio in Both Ears Mode is primarily intended for use
in high noise environments, whilst the default split ear audio is
primarily intended for use in low noise environments.
INVISIO IntelliCable
™
Received audio in both ears mode only works when INVISIO
IntelliCable™ settings are programmed to default audio routing.
Audio Tone
Both Ears On: 1 Beep
Both Ears Off: 2 Beeps
Received Audio in Both Ears
Note
Some cables do not support Mute All Radios Mode.
Mute All Radios
All radios can be muted (-20 dB) via a key
combination.
Key Combo
1. Press and Hold: Mode Button
2. Short Press: PTT1
3. Release: Mode Button
Audio Tone
Mute: 1 Beep
Unmute: 2 Beeps
Exit Mute All Radios
To exit the Mute All Radios Mode, perform any of the following
actions:
• Key Combo
• Press any assigned PTT button
• Connect or disconnect any cable.
Mute All Radios
Note
While transmitting in Default or Swapped audio mode, all
received audio can be heard in one or both ears. Refer to
headset manual.

16
17
Monitor Single Radio
Note
An error tone is heard when no cable is connected to the
COM port being set to Monitor Single Radio Mode.
Monitor Single Radio
A maximum of one focus can be selected at any
given time (mutes other received radio audio by
20 dB) via a key combination.
Key Combo
1. Press and Hold: Mode Button
2. Press and Hold: PTT button
3. Release after 1 Second: All Buttons
Audio Tone
Focus: 1 Beep
De focus: 2 Beeps
Error: 3 Beeps
PTT Button to Use
• COM1: PTT1
• COM2: PTT2
• COM3: PTT3
Exit Monitor Single Radio Mode
To exit the Monitor Single Radio Mode, perform any of the
following actions:
• Key Combo
• Press any PTT button assigned to a muted radio
• Connect or disconnect any cable
Alternative State
PTT Button to Use
• COM1: PTT1
• COM2: PTT2
• COM3: PTT3
Alternative State
Most radio cables run in Open Mic Mode as the alternative
state.
Note
In Open Mic Mode, all receive audio is in the left ear only, as
the V60 is always transmitting.
Key Combo
1. Press and Hold: Mode Button
2. Short Press: PTT → PTT → PTT → PTT
3. Release: Mode Button
Alternative State
An alternative duplex state is available on
certain cables via a key combination.
Audio Tone
Alternative State On: 1 Beep
Alternative State Off: 2 Beeps
Incompatible Cable: 3 Beeps

18
19
Power Management
Power Source
The V60 can be powered from either a battery
pack (PS30) or a Radio.
Getting Started
The V60 automatically starts when connected to
a power source.
Note
If multiple cable failures are detected the priority is:
Headset, COM1, COM2, COM3.
Audio Tone
COM1 Error: 1 Beep (Repeated Continuously)
COM2 Error: 2 Beeps (Repeated Continuously)
COM3 Error: 3 Beeps (Repeated Continuously)
Headset Error: 4 Beeps (Repeated Continuously)
Warning Tones
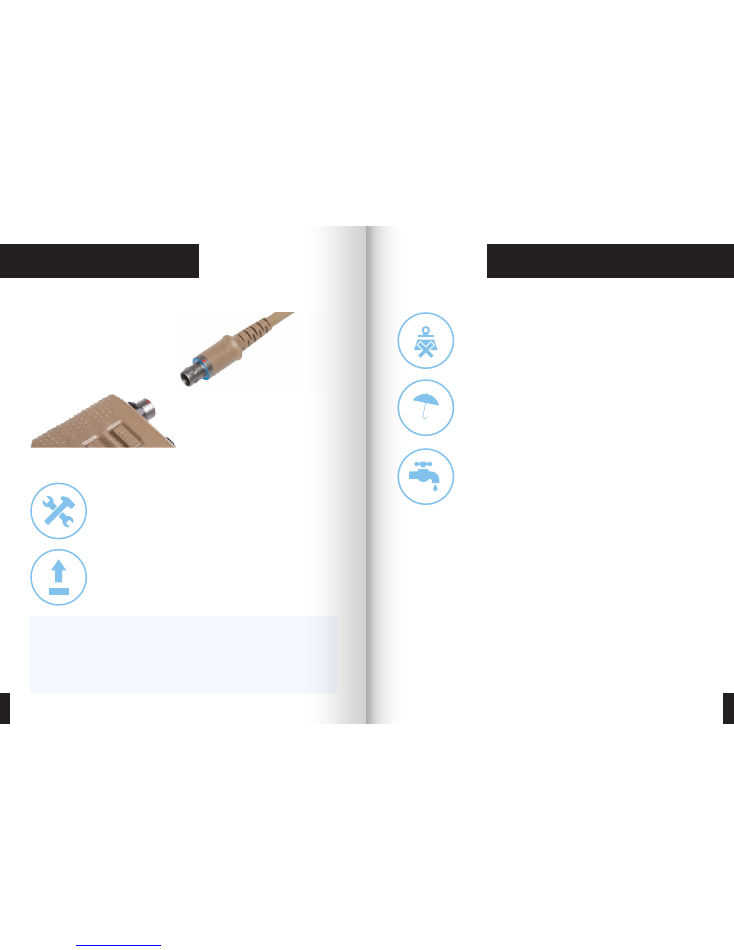
A warning tone is heard when an incompatible
cable is connected. The audio tone stops when
the cable is disconnected.
Causes
• Incorrect INVISIO IntelliCable
™
settings
• Faulty cable or connector
Incompatible Cables

20
21
Troubleshooting
System does not power on
• Check headset is connected
• Check radio is connected and powered on
Bad Audio Transmission
• Please see headset’s user manual for proper usage of
headset. Make sure, if using INVISIO X5 bone conduction
microphone is correctly fitted
• Check cable is connected correctly
No Hear-thru
• Press Mode Button
• Press PTT button to check power is on
Note
Contact your representative if the issue is not resolved.
System Reset
Note
System reset does not change the V60 firmware version.
Key Combo
1. Press and Hold: Mode Button
2. Short Press: PTT1 → PTT2 → PTT1 → PTT2
3. Release: Mode Button
System Reset
System Reset overrides all key combinations
and restores the V60 to its original state.
Audio Tone
System Reset: 5 Beeps
22
23
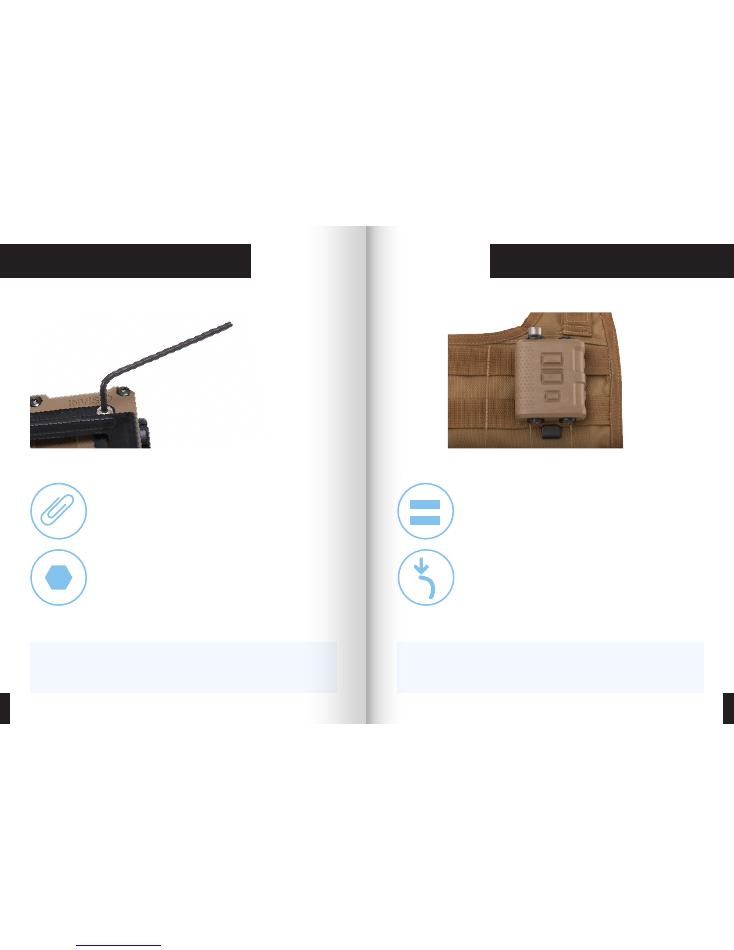
Attachment to Equipment
Fitting To Molle Webbing
2 mm Hex Key
Use a 2 mm Hex Key to change the clip.
Different Clip
The V60 is supplied with a Molle clip as standard,
but different clips are available upon request.
Caution
Ensure the control unit is securely fastened to your equip-
ment, to avoid personal injury in the case of physical impact.
Do Not Stress Connections
Cables should be positioned without hard bends
at the connectors.
Place Through Webbing
The Molle clip is threaded through two Molle
straps, with the hook grasping the lower Molle
strap.
Note
The clip can also be rotated when mounting to allow the
V60 to be attached in different directions.
24
25
Cable Management
Caution
• Ensure cables are securely fastened to avoid
entanglement.
• Care should be taken not over-stress cables mounted
in equipment.
Storage and Maintenance
Removing Connectors
Do not attempt to disconnect cables from the
V60 by pulling the cable. Remove by pulling on
the connector.
Fitting Cables to Equipment
Do not thread cables through equipment, such
that they are subject to abrasion.
Protect from Force
To avoid damaging the V60, store in a
protected area without excess weight.
Dry and Ventilated
Store the V60 in a dry and ventilated area with
caps removed to avoid moisture build-up in
connectors.
Clean in Fresh Water
If the V60 becomes dirty or exposed to salt
water, rinse in fresh water.

26
27
www.invisio.com
CUP11968-9
© 2017 INVISIO Communications A/S.
INVISIO is a registered trademark of
INVISIO Communications A/S.
BCM
INVISIO Bone Conduction Microphone.
Patented in-ear communication microphone for transmitting.
Hear-Thru
Microphone situated on the headset to monitor audio
situational awareness of ambient surroundings.
PTT
Push-to-talk is used when transmitting during a 2-way radio
communication. Pressing the PTT button enables transmission.
Releasing enables monitoring.
PTT Mode
PTT Mode allows communication in both directions, but not
simultaneously. When receiving the user must wait for the
signal to end, before begin transmitting.
Open Mic Mode
Open-Mic Mode allows communication in both directions
simultaneously. This allows all users to monitor and transmit
at the same time.
Latching
Latching is turning and keeping the microphone on.
INVISIO IntelliCable
™
Intelligent cable system enabling recognition of attached device.
Glossary of Terms
Audio Tones
General Rule for Audio Tones
The general rule for the V60 audio tones is based an on/off rule:
• On: 1 Beep
• Off: 2 Beeps
• Error: 3 Beeps
Hear-thru control
• Hear-thru on (1 Beep) - Hear-thru off (2 Beeps)
• Volume up/down (1 Beep)
Radio control
• PTT press (1 Beep) - PTT release (2 Beeps)
• Connect radio (No Tone) - Disconnect radio (No Tone)
• Latching on (1 Beep) - Latching off (2 Beeps)
System
• Power on (1 Beep)
• Power Off (No Tone)
• Open Mic Mode: On (1 Beep) - Off (2 Beeps)
Note
When using a battery pack (PS30), please refer to its user
manual for tones.

www.invisio.com