Full Text Searchable PDF User Manual
HUDSON UBE
OWNER’S MANUAL

-2-
Table of Contents
(2011-10-VH0068-K)
Important Safety Information
3
Before You Start
4
Assembly part List
5
Assembly Instruction
6-10
Console Overview
11
Monitoring Your Heart Rate
12-14
Exploded View
15
Parts List
16

-3-
Important Safety Information
WARNING!
Before using this unit or starting any exercise program, consult your
physician. This is especially important for persons over the age of 35 and/or persons with
pre-existing health conditions. The manufacturer or distributor assumes no responsibility
for personal injury or property damage sustained by or through the use of this product.
SAFETY PRECAUTIONS AND TIPS
1.
It is the owner's responsibility to ensure that all users of this unit have read the Owner's
Manual and are familiar with all warnings and safety precautions.
2. The unit should only be used on a level surface and is intended for indoor use only. The
unit should not be placed in a garage, patio, or near water and should never be used
while you are wet. We recommend a mat be placed under the unit to protect floor or
carpet and for easier cleaning.
3. We recommend not wearing loose clothing or jewelry.
4. Always examine your unit before using to ensure all parts are in working order.
5. Allow the unit to fully stop before dismounting.
6. Pets should never be allowed near the unit.
7. Do not leave children unsupervised near or on the unit.
8. Never operate the unit where aerosol products are being used.
9. Never insert any object or body parts into any opening.
10. For safety and to prevent damage to your unit, no more than one person should use the
unit at a time.
11. Service to your unit should only be performed by an authorized service representative,
unless authorized and/or instructed by the manufacturer.
12. Failure to follow these instructions will void the unit warranty.

-4-
Before You Start
Thank you for purchasing this new Hudson UBE.
This quality product you have chosen
was designed to meet your needs for cardiovascular exercise. Before you start, please read
the Owner's Manual and become familiar with the operation of your new unit.
Remember to take the time to perform the stretching exercises provided to avoid
injury.
If you are taking medication, consult your physician to see if the medication will affect
your exercise heart rate.
If you have heart problems, you are not active, and/or are over the age of 35, do not use the
pre-set programs or start an exercise program without first contacting and receiving
approval from your physician.
To avoid the risk of electrical shock, always keep the console dry. Do not spill liquids on
the console. We recommend a sealed water bottle for beverages consumed while using the
unit.
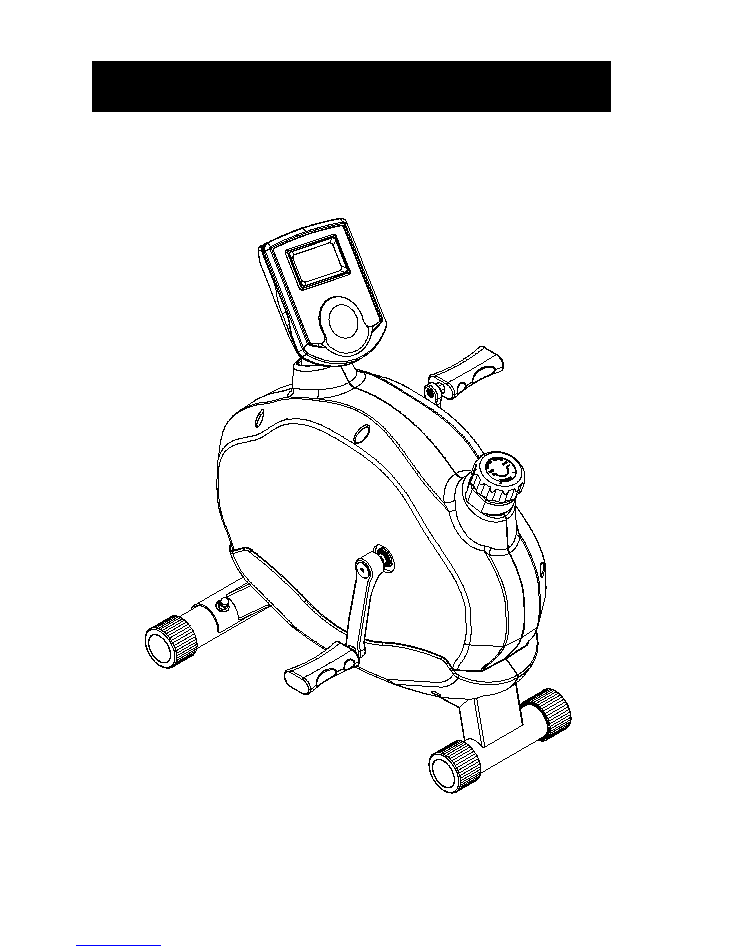
Please review the following drawing below to familiarize yourself with the listed
parts.

-5-
-6-
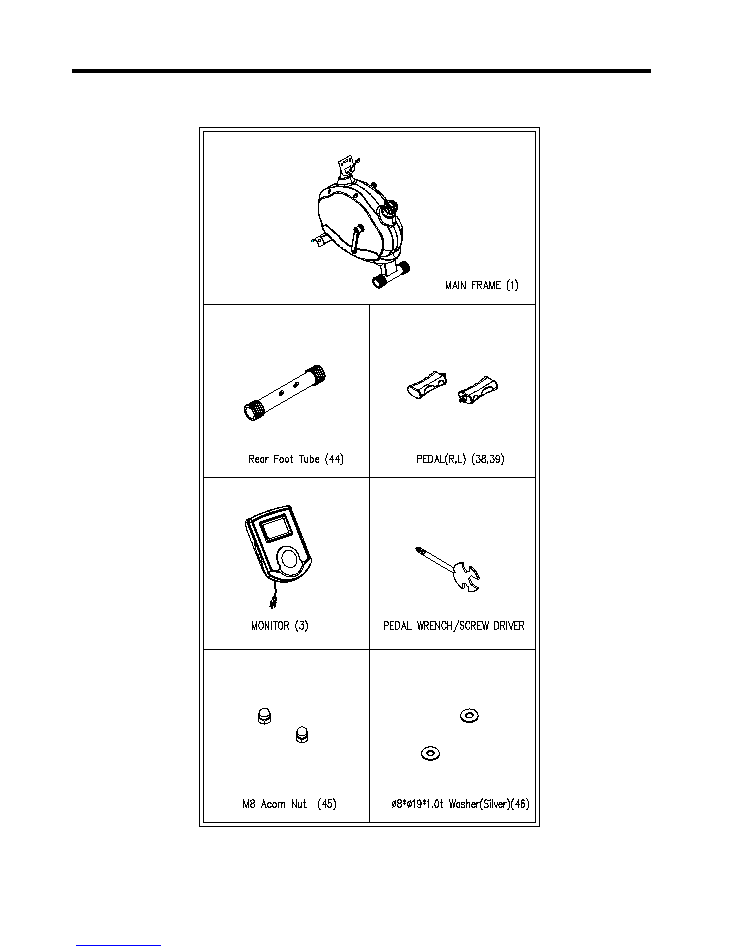
ASSEMBLY PART LIST
-7-
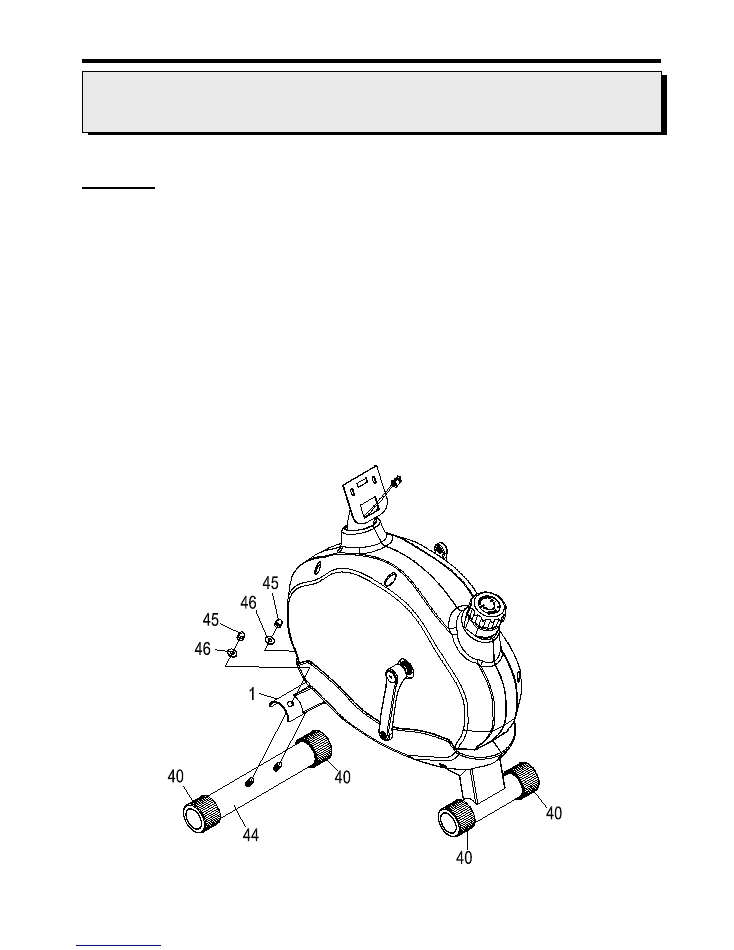
Assembly Instruction
FIGURE 1
Attach the Rear Foot Tube (44)to Main Frame (1) using :
Qty 2 – (46) M8X19mm Washer
Qty 2 – (45) M8 Acorn Nut
Make sure that the Rear Foot Tube (44) with Foot End Caps (40) are assembled to the rear
of Main Frame (1) firmly.
FIGURE 1
REMOVE ALL SECURITY TAPE AND WRAPPING
BEFORE BEGINNING
-8-
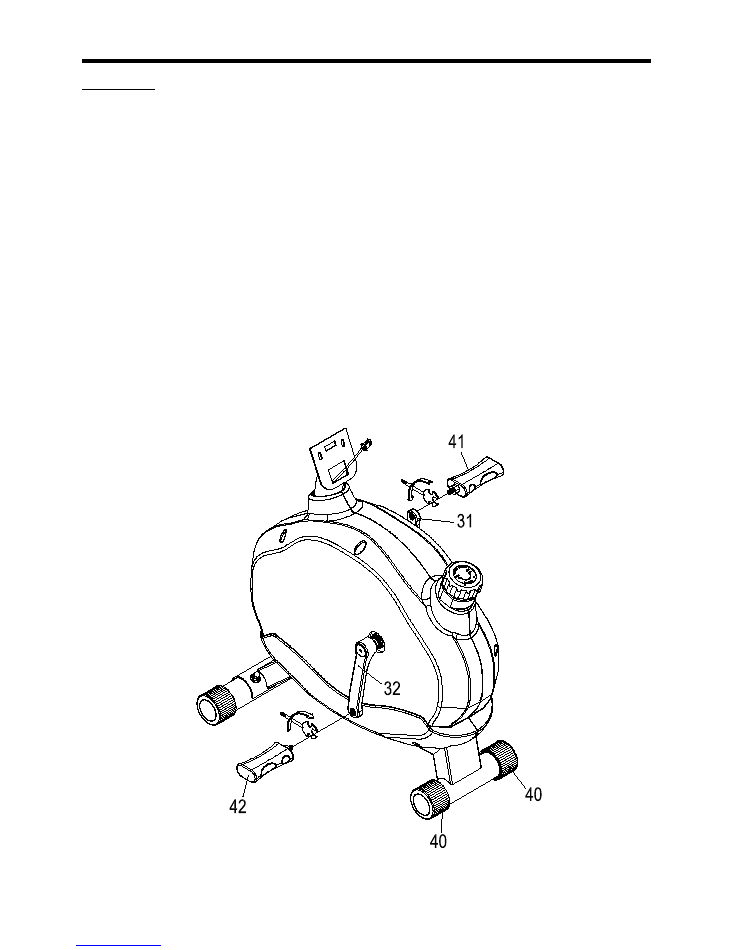
Assembly Instruction
FIGURE 2
Step 1:
Thread the Right Pedal (41) into the hole of Right Crank (31). Secure in place
by turning it
clockwise
to tighten.
Note: Right Pedal (41) is marked with an “R”.
Step 2:
Thread the Left Pedal (42) into the hole of Left Crank (32). Secure in place by
turning it
counter-clockwise
to tighten.
Note: Left Pedal (32) is marked with an “L”
FIGURE 2
-9-
Assembly Instruction
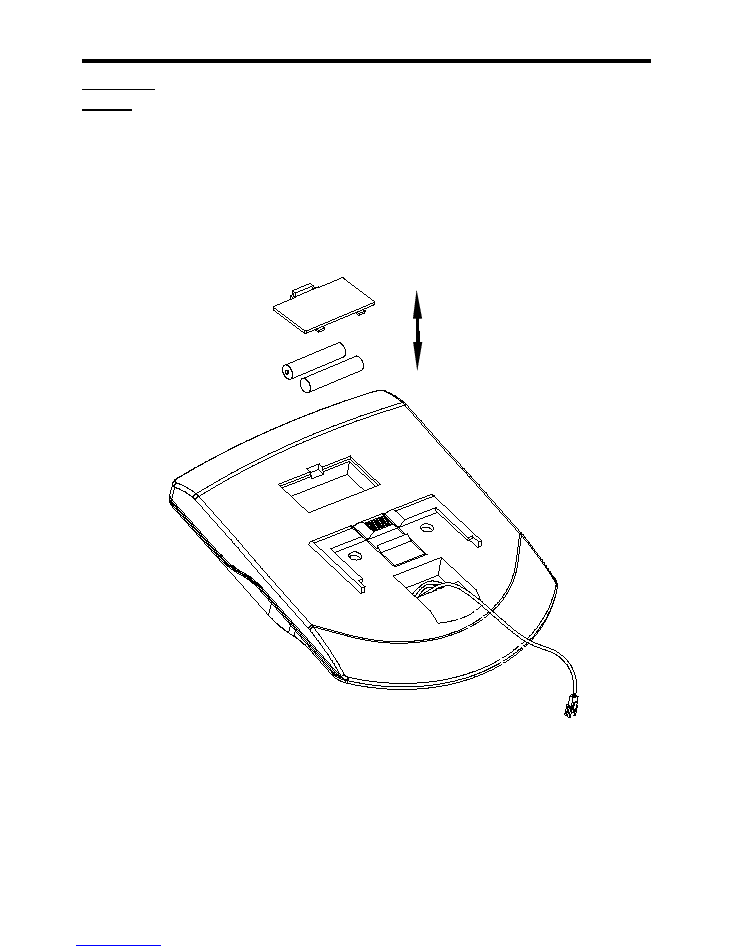
FIGURE 3
NOTE:
Insert the batteries provided into the back of Monitor (3).
-10-
Assembly Instruction
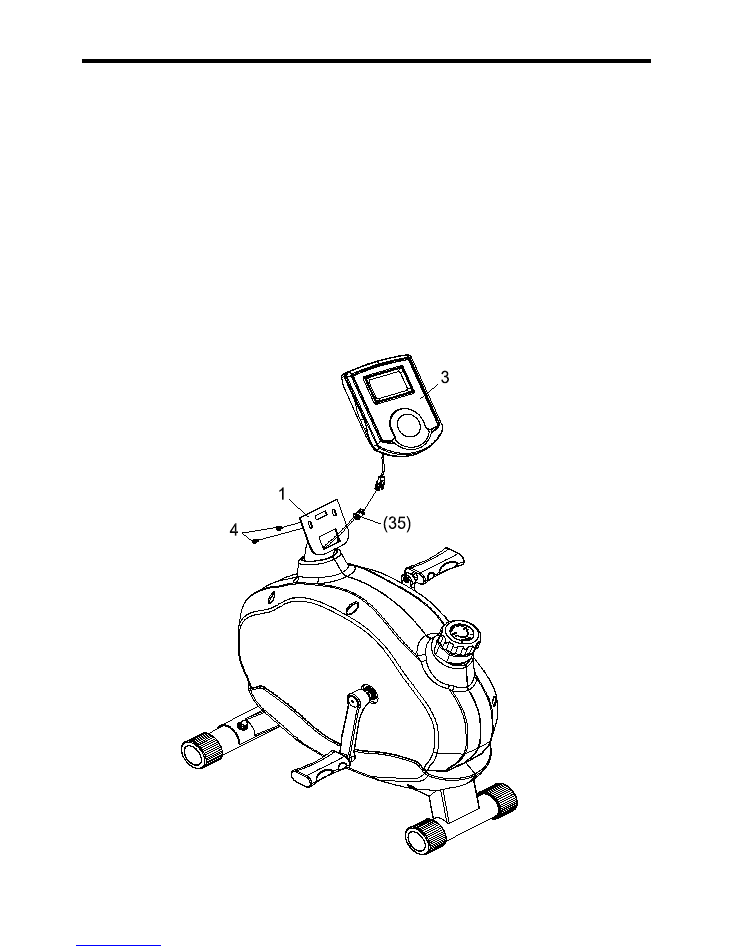
FIGURE 4
Step 1:
Connect the Sensor Wire (35) to the wire out from Monitor (3). Next secure the Monitor (3)
to the monitor bracket (which is welded on the opening section of the Frame (1)) by using
the provided screws (4).
Note: The Screws(4) will already be installed into the back of Monitor (3) when you
remove it from the box.
FIGURE 4

-11-
Congratulations!
You have completed the assembly of your new Hudson UBE
-12-
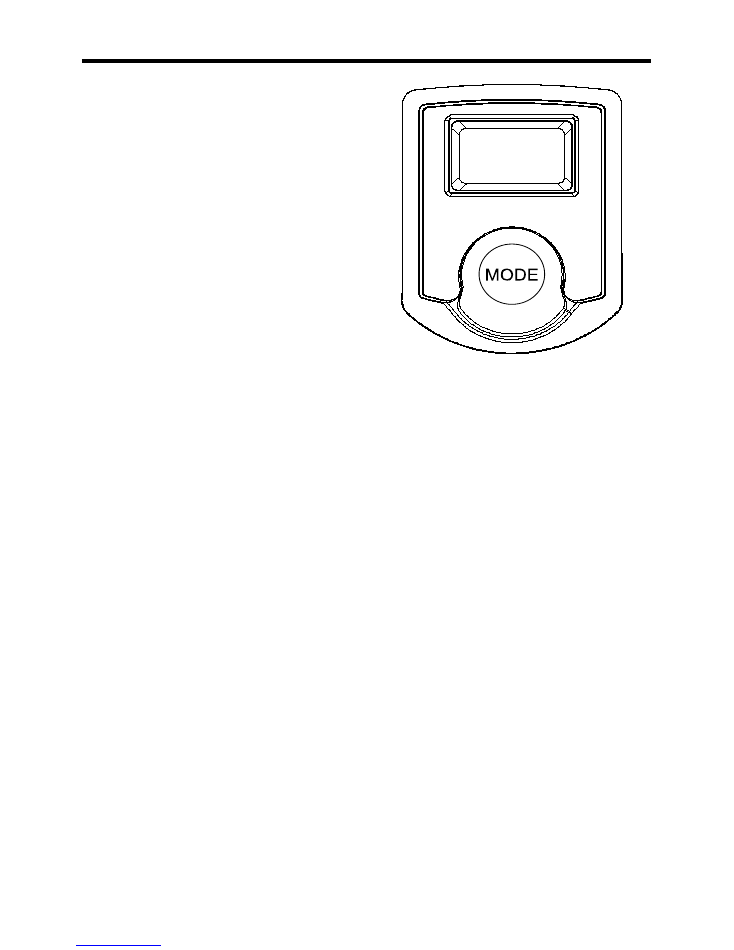
Console Overview
Auto On/Off
When the user starts to exercise, the Display
will show the workout value automatically. Once
the user stops exercising for over 4 min, the
Display will turn off. But the workout value of
odometer will be stored. When user starts exercise
again, workout value of odometer will accumulate
continuously.
Auto Scan
Once the monitor is powered on the LCD will
display all functions values from
Time - Speed - Distance - Calorie - Odometer-
RPM . Each value will be held for 6 seconds.
Display Modes
Time:Display the workout time from 00:00 to
99:59.The user can also press the Mode key to display
the workout time value.
Speed:Display the current training speed from
0.0 to 99.9 KPH or MPH. The user can also press the Mode key to display
the workout time value.
Distance: Display the trip distance from 0.0 to 999.9 Km or Mile. The user can also press the Mode
key to display the workout distance value.
Calories:Display the calories consumption during training from 0.0 to 999.9. The user can also press
the Mode key to display the workout calorie count value.
Odometer: Display the total accumulated distance from 0.0 to 999.0. The user can also press the
Mode key to display the workout odometer value.
______________
To Reset
Press Mode key for 2 seconds, all the function value except Odometer will be reset to zero.
Note:
1. If the computer displays abnormally, please re-install the battery and try again.
2. Battery Spec: 1.5V UM-3 or AA (2PCS).
3. The batteries must be removed from the console before it is scrapped and that they are
disposed safely.

-13-
Monitoring Your Heart Rate
Monitoring Your Heart Rate
To obtain the greatest cardiovascular benefits from your exercise workout, it is important
to work within your target heart rate zone. The American Heart Association (AHA) defines
this target as 60%-75% percent of your maximum heart rate.
Your maximum heart rate may be roughly calculated by subtracting your age from 220.
Your maximum heart rate and aerobic capacity naturally decreases as you age. This may
vary from one person to another, but use this number to find your approximate effective
target zone. For example, the maximum heart rate for an average 40 year-old is 180 bpm.
The target heart rate zone is 60%-75% of 180 or 108-135 bpm.
See
Fitness Safety on page 13
.
Before beginning your workout, check your normal resting heart rate. Place your fingers
lightly against your neck, or against your wrist over the main artery. After finding your
pulse, count the number of beats in 10 seconds. Multiply the number of beats by six to
determine your pulse rate per minute. We recommend taking your heart rate at these times;
at rest, after warming up, during your workout and two minutes into your cool down, to
accurately track your progress as it relates to better fitness.
During your first several months of exercising, the AHA recommends aiming for the lower
part of the target heart rate zone-60%, then gradually progressing up to 75%. According to
the AHA, exercising above 75% of your maximum heart rate may be too strenuous unless
you are in top physical condition. Exercising below 60% of your maximum will result in
minimal cardiovascular conditioning.
Check your pulse recovery rate – If your pulse is over 100 bpm five minutes after you stop
exercising, or if it’s higher than normal the morning after exercising, your exertion may
have been too strenuous for your current fitness level. Rest and reduce the intensity next
time.

-14-
Monitoring Your Heart Rate
(MHR) = Maximum Heart Rate
(THR) = Target Heart Rate
220 - age = maximum heart rate (MHR)
MHR x .60 = 60% of your maximum heart rate.
MHR x .75 = 75% of your maximum heart rate.
For example, if you are 30 years old, your calculations will be as follows:
220 - 30 = 190
190 x .60 = 114 (low end or 60% of MHR)
190 x .75 = 142 (high end or 75% of MHR)
30 year-old (THR) Target Heart Rate would be 114-142
See Heart Rate Table (on next page) for additional calculations.
Fitness Safety The target heart rate chart indicates average heart rate zones for
different ages. A variety of different factors (including medication, emotional state,
temperature and other conditions) can affect the target heart rate zone that is best
for you. Your physician or health care professional can help you determine the
exercise intensity that is appropriate for your age and condition.

-15-
Monitoring Your Heart Rate
-16-
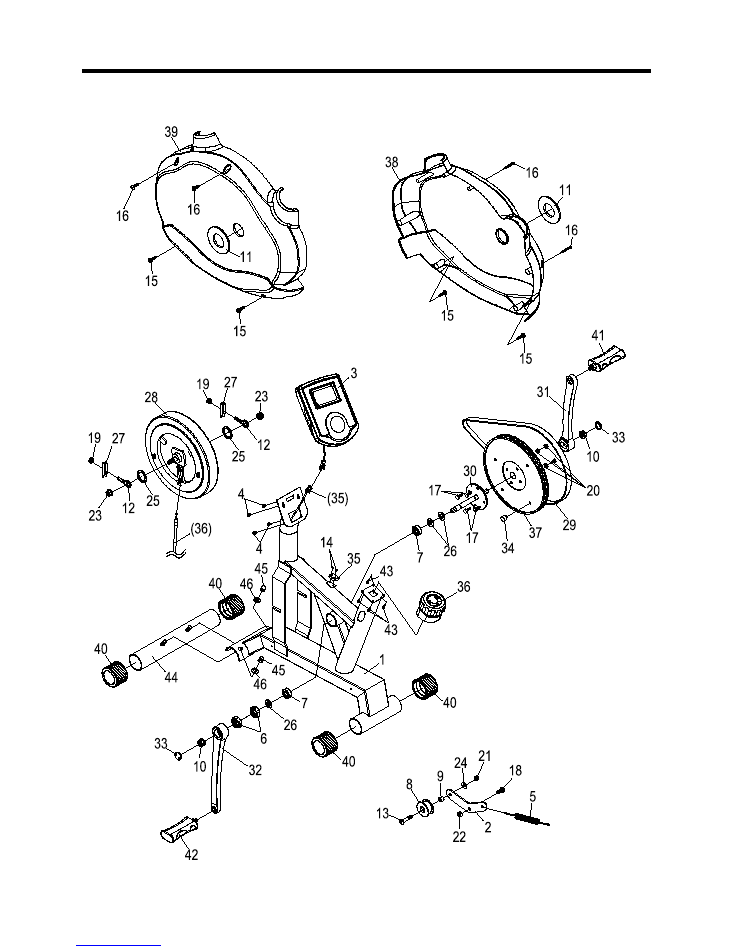
Exploded View

-17-
Parts List
ITEM Q’TY
PART NAME
ITEM Q’TY
PART NAME
1
1
Frame
37
1
Pulley
2
1
Belt Tension Bracket
38
1
Bottom Right Housing
3
1
Monitor
39
1
Bottom Left Housing
4
2
M5X10mm Screw
40
4
Foot End Cap
5
1
Spring
Ø2.8*93m/m
41
1
Right Pedal
6
2
Crank Shaft Nut
42
1
Left Pedal
7
2
#6003 Precise Bearing
43
4
3.5 x15mm L Screw
8
1
Idler Pulley
44
1
Rear Foot Tube
9
1
M8x12.5x14.9L Spacer
45
2
M8 Acorn Nut (Silver)
10
2
M10x P1.25R Cap Nut
46
2
ψ
8
x
ψ
19
x1.0T mm Washer
(Silver)
11
2
Round End Cap
12
2
Eyebolt 6x40mm
13
1
M8x38mm Hex Head Screw
14
2
TP3x8mm Screw
15
4
TP4x16mm Screw
16
4
TP4x25mm Screw
17
4
M6x16mm Hex Head Screw
18
1
M8x20mm Hex Head Screw
19
2
6mm Hex Nut (Silver)
20
4
6mm Locknut (Silver)
21
1
M8 Sliver Locknut
(Thin)(Black)
22
1
M8 Sliver Locknut (Thick)(Black)
23
2
3/8"x26mm Cap Nut (Silver)
24
1
ψ
8
x
ψ
19
x1.0T mm Washer(Black)
25
2
ψ
10
x
ψ
19x2.0T mm Washer
(Black)
26
3
ψ
17
x
ψ
22
x1.0T mm
Washer(Silver)
27
2
Adjustment Channel
28
1
Mag Mrake
29
1
V-Belt-370J5(940m/m)
30
1
Pulley Axle with Plate
31
1
Right Crank
32
1
Left Crank
33
2
Crank Central Cap
34
1
Magnet
35
1
Sensor Wire With Sensor
36
1
Tension Knob