Full Text Searchable PDF User Manual

Wireless Keypad
GKP-S8M
User manual

1
Contents
Congratulations on your purchase of this Honeywell
wireless keypad.
To make the best out of your equipment we advise
you to read this manual carefully.
This keypad is designed to operate on an authorised
radio frequency and will in no way endanger the user.
Contents ................................................................................. 1
Introduction ............................................................................ 3
Arming using your code or tag ............................................. 4
Arming with a fault (*) ............................................................ 5
Disarming using your code or tag ........................................ 5
Resetting the system after an alarm (*) ................................ 6
Incorrect code protection ...................................................... 6
Personal attack ...................................................................... 6
Duress code ........................................................................... 7
Switch on/off receivers .......................................................... 7
Remote Maintenance (optional) ............................................ 7
User Programming functions ................................................ 8
Indicator lights (*) ................................................................ 12
Keypad tones ....................................................................... 13
Maintenance and recommendations .................................. 14

2
ANNEX A ............................................................................... 16
Indicator lights if keypad installed with PMI panels.......... 16
Arming with a fault if keypad installed with PMI panels ... 17

3
Introduction
This manual describes how to use your wireless keypad.
The keypad is used to arm and disarm your security
system using a valid access code or a key TAG.
The keypad is equipped with a proximity tag reader,
located next to the
symbol; the keypad also features an
integrated siren as a deterrent and 4 LEDs to inform you on
system status.
KEYPAD
(*) If keypad installed with CMI, HMI, Sucre Box panels. Refer to Annex A if keypad
installed with PMI panels.
TAG
Siren output
System armed
LED
(LED 1)
Intruder alarm (*)
(LED 2)
Total set
arming key
Tag reader area
S.O.S keys
Partial set
arming key
Tamper alarm (*)
(LED 4)
System fault (*)
(LED 3)
4
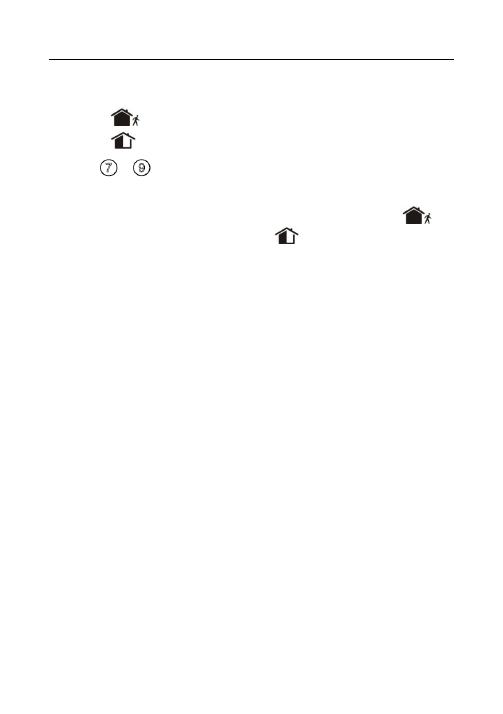
Arming using your code or tag
Press an arming key on the keypad and enter the code or present
a programmed TAG.
Arms the total set
Arms the partial set
Arms the annex set
(the keypad must be associated with Total
+Annex)
When the keypad is dedicated to the annex set only, the
key will arm the annex set and the
key will be disabled.
Arming can be performed with or without user identification
depending on the panel setup.
The arming tone is emitted by the keypad followed by the exit
delay beeps. If a perimeter fault is signalled on arming, disarm
the system before checking all the doors and windows equipped
with contacts.
The zone set arming is completed automatically at the end of the
delay (depending on your system configuration).
Notes
:
Always make sure that your Total arming request is followed
by the arming tone.
Holding the TAG less than 1 minute in front of the keypad will
not reverse the status.
If a detector is parameter in final door, Total set arming is
completed after you close the final exit door. After the door is
closed, the exit delay beeps stop and the ‘arming complete’ tone
is emitted by the panel and keypad siren. For Partial, the zone set
arming is completed automatically at the end of the delay.
+

5
Arming with a fault
(*)
If the system diagnoses a fault on arming, you cannot set the
alarm. Faults include system faults, tampering and triggering of
detectors.
A tone indicating a fault is emitted by the keypad after the arming
request instead of the arming tone.
Check that all doors and windows fitted with contacts are closed.
You can override prevention of arming by requesting arming a
second time within two minutes from the first request. This will
bypass all faults.
The arming process restarts, the arming tone is emitted by the
keypad followed by the exit delay beeps. Arming is completed at
the end of the delay.
(*) If keypad installed with CMI, HMI, Sucre Box panels. Refer to Annex A if keypad installed
with PMI panels.
Disarming using your code or tag
To enable you to get to the keypad without triggering an alarm,
your installer may have programmed an entry delay.
To disarm your system:
Enter a valid code or present a programmed TAG.
The disarming tone is emitted by the panel and keypad siren.
Disarming the system will also stop the sirens if an alarm is
triggered.
Important: Stopping the siren does not interrupt the
transmission of the alarm to the alarm company.
Notes:
Always make sure that your disarming request is followed by
the disarming tone.
Always disarm the system when re-entering the premises.
Holding the TAG in front of the keypad will not reverse the
status.

6
Depending on your keypad’s configuration, this will disarm the
total set or the entire system. In the latter case, the annex set
might need to be re-armed.
Resetting the system after an alarm
(*)
If any of the LEDs 2, 3 or 4 are flashing slowly, an alarm has
occurred (see page 12 for detailed LED functionalities). When
there is an alarm in memory, the system must be reset before it
can be armed.
To reset the system:
1. Disarm it using a valid code or present a tag.
2. If there is more than one alarm in the memory, repeat this
operation for each alarm until LEDs 2, 3 or 4 stops flashing
slowly.
If LED 4 is flashing quickly on your keypad, a confirmed alarm
has occurred and a reset must be performed by your alarm
company, you cannot operate the system. Call the operator.
(*) If keypad installed with CMI, HMI, Sucre Box panels.
Incorrect code protection
Important: If you enter five successive incorrect codes or
present 5 invalid tags consecutively, the keypad will be
blocked for 5 minutes. The intrusion siren will be triggered
if the system is armed.
Personal attack
Note:
This function is optional, and can be set at installation.
You can send an alarm at any time, even when your system is
not armed:
Press the
and
keys simultaneously.
The siren is triggered (depending on the configuration).
The central monitoring station is alerted (if the service is
available).

7
Duress code
Use a duress code if you are forced to disarm your security
system under duress. Your duress code is obtained by adding 1
to the last digit of your code (e.g. 1234 => 1235, 6789 => 6780).
The system will disarm as normal but a silent alert signal is
transmitted to your alarm company (depending on the
configuration).
Switch on/off receivers
Note:
This function is optional, and can be set at installation.
It is possible to switch on/off receivers (such as smart plugs) from
the keypad.
To switch a receiver on/off:
1. Press the
key
to switch the selected receiver on or the
key to switch the selected receiver off.
2. Select the desired receiver by pressing a key corresponding to
the receiver number 0 to 9 (0 corresponds to receiver number
10).
A high beep is played if the receiver is driven successfully;
otherwise a low beep is played.
Remote Maintenance (optional)
Note:
This function is optional and depends on the panel
configuration.
Press the
+
keys simultaneously to activate the remote
maintenance function as configured by your installer. Ask your
installer for more information on this function.
8
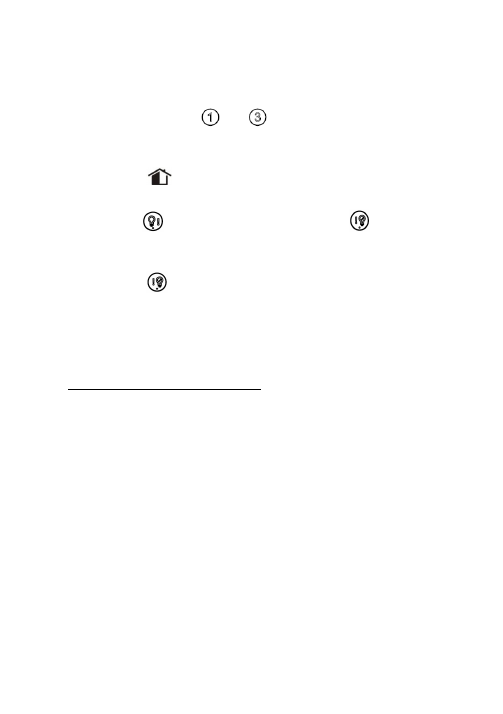
User Programming functions
Important: The system will automatically exit the
programming mode after 20 seconds if no keys are
pressed during this time. When this happens you must
repeat all of the steps necessary for the function you are
using.
The keypad features 2 programming modes:
- User Programming mode to adjust beep level,
enable/disable the chime.
- Master User Programming mode to manage user profiles
(the keypad can have up to 10 user profiles configured). This
mode can only be accessed with the master code (master user
#1).
USER FUNCTIONS
To adjust the volume of the beep:
1. Press and hold the
and
keys simultaneously more
than 2 seconds to enter user programming mode.
A double beep is played and all LED light on.
2. Keep pressing the
key to select the device that you wish
to adjust (each device will emit a beep when it is selected).
Example
: If you want to adjust the beep level for device 2:
press the
key twice. Device 2 will emit a beep to confirm
its selection.
All LEDs start flashing.
3. Press a key from
to
to select the required beep volume
(1 = min, 7 = max).
The device selected will emit a beep at the new level to
confirm the beep volume.
4. Press the
key to exit user programming mode and save
you changes.
9
5. After a few seconds, a double beep is played and all LED stop
flashing.
To enable/disable chime:
1. Press and hold the
and
keys simultaneously more than
2 seconds to enter user programming mode.
A double beep is played and all status LEDs light on.
2. Press the
key.
A double beep is played and all status LEDs start flashing.
3. Press the
key to enable the chime or the
key to
disable the chime.
A long beep is played.
4. Press the
key to exit user programming code and save
you changes.
5. After a few seconds, a double beep is played and all status
LED stop flashing.
MASTER USER FUNCTIONS
To associate a TAG to a user:
1. P
ress and hold the user number “0 to 9” key for 3 seconds (1
is the master).
A double beep is played and all LEDs light on.
2. Enter the master code or present the master tag.
A beep is played and all status LEDs start flashing.
3. Present a new TAG.
The programming mode ends automatically.
4. After a few seconds, a double beep is played and all status
LED stop flashing.
The operation fails if the TAG is already registered.
If the user already has a TAG, the new one will take its place.
To change
a user’s code:
1. P
ress and hold the user number “0 to 9” key for 3 seconds (1
is the master).

10
A double beep is played and all LEDs light on.
2. Enter the master code or present the master tag.
A high beep is played and all status LEDs start flashing.
3. Enter the code for the new user. A high beep is played.
4. Re-
enter new user’s code. A high beep is played.
The programming mode ends automatically.
5. After a few seconds, a double beep is played and all status
LED stop flashing.
To
disable a user’s code:
To disable a use
r’s code and keep the TAG only:
1.
Press and hold the user number “0 to 9” key for 3 seconds (1
is the master).
A double beep is played and all LEDs light on.
2. Enter the master code or present the master tag.
A high beep is played and all status LEDs start flashing.
3. Change the code to 0000 (or 000000 if 6 digits).
4. Re-enter the code 0000 (or 000000 if 6 digits).
A high beep is played.
5. After a few seconds, a double beep is played and all status
LED stop flashing.
To disable a user:
1. Press and hold us
er number “0 to 9” key for 3 seconds.
Note
: it is not possible to disable the master user.
A double beep is played and all status LEDs light on.
2. Enter the master code or present the master tag.
A high beep is played and all status LEDs start flashing.
3. Press the
key to disable the user.
The programming mode ends automatically.
4. After a few seconds, a double beep is played and all status
LED stop flashing.
11
To enable a user:
1. Press and hold the
user number “0 to 9” key for 3 seconds.
A double beep is played and all status LEDs light on.
2. Enter the master code or present the master tag.
A high beep is played and all status LEDs start flashing.
3. Press the
key to enable the user.
The programming mode ends automatically.
4. After a few seconds, a double beep is played and all status
LED stop flashing.
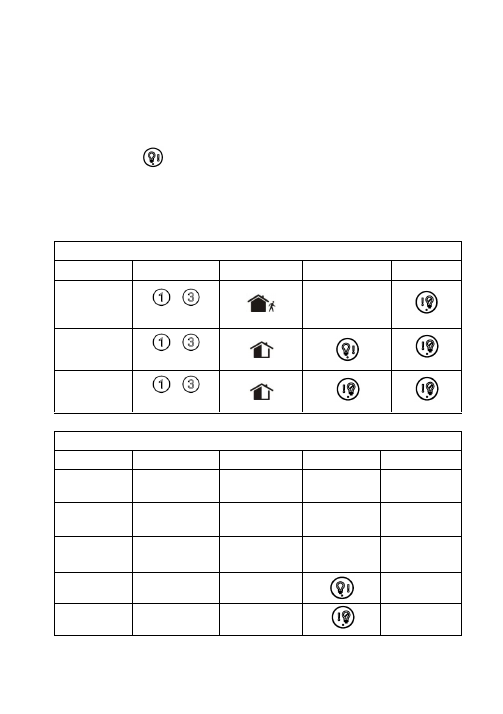
User Programming Mode Summary
Procedure
Entering prog
Command
Selection
End
Adjust beep
volume
+
(for 2 sec)
Select the device
several times
Select level
1 to 7
Enable Chime
+
(for 2 sec)
Disable Chime
+
(for 2 sec)
Master User Programming Mode Summary
Procedure
Entering prog
Authorization
Selection
End
Assign TAG
User key 0-9
(for 3 sec)
Master code or
master TAG
Present TAG
Changing
Code
User key 0-9
(for 3 sec)
Master code or
master TAG
New user’s code New user’s code
Disabling
Code
User key 0-9
(for 3 sec)
Master code or
master TAG
0000
(or 000000)
0000
(or 000000)
Enable user
User key 0-9
(for 3 sec)
Master code or
master TAG
Disable user
User key 0-9
(for 3 sec)
Master code or
master TAG
12
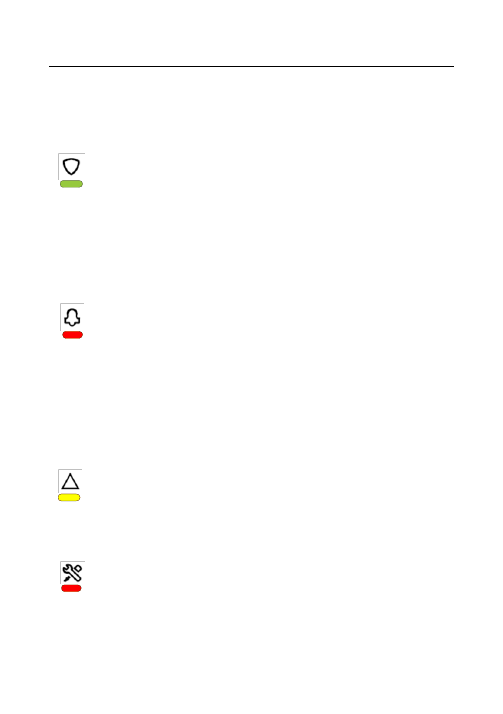
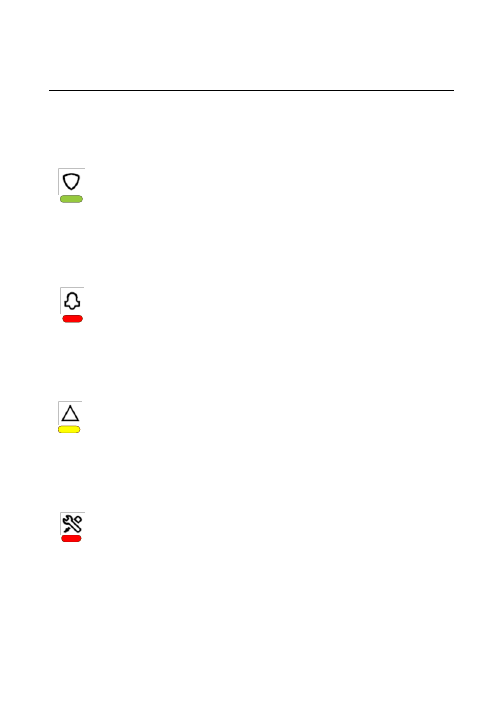
Indicator lights (*)
The front cover of the keypad features LED indicators which
show the status of your security system.
LED 1
indicator “system armed”
On:
Total set is being armed.
Flashing slowly
: Partial set is being armed.
Flashing quickly
: Annex set is being armed.
Off
: The system is disarmed.
LED 2
indicator “intruder alarm”
On
: An intruder alarm is occurring or a detector is triggered on
set. This includes open door-contact, movement detection or
smoke detection.
Flashing slowly
: An intruder alarm is in memory on set and
requires a reset.
Flashing quickly
: A confirmed alarm is in memory and requires
a remote reset. Please call your monitoring operation at the
alarm company.
Off
: No intruder alarm.
LED 3
indicator “system fault”
On
: A system fault is occurring on set.
System faults include battery or power failure, supervision fault,
GSM/GPRS failure or radio Jamming, smoke sensor failure.
Please contact your alarm company if this indication persists.
Flashing slowly:
A system fault is in memory on set and
requires a reset.
Off
: No system fault.
LED 4
indicator “tamper alarm”
On
: A tamper alarm is occurring on set.
Flashing slowly
: A tamper alarm is in memory on set and
requires a reset.
Off:
No tamper alarm.
(*) If keypad installed with CMI, HMI, Sucre Box panels. Refer to Annex A if keypad
installed with PMI panels.

13
Keypad tones
*Can be set to silent mode depending on configuration.
**
Defined during installation.
TOTAL SET
ARMING
Sequence of 3 modulated
sounds.
Duration: 4 seconds
When arming total set,
confirms that the control
panel has received a valid
code or TAG and is
preparing to arm total set.
PARTIAL
SET
ARMING*
ANNEX SET
ARMING
Sequence of 2 modulated
sounds.
Duration: 2, 5 seconds
When arming the partial or
annex set, confirms that the
control panel has received a
valid code or TAG and is
preparing to arm partial or
annex set.
EXIT DELAY
Upon arming...
One double beep per second
followed by faster double
beep for 10s and then 2s
continuous beep.
Total and annex set arming:
beeps continue until final exit
door is closed.
Partial* set arming: beeps
continue for 30 seconds**
until partial set is armed.
ARMING
COMPLETE
After closing the final door.
Three fast beeps
When closing the final exit
door, confirms that the
system is armed.
ENTRY
DELAY
Upon entry...
One double beep per second
followed by faster double
beep for 10s and then 2s
continuous beep.
This entry tone lasts for
30 seconds** after you open
the entry door. You should
disarm your system within
this time.
DISARMING
Long and continuous beep
Duration: 2, 5 seconds
When Disarming, confirms
that the control panel has
been successfully disarmed.
FAULT
2 times 7 fast beeps.
This signal indicates a fault
in the system.
ALERT
4 beeps upon alert...
sent via the keypad
Confirms the transmission of
an alert to the alarm
company.
14
Maintenance and recommendations
Check your system (once a month or according to your
operator’s specifications).
Avoid shocks to all the components and especially avoid
dropping the Tags.
Do not immerse components in water.
Do not use detergents to clean the components. Use a dry
cloth only.
Keep components in a clean, dry place at room temperature.
Dispose of old batteries in containers provided for this
purpose.
Avoid prolonged exposure to siren emissions.
Do not paint or paper over the components.
Do not try to open or move the components; they are tamper-
protected and some of them may cause electric shocks.
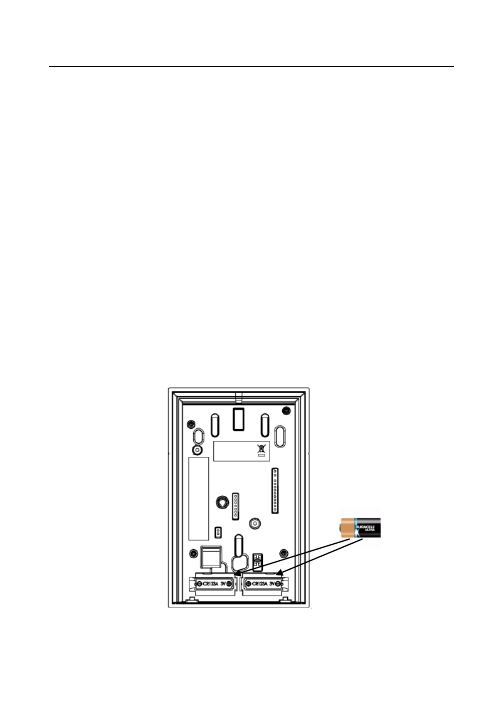
Replacing the battery
The
“System Fault” LED indicates that the keypad battery may
need to be replaced. The keypad will continue to operate for up to
one month after this event.
1. Remove the keypad from the bracket with a suitable tool.
2x CR123A

15
Depending on panel configuration a tamper alarm is sent to
the panel and there is a 120 second delay before transmitting
the specific tamper message to the monitoring station. If
tamper is restored before the end of the delay there is no
transmission (the tamper delay is only when the system is
disarmed. Tamper is immediately transmitted if the panel is
armed).
2. Remove the batteries and replace them with the new batteries.
3. Install the keypad on its bracket.
WARNING: RISK OF FIRE, EXPLOSION AND BURNS, DO NOT RECHARGE,
DISASSEMBLE, HEAT ABOVE 100° C, OR INCINERATE THE BATTERY. WHILE
THE BATTERY CAN NORMALLY BE SAFELY REMOVED BY HAND, CARE
SHOULD BE USED TO ENSURE THAT THE BATTERY TERMINALS ARE NOT
SHORTED, NOR THE BATTERY DAMAGED, DURING THE REMOVAL PROCESS.
DISPOSE OF DEPLETED BATTERIES BY COMPLYING WITH APPLICABLE
NATIONAL AND LOCAL REGULATIONS. IN THE EVENT OF THE BATTERY
BEING DAMAGED, USE PERSONAL PROTECTIVE EQUIPMENT TO REMOVE IT
IMMEDIATELY, AND DISPOSE OF IT IN A SAFE MANNER (REFER TO THE
BATTERY MANUFACTURER
’S SPECIFICATIONS FOR SUCH SITUATIONS). FOR
SWITZERLAND, ANNEX 4.10 OF SR 814.013 APPLIES TO THE BATTERY
INCLUDED WITH THIS PRODUCT. THERE IS A RISK OF EXPLOSION IF THE
CORRECT BATTERY IS NOT USED. REPLACE ONLY WITH LITHIUM BATTERY
TYPE CR123A
Please contact your local authorized Honeywell representative for product warranty
information. All data and images in this document are subject to change without prior notice
16
ANNEX A
Indicator lights if keypad installed with PMI panels
The front cover of the keypad features LED indicators which
show the status of your security system.
LED 1 indicator “system status”
On:
Total set is being armed.
Flashing
: Partial or Annex set is being armed.
Off
: The system is disarmed.
LED 2 indicator “memorized alarm”
On
: An intrusion occurred during the total set activation of the
system. The indicator remains on until the next activation.
Flashing
: An intrusion occurred during the partial or annex
activation of the system. The indicator remains on until the next
activation.
Off
: No memorized alarm.
LED 3 indicator “perimetric fault”
Flashing:
A window or a door protected by a magnetic contact
is open. It flashes until the window or door has been closed.
Off
: No perimetric fault.
LED 4 indicator “system fault”
On
: Activation of a technical or smoke detector.
Flashing
: This indicates a fault in the system (battery,
supervision or peripheral tamper fault, phone line failure or radio
jamming). The indicator remains on or flashing until the fault is
rectified.
Off:
No system fault.

17
Arming with a fault if keypad installed with PMI panels
If the system diagnoses a fault on arming, a tone indicating a fault
is emitted by the keypad after the arming tone.
Honeywell Security Group
1198, Avenue du Docteur Maurice Donat
BP 1219
06254 MOUGINS CEDEX
Tel: +33 (0)4 92 94 29 50
Fax: +33 (0)4 92 94 29 60
www.honeywell.com/security/fr
800-20982-A
2015 Honeywell International Inc.
Honeywell is a registered trademark of Honeywell International Inc.
All other trademarks are the properties of their respective owners. All right reserved