Full Text Searchable PDF User Manual

Page 1
HP-4960-1TB: v1.0
USER GUIDE
4-Camera CCTV Kit
(Aldi Product Ref: 069803022874100)

Page 2
HP-4960-1TB: v1.0
Introduction
The Home Protector CCTV kit is designed specifically
for security and surveillance in the home or small business.
It uses an embedded LINUX operating system with the
standard H.264 video compression format and G.711A
audio compression format ensuring the highest quality
image and low error coding ratio. The robust network
services greatly enhance the network data transmission
capacity and remote control capability.
Page 3
HP-4960-1TB: v1.0
Part One: Basic Operation
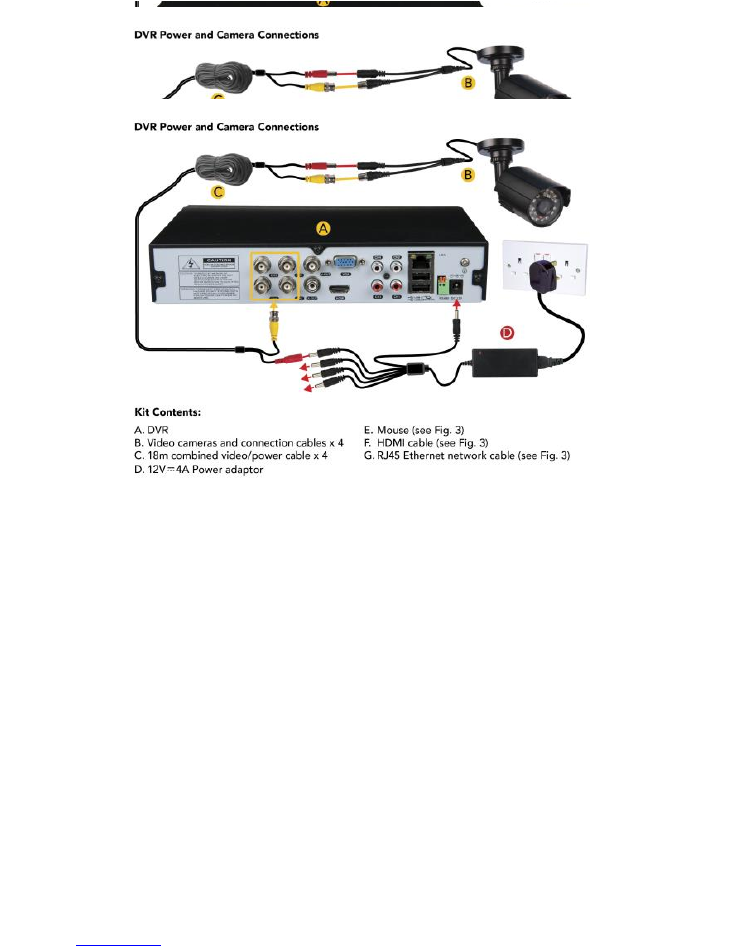
1. Connecting the System

Page 4
HP-4960-1TB: v1.0
2. Powering on the DVR
Plug in the power supply and turn on; the red power light
indicates the DVR is now powered on. When the startup is
completed you will hear a beep, and the default setting for
video output is a multiple-window display showing the
cameras.
NB: Restarting the DVR after an unscheduled power
off will automatically restore the
DVR’s previous state.
3. Powering on the DVR
There are two methods to turn off the DVR; soft switch and
hard switch. For soft switch, select [Main menu] and
[Logout], select preferred option. For hard switch, turn off
power to the DVR.
NB: If replacing the backup battery, ensure DVR
settings are saved or these will be lost and will need to
be re-entered.
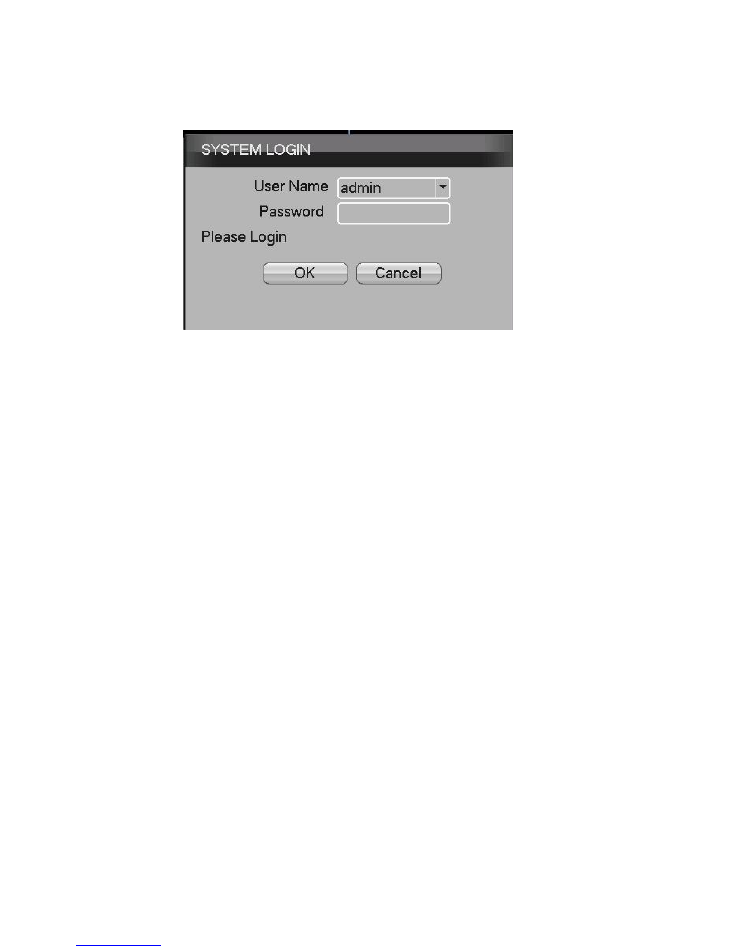
4. Login
When the DVR is powered on, the user must login in order
to view settings. There are two user settings;
“admin”: super user settings with access to all
DVR functions
“guest”: has the ability to view and playback
recorded video.
Page 5
HP-4960-1TB: v1.0
Picture1 login
NB: If the password is entered incorrectly seven times,
he alarm will sound. (By restarting the DVR or after 30
minutes, the account will be unlocked automatically).
For your security, please set a password in [Main
Menu]>[Account]>[Modify Pwd] after first login.
5. Preview
Login as normal and select the multi-menu preview status.
The system date, time and channel name are shown in
each viewing window. The surveillance and alarm status
are also shown in each window. When an alarm is
triggered, the screen will display: video detection, video
shelter, video loss and alarm mark.
Page 6
HP-4960-1TB: v1.0
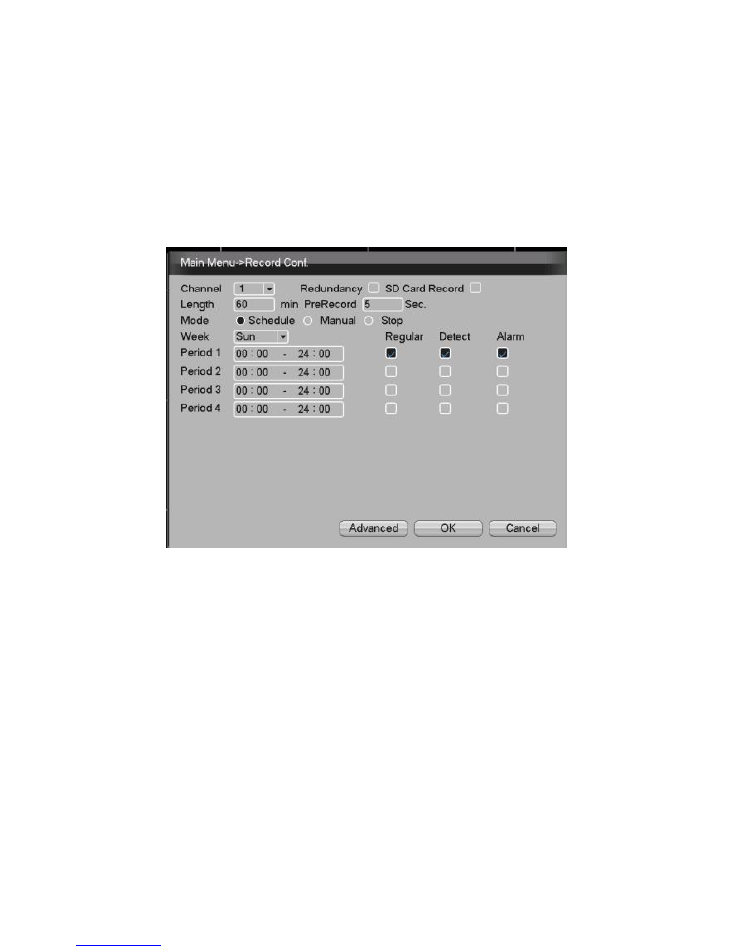
6. Recording Configuration
The DVR will default to record permanently from all
connected cameras. Alternatively you can set the
recording parameters in the Record Configuration menu.
Select [Main Menu]> [Record]> [Record Config] to set.
Picture 2 - Record Config
【
Channel
】
Choose the corresponding channel
number to set the channel. Choose the “all”
option to set all channels.
【
Redundancy
】
Choose the recording file and
backup for two devices. One is read-write disk,
another is redundant disk.
【
Length
】
Set the time length of each video file.
60minutes is default length.

Page 7
HP-4960-1TB: v1.0
【
Prerecord
】
Record 1-30 seconds before the
action. (file length is determined by the code
stream)
【
Mode
】
Set record mode: schedule, manual or stop.
Schedule
:
Record according to the set video mode
(regular, detect and alarm) and time selection.
Manual
:
Click the “all” button and set the corresponding
channel recording no matter it is in any state.
Stop
:
Click the “stop” button and set the corresponding
channel to stop recording no matter it is in any state.
【
Period
】
Set the time section of common recording, The
recording will start only in the set range.
【
Recording Type
】
Set recording type: regular, detection
or alarm.
Regular
:
Perform the regular recording in the set time
section. The video file type is
“R”.
Detect
:
Trigger the “motion detect”, “camera mask” or
“video loss” signal. When above alarm is set as opening
recording, the “detection recording” state is on. The video
file type is “M”.
Page 8
HP-4960-1TB: v1.0
Alarm
:
Trigger the external alarm signal in the set time
section. When above alarm is set as opening recording,
the “detection recording” state is on. The video file type is
“A”.
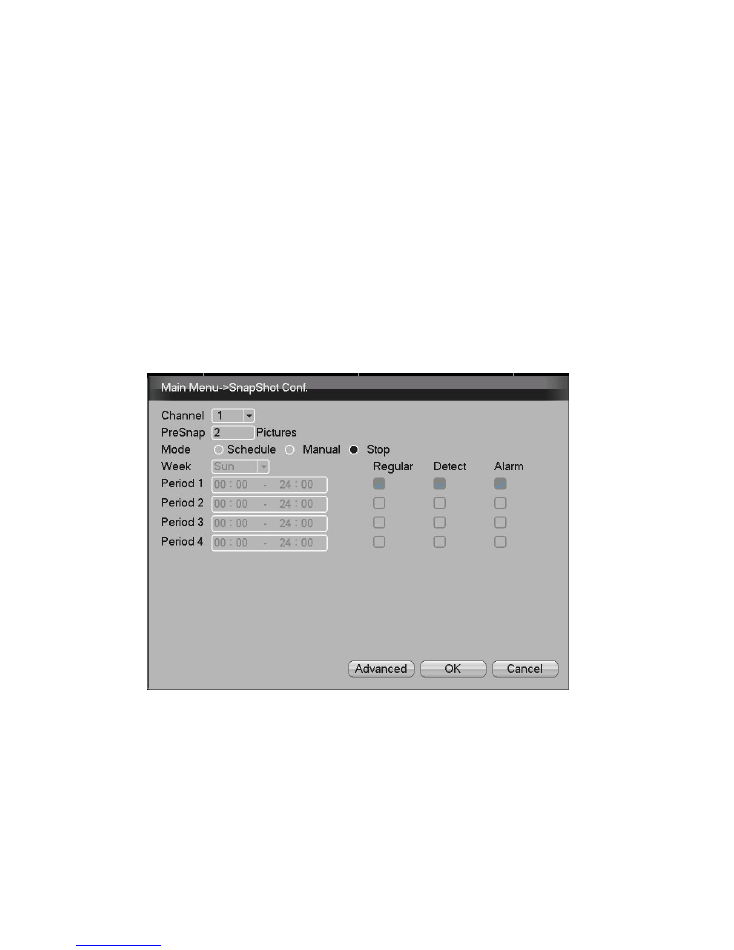
7. Snapshot Storage. (partial devices supported)
Setup snapshot parameters for different channels. please
go to [Main Menu]>[Record]>[Snapshot Storage] for ther
appropriate settings.
NB: For normal snapshot storage, please setup Snap at
[Main Menu]>[Advanced]>[HDD Manage]>[Snapshot].
Picture3 - Snapshot Storage
Page 9
HP-4960-1TB: v1.0
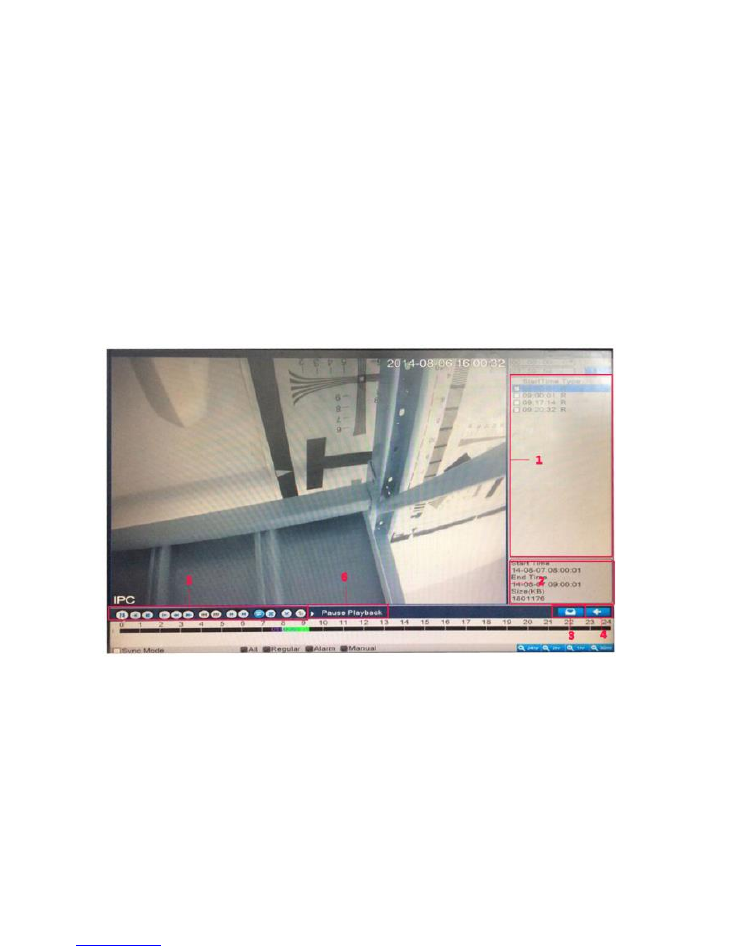
8. Video Playback
There are two methods for you to play the video files in the
hard disk.
1. In the desktop shortcut menu.
2. Main Menu>Record>Playback.
NB: The hard disk used to store the video files must
be set as read-write or read-only state.
Picture4 - Video Playback
Page 10
HP-4960-1TB: v1.0
1.
File option
: Choose the file to playback/backup.
2.
File information
: Start time, end time and file size.
3.
File Backup
: Backup files from HDD.
4.
Switch
: switch to the search interface.
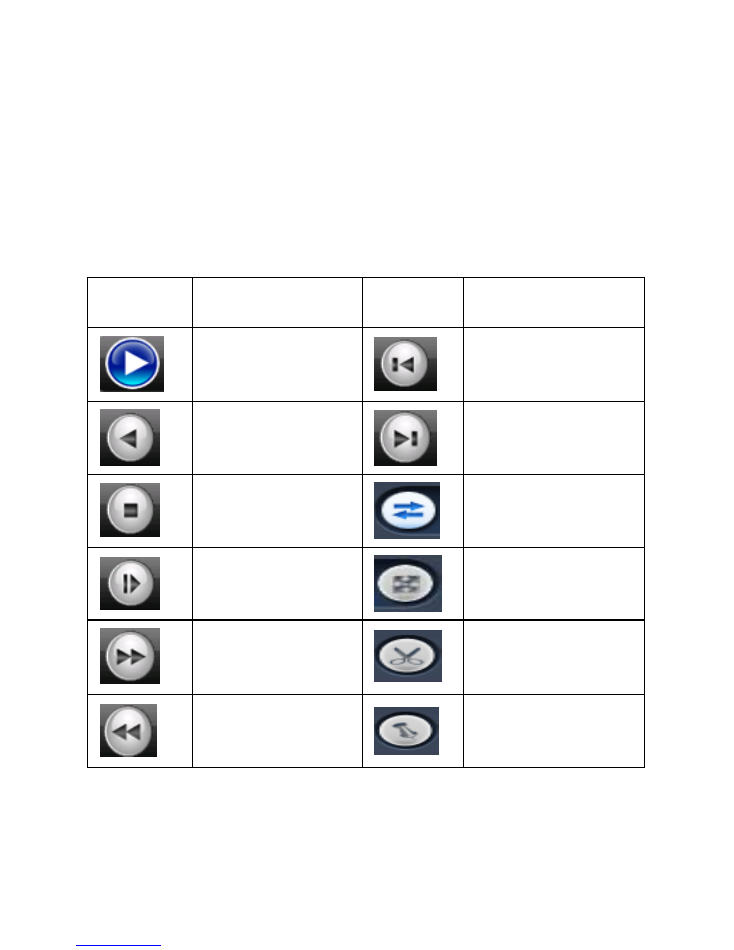
5.
Playback control
: Refer to picture below.
6.
Operation hint
: Display function at the cursor position.
Button
Function
Button
Function
Play
Previous File
Backward
Next File
Stop
Repeat
Slow Play
Full Screen
Fast Play
Cut backup
Fast Rewind
File Label
Page 11
HP-4960-1TB: v1.0
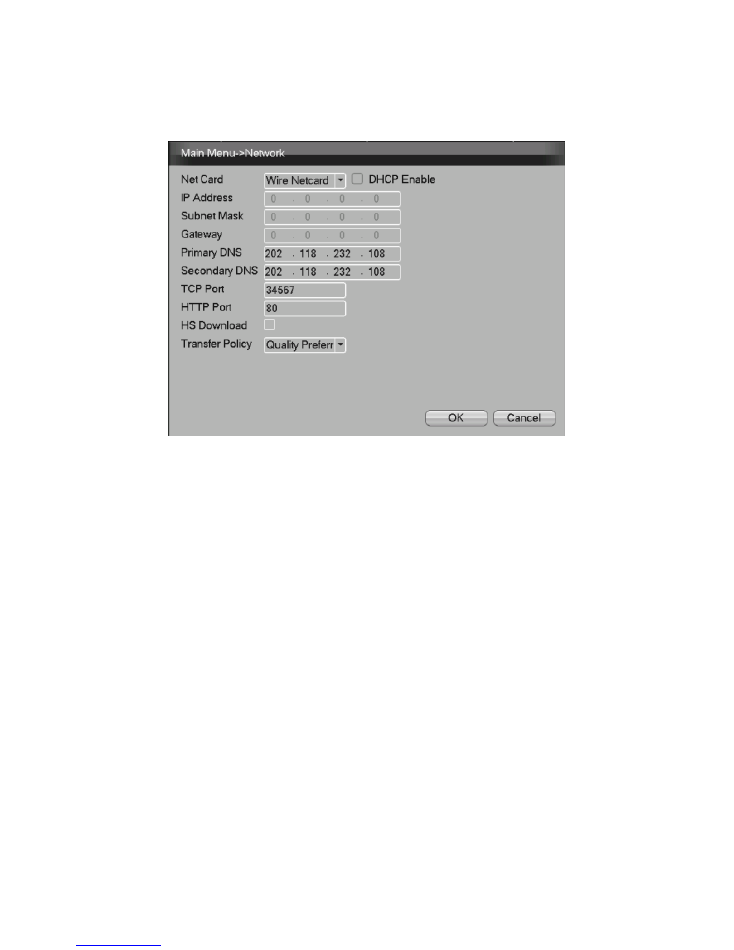
9. Network Setup
Picture 5 - Network Setup
Perform network setup through;
[Main Menu]>[System]>[Network]
【
IP address
】
Default: 192.168.1.10
【
Subnet Mask
】
Default: 255.255.255.0
【
Gateway
】
Default: 192.168.1.1
For manual setup, ensure the
DVR’s IP address and the
Gateway are in the same network IP range. For automatic
setup with your router, check the DHCP Enable box and
after approx. 30 seconds the DVR & Gateway IP
addresses will update. In order to access the DVR on the
local network, enter the DVR IP address into the browser.
Page 12
HP-4960-1TB: v1.0
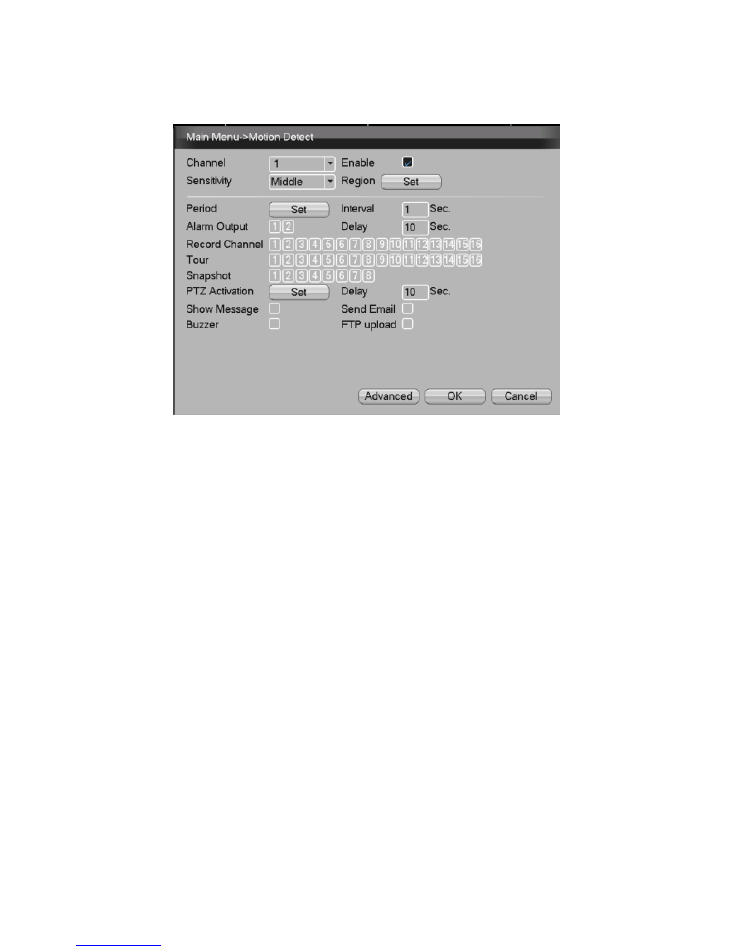
10. Alarm Setup
Picture 6 - Motion Detection
Example:
Set DVR to alarm mode, create a linkage record
and set the PTZ turn to a preset position when there is a
moving object in designated areas during Monday to
Friday.
1. Select
【
Main Menu
】
>
【
Alarm
】
>
【
Alarm Set
】
,
then select Alarm Type.
2. Select a channel and sensitivity level, then set
the time period of alarm surveillance. Set the
monitor area by clicking
“set” (default setting is all
areas), then right click to return to Settings.
3. When in alarm mode, the DVR can perform
linkage
measures.
Alarm
Output,
Record
Channel, Tour, PTZ Activation, Show Message,
Send Email and Buzzer.

Page 13
HP-4960-1TB: v1.0
4. Set the other channel alarm parameters following
steps 2 and 3.
NB: Video Loss & Video Blind setup method is similar
to Motion Detect.
11. PTZ Control
1. Select
【
Main Menu
】
>
【
System
】
>
【
PTZ Config
】
and set basic parameters such as channel and
protocol.
2. Right Click the
mouse, choose “PTZ Control” and
manually control the PTZ camera. Use the mouse
to manually control the PTZ direction. Use the
mouse wheel to zoom in/out with the selected
camera.