Full Text Searchable PDF User Manual
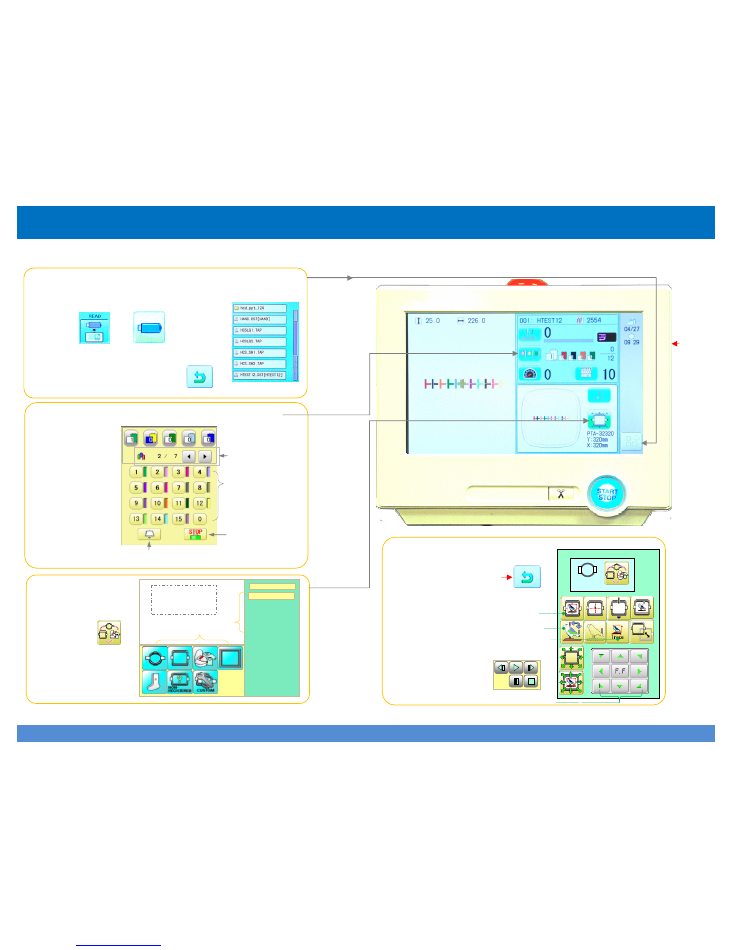
1. Read in a Design from a USB flash drive.
From the
Drive screen, press the menu icon as shown by the arrow.
Insert a USB flash drive into the machine,
and press then .
A list of design appears as shown, right.
Select a design to load and press
to return to Drive mode.
2. Choose design thread colors.
Press the Needle
button on the
Drive screen as
shown. The
screen shown on
the right appears.
Set design colors
by following these
directions.
3. Choose a hoop.
Press the Frame
button in the Drive
screen, then ,
which makes
the screen on the
right appear. Choose
a hoop then go to
step 4.
4. Adjust/check design position
& fit.
After choosing a
hoop, press this button
to return to the screen
shown on the right.
The highlighted
buttons perform
the functions
indicated.
Follow
the
4
steps
on
this
card
to
set
up
a
design.
The
next
card
#2
will
then
take
you
through
sewing.
HAPPY
HCH
‐
701
Journey
Reference
Card
1
of
2:
Design
Setup
HAPPY
HCH
‐
701
JOURNEY
QUICK
REFERENCE
GUIDE
USB flash
drive port
is on this
side behind
the control
panel.
Choose a
design
from the
list.
Arrows select
which section of
the design.
Choose needle
number/ color
Assign a Stop to
selected section
(i.e. appliqué)
Assign a frame out to selected section
Happy machine at the drive (sewing) screen
PTA
32320
320mmx320mm
PTA
32320
320mmx320mm
Design & hoop
outline displayed
here
Select hoop from this list
Select hoop type here
PTA-150
Move design to center
of sewing field
Sewing position to origin
Trace mode, calls up these
buttons to let you start, stop,
pause and step through the
trace.
Move hoop or design position.
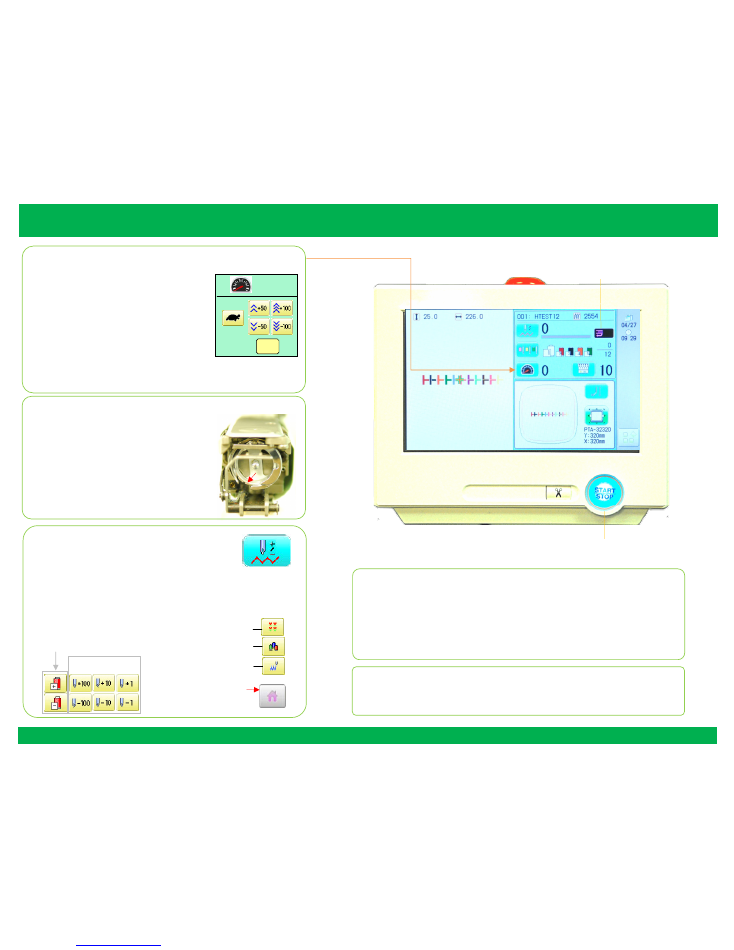
1. Adjust Max Speed
(optional)
:
press the
SPEED
button
to call up the sub-screen shown here.
You can The adjust max allowable
speed between 300 - 1000 stitches
per min, up and down in steps of 50 or
100. Press the turtle button to toggle
“crawl” mode (100spm) on and off.
Blue is on, yellow off. Press OK to
return to the drive screen. There, the actual, live speed
will be shown to the right of the small speedometer.
2. Oil the sewing hook just before pressing START.
Open the bobbin case door and remove
the bobbin case. Apply 1-2 drops of
sewing machine oil where indicated as
shown on the right. Normal operation,
repeat every 4 to 6 bobbin changes. For
heavy, non-stop operation, increase the
frequency i.e. every 2-3 bobbin changes.
3. Thread break/stoppage recovery:
the machine will stop automatically on
detecting bobbin runout, thread break or
other causes. If so, resolve any problems
found, then press this button to adjust sewing position,
for example, to move backwards a few stitches. Press
any of these keys to:
Note about sewing speed:
When starting out, set sewing speed to a
safe, medium speed, then increase with your comfort level with the
machine. Higher speeds while desirable for production increase
peak tensions on thread, and may increase, noise levels, and
frequency of thread breaks. Steadier table surface, improved
knowledge of machine adjustments, can minimize these last factors.
When sewing finishes, the machine is ready for the next item,
displaying the word “END”. To sew another copy in the same
location, simply reload the next garment and press START/STOP.
HAPPY
HCH
‐
701
JOURNEY
QUICK
REFERENCE
GUIDE
Reference
Card
2
of
2:
Sewing
OK
700
set stitch
position
jump to a repeat#
to a color block#
jump to a stitch#
Jog forward/back by
1, 10 or 100 stitches
Go to next/previous
color block in design.
When finished, press
to return to Drive
mode, then START.
Press START/STOP to start or pause sewing.
If showing, indicates the design
is at the starting position